In a decision that plenty of Chrome users will certainly be happy about(this writer definitely included), Google has put a date of September 1st when the latest version of their browser will start blocking all Flash content that isn’t “central to a webpage” from playing automatically.
Flash media like ads and auto-playing videos on websites that aren’t dedicated expressly to video will pause as soon as the page in question loads.
Of course users can also freely click the ads and other videos to play but the choice will now be in the hands users instead of a website’s automated scripting. Embedded video players like YouTube and Vimeo will still function normally.
This new Flash-blocking aspect of Chrome was first tried out in Chrome earlier in the year as a sort of beta release but is now being implemented completely for all users of the browser.
According to Tomm Li, a browser design expert at Google, the reason for the new blocking policy revolves mainly around battery life in mobile and portable devices, since such auto-playing ads often consume lots of CPU power.
However, as millions of annoyed users can tell you, the rise of ads that play automatically all over the web can sometimes also be downright annoying and deeply intrusive. A sudden burst of audio playing at full volume interrupts a person’s normal activities (like listening to music while working on the web).
These ads often leave users with multiple tabs open scrambling to find their specific source and put an end to the annoyance.
Another benefit of the Flash block is the possibility of it helping to reduce the spread of malware through malicious Flash advertising. This has long been a problematic tendency of Flash –the application’s use as a vehicle for security exploits.
The most recent of these was actually uncovered just recently in July, and allowed hackers to remotely execute malicious code in third party machines.
On the other hand, many advertisers won’t be happy about this new Google Chrome policy. A majority of online advertising still relies on Flash and this is the case even with a lot of mobile ads, despite mobile being an area where Flash still isn’t fully supported.
According to a recent study by one ad management firm (PDF), more than 5.3 billion Flash ads were delivered in the first quarter of 2015. The much smoother and less security leak-prone HTML5 is however slowly starting to expand its share of this market, with 4.2 billion ads in the latter format having been delivered in the same quarter.
Other sites are also following the Google anti-flash trend: Amazon.com, the world’s largest online retailer, will stop accepting Flash as of the same date and is doing so for the sake of giving its customers a “positive, consistent experience on Amazon.”
Time will tell as the tech is put into place and reverberations soon follow.
Being a freelancer is a great thing and good fun. It’s full of pitfalls though that can cost a lot of time – time that could be invested better. It’s up to you whether you want to get more things done with the same effort or just enjoy the free time. Our practical tips will help you to optimize your freelancing experience. Enjoying life as a freelancer requires only some minor changes, which, however, can be crucial for your new efficiency. Before We Start: Defining Efficiency What does efficiency mean in this context? I would describe it as the absence of disturbing factors. Each time you are interrupted in your work, you have to read up on the topic again, which costs unnecessary time. Therefore, I would recommend eliminating all disturbing factors while working if possible. Mute your telephone and cell phone, shut the door, tell your family you’re busy (if you work from home), etc. Only if all disturbing factors are eliminated, other tips can come into effect. Set Up Your Workspace Most freelancers work in their four walls. This is a great thing, but if you use your entire home as an office, it will be hard to draw […]
* You might also be interested in the following articles:
The following is a guest post by Zell Liew. I’m stoked to have Zell dishing out some Gulp 101. Zell has a comprehensive tutorial style (see his post on Susy) that lends itself well to a topic of this scope. I’ve also tackled Grunt in a similar fashion. I get the sense people found that pretty darn helpful, so here we go again with the equally popular Gulp!
Gulp is a tool that helps you out with several tasks when it comes to web development. It’s often used to do front end tasks like:
Spinning up a web server
Reloading the browser automatically whenever a file is saved
Using preprocessors like Sass or LESS
Optimizing assets like CSS, JavaScript, and images
This is not a comprehensive list of things Gulp can do. If you’re crazy enough, you can even build a static site generator with Gulp (I’ve done it!). So yes, Gulp is extremely powerful, but you’ll have to learn how to use Gulp if you want to create your own customized build processes.
So that’s what this article is for. It helps you get so good with the basics of Gulp that you can begin exploring everything else for yourself.
Before we dive into working with Gulp, let’s talk about why you may want to use Gulp as opposed to other similar tools.
Why Gulp?
Tools like Gulp are often referred to as “build tools” because they are tools for running the tasks for building a website. The two most popular build tools out there right now are Gulp and Grunt. (Chris has a post on getting started with Grunt here). But there are others of course. Broccoli focuses on asset compilation, one of the most common build tool tasks.
There are already multiple articles covering the difference between Grunt and Gulp and why you might use one over another. You can check out this article, this one, or this if you’re interested in finding out more. Brunch is similar in its focus on assets, and it bundles in some of the most common other tasks like a server and file watcher.
The main difference is how you configure a workflow with them. Gulp configurations tend to be much shorter and simpler when compared with Grunt. Gulp also tends to run faster.
Let’s now move on and find out how to setup a workflow with Gulp.
What we’re setting up
By the end of this article, you’ll have a workflow that does the tasks we outlined at the beginning of this article:
Spins up a web server
Compiles Sass to CSS
Refreshes the browser automatically whenever you save a file
Optimizes all assets (CSS, JS, fonts, and images) for production
You’ll also learn how to chain together different tasks into simple commands that are easy to understand and execute.
Let’s begin by installing Gulp onto your computer.
Installing Gulp
You need to have Node.js (Node) installed onto your computer before you can install Gulp.
When you’re done with installing Node, you can install Gulp by using the following command in the command line:
$ sudo npm install gulp -g
Note: Only Mac users need the sudo keyword. And remember the “$” in the code above just symbolizes the command prompt. That’s not actually part of the command you run.
The npm install command we’ve used here is a command that uses Node Package Manager (npm) to install Gulp onto your computer.
The -g flag in this command tells npm to install Gulp globally onto your computer, which allows you to use the gulp command anywhere on your system.
Mac users need the extra sudo keyword in the command because they need administrator rights to install Gulp globally.
Now that you have Gulp installed, let’s make a project that uses Gulp.
Creating a Gulp Project
First, we’ll create a folder called project to server as our project root as we move through this tutorial. Run the npm init command from inside that directory:
# ... from within our project folder
$ npm init
The npm init command creates a package.json file for your project which stores information about the project, like the dependencies used in the project (Gulp is an example of a dependency).
npm init will prompt you:
Once the package.json file is created, we can install Gulp into the project by using the following command:
$ npm install gulp --save-dev
This time, we’re installing Gulp into project instead of installing it globally, which is why there are some differences in the command.
You’ll see that the sudo keyword isn’t required because we’re not installing Gulp globally, so -g is also not necessary. We’ve added --save-dev, which tells the computer to add gulp as a dev dependency in package.json.
If you check the project folder when the command has finished executing, you should see that Gulp has created a node_modules folder. You should also see a gulp folder within node_modules.
We’re almost ready to start working with Gulp. Before we do so, we have to be clear on how we’re going to use Gulp for the project, and part of that is deciding on a directory structure.
Determining Folder Structure
Gulp is flexible enough to work with any folder structure. You’ll just have to understand the inner workings before tweaking it for your project.
For this article, we will use the structure of a generic webapp:
In this structure, we’ll use the app folder for development purposes, while the dist (as in “distribution”) folder is used to contain optimized files for the production site.
Since app is used for development purposes, all our code will be placed in app.
We’ll have to keep this folder structure in mind when we work on our Gulp configurations. Now, let’s begin by creating your first Gulp task in gulpfile.js, which stores all Gulp configurations.
Writing Your First Gulp Task
The first step to using Gulp is to require it in the gulpfile.
var gulp = require('gulp');
The require statement tells Node to look into the node_modules folder for a package named gulp. Once the package is found, we assign its contents to the variable gulp.
We can now begin to write a gulp task with this gulp variable. The basic syntax of a gulp task is:
gulp.task('task-name', function() {
  // Stuff here
});
task-name refers to the name of the task, which would be used whenever you want to run a task in Gulp. You can also run the same task in the command line by writing gulp task-name.
To test it out, let’s create a hello task that says Hello Zell!.
We can run this task with gulp hello in the command line.
$ gulp hello
The command line will return a log that says Hello Zell!.
Gulp tasks are usually a bit more complex than this. It usually contains two additional Gulp methods, plus a variety of Gulp plugins.
Here’s what a real task may look like:
gulp.task('task-name', function () {
  gulp.src('source-files') // Get source files with gulp.src
    .pipe(aGulpPlugin()) // Sends it through a gulp plugin
    .pipe(gulp.dest('destination')) // Outputs the file in the destination folder
})
As you can see, a real task takes in two additional gulp methods — gulp.src and gulp.dest.
gulp.src tells the Gulp task what files to use for the task, while gulp.dest tells Gulp where to output the files once the task is completed.
Let’s try building a real task where we compile Sass files into CSS files.
Preprocessing with Gulp
We can compile Sass to CSS in Gulp with the help of a plugin called gulp-sass. You can install gulp-sass into your project by using the npm install command like we did for gulp.
We’d also want to use the --save-dev flag to ensure that gulp-sass gets added to devDependencies in package.json.
$ npm install gulp-sass --save-dev
We have to require gulp-sass from the node_modules folder just like we did with gulp before we can use the plugin.
var gulp = require('gulp');
// Requires the gulp-sass plugin
var sass = require('gulp-sass');
We can use gulp-sass by replacing aGulpPlugin() with sass(). Since the task is meant to compile Sass into CSS, let’s name it sass.
gulp.task('sass', function(){
  gulp.src('source-files')
    .pipe(sass()) // Using gulp-sass
    .pipe(gulp.dest('destination'))
});
We’ll need to provide the sass task with source files and a destination for the task to work, so let’s create a styles.scss file in the app/scss folder. This file will be added to the sass task in gulp.src.
We want to output the eventual styles.css file to the `app/css` folder, which would be the destination for gulp.dest.
gulp.task('sass', function(){
  gulp.src('app/sass/styles.scss')
    .pipe(sass()) // Converts Sass to CSS with gulp-sass
    .pipe(gulp.dest('app/css'))
});
We’ll want to test that the sass task is working as we want it to. To do so, we can add a Sass function within styles.scss.
If you run gulp sass in the command line, you should now be able to see that a styles.css file was created in app/css. In addition, it has the code where percentage(5/7) was evaluted into 71.42857%.
/* styles.css */
.testing {
  width: 71.42857%;
}
That’s how we know that the sass task works!
Sometimes we need the ability to compile more than one .scss file into CSS at the same. We can do so with the help of Node globs.
FYI: Gulp-sass uses LibSass to convert Sass into CSS. It’s much quicker than Ruby-based methods. If you want, you can still use Ruby methods with Gulp by using gulp-ruby-sass or gulp-compass instead.
Globbing in Node
Globs are matching patterns for files that allow you to add more than one file into gulp.src. It’s like regular expressions, but specifically for file paths.
When you use a glob, the computer checks file names and paths for the specified pattern. If the pattern exists, then a file is matched.
Most workflows with Gulp tend to only require 4 different globbing patterns:
*.scss: The * pattern is a wildcard that matches any pattern in the current directory. In this case, we’re matching any files ending with .scss in the root folder (project).
**/*.scss: This is a more extreme version of the * pattern that matches any file ending with .scss in the root folder and any child directories.
!not-me.scss: The ! indicates that Gulp should exclude the pattern from its matches, which is useful if you had to exclude a file from a matched pattern. In this case, not-me.scss would be excluded from the match.
*.+(scss|sass): The plus + and parentheses () allows Gulp to match multiple patterns, with different patterns separated by the pipe | character. In this case, Gulp will match any file ending with .scss or .sass in the root folder.
Since we know about globbing now, we can replace app/scss/styles.scss with a scss/ **/*.scss pattern, which matches any file with a .scss extension in app/scss or a child directory.
gulp.task('sass', function() {
  return gulp.src('app/scss/**/*.scss') // Gets all files ending with .scss in app/scss and children dirs
    .pipe(sass())
    .pipe(gulp.dest('app/css'))
})
Any other Sass file that’s found within app/scss would automatically be included into the sass task with this change. If you add a print.scss file into the project, you’ll see that print.css will be generated in app/css.
We’ve now managed to compile all Sass files into CSS files with a single command. The question is, what good does it do if we have to run gulp sass manually every time we want to compile Sass into CSS?
Luckily, we can tell Gulp to automatically run the sass task whenever a file is saved through a process called “watching”.
Watching Sass files for changes
Gulp provides us with a watch method that checks to see if a file was saved. The syntax for the watch method is:
If we want to watch all Sass files and run the sass task whenever a Sass file is saved, we just have to replace files-to-watch with the app/scss/**/*.scss, and ['tasks', 'to', 'run'] with ['sass']:
More often though, we’ll want to watch more than one type of file at once. To do so, we can group together multiple watch processes into a watch task:
gulp.task('watch', function(){
  gulp.watch('app/scss/**/*.scss', ['sass']);
  // Other watchers
})
If you ran the gulp watch command right now, you’ll see that Gulp starts watching immediately.
And that it automatically runs the sass task whenever you save a .scss file.
Let’s take it a step further and make Gulp reload the browser whenever we save a .scss file with the help of Browser Sync.
Live-reloading with Browser Sync
Browser Sync helps make web development easier by spinning up a web server that helps us do live-reloading easily. It has other features, like synchronizing actions across multiple devices, as well.
We’ll first have to install Browser Sync:
$ npm install browser-sync --save-dev
You may have noticed that there isn’t a gulp- prefix when we install Browser Sync. This is because Browser Sync works with Gulp, so we don’t have to use a plugin.
To use Browser Sync, we’ll have to require Browser Sync.
var browserSync = require('browser-sync');
We need to create a browserSync task to enable Gulp to spin up a server using Browser Sync. Since we’re running a server, we need to let Browser Sync know where the root of the server should be. In our case, it’s the `app` folder:
We also have to change our sass task slightly so Browser Sync can inject new CSS styles (update the CSS) into the browser whenever the sass task is ran.
gulp.task('sass', function() {
  return gulp.src('app/scss/**/*.scss') // Gets all files ending with .scss in app/scss
    .pipe(sass())
    .pipe(gulp.dest('app/css'))
    .pipe(browserSync.reload({
      stream: true
    }))
});
We’re done with configuring Browser Sync. Now, we have to run both the watch and browserSync tasks at the same time for live-reloading to occur.
It’ll be cumbersome to open up two command line windows and run gulp browserSync and gulp watch separately, so let’s get Gulp to run them together by telling the watch task that browserSync must be completed before watch is allowed to run.
We can do so by adding a second argument to the watch task. The syntax is:
And in this case we’re adding the browserSync task.
gulp.task('watch', ['browserSync'], function (){
  gulp.watch('app/scss/**/*.scss', ['sass']);
  // Other watchers
})
We’ll also want to make sure sass runs before watch so the CSS will already be the latest whenever we run a Gulp command.
gulp.task('watch', ['browserSync', 'sass'], function (){
  gulp.watch('app/scss/**/*.scss', ['sass']);
  // Other watchers
});
Now, if you run gulp watch in the command line, Gulp should start both the sass and browserSync tasks concurrently. When both tasks are completed, watch will run.
At the same time, a browser window that points to app/index.html would also pop up. If you change the styles.scss file, you’ll see that the browser reloads automatically.
There’s one more thing before we end this live-reloading section. Since we’re already watching for .scss files to reload, why not go a step further and reload the browser if any HTML or JavaScript file gets saved?
We can do so by adding two more watch processes, and calling the browserSync.reload function when a file gets saved:
gulp.task('watch', ['browserSync', 'sass'], function (){
  gulp.watch('app/scss/**/*.scss', ['sass']);
  // Reloads the browser whenever HTML or JS files change
  gulp.watch('app/*.html', browserSync.reload);
  gulp.watch('app/js/**/*.js', browserSync.reload);
});
So far in this tutorial we’ve taken care of three things:
Spinning up a web server for development
Using the Sass preprocessor
Reloading the browser whenever a file is saved
Let’s cover the part on optimizing assets in the next section. We’ll start with optimizing CSS and JavaScript files.
Optimizing CSS and JavaScript files
Developers have two tasks to perform when we try to optimize CSS and JavaScript files for production: minification and concatenation.
One problem developers face when automating this process is that it’s difficult to concatenate your scripts in the correct order.
These scripts are located in two different directories. It’ll be difficult to concatenate them with traditional plugins like gulp-concatenate.
Thankfully, there’s a useful Gulp plugin, gulp-useref that solves this problem.
Gulp-useref concatenates any number of CSS and JavaScript files into a single file by looking for a comment that starts with “<!–build:" and ends with "“. Its syntax is:
<!-- build:<type> <path> -->
... HTML Markup, list of script / link tags.
<!-- endbuild -->
can either be js, css, or remove. It’s best to set type to the type of file that you’re trying to concatenate. If you set type to remove, Gulp will remove the entire build block without generating a file.
here refers to the target path of the generated file.
We’ll want the final JavaScript file to be generated in the js folder, as main.min.js. Hence, the markup would be:
Now let’s configure the gulp-useref plugin in the gulpfile. We’ll have to install the plugin and require it in the gulpfile.
$ npm install gulp-useref --save-dev
var useref = require('gulp-useref');
Setting up the useref task is similar to the other tasks we’ve done so far. The difference is that we’ll have to call the useref.assets() function prior to gulp.src. Here’s the code:
Now if you run this useref task, Gulp will take run through the 3 script tags and concatenate them into dist/js/main.min.js.
The file however, isn’t minified right now. We’ll have to use the gulp-uglify plugin to help with minifying JavaScript files.
$ npm install gulp-uglify --save-dev
// Other requires...
var uglify = require('gulp-uglify');

gulp.task('useref', function(){
  var assets = useref.assets();

  return gulp.src('app/*.html')
    .pipe(assets)
    .pipe(uglify()) // Uglifies Javascript files
    .pipe(assets.restore())
    .pipe(useref())
    .pipe(gulp.dest('dist'))
});
Gulp should now automatically minify the `main.min.js` file whenever you run the useref task.
One neat thing I’ve yet to reveal with Gulp-useref is that it automatically changes all the scripts within “<!–build:" and "” into one single JavaScript file that points to `js/main.min.js`.
Wonderful, isn’t it?
We can use the same method to concatenate and minify any CSS files (if you decided to add more than one) as well. We’ll follow the same process and add a build comment.
The useref task has to change slightly since we now have CSS files in the pipeline as well. We don’t want to run uglify() through CSS files because it’ll make a mess out of it.
We need to make sure uglify() only runs through JavaScript files, and we can do so with the help of gulp-if.
$ npm install gulp-if --save-dev
// Other requires...
var gulpIf = require('gulp-if');

gulp.task('useref', function(){
  var assets = useref.assets();

  return gulp.src('app/*.html')
    .pipe(assets)
    // Uglifies only if it's a Javascript file
    .pipe(gulpIf('*.js', uglify()))
    .pipe(assets.restore())
    .pipe(useref())
    .pipe(gulp.dest('dist'))
});
We can minify files with Gulp-useref as well, but we’ll need to use the gulp-minify-css plugin to help us with it.
$ npm install gulp-minify-css
var minifyCSS = require('gulp-minify-css');

gulp.task('useref', function(){
  var assets = useref.assets();

  return gulp.src('app/*.html')
    .pipe(assets)
    // Minifies only if it's a CSS file
    .pipe(gulpIf('*.css', minifyCSS()))
    // Uglifies only if it's a Javascript file
    .pipe(gulpIf('*.js', uglify()))
    .pipe(assets.restore())
    .pipe(useref())
    .pipe(gulp.dest('dist'))
});
Now you’d get one optimized CSS file and one optimized JavaScript file whenever you run the useref task.
Let’s move on and optimize images next.
Optimizing Images
You’ve probably guessed it by now; we need to use gulp-imagemin to help us with optimizing images.
$ npm install gulp-imagemin --save-dev
var imagemin = require('gulp-imagemin');
We can minify png, jpg, gif and even svg with the help of gulp-imagemin. Let’s create an images task for this optimization process.
You can play around with other options if you want to as well.
Optimizing images however, is an extremely slow process that you’d not want to repeat unless necessary. To do so, we can use the gulp-cache plugin.
$ npm install gulp-cache --save-dev
var cache = require('gulp-cache');

gulp.task('images', function(){
  return gulp.src('app/images/**/*.+(png|jpg|jpeg|gif|svg)')
  // Caching images that ran through imagemin
  .pipe(cache(imagemin({
      interlaced: true
    })))
  .pipe(gulp.dest('dist/images'))
});
We’re almost done with the optimization process. There’s one more folder that we need to transfer from the `app` directory into `dist`, the fonts directory. Let’s do that now.
Copying Fonts to Dist
Since font files are already optimized, there’s nothing more we need to do. All we have to do is to copy the fonts into dist.
We can copy files with Gulp simply by specifying the gulp.src and gulp.dest without any plugins.
Now Gulp will copy `fonts` from `app` to `dist` whenever you run gulp fonts.
We have 6 different tasks in the gulpfile now, and each of them has to be called individually with the command line, which is kinda cumbersome so we want to tie everything together into one command.
Before we do that though, let’s look at how to clean up generated files automatically.
Cleaning up generated files automatically
Since we’re generating files automatically, we’ll want to make sure that files that are no longer used don’t remain anywhere without us knowing.
This process is called cleaning (or in simpler terms, deleting files).
First of all, we’re deleting every file within `dist/**/*`. However, we don’t want to delete `dist/images`, hence we need the ! identifier for `dist/images`. We also don’t want to delete anything within `dist/images` so we need the third glob.
Finally, we need to know when the clean:dist task is finished, so we need to provide del with a callback argument.
In the standard clean task, we’ll want to make sure we clear the gulp cache so the images task will process all our images again.
Phew, that’s a mouthful. Let’s combine all our tasks together now!
Combining Gulp tasks
Let’s summarise what we’ve done. So far, we have created two distinct sets of Gulp tasks.
The first set is for a development process, where we compiled Sass to CSS, watched for changes, and reloaded the browser accordingly.
The second set is for an optimization process, where we ready all files for the production website. We optimized assets like CSS, JavaScript, and images in this process and copied fonts over from app to dist.
We’ve already grouped the first set of tasks together into a simple workflow with the gulp watch command:
gulp.task('watch', ['browserSync', 'sass'], function (){
  // ... watchers
})
The second set consists of tasks that we need to run to create the production website. This includes clean:dist, sass, useref, images and fonts.
If we went by the same train of thought, we could create a build task to combine everything together.
When task-name is called, Gulp will run task-one first. When task-one finishes, Gulp will automatically start task-two. Finally, when task-two is complete, Gulp will run task-three.
Run Sequence also allows you to run tasks simultaneously if you place them in an array:
In this case, Gulp first runs task-one. When task-one is completed, Gulp runs every task in the second argument simultaneously. All tasks in this second argument must be completed before task-three is run.
So we can now create a task that ensures that clean:dist runs first, followed by all the other tasks:
To make things consistent, we can also build the same sequence with the first group. Let’s use default as the task name this time:
gulp.task('default', function (callback) {
  runSequence(['sass','browserSync', 'watch'],
    callback
  )
})
Why default? Because when you have a task named default, you can run it simply by typing the gulp command, which saves some keystrokes.
Finally, here’s a github repo for all the work we’ve done!
Wrapping it up
We’ve gone through the absolute basics of Gulp and created a workflow that’s able to compile Sass into CSS while watching HTML and JS files for changes at the same time. We can run this task with the gulp command in the command line.
We’ve also built a second task, build, that creates a dist folder for the production website. We compiled Sass into CSS, optimized all our assets, and copied the necessary folders into the dist folder. To run this task, we just have to type gulp build into the command line.
Lastly, we have a clean task that clears away from the generated dist folder any image caches that are created, allowing us to remove any old files that were inadvertently kept in dist.
We’ve created a robust workflow so far that’s capable enough for most web developers. There’s a lot more to Gulp and workflows that we can explore to make this process even better. Here are some ideas for you:
Generating inline CSS for performance with Critical
In addition to development or optimization processes, you can also add write JavaScript unit tests with gulp-jasmine and even deploy your dist folder onto your production server automatically with gulp-rync.
As you can see, even though the workflow we’ve created does quite a few things, there’s a lot more that can be done. Creating a workflow that suits your needs can be extremely exciting and fulfilling, but it can be a lot to take in if you’re new to this.
There’s so much more to Gulp that it’s impossible to cover within this blog post, or even a series of posts. That’s why I wrote a book on automating your workflow, and I invite you to grab ten chapters for free if you’re interested in finding out more 🙂
Let me know what you felt about this article in the comments below! Oh yes, feel free to contact me if you have any questions on workflow. I’ll be happy to reply!
Here we go again with another fresh set of awesome freebies for your delectation. This month you’ll find unique icons, high-resolution mockups and templates, neatly crafted HTML themes and UI kits for many purposes, crazy and stylish fonts, brand-new coding snippets and some exciting new tools.
And as always, if you think we missed one of your favorite new freebies, let us know in the comments.
Thin line style PSD icons set
An icon set that comes with 48 icons in thin line style in PSD format, some of the icons contained in this set are download from cloud, image, headphones, share, thumbs-up, favourite, among others.
Collecticons
Collecticons is a collection of 135 filled icons that keeps growing. All of the icons are generated with a tool called Collections processor that comes along in this project licensed under Creative Commons Attribution License 4.0.
Socialoha Icons
Socialoha is a set of 756 regarding the most influential social media icons these days, there’s six different styles in this set making it quite a suitable set for any sort of project.
We Love Icon Fonts
We love icon fonts is an open source project featuring a collection of web font icons very similar to the ones at Google Web Font Icons and dependent of Backbone.js and crystallo frameworks.
Animated flat emojis
A set of 28 animated emoticons that come in fully vector-based and scalable and pre-made GIF-animations in 3 sizes: 32×32, 64×64 and 100×100.
8 free clean business card mockups
A set of 8 mockups featuring clean and minimal business cards. Fully layered, and separated, with smart objects.
Geometric low-poly background business card template
A business card template that features a low-poly-like background with light edges that contrast with a pitch black background for the contact information section.
Clean A4 portrait brochure mockups
A set of two beautiful A4 portrait brochure mockups that comes in well-organized PSD files that feature smart objects. This set is released and delivered by Mockup Cloud.
Essential free logo mockup collection
A set of five 72ppi high-resolution logo mockups in a canvas of 2000×1500 pixels. Some of the logos you’ll find are related to coffee, golden cursive font, and fashion-like logos.
Cardzz: dark schemed iOS UI kit
Cardzz is a UI Kit crafted by Volodymyr Kurbatov for iOS screens that comes with a set of 21 high-quality dark schemed components that contrast really well with colorful content.
Food & drink website UI kit
A kit of round corner containers that feature an appealing food related scheme. You’ll find containers for calendars, interactive ingredient list, type of food sidebar, and shopping cart.
Elegance
Elegance is a user interface kit that features soft cream-like colors and works really well for fashion eCommerce sites. It comes in both PSD and Sketch formats.
Sunshine Travel
Sunshine Travel is a UI kit that features elements specially designed for travel and tourism related topics. This kit is focused on iOS screens and has a flat style.
Apollo: PSD & Sketch UI navigation bar kit
A UI kit that features rounded corner bars, uppercase font, filled icons and a dark and light scheme.
GEOM Display
GEOM Display is a typeface that features only uppercase characters with the characteristic of being completely adorned with geometrical outlined and filled shapes all over them, making it be quite suitable for new era fashion design.
Intro Rust
Intro Rust is a multi-styled and multi-textured font family that comes with 4 sub-families which contain 214 fonts. The names of these subfamilies are Intro Rust, Intro Script, Intro Head and Intro Goodies.
Shumi
Shumi is a very bold line font that is characterized by straight one-angled edges and ends. It features uppercase, numeral and special characters.
Fanaisie
A font with a vintage style with a cowboy town look and feel that features only uppercase characters adorned with well-defined ends and details.
Reef
Reef is a typeface released by Gatis & Evita Vilaks that features both Latin and Cyrillic alphabets for a total of over 500 uppercase, lowercase, numeral, and special characters as well as extra glyphs and symbols. All of them designed with rounded edged bold lines.
Shophia
Shophia is a clean eCommerce website template crafted by Robi Wahyudi and delivered in PSD format that features big containers with framed images, and a fancy looking photo slider.
Creato
Creato is a PSD template for a very modern looking WordPress theme. It basically features two sections a main one with a top menu button and full-width content with a load more buttons at the bottom, and a bottom-most contact section.
Dream
Dream is a Sketch crafted one-page laid out landing page that features a very clean style and soft color scheme. You’ll also find some color-filled and outline icons
Fjord
Fjord is a landing page template that features a very clean style with a thin line black font and 2 color line icons. It is perfectly suitable for any kind of website.
Vanilla Milkshake
Vanilla Milkshake is a WordPress theme that comes in a very simple and background-less layout and refined with elegant typography. It is laid out in a title, main content column and right-side bar.
Huxley
Huxley is a versatile WordPress theme that features a screen-size post slider laid out in a single column, and six extra layout types such as single post and contact page.
Portefeuille
Portefeuille is a one-page portfolio website theme that features a low-poly header background and clean style along its one-column layout.
Sedna
Sedna is a clean and minimal style one-page website theme crafted in Sketch 3 that features colored outlined icons and regular full-width container sections.
30 Bootstrap themes curated bundle
A bundle of Bootstrap themes for both WordPress and non-WordPress environments, collected from all over the Internet, curated and presented to you.
Responsive material card snippet
A snippet developed by David Foliti to generate material design style cards that feature an image that slides away to let content behind it be shown when you click on its top menu icon.
Super simple CSS tooltips
A simple CSS code snippet developed and released by Ben Mildren that adds tooltips to links at three different positions, bottom, left or right, and with or without triangular adorn.
Navigation Reveal
Navigation Reveal is a concept introduced by ZCKVNS that when clicking on menu button, the whole page layout beneath the header sets off tilted in the background to show alternative pages links.
Graphic Library-featured Icons Particle Generator
A code snippet created by Kenji Saito that generates icons by particle flowing effects, every time you scroll or do any mouse gesture this icon gets disintegrated and reintegrates as a different one.
Bootstrap Theme frameworks set
A set of elite Bootstrap themes that work as frameworks, featuring rich and full-guiding documentation and lifetime licensing and updates.
Front-end bookmarks compilation
A huge compilation of web development sites focused on front-end resources that come sorted out from general knowledge at the beginning, to concrete and particular problems at the bottom.
Spark Framework
Spark Framework is a project inspired in Sinatra, that allows you to create Java8 web applications in a very easy way.
FormFiller
FormFiller is a Bookmarklet developed in JavaScript for repopulating forms by only filling the form once and saving the settings for that specific form.
Hobo
Hobo is a collection of open-source plugins written in Ruby, that helps you creating web applications with less coding involved.
Panique
A SASS to CSS automatic compiler through pure PHP that doesn’t use ruby language and features one-line coding. This compiler currently uses SCSS 3.2 syntax, imports and mixins.
GitHub Desktop
GitHub Desktop is a downloadable tool that allows you easily manage open-source projects from GitHub from your Mac or Windows computer. Start projects, branch off projects, craft the perfect commit and more features to see in it.
Elemental
Elemental is a flexible UI Toolkit for React.js websites and apps featuring out-laying tools for CSS, buttons, forms, modals and more elements.
Lavagna
Lavagna is a management tool for open-source issues and projects suitable for small teams. It is lightweight and is coded purely in Java, that provides you with a nice dashboard view and gives you an organized overview of projects.
Rucksack
Rucksack is a CSS Library that simply makes CSS development easier by featuring responsive typography, shorthand for positioning properties, native clear fix, and more.
Tridiv
Tridiv is a CSS 3D shapes creator developed by Julian Garnier that provides you with a right-side bar UI control for easily and intuitively edit your shapes and compositions.
Webflow
Webflow is a website builder that eases the process of developing by automatically generating code as you design and providing you with a full-featured control panel.
TypesetJS
A typographic pre-processor for HTML that doesn’t use any client-side JavaScript and provides you with text edition features such as real hanging punctuation, soft hyphen insertion, optical margin outdents, small-caps conversion, and more.
SamwiseJS
Samwise is a customizable modal that features list menu items and buttons for additional options at the bottom. Suitable for help offering and providing information.
Unsplash It
Unsplash It is an image placeholder generator that provides you with a single URL line and allows you using simple parameters for embedding the placeholders in your website, such as dimensions or effects.
Minigrid
Minigrid is a cascading grid layout designed in minimal style that features a nice and smooth animation when it is laid out onto the page.
Bootstrap image hover HTML & CSS effects gallery
A gallery of nice hover effects applied on images featuring thin lines icons and frames transitional effects. All of the effects are developed in HTML and CSS.
Outline
Outline is a simple and clean CSS framework that works as a starter boilerplate for new web projects. It features full responsiveness, Sass coding, modular building and Susy grids on demand.
Datedropper
Datedropper is a jQuery plugin that allows you to quickly manage and input dates into form fields with animated tooltip-like looking date-pickers.
Artyom
Artyom is a voice control speech recognition library for JavaScript that helps you create your own personal virtual assistant and embed it to your website.
A Kickstarter Campaign (Click To View Campaign) for a WordPress theme called Czar has been in talks recently. The team behind Czar is trying to raise funds to develop this WordPress Theme which they proclaim is a “King Of WordPress Themes” with regards to a few of the atypical features that it offers. We had a look at the campaign and after analyzing it carefully, we feel that these 4 reasons might just make it take a lead on WordPress Themes. To know more about the kickstarter campaign for Czar, click here.
Zootash – The Inbuilt Customer Support Desk
If you have already used a customer support software like Zendesk, you would certainly know how easy it becomes to manage client requests on your website and offer support to your customers through such an application. Czar has tried to capture this area as no other WordPress Theme offers a ready-to-use inbuilt customer support desk. “Zootash” as they call it, initially might not emerge as mature a solution as Zendesk, but since this support desk comes as a free offering with Czar, it might attract a lot of small and medium sized businesses to use it.
Czar Aims At Offering A Complete Solution, Introducing “Czar In A Box”
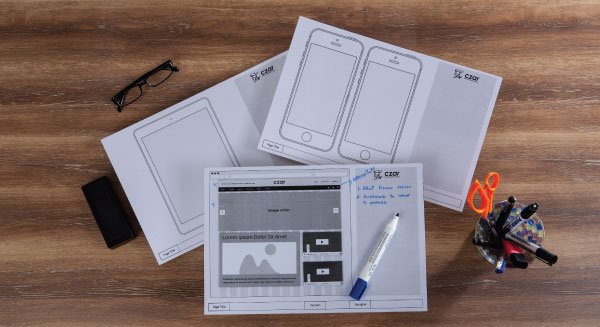
This is, for sure, something which no other theme out there offers. “Czar In A Box” is a package which contains a lot of goodies for web designers and developers and it enables them to unleash the full potential of Czar. These goodies have been designed with the intent of making Czar a part of the designing and development process. The box comes with design boards for desktop, mobile and tablet which, along with the magic elements enable the designer to create wireframes of the design and plan the designs before they start developing using Czar. This really saves a lot of time as all these elements are already a part of Czar and the designed pages can be created quickly using Czar.
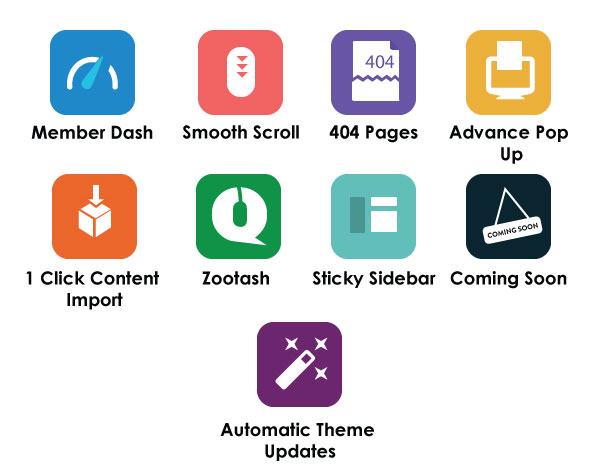
9 Exclusive Plugins Crafted To Work With Czar
Czar comes with 9 Exclusive plugins that are crafted to work seamlessly with it. These 9 plugins offer functionality for which you would usually need to buy additional plugins or would need a WordPress developer to develop the functionality for you. The choice of plugins made by the team behind Czar is good because these plugins fit into a much wider spectrum and provide functionality which is needed by most of the WordPress based websites. For instance the “Advance Pop-ups” plugin enables you to create conditional Pop-ups based on user behavior. Pop-ups are needed by most websites to entice visitors to sign up for a newsletter or the likes. Just like this one there are 8 other plugins which aim at solving specific purposes.
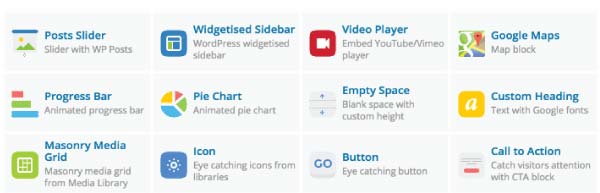
UI Elements That Act As Building Blocks
Well, Czar adopts a modular approach towards design as it counts on various design elements that are part of it, using which one can come up with endless compositions. We see many of the existing WordPress themes banking on a Composition-Based Approach towards design wherein they try to sell a composition and the buyers go for a theme based on its design. But with its modular approach to design, Czar takes customization to a different level altogether owing to its extensive collection of the UI elements. Czar is certainly not the only WordPress theme that adopts this modular approach but with its massive range of UI elements that allow one to come up with numerous compositions, it undoubtedly stands out in comparison to the existing WordPress themes.
It’s quite apparent after taking a look at the Kickstarter Campaign for Czar that the two major attributes that draw the line of variance between Czar and the other existing WordPress Themes are the Inbuilt Customer Support Desk Zootash and the exquisite “Czar In A Box” Concept. If Czar Comes Out The Way It Is Conceived, The Existing WordPress Themes Are Sure To Witness A Game Changing Wave, but we will definitely have to wait to know more about its working and intricacies until the first few licenses have been purchased.
If Czar Comes Out The Way It Is Conceived, The Existing WordPress Themes Are Sure To Witness A Game Changing Wave


 Missing Link Between Your Cloud Apps")