Fast and Free: How to Create Images for Social Media – Using Pablo v2
Small helpers that allow you to create social media images fast and easy are in high demand. Very recently, we introduced you to a lot of these tools. Of course, Pablo, developed by Buffer, was on that list as well. Recently version two of this convenient image service has gone online. Today I want to show you all there is to know. By the end of the article, you will be able to call yourself Pablo, should you wish to…
Throwing Together an Image for Twitter or Facebook in No Time!
First things first, it is important to say that there are much more powerful tools than Pablo. Recently, Sven Lennartz presented you Canva, which we use here at Noupe. We are so convinced of it that we are using its paid premium version. Even the free version of Canva will be sufficient in 95% of all use cases. So why would you look at Pablo in the first place?
Pablo’s primary appeal is definitely the complete reduction to the essentials. This way all of Pablo’s features can be learned in under two minutes. The first result can be downloaded even faster as Pablo immediately starts with an appealingly designed quote suggestion in front of an impressive scenery. Pablo has a thing for quotes. He has a lot of them in store, and you can browse them via „Shuffle Quote”.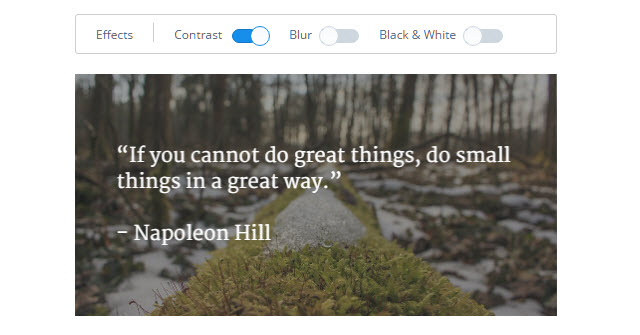
A Couple Backgrounds and Quotes – Here’s Your Social Image
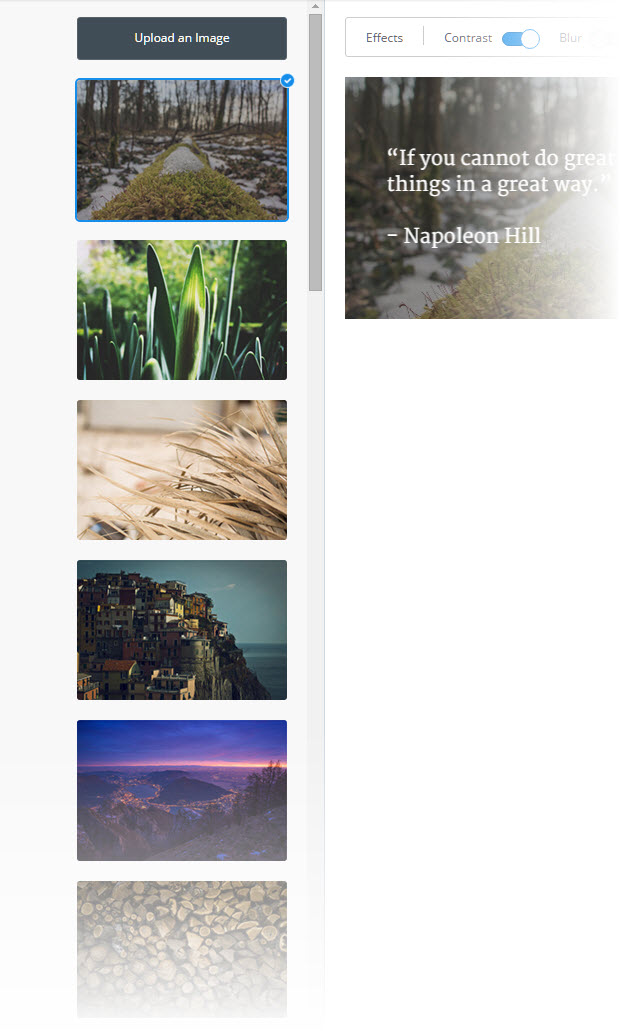
Pablo has about thirty different backgrounds to offer. These can be transferred to the current edit with a simple click. Via „Upload an Image”, you can upload your own images and use these as a background. When doing that, you should make sure that the pictures stay usable in multiple different resolutions. Pablo only makes a rough distinction, dividing „Tall” (for Pinterest), „Square” (for Instagram) and „Wide” (for Facebook and Twitter). You can not influence the focus and the cut of the images. This is why generic images without a clear topic focus are recommended.
A very reduced set of effects allows for a slight customisation of the effective social media image. „Contrast” lays fog over the background to make it easier to read the text. „Blur” uses a very strong diffuser that makes the background image transform into a mix of colours that doesn’t resemble the original image at all. A click on „Black & White”, you guessed it, takes away the colours of the background and leaves greyscales.
A text is added to the center of each image. While you will always receive a quote suggestion at first, you can freely edit it. The text can be moved around via drag and drop. The entered text can also be formatted. You can choose between ten completely different fonts. Furthermore, it is possible to set the text to bold or italic and to choose between small, medium or large font size. Pixel values can not be selected or defined. The design has to be done by eye measure. The text can be set in white or black. White text is recommendable for most of the stock images.
Clicking the button „Secondary Text” will have a second text field pop up that contains the exact same formatting options as the first.
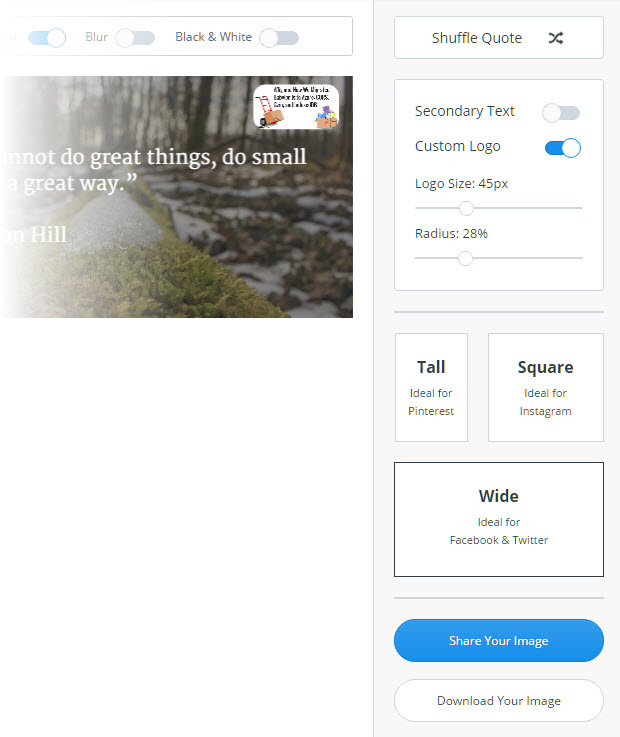
Adding a personal logo is also an interesting option that can be accessed by clicking the „Custom Logo” button. Clicking it opens the file selection dialog. Here, you can choose a JPG or PNG. Unfortunately vector formats don’t work, which will be placed in the center of the background after having been uploaded.
Important: Make sure that you don’t click the slider button, but actually click on „Custom Logo”. Surprisingly, clicking the slider itself doesn’t open the upload window.
Once the logo is uploaded, two more controls are displayed below the button. The top one allows you to change the size of the logo in pixels. The position of the logo is set manually via drag and drop.
Important: If you want to temporarily fade out the logo during editing, for example for visual review, it will disappear permanently after clicking the button which means you would have to recreate it completely.
The bottom slider called „Radius” allows you to round the edges of the uploaded logo. However, this is only recommendable on JPGs, as the radius will affect all free edges of a PNG. The effect resulting will not be desired in most cases.
That concludes Pablo’s scope of features.
To finish up, you will have to decide what should happen to your instant masterpiece. Via „Share Your Image”, you can directly move it over to Twitter, Facebook, Pinterest or into your Buffer. As you probably would have guessed, clicking „Download Your Image” will start the image download. The file name can not be edited and will always be pablo.png.
The image is always delivered as a PNG which is why it’s obviously not a lightweight, given the photographic backgrounds choosable. My test image had 1.3 megabytes. This means you should shoot it through a minimizer before using it.
Another note for Buffer users and those that want or don’t want to use it: While you can sign in to Pablo with your Buffer account, this is in no way necessary or useful. The tool’s entire scope of features can be used without registration. Even uploading custom images or logos doesn’t require an account. Now you could hope that uploaded images and logos are saved for registered users. While that would surely make sense, it’s not the case. Even loyal bufferers always have to start from scratch.
In its result, Pablo stayed true to its strongly reduced scope of options in version two. There are way more powerful competitors, but none that leads to similarly fast results. So whenever you want to quickly decorate a quote to send through your channels, visit Pablo. That guy is really fast…


![Image Is Everything – Ask @aplusk [Infographic]](http://www.noupe.com/wp-content/plugins/contextual-related-posts-2.0.1/timthumb/timthumb.php?src=http%3A%2F%2Fwww.noupe.com%2Fwp-content%2Fuploads%2F2012%2F12%2Fveer-infografik-images-2012-550.png&w=250&h=200&zc=1&q=75 "Image Is Everything – Ask @aplusk [Infographic]")
