Archive

Archive for January, 2016

The Current State of Web Security (An Interview with Anselm Hannemann)

January 18th, 2016 No comments

Anselm Hannemann recently made a post about some of the misconceptions that front-end developers might have about web security. Since I had lots of questions about these things, I thought I’d interview Anselm to get his take on the surprising complexity of getting set up with HTTPS. We talk about things like generating certificates and how we might best make sense of the conflicting opinions many developers, including myself, have about third-party services such as Cloudflare.

For those that aren’t familiar with web security, would you mind describing the differences between HTTP and HTTPS?

Sure! The general difference between HTTP and HTTPS is simple: HTTP, or Hypertext Transfer Protocol, is the default protocol that we use to serve websites and transfer data. However, that information is sent in an unprotected, unencrypted way. HTTPS however combines HTTP and TLS (which is a cryptographic protocol) in order to protect data that is sent over a network by encrypting it.

You may wonder why you would need to encrypt the connection to your website if the content is public anyway. Let’s assume that you use a CMS, like WordPress or Craft, for your website. If you log in over HTTP to your backend, your credentials are sent in plaintext to the server. So, anyone who intercepts your WiFi or internet connection now has access to your CMS (it’s super easy, really – just think of public WiFis in cafés). But not only that, HTTPS can also protect you from getting the wrong content. If HTTPS is set up properly, hackers can’t overtake DNS to serve different content on your domain anymore. With HTTPS it’s also not possible for software on your computer to inject ads or malware into webpages.

You can think of HTTPS as the more secure version of HTTP which prevents you from data leaks to the public and also from falling for phishing.

Why do we need SSL certificates to let the browser know the connection is secure?

First, while you’ll find many people still talking of “SSL”, today we’re using “TLS” as the encryption method when we send information via HTTPS. “SSL” is an old method that shouldn’t be used anymore. HTTPS in general works with certificates, which you can get from your hosting company, to create a secure, encrypted channel in the HTTP protocol to send data. To encrypt the data you need a private key and a public key.

To make this work, you need a so called “X.509”-certificate on your server that contains the information about the site’s authenticity, approved by a root certificate authority (Let’s Encrypt, StartSSL, or similar).

All browsers, on the other hand, have a set of known and trusted root certificate authorities built-in. This is done for a more convenient user experience — the user does not need to review the certificate and approve it to establish the connection to the site. At some point you have probably seen a popup by the browser asking you if you want to trust the website connection because it’s using an unknown identity. This happens when the certificate has not been created by an official, trusted authority. Of course, there are many complex points I’m glossing over here so make sure to read more detailed resources if you’re interested in getting more information to a specific feature or technology (we link a few on the bottom of this article).

A browser needs these certificates to verify if the keys match, this ensures that neither the server, client, or anything in between has been intercepted and (accidentally or otherwise) leaked your precious data. That sounds pretty secure, but there a couple of issues in the details that could still allow attackers to intercept the connection between the client and the server. HTTPS is no magic bullet, but it does make getting at your information a lot more difficult.

As your article states, I was also under the naïve assumption that all I had to do was redirect my site to https in my server configuration file and then tell Cloudflare to switch to HTTPS. Can you describe why this is not the case?

This is not entirely wrong. So, with a service like Cloudflare things are a bit more complex. They offer a bunch of services, for example: DNS hosting, performance optimization, and security enhancements. But a lot of people sign up for Cloudflare because they provide “free SSL”. This indeed is a great feature which totally makes sense as you want to serve all your content over HTTPS, so your CDN should support HTTPS as well.

Unfortunately, and that is what most people don’t understand, they can only provide this for their part of the connection. This means that they start using HTTPS on their servers and then serve content from there to the client. If your website (the so called origin host) does not support HTTPS, this means the data is completely unprotected between your origin and Cloudflare. Even worse, this gives the user the impression that the site and data entered on the site is encrypted and protected while in fact it’s not. Cloudflare cannot modify settings on your server, so they can only do their part to make things safer. You still need to ensure that you’re providing security for the data on your origin server. That‘s what most people fail to understand.

If you did the first thing right — enabled HTTPS on your origin server — then things are slightly better. In this case, you can tell Cloudflare to only connect to your origin over HTTPS and to only serve content to the client using HTTPS. Now we have one more problem: Cloudflare’s Full SSL does not validate the origin certificate – it just uses it, so it might be invalid, self-signed, malicious. At least it means the connection between the servers is always secured by HTTPS. There is what Cloudflare calls “Full SSL strict” which validates the certificate itself, but it’s more like “Basic SSL” because you can’t ensure your customer’s data is encrypted and safe.

Cloudflare (or any other third party service) sits between browser and server and optimizes (i.e. modifies) content for delivery, or to prevent attacks on your server. The problem is that the data is unencrypted while it’s at Cloudflare. HTTPS works for the transfer but is not end-to-end encryption of the actual data sent. This means all content temporarily is unencrypted on the third party service’s machine. Even if you fully trust the company itself with your (and your client’s) data, then the problem is that another third party could gain access to such traffic-optimizing servers and read data or modify it, resulting in either the origin or the client getting modified content.

If you can, you should additionally enable HSTS, or HTTP Strict Transport Security. You do this by adding a rule to your server config that sets this flag. If you set this flag, a browser will only connect to the specified domain over HTTPS for the given timeframe. The timeframe should be set very long, Twitter for example sets it to 20 years to avoid this rule being changed in the event of an attack on their servers. You can also opt-in to include subdomains in this rule.

Finally, to prevent your site being exploited due to a compromised root certificate authority, you can set up HPKP, or HTTP Public Key Pinning, which fills the last gap on security for HTTPS. Unfortunately, if you do something wrong here, the consequences are really bad and could mean your website is not available anymore for the timeframe you’ve set (which shouldn’t be too short). You can read more on that matter and how to set HPKP up in this great article by Scott Helme.

Let’s Encrypt seems like a big step in the right direction in terms of generating certificates but this still requires knowledge of the command line. Why is basic web security so complex? Why are there not simpler solutions to these problems?

Oh yes, it’s great to finally see progress on this with Let’s Encrypt. HTTPS has been around since 1994 and so I’m quite happy that finally, people are beginning to work towards simplifying the process of setting up HTTPS. I see Let’s Encrypt only as the beginning.

Talking about this specific service. It’s just reached public beta status. Currently, it only works on the CLI and is very limited when it comes to being run without root privileges. So although it’s great to see things getting simpler, there are still too many hurdles to overcome.

I’m eagerly awaiting the point where all hosting companies begin to offer HTTPS for free with a super-easy and automated setup process of for any given domain. Because, honestly, today setting up HTTPS properly is way too complex, even for tech-savvy people.

Who do you think should be responsible for web security? Should front-end developers spend more time learning about this stuff? Or is the onus on hosting companies to figure out a more elegant technical solution to the problem — like not offering HTTP access at all?

This is a complex question that can’t be solved that easily. In an ideal world, setting up HTTPS properly for a domain would be easy as a click in a web host’s interface or a single command on a server for a server admin. There’s still a long way to go until we reach that point. Until this is the case, us developers need to take care of this.

As a full-stack or backend developer, you should take care of setting up the certificate on the server. As a front-end or full-stack developer you should take care to enable HSTS and enforcing HTTPS by default, taking care of a proper Content Security Policy, along with other security measures. Each developer, regardless of their title, has a duty to ensure the built project creates a safe and encrypted environment for its users.

Regarding not offering HTTP at all anymore—let’s talk about this again when we solved the still-remaining problems described above. Until then, I don’t believe we should aim to “deprecate” HTTP in general, especially as we still have a lot of legacy regarding hardware, cipher-support, and software out there in the world which would need to go away for a HTTPS-only world.

Which resources would you recommend so that I can learn more about web security?

Fortunately, these topics are well covered with lots of helpful blog posts out there. In general, you should read the articles written by Scott Helme to get into details of specific security features and how to enable them on your website. He has also built securityheaders.io, a tool that checks your site on how secure it is and what you should improve.

If you want to start using Let’s Encrypt for your HTTPS, Tim Kadlec’s starter post is a good idea and also his post on how to enable HSTS with it.

Finally, if you want to know more, check this security link list by Troy Hunt. And if you want to get an overview of the basic technologies then you can find good explanations on Wikipedia as well.

Thanks Anselm!


The Current State of Web Security (An Interview with Anselm Hannemann) is a post from CSS-Tricks

Categories: Designing, Others Tags:

Leaner Responsive Images With Client Hints

January 18th, 2016 No comments

Responsive images have been around long enough for most of us to have taken them for a spin, or at least to have learned from the experiences of those who have. Beyond doubt, the responsive images specification is a great win for the web. However, quite a few reports from the front lines suggest that responsive images can become pretty ugly.

The Client Hints flow: 1. Enable client hints. 2. Client hints are added. 3. Server selects or generates an image. 4. Server responds. 5. Image rendered.

The good news is that there is a fix! No, not throwing JavaScript at the challenge, but by asking the web server for a helping hand. Enter Client Hints, an initiative spearheaded by Google that is already available in browsers (Chrome and Opera) and that is super-simple to use. Let’s see how Client Hints can reduce both image size and verbosity of the responsive images markup.

The post Leaner Responsive Images With Client Hints appeared first on Smashing Magazine.

Categories: Others Tags:

The HTTPS-Only Standard

January 17th, 2016 No comments

A project by the U.S. General Services Administration that outlines how Federal agencies should implement basic web security, going into great detail as to why government websites should always use HTTPS over HTTP:

HTTP has become central to today’s way of life. HTTP is currently the primary protocol for applications used on computers, tablets, smartphones, and many other devices. As our dependency on the internet has grown, the risk to users’ privacy and safety has grown along with it. Every unencrypted HTTP request reveals information about a user’s behavior, and the interception and tracking of unencrypted browsing has become commonplace. Today, there is no such thing as non-sensitive web traffic, and public services should not depend on the benevolence of network operators. When properly configured, HTTPS can provide a fast, secure connection that offers the level of privacy and reliability that users should expect from government web services.

Direct Link to ArticlePermalink


The HTTPS-Only Standard is a post from CSS-Tricks

Categories: Designing, Others Tags:

Popular design news of the week: January 11, 2016 – January 17, 2016

January 17th, 2016 No comments

Every week users submit a lot of interesting stuff on our sister site Webdesigner News, highlighting great content from around the web that can be of interest to web designers.

The best way to keep track of all the great stories and news being posted is simply to check out the Webdesigner News site, however, in case you missed some here’s a quick and useful compilation of the most popular designer news that we curated from the past week.

Note that this is only a very small selection of the links that were posted, so don’t miss out and subscribe to our newsletter and follow the site daily for all the news.

12 Web Development Trends You Must Know About in 2016

Website Design: Robinhood

6 Great Contemporary Alternatives to Helvetica

Milligram: A Minimalist CSS Framework

Google Recommends Inlining Small CSS

9 UX Secrets I Stole from People Smarter than Me

The Ten Most Popular Web Fonts of 2015 (and Fonts You Should Consider Using Instead)

Project Management for Designers

Shadow Parallax with Reactjs

5 Tech Trends of a Modern Digital Agency

The Entire Universe as We Know it in One Spectacular Photograph

The Building Blocks of Flat Design

How to Create Visually Effective Call-To-Actions

The Sad State of Entitled Web Developers

Atom Text Editor 1.4 Released

Leviathan.ai – The Most Important AI News in your Inbox Weekly

Site Design: The Revenant – 200miles.com

What the FlexBox? – A Free 20 Video Course to Learn CSS Flexbox

SEOs Confused, Puzzled After Google’s Mystery Update

Nobody Wants to Use your Product

Creating Calls to Action for Social Media that Actually Convert

Why Desktop UX Still has Something to Teach Mobile

Delightful Design, Deconstructed

6 Business Technology Trends for 2016

Facebook and How UIs Twist your Words

Want more? No problem! Keep track of top design news from around the web with Webdesigner News.

Kremlin : A Beautiful and Classy Script Font – only $7.50!

Source

Categories: Designing, Others Tags:

How to Use Icon Fonts in WordPress

January 17th, 2016 No comments
Font Awesome

Icon fonts are a great thing, as they have a lot of things to offer that regular icons don’t have. As technically, they are fonts and not images, these symbols generated from these fonts don’t have the disadvantages of classic icons. Colors and sizes of the font icons can easily be controlled with CSS and HTML. This means they are scalable and can be used for retina displays as well. In this article, we’ll deal with the question how to use icon fonts in WordPress the best way possible.

Two Ways to Use Icon Fonts in WordPress

The most famous and most extensive icon font is surely »Font Awesome” and it’s the font we’ll use for this article. Font Awesome provides 605 icons for almost all conceivable purposes, and it’s very easy to integrate and use. Today, I will introduce you to two ways of integrating the font – the manual method and the integration via a plugin.

Important Links:

Using Font Awesome Manually

Using Font Awesome manually offers the advantage of higher performance. Your website is not slowed down by unnecessary CSS and JavaScript files. Only one CSS file, which is delivered via MaxCDN’s CDN server, has to be integrated. Of course, you can also upload the needed files to your server, but the integration via MaxCDN will be faster and more performant. Copy the following code into the functions.php of your theme:

Clicking the graphic opens the GitHub Gist
font-awesome-einbinden

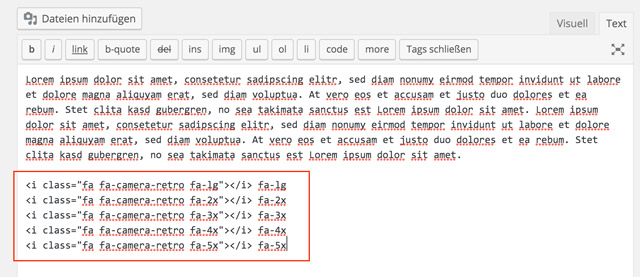
That’s all that’s needed to be able to use the font. If you want to display an icon, go to Font Awesome’s website and look at the examples to get used to using it. You will notice that these icons are changeable and usable in many different ways. You can simply define the size of the pictograms using HTML, which you can enter in WordPress editor’s text view:

Beispiel

Editor

The Result:

Das Ergebnis

Quick Tip:

By the way, the tag is not really necessary, as it also works with a ,

or

element. The color adjustments can easily be made via CSS. The size can also be altered by simply changing the font size.

css-iconfonts

Using Font Awesome With a Plugin

Fontallic

  • Developer(s): Various
  • Work in Progress: More or Less
  • Latest Version From: A Year Ago
  • Compatibility with WordPress 4.4.1: Full
  • Costs: Free on WordPress.org
  • License: GNU GENERAL PUBLIC LICENSE
  • Incompatibilities: Unknown
  • Developer Homepage: Unknown
  • Download from WordPress.org

The advantage of the plugin »WP Fontallic Easypromoweb” is that it has more integrated icon fonts besides Font Awsome. This plugin gives you access to a whole of 2,553 icons. Thanks to the visual editor, you don’t have to go to the text area of your WordPress text editor, as you can easily implement the icons using an additional button in the editor’s menu pane.

Der Button für die Icon-Fonts

Clicking the selection button opens a selection list for the icons.

Die Auswahl der Icons

The pictograms can be further adjusted regarding font size and color. However, it’s not possible to assign the icons to specific HTML elements when using the visual editor. To do that, you need to go back to the editor’s text area and manually assign the symbols.

Icons im Texteditor

Das Ergebnis auf der Website

Addition: Hosting the Icon Fonts on Your Server

The two options that I just presented bribe with simplicity. Not a lot of work is needed to be able to use the font’s advantages. Of course, you can also host the icon font yourself on your server/the web hosting package. This is certainly necessary for other fonts than Font Awesome. That’s why we’ll go through the steps again. First, you need to download the respective download package, the example being Font Awesome.

Subsequently, the .ZIP file is unzipped. The folder “fonts”, which contains the required fonts, is uploaded to the root index of the active theme via (S)FTP. The “font-awesome.css” is taken out of the folder “css”. The data paths to the fonts in the fonts folder still need to be adjusted to (example) url('fonts/fontawesome-webfont.eot?v=4.5.0');. Then, the CSS is placed in the theme’s root index of the theme and referenced in its header. This happens due to the following entry in the theme’s functions.php:

Clicking the Graphic Opens the GitHub Gist
Das Font Awesome CSS in den Header des Themes bringen

Conclusion

Icon fonts are an excellent invention, and I like using them. My favorite is Font Awesome, especially because I only need to integrate one file via the CDN. In my opinion, a plugin doesn’t make much sense, as the manual use is faster and you only need to go to the text area of the text editor to assign icons for lists, buttons, and similar things.

Those that don’t dare to touch the code are apparently served similarly well with using the plugin.

(dpe)

Categories: Others Tags:

WordPress Tips: Turn on DoFollow for Comments, Turn off Internal Pingbacks

January 16th, 2016 No comments
DoFollow für die Kommentare

The two small tips that we’ll give you today will make your WordPress better and more fair. The first tip deals with the NoFollow HTML attribute in the comments that automatically considers every person that comments a spammer. The second tip turns off the Pingbacks generated by your own WordPress. This way your WordPress won’t annoy you whenever you link to an internal article. But more importantly; the people that comment on your article will be valued a bit more, which they will surely appreciate.

Tip No. 1: Remove the NoFollow Attribute

NoFollow is colloquial for the HTML attribute rel=”nofollow”, which can be used to mark links. It makes sure that Google doesn’t use these links to calculate the linked website’s link popularity. This label for hyperlinks was created by Google in cooperation with MSN and Yahoo, on the 18th of January 2005. Even today, it’s still the cause of controversial debates among webmasters.

The Function of the NoFollow Attribute

This attribute was created to gain control over comment spam on weblogs and forums. Spammers tried over and over to increase their link popularity and page rank with links that are automatically posted in the comments. This was supposed to influence and improve the position of the website within the search results.

However, this type of fighting spam didn’t prove effective, as only manually created comment spam could be reduced. The majority of spam is generated automatically, though.

Every Person That Comments Will Be Treated as a Spammer

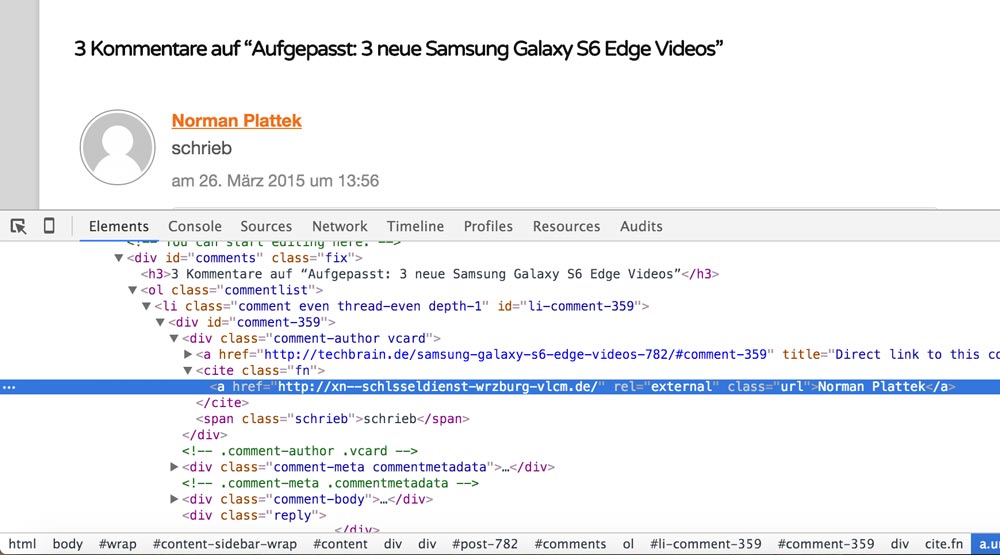
Before: NoFollow in the Comment Links.
Vorher: NoFollow

An undesired effect of NoFollow is that every person that comments will be treated as a spammer due to this attribute. Furthermore, many WordPress users aren’t aware of the fact that the people that comment are treated as spammers by WordPress itself. Of course, readers don’t want to see themselves being treated like that. That’s why it’s more than fair to completely remove NoFollow from your comments.

Completely Remove NoFollow From Your Comments

You need to paste the following code snippet into the functions.php of your theme:

A click on the graphic takes you to GitHub, where you can download the code.

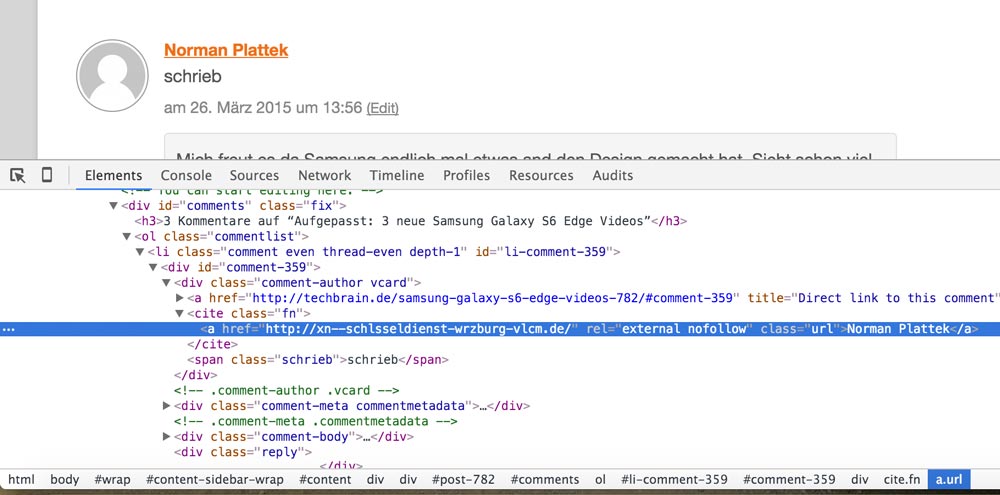
The Result of our Code

After: DoFollow in the Comment Links.
Nachher: DoFollow in den Kommentaren

Tip No. 2: Prevent Internal Pingbacks

Usually, pingbacks are a useful thing. They are an automatic notification that your blog article has been linked in another blog. When you link an article from another WordPress blog in your article, the owner of the linked blog will receive a pingback that appears in the comments. This works for most blog platforms and software.

Vice versa, you will receive a pingback when one of your articles is linked somewhere else. This gives you the opportunity to read the other article and comment when it makes sense to do so. In a nutshell, pingbacks support the network between bloggers.

Own Pingbacks are Created as Well

Unfortunately: Pingbacks are also created when you link one of your articles in another one of your articles. WordPress doesn’t differentiate where the pingbacks come from and treats every pingback equally. This creates the internal pingbacks, which I consider annoying as they don’t make sense.

Turning Off Internal Pingbacks

However, you can turn off internal pingbacks with a couple of lines of PHP code, so only external pingbacks will be displayed. Paste the following code into the theme’s functions.php:

Clicking the graphic takes you to GitHub, where you can download the code.
Die eigenen Pingbacks entfernen

Conclusion

With a few lines of code, you can make your WordPress significantly more fair and less annoying, and this is great. People that comment on articles should receive an added value in the form of a follow link. Internal pingbacks don’t make sense, which is why they should be deactivated.

(dpe)

Categories: Others Tags:

Chocolatey Community Feed Update!

January 16th, 2016 No comments
12/18/2015 - 1630 packages ready for a moderator

Average approval time for moderated packages is currently under 10 hours!

In my last post, I talked about things we were implementing or getting ready to implement to really help out with the process of moderation. Those things are:

  • The validator – checks the quality of the package
  • The verifier – tests the package install/uninstall and provides logs
  • The cleaner – provides reminders and closes packages under review when they have gone stale.

The Cleanup Service

We’ve created a cleanup service, known as the cleaner that went into production recently.

  • It looks for packages under review that have gone stale – defined as 20 or more days since last review and no progress
  • Sends a notice/reminder that the package is waiting for the maintainer to fix something and that if another 15 days goes by with no progress, the package will automatically be rejected.
  • 15 days later if no progress is made, it automatically rejects packages with a nice message about how to pick things back up later when the maintainer is ready.

Current Backlog

We’ve found that with all of this automation in place, the moderation backlog was quickly reduced and will continue to be manageable.

A visual comparison:

December 18, 2015 – 1630 packages ready

January 16, 2016 – 7 packages ready

Note the improvements all around! The most important numbers to key in on are the first 3, they represent a waiting for reviewer to do something status. With the validator and verifier in place, moderation is much faster and more accurate, and the validator has increased package quality all around with its review!

The waiting for maintainer (927 in the picture above) represents the bulk of the total number of packages under moderation currently. These are packages that require an action on the part of the maintainer to actively move the package to approved. This is also where the clean up service comes in.

The cleaner sent 800+ reminders two days ago. If there is no response by early February on those packages, the waiting for maintainer status will drop significantly as those packages will automatically be rejected. Some of those packages have been waiting for maintainer action for over a year and are likely abandoned. If you are a maintainer and you have not been getting emails from the site, you should log in now and make sure your email address is receiving emails and that the messages are not going to your spam folder. A rejected package version is reversible, the moderators can put it back to submitted at any time when a maintainer is ready to work on moving the package towards approval again.

Statistics

This is where it really starts to get exciting.

Some statistics:

  • Around 30 minutes after a package is submitted the validator runs.
  • Within 1-2 hours the verifier has finished testing the package and posts results.
  • Typical human review wait time after a package is deemed good is less than a day now.

We’re starting to build statistics on average time to approval for packages that go through moderation that will be visible on the site. Running some statistics by hand, we’ve approved 236 packages that have been created since January 1st, the average final good package (meaning that it was the last time someone submitted fixes to the package) to approval time has been 15 hours. There are some packages that drove that up due to fixing some things in our verifier and rerunning the tests. If I change to only looking at packages since those fixes have went in on the 10th, that is 104 packages with an average approval within 7 hours!

Categories: Others, Programming Tags:

A _______ of JSON

January 16th, 2016 No comments

JSON (JavaScript Object Notation) is a lightweight data-interchange format. It is easy for humans to read and write. It is easy for machines to parse and generate. Yadda yadda yadda.

But what do you call a small amount of it?

I had a few ideas.

a bit of json
a slab of json
a chunk of json
a glob of json
a hunk of json
a block of json
a wad of json
a dollop of json

From the Choir!

@chriscoyier a drop of json

— Sara Soueidan (@SaraSoueidan) January 13, 2015

@SaraSoueidan @chriscoyier An Argonaut of json

— Christian Heilmann (@codepo8) January 13, 2015

@SaraSoueidan @chriscoyier a nugget of json

— Austin Knight (@austinknight) January 13, 2015

@SaraSoueidan @chriscoyier a smidgen of json

— James Basoo (@JBasoo) January 13, 2015

@chriscoyier a crock.

— Jed Schmidt (@jedschmidt) January 13, 2015

@chriscoyier

a jungle of json
a jason of json
a jab of json
a joyful of json

— Michael Arestad (@michaelarestad) January 13, 2015

@chriscoyier a nest of json?

— Catrina (@SoNotKidding) January 13, 2015

@chriscoyier an [object Object] of json

— Liam Newmarch (@liamnewmarch) January 13, 2015

@chriscoyier a bracket of json

— Rob Lifford (@roblifford) January 13, 2015

@chriscoyier A pinch of json

— Andy Matthews (@commadelimited) January 13, 2015

@chriscoyier
a santa maria of json
a bateman of json
a voorhees of json
a calacanis of json
a kottke of json
an argo of json

— Josh Clark (@bigmediumjosh) January 13, 2015


A _______ of JSON is a post from CSS-Tricks

Categories: Designing, Others Tags:
Comics of the week #322

January 16th, 2016 No comments

Every week we feature a set of comics created exclusively for WDD.

The content revolves around web design, blogging and funny situations that we encounter in our daily lives as designers.

These great cartoons are created by Jerry King, an award-winning cartoonist who’s one of the most published, prolific and versatile cartoonists in the world today.

So for a few moments, take a break from your daily routine, have a laugh and enjoy these funny cartoons.

Feel free to leave your comments and suggestions below as well as any related stories of your own…

Turnaround

Keep that to yourself

Much needed training

Can you relate to these situations? Please share your funny stories and comments below…

Kremlin : A Beautiful and Classy Script Font – only $7.50!

Source

Categories: Designing, Others Tags:

jQuery 3.0 Beta is Now Available

January 15th, 2016 No comments
jquery-featured

jQuery recently completed ten years of active development. Furthermore, jQuery have also announced the release of jQuery 3.0 Beta, and you can start using it in your test projects right away.

jQuery 3.0 comes loaded with many new features. For instance, it has made changes to .show() and .hide() methods. Plus, jQuery.Deferred is now Promises/A+ compatible. Also, deprecated event aliases have been dropped.

However, quite possibly the biggest change that jQuery 3.0 has to offer is that it has dropped support for older versions of Internet Explorer, namely, IE 6, 7 and 8. If you wish to use IE 6, 7 or 8 in your projects, you will have to stick with older versions of jQuery. Support for Internet Explorer 9 and 10, though, is still available in jQuery 3.0 Beta.

jquery-3

Also, the erstwhile jQuery Compat, which was announced alongwith jQuery 3.0 Alpha, has been dropped. After Microsoft announced that it was retiring Internet Explorer 8, 9 and 10, jQuery Compat was no longer meaningful since its primary purpose was to ensure backwards compatibility.

Developers can get jQuery 3.0 Beta directly from the jQuery CDN and start using it in their test projects. Since it is still in Beta, it is not advisable to use jQuery 3.0 Beta in your major projects.

For more info, you can refer to the jQuery 3.0 Beta announcement on the blog.

What do you think of jQuery 3.0 Beta? Share your views in the comments below.

Read More at jQuery 3.0 Beta is Now Available

Categories: Designing, Others Tags: