Archive

Archive for January, 2016

Is Apple Building An App To Help Users Move To Android?

January 12th, 2016 No comments
apple-android-featured

It was recently reported by The Telegraph (UK) that Apple has been working a new app that lets users migrate from Apple devices to Android, if they ever choose to do so.

The said app, among other things, is rumored to help users transfer their data such as photos, contacts, music and other content to an Android smartphone or tablet, should they ever choose to leave iOS devices such as iPad or iPhone.

The reasoning behind this rumor is that Apple has come under fire from several European mobile operators, who feel that users are finding it extremely difficult in migrating away from iOS simply because the transfer of data is a hard task to accomplish.

apple-android

However, Apple has been quick to deny such rumors, and insists that it is not working on any such app that might ease migration away from iOS and towards Android. To quote Apple spokesperson Trudy Miller, via email to Mashable:

There is no truth to this rumor. We are entirely focused on switching users from Android to iPhone, and that is going great.

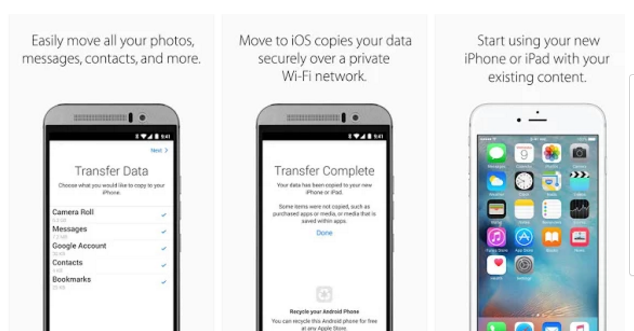
As per Miller’s above comment, Apple has a Move to iOS app in the Play Store, which allows users to migrate their data from Android smartphones and tablets to an iOS device.

What do you think of this rumor, and is there any chance there might be a fraction of truth in it? Share your views in the comments below!

Read More at Is Apple Building An App To Help Users Move To Android?

Categories: Designing, Others Tags:

Variables: The Backbone Of CSS Architecture

January 12th, 2016 No comments

When they hit the front-end landscape a few years ago, preprocessors were heralded as the saviour of CSS, bringing modularity, meaning and even a degree of sexiness. Terms like “Sass architecture” became commonplace, ushering in a new generation of CSS developers who occasionally went to excess with their new-found power. The results were marvellous, and sometimes undesirable.

Variables: The Backbone Of CSS Architecture

One of the unpleasant side effects was a preprocessor elitism that continues to persist. Neophyte designers who were just getting their hands dirty with CSS were overwhelmed by an influx of must-have tools and confused by the bitter partisan wars in web development forums.

The post Variables: The Backbone Of CSS Architecture appeared first on Smashing Magazine.

Categories: Others Tags:

The Sass Ampersand

January 12th, 2016 No comments

The following is a guest post by Rich Finelli. Rich told me he used to have some trouble with the special ampersand character in Sass, but then had a bit of an epiphany and wanted to share that understanding (it’s powers and limitations) with others. My favorite!

The & is an extremely useful feature in Sass (and Less). It’s used when nesting. It can be a nice time-saver when you know how to use it, or a bit of a time-waster when you’re struggling and could have written the same code in regular CSS.

Let’s see if we can really understand it.

Basic Nesting

.parent {
  .child {}
}

This compiles to:

.parent .child {}

You can nest as deep as you’d like, but it’s a good practice to keep it only a level or two to prevent overly specific selectors (which are less useful and harder to override).

Adding another class

The & comes in handy when you’re nesting and you want to create a more specific selector, like an element that has *both* of two classes, like this:

.some-class.another-class { }

You can do this while nesting by using the &.

.some-class {
  &.another-class {}
}

The & always refers to the parent selector when nesting. Think of the & as being removed and replaced with the parent selector. Like this:

The “aha” moment!

Take this Sass:

.parent {
  .child {}
}

This can actually be thought of as short-hand for nesting with the &:

.parent {
  & .child {}
}

So, these two examples both compile to the same thing:

.parent .child {}

The example with the & isn’t anything different than the example without the &. Nesting without the & is shorthand for nesting with it. We can think of the & as a mechanism that allows us to place the parent selector wherever we need it in our child selector. It allows us to nest with alterations. Let’s look at some more examples.

Using the & with pseudo classes

You can write pseudo classes on a class in a much less repetitive way with the &:

.button {
  &:visited { }
  &:hover { }
  &:active { }
}

This compiles to:

.button:visited { }
.button:hover { }
.button:active { }

The & in this case allows us to position .button directly next to pseudo classes without repetition in the authored code. If we left out the & from this example, basic nesting would put a space between them like this…

.button :hover

… which isn’t the same.

Using the & with >, +, and ~

Using the & with the child combinator >, adjacent sibling combinator +, and the general sibling combinator ~ is a breeze. At first I thought you had to use the &, but:

// You don't actually have to do this.
// Here, the ampersand is implied.
.button {
  & > span { }
  & + span { }
  & ~ span { }
}

Leaving the &‘s out of the selector works here:

// This compiles the same as above
.button {
  > span { }
  + span { }
  ~ span { }
}

Both of these examples compile into this CSS:

.button > span { }
.button + span { }
.button ~ span { }

Qualifying based on context

Nested selectors don’t necessarily have to start with the ampersand. You can qualify a selector by putting the & on the right.

.button {
  body.page-about & { }
}

We’re repositioning the parent selector exactly where we need it. This is really useful for qualifying a selector based on a different parent. This will compile to:

body.page-about .button {}

Meaning, select the button class only when a child of a body with a page-about class.

Tweaking the definition of the &

Think of the & as not only being replaced by the parent selector but as being replaced by the *compiled* parent selector.

This is important when nesting more than two levels deep, where more than one level has an &. These next two wacky examples drive this point home.

Wacky but working example #1

Do not write selectors that look like this:

.parent {
  .child {
    & div & & > a {}
  }
}

For each & it will be replaced with the compiled parent selector. Therefore, every time there is an & we’ll insert .parent .child. Here’s the compiled CSS:

.parent .child div .parent .child .parent .child > a {}

Wacky but working example #2

.parent {
  .child {
    .grand-child & {
      &.sibling { }
    }
  }
}

To mentally-compile this CSS, start at the top-most layer and work your way down pealing off the outer layers and replacing the & with the new compiled parent selector.

Here it is compiled:

.grand-child .parent .child.sibling {}

What the & isn’t

I found I was using the & for something it wasn’t from time to time. The & doesn’t allow you to selectively traverse up your nested selector tree to a certain place and only use a small portion of the compiled parent selector that you want to use. I’ve wanted to do something like this before:

.grand-parent {
  .parent {
    &(1) .child {} // Trying to get `.parent`, not `.grand-parent .parent`
  }
}

My intention was for the & to only get replaced with .parent in hopes of compiling to this:

.parent .child {}

But that doesn’t work.

The & is always the fully compiled parent selector.

@at-root to the rescue

It’s worth mentioning that @at-root allows you to break out of your nesting structure entirely to the “root” of your nesting tree.

.grand-parent {
  .parent {
    @at-root .child {}
  }
}

We’ve teleported out of the nesting tree to this compiled CSS:

.child {}

This is nice. From an organizational perspective, all the code is still grouped together, which could be noted as an unsung benefit of nesting. @at-root can help keep specificity levels low because you no longer have the compiled parent selector to increase specificity. All the while still keeping your code conceptually organized with nesting:

.grand-parent {
  .parent {
    @at-root body.page-about .child {}
  }
}

Compiled CSS:

body.page-about .child {}

There’s a few other use cases for the & that can be fun.

Doubling up specificity

Sometimes you need to beat-down the specificity of a 3rd-party CSS library to take ownership of the style:

.parent.parent {}

It’s a lot less overpowering than using and ID, inline style, or !important and it could have benefits over qualifying the selector with an arbitrary parent element. The specificity level isn’t raised based on a selector’s context, but only by itself. With the & you can do that same thing like this.

.parent {
  &#{&} { }
}

The interpolation brackets #{ } are needed as two touching ampersands are invalid Sass.

Modifying the ampersand

Even though you can’t have two ampersands touching without the interpolation brackets — as we demoed earlier in our pseudo class example — you can have another selector touch the ampersand. Touching the ampersand works well with modifier classes.

.btn {
  &-primary {}
  &-secondary {}
}

Compiled CSS:

.btn-primary {}
.btn-secondary {}

This can be quite useful if employing a naming methodology (i.e. BEM) which uses dash and underscore combinated classes rather than combined selectors.

Conclusion

The ampersand combined with nesting is a great feature. Once you know what it’s doing, authoring your Sass can become easier, faster, and less error-prone.

Here’s a couple of other articles specifically about the ampersand, for your reference pleasure:


The Sass Ampersand is a post from CSS-Tricks

Categories: Designing, Others Tags:

Muscula: JavaScript Error Reporting For Your Website

January 12th, 2016 No comments

For quite a while now, JavaScript has established itself as one of the primary languages that web developers speak and work with. More and more websites are coded in JavaScript, and with WordPress developers, too, looking towards JavaScript now, this trend is only expected to grow even more.

So, what happens if your users encounter an error or a bug while browsing your website? Sure, you will fix that error at the earliest, but how will you get to know? Will it not be nice if there were a service that would alert you the minute your website visitors encountered a JavaScript error?

Meet Muscula, a JavaScript error logging service.

Muscula: JavaScript Error Reporting For Your Website

Overview

Muscula is an error logging service that monitors your website in real-time, and alerts you the minute a visitor encounters a JavaScript error. As such, it helps you locate and fix errors that might otherwise go unnoticed, and ensures that your visitors are not greeted by unknown JavaScript errors.

muscula-main

Pretty neat, isn’t it? Let’s see what all it has to offer.

Major Features

Quite obviously, the biggest USP of Muscula is that it captures every single JavaScript error as and when it happens. This means that whether the error occurred during peak traffic hours, or during hours of lesser activity — Muscula will tell you all about it.

Plus, Muscula can translate messages from 34 different languages into English, so localization is not going to be a concern either.

muscula-features

Muscula works with multiple devices and browsers, and once you insert its code on your website, no matter what device your visitors are using — mobile, tablet or desktop — Muscula will monitor it all. There is support for source maps and HTTPS encryption too.

And what about reports and debugging? You can find detailed logs of all errors in your Muscula account’s dashboard, grouped and filtered for easy access and comprehension.

muscula-2

Pricing

Regarding pricing, Muscula has just one single plan. Costing $14 per month, Muscula allows you to monitor and log up to 1,000,000 errors per month — this can be distributed across unlimited websites or restricted to just one website, as per your needs.

The premium plan comes with email notifications and email-based support. If you need to try before you buy, there is a 30-day free trial period that you can make use of to try Muscula before deciding to go ahead with the purchase.

Verdict

So, is Muscula worth the investment?

The answer to the above question depends on the requirements and nature of your web presence. It goes without saying that any website worth its money nowadays relies on JavaScript in some form or the other. However, how exactly are you using JavaScript on your site?

If your project makes use of custom JavaScript code or depends heavily on JavaScript libraries, Muscula is probably going to be your best bet. Why? Well, the answer is simple: no matter how well-coded your work is, and no matter how much revisions and debugging sessions you undertake, bugs and errors can arise out of the blue. In such cases, Muscula can monitor and alert you instantly, thereby saving you from losing business due to an unseen error.

As such, Muscula is comparable to an uptime monitoring service — it monitors your website, not for server uptime, but for JavaScript issues, and alerts you in real time, not for server downtime or outages, but for JavaScript errors and problems.

Therefore, Muscula can help you improve your web development workflow and online business manifolds, by keeping you informed and updated about errors as and when they occur.

However, if your website relies lesser on JavaScript, or probably makes use of scripts that are not custom-coded or have been derived from an otherwise stable configuration, Muscula’s $14 per month pricing might seem overkill for your purpose. Once again, this is pretty much like an uptime monitoring tool: I used free uptime monitors or no uptime monitors for my hobby projects and websites, but for my client work and business sites, the enterprise plan of Pingdom is an essential feature.

The bottom-line here, thus, is that Muscula is by all means a worthy investment if your business or website is seriously reliant upon JavaScript and if an immediate resolution of errors matters to you.

Links

(dpe)

Disclaimer: This article is sponsored by Muscula. They did not take any influence as to what we wrote, however.

Categories: Others Tags:

Moving Along a Curved Path in CSS

January 12th, 2016 No comments

motion-path is specced and already has some support. But there is another way to replicate curved motion paths, as Tobias Ahlin points out:

… if we add a container around the object we want to animate, we can apply one timing function for the X-axis, and another one for the Y-axis. Below, we’re using ease-in for the X-axis, and ease-out for the Y-axis.

Direct Link to ArticlePermalink


Moving Along a Curved Path in CSS is a post from CSS-Tricks

Categories: Designing, Others Tags:

Optimizing SVGs for Web Use

January 12th, 2016 No comments

An in-depth series of posts by Andreas Larsen that walks us through the process of how to (hand) optimize SVGs. He suggests optimizations that it’s unlikely software could do for you. Things like changing the viewBox size to accommodate simple, rounded integers.

Adding this one to our compendium of SVG info.

Direct Link to ArticlePermalink


Optimizing SVGs for Web Use is a post from CSS-Tricks

Categories: Designing, Others Tags:

Safari 9.1

January 12th, 2016 No comments

There are lots of exciting new features rolling out in Safari 9.1 such as support for the picture element, enhancements to the web inspector, CSS variables and gesture events for iOS. Although, what I’m most excited for is the OpenType support with properties such as font-feature-settings and its variants like font-variant-ligatures and font-variant-caps, all of which give us more fine-tuned control over typesetting.

You can play around with these new features in the OSX 10.11.4 and iOS 9.3 betas today.

Direct Link to ArticlePermalink


Safari 9.1 is a post from CSS-Tricks

Categories: Designing, Others Tags:

Designing Adobe Portfolio

January 12th, 2016 No comments

In November 2015 I did a little talk at the School of Visual Arts (SVA) in New York City about designing Adobe Portfolio, and product design. You can watch the talk here. I originally wrote this article in preparation for the talk, but have since expanded upon it to publish here. It aims to introduce the product, share insight into the design process, scans from my sketchbook and some specs/designs from behind the scenes. I hope you find it interesting.

A little intro.

Hello, I’m Andrew. I am the lead product designer and creative director of Adobe Portfolio. I’m going to share with you what myself and a great team of developers at Behance (Adobe) have been working on this past year.

The Adobe Portfolio marketing site

What is Adobe Portfolio?

Basically it’s a product that allows you to quickly and simply create a website to showcase your work, and customise it to suit your style and needs. It’s not a new concept, there are dozens of products out there that do just that. But Portfolio has some key differences:

  • It’s designed specifically for creatives to showcase their portfolio. Meaning it does what you need it to do, simply and quickly.
  • It’s FREE with all Adobe Creative Cloud plans.
  • You can access all of Typekit’s library of fonts, to use on your website.

Portfolio syncs with Behance.

The thing that makes Portfolio most unique is that it syncs with Behance. The idea being that you create a beautiful custom website with Portfolio, and sync your projects to your Behance profile. There you can gain invaluable exposure for your work on a creative platform used by millions of creatives, and people recruiting creatives! But you don’t have to use Behance if you don’t want to?—?you can use Portfolio on its own and choose not to sync with Behance. The choice is yours.

The photography of Matthias Heiderich?—?as seen on Portfolio and Behance

Responsive layouts.

Like any website builder, you need a starting point. So one of the many things we needed to design were layouts geared specifically for showcasing creative work, to act as a foundation that you can easily customise and populate with projects.

The layouts aim to cover a variety of styles to suit different creative fields. They can either be used as an off-the-shelf solution to quickly populate with your projects and publish a website (in minutes), or use the editor’s features to change the structure and appearance to suit your style.

Easily customise the same layout to look very different. Featuring photography by Bryce Johnson

Below are the layouts we’re launching with. The initial layouts (for the public beta and product launch) are very simple, focussing on project covers, galleries and projects. The product will of course grow to offer more features like fullscreen cover images, HTML & CSS editing, blog integration etc… in time. And as the features expand, so too will the variety and number of layouts to choose from as a starting point.

Layouts and the creatives they are named after: Lina, Sawdust, Matthias, Juco, Mercedes and Thomas

We chose to name the layouts after creatives on Behance. We shortlisted creatives whose work lent itself well to a particular layout, and of course was also visually stunning.

I should say, that these layouts were one of the last things to be designed (pre-beta), but I’m leading with them for the sake of this article, to introduce you to what the product does, or at least, its ‘end product’.

The editor.

The product (itself) must enable the user to quickly and simply edit their website, using one of the layouts above as a starting point. The UI is very minimal?—?it gets out of the way and allows you to focus on the design of your website. All changes you make happen live in the editor.

It sounds kinda corny, but I had three things in mind while designing everything from the brand, marketing site, and especially the editor:

Simple, clean and beautiful.

It should empower the user to:

  • Easily edit anything they can see.
  • Manage and add content.
  • Responsively preview their website.
  • Publish and update a live website.

Below are a range of editing scenarios from the product (editor):

Various screens from the editor. Featuring photography by Chris Burkard and design by Andrew Couldwell

The role of a product designer.

My own role as a designer on Portfolio changed pretty dramatically over the year, from concept to launch. As a digital product progresses, so too does your role as a product designer. So to go back to the start:

ProSite.

Portfolio is actually the evolution of an existing Behance product (being retired) called ProSite. It’s 5 years old, so there was a lot that we could learn from that product: What worked well? What didn’t?

Behance Network.

Also, what we’ve learned about the creative community and showcasing work, through designing, curating (and using!) the Behance Network is invaluable in understanding how to build a product like Portfolio.

Understanding your audience is a great starting point.

So I spent a good deal of time absorbing all this knowledge Behance had acquired over the years, and also studying their initial designs for the evolution of ProSite. Asking questions. Making notes. Sketching ideas.

The Behance Network, and ProSite

I always start with a pencil and a sketchbook.

Writing and sketching really helps me to focus, and ideas flow from there. Sometimes I simply write words I associate with the product, or list what it needs to do, just to get it out of my head. It helps to un-clutter the mind and focus on what’s important.

This sketchbook work naturally evolves into UI sketches. Sometimes I’ll sketch a feature, or a small UI detail, or a new approach to the UI entirely. It’s a quick way of purely and simply just designing and exploring ideas. Perhaps most importantly, you don’t get distracted by pixel perfection, fonts, colour, grids, guides etc… like you do while using computer software.

There’s always a point when you know you have enough to take it that step further, and actually start fleshing out these ideas. In the past I’ve used Adobe Illustrator or Omnigraffle for this, to wireframe. But time was tight on this project, so I went straight into Photoshop.

Below are some scans from my sketchbook. Some relate to the product (editor), some to the marketing site and brand:

A few scans from my sketchbook

An interesting image to point out above is the last one (bottom-right). You can see that my sketch is close to what I ultimately designed.

Concepting & prototyping.

All of these ideas and designs are informed and evolved by concepting, prototyping and discussing with the team. It’s good to chat through ideas with other designers and developers, and even the target audience when possible. For example: One particular idea came from me discussing an early (product) design with an MFA illustration student at SVA. A fresh perspective always helps, especially for a product of this complexity.

We were working to pretty intense timeframes on this project. There simply wasn’t time to build any complex prototypes. But what I did do was to create a series of PDF walkthroughs using Layer Comps in Photoshop, showing the mouse cursor move around the screen, demonstrating every interaction, feature and user flow within the product. These allowed developers (and other stakeholders) to critique and/or understand all functionality and the user flow?—?so they knew what was to be built, and also identify any potential flaws in the UI/UX, prior to the build and testing.

Below is (a video of) one example of these PDF walkthroughs:

Prototype/walkthrough showing global customisation in the project editor

Detail in design.

Simply put: Take the guesswork out of it for the developers. Your team needs to understand what needs to be built. It is not their job to fill in the blanks, make it responsive, or guess what happens in any given scenario. I can’t overstate this enough?—?I’ve experienced so many designers designing and considering 20% of a product, and not thinking things through.

In addition to the walkthroughs, user flows and prototypes I talked of earlier, I also like to create detailed specs for all the UI components, features and brand. I feel these are important when you have a large team, so everyone is on the same page, with one central point(s) of reference. The specs aim to cover all scenarios, from rollover states, to errors, active/inactive states etc…, and also cover px values and dimensions (I even go as far as including basic CSS).

Promote/encourage pixel perfection in the build. Lead by example, and set the bar high.

The more detail you include in your designs, the less questions the developers will have, and the less time you will spend managing the build. So you can focus on designing, testing and improving the product.

Also, the nice thing about taking the time to create these ‘UI kits’, is that it’s easier to update the product (design) in the future. There’s no need to update hundreds of mockups, you just update the specs.

Below are a few examples of these styleguides and specs:

Marketing and brand.

Months in now, with the product (editor) designed and being built, I re-focussed my attention to marketing, onboarding and brand. What is this product? How do you get started using it? It needed a voice. An identity.

The name.

When I first joined Behance, this project was somewhat jokingly being called “Prosite 2.0” internally. The ProSite product served its time, but its successor had grown into a different beast. Besides their connection with Behance, they were very different products and had no 1:1 correlation. This was not a re-design/launch. We were building an exciting new product from the ground up, and retiring ProSite. That was important to convey?—?and that starts with the name.

I went back to my sketchbook, and went through a word association exercise of writing down everything this product did, and also what language every similar product on the market was using. The natural progression of all these kept coming back to “Portfolio”. So after some thought, I concluded: ‘Why not?!’?—?it does exactly what it says on the tin. It’s a website creator/editor designed specifically for creating a portfolio. The simplicity and boldness of the name married up well to the design and values of the product. And so we called it ‘Portfolio’, which soon became ‘Adobe Portfolio’ to fit with Adobe’s suite of products.

The marketing site home page featuring a photo by Tanya Timal

The brand.

Portfolio very much has its own identity and personality. Portfolio is not a corporate product (so to speak). It’s white label. It’s yours, to make your own. It’s friendly, simple and approachable. The brand, marketing site, onboarding, copywriting and messaging throughout the (product) user experience all attempt to convey this through the language used, typography, grid, imagery and colours.

Other scenarios include lighthearted messaging and humorous imagery. Project photo by dua?—?Alexander Esslinger

Responsive design.

Going back to my earlier point about detail in design: Web design, just like product design, should have the same attention to detail. In this case, it’s of course important that the marketing site is responsive, but it’s not the developers’ job to figure out how a website responds at different screen sizes.

You’ll be the developer’s best friend if you take the guesswork out of it for them. Believe me 🙂

Below are a few examples of the responsive designs, delivered to the developers to build myportfolio.com:

Responsive designs for the marketing site, showing an early version of the brand identity

View a full case study of the marketing site here

Responsive designs for a couple of the layouts, covering different scenarios

View a full case study of the layouts here

User testing.

A digital product should evolve to suit the people using it, accounting for user behaviour, to give the best user experience. Ideally, products will go through an alpha/beta phase (limited releases) before they launch to everyone. We did this with Portfolio. This helped us to weed out issues, learn if the UI/UX ‘worked’ and gain real user feedback with the intention of improving the product. It’s best to test, learn and refine with a limited user group, than to launch to thousands/millions of people and discover problems when it’s too late.

Test. Learn. Revise. Repeat.

This is important in product design. You learn so much from people using the product.

The best way to know if it works is to use it.

You’ll be amazed what you discover:

052

…People don’t always use a product how you anticipated they would!

  • You learn,
  • You improve,
  • You iterate on the product,
  • You keep testing,
  • And repeat this process.

And honestly, sometimes it does feel a little like this:

053

…But the product will be better for it.

In conclusion.

If I was to take anything away from this it would be:

Slow down.

Get inspired. Understand your audience. Make notes. Sketch ideas.

Concept.

Work with your team. Explore ideas. Think it through.

Detail in design.

Someone (else) needs to build what you design.

Test and improve.

Does it work? How can it be improved? It can always be improved.

Learn.

Always. Every experience in design is a good learning experience.

[– This article was originally posted at Medium.com, republished with the author’s permission –]

Amazing Flame & Light Effects with Flame Painter 3 – only $9!

Source

Categories: Designing, Others Tags:

Forbes.com Recently Served Malware in Ads

January 11th, 2016 No comments
forbes-logo

Of late, Forbes.com had been asking its users to disable ad blockers (if any) in order to browse its website. Thus, if you had extensions such as AdBlock enabled in your browser and visited Forbes, you’d not be able to access the content until you disabled AdBlock.

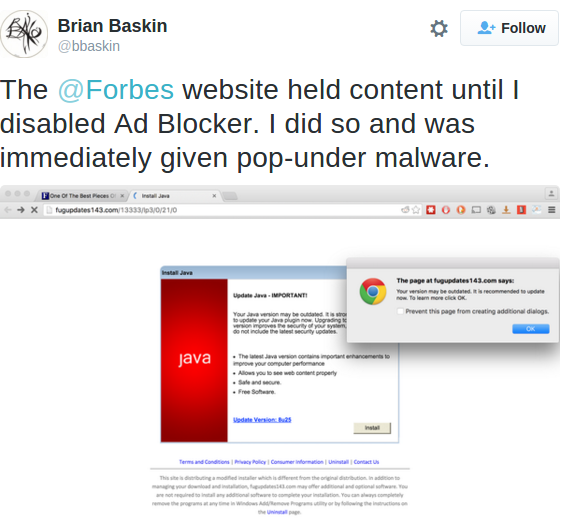
Many users did oblige and disabled their ad blockers, and this is where it got interesting: Forbes.com served ads, and along with that, malware.

You read that right.

As observed by a user Brian Baskin, Forbes.com served malware with its adverts to users, once the ad blockers were disabled. Basking posted a screenshot on Twitter, you can check it out here.

forbes-ad

Was Forbes.com hacked? Nope.

Apparently, just like many other enormous websites, Forbes too relies on third-party ad networks that serve advertisements via ad providers. However, most of these ad networks sign agreements with ad providers who, in turn, sign agreements with advertising clients. As such, the ad networks and/or the ad providers do not actually *serve* the ads themselves, but instead, act as outlets or channels for interested advertising partners or clients.

Since multiple parties are involved, it is not a surprise that malicious content can find its way via ads, even without having to compromise the target website (in this case, Forbes.com). In fact, such malware, if disguised as advertisements, can even serve itself over HTTPS, making it even more difficult to detect.

Lastly, if you were one of the users who turned off their ad blockers for browsing Forbes.com, be sure to run a scan on your device, because such malware does not require users to “click” on the advertisement in order to infect the user’s machine.

Whatever happened to Forbes is not unique, and is not due to the fault of Forbes itself. However, insisting that users turn off their ad blockers in order to access content is slightly far-fetched, and not many users will be happy with such demands.

What do you think of this incident? Be sure to share your views in the comments below!

Read More at Forbes.com Recently Served Malware in Ads

Categories: Designing, Others Tags:

The Vital Guide To Visual Design Interviewing

January 11th, 2016 No comments
toptal-blog-image-1444219661537.2-01__1_-94b2349c88574a6d13a96418c641cbee.jpg

Visual designers are foremost interdisciplinary experts; their expertise covers both digital and print. Their work focuses on details and their final goal is impeccable visual communication. Function and form are achieved through carefully understanding and dissecting briefs and goals from their clients, copywriters, strategists and creative directors.

They design big and small branding projects from the ground up, create and develop campaigns, lead a team of designers, provide quality art and creative direction, and design apps, websites and onsite digital experiences.

Visual designers create big and small branding projects from the ground up.

Visual designers create big and small branding projects from the ground up.

In-depth knowledge of typography, iconography, color, space and texture are essential for creating a great visual experiences that inspires, engages and excites both offline and online users.

Design is subjective, therefore, when being interviewed, designers need to show insight, courage and their thought process; the reasoning behind the decisions and processes is sometimes more important than the result itself. The result of design work is a combination of many factors: Creative and art directors, clients, public and project goals.

This way we can learn more about, and from, the designer and understand the way s/he works.

When discussing “visual design” in these circumstances, it’s not, and cannot in any way be simply how something looks. Function and form should be questioned during all stages of the design process.

When evaluating a visual designer’s portfolio, it is necessary that context and ideation behind a project is shown and explained. Reviewing a portfolio is just the first step of the screening process and helps us determine a designer’s approach.

The Challenge

Visual design is the process of visual communication and creative problem-solving through the use of type, space, image, shape, line, texture, color, material. A great visual designer is capable of creating a meaningful, effective, attractive and inspiring visual representation of ideas and messages. The design process doesn’t only rely on form, and a given problem or a brief, but the study of the problem, research, and analysis will give the solution and form to the project.

Visual Designers work closely with UX and UI designers, copywriters, strategists and clients. They are capable of translating insights, briefs and data into cohesive, straightforward visual communication that adds value.

Visual designers are interdisciplinary experts. They provide quality art and creative direction.

Visual designers are interdisciplinary experts. They provide quality art and creative direction.

A good visual designer will be an expert in:

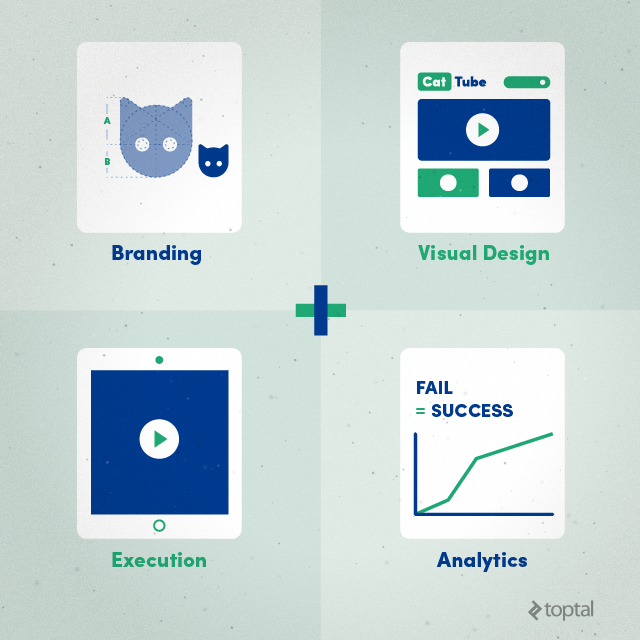
Branding:

  • Corporate identity design
  • Logo design
  • Style Guide design and creation
  • Ensuring consistency across design platforms

Visual Design:

  • Applying branding across visual content
  • Collaborating with UI designers to ensure consistent brand application
  • Guiding visual identity throughout a company and product

Execution and Analytics:

  • Coordination with UI/UX Designer(s)
  • Coordination with Developer(s)
  • Coordination with copywriter(s)
  • Coordination with Art and Creative Director
  • Tracking Goals and Integration
  • Analysis and Iteration
  • Print management

These sets of skills can be translated in various mediums and platforms for which they should deliver:

Concept

  • Strategy
  • Naming
  • Copywriting
  • Photography
  • Development

Design

  • Logo
  • Visual identity
  • Web design
  • Illustration
  • Editorial (books, magazines, brochures etc.)
  • Packaging
  • Signage and wayfinding
  • Type design and lettering
  • Information design and visualization

Of course, not every designer will cover all fields, but it’s the understanding of these particular fields, and the ability to direct and guide the design process, that sets apart great designers.

It's vital to evaluate visual designers' soft skills and their design process.

It’s vital to evaluate visual designers’ soft skills and their design process.

Specialization among designers is common; they can be pragmatic, rational and minimalist in their approach, but that doesn’t mean their output is necessarily so. Their work can be driven by illustrations, or they can use an organic and free approach to design problems, solving them as they emerge. This is why it is vital to examine a designer’s thought process.

When interviewing senior visual designers, it is important to evaluate their soft skills and their design process.This set of questions will help determine if a designer is a fit.

Q: Can you tell us more about your design background?

There is no correct answer here. Finding out more about the designer’s background can mean from his general introduction can provide us with relevant information about the design school the candidate attended, past/current work positions, design experience, problems and projects that s/he found along the way. The interview can be structured more towards the end, adjusting questions along the way, based on information revealed by the designer.

Q: Why did you become a designer?

When discussing this theme, the energy, and imagination behind the answers will give you an idea of the designer’s character and spirit.

Q: What is your design approach?

The design process is essential to how design candidates develop and create their work. Insight and the way they work can distinguish their quality. As the design process becomes more thorough, the results become more elaborate and detailed.

Also, the design process is often limited by budget and time, and a useful insight would be how s/he and the design teams that s/he has worked with in the past handled various situations and briefs.

Q: How would you describe your design research?

When discussing design research, it is necessary to cover all the angles that the candidate understands, and explain the reasoning why s/he decided to use a particular technique, tool, or way of thinking to achieve a result.

Nevertheless, if a designer received the data via the client, copywriter, strategist, or UX designer, it will be necessary to conduct further research that will confirm the designer’s statements, possibly upgrading the outcome.

Q: What software do you use, and when?

Standard skills are a must, from Adobe to Sketch, but look for the extra during an interview. Processing, illustration, animation, video, art skills, and the like that bring extra potential to specific clients and projects.

Q: What field, industry, type of work do you prefer?

From digital to print, 360 solutions, from social causes to luxury designers, pinpoint the candidate’s interests and preferences, and build up the talk to personal goals, projects goals and things they want to do and create but hadn’t had a chance to do.

Q: What do you think of (x) project?

Suggest a few projects, or ask a designer to select a project and then dissect it. The candidate should be able to pick it apart. Listen for the answers that explain context, goals, references, influences and pure aesthetics as well as identifying problems, solutions, and outcome of the chosen direction. If the candidate can elaborate with quick solutions to a set of specific problems, that’s even better.

Q: What areas of your work or personal development are you hoping to explore further?

Discuss areas of personal development, with emphasis on visual design. How would the designer become even better, branch out into different areas and expertise of the design spectrum?

Q: How would you describe your work and your influences?

Look for elaborate and interesting stories, search for passion for design and design thinking. References to history, design history, art, culture, music and architecture are useful when describing choices, intentions and solutions.

Q: Portfolio critique: Please explain three best projects from your portfolio

The candidate needs to explain the entire design process, the decisions, ideation, context, why’s, do’s and dont’s, by describing the production and execution of a specific project. Question the designer’s decisions to discover details of projects and the reasoning behind these decisions. Ask how the designer would have made those projects even better.

Read More at The Vital Guide To Visual Design Interviewing

Categories: Designing, Others Tags: