Archive

Archive for February, 2016

Adobe Stock: The Best Stock Photo Provider (Not Only) For Creative Cloud Users

February 3rd, 2016 No comments

Last year, Adobe started their image service Adobe Stock with multiple millions of royalty-free photos, illustrations, and videos. This happened with Adobe having purchased stock photo provider Fotolia, thus paving the way for Adobe’s image service. Adobe Stock has become a firm part of the Creative Cloud. But what exactly is Adobe Stock capable of? Where are the advantages over Fotolia and other services? What are the prices of the images and how big is the assortment?

50 Million Images from Fotolia

Because Adobe bought Fotolia, Adobe Stock was able to start immediately with a wide variety of photos on offer. The entire Fotolia “Standard Collection” is part of Adobe Stock’s assortment. This includes around 50 million photos and illustrations. Recently, the videos of the “Standard Collection” were added as well.

However, the “Infinite Collection”, which contains material from renowned photo agencies, as well as the “Instant Collection” with photos taken via smartphone, remain exclusive to Fotolia.
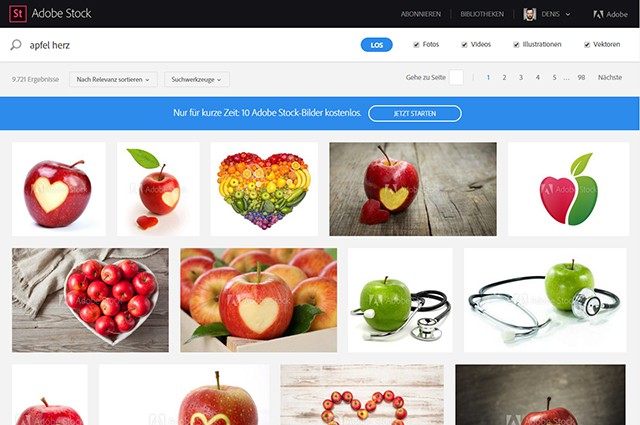
adobe-stock_suche
Search on the Adobe Stock Website

When searching for suitable material, you can filter the results and only have photos, illustrations, videos or vector graphics be displayed. Furthermore, there are additional search filters to only show a certain image orientation – upright or horizontal format – or color. You can also specifically search for images with people or without people on them. In addition to that, there are pre-set categories that help you limit the results when searching so that you only find suitable images.

Using Adobe Stock Directly from the Creative Cloud

The unique thing about Adobe Stock is its integration into the Creative Cloud. This way, you have direct access to Adobe Stock in Photoshop, InDesign, and other Creative Cloud applications. The libraries, introduced in 2015, allow you to save assets such as colors, formats and graphics.

The Creative Cloud synchronizes everything that has been collected in the libraries so that all assets are available for all applications. You can use these libraries to search for photos in Adobe Stock, and you can add fit photos as a preview directly within your libraries.
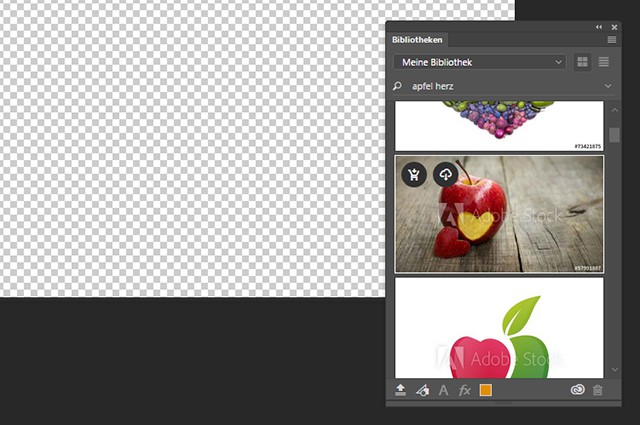
adobe-stock_photoshop_bibliothek
The Search Via Libraries in Photoshop

You also have the option to directly deposit photos as a preview in one of your Creative Cloud libraries when searching on the Adobe Stock website. Alternatively, you can just download preview images to your computer. All preview images contain a watermark and are only available in low resolution. In contrast to the Fotolia preview images, however, the resolution and quality of Adobe Stock previews is significantly higher.

adobe-stock_vergleich
Comparison of the Preview Images of Adobe Stock and Fotolia

While the preview images of Fotolia are barely ever usable to realize presentable drafts with, the ones from Adobe Stock have a significantly better resolution and are available in high quality. This is a significant advantage over Fotolia.

Simple and Fast Workflow

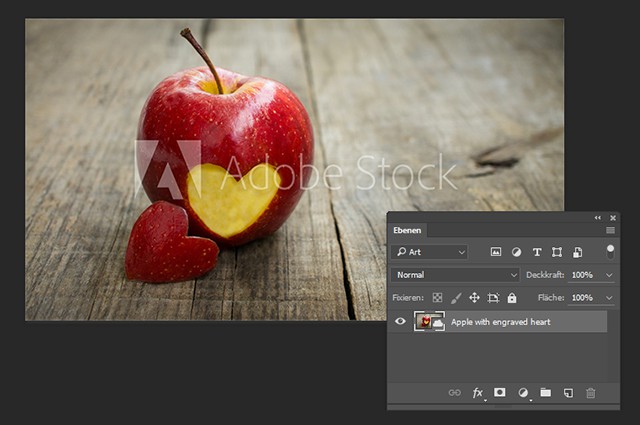
Images that you save into your library directly from Adobe Stock are available as a linked smart object. You can edit these images in Photoshop and apply filters or corrections, for example. However, tools like the eraser or the copy stamp are not available. To use these, you have to rasterize the smart object.
adobe-stock_photoshop_smartobjekt
A Linked Smart Object Placed in Photoshop

The linked smart object has more advantages, however. As soon as you license the used image, Adobe Stock turns the preview image into a high-resolution image and removes the watermark. Thus, you don’t need to manually replace the preview image. This eases the workflow and saves a good amount of time. Wherever you used the preview image, including all files and applications, it will be replaced with the licensed image.

Simple Licensing Model

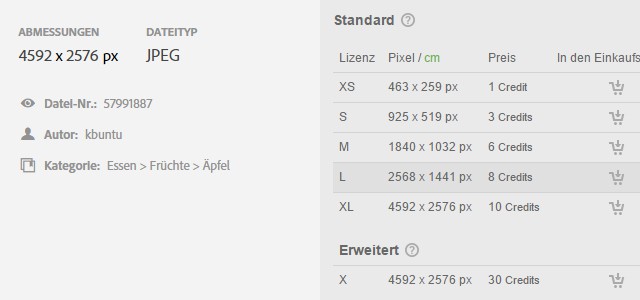
While you need to decide on different licenses for every photo when using Fotolia, Adobe Stock offers a very simple model. Instead of providing pictures in various resolutions with various licensing – for Fotolia, there are six standard licenses and one extended license -, Adobe Stock only offers one license which provides the image in the highest resolution possible.

The Adobe Stock license is equal to Fotolia’s Standard license in its highest resolution

When using Adobe Stock, you also don’t pay with credits. A single Adobe Stock image costs 9,99 Euro by default. There is a monthly subscription for Creative Cloud users that offers ten photos for 29,99 Euro. The standard price of this subscription is 49,99 Euro for those who are not subscribed to the Creative Cloud.
adobe-stock_lizenz
Comparison of Adobe Stock’s and Fotolia’s Licensing Models

A price comparison between Fotolia and Adobe Stock is difficult as the credits that you need to purchase to buy images on Fotolia have different prices. One Fotolia credit costs between 1,35 Euro and 74 Cent, depending on how many you buy. You need to choose the XL or XXL license when buying a full-resolution image on Fotolia. Some photos are only available as an XL license. Most of the time, you’ll pay ten credits for an XL license which is between 13,50 and 7,40 Euro. With Adobe Stock, you always pay 9,99 Euro without a subscription.

Those that require photos on a regular basis get a good deal with their Creative Cloud subscription. Here, you’ll pay 2,99 Euro per photo. By the way, it is also possible to buy more than ten photos a month when using the subscription that’s 29,99 Euro a month. Every additional photo will only cost 2,99 Euro as well.

Conclusion

Adobe Stock has some decisive advantages over other stock providers. The close connection to the Creative Cloud creates a fast and simple workflow. The preview images have a much better quality than the Fotolia ones and the unique subscription for Creative Cloud users guarantees photos for a bargain price. That means that there is enough reason to give Adobe Stock a try. For CC users, it’s a no-brainer anyway…

(dpe)

Categories: Others Tags:

Uber relaunches with a new brand identity

February 3rd, 2016 No comments

Uber has relaunched its brand, with a new logo, identity, app icons, and site designs. One of the most well-known startups in the world, and not always for the right reasons—with allegations ranging from unfair business practices, to assaults on customers—it’s essential for the company that it establishes a positive brand message.

Uber’s growth over the last few years has been extraordinary, and to maintain that growth they need new customers. Moving from luxury service, to affordable luxury, to just affordable, they have been able to expand their target demographic substantially. However the original branding hadn’t evolved with the business model, so this update is intended to more accurately represent how Uber perceives itself.

All of this sounds like a positive approach to a growing company. However, the Uber rebrand misses the spot when it comes to implementation; as part of its redesign, Uber has two new app icons; one for ‘riders’, and one for ‘partners’. Both of which look like something from a sci-fi reboot of Pac-Man. The abstract street elements add a touch of interest, but both marks are very corporate, and more than a little aggressive.

Uber’s new app icons, for riders (left) and partners (right).

Attempting to build a brand narrative, Uber is now talking about ‘bits’ and ‘atoms’. Elements so fundamental, that only the most ego-centric could possibly interpret them as a metaphor for a company. The trouble for Uber is that it’s impossible to cast a stone in San Francisco without hitting a startup that thinks the atom is a perfect metaphor for its business model.

[The atom] belied what Uber actually is—a transportation network, woven into the fabric of cities and how they move. — Uber

By reducing the company to an atomic level, it suggests that Uber can become anything; the flip side is that it’s also the ultimate non-committal statement. Uber doesn’t really know the direction it’s heading in, and is keeping its options open.

Uber’s Mexico-specific branding.

Where Uber is getting it right is with its country brands. Different textures, architectural features, and colors have been incorporated into national-variations on the brand. Something that works well in Australia, may not work well in Iceland, and it’s testament to the cultural variations (color especially) that need to be addressed by global businesses. Eventually Uber plans to extend these national identities to city-specific identities

Uber’s China-specific branding.

Uber’s logotype has also been refined; removing finials, rounding corners, and adjusting spacing. It’s a nicely executed revision that feels more grown up, less startup. This aspect of the redesign is also successful.

Uber’s old (left) and new (right) logotypes.

Uber’s website has also been updated, with fresh images and the new brand assets. It is extremely corporate, and heavily inspired by Google’s Material Design. It feels cold, and a million miles away from Uber’s brand statements about personal journeys. The website feels like a huge missed opportunity to create something personal — finding a ride for example, doesn’t even auto-detect what country you’re in, let alone your city. There has been a lot of discussion lately on whether parallax is a wise design decision. Parallax was overdone and dated at the start of 2015, but by the end of the year an increasing number of sites were rediscovering it. Uber has gone for it in a big way, on their brand guide microsite, whilst it’s not a site most people will visit, it’s interesting that they chose to embrace parallax here.

Uber is one of those startups that’s no longer really a startup. And the rebrand released this week is a lot like a band’s notoriously difficult second album: you put everything into the first release, and then struggle to find your identity with the follow-up.

Uber had the opportunity to define itself, and its role for the next decade or two, but in an effort to distance themselves from their exclusive old branding, their identity has become far too open ended.

Create the Perfect Keyboard Shortcuts with TextExpander for Mac – only $22!

Source

Categories: Designing, Others Tags:

Pen Tool Vs. Live Trace: The Big Comparison

February 3rd, 2016 No comments

In this tutorial, I will teach you how to work digitally on an image you draw by hand. You will learn two completely different ways to approach the image: through the Live Trace Tool and the Pen Tool. Two ways, two results. Learn how to take the best from both.

Pen Tool Vs. Live Trace: The Big Comparison

Along the way, I will give you some Photoshop tips, too. The first thing you’ll need to know is how to manage your drawing in Photoshop and which are the best ways to prepare it for Illustrator. If you are not comfortable drawing in Photoshop, don’t worry! You can download my drawing in high-resolution, skip the Photoshop step and go straight to step 2 to begin with Illustrator.

The post Pen Tool Vs. Live Trace: The Big Comparison appeared first on Smashing Magazine.

Categories: Others Tags:

Building & Maintaining OUI (Optimizely’s UI Library): Part 2/2

February 3rd, 2016 No comments

The following is a guest post by Daniel O’Connor. Daniel shares more about OUI, the UI library by Optimizely Tom Genoni introduced in Part 1.

Over a year ago we set out on a mission at Optimizely to unify our product design and get a handle on our ever-increasing CSS payload. Fellow UI Engineer Tom Genoni spearheaded this effort in 2014 and created our Sass framework called OUI.

We first integrated OUI into a small part of the Optimizely application and gradually added it to the entire A/B Testing product in the months that followed. We have since developed an entire new product, and a handful of smaller ones, using the framework. This increase in scope presented unique challenges and required us to improve our implementation strategy.

In Part 1, Tom wrote about the high-level steps it took to build and evangelize OUI. In this post I’ll discuss the Sass architecture decisions we made and processes we added that have allowed us to scale OUI.

The Anatomy of OUI

OUI was created outside of the Optimizely codebase and lives in its own repository on GitHub. The architecture allows developers to easily modify the default styles by overriding variables and to create partials (components and objects) that play nicely with the framework.

The root `my_app.scss` file combines variables and partials from both OUI and the local project.

This figure above shows how we typically integrate OUI into an application. In practice, the `my_app.scss` file typically looks like this:

// [1] Import OUI and app functions and mixins
@import 'oui/partials/elements/functions';
@import 'oui/partials/elements/mixins';
@import 'my_app/partials/elements/functions';
@import 'my_app/partials/elements/mixins';

// [2] Import OUI and app variables
@import 'oui/oui-variables';
@import 'my_app/my_app-variables'; 

// [3] Import OUI and app partials
@import 'oui/oui-partials';
@import 'my_app/my_app-partials'; 

// [4] Import OUI trumps
@import 'oui/partials/trumps/background';
@import 'oui/partials/trumps/borders';
@import 'oui/partials/trumps/layo	ut';
@import 'oui/partials/trumps/margin';
@import 'oui/partials/trumps/padding';
@import 'oui/partials/trumps/sizing';
@import 'oui/partials/trumps/type';

A few notes about the SCSS above:

  1. We first import OUI’s mixins and functions followed by any custom ones we need.
  2. OUI’s variables load right before our app’s variables. This allows us to amend or override existing variables and introduce custom ones.
  3. This is the meat of the file. The first partial imports all of OUI’s base rules, components, and objects whereas the the second imports code custom to our product. By listing them here we ensure they pick up all default variables along with any added or changed by our app’s variables.
  4. Trumps, our utility classes, are loaded last because they perform a specific job and should not be overwritten.

Version 1: Basic Integration of OUI with npm

Hosting OUI on GitHub gives us the freedom to easily integrate it into projects using npm, and at first we only used it to pull in the most-recent OUI commit from GitHub that would work in the Optimizely application:

npm install --save git://github.com/optimizely/oui.git#commit-hash

In fact, any GitHub repository can be installed as a dependency using this method. And specifying the commit hash is a lightweight way to prevent breaking changes in OUI from automatically being pulled in. Using this process, references to OUI in `my_app.scss` are pointed to the `node_modules/` directory, the default install location for npm.

// Before:
@import 'oui/partials/elements/functions';

// After:
@import 'path/to/node_modules/oui/partials/elements/functions';

Alternatively we could symlink `oui/` to `path/to/node_modules/oui/`.

This basic approach worked for a few months, but questions arose as we began adding OUI to other projects. How can applications automatically pull in OUI bug fixes and other non-breaking changes? How can we provide context when upgrading to a new version of OUI? And how can we keep documentation up-to-date while moving quickly? We knew we could do better!

Version 2: Advanced Implementation of OUI

To make OUI truly robust and developer friendly, we built on our previous work and took advantage of a number technical tools and best practices. Though these steps are more advanced, we found them to be indispensable.

  1. Using npm and Semantic Versioning
  2. Adding a change log
  3. Implementing a build system
  4. Creating a living documentation solution

Versioning

OUI has been in development for over a year, but breaking changes are still common. A breaking change, such as renaming flexbox classes, can require hours of careful find and replaces to support in a large codebase.

As previously mentioned, we initially pulled in OUI from GitHub using npm and included a commit hash to prevent breaking changes from automatically getting fetched. This solution is slow because it requires updating the commit hash in an application’s `package.json` for each new change. Ideally, backwards compatible changes such as bug fixes and new components should automatically be pulled in.

We accomplished this by publishing OUI on npm, following Semantic Versioning in our version numbers, and configuring NPM to accept minor and patch changes. Contributors to OUI identify breaking changes and change version numbers accordingly.

Keeping a Change Log

Upgrading to the latest version of OUI within a project can be difficult without context or clean release notes. We created a change log (based on Keep a Changelog) to track all commits and pull requests. This makes it easy to generate helpful release notes that help developers implementing OUI know exactly what they have to fix or change when bumping up a full version.

Linting and Compiling SCSS with Travis CI

We use scss-lint to maintain a consistent style and run node-sass to ensure the SCSS compiles. We have integrated the basic lint and compile checks into GitHub pull requests using GitHub’s Travis CI integration.

This ensures the code is clean and prevents glaring bugs from being merged. It also has the added benefit of automating part of the code review process, allowing reviewers to focus on the important parts.

Creating Living Documentation

We have dozens of engineers that use OUI. To ensure everyone can use the framework, we must have well-documented code. We use ScribeSass, a node.js module built in-house, to auto-generate a documentation website (not live yet) based on comments in the SCSS files code. We’ll be releasing it as an open-source project soon.


We introduced OUI to the Optimizely codebase over a year ago. The architecture decisions that make OUI flexible and the investment in tooling and processes has allowed us to integrate it in five repositories, easily onboard new contributors, and enable a team of software engineers to write HTML without introducing new CSS.

We encourage you to poke around the repository on GitHub, read our CONTRIBUTING.md and README.md files, and reach out with questions!


Building & Maintaining OUI (Optimizely’s UI Library): Part 2/2 is a post from CSS-Tricks

Categories: Designing, Others Tags:

CSS-Tricks is a Poster Child WordPress Site

February 3rd, 2016 No comments

I like other CMS’s. I promise. But WordPress is super perfect for all the things I need and want to do around here on CSS-Tricks.

Direct Link to ArticlePermalink


CSS-Tricks is a Poster Child WordPress Site is a post from CSS-Tricks

Categories: Designing, Others Tags:

The Scooter Computer

February 3rd, 2016 No comments

When we initially deployed our handbuilt colocated servers for Discourse in 2013, I needed a way to provide an isolated VPN channel in for secure remote access and troubleshooting. Rather than dedicate a whole server to this task, I purchased the inexpensive, open source firmware friendly Asus RT-16 router, flashed it with the popular TomatoUSB open source firmware, removed the antennas, turned off the WiFi and dropped it off in our colocated rack to let it act as a dedicated VPN access point.

And that box – which was $100 then and around $70 now – worked well enough until now. Although the version of OpenSSL in the 2012 era Tomato firmware we used is not vulnerable to Heartbleed, it’s still getting out of date in terms of the encryption it supports and allows. And Tomato itself is updated sporadically, chaotically at best.

Let’s face it: this is just a little box that runs a chopped up version of Linux, with a bit of specialized wireless hardware and multiple antennas tacked on … that we’re not even using. So when it came time to upgrade, we wondered:

Why not just go with a small box that can run a real, full Linux distro? Wouldn’t that be simpler and easier to keep up to date?

After doing some research and asking on Twitter, I discovered there are a ton of amazing little Broadwell “mini-PC” boxes available on AliExpress.

The specs are kind of amazing for the price. I paid ~$350 each for the ones I selected:

  • i5-5200 Broadwell 2 core / 4 thread CPU at 2.2 Ghz – 2.7 Ghz
  • 8GB DDR3 × 2 = 16GB RAM
  • 128GB M.2 SSD
  • Dual gigabit Realtek 8168 ethernet
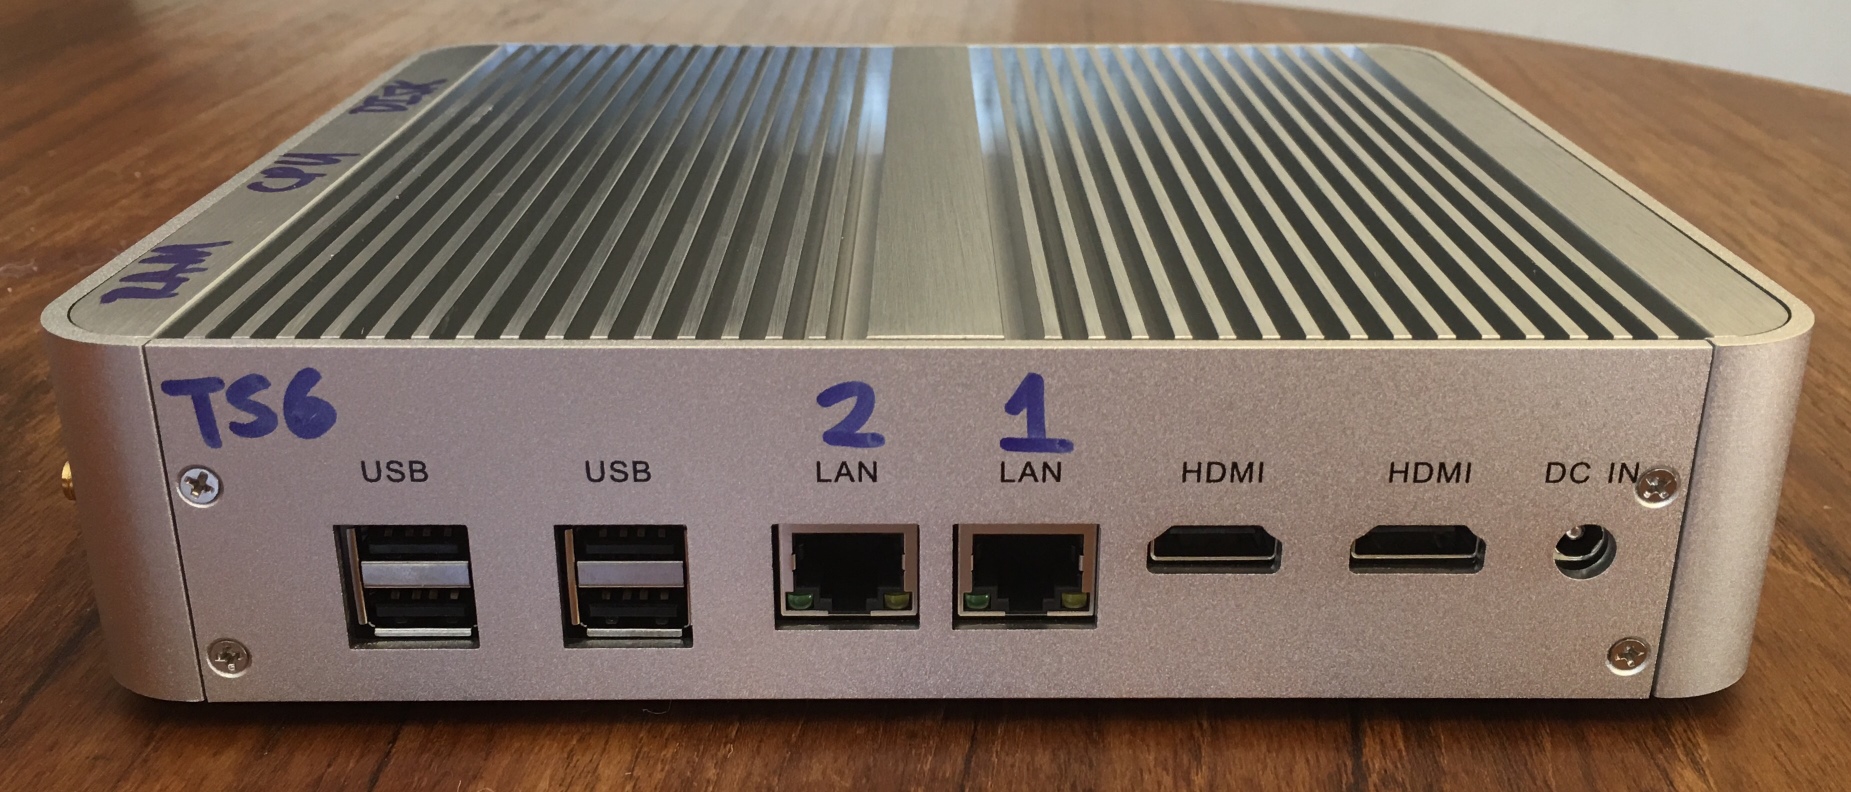
  • front 4 USB 3.0 ports / rear 4 USB 2.0 ports
  • Dual HDMI out

(There’s also optical and analog audio connectors on the front, as well as a SD card reader, which I covered with a sticker since we had no need for audio. I also stripped the WiFi out since we didn’t need it, but it was included for the price, too.)

Selecting the i5-4258u, 4GB RAM, and 64GB SSD pushes the price down to $270. That’s still a solid CPU, only a single generation behind Intel’s latest and greatest Skylake, and carrying the midrange i5 moniker; it’s no pushover. There are also many, many variants of this box from other AliExpress sellers that have slightly older, cheaper CPUs that are still plenty powerful. You can easily spec a box similar to this one for $200.

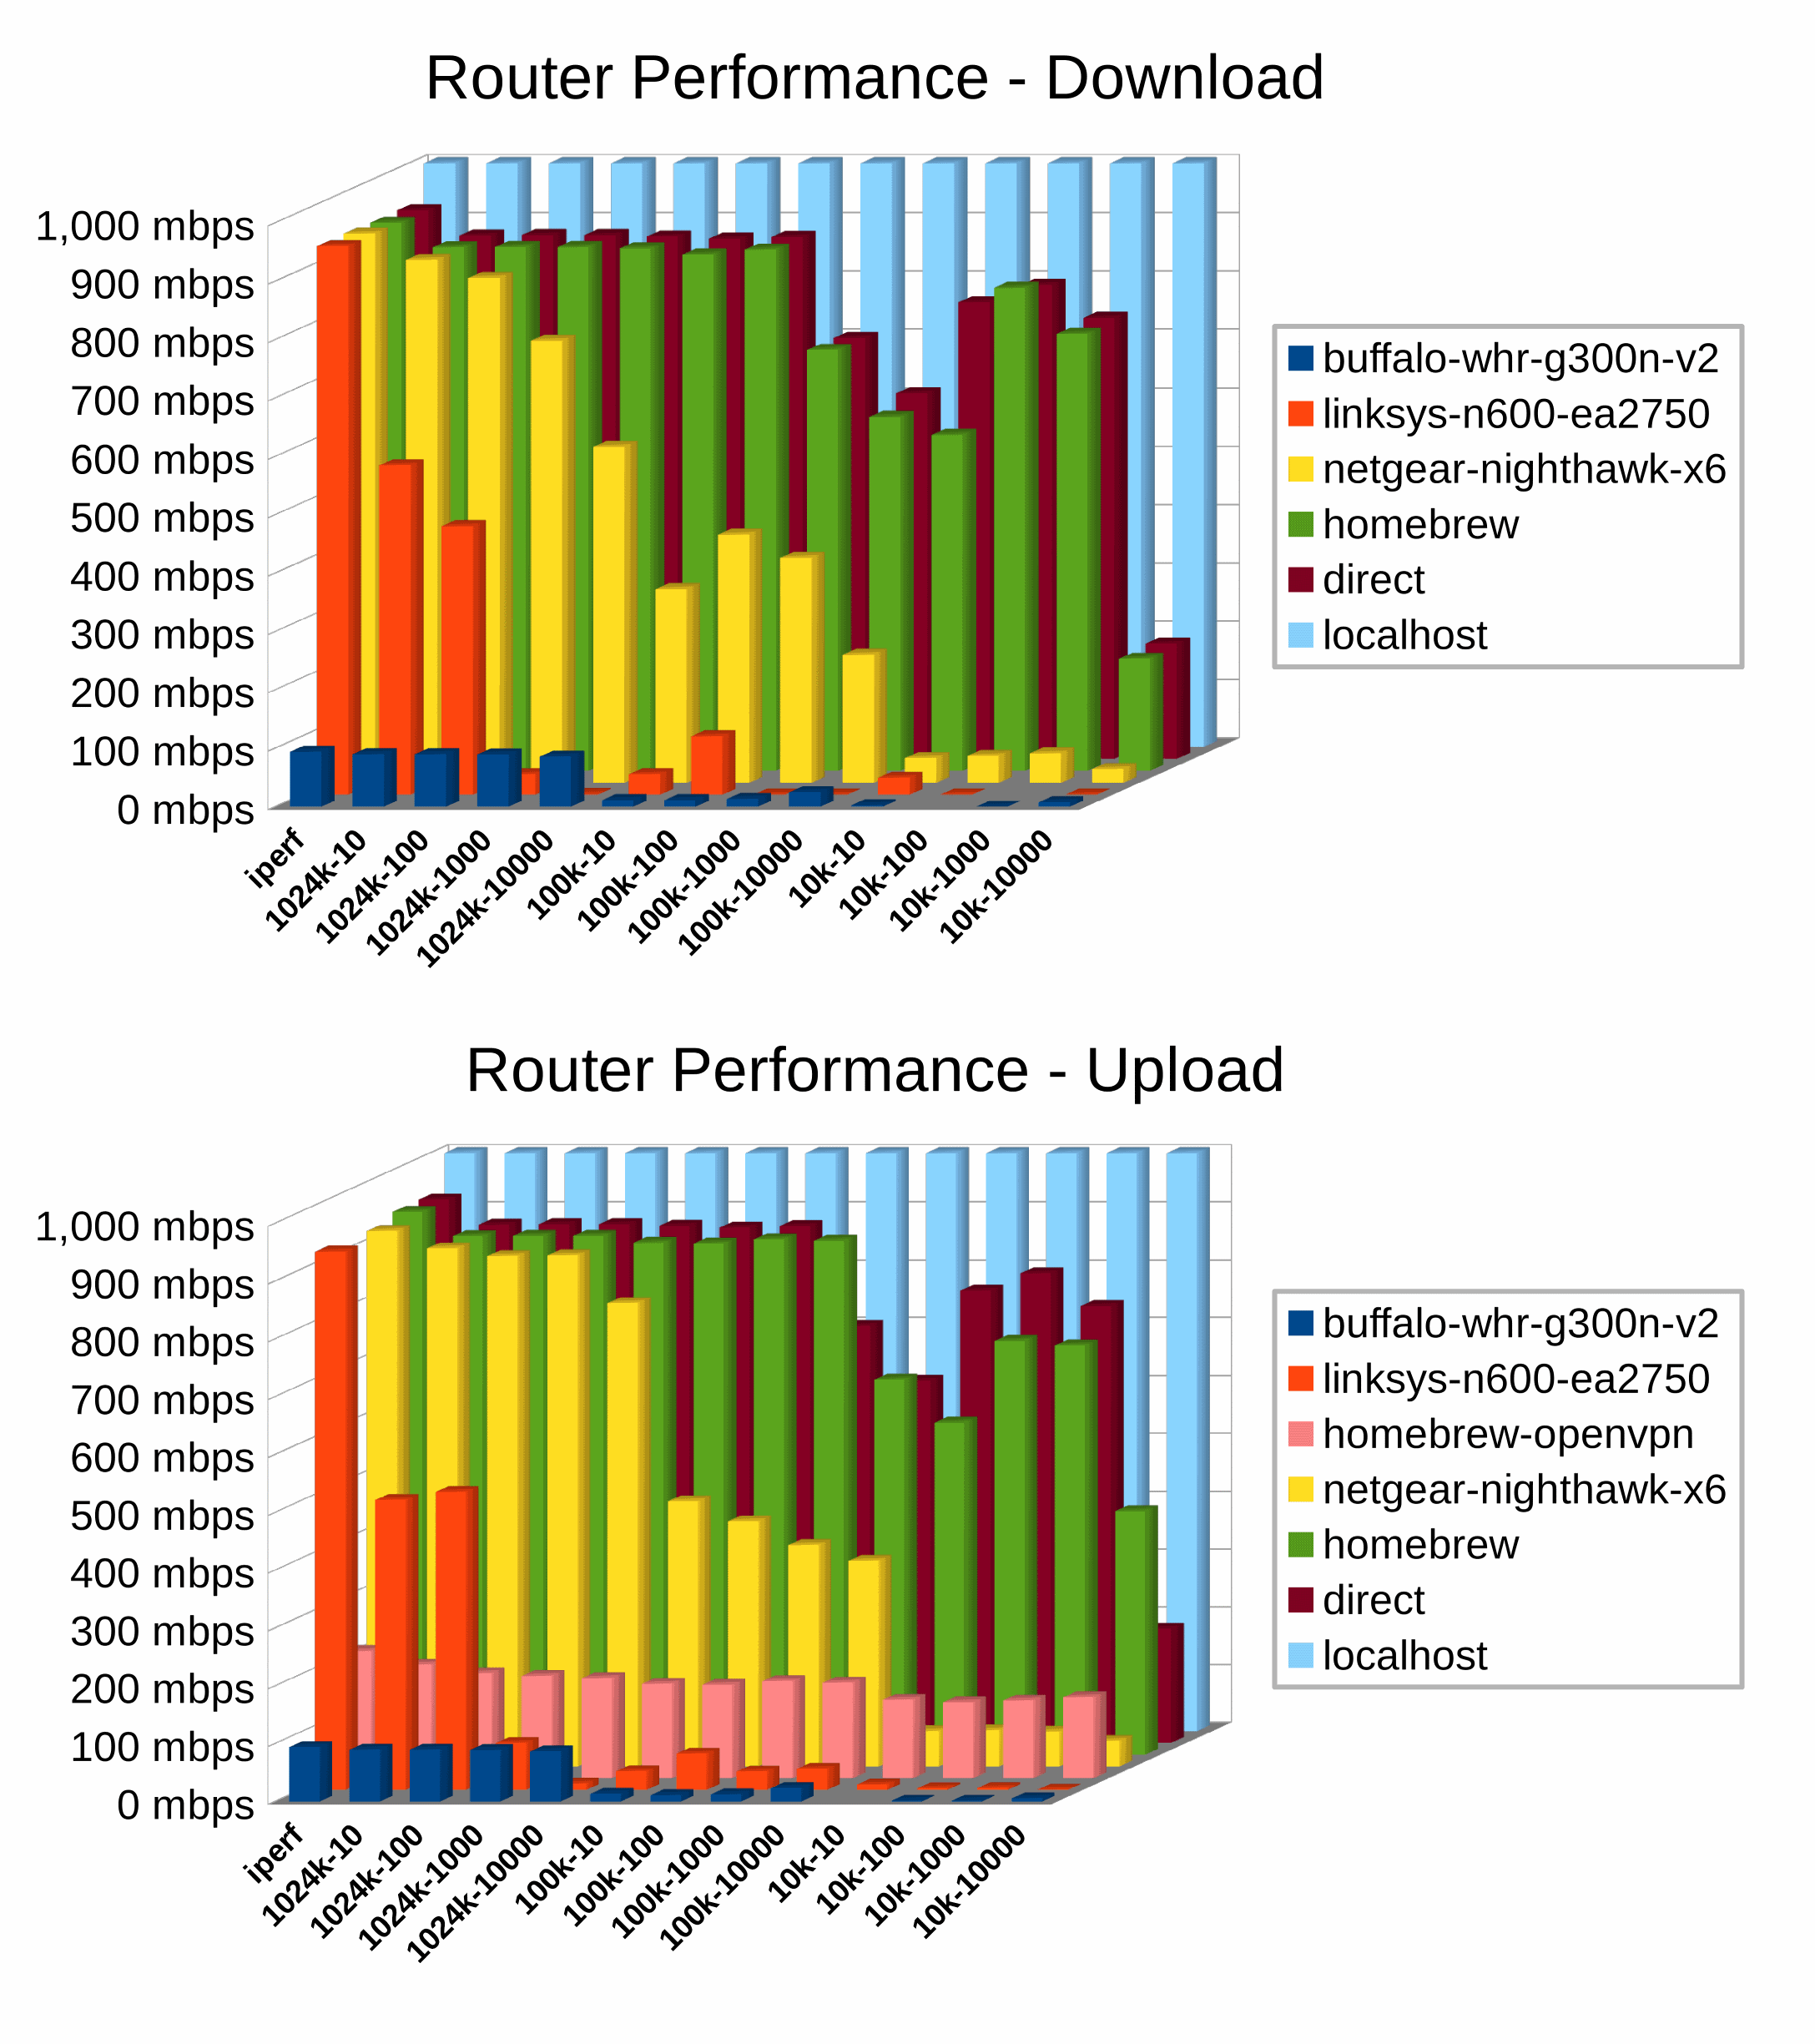
That’s not a whole lot more than the $200 you’d pay for a high end router these days, and as Ars Technica notes, the average x86 box is radically faster.

Note that the above graphs, “homebrew” means an old, 1.8 Ghz Ivy Bridge dual core chip, 3 generations behind current CPUs, that doesn’t even merit the i3 or i5 designation, and has no hyperthreading. Do bear that in mind as you keep reading.

Meet The Scooter Computer

This box may be small, and only 15 watt TDP, but it is mighty. I spun up a new Digital Ocean droplet and ran a quick benchmark:

sudo apt-get install sysbench
sysbench --test=cpu --cpu-max-prime=20000 run
Tie Shuttle 6

total time:           28.0707s
total num events:     10000
total time take:      28.0629
per-request stats:
     min:             2.77ms
     avg:             2.81ms
     max:             3.99ms
     ~95 percentile:  3.00ms
Digital Ocean Droplet

total time:          35.9541s
total num events:    10000
total time taken:    35.9492
per-request stats:
     min:             3.50ms
     avg:             3.59ms
     max:             13.31ms
     ~95 percentile:  3.79ms

Results will of course vary by cloud provider, but rest assured this box is just as fast as and possibly even faster than the average cloud box you could spin up right now. Of course it is “only” 2 cores / 4 threads, but the more cores you need, the slower they tend to go because of the overall TDP limits of the core package.

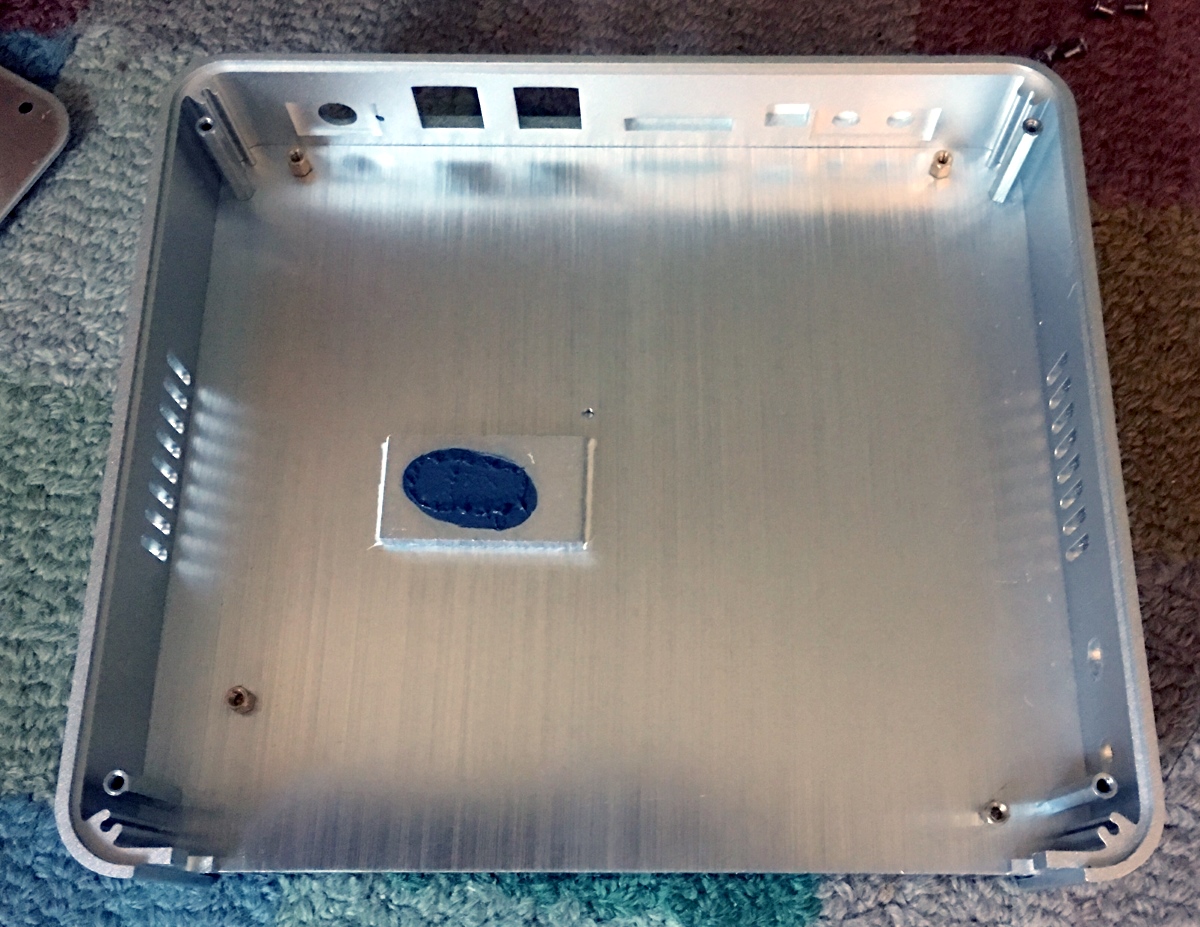
One thing that’s not immediately obvious in photos is that this thing is indeed small but hefty, like holding a solid chunk of aluminum in your hand. That’s because the box is passively cooled — the whole case is the heatsink, as the CPU on the bottom of the motherboard mates with the finned top of the case.

Opening this box you realize just how simple things are inside it; it’s barely more than a highly integrated motherboard strapped to an aluminum block. This isn’t a Steve Jobs truck, a Mac Mini car, or even a motorcycle. This is a scooter.

Scooters are very primitive machines; it is both their greatest strength and their greatest weakness. It’s arguably the simplest personal wheeled vehicle there is. In these short distance scenarios, scooters tend to win over, say, bicycles because there’s less setup and teardown necessary – you don’t have to lock up a scooter, nor do you have to wear a helmet. Just hop on and go! You get almost all the benefits of gravity and wheeled efficiency with a minimum of fuss and maintenance. And yes, it’s fun, too!

Passively cooled computers are paragons of simplicity and reliable consumer electronics, but passively cooling a “real” x86 PC is the holy grail. To get serious performance you usually need to feed the CPU at least 10 to 20 watts – and dissipating that kind of energy with zero fans and ambient airflow alone is not trivial. Let’s see how our scooter does overnight running Mersenne Primes, which is the heaviest CPU load possible.

You can place your hand on the top of the box during this, but it’s uncomfortable. And the whole box radiates heat, not just the top. Overall it was completely stable for me during overnight mprime torture testing with the 15w TDP CPU I chose, and I am comfortable with these boxes sitting in our rack in the datacenter, even under extended full load. However, I would be very careful putting a 28w TDP CPU in this box unless you are absolutely sure it won’t be at full load very often. Have I mentioned that passive cooling is hard?

Power consumption, as measured by my Kill-a-Watt, ranged from 7 watts at the Ubuntu Server 14.04 text login screen, to 8-10 watts at an idle Ubuntu 15.10 GUI login screen (the default OS it arrived with), to 14-18 watts in memory testing, to 26 watts in mprime.

(By the way, don’t bother using burnP6, it generates way too little heat compared to mprime, which is an absolute monster. If your box can survive an overnight run of mprime, I can assure you it’s ready for just about anything the real world can throw at it, ever.)

Disk

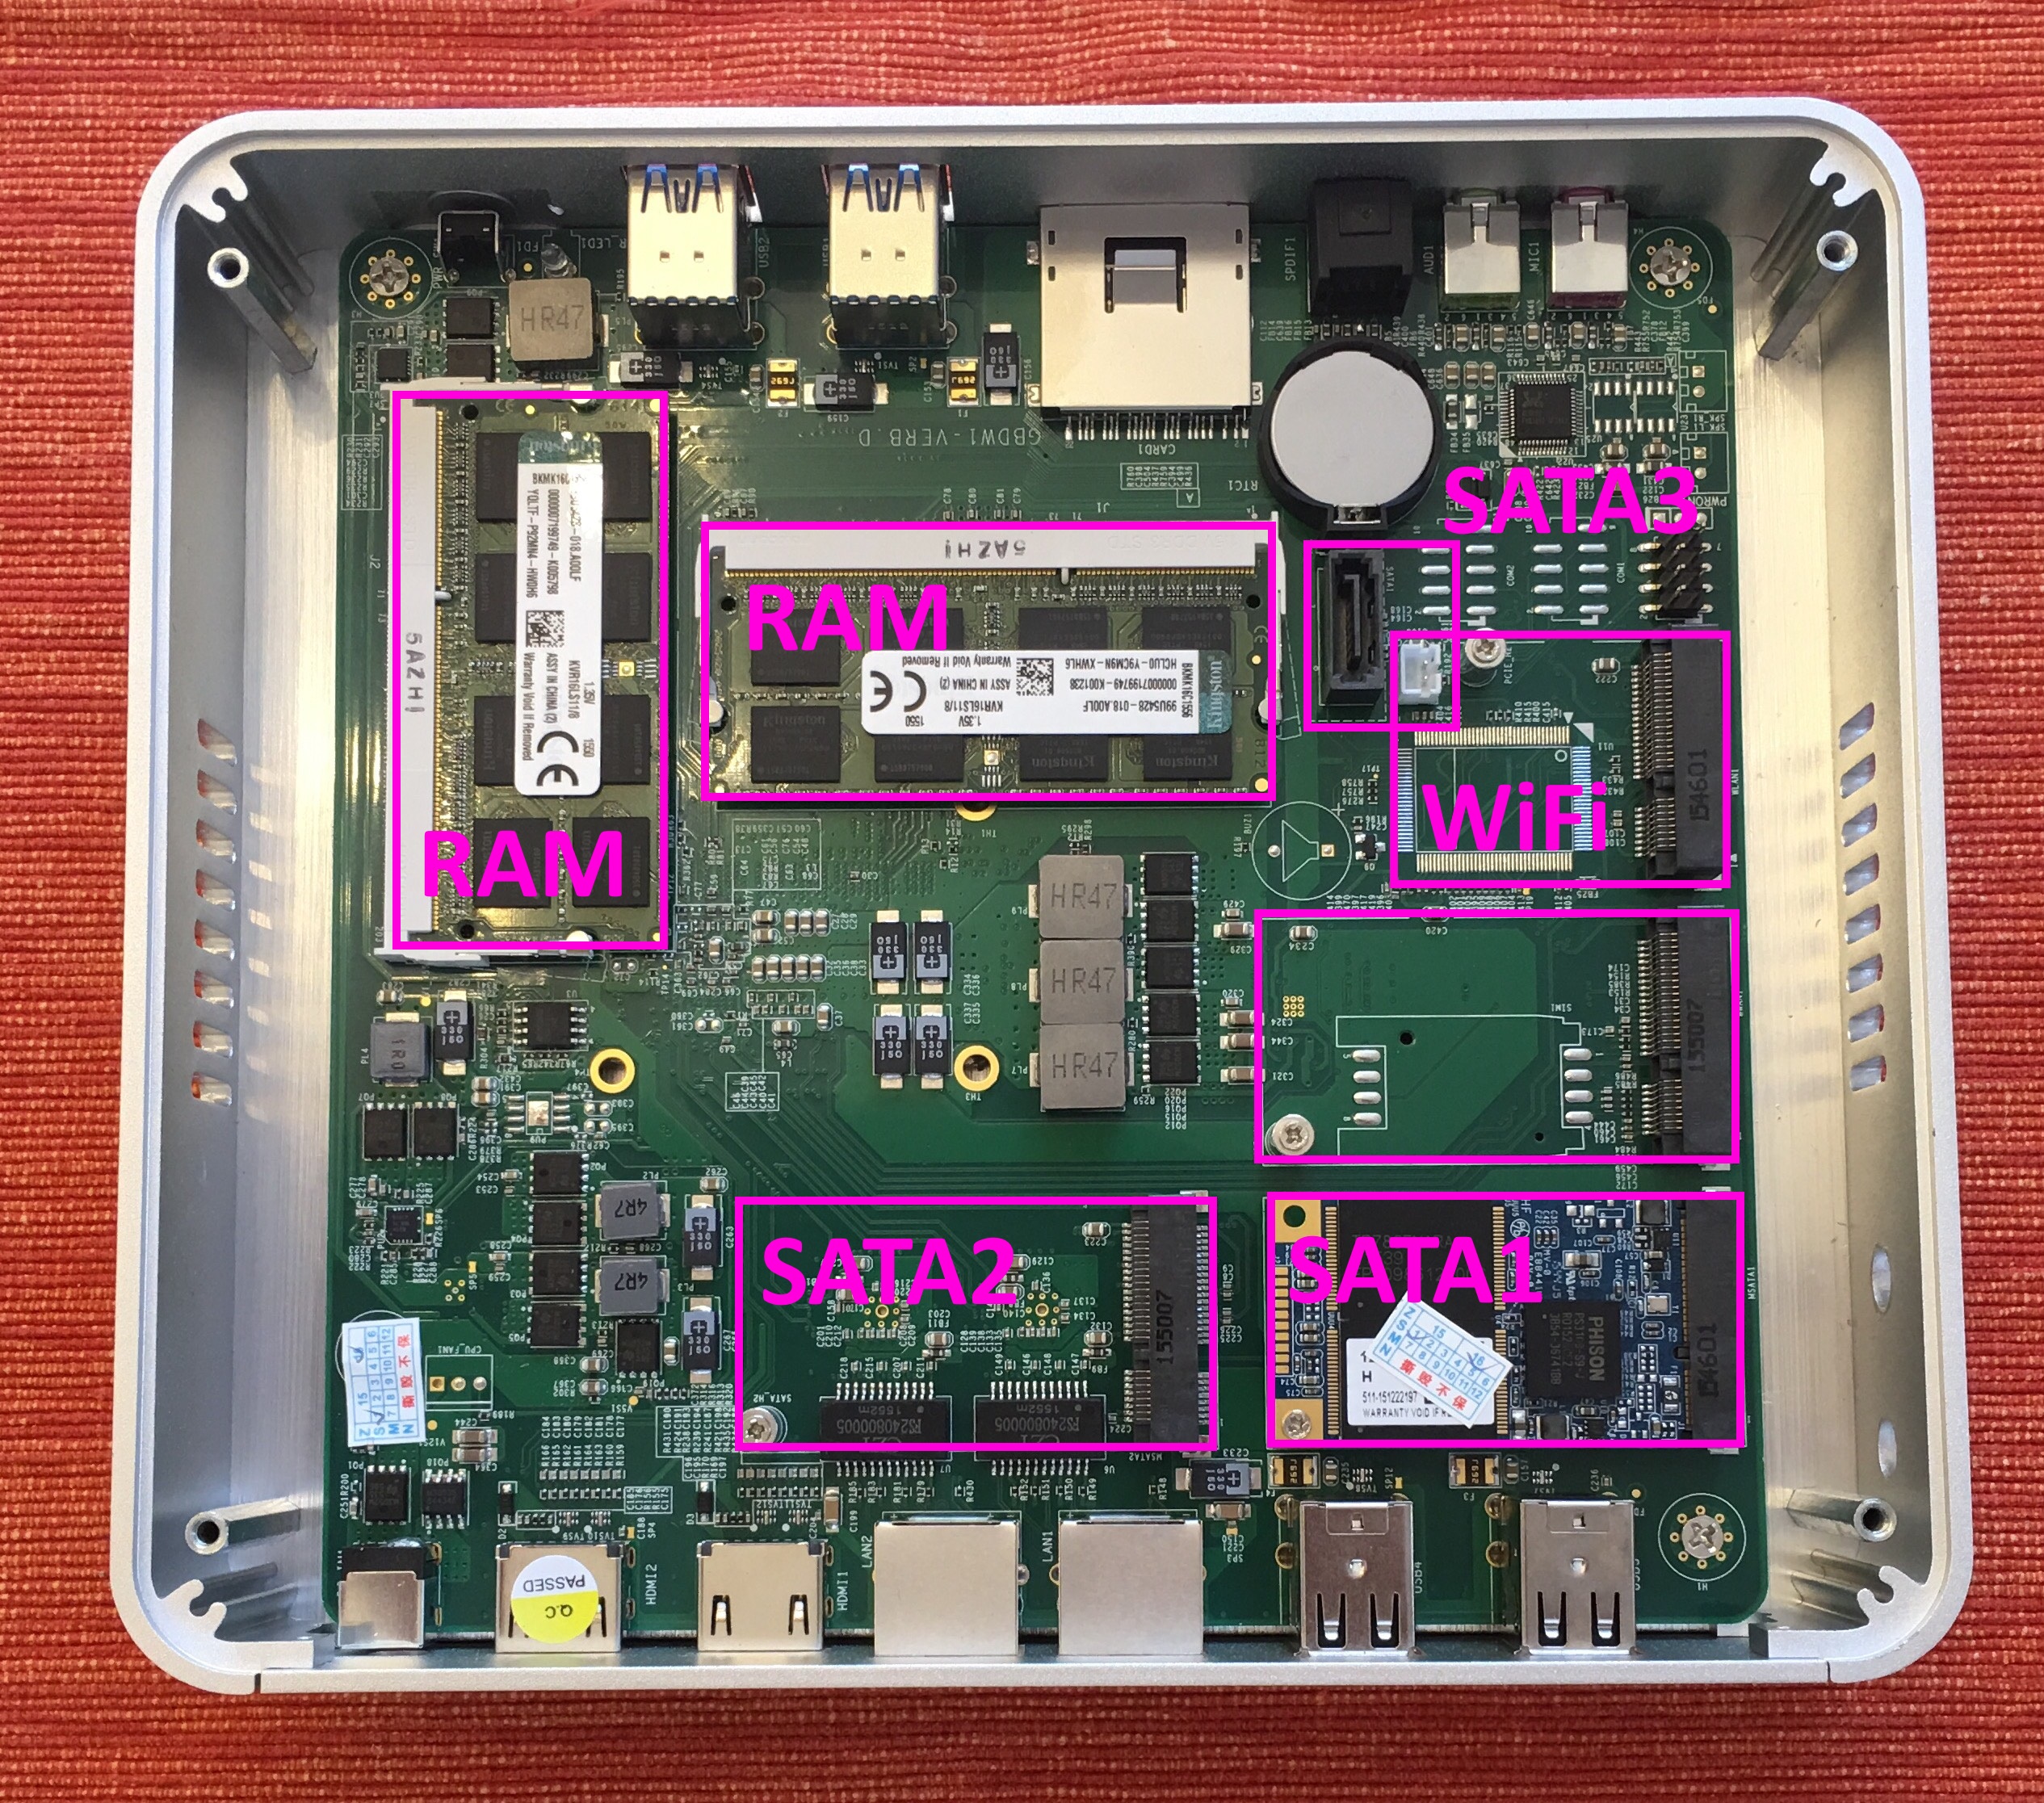
The machine has M.2 slots for two drives, as well as a SATA port and power cable (not pictured, but was included in the box) if you want to mate a 2.5″ drive with the drive mounting holes on the bottom of the case. So if you want a mirrored RAID array here for reliability, or a giant honking 2TB 2.5″ HDD in there for media storage, it’s possible!

Be careful, as the internal M.2 slots are 2242, meaning 42mm length. There seem to be mostly lower cost SSD drives in this size for whatever reason.

Don’t worry, though, the bundled 128GB Phison S9 M.2 SSD has decent performance, roughly equal to a good SSD from a few years ago:

dd bs=1M count=512 if=/dev/zero of=test conv=fdatasync
hdparm -Tt /dev/sda

536870912 bytes (537 MB) copied, 1.52775 s, 351 MB/s
Timing cached reads:   11434 MB in  2.00 seconds = 5720.61 MB/sec
Timing buffered disk reads:  760 MB in  3.00 seconds = 253.09 MB/sec

That’s respectable SSD performance and won’t hold you back in most use cases, but it’s not a barn-burning disk subsystem, either. I’m not entirely sure retrofitting, say, the state of the art Samsung 950 Pro M.2 2280 drive is possible due to length restrictions.

Of course the Samsung 850 Pro would fit fine as a traditional 2.5″ SATA drive mounted to the case cover, and would perform like this:

536870912 bytes (537 MB) copied, 1.20895 s, 444 MB/s
Timing cached reads:   38608 MB in  2.00 seconds = 19330.61 MB/sec
Timing buffered disk reads: 1584 MB in  3.00 seconds = 527.92 MB/sec

RAM

Intel limits these Broadwell U class CPUs to 16GB RAM total, so maxing the box out is only going to set you back around $70. Still, that’s a significant percentage of the ~$350 total cost, and you may not need that much RAM for what you have in mind.

However, do be careful that you get dual-channel RAM for lower RAM configurations; you don’t want a single 4GB DIMM, you want two 2GB DIMMs. They ship from the vendor with a single DIMM, so beware. It may not matter depending on the task, as noted by AnandTech, but our boxes will be used for OpenSSL, and memory is cheap, so why not?

The Versatile Scooter

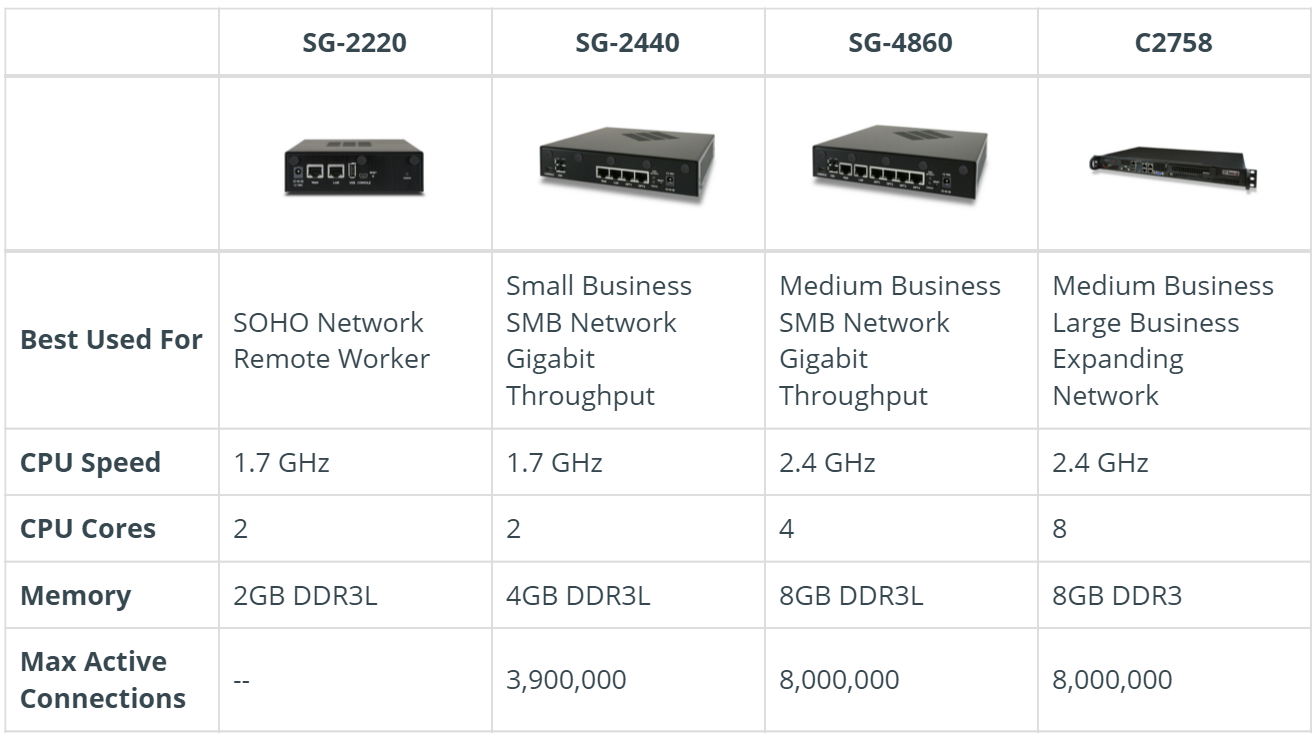
When I began looking at this, I was shocked to discover just how low-end the x86 CPUs are in a lot of “dedicated” devices, such as the official pfSense hardware:

Sure, 2.4 Ghz and 8 cores on that C2758 sounds reasonable – until you realize those are old Intel Bay Trail Atom cores. Even the current Cherry Trail Atom cores aren’t so hot. Furthermore, those are probably the maximum “turbo” frequencies being quoted, which are unlikely to be sustained under any kind of real multi-core load. Also, did I mention this is being sold as a $1,400 device? Except for the lack of more than 2 dedicated gigabit ethernet ports, I’d put our scooter computer up against that C2758 any day of the week. And you know what? It’d win.

I think this logic applies to a lot of dedicated hardware these days — routers, switches, firewalls, and so on. You’re often better off building up a modern high power, low TDP x86 box and slapping a regular Linux distro on there.

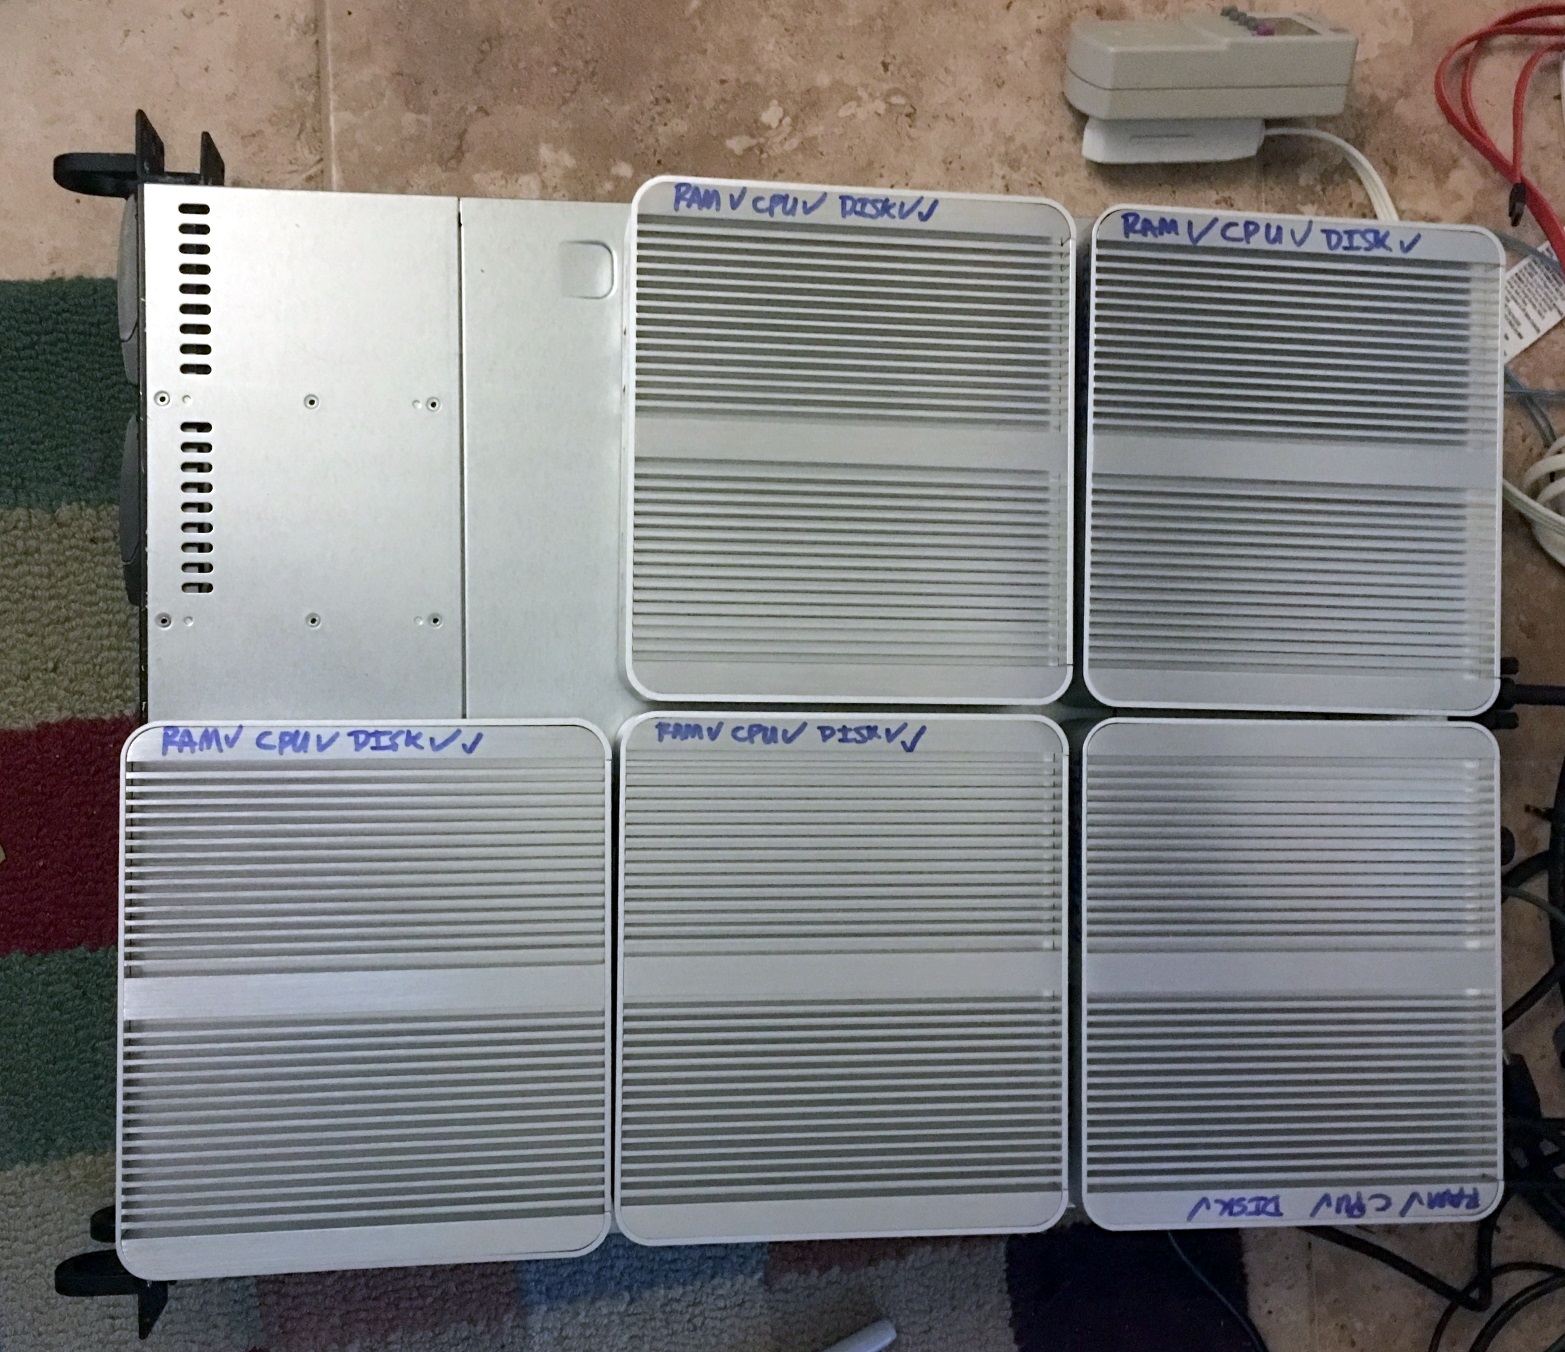
You can even kinda-sorta fit six of them in a 1U rack space.

(Well, except for the power bricks and cables. Vertical mounting on a 1U shelf works out a bit better, and each conveniently came with a stand for vertical operation.)

Now that I’ve worked with these boxes, I’ve become rather enamored of the Scooter Computer concept. Wherever we were thinking that we had to run either:

  • A virtual machine on big iron for some small but important utility function in our rack.

  • Dedicated, purpose built hardware for networking, firewall, or switching with a custom OS.

… we can now take advantage of cheap, reliable, flexible, totally solid state commodity x86 hardware that’s spread across many machines and running standard Linux distributions, like all the rest of our 1U servers.

[advertisement] At Stack Overflow, we put developers first. We already help you find answers to your tough coding questions; now let us help you find your next job.
Categories: Others, Programming Tags:

Writing Next Generation Reusable JavaScript Modules in ECMAScript 6

February 2nd, 2016 No comments

Are you excited to take advantage of new JavaScript language features but not sure where to start, or how? You’re not alone! I’ve spent the better part of the last year and a half trying to ease this pain. During that time there have been some amazing quantum leaps in JavaScript tooling.

Writing Next Generation Reusable JavaScript Modules

These leaps have made it possible for you and me to dive head first into writing fully ES6 modules, without compromising on the essentials like testing, linting and (most importantly) the ability for others to easily consume what we write.

The post Writing Next Generation Reusable JavaScript Modules in ECMAScript 6 appeared first on Smashing Magazine.

Categories: Others Tags:

How Will REST API Affect WordPress Developers?

February 2nd, 2016 No comments

With the advent of WordPress 4.4 last year in December, we saw the inclusion of the first half of REST API in the WordPress Core, and the rest of it is expected to be with us in the upcoming major release of WordPress.

That said, REST API has been around us in the WordPress world for quite a while, especially by means of the REST API plugin. The community is abuzz with all talks about how important REST API will soon be for WordPress development, and how it is going to change the way developers code and interact with WP.

So, how is REST API going to affect the WordPress users and developers, and what exactly will we be able to accomplish using it? We will find the answer to this question in this article.

How Will REST API Affect WordPress Developers?

The Rise of JavaScript

Matt Mullenweg made it pretty clear during his State of the Word 2015 address when he declared: “Learn JavaScript, deeply!”

With REST API in WordPress, the role of JavaScript in WordPress development will be increased manifolds as HTTP requests and other JSON queries will make good use of JS.

With Node.js rising in usage, coupled with the likes of AngularJS, React and Backbone.js, JavaScript surely is a popular entity on the web and as such, its rising importance in the world of WordPress development is a welcome note.

wp-rest-api

What About PHP?

WordPress is coded in PHP, so it is pretty obvious that the role of PHP cannot be diminished. However, with the rising influence of JavaScript, how will PHP keep up?

Well, PHP powers 80% of the web, so in all likelihood, there is hardly much that can be affected. But all said and done, REST API will actually influence PHP in an ostensible manner: now, for your third-party app to interact with WordPress, the app does not need to be in PHP anymore, as REST API can allow for cross-platform interaction between applications, which brings us to our next point.

Cross-Platform Interaction

REST API is more of an architectural style rather than a systems protocol. As such, it can be implemented on any platform that has been built or coded via any script or language. Thus, REST API can be used by an application that is built using Ruby on Rails, or by a plugin coded in PHP, or by software written in C#.

What this means is that even those applications and platforms can interact with and share data with WordPress that are otherwise not built using WordPress, or even PHP for that matter. So we can have websites and applications that are running in Python sharing data with WordPress sites, and vice versa.

wp-rest-2

The Backend? Who Needs it Now?

If you have been following the happenings in the WordPress community of late, you might have already heard of Calypso, or the desktop apps for WordPress.com that you can install on your computer and use to manage your blogs and websites (on WordPress.com or self-hosted WordPress sites running Jetpack) right from your desktop, without having to log into the WordPress admin panel.

Thus, such features add a whole new dimension to remote management of your website: you can actively monitor and manage your websites without having to log in at all — create new posts and pages, moderate comments, edit and modify data, and so on.

Furthermore, you can even build apps that work atop WordPress without actually having to force the users to log in to WordPress.

Mobile Support

Much like desktop apps, REST API also adds a new dimension to mobile development vis a vis WordPress. Shortly, as REST API becomes better integrated and included within WordPress, you can expect a whole new array and fleet of mobile applications and better support for mobile devices.

Of course, WordPress.com does have its mobile app that also lets you administer Jetpack-powered self-hosted websites. And with REST API, you can expect more such applications that help you remotely manage and access your sites.

Conclusion

As you can see, REST API is here not just to change the way our plugins and themes interact with WordPress, but also to overhaul and modify the manner in which web development works currently in the world of WordPress.

There is no dearth of great literature if you wish to learn how to master REST API with WordPress. For instance, here is a wonderful overview of what REST API exactly is:

Similarly, as an existing WordPress developer, it might be well worth the effort to start learning JavaScript and REST API, so that by the time REST API is fully integrated into WordPress, you are ready to accept new challenges and come up with new solutions. For that matter, Tuts+ have an ongoing series about WordPress REST API.

Are you an active WordPress developer? How excited are you about REST API and what impact do you think it will have in the world of WordPress development? Share your views and thoughts in the comments below!

(dpe)

Categories: Others Tags:

The Vital Guide To User Experience (UX) Design Interviewing

February 2nd, 2016 No comments
toptal-blog-image-1444200235083-f97ebee6194e38541e6d2807f6435251.jpg

A user experience (UX) design expert is a multi-talented jack-of-all-trades who possess knowledge in the areas of psychology, design and technology. These designers have a thorough understanding of the user and business goals and filter those into the digital experience so that your product feels intuitive, simple and facilitates the user and business goals.

The questions presented in this guide help identify user experience designers with the experience to produce masterful digital products.

As with any area of design, there is a high level of subjectiveness. This guide will help remove some of the subjectivity by allowing you to discover what makes a great UX designer and help you make the right hiring decisions.

The Challenge

User experience design encompasses many facets of both the design and development process. A great user experience designer will be an empathetic communicator who is curious and uses both qualitative and quantitative data to validate design hypotheses. The work of a UX designer is difficult to measure due to the varied nature of the role and output of the work.

Finding a UX designer requires a highly-effective recruiting process in conjunction with considered questions, as outlined below, which help identify candidates who are true experts.

UX design is a growing discipline with an extremely broad definition

UX design is a growing discipline with an extremely broad definition.

UX design is a growing discipline. It was created by Dr. Donald Norman, a cognitive science researcher, who first defined the importance of user-centered design. User experience actually has a formal definition (ISO 9241-210), but it boils down to: How people respond to what they experience. Effective UX design allows users to find value in the system and their interactions within it.

This extremely broad definition translates directly into the various skills that an expert UX designer will deliver:

Strategy and Content

  • Competitor Analysis
  • Customer Analysis
  • Product Structure/Strategy
  • Content Development

Wireframing and Prototyping

  • Wireframing
  • Prototyping
  • Testing/Iteration
  • Development Planning

Execution and Analytics

  • Coordination with UI Designer(s)
  • Coordination with Developer(s)
  • Tracking Goals and Integration
  • Analysis and Iteration

Such varied output can make any designer’s head spin, not to mention that of a hiring manager. So where do we start when interviewing UX Designers?

Strategy and Content

Before designing the digital experience, a UX designer’s job is to work on the strategy and content of the experience, working together with relevant experts. Strategy involves assessing the market and competitors, ranging to market positioning to full sitemap analysis and product feature content audits.

In addition to getting to know competitors, UX designers discover the product demographic and create detailed user personas. From here, a good UX designer will develop content and a strategy that differentiates the product and speaks directly to the target demographic. The following questions will support you in finding an excellent UX designer, from a strategy and content perspective.

Q: What is the definition of User-Experience?

A good definition, and an expected answer, should be somewhere in the lines of Nadeem Khan:

“It is a process that solves a problem of design, by taking into account the user’s goals and needs.”

Good responses may vary depending on the diversity or the key focus of the UX candidate. From a research perspective, a good UX designer can broaden their answer to include covering, “using data and research to guide product decisions, where user and business goals are taken into account.” A good candidate will have, above all else, the ability to use empathy and science to back up product design decisions.

Q: How would you best describe user-centred design to a client who is unfamiliar with the process?

Excellent answers will focus on placing the user in focus and making design decisions based on the evidence provided by users during research, data collection and the iterative approach to designing a service, product or tool. Placing the user in the centre of the design process is essential.

Q: What do you do on a personal and professional level to advocate for good usability?

A great UX design candidate will be able to outline several different examples of how they advocate for good usability. At the core, testing and iterating ideas, prototypes, concepts and products, and using user- generated data to inform design decisions will guide good usability.

The candidate may also talk about technical issues, such as cross-platform accessibility, or designing for access in environments where constraints from the user or technology limit a user experience. For example, making sure that blind people or people with restricted eyesight can read and access a website to gain information.

Wireframing and Prototyping

Once a UX designer has gathered data and research on the key user profiles, the next job is to start using that data to begin mocking up wireframes and later prototype products to further support (or reject) the initial data gathering. This phase should be rapidly iterated upon and the wireframes will later act as blueprints for a user interface or visual designer to step in and continue with the product design. The following questions will support you in finding an excellent UX designer, from a wireframing and prototyping perspective.

Q: Do you specialise in wireframing and functionality design, or other areas of design?

There are many different design profiles. From UX to UI, Visual, Interactive and Print, plus a surplus of emerging design fields, such as game design and more. With all these different profiles, a good UX designer will identify with being a UX designer. He or she will validate this by using examples that illustrate user-generated research adapted for designing new interaction patterns, interfaces and systems that solve design problems.

Q: What kind of data would you use to validate your design?

This question seeks to understand whether a UX designer uses valuable data points to either support or reject design decisions. Good answers will vary depending on the specific design to be validated, but this is the point and what the client should be looking for.

The ability to provide an answer that is relevant to a particular problem will set apart a designer who knows what s/he is talking about. Other thing to look for are metrics on specific features and patterns in design, data gathered from user interviews, surveys and in-product testing.

Q: Do you have a prototyping tool and wireframing tool preferences?

The software that a user-experience designer uses varies greatly due to the large number of products available. A UX designer may start with pen and paper prototypes, then use tools like Axure, Balsamiq, Justinmind Prototyper, Solidify App, Filesquare, Mockingbird, iPlotz, InVision, Framer.js, XCode, Quartz Composer or others to both wireframe and prototype their design.

Execution and Analytics

A good UX designer will be able to keep track and iterate upon the user experience as the product evolves. Part of this is good communication with other designers and teammates, including UI designers, visual designers and interaction designers. Setting goals and iterating towards them is part of the expertise of a UX designer.

Q: Give me an example of a project where the requirements changed halfway through, and how did you approach this?

Listen for answers where the designer talks about being agile to iterate on various requirements, as well as advise the client to backup any changes to requirements with data generated from users. This is somewhat subjective, as you will have to check whether or not the candidate’s approach to evolving requirements will be a good fit for your project and organisation.

Q: How do you provide clear instructions for other designers and developers to work from?

A good UX designer will be an excellent communicator, both with users and other teammates, using empathy to guide them through communication patterns. A possible answer is to provide a clear brief plus instructions in the form of user personas, sitemaps, information architecture, wireframes and prototypes, as well as effectively communicating verbally or through writing to the relevant team members.

Q: Where does your role as a user-experience designer finish?

A user-experience designer’s work is never finished and there is always more testing and iterations to make.

Read More at The Vital Guide To User Experience (UX) Design Interviewing

Categories: Designing, Others Tags:

Building & Maintaining OUI (Optimizely’s UI Library): Part 1/2

February 2nd, 2016 No comments

The following is a guest post by Tom Genoni. Tom is going to introduce us to the thinking and process behind Optimizely’s new UI library / Sass framework. Part 2, tomorrow, will be by Daniel O’Conner who will look at some of the technical and integration bits.

When I first started working on web projects, stylesheets were seen as a necessary evil. It was neither a real language to be taken seriously by a computer-science minded engineer nor simple enough for a designer to fully own and understand. With few best practices, organization of the CSS was always ad hoc—“type styles in this section, colors in that section”—and every company did it differently. But as web applications, and the teams building them, grew larger and more complex it became harder to manage ballooning codebases while maintaining consistency across teams and projects.

Among the first popular CSS frameworks that emerged to address this problem is Bootstrap. Many similar frameworks have followed but the purpose has always been the same: instead of writing CSS from scratch on a project by project basis, start with a styled set of the most common components—grids, buttons, form elements, breadcrumbs—that are cross-browser compatible and easily combined into larger interfaces.

At Optimizely we wrote and actively maintain our own Sass framework called OUI (pronounced like the French word for “yes”) based on the work of innumerable members of the web community including Mark Otto, Jonathan Snooks, Nicole Sullivan, and Harry Roberts and the philosophies of scalable, object-oriented CSS and HTML espoused by BEM and SMACSS.

Figure 1: Meet Louis, the official mascot of OUI.

The ongoing goals for OUI are to provide code that is…

  • Abstracted. Component names shouldn’t be derived from the content they contain. Class names should convey structural meaning.
  • Reusable. Components should be generic enough to be reused throughout the site. They should make no assumptions what page/view they will be used on. Problems solved in one area should be easily applied elsewhere.
  • Mixable. Components should be able to join together to create larger blocks.
  • Powered by variables. All common design elements—colors, fonts, spacings, shadows—should be defined using the pre-existing variables.
  • Scalable. Reusing patterns means new elements can be created faster and with minimal additional CSS.
  • Consistent. Developers will be better able to read each other’s code and will contribute to more reliable end-user experiences.
  • Small and DRY. Since we’re reusing low-level components to build larger objects we cut down on CSS bloat. Less code means fewer bugs.

In this post I’ll discuss the practical steps and the partnerships with engineers and designers it took to build it along with some problems we encountered along the way and, in Part II, my colleague Daniel O’Connor and fellow UI Engineer will describe the technical details of how we test, version, and integrate it into projects.

Phase 1: Get Your Designers On Board

Arguably the most important phase of creating a UI library is establishing close collaboration with your design team. Designing with a framework often requires a workflow shift away from pixel-perfect mocks and can lead to what might seem like a loss of design freedom. Fortunately there’s a way to address this: audit your site and present your findings.

Devote a day or two to taking screenshots of your site. Scour every nook and cranny for all instances of buttons, forms, tables, font sizes, colors, tags, icons, etc., and group them together. What you’ll likely surface will leave your designers aghast: buttons of all shapes and sizes, headings with little regularity, 27 shades of blue, and many other examples of good intentions gone bad. Putting your designers in charge of consolidating these inconsistencies will make them partners in the framework’s construction and allies in rallying others around the effort.

Phase 2: Own the Front end

Decide with your engineering team who “owns” the visual front end. Because your framework’s CSS and HTML are tied together we’ve found it’s important to have a smaller group, familiar with the framework’s patterns, responsible for delivering code to often thankful engineers who no longer have to wrestle with uncooperative z-indexes.

At Optimizely it’s our UI Engineers, who are officially part of the design team, that fill this role. With this tighter control we’ve dramatically cut the new CSS we have to write, our code is cleaner and more consistent, and we experience far fewer bugs. Over time the responsibility for writing HTML and CSS can widen as engineers understand how to use the library effectively and as the framework matures.

Phase 3: Identify Your Components

Bootstrap contains just about everything you’d need to build most sites. But maybe you don’t want breadcrumbs or perhaps you can use newer CSS properties because of your browser support. Either way we recommend referencing existing frameworks and creating a list of only the components required to cover your use cases. By building it yourself you’ll more easily identify potential trouble spots and will learn a ton in the process.

OUI was built with only the components and variables we decided were universal. Each Optimizely project that uses OUI adds any custom CSS code on top of it, only in that project’s repository. This allows each project to meet its unique design needs while keeping OUI lean and untouched. If different projects introduce similar components we have the option to “graduate” them into OUI, though this has rarely happened. In Part II we’ll describe our integration and versioning system in more detail.

Phase 4: Organize & Build

CSS preprocessors have been a boon for organizing code by supporting partial files containing only what’s needed for a given component. But it’s still a challenge to decide how to name things and where to put them. With OUI we currently use the following structure:

  • _oui-partials.scss: A rollup of all the partials to be included.
  • _oui-variables.scss: Variables for virtually everything. This includes a custom function to retrieve values from nested variable objects.
  • oui.scss: A root Sass file that includes all the rollups (used just for testing and not referenced by projects that use OUI).
  • library: Third party libraries (we will likely remove this)
  • partials: A directory of all the partial files.
    • elements: Mixins and functions. Since we’re using node-sass for compilation we also include the mixins we need for animations, tints, and prefixes that would ordinarily come from Compass.
    • base: Resets and minimal HTML element styling (links, tables, lists)
    • components: Low-level bits that help form objects (grid, media, nav)
    • objects: The fully formed and styled pieces (buttons, spinner, dropdown)
    • trumps: Helper classes for layout (margins, paddings, font styling)
  • In the Sass we don’t use IDs, selector depth is kept to a minimum, and the source order helps us keep specificity low. You can take a closer look at the OUI repository.

    Phase 5: Document & Evangelize

    All this work won’t help streamline your code if nobody knows about it or how to use it. Here are a few suggestions that have helped OUI gain traction at Optimizely.

    1. Pick a code name. Like any good engineering project, your framework should have an internal code name. It’s probably not something you usually do with CSS projects but, hey, this one is important! If it’s short enough you can use it as a prefix for namespacing classes.
    2. Provide good documentation. As anyone who has ever tried it knows, writing and more importantly maintaining good documentation with code samples, usage guidelines, and a changelog, is not easy. Incomplete or out-of-date documentation will only frustrate your developers and can undermine trust in the project. To combat this, nominate owners and have clear expectations about what to document and how to keep it accessible and current.

      This is an on-going challenge for us, but we’re inching closer. Unhappy with existing solutions, Daniel O’Connor has been leading the effort to build a robust living style guide script, called ScribeSass, that parses comments and code in Sass source files and renders code samples and examples. We’ll be releasing that as an open source project soon.

    3. Evangelize. With your pithy code name and documentation in place, start spreading the word. Give tech talks using real examples that demonstrate the speed and consistency benefits of reusing existing styles and patterns. If you have the budget for it, make stickers, t-shirts, or posters. Each month collect statistics on the size, rules, and specificity of your CSS and the number of bugs and time your team spent fixing them and share the results. We saw drops across the board.

    Lessons Learned

    Like any web project we made lots of mistakes, fixes and additions along the way. Here are a few of the challenges we faced, adjustments we made, and issues we continue to confront.

    • Namespacing. OUI worked well for new projects but as we started refactoring existing projects we realized we could have class-name collisions. To avoid this we added the option of a namespaced Sass variable that will add a prefix to most classes in the final CSS output. For example, if “oui-” is the namespace value, the class “.media” becomes “.oui-media”. This gave us the flexibility to more freely mix OUI with legacy code.
    • Versioning. For a while we weren’t convinced the overhead of introducing formal versioning was worth the effort. There were only a few projects using OUI and we didn’t want to add too much friction to making changes. But pushing fixes—especially ones that might cause breaks—and communicating their impact became problematic. We decided to adopt Semantic Versioning and with the help of a well-maintained changelog and a few Gulp packages we are able to add features and fix bugs without fear of breaking projects using OUI. In Part II, Daniel O’Connor will discuss setting up versioning in more detail.
    • Sass mixins vs extend. Initially OUI was setup using a fair number of extends. We were aware of their pitfalls and introduced them carefully, always with placeholders. But using extends can move CSS classes around in unwanted ways and despite our best efforts we did eventually have a few issues with source order and specificity. We decided to convert many of the extends to mixins and although it’s slightly more code we’re less concerned about future gotchas.
    • Responsiveness. This one is tricky. We’ve included media query mixins and optional breakpoints to a handful of our patterns, like grids. But since so much of responsive design is unavoidably complex, often requiring a good amount of custom code, there isn’t much more OUI can provide beyond the basic building blocks. Despite this inherent challenge, we will continue to evaluate ways of making the framework responsive friendly.
    • Custom vs reusable patterns.
      As new designs and layouts are created, falling on a spectrum between reusing an existing pattern to completely custom, it’s up to the UI Engineer to decide how best to build it. Ultimately the goal of building a UI library is keeping your CSS codebase as small and manageable as possible, but you also have to weigh the needs and flexibility required by your brand and products. Can the design be altered slightly to fall into an existing pattern? If this isn’t the case, should this be a new pattern or is it entirely unique? Negotiating this is more art than science and underscores the importance of collaboration and compromise between Designers and UI Engineers.
    • Stick to it. Over time it’s easy to let standards slide. A few hard-coded values and magic numbers here and there won’t bring down your application. But since many CSS bugs arise from the unintended consequences of code written long ago it’s important to keep those little time bombs out. That discipline will pay off.

    Results So Far

    Though the following comparison isn’t quite “apples to apples”, these CSS statistics* come from two similarly visually complex products at Optimizely. The first is an older application built prior to OUI and the second used OUI exclusively.

    Product without OUI Product with OUI Change
    Gzip Size 101 KB 33 KB -68%
    Stylesheet Size 618 KB 193 KB -69%
    Rules 3259 1757 -46%
    Selectors 5183 2407 -54%
    Identifiers 21375 4009 -81%
    Declarations 9356 4429 -53%
    Specificity Per Selector 87 15 -83%
    Top Selector Specificity 641 50 -92%
    ID Selectors 3135 0 -100%

    * Most values generated using Parker, a “stylesheet analysis tool”.

    Summary

    Managing a framework at your company, either by forking an existing one or writing your own, can be daunting. But for design and engineering teams concerned about maintaining consistency between projects, the benefits are too numerous to ignore. By relying on predefined patterns you’ll get uniformity in visuals and in code, faster HTML builds, fewer bugs, less CSS bloat, and it allows product designers to spend less time on specifications and more time on the bigger challenges of user experience and information architecture.


    Building & Maintaining OUI (Optimizely’s UI Library): Part 1/2 is a post from CSS-Tricks

    Categories: Designing, Others Tags: