Archive

Archive for June, 2016

Interactive Data Visualization: Animating the viewBox

June 8th, 2016 No comments

Controlling the way that a data visualization lays out on your page on the fly is powerful in terms of conveying information. In the past, we’ve talked about how we can use this to hide and show information for responsive development. When working with SVG, we can do this by using the viewBox as a camera, isolating the relevant information on the page to highlight information for the viewer. There are so many uses for this technique. We’re going to be looking at a new way of working with it dynamically to get the processor to do the heavy lifting for us.

Before we go into animating the viewBox, we should cover what the viewBox in SVG is. I’m just going to cover the basics here, but if you want to deep dive, there are some great articles to help with that.

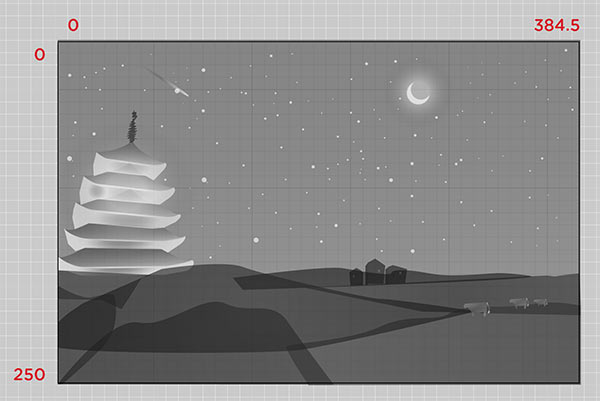
The viewBox acts as a window in which you see in to your SVG. It’s defined with 4 coordinate values: min-x, min-y, width, and height. If the graphic below, you can see the full drawing:

The black box around it is defining the viewBox. If you’re familiar with Illustrator, this is the “artboard”. You can change up the artboard in Illustrator by going to File > Document Setup > Edit Artboards. You can then crop your image on the fly and change the visible area. If you know that your graphic is exactly the size of your desired viewBox, you can quickly do so with Object > Artboards > Fit to Artwork Bounds.

See the Pen showing the full viewBox by Sarah Drasner (@sdras) on CodePen.

When we keep the viewBox the same, and we can change the width and height of the SVG:

See the Pen showing the full viewBox by Sarah Drasner (@sdras) on CodePen.

You can think about it a little like the SVG DOM is plotting itself along a grid. That grid can shrink and grow but the aspect ratio of the grid stays consistent. Here we have the SVG plotted at 0 min of the x axis of the grid and 0 min of the y. The width expands across by 384.5 and the height by 250, roughly.

If we group those houses together, we can see where they lie as well:

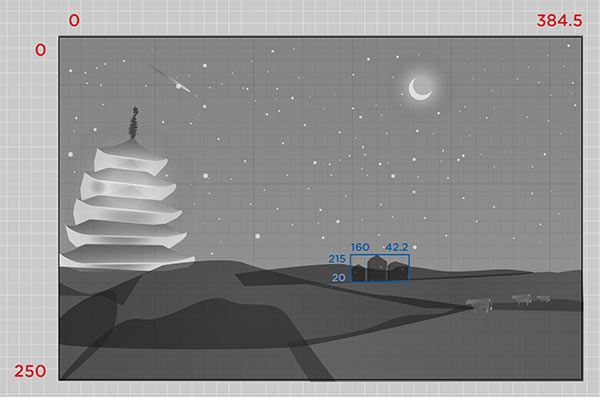
We can crop the whole visible area to just the houses by changing the viewBox to "215 160 42.2 20"

In order to find the viewBox coordinates for that group, we could do some measuring, editing by hand, but that’s pretty arduous and because the viewBox is scalable, gets tricky. Luckily for us, there’s a native method we can use called getBBox(). This returns the bounding box at the time that the method is called, and is exclusive of stroke, masking or filter effects. It returns an SVGRect object at the time that it’s called (even if it hasn’t yet been rendered).

The cool thing about the SVGRect object is that it returns four values. The x-min, y-min, width, and height. Sounds a bit familiar, huh?

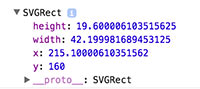
This is really handy for us because in order to update the viewBox dynamically, all we have to do is we store the values from the object as our new viewBox string like so var newView = "" + s.x + " " + s.y + " " + s.width + " " + s.height;

We can then set the new viewBox string as the viewBox attribute on the SVG: foo.setAttribute("viewBox", newView);

See the Pen showing the full viewBox by Sarah Drasner (@sdras) on CodePen.

Now we’re cooking with gas.

To animate to the new viewBox values, we have a few options, all using JavaScript (for the time being):

  • We can use requestAnimationFrame with a polyfill to update the value of our coordinates over time.
  • We can use GreenSock’s attr plugin (comes already bundled in with the typical default library of TweenMax) to animate it.

The cool thing about GreenSock is it can animate any two integers, so it’s a pretty nice tool for this. I’m going to use GreenSock in the following example because there are a number of other things I want to animate, and I’d like quick finite control of my easing values. But either method works well.

One quick thing to keep in mind is that SVGRect will always return a rectangle, even if the element in question is not one, and there are no diagonals, even when it’s transformed. Here’s a quick demo of some rotating shapes with a stroke applied so that you can see what I mean:

See the Pen Showing what happens to the Bounding Box when an SVG Element is rotated by Sarah Drasner (@sdras) on CodePen.

In the following example I have a map, and when the user interacts with it, I want to give more information on the specific country they select.

See the Pen Animated viewBox Data Visualization by Sarah Drasner (@sdras) on CodePen.

I have a repeated animation for the hotspots. I’m also using some simple data attributes on the elements themselves so that I can store and use that information to animate. Consistent naming is important here – it’s how I’m controlling which country is expanded and what details are shown.

<g data-name="usa" class="hotspot">
  <circle id="dot2" cx="221" cy="249" r="2.4" fill="url(#radial-gradient)"/>
  <circle id="dot1" cx="221" cy="249" r="2.4" fill="url(#radial-gradient)"/>
  <circle id="dotmid" cx="221" cy="249" r="2.3" fill="#45c6db"/>
</g>

I’ve also added some extra padding to the hotspot elements so that their click target is large enough for mobile devices and our fingers

.hotspot {
  cursor: pointer;
  /* make the hit targets bigger for mobile */
  padding: 20px;
}

I can then write a function that, on click, passes in the data attribute and updates the viewBox based on the shape of the country. I’ve added 200 to the width to accommodate for the text beside the country.

// interaction
function zoomIn(country) {
// zooming in part
var currentCountry = document.getElementById(country),
    s = currentCountry.getBBox(),
    newView = "" + s.x + " " + s.y + " " + (s.width + 200) + " " + s.height,
    group1 = [".text-" + country, ".x-out"],
    tl = new TimelineMax();
  
    tl.add("zIn");
    tl.fromTo(map, 1.5, {
      attr: { viewBox: "0 0 1795.2 875.1"}
    }, {
      attr: { viewBox: newView }
    }, "zIn");
    tl.to(".text-" + country, 0.1, {
      display: "block"
    }, "zIn");
    tl.fromTo(group2, 0.25, {
      opacity: 1
    }, {
      opacity: 0,
      ease: Circ.easeIn
    }, "zIn");
    tl.fromTo(currentCountry, 0.35, {
      opacity: 0
    }, {
      opacity: 1,
      ease: Circ.easeOut
    }, "zIn+=0.5");
    tl.fromTo(group1, 0.5, {
      opacity: 0
    }, {
      opacity: 0.65,
      ease: Sine.easeOut
    }, "zIn+=1");
}

$(".hotspot").on("click", function() {
  var area = this.getAttribute('data-name');
  $(".x-out").attr("data-info", area);
  zoomIn(area);
});

If I wanted my code to be super slim, I could have wrapped the timeline in a function and simply reversed it when someone clicked the x-out, but when I tried that, the animation was just a little sloppier than I liked, so I created a new function to refine the timing a little. I could also have used tl.to instead of fromTo, but I’ve found that when restarting animations, offering an initial value in fromTo helps to stabilize it a bit (particularly if you don’t know who might be updating your code).

viewBox in CSS?

There was a proposal by Jake Archibald to promote the viewBox as a CSS property, which I heavily support. If you want to support it, too, please either add a comment with technical feedback or add a thumbs up to one of the existing comments (to avoid crowding the main thread). A CSS property to control the viewBox would be wonderful because we could easily apply media queries and animation, perhaps even reducing the layout triggers and repaints for such updates.

Another Demo: A Guided Infographic

For extra fun, I made a small flowchart to show how this technique can be used to guide users. This particular chart guides users toward choosing the right image format for the job.

See the Pen Animated Flow Chart 3 by Sarah Drasner (@sdras) on CodePen.

Animation warning: It’s potentially dizzying, so don’t play with it if you have a vestibular disorder. If I embedded this on a production site I might have a toggle to turn the animation off or a fallback to a simplified questionnaire.

Other Explorations

There are other people working with the idea of animating the viewBox as well. Louis Hoebregts wrote a great post on it, and David Bachmann Johannesson made this slim and awesome Pen, among others.

Seen others? Link us up in the comments.


Interactive Data Visualization: Animating the viewBox is a post from CSS-Tricks

Categories: Designing, Others Tags:

Make Music In The Browser With A Web Audio Theremin

June 8th, 2016 No comments

Petrograd, Russia, 1920. Deep in his scientific laboratory, a young Léon Theremin accidentally notices that the sound coming from one of his high-frequency oscillators changes pitch when he moves his hand. Popular culture is changed forever. The theremin’s unique sound proves perfect for sci-fi soundtracks and Good Vibrations by the Beach Boys. The world is a better place.

Make Music In The Browser With A Web Audio Theremin

For the better part of a century, musicians have been waiting for a similar breakthrough technology to again change the way we create music. I’m delighted to announce it has already arrived. It’s called the Web Audio API.

The post Make Music In The Browser With A Web Audio Theremin appeared first on Smashing Magazine.

Categories: Others Tags:

Wix announces AI-designed websites

June 8th, 2016 No comments

Website builder Wix has just announced the release of a system it has dubbed “Artificial Design Intelligence”—or “ADI” for short—that it’s marketing as “The Future of Website Building”.

Wix ADI claims to be an AI-driven service that not only designs your site for you, it will even gather your content. Wix refers to it as the first AI website builder to reach the market—which discounts The Grid (still in restricted beta after its announcement back in 2014).

There’s been a creeping awareness amongst The Grid’s early adopters (those people who paid up front, sight unseen) that The Grid’s marketing may have over-promised a tad. Certainly the extended beta period has run on and on, despite substantial funding, with mixed reviews and no end in sight. It seems inevitable that the release of Wix ADI will revive the blog-hysteria that AI has made designers obsolete; however the fear is as unfounded now as it was the last time.

Wix have not created an AI. Wix have adopted the term artificial intelligence because it suits their marketing. When AI arrives, it will be heralded as an integral part of NASA’s first Mars mission, or introduced by IBM as a way to interpret big data; it will not be knocked up, in just two years, as a template vendor’s side project.

AI, as developed by Wix, and The Grid, and (one presumes) several other bandwagon jumpers who haven’t announced their version yet, is no more artificial intelligence than robots on an automated assembly line constitute skilled craftsmen. Like The Grid, Wix ADI is marketed at small businesses that cannot afford the services of a web designer. They’re not taking a shot at the web design industry (although naturally, they would if they could). Most small businesses don’t understand the term “dynamic template” so “AI” gives them a better picture of what they’re buying into. You, as a web designer, need not be fooled.

Wix ADI doesn’t need AI, it needs clairvoyance, because it generates a site based on just five questions, and one of those is “What’s your name?”. The other questions are: “What will the website be used for?”, “Do you need any special features or capabilities?” “Where is the business located?”, and “What design style do you want?”. From the answer to these questions Wix’s Nir Zohar believes Wix ADI will produce a professional standard site:

Each is custom-made, designed as if by a pro and absolutely unique. There are billions of different options, so your site will not look anything like the next guy’s

Once you’ve answered the five basic questions, the process works like this: Wix ADI creates ‘structures’ which are basically your content, it then edits out anything that wouldn’t make sense to a human (how it knows is unclear), then you pick one of a few hundred themes.

And there’s the key: you pick out a theme. Wix ADI is an elaborate template browser.

So how good is it? Well, we’ll have to wait and see, because although it will be rolling out to Wix users in the next couple of months, it isn’t available globally just yet. Wix have released one site: jesskellytrainer.com has been designed by Wix ADI, and it’s not too bad; the design is uninspiring, the code has a few obvious fails, and the SEO is atrocious, but I’m certain I’ve seen worse sites that cost a lot more.

Although a price point has yet to be announced, one of Wix’s main selling points is cheapness, so it’s safe to assume they’ll be keeping it affordable. For clients looking to spend under $100 on a site, it’s an ideal option. It’s unlikely to provide competition for freelancers or agencies, although a few PSD to WordPress services may be getting hot under the collar.

As a designer it’s difficult to accept automation when it is perceived as a devaluation of design, but we should actually be celebrating releases like Wix ADI because they highlight they extra value designers bring to clients. And Wix should be applauded for bringing a product to market—actually getting any product to sign-off is an achievement. It’s not AI, not even close, but it looks likely to make picking a template easier, and for some businesses, that’s the limit of the help they want.

WordPress Form Builder without Any Coding Knowledge – only $11!

Source

Categories: Designing, Others Tags:

15 Awesome Tools That Do The Trick

June 8th, 2016 No comments
web-design-tools

Our time is limited and we can’t just search the Internet forever for the best tools available out there. That’s why we’ve selected exactly 15 tools and services that do the trick for any business or freelancer. All of them have great features, they’re really easy to use and their prices are really affordable. If you do some research, you will see that all of them have really strong, professional teams behind them that know how to create awesome results and value for you. Enjoy!

  1. Browserling.com

Browserling is something you should know about. It really does the trick. It’s an online cross-browser tester with tons of awesome features that let anyone create a more standards-compliant, responsive and bug-free version of their site. Pretty much everyone on this list uses Browserling to make sure their products work in all the browsers.

Let’s get into features straight away. First you can choose from hundreds of browsers and they load in 5 seconds. Next, you can capture screenshots of browsers. Then you can annotate screenshots with Bug Hunter and pinpoint bugs. Need to do local testing on local web server? SSH tunnels have your back. Do you often need to access the same browser? They’ve bookmarklets that let you bookmark your favorite browsers and then access them with a single click on the bookmark. Do you often need to do URL decoding, HTML decoding, JS beautification, or XML to JSON converting? They’ve created amazing web developer tools that have 50+ tools like this (available absolutely for free). As they say – no ads, no garbage, no nonsense – just tools. Press button, get result.

Browserling is trusted by over 15,000 users and huge corporations, such as Blekko/IBM and even the government and NHS, UK’s National Health Service.

The best part of Browserling is that it just works in your browser and you always get access the latest versions of browsers, because they install them as soon as they get released. They have Windows and Android as current operating systems, but iOS, Mac OSX and Linux are coming soon. Go try them out! Theyve a free version available and its totally awesome! (PS. And they’ve an amazing webcomic.)

2. Luckyorange.com

2.Luckyorange.com homepage

Lucky Orange is definitely “lucky”, as it provides you with the best tools and features to turn more visitors into customers on your website! It is a great analytics platform that offers a lot of helpful users’ stats that can make you improve the performance of your website.

For example, they provide you with beautiful heat maps that sum-up all of your visitors’ actions in one clear picture, showing you how people read and interact with your site, by watching their clicks, movement or how far they scroll. You can segment heat map data by location, browser, dates, mobile users, and more. Next, you have a great realtime dashboard, where you can see exactly the people browsing your site at the moment, having the possibility to watch everything they did, talking to them and even co-browsing, to help them with their problems. Finally, another great tool is the polling system, which is fully customizable, can have multiple questions, redirect to URLs, and can be triggered at just the right moment, to give you instant customer feedback. For more, go and have a look yourself!

3. Invoicely.com

3. Invoicely

If you have a work or business that involves sending a lot of invoices to clients, such as being a web designer or freelancer, then Invoicely is here to help you get your finances out of the way, saying “good bye” to the time-wasting paper invoices. It is a free, online solution, that helps you track all your invoices from a single dashboard.

It gives you the chance to create amazing and professional invoices, in any language or currency, in just a few seconds. Then, you can easily send unlimited invoices to your clients, at any account level. If you have multiple businesses with different teams involved, you can still manage them, as Invoicely lets you set up as many businesses as you like. You can add admin and staff members as your business grows and easily set permissions for them. Moreover, with Invoicely you get generated reports, monthly and yearly statements and customizable summaries on your earnings and expenses, invoices, estimates and bills, all to keep your finances in one place. Go check them out for many other great options!

4. Invoiceocean.com

4 Invoiceocean

Do you have multiple business and you want to manage them from the same account? Haven’t you tried InvoiceOcean yet? Then you should try it right now. This app allows you to switch between your businesses really easy with only a few clicks with the option of getting separate reports. Also, you can divide your company in multiple departments. If you want to you can receive different document numbering, reporting and different users for each department, all of this to make your work easier and to help your business prosper. You should as well know that you can access your business information from you smartphone because the InvoiceOcean mobile app is ready to use. You can now add photographed receipts as expenses straight from your mobile device.

5. Sketch to HTML by Xfive.co

5. Sketchtohtml.com

Do you love designing in Sketch, but don’t have time for conversion to HTML or just don’t know how to do it? Sketch to HTML by Xfive will bring your designs to life. All you have to do is press the “Get started” button and let them worry about the rest. Their motto is “Dream, Move, Hope, Do” and that’s because with their help you can achieve your goals and create the best project possible.

6. uKit.com

6 uKit.com

Though uKit has been launched a year ago, it has already forced its way to the top. It received much attention from review services and was highly rated by http://mmthomasblog.com/. The main highlights of the system are a simple drag-and-drop editor and a wide choice of themed widgets, which makes it really simple to put together a professional website in minutes by simply manipulating the elements like in LEGO. With over 240 professional-looking themes, a mobile responsive version, and included web hosting, uKit is definitely a good choice to put your business on the Web.

7. Mobirise.com

7 Mobirise.com

With the immense spread of advanced online technologies, which have already become a significant part of our everyday life, creating a website that will attract the attention of your target audience and keep them interested in your business is vital. By using this website builder, you will be able to create a site that will be accessible on any mobile device, which is crucial for those users, who have got used to browsing through the web on the go.
Apart from the convenient web design options, Mobirise team has made it possible to host the newly created website on any platform of your choice with regard to your business or personal needs. What’s more, there are no hidden charges involved when it comes to using this website builder. The tool is free for all users, with no exceptions.

8. Dealfuel.com

8. Dealfuel.com

DealFuel is pretty popular, thanks to its amazing web designer deals that it offers, from WordPress themes, webpage tools, online tutorials and eBooks, to templates, SEO tutorials and graphic tools, such as icons, badges, mockups, Photoshop actions and more. It has a special “Freebies” section, where you can get some great deals (worth hundreds of dollars) for free! So if you are looking to save a good deal of money and quality time, head straight out there.

9. Photowoa.com

9 Photowoa

These awesome guys from PhotoWhoa provide you with curated products to improve your photography. From some great tutorials from Lindsay Adler, ebooks from Michael Zelbel, guides from Ana Brandt – you have it all here (Difficult to believe?)You can find something for every photographer, from glamour and weddings to portraits, or even food photography, all of them at discount prices! In addition , you can manage to get your hands on some photography gear, such as flashes, wireless triggers, camera straps and camera filters at unbelievable prices.

10. Cyberchimps.com

10 Cyberchimps

Get 100% responsive and SEO-optimised WordPress themes; that can help you grow your website, making it more beautiful and professional looking. CyberChimps provides you wide range of themes, covering various niches, such as restaurants, blogs, travel companies and more. You can join CyberChimps Club, that gives you access to all their 40 WordPress Themes and Plugins – and all new releases too!

11. Onlinelogodesign.us

11 onlinelogodesign

To own an inspired logo is the first step to business success and also an important part in brand and social marketing. OnlineLogoDesign offers a team of hand-picked designers at different prices (from $99 to $299) to create yours. Just by looking at their portfolio, which contains over 20 000 examples, you can be sure by their excellence. Go have a glance!

12. Freelogodesign.me

12 .freelogodesign

A free logo might seem a dream request, but you can actually get one at FreeLogoDesign. After you send them a request, they will send you an icon three days later, at most. They give away five icons daily and have tons of fresh designers eager to make an incredible logo, to pass an exam to get a job. With such a great offer, why on Earth wouldn’t you give it a try?

13. Colorlib.com

13 Colorlib

Pinbin” is a clean, minimalistic, beautiful and responsive theme inspired by Pinterest. It is ideal for graphic and web designers, photographers and many other creatively related activities. It is a portfolio theme, making it the perfect choice for any artist who is looking to create his or her own site with their work. If you are one of those creative people don’t waste any more time and download it!

14. MotoCMS.com

14 Motocms

Launching a website from scratch in just a few minutes seems to be quite a complicated task, unless… you use MotoCMS. This website builder offers a selection of tools, which make the process much simpler even for inexperienced users.
An intuitive WYSIWYG editor comes with step-by-step guidelines, following which you will cope with the task in no time. A user -friendly interface and a collection of high quality templates help create websites, which are both functional and professionally looking. Versatility of web design features, in its turn, contributes to the efficacy of the process and helps improve the search engine ranking of the website.

15. Typeform.com

15 Typeform

Typeform represents the next-generation of online forms. You can build surveys, quizzes, 360 degree feedback forms, and simple apps. For devs, Typeform has an API so you can integrate its beautiful interface into your next project. You can start using Typeform for free, and upgrade to utilize more advanced features. Take it for a spin today. No sign-up required.

Having the right tools and services at your disposal will make the trick for you. These 15 tools are among the best solutions available and were tested by many companies and freelancers. Try them on your own !

Read More at 15 Awesome Tools That Do The Trick

Categories: Designing, Others Tags:

Breaking Out Of The Box: Design Inspiration (June 2016)

June 8th, 2016 No comments

There’s no doubt that simple design is hard, since it requires much more thought and inspiration. It’s about understanding exactly what your users need. Colors play a major role, and today I’d like to show you a couple of illustrations that may motivate you to try out some new color combinations and techniques.

Breaking Out Of The Box: Design Inspiration (June 2016)

Take a look at the following photographs, posters and book covers that have been created with some really inspiring shades and color palettes, and some even show how to cleverly use negative space. From 3D illustrations to artwork created with ink and watercolors, I’m sure there’s something that’ll spark your inspiration. Be warned though, some of them may even give you wanderlust from just looking at them.

The post Breaking Out Of The Box: Design Inspiration (June 2016) appeared first on Smashing Magazine.

Categories: Others Tags:

10 Top WordPress Email Newsletter Plugins To Get More Email Subscribers

June 7th, 2016 No comments

More than 34% of the people across the globe use emails on a regular basis. That’s more than 2.5 billion people and this number is expected to increase in the coming years. In fact, emails have become a new way for communicating in this era of internet. According to Radicati Group, 109 billion emails out

Categories: Designing, Others Tags:

139 Animation Effects – Animate.css in Adobe Muse

June 7th, 2016 No comments
Muse For You - The Animator Widget - Adobe Muse CC

Choose from 139 Animation Effects for your Adobe Muse website. No Coding Skills Required.

Website animations are becoming more and more popular on the web today. Animations can make your website stand out and give it more life. Two of the more popular website animation libraries are Animate.css and Magic.css. Animate.css is well known within the web design community and many web designers and developers use it within their website. Magic.css, although not as popular as Animate.css, has many great animations that you can add to your website. With these libraries you can have elements rotate, fade in, fade out, flip, bounce, shake, pulse, vanish in, vanish out, bounce in, etc. You can visit the above libraries to see all of the animations.

Animate.css Image

Magic.css Image

This gave me the idea to create a widget for Adobe Muse that combined both of these libraries and allowed users to add these animations to their Adobe Muse website. I called the widget “The Animator Widget,” a name I thought was fitting for what it does :). In total there are 139 web animations that you can add to any element on your Adobe Muse website. All you have to do is add the widget, assign the widget to the element, and you immediately have animation on your website. This makes web designing in Adobe Muse a lot of fun. You can have the animation start on load, on start, on hover, on click, or on scroll. This allows you to completely customize how you would like your users to experience the animation.

Muse For You - The Animator Widget - Adobe Muse CC

The Animator Widget Cover Art

Features Include:

  • Choose from 139 different animations
  • Set the duration of the animation
  • Add a delay to the animation before it starts
  • Set how many times you would like the animation to repeat
  • Infinitely loop the animation
  • Add to any element on your Adobe Muse website
  • Lightweight for your website

Trigger Animations:

  • On Load
  • On Start
  • On Hover
  • On Click
  • On Scroll

It is no wonder this widget has been one of the most popular in the Muse For You Shop. Web designers and developers love engaging their audience with animations. You can choose from 139 animations and completely customize how elements animate within your Adobe Muse website. Watch the video tutorial above to see the widget in action and how it works. To access the widget visit http://museforyoushop.com.

Read More at 139 Animation Effects – Animate.css in Adobe Muse

Categories: Designing, Others Tags:

Run Multiple Find & Replace Commands in Sublime Text

June 7th, 2016 No comments

I run Find & Replace commands a lot. Sometimes I’m changing a class name. Sometimes I’m looking for a function reference and want to make sure all instances have been accounted for. Sometimes I’m working on an article and and some conversion process requires some global changes. I’ve often wished I could run a single command to run all the Find & Replace commands I normally have to do individually. I finally web searched my way through a solution so figured I’d write it down.

Install the RegReplace Package

There is no way to do this directly within Sublime Text, so we’ll need a little help. RegReplace works very nicely for this.

Package control is typically the easiest way to do this kind of thing:

Edit the User Settings

The settings for this package is where you define all the find & replace commands you want to be able to call. You add new objects to the replacements section in the JSON. It’s fairly self explanitory. Here’s two I added that I’ll want to be running together:

{
    "replacements": {

        "remove_opening_ps": {
            "find": "<p>",
            "replace": "",
            "greedy": true,
            "case": false
        },
        "remove_closing_ps": {
            "find": "</p>",
            "replace": "",
            "greedy": true,
            "case": false
        }, 

}

Edit the User Commands

The find & replace chunks we set up don’t do anything by themselves, we need to attach them to a command. This chunk of config is an array of commands we can add to. We could call our two new find/replace bits in a single command we create, like this:

[
    {
        "caption": "Reg Replace: Remove All P's",
        "command": "reg_replace",
        "args": {
            "replacements": [
                "remove_opening_ps",
                "remove_closing_ps"
            ]
        }
    },
]

You can name the command (the caption) whatever you want. It then becomes available as a command to run.

Run the new command!

Easy cheesy.


Run Multiple Find & Replace Commands in Sublime Text is a post from CSS-Tricks

Categories: Designing, Others Tags:

Blog Checklist #2: 10 Things You Should Do After Publishing an Article

June 7th, 2016 No comments
10 Things You Should Do After Publishing an Article

Have you ever asked yourself what it is that sets the big blogs apart from the many small ones? Not all factors are as obvious as endurance, for example. A major factor is the way you approach the work of blogging. Because that’s what blogging is. A type of work. The more professional the work is done, the better the chances of creating a large and significant readership and following. Thus, professional bloggers often work with checklists, to make sure they don’t forget anything. For today’s article, I’ve created such a blog checklist for you.

Recently, I’ve brought you another blog checklist that contained things to be done before publishing an article. However, high-quality blogging is more than simply working off a list ending with publishing a post. After the release, there is still a bunch of critical work to do, which is crucial for the quality of your blog. That’s why today, I’ll show you ten things you should do after publishing a post. This second quality check will increase the value of each of your blog’s articles drastically.

1 – Share the Post

Immediately after being released, you should share the post on your social networks. Don’t forget any of them. It is essential to get traffic as early as possible. After sharing, it is important to overhaul your post. After the overhaul, you should find out when the majority of your followers is online, using the Facebook statistic function (if you are active on there), and then share your article again during these periods. You should wait for a few days between the first and second sharing.

2 – Review and Correct the Post

I’m sure that you put a lot of time into an article before publishing it. But when you’re like most other bloggers, your articles are guaranteed to contain spelling and style mistakes. Or maybe there are parts of the article that could use more elaboration. That’s why I recommend reading your articles again to remove errors, stylistic quirks, and to elaborate lacking parts.

This sounds like a lot of work, but you should put it in. The quality of your posts increases tremendously. You readers will thank you. On top of that, well-elaborated articles will quickly create your expert reputation on the topic.

3 – Include Your Article in Your Email Newsletter

Your email subscribers are your most loyal readers, as they gave you permission to send them emails. This means a lot, as nowadays, there’s a lot of email spam in everyone’s inbox.

However, before your article is sent to your newsletter list, you should assure that it was corrected and reviewed. Your subscribers aka VIPs are a lot more important than your Facebook followers or fans. Thus, make sure that you only present them high-quality articles.

If you don’t have a newsletter yet, I recommend offering one. Email marketing is still one of the most favorable factors for professional blogs that want to earn money. Of course, this procedure can be automated, by setting the newsletter up to be sent out daily or weekly.

4 – Share Your Article in Your Groups

I’m sure that you’re a member of specific groups within your social networks. Always share your articles with these groups as well. Interesting groups can be found on Facebook, LinkedIn, Xing, and Google+, for instance. If you’re not a member of any group yet, I recommend looking into this topic and then joining groups that deal with your topics. This way you can directly address your target group on social networks.

5 – Link to Your Older, Still Successful Posts

If you publish a lot of articles that don’t become outdated too quickly, you’ll have created genuine gold after some time. You can use these articles again to drive additional traffic to your new articles. Thus, always dig out your most successful old articles and link them to new posts with a similar topic. For one, your old successful articles make sure that your new articles gain more traffic, and at the same time, you’ll build a strong SEO structure, due to the internal linking.

6 – Always Reply to Comments

Getting the first comments on posts is a tough challenge for young and new blogs. Unfortunately, only very few people are willing to leave a comment and discuss the article. That’s why you should never ignore a comment. Make replying to comments your highest priority. This creates an active connection with your readers, which then might just give you their email address for your newsletter. On top of that, Google also pays attention to comments. It is very likely that Google will rank articles with lots of comments higher than articles without comments.

7 – Content Syndication With Partners

When you publish more and more content, you should look for partners in your niche. Over time, these connections can be very advantageous and profitable for both parties. You could post guest articles, which at best boost traffic on the partner’s websites. Additionally, it is possible that the connection results in a content syndication partnership, which could increase your post’s range exponentially.

Once you developed a syndication partnership, you made it. There’s nothing better that can happen to you. You should take advantage of this partnership as often as possible.

This is a Content Syndication:

Content syndication means nothing else than double utilization. Your posts will then be published on your partner’s blog, and your partner’s articles will be displayed on your website. However, you should pay attention to double content as Google doesn’t like that. This can be accomplished by linking the original article: “This article first appeared on yourpage.com”.

Additionally, the article on the partner page should also contain an author bio with a link to the website. The optimal solution would be a canonical link to the original article so that Google is sure that it’s not double content as well.

This is How a Partnership Could Emerge:

Search for the most influential and well-visited blogs in your niche. Contact every single one of them, and ask the bloggers to read and give feedback on your article. Ask them to tell you what you could improve. Not every blogger will reply. But when one of them does, you’ve already gained a lot and went up one stage on the career ladder of bloggers.

If you struggle to find the influencers within your niche, you can use the tool Buzzsumo. One request a day is free.

10 Things You Should Do After Publishing an Article

Buzzsumo Searches Your Niche’s Twitter Influencers For Free.

8 – Convert Your Posts Into Different Formats

Professional blogging is hard work. It’s definitely not enough to write blog posts, and let them die in the depths of the internet. Every article with over 1,000 words and notable traffic is worth being used multiple times. Thus, convert your good posts into different formats and use them again.

How to Use Your Post in Other Formats:

The possibilities are almost infinite. For example, you could use your article as a script for a video. You could divide the script into smaller bits to turn it into a video series. Using it as the base for a podcast is also plausible. Of course, you could also turn it into an ebook, or a checklist. Ebook and checklist could also serve as an “email collector” for the newsletter.

9 – Set Up a Schedule for Social Networks

Most people only share their content once or twice after publishing. Of course, it is important to share the article immediately, but you lose a lot of potential this way. If you write articles that are not outdated after one week but keep their relevance over a longer period, I recommend the following course of action:

Create a Schedule for Months in Advance

Plan the sharing of your articles for months in advance. Don’t share them once or twice, but a lot of times. You could share your valuable articles at least twice a week to assure that they receive maximum attention. To do that, there are multiple tools or services. I use Buffer for that purpose, as it is the best tool in my opinion. It lets you plan your posts for social networks very easily, the posts look appealing, and working with the tool is rather simple.

buffer

The Buffer Interface Directly in the Service’s Web Version.

Buffer also provides the advantage that your posts can look differently for the different networks. In the free version, one profile per platform can post ten planned articles. However, I recommend the “Awesome Plan” for 10 USD a month. With this plan, you can fuel ten profiles with up to 100 scheduled posts per profile.

Buffer is available for:

  • the web – as a browser version
  • iOS
  • Android
  • as a browser extension

10 – Keep an Eye on the Statistics

Always keep a look at the numbers. If you don’t use an analytics software on your blog, quickly sign up for a Google Analytics account. Google’s analysis software is free, very extensive and exact. Google Analytics offers plenty of useful information. You’ll learn how many visitors you have, which articles are the most popular, where the visitors are from, how many pages they look at, how long they stay, and a lot more. When using Google Analytics, it is crucial to pay particular attention to privacy.

You can then use the most relevant data to optimize your posts and your blog, and to develop it consistently. If you use WordPress, you can also look into some of the critical data in your website’s admin area. For that, there’s the free plugin “MonsterInsights“.

(dpe)

Categories: Others Tags:

Freelance mistakes you’ll probably make

June 7th, 2016 No comments

Working as a freelancer means that your business is all about you. You’re the sole person in charge of making the tough decisions. You’ll decide how to market your business, which services to offer and how much to charge.

While that can give you a sense of freedom and power, there is a risk to it all. Having the power to make those tough decisions doesn’t necessarily mean that you’re automatically an expert at making them. It’s quite possible to make the wrong choice and end up in a bad situation.

I’ve been out there freelancing since 1999. Starting out, I felt as if I were smart enough to be successful. In fact, I was a 21 year old kid who had absolutely no clue about the importance of the decisions I was making. I didn’t fully realize what I was getting into.

With that in mind, I’m going to share some situations that I’ve personally been in that were less than ideal (and some tips on avoiding them). Hopefully, it will help to prevent you from becoming entangled in something that isn’t good for you or your business.

Performing tasks that don’t fit with your business

If you’re just starting out, you may not fully have a sense of the boundaries you need to put up. There are some clients out there who will just think of you as a “computer geek”. Therefore, that must mean you’ll gladly take on any task relating to a computer.

It’s hard to focus on web design when you’re getting asked to troubleshoot someone else’s router

I’d like to think of myself as a nice person (although others may see it differently – ha!). So when clients asked me to do things like setup their broadband connection, provide support for their PCs, etc. – I did it. Somehow, I figured I was doing them a one-time favor and that would help build my business. Instead, I’d get calls when that internet connection failed or when Windows crashed. It set me up for being the one to call for these issues.

Going outside the scope of your business can put you on the hook for all sorts of tasks that will take away from what you are trying to accomplish. It’s hard to focus on web design when you’re getting asked to troubleshoot someone else’s router.

That’s not to say you should never give some advice or go the extra mile for a good client. You just need to make it clear that you won’t be an ongoing resource for that type of thing. Use your best judgment and tread carefully.

Working with someone only because you need the money

If you’ve spent any time at all as a freelancer, you’ll know that not all projects or clients are created equally. It’s ideal to work with people who treat you with respect and with whom you can have an open dialogue. And, you’ll want to work on projects that have a clear vision and goals. Getting yourself into a quagmire of a confused project or dealing with a suspect client can take a toll on you physically, emotionally and even financially.

…dealing with a suspect client can take a toll on you physically, emotionally and even financially

There have been a few times in my career when business wasn’t going so well. Desperate for money, I decided to bite the bullet and work with some people and projects I wasn’t really comfortable with. I’ve written before about needing to have a “sixth sense” for people. And, even with that sense of potential problems, I still went ahead and made the wrong choice. It was short-sighted and I regretted it almost immediately.

Obviously, everyone has financial concerns. We all have bills to pay and mouths to feed. But, unless it’s a dire emergency (like, for example, being evicted from your home), then you need to seriously think about the consequences.

Now, I’m not saying you have to get along splendidly with everyone you work with. Nor should you expect any project to be problem-free or provide you with endless joy. You don’t even have to agree with the point of view of the people you’re working for. But if your thought is to simply take the money, work on the project, then get as far away as possible – it’s probably not a good fit for you.

Making bad business arrangements

There may be times when you’re presented with an opportunity to partner up with another business. It could be that you’re either hiring or taking on some extra work from another freelancer. Or, perhaps you agree to promote a product or service to your clients in exchange for cash. Many times, this can have a very positive effect on your business. Still – there are some pitfalls that can cause you major stress.

I have partnered up with multiple freelancers and businesses over the years in a variety of ways. Most have worked out really well. But there have been times when it has been a struggle. There have been freelancers I’ve partnered with who missed crucial deadlines – leaving me to scramble at the last minute to get a project done. And I’ve been hired on to do projects only to find that either the scope of work was greatly misrepresented or, worse yet, I completed the work only to be left without payment.

Relying on others to hold up their end of the bargain can be difficult

Relying on others to hold up their end of the bargain can be difficult. That’s why it’s important to set up a clear understanding of terms and boundaries before you enter into a business arrangement. It’s always a good idea to put it in writing.

There is no guarantee that this type of relationship will be successful. However, the more you know about what is expected of both you and the other party can help you avoid disaster.

Bad situations can be avoided…most of the time

While the situations above were difficult, the lesson I’ve learned from it all is that most of them could have been avoided. It comes down to being confident and proactive in your approach to business.

Believing in yourself, your talents and your vision for your business is vital. Know that you don’t have to settle for projects or clients that aren’t a good fit. I know, it sounds a bit like relationship advice. But if you have confidence in yourself and what you’re doing, you’ll be on a path to success. You may even find that the quality of your work improves because you’re working on better projects!

The other part of this is being proactive. That means you should research clients and potential business partners. Ask a lot of questions and get a feel for who they are. Take the information you’ve learned and use it to make a wise decision.

Clearly, we can’t prevent ourselves from hitting every pothole in the road. But we can certainly steer ourselves around the worst of them.

Creative Kitchen Font Bundle: 6 Delicious Font Families + Extras – only $18!

Source

Categories: Designing, Others Tags: