Harry Roberts has written about Parker, a stylesheet analysis tool by Katie Fenn. He explains why using tools like Parker are wonderfully helpful to developers:
I use Parker almost daily, and regularly go through it with my clients and workshop attendees. Parker surfaces some really interesting numbers, and if you know what they represent, you can draw some really valuable insights about your CSS from them.
Harry also describes a very important reason as to why developers might use lots of selectors per rule. So instead of containing styles within a single class, such as .btn { }, many developers often chain multiple selectors together, like .btn, .input[type="text"] {}, which tends to lead to unmaintainable code:
The surprisingly still-persistent fear and avoidance of judicious use of classes in our HTML often leads to developers creating (and subsequently maintaining) unwieldy lists of selectors that are all chained to the exact same declarations. By adopting a more class-based architecture, we can begin to recycle these rules in a much more terse and practical way.
Nowadays, many people earn their money in an office and have to sit all day. This is not beneficial to your health at all. The majority of office workers have to deal with back pain and tension at one point in their job. The problem is that humans can adapt to almost anything. Even to things that harm us or make us sick. In this article, we’ll give you some tips on how to prevent the common desk-job afflictions, so that you are not one of the people that suffer from pain and malaise on a daily basis.
Desk-Job Afflictions are Often the Result of Wrong Habits
Of course, you don’t have to accept that your desk-job is harmful to your health. Simply change some of your habits, and you’ll already make a lot of progress. Keep in mind: you spend a significant part of your life at work, so you should focus on a healthy way of working.
1 – Even as a Desk-Worker: Do More Exercise
Hippocrates once said that healthy food and exercise are the way to good health. Thus, you should find ways to do more exercise. Half an hour a day is enough. According to the World Health Organization, however, 60 percent of the world’s population don’t exercise for at least half an hour a day. According to the German magazine Focus, 20 more minutes of exercise are enough to extend your life by about six years. I can’t tell you if that will happen. Nonetheless, exercise is the best cure for tension and back pain.
You Could Try and Implement the Following Tips:
Getting up every 30 minutes to stretch properly should definitely be possible.
Don’t sit when you’re on the phone, stand up and walk around.
Suggest meetings to be held standing up.
You could suggest a walk for two-person meetings.
Move the bin to the opposite end of the room.
Have a short office workout every day. Five minutes are enough.
2 – Always Drink Enough
In the heat of the battle, we sometimes forget to drink sufficient amounts of liquid. However, this will instantly take revenge as we will suffer from fatigue, dizziness, headaches, and the loss of concentration. Not drinking enough always comes with instant malaise. That can easily be avoided.
The Following Tips Can Help You:
Always place a bottle in your desk’s field of vision.
Try juices with low amounts of sugar.
Prepare constant supply. However, you shouldn’t drink more than two cups of coffee.
You prefer drinking tea? Make sure that your favorite types of tea are always available in your office.
For meetings and longer phone calls, always have a drink at hand.
3 – A Daily Office Workout Helps Immensely
Sitting is poison for our body. Joints and muscles brace, and you won’t have to wait for the back pain. Exercising in between work is probably the best thing you can do. That’s not always possible. Thus, Ergotopia has developed a short, five-minute office workout which can be integrated into your work routine very easily.
Check out that video. It is in German, but the moving images speak for themselves:
4 – Switch Up Your Work Routine
I can’t tell you this enough. It affects your entire work environment and is not only worth a mint for monotonous work. It can also be used for health aspects. Switching up your work routine means: only work sitting down when necessary. Work standing as much as possible. You could walk around while being on the phone with someone, or switch the room for certain tasks.
Longer letters can be read in different places. Of course, you know best what you could change. Maybe, you could create a work plan for varied tasks, so you know in advance which tasks you can do where and how. The main thing is to bring variety into your work routine.
5 – Against Thick Air: Ventilate Regularly
In an office, the air is often thick. I’m talking about the quality of the air in your office. Oftentimes, the air in open-plan offices is a lot worse than in small one-person offices. The more people sit in one room, the worse the air quality. The amount of carbon dioxide in a room increases drastically. The room climate doesn’t only depend on the people’s oxygen consumption, but also on the emissions and dust of the devices.
Did you know that poorly ventilated office rooms can cause a plethora of diseases? Headaches, respiratory diseases, colds, and a lot more can be resulting from a poor room climate. Thus, always make sure that the office room is ventilated properly. Ventilating once an hour can’t be harmful, but it can prevent diseases.
6 – Avoid the Food Coma
You work for a large company that runs a canteen? Take a look at the majority of food that is offered. Most of the time, it will be very greasy food, as it’s very cheap to cook. Greasy food isn’t always bad, at least not when you have to deal with a lot of physical work. But any person with a desk-job will slide into the food coma this way.
Food coma means that you will feel uncomfortable after eating. The food is heavy on the stomach, and you become tired. On top of that, your work motivation will drop immensely. That’s why you should pay attention to a reasonable ingestion. Eat lighter things, eat more salat, or bring your food from home. It’s better to eat multiple small meals than one or two large ones.
It’s also important to take your time with breakfast. Also, make sure to consume light but filling meals. Many people will recommend whole-grain bread or cereal. However, both are rich in sugar. I recommend reading the percentage values of the ingredients. By the way, a roll with Nutella on it has fewer calories than a bowl of cereal. Always have an eye on your calory consumption.
7 – Don’t Let Yourself Get Stressed
Stress is one of the factors that can really make you sick. Always keep the stress levels low.
Stress is like a spice – the right amount enriches the flavor of a meal. Too little makes the food taste stale, too much will choke you.
– Donald A. Tubesing
There are many things you can do to too much stress. However, you should know in advance that stress is created inside of you. Thus, you are the only one that can lower your stress levels. I can recommend the following things:
Every evening, you should prioritize the tasks of the next day regarding importance. A is the most important job and should be completed as soon as possible. After A is done, B is next. B is equivalent to tasks that are important but don’t have to be done instantly. Everything else goes to C.
Learn to delegate if your position allows you to. Tasks that you marked with a C can be delegated. If you can’t delegate them, just forget them.
Take breaks on a regular basis and step away from your desk.
Zone out for a moment, close your eyes and breathe in and out deeply.
Force yourself to smile. A smiling person has a lot less stress to deal with.
8 – Spend Your Breaks Outside
When you have a break, don’t stay in your office, but go out to the fresh air. You can also do that when it’s raining. So go get a good slicker. Relax outside, breathe deeply. Maybe there’s a park nearby? Or a forest? If so, that would be the right place for relaxation. You could also visit a café to zone out. The most important thing is to be outside during your breaks. Short walks can lower your stress levels a lot.
9 – Indoor Plants Improve the Room Climate
Indoor plants improve the room climate and help balance your mind. Looking at them is good for your soul. They also filter the air, which is why they are good for your health as well. In a study, Norwegian scientists found out that indoor plants helped reduce diseases among office workers. [1] The result showed that 30 percent of the staff didn’t have a dry throat anymore, another 30 percent felt less tired, and 37 percent got rid of their cough. Spider plants, dragon trees, aloe vera, umbrella trees, and ivy seem to be especially effective.
10 – Pay Attention to a Healthy Posture
I know. This is really difficult. When I have to work sitting down, I tend to slouch as well. In the heat of the battle, the posture is easily neglected. But these habits are exactly what causes annoying, and painful tension that can be prevented by the correct position. In the beginnning, it will be tough to make sure to sit correctly at all times. But this small effort will help your body very quickly, as it won’t feel any tension pain anymore.
Every week users submit a lot of interesting stuff on our sister site Webdesigner News, highlighting great content from around the web that can be of interest to web designers.
The best way to keep track of all the great stories and news being posted is simply to check out the Webdesigner News site, however, in case you missed some here’s a quick and useful compilation of the most popular designer news that we curated from the past week.
Note that this is only a very small selection of the links that were posted, so don’t miss out and subscribe to our newsletter and follow the site daily for all the news.
That Awkward Moment When Google Fails its own Website Testing Tool
5 Lessons We Can Learn from Japanese Web Design
The Internet’s 10 “Ugliest” Websites
Site Design: Booounce!
Site Design: Waaark.com
Site Design: Ara
Vanilla List
What Needs to Be in your Style Guide? (And How do You Enforce It?)
Improving your CSS with Parker
Website Design: Design Disruptors
Eye-tracking Heat-maps Reveal Best Logos
How Quitting Job to Pursue your Passion is Bullshit
Why Brutalism is the Hottest Trend in Web Design
How Design is Shaping the Future at Tech Giants like Facebook
Mobile UX Design: The Right Ways to Ask Users for Permissions
The Fun Approach to Creating More Successful Websites
On Apple, Steve Jobs, and the Loss of Simplicity
Facebook’s Director of Product Design on the Death of Websites
What UX Designers Can Learn from 1990s Japanese Video Games
PayPal to Halt Operations in Turkey After Losing License, Impacts ‘hundreds of Thousands’
Apple is Working on an AI System that Wipes the Floor with Google and Everyone Else
IBM & Cisco to Bring Watson to IoT
Google Launches Business-friendly Mobile-test
Google Says Mobile Speed will Soon Impact Rankings
Baubauhaus
Want more? No problem! Keep track of top design news from around the web with Webdesigner News.
Every week we feature a set of comics created exclusively for WDD.
The content revolves around web design, blogging and funny situations that we encounter in our daily lives as designers.
These great cartoons are created by Jerry King, an award-winning cartoonist who’s one of the most published, prolific and versatile cartoonists in the world today.
So for a few moments, take a break from your daily routine, have a laugh and enjoy these funny cartoons.
Feel free to leave your comments and suggestions below as well as any related stories of your own…
A matter of priorities
Leave some mystery
Maybe that’s not a good thing
Can you relate to these situations? Please share your funny stories and comments below…
Have you ever looked at a font and thought: “I could do that!”? Well, now you can—for a fraction of the price of professional font publishing software.
Our sister-site, MightyDeals, is running a fabulous deal on an incredible plugin: Fontself Maker allows you to convert your own lettering into actual fonts, right inside Adobe Illustrator CC.
You can create all kinds of type styles with this innovative plugin, but where it truly excels is in converting lettering to fonts. Once you have your artwork ready in Illustrator, simply drag and drop your shapes into the Fontself Maker panel. The plugin will even take care of essential font features like kerning. The final font is then exported in Opentype format.
Any shape you like can be converted into a glyph; it’s the perfect way to create icon fonts. You can even take advantage of advanced features like ligatures to create cursive scripts.
The regular price for this awesome plugin is $49, but for a very limited time you can get it for $24, that’s 50% off! Head over to MightyDeals.com to grab this deal today.
Despite valiant efforts to come up with an alternative approach, pop-ups still infest the web. It seems like every site you visit wants you to sign up for a newsletter, take advantage of an offer, visit a sponsor, or provide feedback—all before you’ve actually reached the content you arrived to see.
The value of the pop-up to designers is obvious: a piece of information that doesn’t need to be on screen all the time, doesn’t need to displace other more permanent elements of the design; creating its own window gives it temporary space, and the required prominence, without interrupting the rest of the layout.
Pop-ups can easily be dismissed, often simply by clicking anywhere but on the pop-up. Psychologically they partition content, allow for competition entries, logins, and the like, to be focussed on for a short period of time. Pop-ups also neatly side-step the issue of opening new windows, maintaining a single session and preventing users from passively navigating away from a site.
But pop-ups are also intrusive. They’re a lot like a waiter that tries to take your order before you’ve taken off your jacket. They’re easy to apply to a site with minimal disruption, but easy solutions are rarely good solutions.
Usability testing tends to show that users dislike pop-ups—closing them as soon as possible—but that they also tend to understand them, perhaps because they mimic the basic UI of the OS.
With usability so high on everyone’s agenda, did pop-ups simply evolve at the right time? Are they a stable design pattern, or a particularly persistent design trend?
In this tutorial, we’re going to learn how to design a carousel slider in Adobe Experience Design CC (Adobe XD).
The Steps (1-13)
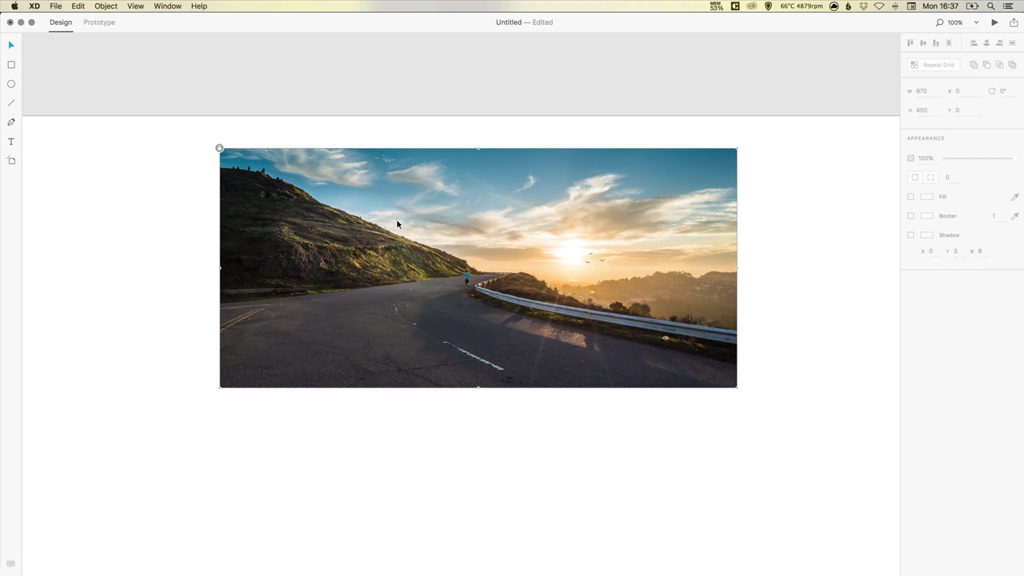
1. From the Welcome Screen create a new document, Web 1920.
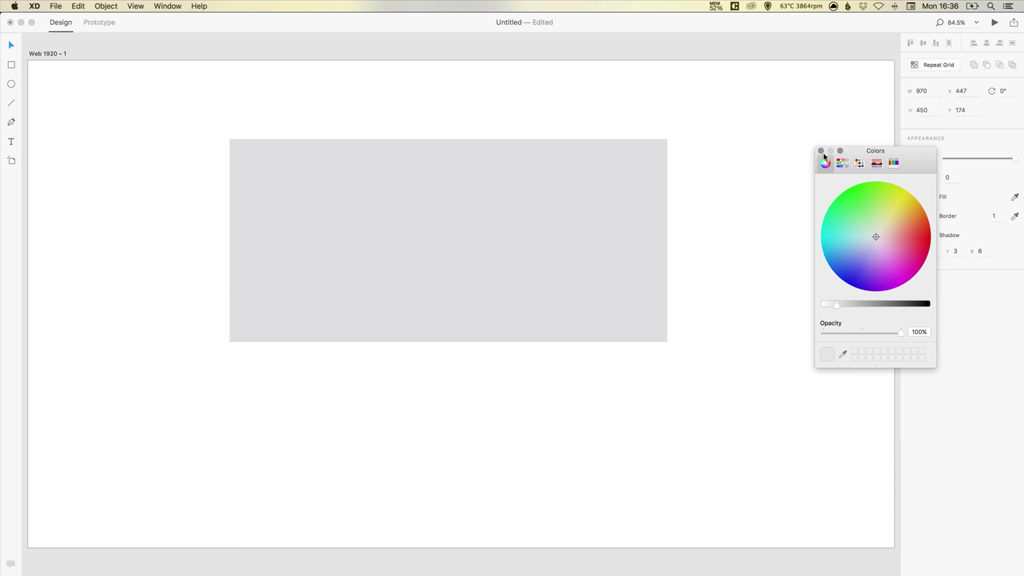
2. Select the Rectangle Tool, and draw a rectangle on the artboard. In the Property Inspector on the right-hand side, select a Width of 970 px, and a Height of 450px. This will be the size of our carousel slider.
3. In the Property Inspector, also deselect the Border option by clicking the tick box, and also select a Fill colour of your choice.
4. Position the rectangle centrally on the artboard with the help of Adobe XD’s smart guides that appear to assist with alignment, and leave a small amount of room above the carousel slider, for where the website navigatation would appear.
5. Locate the image for your first carousel slide on your computer, Left-click and drag into Adobe XD on to the rectangle that we created in Step 2.
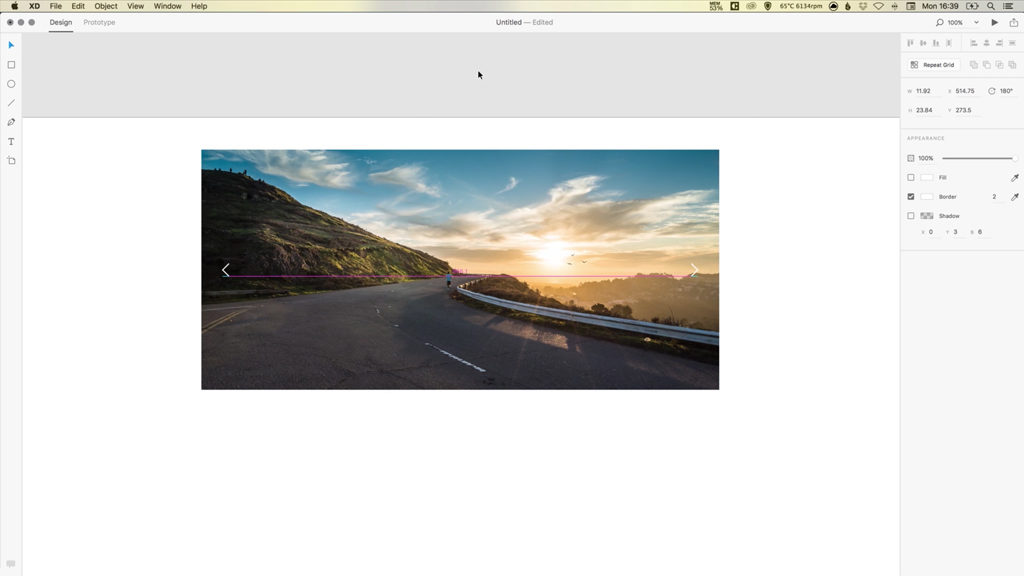
6. Next, select everything on the artboard by dragging over it with your mouse, and go to Object > Lock. This will lock the position of our slider so far, so that in the next few steps we don’t accidentally move anything when working on top of it. Select the same Lock option again, to unlock the objects.
7. Select the Pen Tool, Left-click and hold Shift to draw a diagonal line. Holding Shift will ensure that the line has an angle of 45 degrees. Draw a second line also holding Shift, but going back in the opposite director, to complete the shape of your arrow. This will be the primary means of navigation for our carousel slider.
8. Select your newly created arrow and go to Edit > Duplicate. Position one arrow on the left-hand side of your carousel, pointing left, and position the other arrow on the right-hand side, pointing right.
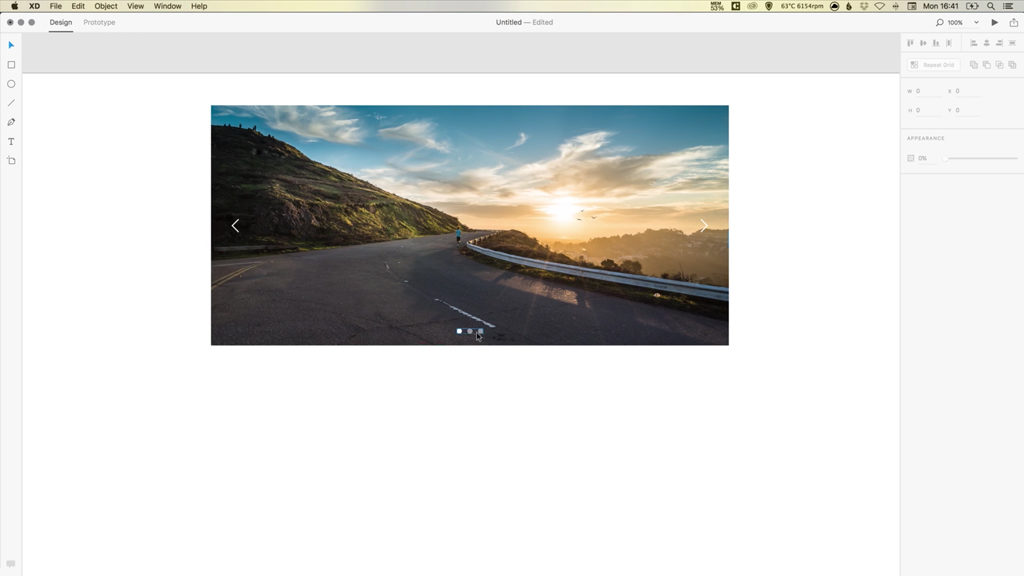
9. Lastly, we’re going to create the secondary navigation. Select the Ellipse Tool and hold Shift to draw a small circle.
10. With this circle selected, go to Edit > Duplicate, and move this duplicated circle slightly to the right of the first circle. Repeat as many times as necessary, depending on the number of carousel slides that you would like to include. Adobe XD smart guides will assist in spacing the circles an equal distance apart.
11. Select one circle, and give this circle a Fill colour of your choice – this is going to represent our ‘active’ carousel slide.
12. Select all of the other circles, select a colour, and reduce the Opacity of these circles in the Appearance options on the right-hand side. The goal here is to communicate to the user that one slide in particular is ‘active’ – and the other slides, although they are there to be viewed, are currently ‘inactive’.
13. Lastly, hold Shift and select all of these circles and go to Object > Group, and drag this group to position centrally within the carousel slider.
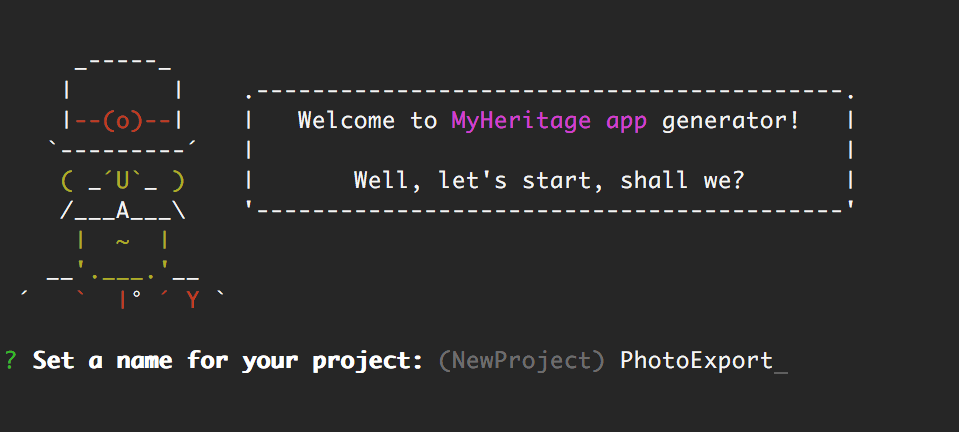
The following is a guest post by Noam Elboim, a developer at myheritage.com. Noam has dove head-first into Yeoman – from not knowing anything or understanding how it could help at work, to building a custom generator just for them. If you think a tool to help you scaffold out new projects to your liking could help you, check out Noam’s journey!
On my first day at MyHeritage, I remember this exchange with the web development team leader:
Team Lead: You have some experience working with Node.js modules like Yeoman, right?
Me: Yeah, I know a bit.
Team Lead: I think using Yeoman here would save us a bunch of time on creating new pages. Do you think you can manage something like that?
Well, that was my first day; I barely knew where my seat was. However, I remember clearly what I was thinking, and I didn’t understand how Yeoman could help here.
For me, and for many others, Yeoman was a tool to generate a full working application, from zero to hero, in no more than two seconds. It was not for adding parts to an existing application.
I was completely wrong. Allow me to share with you how we created a Node.js module at MyHeritage that extends the functionality of Yeoman to save us tons of time on everyday tasks.
The Problem
Creating new pages in MyHeritage used to be a challenging task. Each new page that was created demanded about two days of work to prepare everything, including asset management, a server-side component and a client-side bootstrap of an application. In short: a large number of files.
Most developers do not create new pages on a regular basis. Before the real work could even begin, a lot of time was required just to understand how to create the new page. Then, once the page was created and the work was “done”, there were still hours of time remaining to debug anything that didn’t work.
Two days was just way too much time to invest in a simple task like that.
A Ray of Hope
A couple of months after my conversation with our team lead, the toll of creating new pages had become significantly greater and we couldn’t continue down that path. We knew that an immediate solution was necessary and that it must be simple, easy to maintain, and most obviously, very fast to use.
First, we broke down the problems associated with creating a new page. The process required a lot of steps, including routing configurations and translations services, running terminal commands for creating certain files (like A/B tests or Sass files) and even running some Gulp tasks (like compiling Sass or creating sprites).
At this point we were certain that extending Yeoman would serve us best, but we still had to figure out how it could satisfy all of these needs while still maintaining its core simplicity and ease of use.
A Few Words on Yeoman
Yeoman helps you to kickstart new projects, prescribing best practices and tools to help you stay productive.
That is the first line on Yeoman’s website and it’s 100% right.
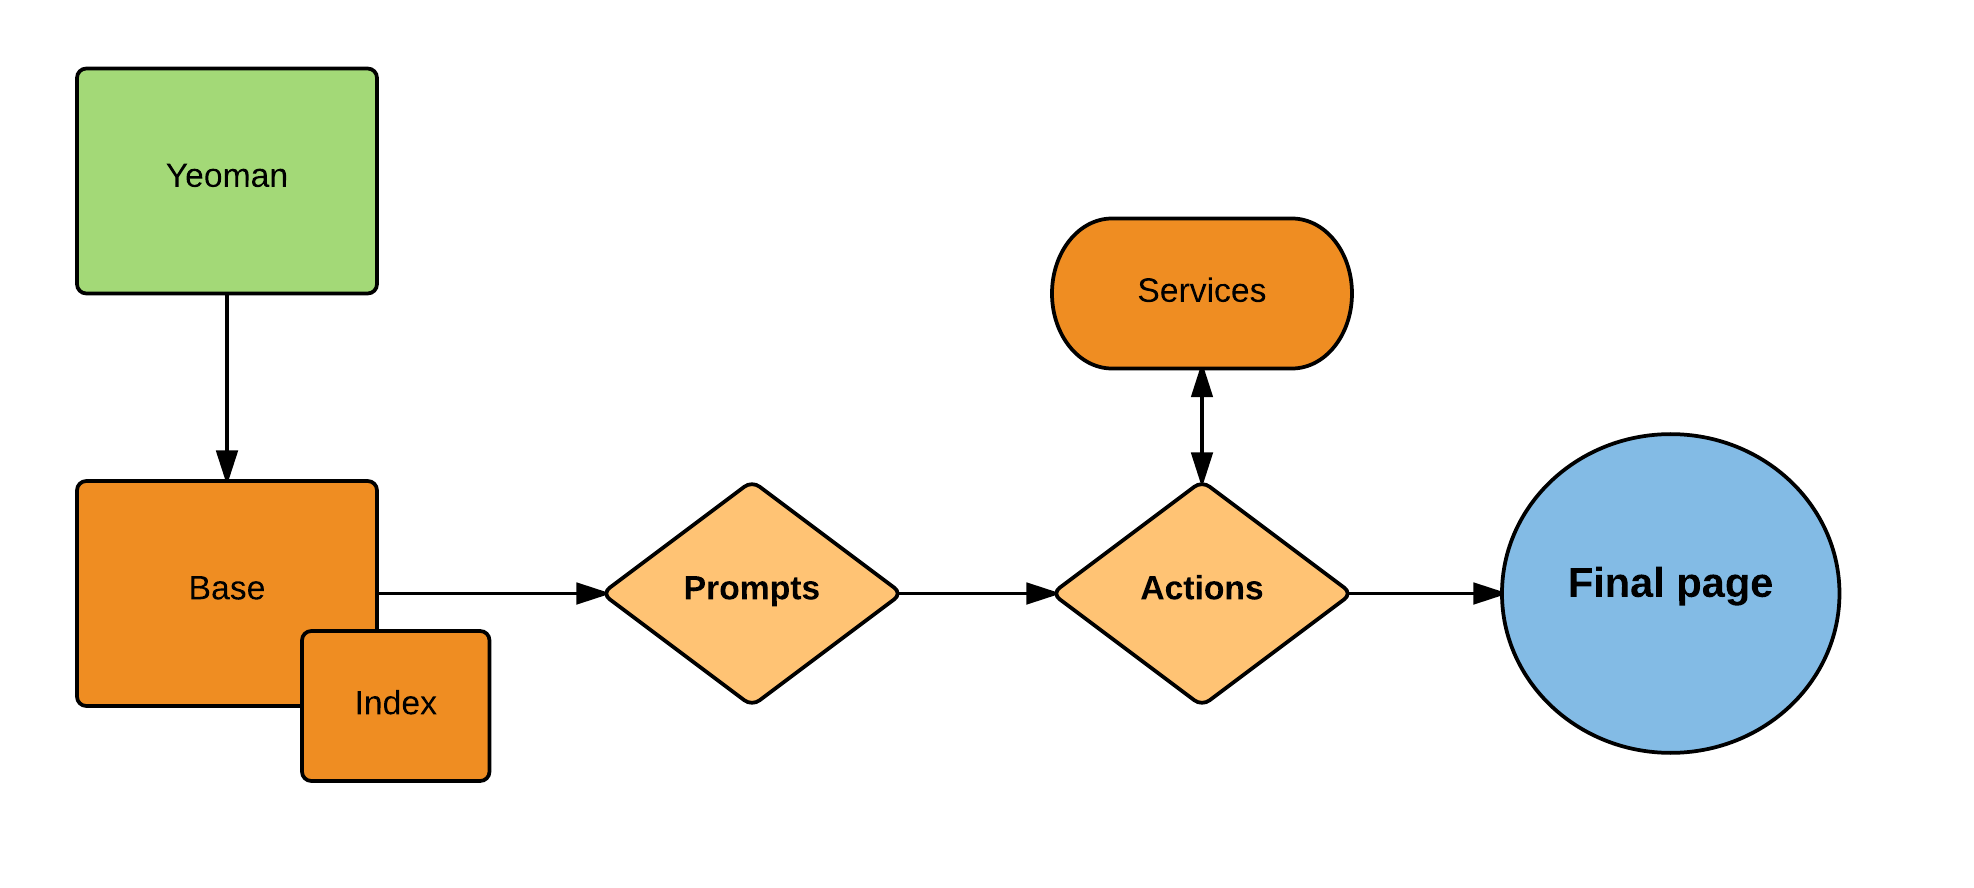
It’s a Node.js module with thousands of generators to choose from. All generators basically work the same — first the user is asked a set of questions in user interfaces that are based on Inquirer.js. Then, using the user’s input, Yeoman generates the proper new files.
A string input prompt for providing the name of the project. A checkbox prompt is used to set the “Master Page” configuration.
Why Yeoman
We had a range of options from using a full working generator to building something from scratch. There are a couple of reasons we chose Yeoman:
First of all, simplicity. Yeoman features a clear API, a generator’s generator for getting started, and serious ease-of-use as a Node.JS module.
Second, maintainability. Yeoman is being used by thousands of people worldwide and it’s based on the Backbone.js Model which allows it to be extended in a way that is easy to understand.
Finally, speed. Simply put: speed is a given with Yeoman.
Our solution
We wanted to add another stage between the two halves of Yeoman’s flow to extend the data that we collect from the user through an ordered set of functions. For example, we may want the ability to get snake_case from CamelCase, or to capture the output of a command executed in the terminal. We require this stage to be configurable via a JSON file.
We break every function down to an object that includes the name of the function to execute, the arguments, and where to store the output. We use Node.JS so that those functions run asynchronously and return promises. When all promises resolve, we generate the files. Here is an example of how the Generator class uses the Yeoman-generator module, which is named “generators”:
var generators = require('yeoman-generator'),
    services, prompts, actions, preActions, mainActions,
    _this;

module.exports = Generator;

/**
 * Generator object for inheritance of Yeoman.Base with different services, prompts and actions files.
 * To use the generator in you Yeoman generator, create a new Generator instance with your local files and export the return value of Generator.getInstance()
 * @param externalService - local generator services.js file
 * @param externalPrompts - local generator prompts.json file
 * @param externalActions - local generator actions.json file
 * @constructor
 */
function Generator (externalService, externalPrompts, externalActions) {
  services = externalService;
  prompts = externalPrompts;
  actions = externalActions;
  preActions  = actions.pre;
  mainActions = actions.main;
}

/**
 * Get instance will create extension to the Yeoman Base with your local dependencies
 * @returns {Object} Yeoman Base extended object
 */
Generator.prototype.getInstance = function () {
  return generators.Base.extend({
    initializing: function () {
      _this = this;
      this.conflicter.force = true; // don't prompt when overriding files
    },
    prompting: function () { /* ... */  },
    writing:  function () { /* ... */  },
    end:  function () { /* ... */  }
  });
};
How to Build a Generator
Once the base is ready, creating a new generator is a piece of cake. We just need to create a new folder containing 4 files and a folder of templates in it. The name of the folder is the name of the generator. The 4 files are:
Prompts — a JSON file full of objects which map prompted questions to the stored data.
[
  {
    "type": "input",
    "name": "name",
    "message": "Name your generator:",
    "default": "newGenerator"
  },
  {
    "type": "list",
    "name": "commonServices",
    "message": "Want some common services:",
    "choices": ["yes", "no"]
  }
]
In this example, the first item will ask the user to “Name your generator:” with the default answer of “newGenerator”. It stores the answer in the data object by the field “name”.
The second item asks a multi-choice question with the options “yes” and “no”. The default is the first choice, “yes”.
Services — a JS file with all the functions we need for extending the data from the user.
var exec  = require('child_process').exec,
  chalk = require('chalk'),
  Q     = require('q');

module.exports.generateSprite = generateSprite;

/**
 * Run gulp sprites in our new sprite folder
 * @param {String} name - the name of the project
 * @return {Object | Promise}
 */
function generateSprite (name) {
  return Q.Promise(function (resolve, reject) {
    console.info(chalk.green("Compiling new sprite files..."));
    if (name) {
      exec('gulp sprites --folder ' + name, function () {
        resolve();
      });
    }
    else reject("Missing name in generateSprite");
  });
}
This example explains a service called “generateSprite”, which will run a terminal command that is already configured for the project. This specific script creates a sprite folder. If the function manages to run the command successfully, it will resolve a promise that will mark the operation as successful. Templates can be generated based on the outcome.
Actions — a JSON file that maps of all the functions that we need to execute before generating files — the “pre” section — and another mapping of template files and their final location where the files will be generated, which is the “main” section.
In the “pre” section there is a task which will run only if the field “name” is defined or true (based on the requirements defined in the “dependencies” array of fields). The arguments to provide in the service function inside the “args” object by the “arguments” array. The output of the function is saved in the location specified by the “output” field. The name of the function is defined by the “action” field. In this implementation you can provide only one function, but it could easily support multiple functions by using an array in “action”.
In the “main” section there is a task with similar functionality. If a field in the “dependencies” is missing or faulty, then the file will not be generated. However, this is not the case with “optionalDependencies” which are, in fact, optional. The fields exposed to the templating engine are defined in the “dependencies” and “optionalDependencies”.
The “templatePath” has the path to the template file and the “destinationPath” is the destination for the file. “destinationPath” can use data from the “pre” section as we see here with the “name” field ().
Notice that we use EJS templating language. Yeoman actually supports additional templating engines beside EJS, like handlebars.
Index — a JS file. Yeoman requires that each generator has an index file. The index links the 3 other files and inherits from the base. Basically, it creates an instance of the base with separated prompts, services and actions.
var Generator   = require('../generator'),
    services    = require('./services'),
    prompts     = require('./prompts'),
    actions     = require('./actions');

var generator = new Generator(services, prompts, actions);

module.exports = generator.getInstance();
As you can see in this example, it creates the instance and exports it to work with Yeoman.
Templates — easy as it sounds: just templates to create files.
<h1>My first template in <%= name %>!</h1>
<% if (spriteFolder) { %>
  I even managed to create sprites for it!
<% } %>
Note that the balance between extending the data and creating templates is completely dependant upon the kind of generator you would like to create. For example, a generator that only creates new files with no sophisticated data may not require extension. On the contrary, we might want a generator that just runs a set of system commands, which will have no templates.
Both cases are possible, and even likely, for some uses. The ability to do both, or just either one, exhibits how flexible it is to use and create a generator for any need.
What We Have Gained
Since we solved our problem by creating the generator for new pages, we have been able to use Yeoman to create more generators, including one that creates a new part in our backend API and another that creates a full working Angular application (with unit tests and all).
As we use Yeoman more and more every day, the pros for us are quite obvious, but there are some cons that we have noticed and you should keep them in mind.
Pros
Fast — Creating a new page now takes us about 1 minute.
Best practices and conventions — Yeoman forces developers to use best practices and helps ensure that conventions are followed and learned by our team. A team can make sure every page made will use the same conventions, no matter which developer created it. Do you want to make sure every page uses some new and shiny service? Just add it in the “new page” generator and you are done.
Cleaner code environment — Because we removed the ability for developers to copy/paste sections of code that they don’t completely understand, bugs tend to appear far less frequently and the unnecessary duplication of code is much less of a problem.
Cons
Maintenance — This is the hard part. Best practices tend to evolve and change. You always have to make sure that the generator is in the forefront of the codebase, which requires investment. It’s not a “hit and run” project — you will have to update it as your codebase and technology evolve.
Fit for all uses — This is more of a challenge than a con, but failure to implement a generator properly could lead to developers who don’t use the generator you have worked long and hard to build. It is important for the generator to be generic but still save the developer a significant amount of time on repetitive and frustrating tasks. For example, instead of implementing a function, put a TODO with some explanation.
In Conclusion
Our generators are very specific to our projects, so those aren’t open source, but there are lots of more widely useful generators you can use or reference as you build your own, like this one for Angular 2.
Using Yeoman really made our everyday work easier and better after we created generators for a lot of repetitive tasks. We even made a generators’ generator! But it also brought to our lives unexpected challenges that we cannot ignore. There is a balance between what should be automated and what needs to be done manually by a developer and it’s a matter of figuring this out for each project and need… But that’s a topic for another time.
There’s no doubt that web fonts are an enormous enrichment for web design, and it has become hard to image it without them. After all, web fonts were what ended the uniform typography with Verdana and its contemporaries. As web fonts have to be downloaded, in contrast to system fonts, they are an additional resource that causes additional data traffic. The following tips will help you optimize your web fonts, and make sure that they will load faster.
Restricting the Font’s Character Set
Well-built fonts can have hundreds of characters. This includes language specific letters such as the German umlaut or the “ß” and those even more exotic characters of other languages. If you only publish in English on your website, you should focus on the character set that forgoes all letters that are not needed.
If you only use a font in capital letters, for headings, for example, you should cross out lower case letters from the character set. This makes the files as small as possible. Especially when it comes to the mobile web, small files are still necessary.
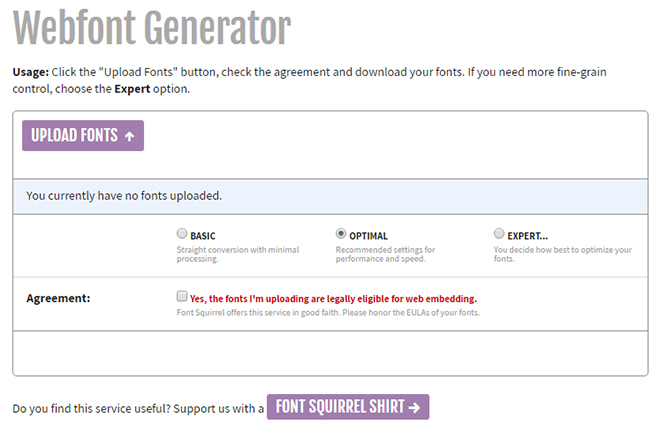
Web Font Generator by Fontsquirrel
Most web font providers like MyFonts for example, offer a web font generator which allows you to define the character set yourself. There, you can choose which languages should be supported. A freely accessible web font generator can also be found at Fontsquirrel. Upload a desktop font, and generate the appropriate web fonts in all standard formats.
Even though there are still a bunch of different web formats like EOF and TTF that are being used, the WOFF format has become the standard by now. There’s already a successor in WOFF2, which creates much smaller font files. Thus, you should consider both WOFF and WOFF2. The browsers that already support the new format can then download smaller files.
Web font generators like the one by Fontsquirrel already support the new format.
Restricting the Character Set Via CSS
Modern browsers also support another option to restrict a font file’s character set, known as the CSS attribute “unicode-range.” It can be used to define individual characters or character areas of a font. Then, the browser will only download the fonts that are within the defined Unicode area.
In the first example, we create a Unicode area that contains the code points “U+0025” to “U+00FF”. In the second example, a wildcard is placed. In the final example, the first two areas are combined.
Using the “Lobsters” for the Unicode Area “U+0026” (Ampersand)
Unfortunately, not all browsers support this characteristic. Internet Explorer and Edge, both only display the symbols that are in the defined Unicode area in the browser, but still download the entire character set.
Compressing and Caching Fonts
Last but not least, there’s a server-side option to compress a font. For example, “.htaccess” allows you to make sure that the font files shrink via deflate before being sent to the browser. This reduces the file size during the transfer, which once again slims the amount of files that has to be transferred.
On top of that, you should use “.htaccess” to make sure that your font files are cached in the browser. No changes occur when it comes to font files, which is why a very generous period can be set up for the caching.
In the example, “ExpiresByType” is used, so that the font stays cached for a year, and additionally, “AddOutputFilterByType” applies the deflate compression.
In times where Facebook announces to track all web users whenever it can, it feels weird to work on disaster management tools. You may now ask why, but if you consider what data you work with in such a project, you’re likely to be monitored because of a lot of keywords in there.
And that’s what bothers me most: That people who want to do good need to fear that they’re under complete surveillance. I like Tor and secure VPNs more than ever for that reason. Speaking about web development, here’s why using Tor or VPNs for testing performance is a great idea.