Archive

Archive for June, 2016

InVision reveals design industry stats

June 17th, 2016 No comments

What is a design-driven organization, according to designers? What organizations put a legitimate emphasis on design? Conversely, which industries seem to lag behind the rest? All of these questions and more are answered in InVision’s first ever Product Design Trends Report.

This global survey that polled more than 1650 designers in 65 countries across the world offers an enlightening and insightful look into the state of design and the industry today. All of the respondents provided information on their: careers, education levels, compensation ranges, roles in the industry, income variables, design tool preferences, and purchasing habits.

More topics are also covered in this wide-ranging survey that seeks to identify what types of organizations really value design. As design has established itself as a potent force in companies today, many are interested in determining how and if these organizations are harnessing it to the fullest, possible benefit.

Some of the survey answers are truly unexpected while others are interesting and will give you pause. Let’s dive into some of the more memorable data that was uncovered.

  1. Design takes the lead: Design plays a leading role in 38.4% of companies across the world with at least 2000 employees. Interestingly, at startups, this percentage is much higher, with 65% of startups leading with design.

  2. The importance of design: More and more top decision-makers at companies see design as playing a crucial role at their company. This holds true for 33% of female directors versus 36% of male directors; 25% of female managers versus 24% of male managers; 12% of female VPs versus 10% of male VPs; 9% of female C-level executives versus 10% of male C-level executives; and 7% of female entry-level employees versus 8% of male entry-level employees.

  3. Full-time employment: Some 87% of designers enjoy full-time employment. However, there’s a critical difference between self-employed designers and full-time designers: Those who are self-employed earn 3.7% more than full-time designers, no matter where they work.

  4. Teamwork is commonplace: 75% of all designers actually don’t work alone. They work as part of a team, usually within a corporate setting or the headquarters of a company. More specifically, 15% of designers work with a distributed team or remotely while 10% work in a shared-office environment with their teams.

  5. The pay is good: On average, a designer makes $80,606 per year. Those who get paid the most are product designers and usability testers and researchers. These two occupations earn double what marketing and conceptual designers make. Interestingly, men only make a little bit more per year than women in the design industry, with the average male designer taking home $77,112 compared to the average female designer’s $76,014.

  6. Degree holders: The majority of designers have at least a bachelor’s degree (60%). Women are likelier than men to have a higher degree, with 71.5% of female designers holding a bachelor’s degree compared to 55.8% of male designers, and 17.3% of female designers holding a master’s degree compared to 16.9% of male designers.

LAST DAY: Ed’s Market Font Family by Laura Worthington – only $19!

Source

Categories: Designing, Others Tags:

Deal: Lifetime access and unlimited downloads from StockUnlimited

June 16th, 2016 No comments

One of the hottest trends right now is illustration—it’s the perfect way to give your site some contemporary cool. But illustration takes a lot of skill, and a lot of time. Imagine if you had unlimited access to your own illustrator, who could provide exactly what you need, forever? Well, we can’t quite manage that, but we can manage the next best thing via our sister-site MightyDeals: an incredible deal on a lifetime access subscription to StockUnlimited.

They say a picture is worth a thousand words, if that’s true then this deal delivers half a billion words, because StockUnlimited has 500,000+ vectors. StockUnlimited covers illustrations, icons, and all kinds of vector file. You’ll find infographics, icons, banners, backgrounds, animals, transport, food, vintage, beauty, business, and tons more.

With no download limits, caps, or restrictions whatsoever, you’ll be able to download anything you want. And with thousands of new files being added every week, you’ll never exhaust this source of high-quality vector stock.

All files are provided royalty-free for both personal and commercial work. Lifetime access to StockUnlimited usually costs $667, but for a limited time, you can grab it for just $39, that’s 94% off! Head over to MightyDeals.com to grab this deal today.

LAST DAY: Ed’s Market Font Family by Laura Worthington – only $19!

Source

Categories: Designing, Others Tags:

Top Tips On Working with a Remote Development Agency

June 16th, 2016 No comments
image001

You’re a web design professional in need of a coding agency to help you bring your project to a satisfactory conclusion. Where do you turn?

An excellent solution would be a remote coding agency. It’s simply a matter of locating an agency that specializes in coding, has been in the business for some time, and obviously knows what they are doing.

An ideal match will be an agency known for:

  • the quality of its work, and for following good work procedures.
  • its transparency, with each coder’s willingness to take on responsibility.
  • rapid reactions to crisis situations, and the ability to meet agreed upon deadlines.
  • experienced remote coders who are good at what they do, and who have important assignments from key clients under their belts.

There is such a development agency; one you will enjoy and profit from working with.

Tips on Working with a Remote Development Agency

Xfive is a remote development agency with an interesting history and an appealing work ethic as well. Xfive started 10 years ago as a group of freelance coders who decided to work together to make it easier to provide services to large and important clients – Twitter, Threadless, and Fox Enterprises, to name several. It eventually became necessary to establish physical offices, so they could work and communicate better between themselves and with their clients.

Currently working out of several offices, and with a number of remote employees, the Xfive team has built an impressive internal structure, and put in place a set of work procedures along with a company culture that would make employees of most companies envious.

Communicate Deadlines Starting with the First Discussion

This is important. A flexible, client-oriented agency can adjust its workforce and its workload when necessary, to assure your project will be ready when promised.

An example of this situation is Xfive’s collaboration with Luminus Networks, a startup that provide network administration tools. The client wanted to launch the website very fast: “We had a really short deadline to work on the website and I actually didn’t think that anyone would be able to pull together with our website. But I contacted Xfive and thought ‘well, they’ll chop the design at least’. And I was really surprised that they were able to say “Yes, we can do it”! Then I think the first draft was delivered like the day I had it scheduled. So it hadn’t even been a whole day you worked on it” says Caryn, from Luminus Network.

Discuss a Plan and Its Timeline

When you work with a professional development agency, expect a Project Manager to take charge of your project. This designated PM will coordinate project activities on your behalf, take care of everything for you, and report progress. At the outset of the project, you should expect to receive a plan proposal from the PM that outlines project tasks.

image003

Have Weekly Report Meetings

Working with a remote agency doesn’t mean that meetings are not important nor practical. Quite the opposite is true. Unlike many meetings that take place in a meeting room, remote meetings tend to be brief and to the point.

A weekly 20-minute Skype call may suffice, to discuss:

  • tasks completed and delivered that week; with verification of compliance with the brief.
  • a discussion of upcoming priorities and deadlines.

Agree Upon the Project’s Specifications, and Stick with It

Before you seek agreement on your project’s specifications, double-check to make certain they are complete and correct. This is where you want to strive for perfection. An incomplete or erroneous spec can require changes, which in turn can lead to additional time being spent on your project and missed deadlines. Even the simplest modifications can at times require substantial code changes.

Xfive Team members also provide project consultancy. They can help you select the right technology, note possible shortcuts that could save time and money, and advise you upfront if they see problems that may require adjustments in your specifications. That’s the type of consultation and collaboration you want to have.

image005

Remote vs. Local Development Agencies

The agency down the street may serve you well for certain types of development projects, but working with a remote development agency has its advantages – many of them in fact.

A remote development agency likely serves an international market, they have served large clients, and they have a professional staff that is more than capable of taking on projects large and small, and projects of varying complexity and varying degrees of criticality with respect to deadlines.

With a large and diversified staff, as is the case with Xfive, a remote agency is in a better position to fully understand your needs, and can place your project under the types of controls that will ensure you will receive a high-quality deliverable on time.

The Xfive team works on three continents. Between the office staffs and freelancers, language is never a problem. You’ll never find yourself caught up in a communications gap because one side does not completely understand the other. You can always expect quality service, and an affordable price. You will also find that working with Xfive is a pleasing experience, and that you may even learn some useful things about your own projects.

About Xfive

Xfive is a popular new brand that has helped thousands of clients over the past decade, much of that time under the XHTMLized name.. The new name focuses less on the widely-used programming language, and more on the agency culture, where high fives for work well done are a common occurrence. Not only does this culture place an emphasis on employees working together, but on reaching out to their clients and customers as well.

Clients not previously mentioned, include Microsoft, Rogers, and eBay. Xfive has also worked hand-in-glove with numerous digital design and creative agencies and startups. The Xfive team always looks forward to the opportunity to act as an extension to your project team, whether you are a major corporation, a startup, or an individual who has a good idea.

If you are looking for a source for full-service solutions, and one that can expand your capacity for project deliverables, Xfive is that source.

Read More at Top Tips On Working with a Remote Development Agency

Categories: Designing, Others Tags:

11 of the Most Stunning & Minimalistic Beer and Cider Labels Ever

June 16th, 2016 No comments

Beers and ciders that are consumed by most people around the world are nothing special; they’re mass-produced in large factories with little/no variation in flavour between each batch. Typically, the bottle labels are the same as the beer: boring, plain, and offer no real sense of personality behind the brand. It’s usually all about packing

Categories: Designing, Others Tags:

6 simple rules for explaining the web to clients

June 16th, 2016 No comments

One of our biggest challenges when producing client work is communicating technical information effectively with clients. Many developers in our community face similar obstacles. Selling and shipping technical solutions to clients always comes with important communication challenges.

So recently, we brought together ten experienced developers to discuss this issue. Our aim was to come up with key takeaways on fostering a healthy, effective client communication during technical projects. Everyone present agreed that technical simplification is a critical skill for developers: If you want your client to trust you and your expertise, you need to be able to communicate effectively with him/her.

According to them, client communication took between 5-15% of their weekly workload. In this post, we’ll discuss six ways for developers to communicate more effectively with their non-technical clients. Here’s hoping you find helpful insights and examples in here!

1) Choose your communication channels wisely

All communication channels weren’t born equal.

Different clients will prefer different channels. Phone, chat, video, meetings, you name it.

Of course, you should try to adapt to your customer’s favorite channel. It’ll show you’re flexible. However, you should also make sure he/she’s onboard with yours. And yours should definitely be either email or your project management tool.

Why? Because asynchronous, written channels will give you more control over communication.

Right from a project’s start, make it clear that these will be your official communication channels.

They’ll allow you to:

  • verify the validity of your answers;
  • take ample time to formulate and proofread your answers;
  • set the frequency of exchanges to manage expectations.

Live conversations often don’t give you enough time to think things through thoroughly. Yes, it’s important to be available to your client. But you can’t be chatting non-stop during work hours; you’d never get anything done.

If you have significant live exchanges, try to recap key points either via email or your project management tool. One developer we interviewed writes a clear list of reminders and actionable items for both parties right after each meeting. He then sends this list to his clients, every time.

These written communications will act as a precious archive for you, your team, and your client later on.

2) Use visual assets as much as possible

Written content is essential for clearer communications. However, when it comes to technical simplification, there’s another medium you should use intensely: visual assets.

Why? Well, on a biological level, visual content is easier to decode than text and easier to remember for our brain. Hence, showing, not only telling, will work wonders for your communication efforts.

Gabriel, an experienced developer, told us that a decent screen capture tool is the first thing he installs on any new computer: “Sure, clients like when I explain what I’m doing. But they love it even better when I show them what I’m doing.”

For asynchronous communications (emails), always try to attach screenshots, gifs or video captures to illustrate your points. Nothing puts a client more at ease than a bug fix confirmed with a live screen & URL. 🙂

And when you’re in a meeting showing off a new project, live demos should be your go-to tactic. Say you’re discussing the responsive format of a website. Don’t just tell the client it’ll “look good on mobile”. Instead, hand them an actual tablet and let them try for themselves. Visual assets will act as proof that what you’re doing is actually working.

3) Leverage relatable frames of references

Many clients will have at least some experience with the web or technology in general. Try and use these as points of comparison to simplify your technical initiatives or challenges. Most developers we talked to affirmed that referencing technical common ground helped their clients understand better. A few examples:

  • shopping cart and e-commerce modules can be compared to Amazon experiences;
  • social interactions can be illustrated with common features of Facebook or Twitter;
  • content management functionalities can be compared to WordPress’ well-known CMS.

Go ahead and ask your clients what tools, apps or technologies are they using in their lives. Then ask yourself: How can you draw parallels with these to better communicate your point?

Analogies were another popular simplification technique during our interviews. Many developers used simple metaphors to ease their client’s understanding. An analogy that often helps is comparing the building of software, sites and apps to an actual house. Some decisions and material choices need to be done first for the whole thing to stand solidly later on. And some tools you’re using are probably literally like a house’s pre-built foundation. They allow you to kickstart development and get the walls up faster.

4) Be empathetic and constant

A positive attitude will go a long way in client communications and relationships. It’s easy to forget how deep your technical expertise actually is. However, always remind yourself that your client doesn’t necessarily share your knowledge and experience. Try to put yourself in their shoes.

The most important takeaway here: You’re building a relationship, not just software, apps, and websites.

And sending negative signals—frustration, impatience, avoidance—will slowly but surely poison your client relationship.

So at all times, try to be empathetic, patient and constant. Mind your tone, stay calm, and take your time. Especially during live conversations.These attitudes will help appease clients during rough patches, and build trust & appreciation for your expertise.

Being constant is particularly essential. As your project advances, some things are bound to change, or literally go south. So while initial education is important, continuous client communication will determine how healthy you keep your relationship.

Oh, last but not least: your clients are actually paying money for your services. They deserve the better version of yourself, don’t you think?

5) Offer choices, involve clients in decision-making

Using the four tips above will keep your clients aware and confident. And once they’re familiar with technicalities, you can offer them choices. Involving them in decision-making will:

  • stimulate their interest in your work/their project;
  • enhance their sense of agency and control;
  • raise their level of shared responsibility.

And to help make the consequences of these choices clear, attach a business dimension to them: Solution A will give your users more freedom to do X, but will cost 25% more. Solution B will give users limited freedom to do X, but will lower costs by 15%. In your opinion, is the extra amount of freedom to your users worth the increase in price?

6) Know where to draw the line

We’ve seen that good technical simplification has tremendous value for both parties. But it also has its drawbacks. If you try to over-do it, you might lose precious time for you and your clients. So it’s important to know when simplification isn’t worth it.

Maybe it’s just too small a bug to go into details before fixing it. Or maybe it’s too complex an architectural choice to translate it to non-geek speak. In the last case, don’t hesitate to use shortcuts (like simple analogies) to get your point across. Of course, the line here will move depending on the level of your client’s tech-savviness and the depth of your relationship. And if a client asks an explicit answer, you should always try to provide one.

Otherwise, don’t hesitate to leverage that trust you’ve been building: ask them to trust you!

LAST DAY: Ed’s Market Font Family by Laura Worthington – only $19!

Source

Categories: Designing, Others Tags:

The Art Of Layout Testing With Galen Framework

June 16th, 2016 No comments

When designing a graphical user interface, there is always an open question: How do we automate testing for it? And how do we make sure the website layout stays responsive and displays correctly on all kinds of devices with various resolutions? Add to this the complications arising from dynamic content, requirements for internationalization and localization, and it becomes a real challenge.

The Art Of Layout Testing With Galen Framework

In this article, I will guide you through an interesting new layout testing technique. Using Galen Framework, I will provide a detailed tutorial for writing meaningful generalized layout tests, which can be executed in any browser and on any device and at the same time used as a single source of truth in your design documentation.

The post The Art Of Layout Testing With Galen Framework appeared first on Smashing Magazine.

Categories: Others Tags:

Animated SVG with Adobe Animate and Snap.SVG

June 16th, 2016 No comments
snapsvg_framework-640x427

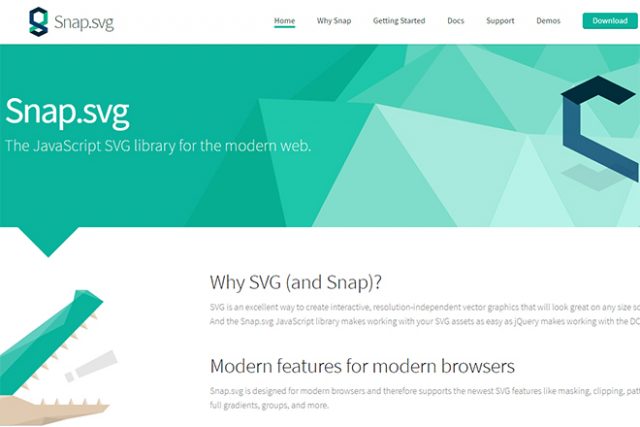
With Animate CC, Adobe finally sounded the bell to the end of Flash. While the renamed animation program still supports Flash, it has moved its main focus towards HTML5 and WebGL. Now, for each new project, you decide whether you want to create an animation via HTML5 canvas or WebGL. Animated SVGs with Animate CC were not possible until recently. The extension “Snap.SVG Animator” expands the Animate CC feature scope by this exact function.

The Framework Snap.SVG

Snap.SVG Allows Vector-Based SVG Animations

Unique about Flash was always the fact that it brought vector-based graphics and animations to the browser. This was not possible with web standards. Apart from fonts, only pixel-based formats like JPEG and GIF were used. With the introduction of HTML5, the XML-based SVG format became increasingly popular as well, as it is vector-based and animatable, similar to Flash.

This gives the SVG format a decisive advantage over HTML5 canvas, which only allows for pixel-based animations. Especially when zooming in, this format’s disadvantage in comparison to SVG becomes evident. As Animate CC is generally vector-based, it is logical to provide vector-based distribution formats.

As SVG animations are realized via JavaScript beyond the CSS3 attributes “transition” and “animation”, there are plenty of frameworks to support you create complex animated SVG. One of the most popular frameworks is called Snap.SVG. It provides a bunch of methods that you can use to create shapes, and to animate them in many different ways.

At that, Snap.SVG also allows you to create interactive animations, which are triggered by a click or tap. When taking a look into the Snap.SVG documentation, you’ll quickly notice how extensive the framework really is. The animate expansion “Snap.SVG Animator” combines the simple controls of Adobe Animate CC and the complex variety of Snap.SVG.

Installing the Free Extension and Getting Started

First, you need to install the free extension “Snap.SVG Animator”. You can find it on the Adobe add-ons website. The extension is available for both the Windows and the Mac version of Adobe Animate CC. You can either install it manually, or directly via Creative Cloud.

snapsvg_assons-640x427
Addon for Animate CC

As soon as “Snap.SVG” is installed, you’ll find a new document type named “SnapSVGAnimator” within Animate CC. So now, you don’t only choose between HTML5, WebGL, and ActionScript, but you also have the option to set up an SVG document. Just like all the other document types, this one will not allow you to switch types later on.

snapsvg_dokumenttyp-640x396
New Type of Document in Animate CC After the Installation of the Extension

Thus, you need to decide which format you want to use for development and design as soon as you start a new project. After that, you can work with Animate CC in the way you usually do. This means, creating shapes, converting them into symbols, and creating animations.

Creating Actions via JavaScript

Now you can also build interactive SVG animations using “Snap.SVG Animator”. While HTML Canvas and WebGL provide code fragments to drag into your action window rather easily, these fragments don’t exist for “SnapSVGAnimator”. However, a well-organized API with the most important methods is provided.

How to easily define a click action for a symbol entity:

this.example.click(function() {
  this.example.play();
});

In the example, clicking the entity “example” will make it play.

Publishing an SVG Document

Publishing your SVG document is very simple and straightforward as well. You’ll choose an output file, and you’ll have the option to influence the compression of the files via extended settings.

Aside from an HTML and a JSON file, the output contains two JavaScript files. These contain the Snap.SVG framework, to assure that all necessary files are generated and made available by Animate CC or the extension, respectively.

(dpe)

Categories: Others Tags:

Court rules in favor of net neutrality

June 16th, 2016 No comments

Yesterday a federal court in the US ruled that the Internet must be treated as a utility, not a luxury. The court, specifically the United States Court of Appeals for the District of Columbia Circuit, has reaffirmed the notion that Internet access is essential.

Anyone who’s been following the legal battle between Internet service providers and the FCC knows what this means. For anyone who hasn’t been paying attention, it means that the FCC gets to tell ISPs how they should operate. This government regulation means that all data on the Internet must be given equal priority.

If this ever changes, companies like Comcast and Time Warner will be able to make website owners pay for faster access to their customers (who are also paying for Internet access in the first place). Basically, larger companies with more money will be able to pay for their sites to load faster, and smaller websites will eat digital dust.

consumers and tech giants alike have rallied behind the FCC to keep net neutrality alive

This would also enable ISPs to slow down large content sites like Hulu and Netflix in order to favor their own video streaming services. Naturally, consumers and tech giants alike have rallied behind the FCC to keep net neutrality alive.

Some of you will remember that last year, the FCC created some new rules to enforce net neutrality, this equal treatment of all data. Even before that, ISPs in the US have been challenging the FCC’s authority, hoping to gain more autonomy. The new rules have made them redouble their legal efforts, however.

They claim that the new rules will discourage competition in the broadband industry, and fear that the FCC will impose regulations on the rates that they are allowed to charge. While the FCC has promised not to, many remain unconvinced.

It’s likely that this case will be taken all the way to the Supreme Court, so we’re not out of the woods yet. It could be debated for another decade. But hey, getting those new Marvel series online is totally worth it.

Create Your Own Fonts in Minutes Right Inside lllustrator – only $24!

Source

Categories: Designing, Others Tags:

Draw a Calendar Icon in Illustrator

June 15th, 2016 No comments
Dansky_Learn How to Draw a Calendar Icon in Adobe Illustrator

In this tutorial, we’re going to learn how to draw a calendar icon in Adobe Illustrator.

The Steps (1-16)

1. Create a New Document.

2. Select the Rectangle Tool and draw a four-sided shape.

3. Remove the fill from the shape, and give it a stroke width of your choice and the colour black. This will be the main body of our calendar icon.

Draw-calendar-icon-illustrator-1

4. Left-click on the inner handles (just inside the edge of the shape’s corners) to adjust the radius and slightly round-off all four corners.

5. Select the Line Segment Tool and Left-Click and hold Shift to draw a horizontal straight line. Make sure that this is the same colour, and uses the same stroke width as in Step 3.

6. Position this new line horizontally central to the shape created in Step 2, and leave a small gap between this line and the top of our four-sided shape.

Draw-calendar-icon-illustrator-2

7. Select the Ellipse Tool, and Left-click and hold Shift to draw a circle. Give this circle the stroke colour black, and a slightly smaller stroke width than the previously created shapes. This circle will represent a pin, that is holding up the calendar.

8. Select the Line Segment Tool, and Left-click and hold Shift to draw a short line at a 45 degree angle. Position this line between the main calendar body and the pin (circle). Hold Alt + Shift and Left-click on the line to drag across to the right and create a copy. Next, go to Object > Transform > Reflect, and reflect this line along the Vertical Axis. Position this ‘reflected’ line on the opposite side of the pin (circle).

9. Next, we’re going to create the calendar days. Select the Rectangle Tool and Left-click and hold Shift to create a square. Position this square within the main body of the calendar, and adjust the size so that you can fit another 30 days/squares approximately in this space.

Draw-calendar-icon-illustrator-3

10. With the first calendar day selected, Left-click and hold Shift to drag to the right and create a copy. After creating this initial copy, press Cmd/Ctrl + D to repeat the last action within Illustrator. Repeat until you have 7 squares in total.

11. Select all 7 squares and repeat Step 10, this time dragging the entire row of squares down to duplicate three additional rows. In total there should be 28 squares following this tutorial.

12. Colour the calendar days (part of previous/upcoming month) as desired, and select all 28 squares, and go to Object > Group. Position this group centrally within the main calendar body.

Draw-calendar-icon-illustrator-4

13. Select a colour of your choice and using the Rectangle Tool draw a four-sided shape that covers the top section of the calendar – we’re going to add a splash of colour here!

14. Position this new rectangle over the top section of the calendar, and then go to Object > Arrange > Send to Back. This ensures that the colour is contained within our main calendar body.

Draw-calendar-icon-illustrator-5

15. Go to Edit > Copy, and Edit > Paste in Place to create a copy of this new coloured rectangle. With this shape selected, drag the top-centre anchor point down to about 50% the height of the original size. Give this shape (now covering the lower half of the coloured rectangle) a slightly darker shade of the colour used in Step 13.

16. Drag over everything on your artboard to select all objects, and go to Object > Group, to group all shapes into one object that can then be easily moved around the artboard.

Draw-calendar-icon-illustrator-6

Download Adobe Illustrator.

Read More at Draw a Calendar Icon in Illustrator

Categories: Designing, Others Tags:

Git’s Patch Mode

June 15th, 2016 No comments

Let’s say we’ve just changed some CSS in a file and we want to stage it with Git. You might do something like this:

git add styles.css

…and then we’d want to make a commit with that staged code:

git commit -m "Fixed the CSS"

I’ve been doing this for a long time, but there’s lots of problems with this approach. For one, what happens if you changed more than one thing in `styles.css`? Perhaps we changed the borders of an element and then we changed the background color of an element that’s completely unrelated to the first. Well, it’s going to be very difficult to understand the history of our commits if we run git log.

This is where Git’s patch mode comes in. It’s a thoroughly helpful flag that lets us split parts of a file so that we can stage and commit each part separately.

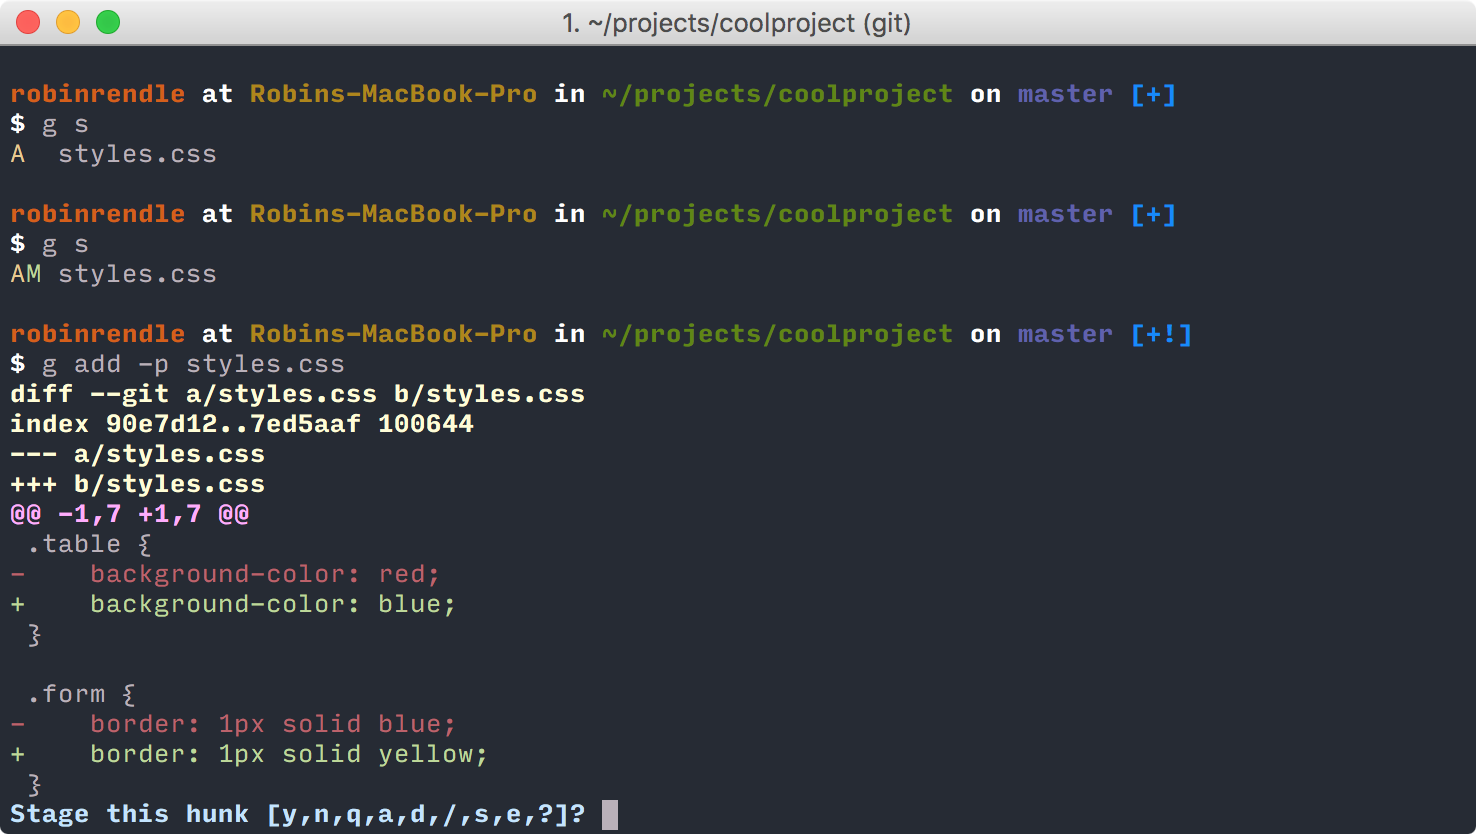
git add -p styles.css

Once we run that command we should see something like this:

We’ve made two changes on two separate elements, but there are all sorts of commands that we can run on something called a “hunk”. What we see here is one part of the codebase, or one hunk, but to see what all these commands mean we can just type ?. This will list all of the commands for us:

In this case, our two changes that we’ve made are currently part of the same hunk, so we’ll need to split them by typing s.

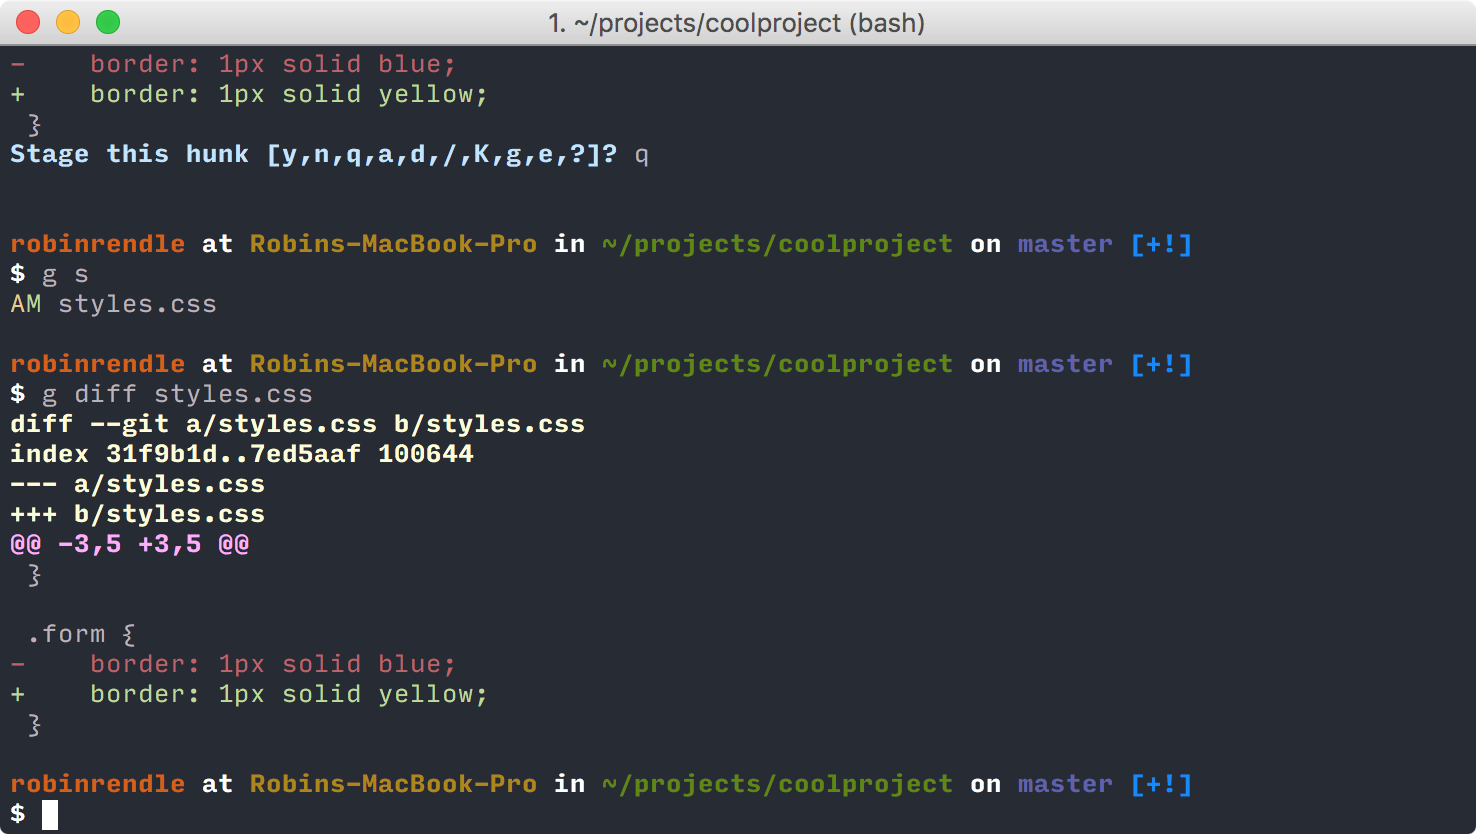
Now we can see that only the changes on the .table class have been selected, which is precisely what we wanted. Then all we have to do is type y to stage that hunk. However, git will give us the option to stage more hunks which is useful when we make similar changes to different parts of the codebase. Yet in this situation we just want to quit out of this process so we’ll need to run q.

This all makes more sense when we type git status into the command line; we’ll see that we’ve added some code from styles.css and if we run git diff styles.css we’ll see that only one line of CSS has been staged:

All that’s left is to make the commit whilst making sure we write something memorable for future reference, such as:

git commit -m "fixed the border of the form"

This way we can scan through our commit history and understand it all much more easily.

Yay for Git’s patch mode!


Git’s Patch Mode is a post from CSS-Tricks

Categories: Designing, Others Tags: