Archive

Archive for July, 2016

Poll: Is Twitter verification a good thing?

July 20th, 2016 No comments

One of the biggest bugbears of social media is trolling: attacking individuals based on race, religion, gender, sexual orientation, or politics. If you’re a woman with the temerity to hold an opinion of any kind you’ll be subject to abuse, threats of sexual violence, and even the murder of your children. If you have the audacity to star in a remake of an 80s kid’s film, then God help you.

And all of this is made possible by anonymity.

Twitter has offered the famous the option of a verified account for a while, principally to help fans navigate the multitude of parody, tribute, and troll accounts that spring up around celebrity. The process for account verification has previously been extremely opaque, and only 0.05% of Twitter accounts are currently verified; however Twitter is now offering the option to apply for verification to all users.

Verification allows you to filter out trolls

Note, that Twitter is allowing all users to apply, you won’t necessarily be approved for verification. To be accepted Twitter needs to decide that verifying your account is in the public interest. To meet the minimum acceptance criteria you’ll need: a verified phone number, a confirmed email address, a bio, a profile photo, a header photo, a birthday, a website, and to set your tweets to public.

There’s no clarification from Twitter on how long you’ll have to wait, or whether it’s relaxing its internal acceptance criteria.

Being verified on Twitter changes the experience in one fundamental way: the notification system allows verified accounts to filter replies to only show other verified accounts. In other words, verification allows you to filter out trolls.

This attempt to tackle abusive behavior will ultimately result in a two-tier Twitter

For most people, anonymity on social media is irrelevant. But for many, anonymity online is essential: Equality campaigners in Saudi Arabia, pro-democracy protestors in China, even the furry fan who prefers not to share his pastime with his co-workers. And furthermore, there are millions of users who simply want to partition their online and offline lives.

The danger with verification is that those people who cannot be verified for their own safety, or won’t be verified because they prefer not to be, are excluded from the global conversation. And this attempt to tackle abusive behavior will ultimately result in a two-tier Twitter, one for the Kardashian-like, and one for the rest of us.

The Icon54 Collection of 2,100 Perfect Icons in 49 Unique Categories – only $19!

Source

Categories: Designing, Others Tags:

Be a better designer by designing less

July 20th, 2016 No comments

Designer’s block haunts you. If you’re a designer you’ve experienced it at one point or another — that feeling you’re stuck in a rut and it feels like you’ll be there forever. Even when you escape designer’s block you have other problems waiting for you. You can’t seem to create the design you want. You end up creating the same designs you always do. The images are different, but the layout, the output feels the same.

It’s not uncommon for designers to feel unoriginal or, like a fraud. It feels like everyone else is doing a better job than you, or just plain better. You look around and you see all of the beautiful and amazing things other designers create. Then you look at your work.

Work is frustrating when you don’t have a system… your system.

It’s common for designers to rely on inspiration sources. For many, that process is never really fleshed out. They find something that inspires them, then they work incredibly hard to create something original. Most struggle.

Read articles on designer’s block and they’ll share tips like: Go get a big cup of coffee, use more color, or try something new. Others suggest networking, staying positive or finding time for inspiration.

These tips, while helpful, don’t address the source of the problem. See, greatness isn’t innate. It’s engineered. Greatness comes from structure. Elite athletes, A-list movie stars, soldiers, you name it. Their success is engineered.

Okay, what does that have to do with designing?

Everything.

  • Soldiers study military strategy, endure operant conditioning, practice hand to hand combat, etc.
  • Doctors practice surgeries and memorize books; they study the body, pathology, processes, etc.
  • Athletes eat a high protein diet, practice their moves and lift weights.
  • Actors practice their lines, study linguistics to copy accents, master psychology, etc.

Can you see the theme? All-star professionals follow a system.

I’m not talking about a system or process you use to design something. This isn’t a process you use to do the work (most designers have that already). No, I’m talking about a system you use to improve yourself to enhance your wisdom, knowledge, understanding and creativity.

Most designers don’t have that kind of system. But every designer needs it. When designer’s block hits we try to force our way through. Conventional wisdom says “just keep designing”.

But the answer is actually the opposite. You become a better designer by designing less.

Whaaat?! Why should I design less?

Because you’re creatively malnourished. If you’re struggling with designers block it’s a sign you’re not getting what you need.

Let’s play pretend for a moment:

Imagine that you’re asked to run a marathon. You’re given a sponsor, professional grade equipment, the best trainers, etc. If you win the race your sponsor promises to give you 300,000 dollars, tax free. Sounds doable right?

Just one catch… you’re not allowed to eat food or drink water for 2 days before the race.

Still doable? For most of us the answer is no.

Designers are running a marathon without “food”. Almost immediately I hear “I use Behance or CSS zen garden, I’m not ‘malnourished’!” If I walk into the grocery store, put the food in my basket, and stare at it, am I full? Of course not! Because I have to eat the food. If I want to be satisfied, I have to make that food a part of me.

It’s no different for you.

As a designer you’re expected to create beauty, order, harmony, and direction. You’re expected to make purpose visual. If you don’t have what you need that becomes difficult. Because you can’t give what you don’t have. If you don’t have anything there’s nothing to give. If you don’t have enough, it shows in your work.

Well fed designers have lots to give

What if you’re malnourished? How do you become a well fed designer? Is there a way to ensure you have everything you need to create amazing and wonderful things?

You bet. Here’s how.

Create a list of places to eat.

If you’re experienced you already have a list of places to go when you need ideas, creativity or knowledge. Here’s a short list for those who are starting out.

Use this list, or build your own. Subscribe to or follow the publishers on your list. If possible, make your selection specific. Spend time looking around on these sites. It’s common for designers to feel guilty when they’re browsing instead of working. Ignore this feeling.

As you’re browsing take note of your (productive) thoughts and feelings.

  • What stands out to you?
  • What do you like?
  • Can you explain why you like it? Think about your answer.

Save anything and everything you find appealing. Add it to your favorites, save it with delicious or pocket. Come back to these later. Choose the items you want to steal

Am I encouraging you to steal someone’s work illegally? No. Am I asking you to share or post someone’s work illegally? Again no. Here’s what I’m suggesting: you copy their work privately, to learn.

Why?

Because everything is a remix. Kirby Ferguson, a New York filmmaker, created the series everything is a remix, where he shows that all “original” material builds off of or remixes material that came before it.

As people, everything we create is based on and influenced by other peoples work. He discovered that noteworthy creators used a simple formula to create amazing things. They copy, transform, and combine.

This is how you deal with designer starvation. All of our beloved movies, our favorite stories, even our technological advances, are remixes of other people’s work. And they all use this formula.

Transform what you’ve stolen

Add your personal touch, your flourishes. Add details to the items you’ve copied. Change them, turn them into something else.

When you transform a design you internalize it. You gain a deep and intuitive understanding of the pieces you’ve copied. You learn how to work with various styles, how to compensate for mistakes and differences, how to flow with someone else’s style.

As a designer, this is how you eat. Eat until you’re full… Then, combine your changes with something else. Combine your transformations; merge them together and you create something completely new. Do it successfully and you’ve absorbed the details and nuances of those you learned from.

Copy, transform, combine.

This system makes designer malnourishment a thing of the past. As you use this system to learn and grow you’ll find that ideas are everywhere. Use this system consistently and your skill grows by leaps and bounds.

You’ll become the amazing designer you want to be, simply by following a system. Ignore the system and your skill begins to fade. The amount of time it takes to lose a skill is proportional to the amount of time it took for you to acquire it. The more consistent you are with your system, the deeper your developmental roots.

At some point though, you have to design something

It’s true. You have to build or create something if you want to get better. But the quality of your designs depends on whether you’ve eaten. The more you eat the better you’ll perform. But only if you use what you’ve eaten. Eating alone won’t get you the results you’re looking for. You have to use what you’ve taken in.

Creative starvation creates designer’s block. If you’re a designer you’ve experienced it at one point or another. This time it’s different. You understand the cause, you won’t be stuck in a rut forever. You have a system.

The Icon54 Collection of 2,100 Perfect Icons in 49 Unique Categories – only $19!

Source

Categories: Designing, Others Tags:

How To Use Arguments And Parameters In ECMAScript 6

July 20th, 2016 No comments

ECMAScript 6 (or ECMAScript 2015) is the newest version of the ECMAScript standard and has remarkably improved parameter handling in JavaScript. We can now use rest parameters, default values and destructuring, among other new features.

How To Use Arguments And Parameters In ECMAScript 6

In this tutorial, we will explore arguments and parameters in detail and see how ECMAScript 6 has upgraded them.

The post How To Use Arguments And Parameters In ECMAScript 6 appeared first on Smashing Magazine.

Categories: Others Tags:

WordPress Backup: The Right Strategy

July 20th, 2016 No comments
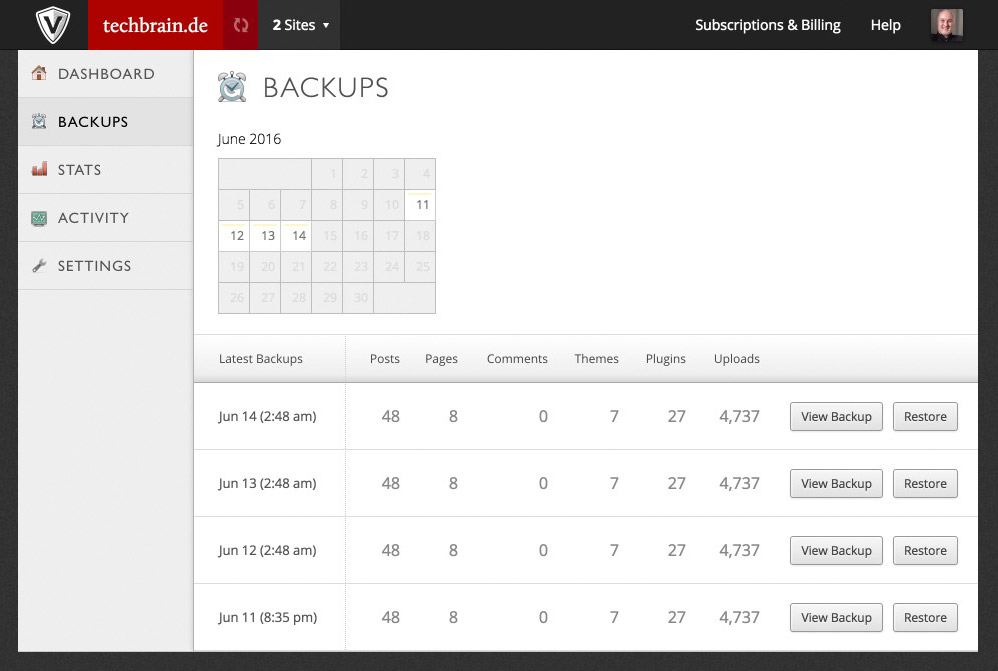
VaultPress WordPress Backup

A WordPress backup strategy is of significant importance for every website and blog. Maybe you already read that over and over and can’t stand hearing about it anymore. Nonetheless, you should consider it immediately, should you not provide regular backups for your blog yet. It can go up in flames a lot faster than you might think.

This is Why a Backup Strategy is of Immense Importance

It can hit any of us at any time. You have to be aware of that. I, for example, thought that I wouldn’t need a backup for each of my websites. As a result, my personal website andreas-hecht.com was not saved in backups, as it didn’t have much content. I had to regret that later on.

A few weeks ago, I saw that my theme – Enfold by Kriesi – needed an update. Expecting nothing evil, I clicked the update button. A few minutes later, I was sitting in front of the debris that used to be my website. Enfold has destroyed it in a matter of seconds. The theme didn’t give out any HTML source code anymore after the opening . I wasn’t even able to bring my website back to life by installing an older version either.

The installation of a WordPress basic theme managed to return my blog content, but the deposited pages were gone forever.

All of that just because I am an idiot that wanted to save five dollars a month. All of my other websites are secured by VaultPress, which I will present in a bit.

Further Information:

Killed in Action: When Your Website Suddenly Dies (in German language)

WordPress Backup Solutions – What’s Available, What Makes Sense

There are many options to create backups for WordPress. Not all of them make sense, as for some – free – versions, extensive knowledge on database administration is required to be able to apply the backups. Thus, the automatic backup solutions are better choices for inexperienced users or those who prefer a professional solution. They allow you to restore your backups with a single click. Good backup solutions are never free. However, the costs are very appropriate.

In the following, I will present two examples for each of the backup solutions.

The Fully Automized Solutions: Backup Services

These backup services always require payments. However, the costs are reasonable and range from five USD to nine Euro a month.

1 – VaultPress

VaultPress should be one of the most popular services for fully automatic WordPress backups. The provided service’s quality and user-friendliness are excellent. By the way, VaultPress is a project by Automattic, the company behind WordPress.

This is how it works: log into VaultPress using your WordPress.com account, enter your URL, as well as your credit card information for the payments. Afterward, install the VaultPress plugin on your blog and enter the registration number you received in the VaultPress dashboard. Now, all you need to do is enter the SFTP or SSH access information for your server so VaultPress can work properly.

The Access Data For Your Server / Your Webhosting Package, Deposited in VaultPress

The Access Data For Your Server / Your Webhosting Package, Deposited in VaultPress.

The service instantly starts doing its job and creates the first backup of your entire website, including the uploads.

Viewing the Backups Created by VaultPress.

Viewing Individual Backups Created by VaultPress.

As you can see, each backup can be restored with just one click.

Important Information:

  • Paid: yes, available starting at 5 USD a month per URL/website
  • What exactly does it create backups of: the entire WordPress installation
  • Where are the backups hosted: on the service’s servers (USA)
  • Support: yes, via email. Fast and, from my experience, good
  • Disadvantages: None, aside from the data storage in the USA
  • Recommendable: Totally, from my own experience
  • Trial period available: no
  • Payment options: credit card only
  • Possible payment rates: Monthly and annually. Yearly payment saves one month’s fee
  • Terms of termination: termination possible at all times via one click from the dashboard
  • A WordPress.com account is required
  • Link to the product

2 – blogVault

WordPress Backup blogVault

BlogVault doesn’t only offer a fast and straightforward backup solution with recovery, but also other interesting, additional functions. One advantage is the test recovery that VaultPress doesn’t have. The service requires the installation of a plugin.

What BlogVault Can do:

  • Backup history of up to 30 days: single pages or the entire website can be restored.
  • One-click-recovery: no fumbling around with database files or something similar.
  • Test Recovery: lets you check if your website was saved entirely. The service provides a test restoration with one-click from their servers.
  • High security: blogVault saves your backups on servers by Hetzner, as well as Amazon S3. Additionally, you’re also able to keep the backup in your Dropbox.
  • Additional functions: blogVault provides easy relocation of a WordPress installation.
  • Email support: currently only in English

Important Information:

  • Paid: yes, starting at 9 Euro a month for one website
  • What exactly does it create backups of: the entire WordPress installation
  • Where are the backups hosted: on the service’s servers at Hetzner, and on Amazon S3
  • Support: yes, via email
  • Disadvantages: no evident ones
  • Recommendable: most likely
  • Trial period available: yes, you get seven days. After that, you’ll be charged
  • Payment options: PayPal only
  • Possible payment rates: monthly and yearly. Annual payments save between 12 and 16 percent.
  • Terms of termination: termination is possible at any time with one click via the dashboard
  • Link to the product

BlogVault sounds promising. I’ll make sure to do some in-depth testing with it shortly. Afterward, I can make safe statements. There is no risk in using the 7-day trial to check if the service meets the expectations.

Manual Solutions via WordPress Plugins

The manual solutions for a WordPress backup are mostly some popular and free plugins. They may be able to create a backup, but they are unable to restore it. Thus, you need to have experience with using phpMyAdmin to get the stored database back into the system. However, there is also a plugin solution that can restore the saved backups. This solution is paid but seems recommendable.

1 – BackupBuddy

wordpress backup BackupBuddy

The User Interface of BackupBuddy

BackupBuddy is another paid backup solution. It claims to protect over half a million WordPress websites since 2010. BackupBuddy also offers backups that are restorable with one click. There are many different types of backups available. You could save the entire website, or just the data, or the database.

A restore feature is provided, and additionally, you can comfortably move a site to another server. Aside from the businesses’ servers, the files are also saved in the Dropbox, on Amazon S3, or Google Drive, as you wish. It’s also possible to download the saved backups.

What BackupBuddy can do:

  • Backup recovery: single areas or the entire website can be restored
  • One-click-recovery: No fumbling around with database files or something similar.
  • High security: BackupBuddy saves your backups on own servers or in your Dropbox. Saving on Amazon S3 and Google Drive is possible as well. On top of that, the backup can be downloaded at any time.
  • Additional functions: BackupBuddy provides an easy relocation of a WordPress installation, as well as fascinating features for developers. Migration, cloning, and a staging website are easy to realize. The staging function is interesting, allowing you to clone a developer page, and keep it up to date with a few clicks. Services for the relocation to a new domain and the automatic replacement of an old domain with a new one are integrated as well. Also, the plugin provides plenty more features and tools. It is very extensive.
  • Ticket support: currently only available in English

Important Information:

  • Paid: yes, starting at 80 USD per year and website. At the moment, you’ll receive 25 percent off when signing up for the newsletter.
  • Updates and support period: one year each, as you pay per year
  • What exactly does it create backups of: the entire WordPress installation or specific areas
  • Where are the backups hosted: on the service’s servers in the USA, or on Amazon S3, Google Drive, or in your own Dropbox.
  • Support: yes, via a ticket system
  • Disadvantages: no obvious ones
  • Recommendable: most likely
  • Trial period available: no
  • Payment options: credit card only
  • Possible payment rates: annually
  • Terms of termination: license runs out automatically when it is not extended. Thus, termination is not necessary.
  • Link to the product

2 – BackWPup – free

BackWPup WordPress Plugin

BackWPup is probably the most popular free backup plugins. It works perfectly fine, at least on more expensive hosting options. On cheap shared-hostings, the plugin often stops with an error message, as the backup job takes longer than accepted by the hoster. That’s my experience with the plugin, at least.

Depending on your needs, the plugin either saves your entire page or only the database. Additionally, a backup for the files (the XML import file) and the plugins can be executed. Furthermore, there are many different security measures available, including the own server, the Dropbox, Amazon S3, FTP, and so on.

BackWPup has one disadvantage, however: it is not capable of restoring backups. This has to be done manually, requiring knowledge on database administration. If you lack this knowledge, an expert has to be hired. A paid version is available too, yet it can’t recover backups either.

An Overview of the Functions:

  • Database backup (requires mysqli)
  • WordPress XML Export
  • Creates a file with the installed plugins
  • Optimizes the database
  • Checks and repairs the database
  • File backup
  • Backups in zip, tar, tar.gz, tar.bz2 format (requires gz, bz2, ZipArchive)
  • Saves the backups on: server, DropBox, Amazon S3, Microsoft Azure, RackSpaceCloud and SugarSync

Important Information:

  • Free on WordPress.org
  • No backup recovery
  • Only basic support via the WordPress support forum
  • Work in progress
  • Developer: Inpsyde GmbH, Frank Bültge, Daniel Hüsken
  • Newest version from: May 2016
  • Download on WordPress.org

Conclusion

A good backup strategy is indispensable. However, there are many trip hazards, especially when it comes to the free solutions. Thus, a paid solution for little money is recommended. Experience shows that, after the installation and activation, you don’t have to take care of backups anymore, as everything runs smoothly in the background. And should the worst case scenario happen, everything is recovered in a few minutes thanks to the restore function.

From my misery, I learned that you should not run a website without backups. Thus, all of my websites have a backup solution now. This lets me sleep calmly again.

(dpe)

Categories: Others Tags:

One Page Scrolling Websites in Adobe Muse

July 20th, 2016 No comments
Muse For You - Anchor Point Scrolling Widget - Unsplash Image

One Page Scrolling Websites in Adobe Muse. No Coding Skills Required.

Adobe Muse CC Logo

One page scrolling websites have been popular for some time now. They allow you to scroll to different sections of the website when clicking on the menu and the user can receive all the information on one page rather than having to navigate to different pages. We have seen them quite a bit with Bootstrap templates and even a few WordPress templates. Adobe Muse is well known for its ability to create a one page scrolling website within minutes.

Muse For You - Anchor Point Scrolling Widget - Unsplash Image

The reason one page websites are so popular is because they are simple to navigate and scrolling to each section of the website can be quite fun. Another name for a one page scrolling website could be an “Anchor Point Scrolling” website. It could be called this because when you are building a one page website you are assigning anchor points to different sections on the website and then assigning menu items to those anchor points. This is what causes the website to scroll to those different sections.

One of my first videos was about creating a one page scrolling website in Adobe Muse. As I started developing more widgets for Adobe Muse I thought it would be interesting to take the one page scrolling concept a bit further. I created a widget called “Anchor Point Scrolling” that allows you to control the speed and easing of the one page scrolling website. This allows you to give your website a unique feel as users are scrolling to the different sections.

Muse For You - Anchor Point Scrolling Widget - Adobe Muse CC

In the video above I go over how to use the “Anchor Point Scrolling” widget and where to access it.

The “Anchor Point Scrolling” widget can be found at http://museforyoushop.com.

Happy Musing :).

Read More at One Page Scrolling Websites in Adobe Muse

Categories: Designing, Others Tags:

Freelancers – Increasing Your Income Isn’t as Difficult as You Think

July 20th, 2016 No comments
8

Like most freelancers, you constantly work at getting better at everything you do, but at times you seem to hit a plateau. If only you could find a way to increase your productivity, improve the quality of your deliverables, or both.

This may not be as difficult as you think. Half of the freelancers questioned in a recent study, expect their income situation to improve this year. And a third of them reported an increased demand for the type of work they do.

The truth is, this is a great time to be a web design freelancer. The demand for web freelancing services is growing, as is the number of prospective clients who are willing to pay more.

You can try to emulate what seems to work for others, but what works for someone else won’t always work for you. A better approach is to take the time to understand how it is possible to work less for more income. And once you’ve discovered how you can do it, go with it.

Here are some suggestions to help you do just that.

Pre-Built Websites Will Get You Off to a Running Start

Finding time-saving tools and techniques is a great way to start, but that’s only half the battle. If you want your income to keep moving in an upward direction, you also need to improve the quality of your work.

Greater productivity. Higher quality? Is there a tool that offers both?

The answer is yes.

Start using pre-built websites, like these:

A cool homepage like this one will delight almost any client.

Why should you use pre-built websites?

  • Your final deliverable will look different once you’ve finished customizing, but some of the design work has already been done for you. You’re off to a fast start.
  • When you want to give your client a preview, one based upon a pre-built website is far superior to a wireframe or mockup. You will be giving your client something of definite value to review and comment on.
  • UX principles are already embedded. This can save you a ton of time, and you can focus on what you love most and do best – design.

Be Theme has 210+ of these pre-built websites. It’s easy to find a great starting point for building almost any type of business – like these three:

Be VPN

2

Clean, Crisp, and Professional

Be Cars’ Smooth Effects

3

The Selling Power of Images

Be Minimal

4

Elegance – Befitting of a Gallery

Don’t Neglect Passive Income Opportunities

Although most of the money you make comes from the services you provide to others, you can also apply your freelancing skills and knowledge toward generating passive income. Passive income has its good points; like making money 24/7 – including when you’re asleep.

Passive income also enables you to free up time for other pursuits, whether they are devoted to making more money or not. Having a source of extra income can also allow you to be a bit choosier as to which freelancing assignments you are willing to take on.

  • You might consider affiliate marketing. Affiliate marketing can be a reliable source of income; plus, you already know how to design a money-making website.
  • If you create some of your own design elements, consider selling them, and designing and selling even more icons, vectors, or markups, on your own website or through another.
  • Write an eBook. Take stock of your knowledge, skills, and experience. It doesn’t necessarily have to be about web design or freelancing.
  • Quality photos can be money makers, but only consider this approach if you will have professional-grade photos to sell. If not, apply your graphics skills to t-shirts, coffee mugs, and similar items for sale online through the online store you’ve created using a pre-built website.

Like this one below:

6

Since You are in Business, You Need to Lower Your Risks

If you don’t know what you’re doing, don’t do too much of it. If you want to realize the potential money-making benefits from your freelancing, you have to know what you are doing – from a business perspective.

7

When you are running a business, time is money. Take stock of your current work habits, see where you can improve, and where you can eliminate any habits or procedures that are time wasters.

Working smarter exposes you to far less risk than working harder does. Working harder increases your chances of making mistakes, especially if you find yourself multitasking.

A great example of working smarter is to base your website-building projects on pre-built websites. Customizing and tweaking involves far less risk that starting from scratch.

Working on a long-term assignment can give you a sense of security, and put you in a comfort zone. If you truly want to improve, you need to be nimble and be willing to prepare yourself to take on new challenges. This may require adding to your skillset and/or using productivity-enhancing tools to their full advantage.

The best advice of all? It’s already been touched upon, but it’s worth emphasizing:

Acquire a business mindset.

Increasing Your Day-to-Day Productivity

Taking stock of your work habits, and searching for the best tools to work with, are too good ways to increase your productivity. Working harder or longer are two of the worst.

If you want to work hard at something that will improve your productivity, and your income, it’s this – discipline.

One of the nice things about freelancing is that, more often than not, you can set your own schedule. You can, and probably do, work from home – another nice thing. But not everyone is disciplined enough to do either, and succeed in their work. You may already have the discipline needed, or you may find some areas where you could improve.

  • It’s important to establish a routine, and stick to it; or better yet, keep working to improve on it.
  • Avoid multitasking, even if you feel you’re good at it. Nine times out of ten, multitasking is a productivity killer.
  • If organizing your time or your work is a challenge, study up on the subject. Try the “touch things only once” approach. It may not be easy at first, but it’s a great way to keep everything under control.

8

Avoid working when you should be devoting your time to other things, or others.

If you made a New Year’s resolution to find ways to increase your freelancing income, 2016 is a good year to make that happen. If you are willing to seek them out, there are plenty of gigs that pay well, both long- and short-term.

Low-paying work is easier to find; but that is always the case. If you’re willing to work at it, you should have no trouble finding work that pays well and keeps you busy. If you take some of the recommendations discussed here, and treat your freelancing activities as a business, you should see your income start to increase.

Couple a business mindset with the right tools, and you will do well. You can get yourself off to a fantastic start by taking a good, hard look at all of the benefits Be Theme, with its huge selection of pre-built websites, brings to the table.

Take extra time to view this Be Theme video and pre-built websites. You’ll soon become convinced that you’ve come across a tool that will not increase your productivity, but put you in a better position to take on those tempting, and more lucrative, assignments.

Read More at Freelancers – Increasing Your Income Isn’t as Difficult as You Think

Categories: Designing, Others Tags:

We teach clients the skills to do our job, and you should too

July 19th, 2016 No comments

There are two types of design clients in the design world: Those with more money than time, and those with more time than money.

The former usually prefer to take a hands-off approach. They’re happy to hire out all tasks to you, large or small, and then pay the bill when it comes. It’s smooth sailing.

It’s the latter type of clients that can be trouble.

These bootstrapping clients are hard-pressed to dig up the funds to send run-of-the-mill projects to a design team. They’re able to invest in beautiful branding, but from there on out they try to skate by with a DIY approach to save money. They drop their logo file into a haphazard Word document to DIY their mail flyers. They fiddle for hours to create new web banners in Paint. They use the wrong fonts, swap out their colors willy-nilly, and probably drop in some pixelated clip art while they’re at it.

And that sucks for you big time: Your beautiful work is squandered.

Instead, teach your clients how to do your job.

If you know your bootstrapping clients are going to start revving up their DIY engines, why not do what you can to ensure they find success – and your work doesn’t end up next to crappy clip art? Why not give them tools they can use to create successful flyers, social media graphics, signage, or what have you – without having to rely on you?

Get them set up with their proper fonts, brand colors, and logo files all in one place (there are a few easy-to-use online options out there, like Canva or Visage). Create templates they can use again and again. And then teach your client how to handle their own design projects – without hiring out the job to you.

Teach your client how to handle their own design projects – without hiring out the job to you

(Yes, really!)

I’m not saying to do all this for free. Charge your hourly rate to get them all set up and on their way. Or charge a flat fee. Or build it into your pricing structure. It doesn’t matter how you do it. In the end, the empowerment and education you provide your clients will come back to you.

Let me give an example:

Case study in empowerment

A cash-strapped client hit us up one Friday evening. Was there any way we could put together a Facebook ad for an event happening on Sunday — ASAP?

Um, no, not on that timeline…

But this was the perfect time for them to use the templates we’d set up for them on an online design program just one week earlier. We encouraged them to go for it.

They were able to open up their online account and use the on-brand photos, fonts, and colors we’d already prepared for precisely this type of occasion. And when the ad came out, you know what? It was PRETTY DANG GOOD for someone with no design background.

Would we have adjusted the layout? Yes. Would our text spacing have been more even? Yes. Would our composition have been cleaner? Yes. But how we would have done it differently is not the point.

The point is that it was entirely on-brand for our client. It was a successful ad that, under circumstances where we hadn’t been willing to teach our clients to spread their own wings, could easily have been a bunch of word art thrown together on a rainbow background in Paint.

That first successful ad proved to our client that they can create successful designs on their own time. Since then, they’ve run more campaigns on their own — totaling hours of work they wouldn’t be able to afford to hire us to do — and generated more business each time.

You’re not obsolete, far from it

There’s one BIG, exasperated question that we’re asked again and again by our family, friends, and other design firms: “Why do you teach your clients how to do what they pay you to do? You’re going to put yourselves out of business!”

Here’s the honest answer: That’s not the case at all. We’re not cutting off business by empowering clients. In fact, we’re generating more. How? It’s simple enough to anyone, after spending time in our studio or speaking with our clients: Trust.

We walk the walk when we say that we want to empower small businesses to succeed through high-quality design.

Clients love and trust the transparency this empowerment provides

Yes, it would be awesome if all small businesses could hire us to handle their ongoing needs after we work with them to create original branding or launch their new website. But we know that lots of small businesses don’t have the budget for that kind of ongoing investment – especially if they’re just starting out.

Getting clients set up to use a simple, online design program and teaching them to do our job proves we’ve got their back when they need it. We’re able to demonstrate that we’ve got the foresight to set them up for success and want to see them get there. And clients love and trust the transparency this empowerment provides.

So when the time comes for a big project? When their business has grown steadily and they can afford to hire us? When they find they have more money than time?

They know who to partner with. And they know right where to find us.

This model of trust and empowerment shouldn’t be the exception in the world of design for small businesses. It should be the norm: really helping small-budget clients succeed is not only the right thing to do, it benefits their business and yours as your reputation for honest commitment grows. And when they’ve reached the point of success where they shift into having more money than time, they’ll be turning to you without a second thought.

22 Powerpoint Templates (7600+ slides) from Slidehack – only $27!

Source

Categories: Designing, Others Tags:

Trump campaign rebrands after web reacts

July 19th, 2016 No comments

Last week, Republican presumptive nominee Donald Trump chose Indiana Governor Mike Pence as his running mate. In keeping with the campaign season, that also means that the campaign released a new logo to commemorate Trump’s choice.

The initial version of the new logo—it’s since been changed—featured a capital “T” for Trump essentially being inserted in a capital “P” for Pence. This part of the logo was colored blue and sat next to red, horizontal bars, mimicking Old Glory. In other words, it was the Trump campaign’s attempt to depict Trump and Pence as the stars of America. The campaign has since pulled this iteration of the logo, probably prompted by the mockery the logo was receiving on social media.

or something@JuddLegum pic.twitter.com/0AJJDFqiSp

— darth™ (@darth) July 15, 2016

There were legitimate design choices in the original: For example, the use of the American flag in the logo showed an understanding of using a visual language that’s immediately familiar to all Americans, as a way of making an instant connection with voters, it’s effective; The positioning of the “T” over the “P” is also symbolic of the fact that Trump is the presidential nominee while Pence is his vice-president choice, so the design communicates that hierarchy as well; The unfortunate positioning of the “T” in the “P” has attracted mockery yet, when looked at from a purely design standpoint, it actually represents a stylized approach to design, a monogram.

Monograms are seen to be conventional and traditional, which is a huge part of Trump’s platform as he courts Republican voters. Further, the use of monograms, is usually associated with richer individuals, so its use in the first version of the Trump/Pence logo intended to convey wealth and status.

In spite of these design touches, the Trump campaign recently pulled the initial logo and replaced it with a less controversial and more conventional logo design, featuring just the type from the first version.

The second version is simple and straightforward: It simply shows Trump’s and Pence’s names stacked on top of each other, with Trump’s name boasting slightly larger type size than Pence’s. Trump’s name is blue while Pence’s is red, and the fonts for both names are clean sans serifs. Underneath their stacked names is Trump’s now-famous slogan: “Make American Great Again!”

According to Trump spokesman Jason Miller, the Trump campaign has a number of logotypes it’s considering. The final, official logo will be revealed this week during the GOP National Convention in Cleveland, Ohio.

22 Powerpoint Templates (7600+ slides) from Slidehack – only $27!

Source

Categories: Designing, Others Tags:

A Deep Dive Into Axure 8: A Comprehensive Review

July 19th, 2016 No comments

Behind every great invention lie dozens of sacrificed prototypes. It took Michele Ferrero almost five years to perfect the spherical wafer within the famous chocolates that bear his name. No great product or invention emerges fully formed, and this applies to great websites and software as well. Whether you’re working on digital products or chocolates, prototyping plays an important role in any successful project.

A Deep Dive Into Axure 8: A Comprehensive Review

If you work in user experience or software development, chances are you will have encountered Axure RP at some point. Launched in 2003, Axure has gained a loyal following within the UX community. It allows for the creation of rich, functional prototypes without writing a single line of code.

The post A Deep Dive Into Axure 8: A Comprehensive Review appeared first on Smashing Magazine.

Categories: Others Tags:

Animated and Interactive SVG: Essential Tips

July 19th, 2016 No comments
Animated and Interactive SVG: Tips You Should Keep in Mind

The SVG format has turned into a contemporary alternative to Flash in many regards. Not only is it vector-based, but it also renders animations and interactions possible. Due to the different ways to create animations and to integrate SVGs into a web project, you should keep the following tips in mind to make sure that everything works the way you want it to.

Animations Via JavaScript, CSS or SMIL?

There are three options when it comes to setting SVGs in motion. Certainly, the easiest one is using SMIL: “Synchronized Multimedia Integration Language”. Here, unique elements like “” are available, allowing you to tween and morph any SVG shape. However, Google has marked it as “deprecated” in its Chrome browser, which is why you should probably forgo SMIL.

<rect x="0" y="0" width="50" height="20">
  <animate attributeName="x" from="0" to="100" dur="5s"/>
</rect>

Using CSS, you get to animate elements in a way similar to how you do it in combination with HTML. The attributes “transition”, “animation”, and “@keyframes” are available. However, here, you only get to change values via animation that can be defined via CSS, meaning position and color, for example. The shapes of a polygon or a path can not be altered using a CSS animation.

rect {
  animation: animation 5s infinite;
}

@keyframes animation {
  0% {
    transform: translateX(0);
  }
  100% {
    transform: translateX(100px);
  }
}

Both the SMIL, and the CSS example result in the same animation.

As animation options via CSS are limited, there are plenty of JavaScript frameworks that are used to realize complex SVG animations. JavaScript grants you access to all elements and attributes of an SVG element.

var i = 0;

function animation() {
  document.getElementsByTagName("rect")[0].setAttribute("width", i++);
  window.requestAnimationFrame(animation);
}

In the example, a rectangle’s width is enhanced via animation. Of course, significantly more complex animations would be possible as well.

The way how you should implement SVG into your web project depends on whether you choose JavaScript, CSS, or even SMIL. Generally, you have the option to use SVG graphics or files like normal images via the “” element, or via the “url()” function, as a “background-image”, for example.

However, the browsers deal very differently with the three animation options, depending on the implementation method.

When using an animated SVG like a regular image file, CSS and SMIL animations are only executed in Chrome. Firefox only supports SMIL animations, and Internet Explorer and Edge don’t support any animations in that case.

Implementing SVG Via an “” Element or Inline

The integration using an “” element provides the largest possible support amongst all animation options. Alternatively, you could also directly embed an SVG within your HTML document, even saving a request doing so. In this case, Firefox supports all three animation methods.

Internet Explorer and Edge however, generally don’t support any CSS and SMIL animations. Thus, you’ll only have the JavaScript option left.

Interactions Using JavaScript

Aside from animations, JavaScript is also able to create an interactive SVG graphic. This way, you can integrate event listeners that react to mouse clicks, for example. To make JavaScript work within an SVG, it either needs to be implemented into the HTML document with an “” element, or directly.

document.getElementsByTagName("circle")[0].addEventListener("click", function() {
  alert("Hello");
}, false);

In the example, a click on a circle triggers an “alert()”.

When tieing in an SVG file as a background via the “” element, or using CSS and “url()”, the JavaScript it contains is not executed.

Even when integrating an SVG file with an “” element, you are able to control the elements marked up inside using a JavaScript of the integrating HTML document. For that, the attribute “contentDocument” is available, granting access to the elements of the files integrated via “” or “”.

document.getElementsByTagName("object")[0].contentDocument.getElementsByTagName("circle")[0].addEventListener("click", function() {
  alert("Hello");
}, false);

In contrast to CSS and SMIL, JavaScript within SVG is dealt with the same way amongst all browsers.

(dpe)

Categories: Others Tags: