Archive

Archive for August, 2016

Reducing Complexity: A New Trend in Mobile Design

August 18th, 2016 No comments
instagram-UI-comparison

We’ve been living in a world of clean, clear, and minimalistic design for a while now. It’s inevitable to ask oneself what could be next. Regarding minimalism, a couple of pioneers like Facebook, Apple, and Airbnb, have already given an answer. “Reducing complexity” is the keyword, continuously simplifying the design. There’s not a lot that remains of the compound, but still appealing designs of the apps of these three businesses.

What is the Reduction of Complexity Supposed to be?

Have you never heard of the reduction of complexity before? That’s not a big deal; the term is still rather new. It is used to describe a design that goes much further than the typical measure of minimalistic, flat design. Of course, one could claim that it’s not more than the next, logical step of minimalism in mobile design. However, there are a couple of characteristics that define this new trend.

The Definitions for This New Trend From the Silicon Valley are the Following:

  • Larger, bolder headings
  • Straightforward and universal icons
  • Avoiding the use of colors

The result of these few traits create apps that look as if they all originated from one design workshop.

The Trend’s First Appearance

The trend first appeared at the end of May of this year when Instagram released its new user interface.

Instagram

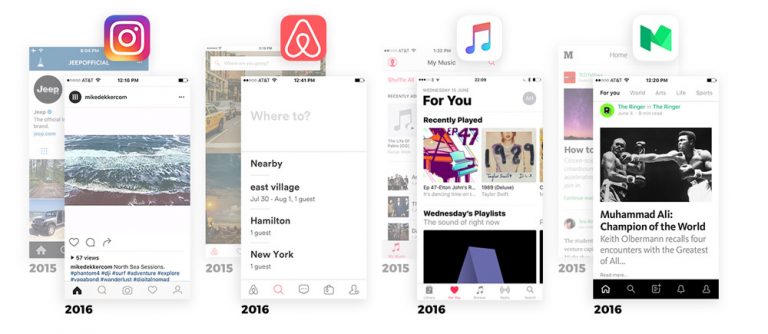
As you can see, Instagram reduced a lot of the formerly blue and gray color scheme that dominated in 2015. Fonts became bolder, the navigation at the bottom was purged, and the icons were simplified.

What remains is a black-white-UI with a clear focus on the content and user-friendliness.

Airbnb

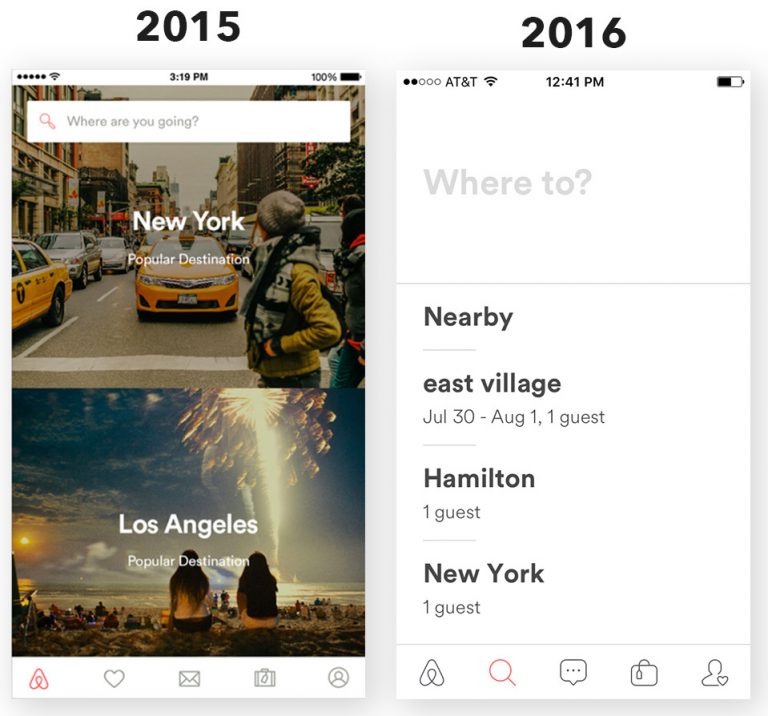
Shortly after the release of the new Instagram UI, one could see that Airbnb also started providing its app in a simple, clear design with a lot less complexity. The logic behind this new trend that will probably affect a lot more apps soon is familiarity. Everything looks almost the same, and the users will be able to orientate themselves instantly.
Airbnb-App-neues-Design-768x716

The revamped UI of Airbnb did not receive the large media echo of the new Instagram app that was released one month later. Maybe, the reason is that Instagram also revealed a new, cool app icon on top of that.

Airbnb shows a reduction in seemingly redundant areas of parts of the apps as well. Large, bold fonts have taken the spot of beautiful images. Colors were reduced and icons were simplified. What remains is an app that values functionality, displayed in black and white, and reduced to the content.

Whether the app’s design won anything from this reduction certainly is a question of taste.

Apple

Apple is the most recent example for a design that has fully dedicated itself to the reduction of complexity. Last month on the WWDC, the tech giant announced a bunch of interesting things for the consumers, including the release of iOS 10. This was announced as the largest iOS release of all time. At least, it is supposed to be the next big thing since iOS 8, which was advertised in a similarly boastful way.

Here is a comparison of the Apple Music app before and after the redesign:

apple-neue-ui-768x702

The redesign of Apple Music is obvious on first sight. Other, important aspects of the new iOS version are UX updates, and a couple additional features. But the redesign of the UI is instantly noticeable. The look was completely refreshed and spiced up with a card design for the album covers. Large, bold fonts and this very card design are what dominates, and are supposed to make the album covers stand out and more appealing.

However, Apple does not lose track of the pure doctrine of complexity reduction. They use different, solid icons and shadow in map design. The new design seems like a mixture of the old layout line, and the new, reduced design. Personally, I like the old design much better, but we have to take whatever they offer us.

The pure key elements for the reduction of complexity were inherited. The large, bold fonts, as well as the clean black-white-UI.

What Does That Mean For Us?

You need to stay strong right now. All it means is that we’ll have to say goodbye to the design of our favorite apps. The pure app design will continue to adapt, and the individuality of layout will probably die out soon.

The tech branch is, like many others as well, a league of imitators. The users that already got a taste of the new uniform design have not complained yet. How were they supposed to: the big players of mobile operating systems have been rolling out new, binding design guidelines to the developers for a while already. Android with its material design, and Apple with its reduced, clear (uniform) design.

More and more developers will jump on the uniform design train when it comes to their apps’ layout, resulting in a monotonous app design. This can have both advantages and disadvantages. The fact that you will feel “at home” in every app appears to be an advantage. However, one advantage is the lack of personality, as it is slowly given up, step by step.
apps-im-vergleich-aus-2016-768x334

Whether you are for or against the monochrome blandness of the new uniform designs, you can’t design that it is a sign of progress. The product development process starts to turn into an integral process that focuses on the users.

The old development process was not solely focused on the app’s functionality, but also on an appealing design, which, in the end, is a part of user friendliness as well. Most of the time, the design department was only asked to “make it look good”. After that, hours and days were put into the design process of the app. Oftentimes, the functionality was left behind the design requirements.

Now, developers have more options and are able to fully focus on the app and its functionality for the consumer. The appearance is clear from the very beginning and can not be changed, allowing the developers to create the best possible product for the users.

The Ultimate Guide for the Reduction of Complexity

Follow these guidelines, and you’ll have a good chance to develop an award winning app.

  1. Remove the colors. Okay, you can use any color, as long as it’s black and white. The content is what counts.
  2. Make larger, bolder, and blacker headings and fonts. Do you see that heading in your app? Make it much larger, bolder, and pitch black.
  3. Use very simple and minimalistic icons. Once again: don’t use colors. Do you want bonus points? Simplify your navigation and generally place it at the bottom. From left to right: home, search, primary action, secondary action, profile.
  4. Whitespace? Just triple it. It will be fine. Maybe even quadruple it. That’s fine too. What can go wrong?
  5. Make the app icon bright and shiny. Maybe use colors and a lightning, because this is the only place where you get to show personality and establish your brand. As well as set yourself apart from the others.

The Webdesign Trend Also Goes Towards More Simplicity.

Conclusion

A rising star was born on the sky of mobile design. However, the reduction of complexity also reduced any individualism and personality that used to be a part of apps. Soon enough, everything will most likely look and feel the same. This brings up the question if we, the users, will be the winners or losers of this new trend. What’s your opinion?

Source/Graphics: SWARM

Categories: Others Tags:

Getting Started With Koa 2 And Async Functions

August 18th, 2016 No comments

One of the upcoming features of JavaScript that I especially like is the support for asynchronous functions. In this article, I would like to show you a very practical example of building a server-side application using Koa 2, a new version of the web framework, which relies heavily on this feature.

First, I’ll recap what async functions are and how they work. Then, I’ll highlight the differences between Koa 1 and Koa 2. After that, I will describe my demo app for Koa 2, covering all aspects of development, including testing (using Mocha, Chai and Supertest) and deployment (using PM2).

The post Getting Started With Koa 2 And Async Functions appeared first on Smashing Magazine.

Categories: Others Tags:

WordPress 4.6 “Pepper” released

August 17th, 2016 No comments

WordPress 4.6 is out. Go get it.

Okay, if I don’t write more than that, I’ll be asked to elaborate, I suspect. And it’s just as well, because this might be one of WordPress’ most important updates in a while. I’m not at all exaggerating about that.

You can find out more at the end of the… kidding. Here it is:

WordPress will now save your content to the browser

In my experience, WordPress’ versioning and recovery options have been iffy at best. There have been times that I’ve gone through the process of restoring a draft, only to see the content field completely stripped of content.

Don’t get me started on how much of a pain it is to grab content straight from the “compare drafts” screen. It’s almost easier to rewrite it all.

Well from now on, WordPress will save the current draft to the browser. If everything crashes somewhere between the 6th and 8th circles of Hell, content recovery just got a lot easier.

No word on fixing the version system though.

Streamlined update process

Ever wish that you could just download, install, update, and delete plugins without constantly reloading pages? Well someone with programming skills did too, and now we have that feature. It just got that much easier to install a plugin that breaks your system.

All hail AJAX.

(No but really, that’s cool, and will save a lot of people a lot of time.)

Other improvements

There is now an automatic link checker that makes sure you never, ever make a link to https://wordpress.org/example.org ever again. This is possibly as much for your convenience as their bandwidth.

In addition, the WordPress dashboard will now prioritize fonts that you already have installed. Basically, this means that it will load and run a bit faster, since webfonts will be the fallback. It also means that your typographical experience in WordPress may vary greatly.

Under the hood, they’ve made various improvements, including a few designed to further speed things up. It will also automatically download and use language packs for all of your plugins and themes, provided they are available from WordPress’ translator community.

All in all, this update is made up of quality-of-life features for both content editors, site managers, and theme developers. Over the last few updates, we’ve seen a trend of features that deliberately target pet peeves and performance issues, and I like it.

I think we can save any attempts to redefine the blogging experience ’til, say, 6.0?

MOTOPRESS: Drag and Drop Editor for WP (unlimited license) – $29!

Source

Categories: Designing, Others Tags:

How to Airbrush Skin in Photoshop

August 17th, 2016 No comments
Dansky_How to Quickly Airbrush Skin in Photoshop

In this tutorial, we’re going to learn how to retouch or airbrush skin in Adobe Photoshop.

The Steps (1-8)

1. Open your photo in Photoshop.

2. Right-click your Background Layer and select Duplicate to create a copy.

airbrush-skin-adobe-photoshop-1

3. Select the Heal Brush Tool, and set the Brush Hardness to 0% for a soft/feathered edge. Holding Alt, Left-click on an area of smooth skin to sample, and then Left-click and paint over an area of skin that you would like to retouch and remove any imperfections (spots, scars etc.)

4. Again, Right-click your Background Layer and select Duplicate to create a copy and set the Blending Mode to Overlay.

airbrush-skin-adobe-photoshop-2

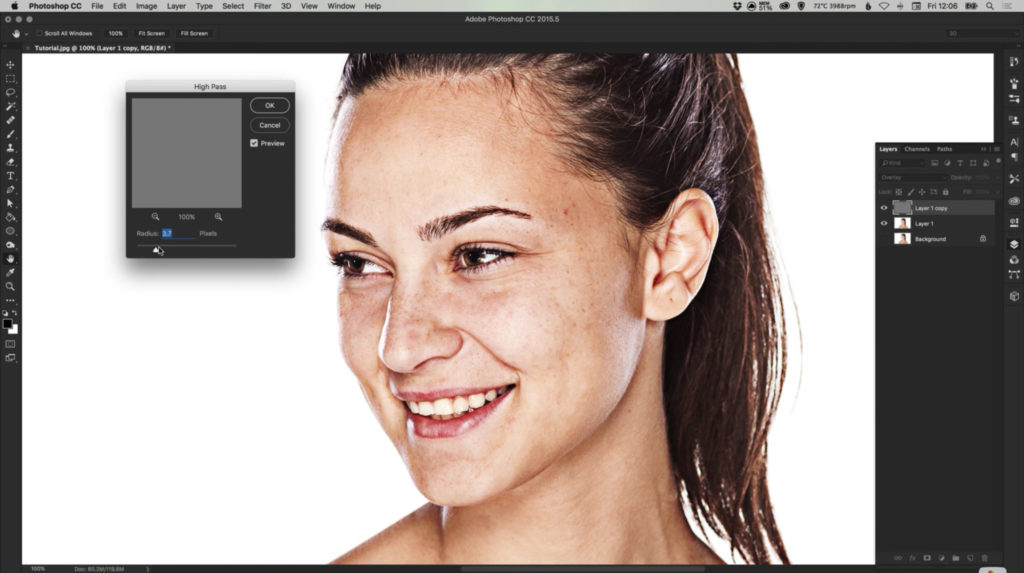
5. Go to Filter > Other > High Pass, and specify a value between 10-20 approximately to add a High Pass grain-style effect to your photo. Press Cmd/Ctrl + I to invert the layer, giving your top layer a slightly blurred aesthetic.

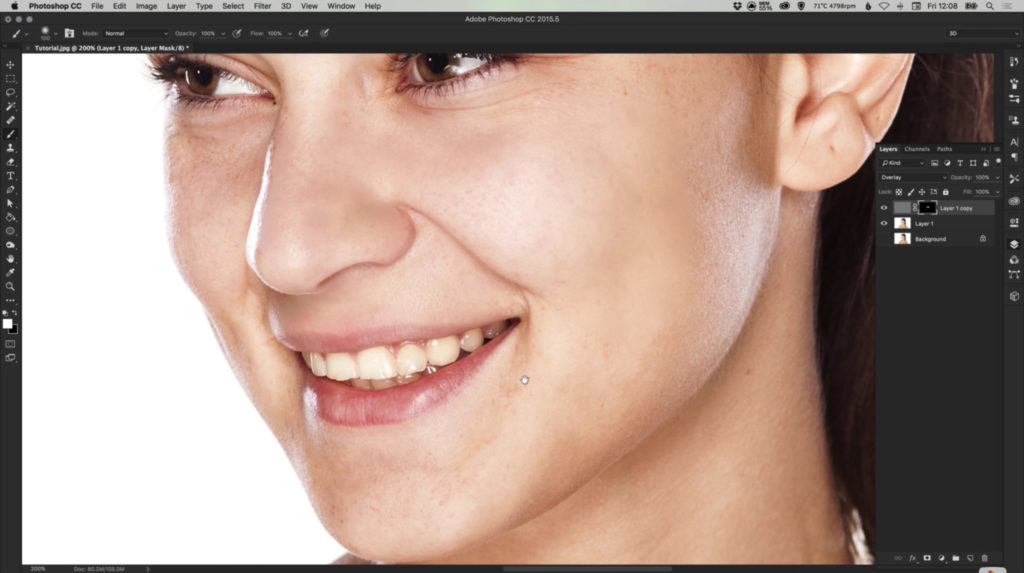
6. In the Layers Palette, hold Alt and select Add New Layer Mask. With the layer mask selected, select the Brush Tool, with a Hardness of 0%, and a Foreground Colour of White (#FFFFFF).

airbrush-skin-adobe-photoshop-3

7. Start painting into the mask over the larger areas of skin – for example, the cheeks, forehead, chin and nose. The goal is to smooth out the larger areas of skin, without smoothing over facial features (eyes, mouth etc.)

8. The Opacity of the top layer can also be reduced to lessen the visibility of the airbrushing effect. Conversely, the layer can be duplicated again to add an even further defined airbrushing effect.

airbrush-skin-adobe-photoshop-4

Download Adobe Photoshop.

Read More at How to Airbrush Skin in Photoshop

Categories: Designing, Others Tags:

You can kinda invent your own weird design language with attributes and attribute selectors

August 17th, 2016 No comments

In CSS, attribute selectors have some fairly powerful matching abilities. You can match any attribute and and any attribute with exact values, values that start with certain text, contain certain text, end with certain text, etc. This allows you to get pretty weird with a styling “language” if you want to.

For example…

<div fencing="a bit dotty"></div>

That’s a totally made up attribute, so hopefully that never means anything in future HTML. We can select on it now though:

[fencing="a bit dotty"] {
  border: 2px dotted black;
}

If we were building a “language”, we could make an alternate:

[fencing="a lot dotty"] {
  border: 4px dotted black;
}

or even split it up like…

[fencing] {
  border-color: black;
}
[fencing*="dotty"] {
  border-style: dotted;
}
[fencing*="a bit"] {
  border-width: 2px;
}
[fencing*="a lot"] {
  border-width: 4px;
}

weird right.

I see it around sometimes. Here’s an even more fleshed out example by Dan Chilton:

<p style="three quarters width with a black 
          background, light text, red border, 
          thick border, rounded, lots of padding, 
          and a drop shadow">
  Lorem ipsum...
</p>

The CSS accommodates the language like…

[style*="full width"] { width: 100%; }
[style*="three quarters width"] { width: 75%; }
[style*="half width"] { width: 50%; }
[style*="quarter width"] { width: 25%; }

[style*="gray background"] { background-color: #CCC; }
[style*="black background"] { background-color: #000; }
[style*="yellow background"] { background-color: #FF0; }
[style*="pink background"] { background-color: #FAA; }

/* a bunch more */

Demo:

See the Pen Semantic style language exercise by Dan Chilton (@bjork24) on CodePen.

That might seem silly, but “Real Things” use it sometimes too, like the Flex Layout Attribute thing that was going around not too long ago.

Mark Huot combined this idea with unicode characters. How about some HTML like this:

<div class="box" box="↖"></div>
<div class="box" box="▣"></div>

And CSS to match the “language”:

[box*="▣"] { padding: 20px; }
[box-xl*="▣"] { padding: 40px; }

[box*="↑"] { padding-top: 20px; }
[box*="→"] { padding-right: 20px; }
[box*="↓"] { padding-bottom: 20px; }
[box*="←"] { padding-left: 20px; }

[box*="↕"] { padding-top: 20px; padding-bottom: 20px; }
[box*="↔"] { padding-left: 20px; padding-right: 20px; }

[box*="↖"] { padding-top: 20px; padding-left: 20px; }
[box*="↗"] { padding-top: 20px; padding-right: 20px; }
[box*="↘"] { padding-right: 20px; padding-bottom: 20px; }
[box*="↙"] { padding-bottom: 20px; padding-left: 20px; }

Demo:

See the Pen Crazy Box Padding by Mark Huot (@markhuot) on CodePen.

This idea of putting a styling language into attributes isn’t far away from what Atomic CSS is:

Made some handy @code snippets to write Atomic CSS. Now no need to remember the #acss syntax!

/cc @thierrykoblentz pic.twitter.com/IvfdsKdOak

— Pankaj Parashar (@pankajparashar) March 13, 2016

Or Expressive CSS, either, which encourages style-specific class names.


You can kinda invent your own weird design language with attributes and attribute selectors is a post from CSS-Tricks

Categories: Designing, Others Tags:

Adobe Acrobat Alternative PDFelement Creates, Edits, and Protects PDFs

August 17th, 2016 No comments
pdfelement

The PDF format is still the standard when it comes to exchanging documents. PDFelement is an extensive PDF editor that allows you to create, edit, and even sign PDF files or protect them from being altered, if necessary. The application is a great alternative to Adobe’s Acrobat, not only because it’s much more cost-effective…

Intuitive Controls Thanks to a Simple Interface

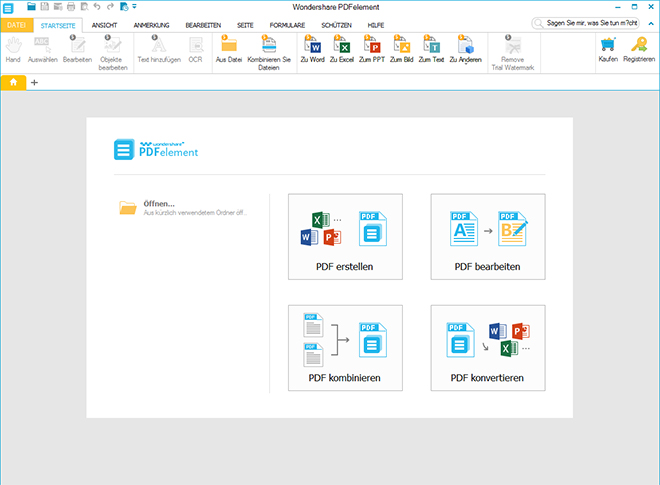
PDFelement is available as a classic desktop application for Windows and Mac. When starting the PDF editor, first choose one of the four basic functions that allow you to either create, edit, combine, or convert a PDF file.

Intuitive Benutzeroberfläche

Intuitive User Interface

Creating PDF files is as easy as it gets. Just open any file – no matter if it’s an image file or an Office document -, and it will be available as a PDF file in PDFelement. Afterwards, you are able to add bookmarks or notes to single pages.

Alternatively, it’s also possible to create PDF files via a PDF printer. This way, you create a PDF file in any application and then edit it in PDFelement.

Editing PDF Files and Adding Images

The big advantage over simple PDF printers is the option to alter an existing PDF file. For instance, changing text is child’s play. Here, the formatting remains, as long as the used font is available on your system.

While text editing, single paragraphs are displayed as a text field. You are able to change the text, as well as move the text field, or adjust the font, and its size. The same thing works with all other elements, like images, for example.

Einfaches Bearbeiten von Inhalten

Simple Editing of Contents

While Adobe Acrobat usually compiles texts in one large block, you are a lot more flexible with PDFelement, because the paragraphs can be edited individually, making them relocatable.

You also have the option to add new content to your PDF file. Place new text, and import images that you get to scale, rotate, and move in the document.

On top of that, add a link to a website or a page within the PDF file to your texts. Alternatively, you could also freely place links on a page by drawing an area that will be provided with a link.

Adding Pages, as Well as Header and Footer

PDFelement is not only suitable for making small changes to a PDF document. You also get to add pages or from other PDF files, or even blank pages. You can also set up an empty PDF document and create all the content directly within PDFelement.

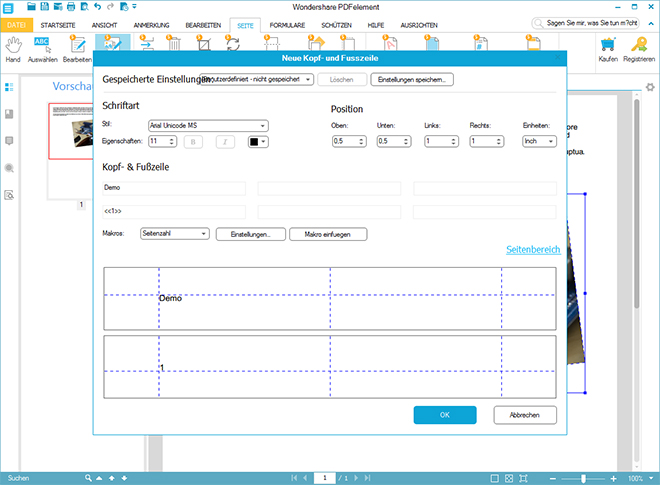
Place texts, images, links, and even create headers and footers that will automatically be integrated on each page of your document. Adding an automatic page numbering is not an issue either.

Kopf- und Fußzeile auf alle Seiten hinzufügen

Adding a Header and Footer to All Pages

There are further features that enable you to edit single, or all of a document’s pages. Thus, you can prune a page to a specific section. You rotate pages and have the option to replace single pages, or to turn them into independent PDF files.

Protecting PDF Files and Blacking Sensitive Content

PDF files that contain sensitive information are not a rare thing. Oftentimes, bills, contracts, and other confidential documents are often saved in the PDF format. To assure that unauthorized people don’t have access to this kind of information, PDFelement lets you protect your confidential PDF files with a password, for example.

There are different ways of protecting your document via password. You can make a password required to open the document. Alternatively, you could also only protect the document from printing and editing via password.

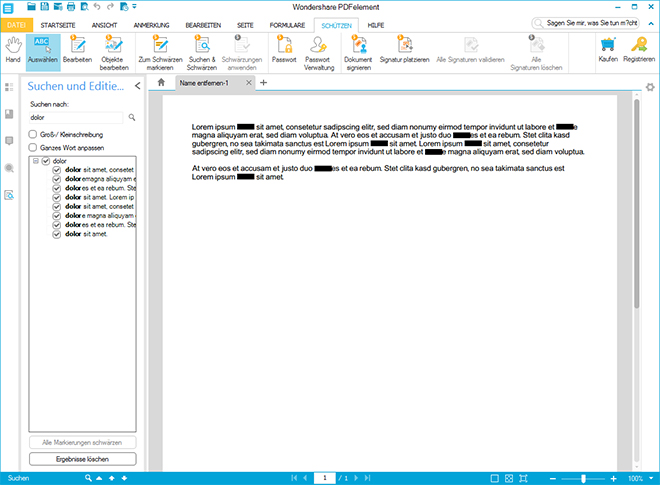
Sensible Inhalte schwärzen

Blacking Sensitive Contents

If you happen to want to send documents with private information to third parties, PDFelement also allows you to black certain contents of a document. For instance, you could look for names and contact information via search function, and then cover them with a black bar.

Here, the original content is actually deleted from the document, assuring that it is not possible to recover this information.

It is also possible to add a signature to a PDF document, in order to make it easy to trace back its origin. Either create signatures yourself, or just implement existing ones.

Creating Interactive Forms

Oftentimes, PDF files contain interactive forms that can be filled in directly within the PDF reader. Creating this type of PDF forms is also very simple when using PDFelement.

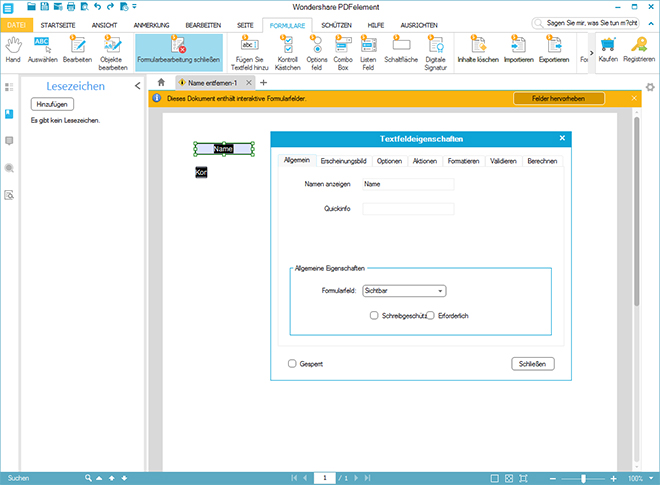
Interaktive Formulare erstellen und verarbeiten

Creating and Processing Interactive Forms

For example, the special form mode lets you place input fields, check boxes, as well as pick lists. Each form element contains plenty of attributes that enable you to define appearance and functionality.

Place mandatory fields and decide what should happen during picking or entering. For instance, you could call up a link or fade in or hide other form elements.

JavaScript is available for complex functions, allowing for things such as calculations between entered values.

It is possible to print finished forms, or send them to a certain address via email. An alternative option is sending the form information to a web address that processes the information server-sided.

Turning a PDF File Into an Office File

While turning an office document into a PDF file has never been a problem, this usually is not possible the other way around. However, PDFelement even allows you to do that.

To do so, pick a desired target format. There are Microsoft Word, Excel, and PowerPoint in different version to choose from. An export into different image formats is also possible.

During the export into an Office format, the formattings remain, so that the PDF file’s layout is transferred into the export format.

Free Trial Version

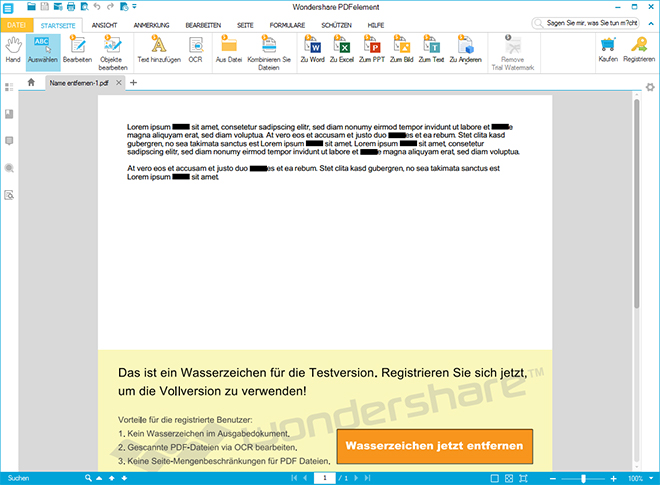
PDFelement by Wondershare can be tested in a free trial version. Here, all PDF files you create are labelled with a watermark. If you decide to license the application, removing the watermark from your documents is no problem at all. Thus, you won’t have to recreate them.

watermarks in trial version

Watermark of the Trial Version

Text Recognition (OCR) for Scanned Documents

PDF documents are not always created from existing Office files, but also from JPEGs and other image formats. PDFelement recognizes that and suggests using a text recognition. Especially with scanned documents, the OCR function makes sure that your texts are made copiable.

However, the text recognition is not usable in the trial version.

Inexpensive Alternative to Adobe Acrobat

If you decide to license PDFelement, a license for private use will cost you $69,95 per Windows computer. The license for commercial use is $119,95. If you also want to use the OCR function, PDFelement will be $89,95 for private, and $149,95 for commercial purposes. The Mac versions are a little more expensive.

When compared to other PDF editors with a similar scope of features, PDFelement is a true bargain. On top of that, you’re guaranteed to receive free updates for a lifetime.

(dpe)

Categories: Others Tags:

Vivaldi 1.3 is a bold new vision for browsers

August 17th, 2016 No comments

If there’s one thing you can count on from the folks at Vivaldi, it’s that they’re always seeking to make their browser faster, better and more stable, while adding more features and functionality. One of the latest features they’ve added is something that’s going to appeal to users’ visual side.

According to a recent blog post, the company says that version 1.3 has added the following, major improvements:

  • Custom themes
  • Better mouse gestures
  • Increased privacy

Let’s look at each new improvement in greater detail…

Custom themes

Themes that you can configure to your liking mean that you can have Vivaldi look exactly how you want it to on your desktop. Vivaldi’s theming engine offers quite a lot of deep customization options, more so than what’s ever been available in a browser before.

Customizing themes to suit your taste is very easy: Start by heading to Settings and then Themes. From there, select one of the many default themes and then click on the icon with the pen to edit it. Users have the freedom to change the background, foreground, highlight and accent colors to really spruce up their browser’s user interface.

Implement changes by either adding a hex code to each field or rely on the color picker.

Once you’re done, just give your new theme a unique name, and then click on “save.” Easy peasy.

Mouse gestures

Vivaldi has improved mouse gestures considerably in this latest release. Users are now able to navigate both browser and web content more efficiently than in prior versions.

Here’s the bottom line: This version adds more default mouse gestures, increasing the user experience. As a result, there are now more than 90 unique browser actions that can be performed through a mouse gesture. The level of customization has gotten very deep, which is what power users expect.

Added privacy

Privacy is always a very serious concern on the web. No one wants third parties tracking their browsing history and finding out their behavioral patterns from how they surf the web. Vivaldi has made protecting privacy a top concern in this latest version.

While WebRTC is arguably an interesting and powerful series of features (it provides video-chat, voice and file-sharing capabilities to your web brower natively inside of HTML), there is an unfortunate downside to it; for one thing, it makes users more vulnerable on the web by disclosing their IP addresses. Naturally, this gives rise to legitimate privacy concerns.

As a result, Vivaldi 1.3 allows users to now turn off WebRTC at their discretion. You can only have it on when you absolutely need it.

A bold vision for the browser

Finally, for Linux users, platform-specific updates arrive with this release. Tab hibernation gets a UX boost: This puts your tabs to sleep, thereby freeing up some much-needed system resources. Additionally, 1.3 offers improved support for proprietary media within HTML5.

Vivaldi always says that its mission is to make browsing safer, more productive, more fun and more personal for all. 1.3 takes a huge step in that direction.

MOTOPRESS: Drag and Drop Editor for WP (unlimited license) – $29!

Source

Categories: Designing, Others Tags:

Applied and Trusted Ways To Secure WordPress Site From Attack

August 17th, 2016 No comments

While running a WordPress site, Security is something which should always be taken into consideration. In order to ensure that your site and data are secure, you need to have a solid foundation that keeps your site away from hackers and spammers. With a strong community of users and developers to further improve the

Categories: Designing, Others Tags:

Why You Should Embed SVG Inline

August 17th, 2016 No comments
w3csvglogo-768x198

Those working with SVG graphics have multiple options to embed them into an HTML document. Aside from using it as a classic image file via the “” element, SVG can also be implemented via “” or “”. The latter two have the advantage that they allow for the execution of JavaScript and animations. The simple variant however, is marking SVG inline in the HTML source code.

w3csvglogo-768x198

SVG Inline: No Additional Request

Firstly, inline SVGs don’t cause an additional request, since they are a part of the HTML document. This will be especially noticeable when there are many small SVGs on one page.

However, when the same graphics are used in multiple documents, embedding them externally might be the way to go. With the according cache settings, the graphics won’t have to be newly loaded for each loading document.

Uniform Styles

Furthermore, a completely different, very useful advantage of inline SVGs is the option to control the appearance of the graphics via the HTML document’s stylesheets.

Fill and line color can be defined as well as line strength, and transformations. SVG stylesheets are marked up the same way HTML stylesheets are, and it is possible to combine HTML and SVG sectors.

1
2
3
4
5
6
7
article svg rect {
  fill: red;
}
 
asidesvg rect {
  fill: green;
}

In the example, the fill color of an SVG rectangle is defined depending on the parental HTML element. If it’s an “

” element, it will turn red, while an “

Categories: Others Tags:

Photoshop Etiquette For Responsive Web Design

August 17th, 2016 No comments

It’s been almost five years since Photoshop Etiquette launched, which officially makes it a relic on the web. A lot can happen on the web in a few years, and these past five have illustrated that better than most.

In 2011, everyone was just getting their feet wet with Responsive Web Design. The traditional comp-to-HTML workflow was only beginning to be critiqued, and since then, we’ve seen a myriad of alternatives. With a shift from page-based design to building a design system, it’s truly an exciting time.

The post Photoshop Etiquette For Responsive Web Design appeared first on Smashing Magazine.

Categories: Others Tags: