Despite all of its functions and popularity, there’s one thing that WordPress is missing: the option to create and implement forms out of the box. However, adequate features can easily be added thanks to plenty of plugins. RegistrationMagic is a plugin that sticks out from the rest, as it provides very extensive options for the creation and management of forms, while being equipped with additional and extensive analysis functions.
Simple Creation and Designing of Forms
RegistrationMagic is easily installed using the WordPress plugin manager. Subsequently, you’ll find a designated area for the creation and management of forms in the backend. Because there are two paid plans aside from the free one, you won’t have instant access to all functions. Nonetheless, there will still be plenty of features available to you in the free version.
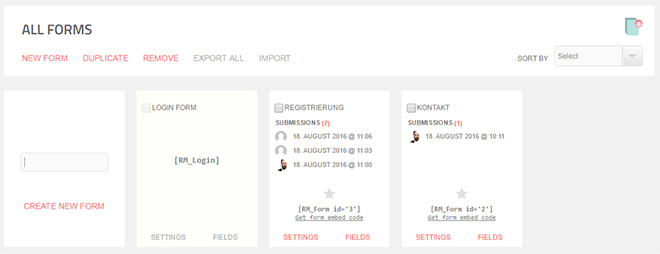
Overview of all Forms
First, all available forms are displayed in the overview of RegistrationMagic. You can either edit these or set up a new form. To set up forms, neither knowledge on HTML, nor CSS expertise is required. The graphic interface guides you through the creation process step by step. First, you assign a name, as well as a description, and if you wish to, an additional text that is placed above the form.

Overview of the Form Configuration
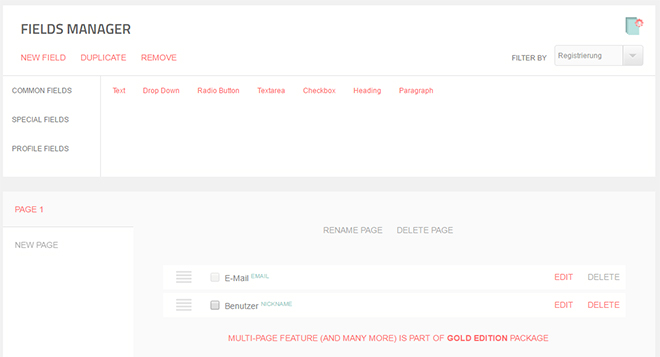
Afterwards, you’ll be redirected to a configuration page where you get to compile and design your form individually. For instance, “Custom Fields” allows you to add input fields to your form. There are general fields like one- or multi-column text fields, as well as checkboxes and radio buttons. Moreover, more specific fields to enter email addresses, dates, and passwords are also provided. There are dropdown lists to pick a country from as well.
Thirdly, you get to use profile fields, which are used to query name, nickname, and website. Every single field can be customized, and you get to choose whether it is a mandatory field. On top of that, it is also possible to add an icon to each field, which can be chosen from a list of Google’s “Material Icons”.
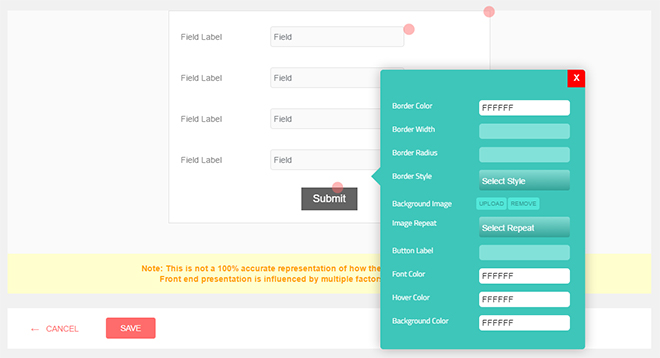
Determining a Form Design
You also define the appearance of your forms. The “View” area displays a preview of the design. Simply pick colors for frame, text, and fill color.
Once your form is finished, you integrate it into an article via shortcode. In the text editor, a dropdown list with all available forms is provided. Thus, you don’t have to manually add the shortcode, and all you need to do is choose the form from the list.
Receiving and Evaluating Form Information
All successfully filled-out and submitted forms are stored in a database, available under “Form Submissions”. Here, you’ll get to see all form fields, as well as all the input for each submitted form.
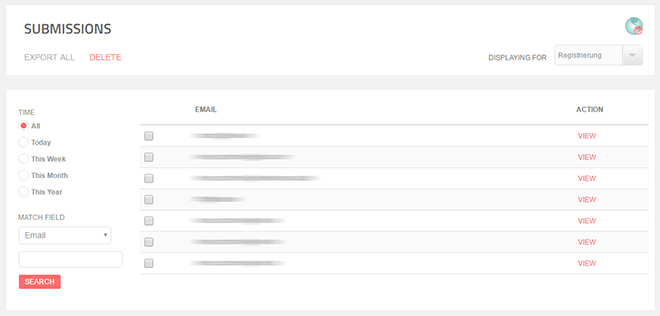
Overview of All Form Information
Files uploaded by the user are stored in the area “Attachments”. This is how you access e.g. images that were sent via form.
For a better overview, you can restrict the view to only display the information of certain forms. It is also possible to limit output to certain time spans and input fields. The more form data you collect over time, the more you’ll value RegistrationMagic’s sorting functions.
Just like most form plugins, RegistrationMagic is also able to send submitted forms to you via email.
Unique about RegistrationMagic is the analysis area for forms. Here, you’ll receive an overview on how often forms were submitted. For example, this tells you how often a form was filled out, but not submitted successfully. A reason for that could be the lack of willingness to input mandatory information with the user vanishing into the mist.
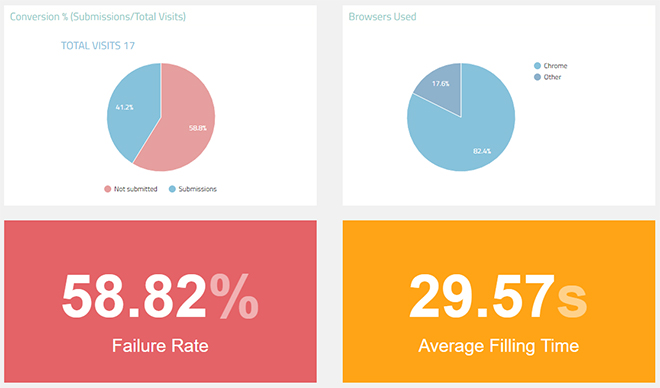
Analysis for Forms
The displayed error rate will tell you exactly how high the amount of forms that were not sent successfully is. You also receive information on the average time it takes the users to fill in a form.
In the paid plans, there is another analysis function that doesn’t focus on entire forms, but individual input fields. This allows for a much more differentiated analysis.
Registration and Login Forms
You can also use RegistrationMagic to create forms for user registration and login. To do so, simply state that a WordPress user is to be created automatically once a form is sent. The users created this way will automatically have the roll “subscriber” assigned to them.
You also get to choose whether each user is able to pick a custom password upon registration, or if the passwords should be distributed. In the latter case, the password is sent to the user via email.
Adding Input Fields to a Form
When using the paid plans, there will be additional functions available. For instance, you get to determine that newly registered users need to be activated by an admin first. Moreover, you can also assign a different role to users. Instead of “subscriber”, you could assign something like “author”, or “editor”, or whatever role you want to establish.
To allow registered users to log in later on, there is a login form that you integrate into a page via shortcode.
The page “Submissions”, is created automatically and ensures that signed-up users are able to view their profile information. This lets the users change their password. The content of the page is provided via shortcode, so that you can implement it on the desired page.
Interaction With MailChimp and Other Services
If you wish to use RegistrationMagic for email marketing, it is easy to integrate other services like MailChimp. To do so, set your MailChimp API key in RegistrationMagic, and provide a registration form for MailChimp.
While you manage the subscriptions for your newsletter using RegistrationMagic, MailChimp takes care of sending the newsletter out. The paid version also supports the services Aweber and Constant Contact.
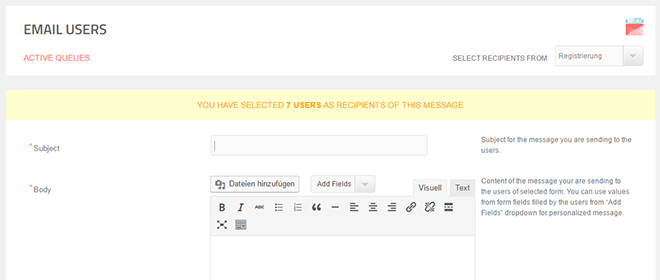
Sending Emails to All Users of a Form
RegistrationMagic also provides an alternative to external services when it comes to sending emails to all users of a form. Add text and images using a rich text editor and send HTML emails.
Silver and Gold Plan
As mentioned before, the free plan does not give you access to all of RegistrationMagic’s features. Among other things, the Silver plan lets you use more input fields. You’ll also be able to access the export function, which saves form data in CSV and PDF format.
Furthermore, it is possible to send forms to external addresses. This is useful if you want the information to be saved on an external database, for example.
The Gold plan grants you access to additional safety functions, and lets you block IP addresses, as well as define the standards for password strength. The Silver plan applies for one website, while the Gold plan applies for an unlimited amount of sites. Both plans guarantee support and updates for the duration of one year from the date of purchase.
Conclusion
RegistrationMagic doesn’t leave much to be desired when it comes to forms. The graphical interface makes it easy to use without having to be knowledgeable in programming or markup. The large scope of functions allows you to create the best registration forms thinkable.
(dpe)


