Archive

Archive for October, 2016

Will we be flattening our HTML for CSS Grids?

October 5th, 2016 No comments

I was watching Rachel Andrew talk about CSS Grid Layout yesterday at An Event Apart. Grid is amazing and the day will soon come where it’s a dominant web layout tool of choice. That day isn’t here yet though, as no stable browser is shipping the latest version of the spec (it’s behind a flag at best).

The good news is that, as of just a few days ago, the spec is really stable and has entered “Candidate Recommendation” status. Since all browsers have been developing against the spec, it’s likely that widespread non-prefixed ready-to-go support will drop in all stable browsers fairly soon.

The bad news is that it will probably do-so without subgrid support, a point that Rachel underscored well in her talk.

Here’s some typical “page layout” HTML:

<body>
  <header class="site-header"></header>
  <main class="main-content"></main>
  <aside class="sidebar"></aside>
  <footer class="site-footer"></footer>
</body>

All those major elements are a direct child of , so can be the grid and the four major elements are laid out on that grid. That’s kind like one of Rachel’s examples at GridByExample:

But…

… let’s say we wanted to build a grid from elements that weren’t necessarily at a completely flat HTML structure like we just saw.

<body>
  <header class="site-header">
    <h1>I want to use the grid.</h1>
    <nav>Me too!</nav>
  </header>
  <main class="main-content">
    <ul class="schedule">
       <li>Me three!</li>
       <li>Me four!</li>
    </ul>
  </main>
  ...
</body>

We can nest grids, just like we can nest flexbox within a grid cell or flexbox within flexbox, but in the example above we cannot make those child elements participate on the same grid together.

You can see some of this at work in Jen Simmons Jazz Poster example, where headers are being hidden because they can’t be in the correct place both semantically and positionally at the same time.

Subgridding might get a little tedious, since it’s kinda “subgrids all the way down”. To make even my little example above work it would be like…

body {
  display: grid;
}
.site-header {
  display: grid;
  grid: subgrid;
}
.main-content {
  display: grid;
  grid: subgrid;
}
.main-content > ul {
  display: grid;
  grid: subgrid;
}

And that’s without defining how the grid actually works.

Eric Meyer has also emphasized this need for subgrids:

Without subgrids, you’d either have to make every element you want to lay out a child of the body element (or whatever you used to create the page grid), or you’d have to recreate segments of the page grid in each nested grid, and give up any hope of columns that can flex with the contents of multiple page sections. Neither solution is appealing.

He used

markup as an example, where / pairs are necessarily grouped within container elements, meaning they can’t participate on the same grid together.


Each of these rows has to be it’s own grid context, meaning it’s not nearly as useful as if they could share the same grid.

He called for grid to not even be shipped until this can be handled:

subgrids are a major component of grid layout, and should be a part of any grid layout implementation when it emerges from developer-preview status. If that means delaying the emergence of grids, I think it’s worth it.

That ship has likely sailed …

… on having full subgrid support the day CSS Grid “ships”. But it’s probably worth making some noise (like writing this blog post) to indicate this is fairly important and should be worked on and released as quickly as possible after the first round of CSS Grid goes out. That’s not my thinking, that’s what Jen Simmons said she’ll be pushing for at Mozilla.

And even bigger danger is that subgrid is considered “at-risk” and “may be dropped during the CR period”.

And by “browser-maker folks”, as an interesting aside, it’s not always employees of browser companies that do this work, but often outside committers. Here’s a blog post about all this from one of those outside committers.

The risk…

… is that we love grid layout so much, that we’ll malform our HTML to make it work. We’ll make our HTML less accessible to make our grid idea work. We’ll ignore semantics and flatten our HTML.

Or maybe nobody will do that. But hey it would be nice to have to tools so it’s not even an issue.


Will we be flattening our HTML for CSS Grids? is a post from CSS-Tricks

Categories: Designing, Others Tags:

8 ways to design sites faster in Photoshop

October 5th, 2016 No comments

As a web designer, it’s hard to stay organized. Not only are you balancing several projects at once, but you’re likely facing tight deadlines and tough clients as well. You may also be bouncing from brand to brand, and having to constantly learn new brand guidelines and styles.

Fortunately, there are many ways to make your workflow more efficient. To help out, I’ve put together these eight tips to keep you sane in your web design career

1. Keep your files organized

One of the easiest things you can do to keep your sanity is keep your files organized. Creating and maintaining a consistent folder structure will make finding your files a breeze. Problems arise when you structure one folder differently than another, making it a challenge to locate that Final-Final-logo.ai file.

Consistent file naming conventions are essential when organizing your files. This is where versioning comes in. Some designers use dates, others use version numbers, and some use rounds. This will depend on your industry and your personal preferences, but it’s a good practice. Thanks to versioning, you can easily track which file is the most current, especially if you have old versions saved for reference.

I generally keep two to three old versions in case the client wants to revert back to that hero strategy from Round One, or preferred your mobile treatment from Round Two. In order to avoid the pack rat mentality, it’s good to archive or delete older files to keep your hard drive from being bogged down.

Here’s a sample structure that I use at Clearlink.

The combination of a consistent folder structure and naming conventions with versioning will also help search-ability. For instance, if you start all your file names from one brand with the brand name or abbreviation, you can filter the assets for that brand easier. This will help differentiate “ATT-logo-final.ai” from what could potentially be a sea of “logo-final.ai’s”.

2. Understand your framework

One thing I didn’t learn until several years into my design career is how to properly utilize an existing framework. The two heavy hitters in the framework world are currently Bootstrap and Foundation, but Google’s Materialize will surely give them a run for their money in the near future. The company that I work for uses Foundation for the majority of their branded sites.

Foundation comes with a built-in responsive grid, along with styling for buttons, fields, typography, navigation, etc. amongst many other things to make your life easier. By utilizing Foundation’s built-in grid within your PSDs, you’ll make it easier for the developer to implement your designs in a more pixel-perfect way than if you do your own thing. Photoshop has this nifty guide layout tool that not only makes creating grids a breeze but also attaches them to the art-board for ease of file restructuring and movement.

Screenshot from the Foundation Cheat Sheet

Frameworks also provide a good starting point for button styling, forms, etc. and help show the possibilities and limitations of the design strategies you can implement. Not only will this give you a great starting point for your design, but it will help foster friendlier collaboration with your developer.

3. Organize your layers by content section

When you’re dealing with complex web design PSDs with so many folders, layers, smart objects, etc., it’s easy for things to get messy. Once layer 2,455 comes around, you start to realize that you need some sort of organization within your PSD. This is why I recommend organizing your PSD by sections.

Mine generally consist of folders that include Nav, Hero, Intro, Packages, Benefits, Footer, etc. I also color code these folders in rainbow fashion, so they’re easy to navigate. This makes updating sections and reworking your PSD a breeze.

I organize my file into section folders that are rainbow color-coded for easy scan-ability.

For example, if you need to make the hero section larger, you can easily drag all the folders below as one unit (holding command) and then drag them back after the update is made. This strategy also helps developers and other designers easily navigate your file. By using understandable names like “Hero” and “Nav”, a new designer can easily jump into the folder and make whatever changes they need.

Some designers will even get into naming individual layers, which can also be incredibly beneficial but can get a bit time-consuming. Since layers are easy to find via the auto-select tool when it’s set to “layer,” it’s easy to get to individual layers these days, so it’s up to the individual designer how they want to organize their layers. The point is that you git ‘er done.

4. Memorize all the keyboard shortcuts you normally use

This one’s a biggie for efficiency. If you find yourself using a specific key command regularly, memorize it. You’ll increase your efficiency exponentially if you have all the main keyboard shortcuts down.

Some important ones are saving, font size and leading, layer ordering, save for web, and opacity among many more. Photoshop also gives you the ability to create custom shortcuts. In my book, the most important command to have memorized is saving your file. Due to Adobe’s random crashes, it’s good to err on the side of saving often rather than risk losing any of your progress.

Adobe gives you the option of customizing your keyboard shortcuts under Edit > Keyboard Shortcuts

Shortcuts also tie in to organizing your layers by content section folders (as mentioned above). It’s easier to bring layers to the top and bottom of a folder using keyboard shortcuts than re-ordering layers in an unorganized file. This is where organizing your file as you design comes into play. Memorizing frequently used keyboard shortcuts and keeping your layers organized will vastly improve your efficiency and help other designers work with your files.

5. Utilize CC Libraries

One of the best things that Adobe has added since creating CC is libraries. If you haven’t heard of them, you need to check out this amazing tutorial on how to use them.

I feel like every design team should be utilizing this amazing feature. Libraries allow you to create a brand library with assets like colors, font styles, photos, icons, and symbols (like headers & footers). Thanks to libraries, you can easily collaborate with creatives from multiple organizations using a single brand library.

Libraries make it easy to change colors and update text styles with the click of a button. They also help store brand icons that can easily be updated in one place with updates reflected quickly across PSDs. This is incredibly beneficial for headers and footers for your site, where you’re likely to make small updates throughout the project.

I also use CC Libraries for font styling throughout my design. I’ll set up styles for hero copy, headings, subheadings, body copy, disclaimers, etc. for desktop, tablet, and mobile applications. Regarding the view toggle, I find myself using the list format more-so than the tile view due to its easy scan-ability.

Library elements viewed as a collaborator

Libraries are also great for team collaboration. You can choose to either collaborate with other creatives so they can edit and add to the library, or you can share the library link for easy access. They also have a “Create New Library from Document” feature, but I prefer to create the library myself, so it stays organized and only has the most relevant assets.

Unfortunately, there are a few downsides to libraries, one of these being the lack of separate character and paragraph styles for text. I work around this by applying my character style in a separate box and then pasting different styles into a box together to make text boxes easier to manage within the file. Another downside is that you currently can’t update a character style globally. Currently, there’s no organization abilities within the library to create subfolders within the categories (color, character styles, etc.), but hopefully Adobe is working on this as well.

The current way CC Libraries work is that the most recently updated/added asset will appear up top. CC Library colors can’t be applied to individual text within text boxes and are only easily applied to shapes and entire text boxes. I’m sure Adobe is hard at work to fix these issues, so I’m not too worried, especially since the pros definitely outweigh the cons.

6. Keep images and vectors in smart object format

Even though it will make your file larger, keeping your images and vectors in smart object format will make it easier for future designers to edit your PSDs. Picture this: the client comes back with edits that include re-cropping a hero photo and making small tweaks to a vector icon. This is more smoothly done if the PSD includes the full-resolution photo rather than a smaller, rasterized version. Vectors are also easy to tweak when they’re smart objects from Illustrator rather than rasterized graphics.

Another benefit of having photos in smart object format comes when you save them as PSDs and then place them into your file as a smart object. Using a placed photo PSD makes it easy to add adjustment layers and edits within a separate, contained photo file rather than cluttering up your source file. Utilizing smart objects as library graphics gives you even more of a winning combination. Not only can you easily edit the vector objects, but library graphics will update across all applications.

The “SmartSi-Features” image can be edited in a separate PSD to keep the clutter of the main file to a minimum. The icons in this section (Easy to Program, Save Energy, etc.) are saved as library graphics so that they can be edited in one place with changes reflected across all documents.

7. Create a style guide and stick to it

A lot of brands will have a general style guide for you to follow when it comes to fonts, colors, photos, icons, illustrations, etc. This is helpful as a resource but won’t always keep you consistent on your website-specific styling. I’ve vastly improved my efficiency by creating web style guides for each specific site that I work on.

Sometimes brands will have multiple sites with different styles, so I make sure I have one for each site, so I can stay consistent while I design. This also creates an easy drag-and-drop resource when I need buttons, icons, illustrations, photos, etc. Not only will this make you more efficient as a designer, but it will help you stay consistent in your styling throughout the site.

What spacing do I use between sections? Check out the style guide! What was the primary button color and padding again? Grab it from the style guide! This will also help other designers easily jump on the site designs with ease and efficiency. If you merge the use of CC Libraries with the style guide, you’re even more ahead of the game.

I create a PSD style guide for all the different brands that I work on so I can easily grab elements like buttons and icons.

A lot of designers are tempted to add new styles each time they face a new problem within the design. For consistency, it’s best to avoid this and always stick to the standards you’ve established within your style guide. If you add new layers and styles, make sure they are applied across the entire site.

The more new styles that are created, the more complex future designs will be, and the harder it will be for new designers to jump on projects and keep designs consistent. In many instances, consistency is more important than constant innovation when it comes to user experience. Even though it may take you more time to create the web style guide at the beginning of a project, it will increase your efficiency for all future pages.

One best practice that I learned from Brad Frost is to do an interface inventory either during the design process or on an existing site that you’ll be working on. An interface inventory consists of collecting all the different text styles, button styles, etc. via screenshots and compiling them to find inconsistencies. You can then present your findings to the client to propose updates and improvements.

Since websites touch multiple designers over the case of their existence, things can get pretty hairy in the consistency department. Once you find a unified design style for the elements on the page, make sure to update your style guide so that everyone is up to date.

Interface inventory screenshot from http://bradfrost.com/blog/post/interface-inventory/

8. Foster inter-departmental collaboration.

A lot of people that pursue careers in marketing production (designers, developers, copywriters, etc.) tend to be introverted, so it’s hard to step out of your comfort zone when it comes to collaboration. It’s also hard to leave your expertise bubble, especially when it’s easier to relate to people in your field. Even though it can be awkward or uncomfortable sometimes, leaving your bubble and regularly collaborating with people from other departments can vastly improve the quality of your designs along with your efficiency.

A prime example of this is when designers and developers collaborate on a redesign. You should meet with the developer beforehand to go over what framework they’re using, educate yourself on the grid system, and assess the possibilities. When the design work is complete, make sure to share your Photoshop Library, so the developer will have easy access to the color palette, font styles, etc. It’s also helpful to share the style guide in advance, along with any components you’ve designed to give them a good head start.

Collaboration with other designers on your team utilizing Libraries will also help you stay consistent and be more efficient. Giving the Art Director or most Senior Designer responsibility over Library and style guide updates will eliminate confusion and keep branding consistent. Just make sure there’s a line of communication when updates are made, so that everyone is on the same page.

Stay sane

Web design can be overwhelming and challenging sometimes. It doesn’t always have to be that way. By following these simple tips on Photoshop efficiency, you can alleviate a good chunk of your stress. Not only will this improve your well-being, but managers and directors on both the business and creative side will really appreciate your hard work and commend you for it. After all, everyone is good with more consistent, efficient, beautifully-crafted design.

74 Photo-Realistic Apparel and Label Mockups – only $14!

Source

Categories: Designing, Others Tags:

The Psychology of Colors in Marketing and Branding

October 5th, 2016 No comments
psychologie-der-farben-teaser

The psychology of colors and their effect is one of the most interesting and controversial aspects of marketing. The depth of the analysis has always been a problem. Color theory is a very complex topic with many nuances. Unfortunately, the quite popular infographics on the topic don’t go into detail as much as they should. Today, we’ll try to work out this difficult subject.

Common Misconceptions About the Effects of Colors

Science has shown that personal preferences, experience, parenting, and cultural differences can affect the way we perceive colors. Thus, the idea to trigger certain emotions with certain colors is not reliable in practice. Nonetheless, there is a lot to learn about colors and their effects. We also need to test if we want to accept that nothing is guaranteed and that there are no precise answers.

The Important Meaning of Colors in Branding

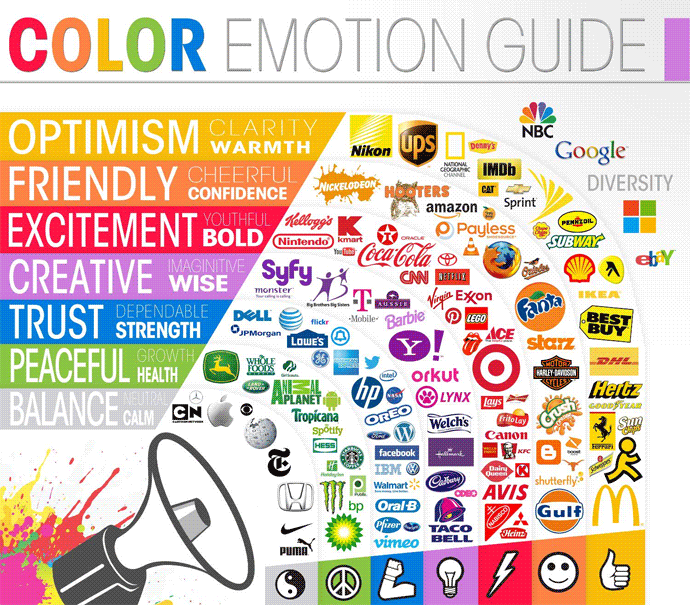
First, let’s take a look at branding, and color perception in connection with the design of brands. Plenty of studies attempted to classify the consumer reactions on different colors:

Color Emotion Guide - The Psychology of Colors in Marketing and Branding

© The Logo Company

The truth is, that the effect of colors is too dependant on personal experience, making it impossible to assign individual emotions to one color. However, there are certain patterns in the perception of the color.

In a study titled “Impact of color on marketing,” scientists found out that up to 90% of purchase decisions are linked to specific colors; depending on the product, of course. When it comes to a particular color’s role in branding, another study worked out that the connection between a brand and its color is imperative. Consumers will quickly notice if a brand’s color fits to what it’s trying to sell.

Another study concluded that the purchase intention of the consumers strongly depends on the color used by the brand. Colors influence how customers perceive the brand’s personality. Who would buy a Harley Davidson without the label giving them the feeling that these bikes are super cool?

Our brain wants to be able to immediately recognize brands as such. That’s an important element when it comes to creating a brand identity. A blue Coca-Cola logo wouldn’t even be half as effective regarding brand perception and selling the product. To compete with a direct rival, a strong brand identity and the right color for the branding is required.

When it comes to finding the “right” color – science found out that – predicting the consumer reaction to appropriate colors is said to be greater than the unique color itself. The Harley-Davidson logo conveys ruggedness and coolness; Coca-Cola conveys refreshment, and the Apple logo expresses a desire. Thus, the goal is to find colors that are the most capable when it comes to playing with these emotions.

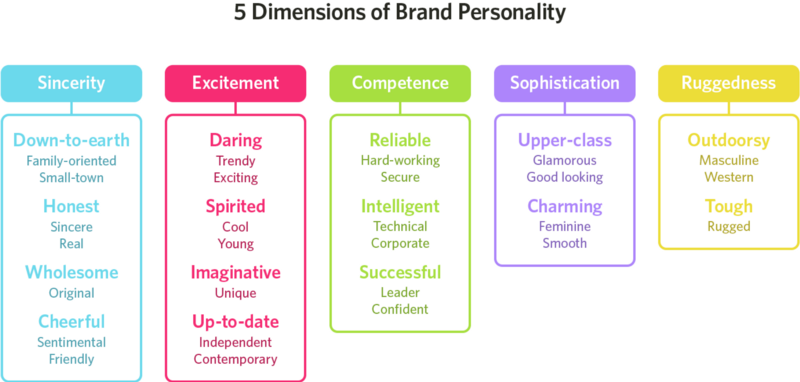
The psychologist and Stanford professor Jennifer Aaker conducted studies on this subject. Her research work “Dimensions of Brand Personality,” suggests that there are five core dimensions that affect brand personality.

The Five Dimensions of Brand Personality
Sometimes, brands possess a mix of two of these characteristics, but for the most part, they are dominated by a single one of them. Generally speaking, some specific colors are connected to specific traits; like brown and sturdiness, purple with ingenuity, and red is often perceived as exciting. Almost every study will indicate, that when it comes to branding, finding a color to support the personality is better than relying on stereotypical color connotations.

So, there are no clear guidelines regarding which colors individual companies should use. Of course, “it depends” is a frustrating answer to the question about the optimal color choice, but it’s the truth. A color should always be viewed in the context in which the brand is moving. It’s the feeling, the mood, and the image that influence the color choice of the brand or the product.

Color Trends for Men and Women

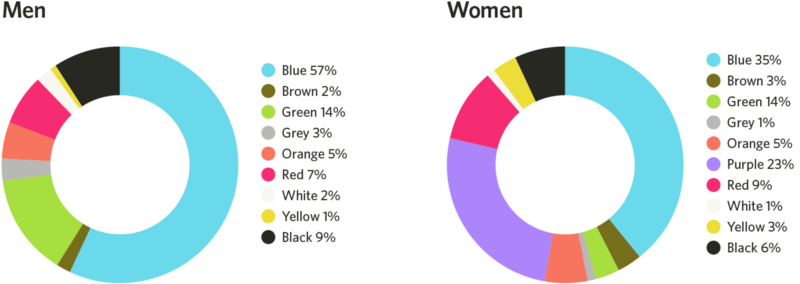
One of the most interesting examinations on this subject is the work of Joe Hallock, on »Color Assignment“. Hallock’s data shows clear preferences of the different genders regarding colors. Here, blue seems to dominate both genders. However, purple shows the different preferences of men and women.

It’s important to include the environment and cultural perception when dealing with the suitability of a specific color for a gender. Often, the milieu and the cultural environment affect the cognition of colors. This may also affect individual decisions. In our cultural environment, a soft blue and rose are often associated with boys and girls.

An Image of Hallcock’s Assessments:

The Favorite Colors of Men and Women

farbwahrnehmungen -nach-geschlechtern-sortiert

Blue is one of the favorite colors of both genders.

However, Men and Women Don’t Like These Colors

Diese Farben mögen Männer und Frauen überwiegend nicht

The majority of men and women don’t like these colors.

Research makes it evident that nuances in color perceptions and the preferences often are the main factors. Men usually prefer stronger colors, while women favor the softer, gentle colors.

The male gender tends to like shades of colors with black components, while women tend to like shades with white elements better. The different color preferences have always been an often-discussed issue, although brands can and should easily work outside of gender stereotypes.

Breaking expectations can be rewarded, as shown by several brands already. The majority of both genders does not like red. However, the color is the base for a lot of really successful brands. An appropriate color choice does not have to consist of the favorite colors to be successful.

Harmonious Color Coordinations

The psychological principle of isolation states that an element that works like a “sore thumb” is very likely to be remembered. Here, studies show that the participants remember an article or product a lot better when it stands out and sets itself apart from the rest.

Two other studies on color combinations – one dealt with the measurement of aesthetic reactions, while the other focused on consumer preferences – worked out that a wide majority prefers color patterns with similar colors. However, palettes with a high contrast color choice were also perceived as pleasant.

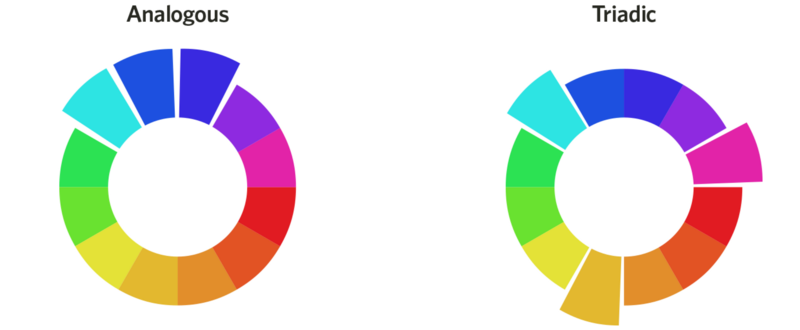
Regarding color coordination, this means creating a visual structure that consists of a base of analog colors and the contrast with complementary (or tertiary) colors.

analoge-und-tertiaere-farben

Another route to take would be using a background, a base, and an accent color that support a clear hierarchy of the website; the customers and visitors are “trained” to do certain actions.

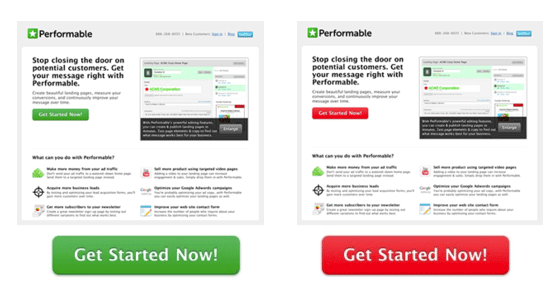
Why is this important? Understanding these principles means achieving better conversion rates. Let’s pay attention to the effect on our mind when the color of a button changes. Which button will be clicked more frequently?

konversionsraten-mit-farben-steigern

The red button is the obvious winner of the test conducted by Hubspot. The conversion rate increased by 21 percent. Of course, this is not only due to the red color but also due to the isolation of the button color.

The rest of the website was designed with a lot of green elements. In the end, this means that the green button simply drowns in the rest of the website. The red button immediately stands out, and clearly, sets itself apart from the other used colors. The result is the improved conversion rate. So that’s a good example of using complementary colors.

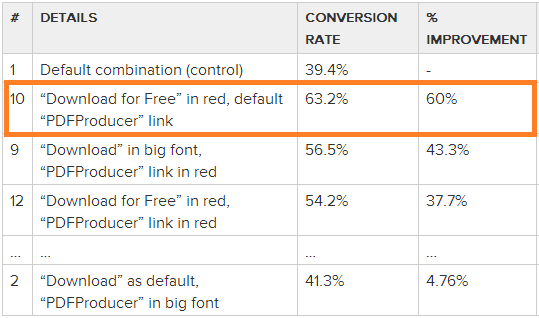
We’ll find a similar effect in a test of multiple variants published by Paras Chopra in the Smashing Magazine. Paras tested a couple of variants of download links for his PDFProducer program.

The Following Versions Were Tested:

Paras Chopra's Test on the Right Download Link Colors

Can you guess which combination scored the best results? Here’s the answer:

ergebnis-downloadlink-test

The tenth variant worked a lot better than all the others. It is not possible to consider this a coincidence, though, as version ten had the best contrast of all examples. The text “PDFProducer” is small and gray, but the red call-to-action text “Download For Free” creates a high contrast, which is vital for higher conversion rates. But how do we define success for tests like this? Do we measure clicks or sign-ups?

Of course, this depends on what we plan to achieve with the call-to-action. In this case, sign-ups would certainly be the right answer. The “free download” is paid with the email address of the interested user, as a sign-up for the newsletter is necessary.

Why We Prefer Sky Blue Over Light Blue

Although different colors are perceived differently, the describing names of the colors also count. A study called »A Rose by Any Other Name” asked the test participants to rate products (like makeup) with individual color names. The result was that fancy names of colors were preferred. “Mocha” for example was perceived as much more likable than the real name of the color brown. For this test, the participants got to see two identical products, with the only difference being the name of the color.

The same effect is applied to a lot of products. Varnish colors with fancy names were perceived as much more pleasant to the eye than their simple-named counterparts. Odd and unique color names work better for the majority of products, ranging from gummy bears to sweatshirts. Chalk with the color name “razzmatazz” sells a lot better than it would with the real name lemon.

Find Your Own Color Palette

At the end of this article, many questions remain unanswered. There is still no cheat sheet for the perfect color choice. Maybe there will never be a single right answer. However, there are suggestions to follow. One of them can always be a good piece of advice: start A/B tests with two versions that you decided on. Use contrasts and the power of complementary or tertiary colors.

(dpe)

Categories: Others Tags:

Next Generation Server Compression With Brotli

October 5th, 2016 No comments

Chances are pretty good that you’ve worked with, or at least understand the concept of, server compression. By compressing website assets on the server prior to transferring them to the browser, we’ve been able to achieve substantial performance gains.

For quite some time, the venerable gzip algorithm has been the go-to solution for reducing the size of page assets. A new kid on the block has been gaining support in modern browsers, and its name is Brotli. In this article, you’ll get hands-on with Brotli by writing a Node.js-powered HTTP server that implements this new algorithm, and we’ll compare its performance to gzip.

The post Next Generation Server Compression With Brotli appeared first on Smashing Magazine.

Categories: Others Tags:

A Redesign with CSS Shapes

October 4th, 2016 No comments

CSS Shapes is like the perfect example for progressive enhancement these days. Kinda like border-radius was. Older browsers have square corners! Who cares! CSS Shapes allow you to wrap text irregularly – like along the path of a circle().

Eric Meyer uses it on a production page and shows how it works. Here’s some code I snagged from the CSS on the site itself showing it only being applied on large screens with support:

@media only screen and (min-width: 720px) {

  @supports (shape-outside: circle()) {

    .single-page article .complex-content img.right {
      shape-outside: circle(150px at 170px 130px);
    }

    .single-page article .complex-content img.left {
      shape-outside: circle(150px at 130px 130px);
    }

  }

}

Jen Simmons has a bunch of great demos of this as well. Looks like shape-outside supports circle(), ellipse(), polygon(), and url() but not path() yet.

Direct Link to ArticlePermalink


A Redesign with CSS Shapes is a post from CSS-Tricks

Categories: Designing, Others Tags:

Draw an SVG with Fill in Adobe Muse

October 4th, 2016 No comments
Muse For You - Draw an SVG with Fill in Adobe Muse - Web Design Ledger

Draw an SVG with Fill in Adobe Muse. No Coding Skills Required.

In the video tutorial above I go over how to draw an SVG in Adobe Muse with the SVG Draw Widget found at http://museforyoushop.com. I recently released an update where you can now draw the SVG and have the fill fade in. The steps are as follows.

1. Drag and drop the “SVG Draw – Add First” widget from the library panel and place it at the top of your Adobe Muse website. If you do not see the library panel go to Window > Library.

2. Drag and drop the “SVG Draw Widget” from the library panel.

3. Add an SVG image. The SVG image can be any size and have a fill.

4. Set the stroke color and stroke width within the widget options.

5. Select the “Add Fill After Draw” option to have the fill fade in after the SVG draws.

6. Select “Enable Fill Color” if you would like to set a solid color for the fill instead of the original fill of the SVG image. If this option is selected you can select a fill color for the SVG.

Muse For You - Draw an SVG with Fill in Adobe Muse - Web Design Ledger

7. Choose from the following drawing methods:

  • Delayed – Draws all the SVG paths at the same time with a delayed start.
  • Async – Draws and finishes all the SVG paths at the same time.
  • One by One – Draws the SVG paths one by one.

8. In the new update you have the option of redrawing the SVG:

  • On Hover
  • On Click
  • On Window Resize

You can have the SVG redraw in all of these cases or different variations. For instance you can select on hover and on click.

9. If you would like the SVG to fade out after it draws enable the “Fade Out” option. This option works well if there is no fill.

10. Done.

For more video tutorials and widgets for Adobe Muse visit http://museforyoushop.com.

Happy Musing :).

Read More at Draw an SVG with Fill in Adobe Muse

Categories: Designing, Others Tags:

Breaking Out Of The Box: Design Inspiration (October 2016)

October 4th, 2016 No comments

Whenever I work on an illustration, the objects don’t always have to look like they do in real life. They can look like how I perceive them in my mind. Breaking away from reality is the privilege you have as an illustrator. There are, in fact, no boundaries. Illustrating is creativity in its pure form. It is endless and that’s why I love it so much.

The illustration above is an inspiring example of using geometric shapes to create a bicycle with a minimum of detail. Sit back, relax, and feed your appetite. Here’s your monthly dose.

The post Breaking Out Of The Box: Design Inspiration (October 2016) appeared first on Smashing Magazine.

Categories: Others Tags:

Photoshop Elements 15 and Premiere Elements 15 are out

October 4th, 2016 No comments

It’s worth remembering that web designers are hardly the only people making pretty things for the web. We’re certainly not the only people creating content for the sites that we ourselves build. The corollary here is that a lot of these people will be consumers, and will be using consumer-grade tools. It’s a good idea, then, to keep an eye on the tools that non-professionals will be using, and keep them in mind when we work.

In this case, those tools are Photoshop Elements 15, and Premiere Elements 15, both of which were just released by Adobe. They’ve both been updated with a number of features to make photo and video editing easier for beginners, and anyone who just wants to put something that looks good on their Facebook feed.

In fact, creating media for social networks is one of the major focuses for Adobe’s Elements series these days. It makes sense. People largely don’t print out family photos anymore. They put them in albums on their social media site of choice, and make comments designed to embarrass their teenagers.

You know, the usual family stuff, only now the whole world can see it! Progress!

And now, Adobe’s making it easier. In fact, on top of the social media focus, the Elements series has introduced a batch editing feature or two, so you can embarrass those teenagers more, and faster.

Photoshop Elements

The big focus lately has been on designing the app (actually both of them) to do the heavy lifting for the user. Gone are the days when beginners had to spend an hour outlining the subject of their photo with the pen tool to select it properly. The app does that sort of thing for you.

They’ve also added a number of new guided edits. Basically, these are just wizards that take users through a number of steps and program features to help them get a pre-defined result. The news ones include:

  • Turning a photo into text
  • Effects collages
  • Speed pan effects
  • Creating your own digital frames
  • Painting effects onto photos

Lastly, there’s a feature to help users adjust the facial features of people in their photos. That teenager of yours in a foul mood? You can change that, at least in the photo. Now only their favorite band-related t-shirt can tell the world how they really feel.

Premiere Elements

Premiere Elements is also bringing more automation and automatic detection into the mix. First up is the fact that they added face detection to their pan, zoom, and trim effects, to make sure the faces stay in the picture.

For music, there’s a new feature they’re calling Remix, which will automatically remix a song down (or up) to the length of your video. I haven’t had a chance to personally test this feature, but it is very interesting to me. I mean, an algorithm mixing instrumental music is one thing, but how would it handle vocals?

Okay, I’m actually really curious about that one.

Next, we have Haze Removal. It first introduced as its own effect in Photoshop Elements, and now you can do it with video. That’s… all there is to it.

Lastly, there’s now a feature to make it easier for people to make video collages. As it’s something that would usually require a bunch of manual positioning, I kind of wish they’d put this into the regular version of Premiere.

Conclusion

These apps come with the usual hefty price tag, so they’re best suited to someone who is doing this stuff a lot, like a hobbyist, or a particularly dedicated relative. That said, if that’s you or your client, then this feels like a generally solid update to decent consumer software.

You should get lots of likes.

Increase Productivity with UnDistracted for Mac – only $5.99!

Source

Categories: Designing, Others Tags:

Grade.js: Gradient Frames for Your Images Via JavaScript

October 4th, 2016 No comments
gradejs-demo

What a bulky title for such a streamlined tool. Grade.js is a JavaScript library that you use to automatically frame your images. The interesting thing about that is that the frame is made up from a gradient of the two most dominant colors of the respective image. But try fitting that into a headline…

Grade.js: Easy to Use, Neat Results

Grade.js is the latest project of developer Ben Howdle from the United Kingdom. Ben is distributing the JavaScript library for free under the MIT license via Github. You can learn about its functionality on this demo page.

There are different options for the integration into your project. You can download the 104kb large script, and upload it onto your project. You could also install it via npm, or use the given CDN link.

Using it is very easy. First, you implement the script and initialize it. Like this, for example:

1
2
3
4
5
6
7
8
9
10
11
<script src="path/to/grade.js"></script>
<script type="text/javascript">
    window.addEventListener('load', function(){
        /*
            A NodeList of all your image containers (Or a single Node).
            The library will locate an <img /> within each
            container to create the gradient from.
         */
        Grade(document.querySelectorAll('.gradient-wrap'))
    })
</script>

Then, place a container div around the image you want to frame. This container is marked with the class “gradient-wrap”.

That can look like this:

1
2
3
4
<!--the gradients will be applied to these outer divs, as background-images-->
<div class="gradient-wrap">
    <img src="./samples/finding-dory.jpg" alt="" />
</div>

That’s it. From now on, all of the page’s images that are in a container with the class “gradient-wrap”, will be equipped with a frame like this one:

To do so, the JavaScript detects the two most dominant colors from the color palette of the respective image, and creates a suitable gradient. It’s obvious that you need to place all images in separate containers, isn’t it?

Categories: Others Tags:

Essential resources for developers

October 4th, 2016 No comments
flynn

In this roundup, we’ve included app platforms, templates, source code tools, learning tools, frameworks, JavaScript resources, and much more.

Much of what’s on the list this month is free, with a few high-value paid apps and tools also included. They’re sure to be useful to developers, from beginners to experts.

If we’ve missed something that you think should have been on the list, let us know in the comments. And if you know of a new app or resource that should be featured next month, tweet it to @cameron_chapman to be considered!

Flynn

Flynn is a platform for hosting and running your apps, databases, websites, and services at scale. It creates running applications directly from your code, connects all of your microservices, and more.

HTML Email

HTML Email is a set of responsive email templates that you can actually use in production. It saves time, and simplifies the entire dev process.

html email

Website Downloader

Website Downloader lets you download the source code and all the assets of any website you choose. Just enter the URL and start downloading.

website downloader

Mimo

Mimo is a platform for gamified computer science learning. It makes it easy to learn CS lessons on the go, during your commute, waits, and other idle moments.

mimo

GitHub Projects

GitHub Projects is a new way to add seamless project management integration into your GitHub dev process, with an interface similar to Trello’s. You can reference every issue and pull request with a card and notes make it easy to never miss an idea.

github projects

Indie Hackers

Indie Hackers makes it easy to see how founders are writing their own paychecks (including how much they’re earning). It includes founders of side projects earning anywhere from a couple hundred dollars extra per month to those earning over $100k.

indie hackers

Pusher

Pusher is a unified API for building cross-platform apps with programmable push notifications for both iOS and Android devices. It’s easy to integrate, scalable, and reliable.

pusher

Simpla

Simpla is a collection of HTML elements that make it easy to build dynamic content without a CMS. Just create editable content in your code and the update it inline.

simpla

Buddy

Buddy is a Git and continuous delivery platform that works with Github, Bitbucket, and GitLab. It helps you test, build, and ship better apps and websites faster.

buddy

Gutenberg

Gutenberg is a modern framework for making your web page print correctly. There are multiple themes available to style your printed docs.

gutenberg

Mini.css

Mini.css is a minimal, responsive, mobile-first CSS framework. It’s style-agnostic and uses Sass.

mini.css

Blueprint

Blueprint is the first responsive iOS 10 Craft library for Sketch. It’s ready for both iPhone and iPad, and also works as a standalone sketch template.

blueprint

Postmate

Postmate is a simple, promise-based postMessage library from Dollar Shave Club.

postmate

Wing

Wing is a minimal CSS framework made for smaller side projects where a full-blown framework like Bootstrap or Foundation is overkill.

wing

Plottable.js

Plottable.js is a set of flexible, premade components for building interactive charts on the web. It’s built on D3 and lets you create area plots, line plots, bar plots, and more.

Plottable.js

Materia

Materia is a modern dev environment for building advanced mobile and web applications. It covers all the major aspects of building an app in just 9 simple steps.

materia

Coding Confessional

Coding Confessional offers up anonymous confessions from programmers all over the place.

coding confessional

Code Roulette

Code Roulette is a pair programming game for developers. Get paired up in real-time to solve coding challenges together in random programming languages.

code roulette

Quill

Quill is an API-driven rich text editor that was built for developers. It’s cross platform and works on all modern browsers on desktops, tablets, and phones.

quill

Avocode 2.10

Avocode 2.10 is a workspace for designers and developers to help them work together. The newest version has a completely updated UI.

avocode

Swift 3.0

Swift 3.0 is the first major release of Swift since it was open-sourced. It includes major improvements and refinements to the core language and Standard Library, among other new features.

swift 3

App Tools

App Tools is a curated list of the best tools in the mobile app ecosystem, from beta testing to wireframing and prototyping and more.

app tools

Thimble

Thimble is an online code editor that makes it easy to learn to code HTLM, CSS, and JavaScript while you create your own web pages.

thimble

Sketchode

Sketchode is a free Sketch software application that’s a design solution for developers. It makes the workflow from designer to developer smoother.

sketchode

Betafy

Need to find some beta users for your startup? Betafy is a great way to do so, giving you access to a large pool of beta users and testers.

betafy

CodeDammit

CodeDammit makes it easy to learn to code by looking at real examples. You can view web code, mobile code, or code snippets.

codedammit

Fork

Fork is a fast and friendly git client for Mac that’s currently in public Beta. It includes tabbed browsing, makes it easy to open your repository website in your browser, and more.

fork

Spectre.css

Spectre.css is a lightweight, responsive, modern CSS framework for extensible development.

spectre

Micro

Micro is a terminal-based text editor that’s easy and intuitive, while also taking advantage of all the capabilities of modern terminals.

micro

Prismic.io

Prismic.io is a CMS with an API-based approach that lets you use your own programming language and framework preferences. It gives you the freedom to structure your pages and posts the way you want, using native custom types.

prismic

GraphicsJS

GraphicsJS is a lightweight JavaScript graphics library that has an intuitive API based on SVG/VML technology.

graphicsjs

Increase Productivity with UnDistracted for Mac – only $5.99!

Source

Categories: Designing, Others Tags: