Archive

Archive for October, 2018

The Best Designers Are Taoists (Sort Of)

October 18th, 2018 No comments

Okay, for the love of any God you prefer, read this bit before you start writing comments…please? I’ve been studying up on philosophical Taoism lately because someone very near and dear to me is a (philosophical) Taoist, and I wanted to understand her better. What I’ve found is that web and UX designers have, by studying the data, come to a lot of the same conclusions as ancient Eastern philosophers.

While the lessons in this article may not be new to most of you, I thought it would be interesting to see how the principles of good design match up with Lao Tzu’s1 principles for good living. The world’s top designers are not, to my knowledge, actual Taoists. Neither am I evangelizing for Taoism. For one, I do not consider myself to be a Taoist, and secondly, evangelism as we know it is largely anathema to the ones I’ve met.

Thirdly, the practitioners of philosophical Taoism I’ve met will get a little annoyed if you call it a religion. Philosophical Taoism is just that: a philosophy, and many people adopt the philosophy alongside any religion they might already have.2

But without getting further into that3, here’s what I’ve found.

1. Don’t Struggle

“Struggle” as a concept, is unavoidable. We struggle so we can eat. But Taoist philosophy says that we should not struggle more than we have to. Take a lioness, for example: she may struggle to hunt down enough food for her cubs and her pride, but she does not struggle to be a lion. That part is instinctual, and she revels in it.

We humans, and designers/developers in particular, are very good at overcomplicating things for ourselves. We struggle not just to design and improve at our jobs, but we often struggle in ways that simply aren’t necessary. If you need examples, I’m just going to refer you back to Zeldman’s article: The Cult of the Complex. Smart designers keep it simple.

Another way good designers embrace this principle is in our love of workarounds and adaptability. While Bruce Lee himself was apparently non-religious, that whole “be like water, my friend” speech is actually one of the most important metaphors in the Tao te Ching. Water doesn’t struggle against obstacles, it goes around them. Nowadays, that sort of adaptability is basically a requirement for getting hired onto any studio or team that know what they’re doing.

2. Don’t Meddle

The Tao te Ching was, like many early self help books—I’m kidding—intended to be read by people in positions of leadership. Much of the advice is geared toward teaching local leaders—referred to in the book as “sages”—how to lead people, and more importantly, how not to. Most of the verses regarding this topic advise the sage against meddling too much in the affairs of their people.

Good designers would advise the same. Give your users a clear and easy path to the end goal, and then let them do their thing. Attempting to meddle with the way people browse will usually just annoy the hell out of them. Think of scroll jacking, modal pop-ups, the old pop-ups, obscure and unnecessarily creative navigation, and that sort of thing.

3. Be Slow to Judge

I know, Jesus said that, too. But the Tao te Ching takes the concept a bit further in suggesting that we should refrain from calling anything, anyone, or any circumstance good or bad until things have truly had a chance to play out. That is, don’t pass judgement until all the data is in4.

Designers these days are increasingly coming to rely on this same principle to inform their work. It’s one thing to “feel” like a big blue button would be better than a small green one, or vice versa. It’s another to know without a doubt that one is working better than another. While A/B testing is not always the best way to make design decisions, the importance of actually following the data to its conclusion cannot be understated.

4. Show, Don’t Tell

Taoists might make good designers, but they’re terrible marketers. I’m kidding again. It’s just that the Taoists I’ve encountered so far place far more importance on showing, rather than telling. Evangelism, as I’ve said, is not something they do. They believe that the only way to truly convince another to follow the Tao is to do it themselves, and let others observe the benefits.

Design is inherently visual, so this comes rather naturally to most of us. Good designers embrace this principle at every level with marketing, tutorials, or app walkthroughs, and of course, with the actual images in our content. After all, seeing is believing. A picture is worth a blah blah blah. We know this one.

5. Do No Harm

Correlating with that “Don’t Struggle” bit, philosophical Taoism encourages people to be themselves, to live how they want, and do what they feel is right, with just one very important caveat: don’t hurt anybody else. Violence is a last resort for self defense, and infringing on the freedom of others is anathema.

What we designers have discovered is that bad designers—the ones using dark patterns, trying to abuse SEO, and injecting two hundred trackers and a Bitcoin miner through ads—make the Internet worse for everyone. As the ecosystem of the Internet tries to defend itself, the bad actors find their gains are short-lived, sites find themselves struggling to make any kind of ad revenue, and the reputation of the whole industry is tarnished.

6. Contribute With no Expectation of Reward

Conversely, Taoism teaches that when we do good, we should do it without expectation of thanks, or reward. People who do this are often (though I’d say not always) given that recognition, and greater access to the community’s resources. Meanwhile, people that do good for recognition are usually found out, and fade into obscurity.

We’ve found this out in our community: the names we recognize in the design world are most often those of people who made our lives as designers easier. The people who wrote tutorials, ran educational podcasts, made videos, and did it all for free. Eventually, many of them did get recognition, and money, and invaluable contacts in the industry, but they had to put in a lot of thankless work first. People like me are design writers. They are design heroes.

1Lao Tzu is the reputed author of the original Tao te Ching: a collection of 81 verses that outline principles for good living and leadership.

2There is a branch of Taoism that is steeped in a fair amount of mysticism and incense which makes it look, sound, and smell like religion, but even these practitioners may tell you it’s not one. And then there’s another branch that is rather religious, with various gods and so on. There are lots of branches, and it gets complicated.

3Wikipedia is your friend. Heck, I started my study with Dudeism, a form of Taoism that uses the movie The Big Lebowski as the source of all its symbolism.

4 There is a famous Taoist parable which illustrates this type of indifference and its utility: A farmer has only one horse. When the horse runs away his neighbors say “What bad luck!” The farmer merely says, “Is it?” Days later, the horse returns and brings with it a beautiful wild stallion. His neighbors say “What good luck!” The farmer replies, “Is it?” Enchanted by the new horse, the farmer’s son tries to ride it, but is thrown and badly injured. The neighbors say “What bad luck!” To which the farmer shrugs, “Is it?” Not long afterwards the country is under threat and every able young man is conscripted into the military, but the son cannot go because of his injuries. “What good luck!” the neighbors say. The farmer again only says, “Is it?”

– Benjamin, Oliver. The Tao Te Ching: Annotated Edition (pp. 75-76). Abide University Press. Kindle Edition.

Featured image via DepositPhotos.

Add Realistic Chalk and Sketch Lettering Effects with Sketch’it – only $5!

Source

Categories: Designing, Others Tags:

Did we get anywhere on that :nth-letter() thing?

October 17th, 2018 No comments

No, not really.

I tried to articulate a need for it in 2011 in A Call for ::nth-everything.

Jeremy takes a fresh look at this here in 2018, noting that the first published desire for this was 15 years ago. All the same use cases still exist now, but perhaps slightly more, since web typography has come along way since then. Our desire to do more (and hacks to make it happen) are all the greater.

I seem to recall the main reason we don’t have these things isn’t necessarily the expected stuff like layout paradoxes, but rather the different typed languages of the world. As in, there are languages in which single characters are words and text starts in different places and runs in different directions. The meaning of “first” and “line” might get nebulous in a way specs don’t like.

Direct Link to ArticlePermalink

The post Did we get anywhere on that :nth-letter() thing? appeared first on CSS-Tricks.

Categories: Designing, Others Tags:

The Best Examples of the Worst UI Designs and How To Avoid Them

October 17th, 2018 No comments
UI Designs

Think about how many times you went on a website or a mobile app and left because of the poor design? I personally can count multiple times recently when I was searching for something specific, and the website was impossible to navigate. Unfortunately, this is a trend that I’ve noticed catching on here lately. Let’s put a stop to it and go over some of the worst UI designs that people still seem to think are okay.

Cluttered interface

UI Designs

One of the biggest turn-offs for me is a messy or cluttered interface. Listen, I get it, you offer a lot of cool features and blog posts. However, I don’t need all that junk on my screen at one time. It can and very often does confuse people to a point where they’d rather look elsewhere.

Basically, a cluttered interface can quickly go from a source of information, to this:

UI Designs
The solution is simple, create a more interactive interface that allows for multiple, easy-to-read transitions to other areas of the website.

Lack of contrast

UI Designs

See how all of this just blends together? When navigating a website, you want clear and understandable navigation. I don’t want to have to squint and lean in just to see if what I’m clicking on is a link or just part of the scenery.

UI Designs

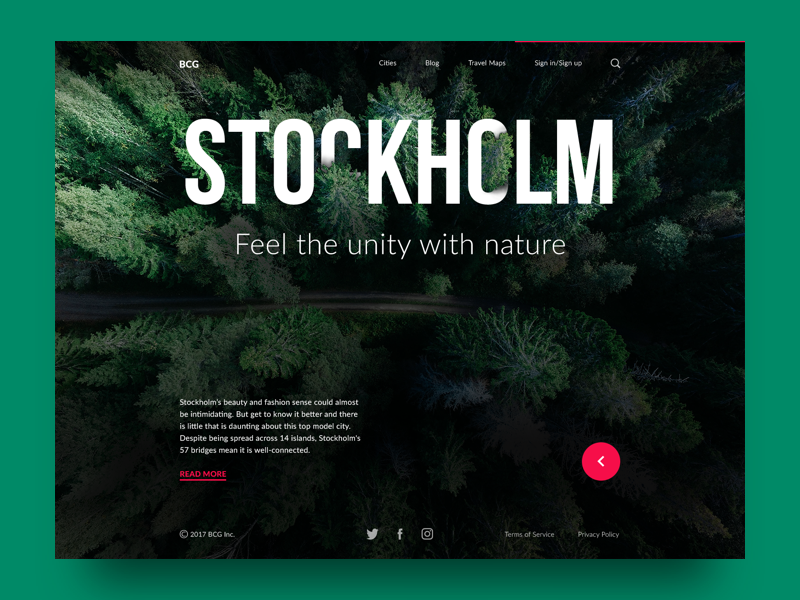
This is a great example of contrast. The letters are bold and defined, and nothing blends into the background. Of course, this is a promotion for a TV series, but you get the point. It also doesn’t have to be as wildly contrasting as the above image. Take this interface for example:

UI Designs
All the letters are clear, the colors aren’t overwhelming or wild, and it’s still very creative. This is a great example of a website UI that everyone wants to see more of.

Bad Consistency

One of the worst UI designs out there is bad consistency. Don’t get me wrong, changing things up a little bit just to be artsy and creative can really help your website grow. The problem is that people either take this way to far, or don’t take it far enough.

To break this down a little better, let’s talk about when consistency is needed and when it isn’t. For a design website, it’s not so important to be consistent, because that’s what design is, inconsistent. When you visit any given design website, the last thing you want to see is all the images lined up and the same size. You want each experience to be different and you want articles to be broken up in interesting ways.

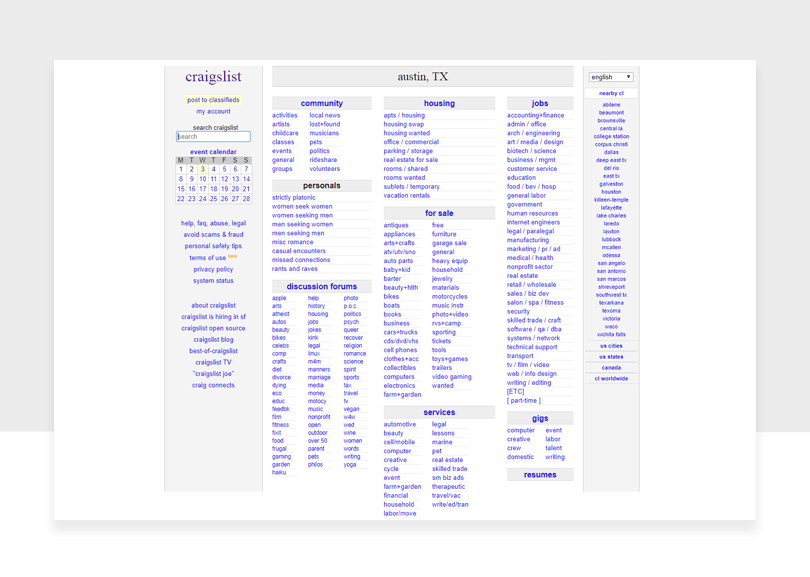
On the other hand, you have websites that are so plain and boring because they’re so consistent.

UI Designs
Craigslist is a great example of too much consistency. As one of the most used websites in the United States, it would make sense for them to spice it up a little.

This isn’t me bashing anything other than their design consistency. The website functions perfectly and is easy to navigate, it is just lacking in the pretty department.

How to Avoid These Most Common Mistakes of bad UI Designs?

Generally speaking, there are five mistakes people do that end up in a bad UI design:

1. Working limited by the deadlines

We all know that as a designer, it is quite difficult to gain notoriety at the beginning of the career. Novice designers are advised to take as many jobs as offered. Granted, this can happen to designers at any level. Not only do they overload themselves with work, but they are pressured by deadlines. In such circumstances, creativity has no room. One step to avoiding bad UI designs is making time to explore and select the best for clients.

2. Forgetting who or what you design for

When designing, people tend to forget that ultimately, the ones who will interact with their designed work are the users, not their clients. Therefore, instead of being focused on the deadline and paycheck, ask yourself “Is my work user-friendly? Do I offer a pleasant experience?”

3. Not knowing the target audience

We are talking about user interface, not designer interface for a good reason. UI design means putting the user before ourselves. It is important to create while focusing on the target audience. Our goal has to be offering them the experience and interface that would ensure them easy navigation.

4. Mentally designing too much too early

One of the qualities of a designer is flexibility. In the early stage of design, we might be so excited about a project that we project it in our minds and we try to stick to it no matter what. But we need to allow ourselves to explore more, and admit when something needs to be changed, even if they are our ideas.

5. Exaggerating with dynamics

Too much of anything can ruin a project. With today’s technology, we have easy access to tools that can do literary anything we want. It’s easy to get carried away with decoration and animation, but the key to a design is, in fact, to keep it simple and accessible.

Conclusion

Hopefully, these trends of bad UI design will go away sooner rather than later. The worst UI designs often come from startups or companies that haven’t been in business long. Ideally, after a few years of experience, they will get better at UI design.

New websites, take this as a learning opportunity. Don’t fall prey to what’s easy in UI design. Be different and unique. Keep the readers in mind, and everything else will follow suit.

Read More at The Best Examples of the Worst UI Designs and How To Avoid Them

Categories: Designing, Others Tags:

Introducing GitHub Actions

October 17th, 2018 No comments

It’s a common situation: you create a site and it’s ready to go. It’s all on GitHub. But you’re not really done. You need to set up deployment. You need to set up a process that runs your tests for you and you’re not manually running commands all the time. Ideally, every time you push to master, everything runs for you: the tests, the deployment… all in one place.

Previously, there only few options here that could help with that. You could piece together other services, set them up, and integrate them with GitHub. You could also write post-commit hooks, which also help.

But now, enter GitHub Actions.

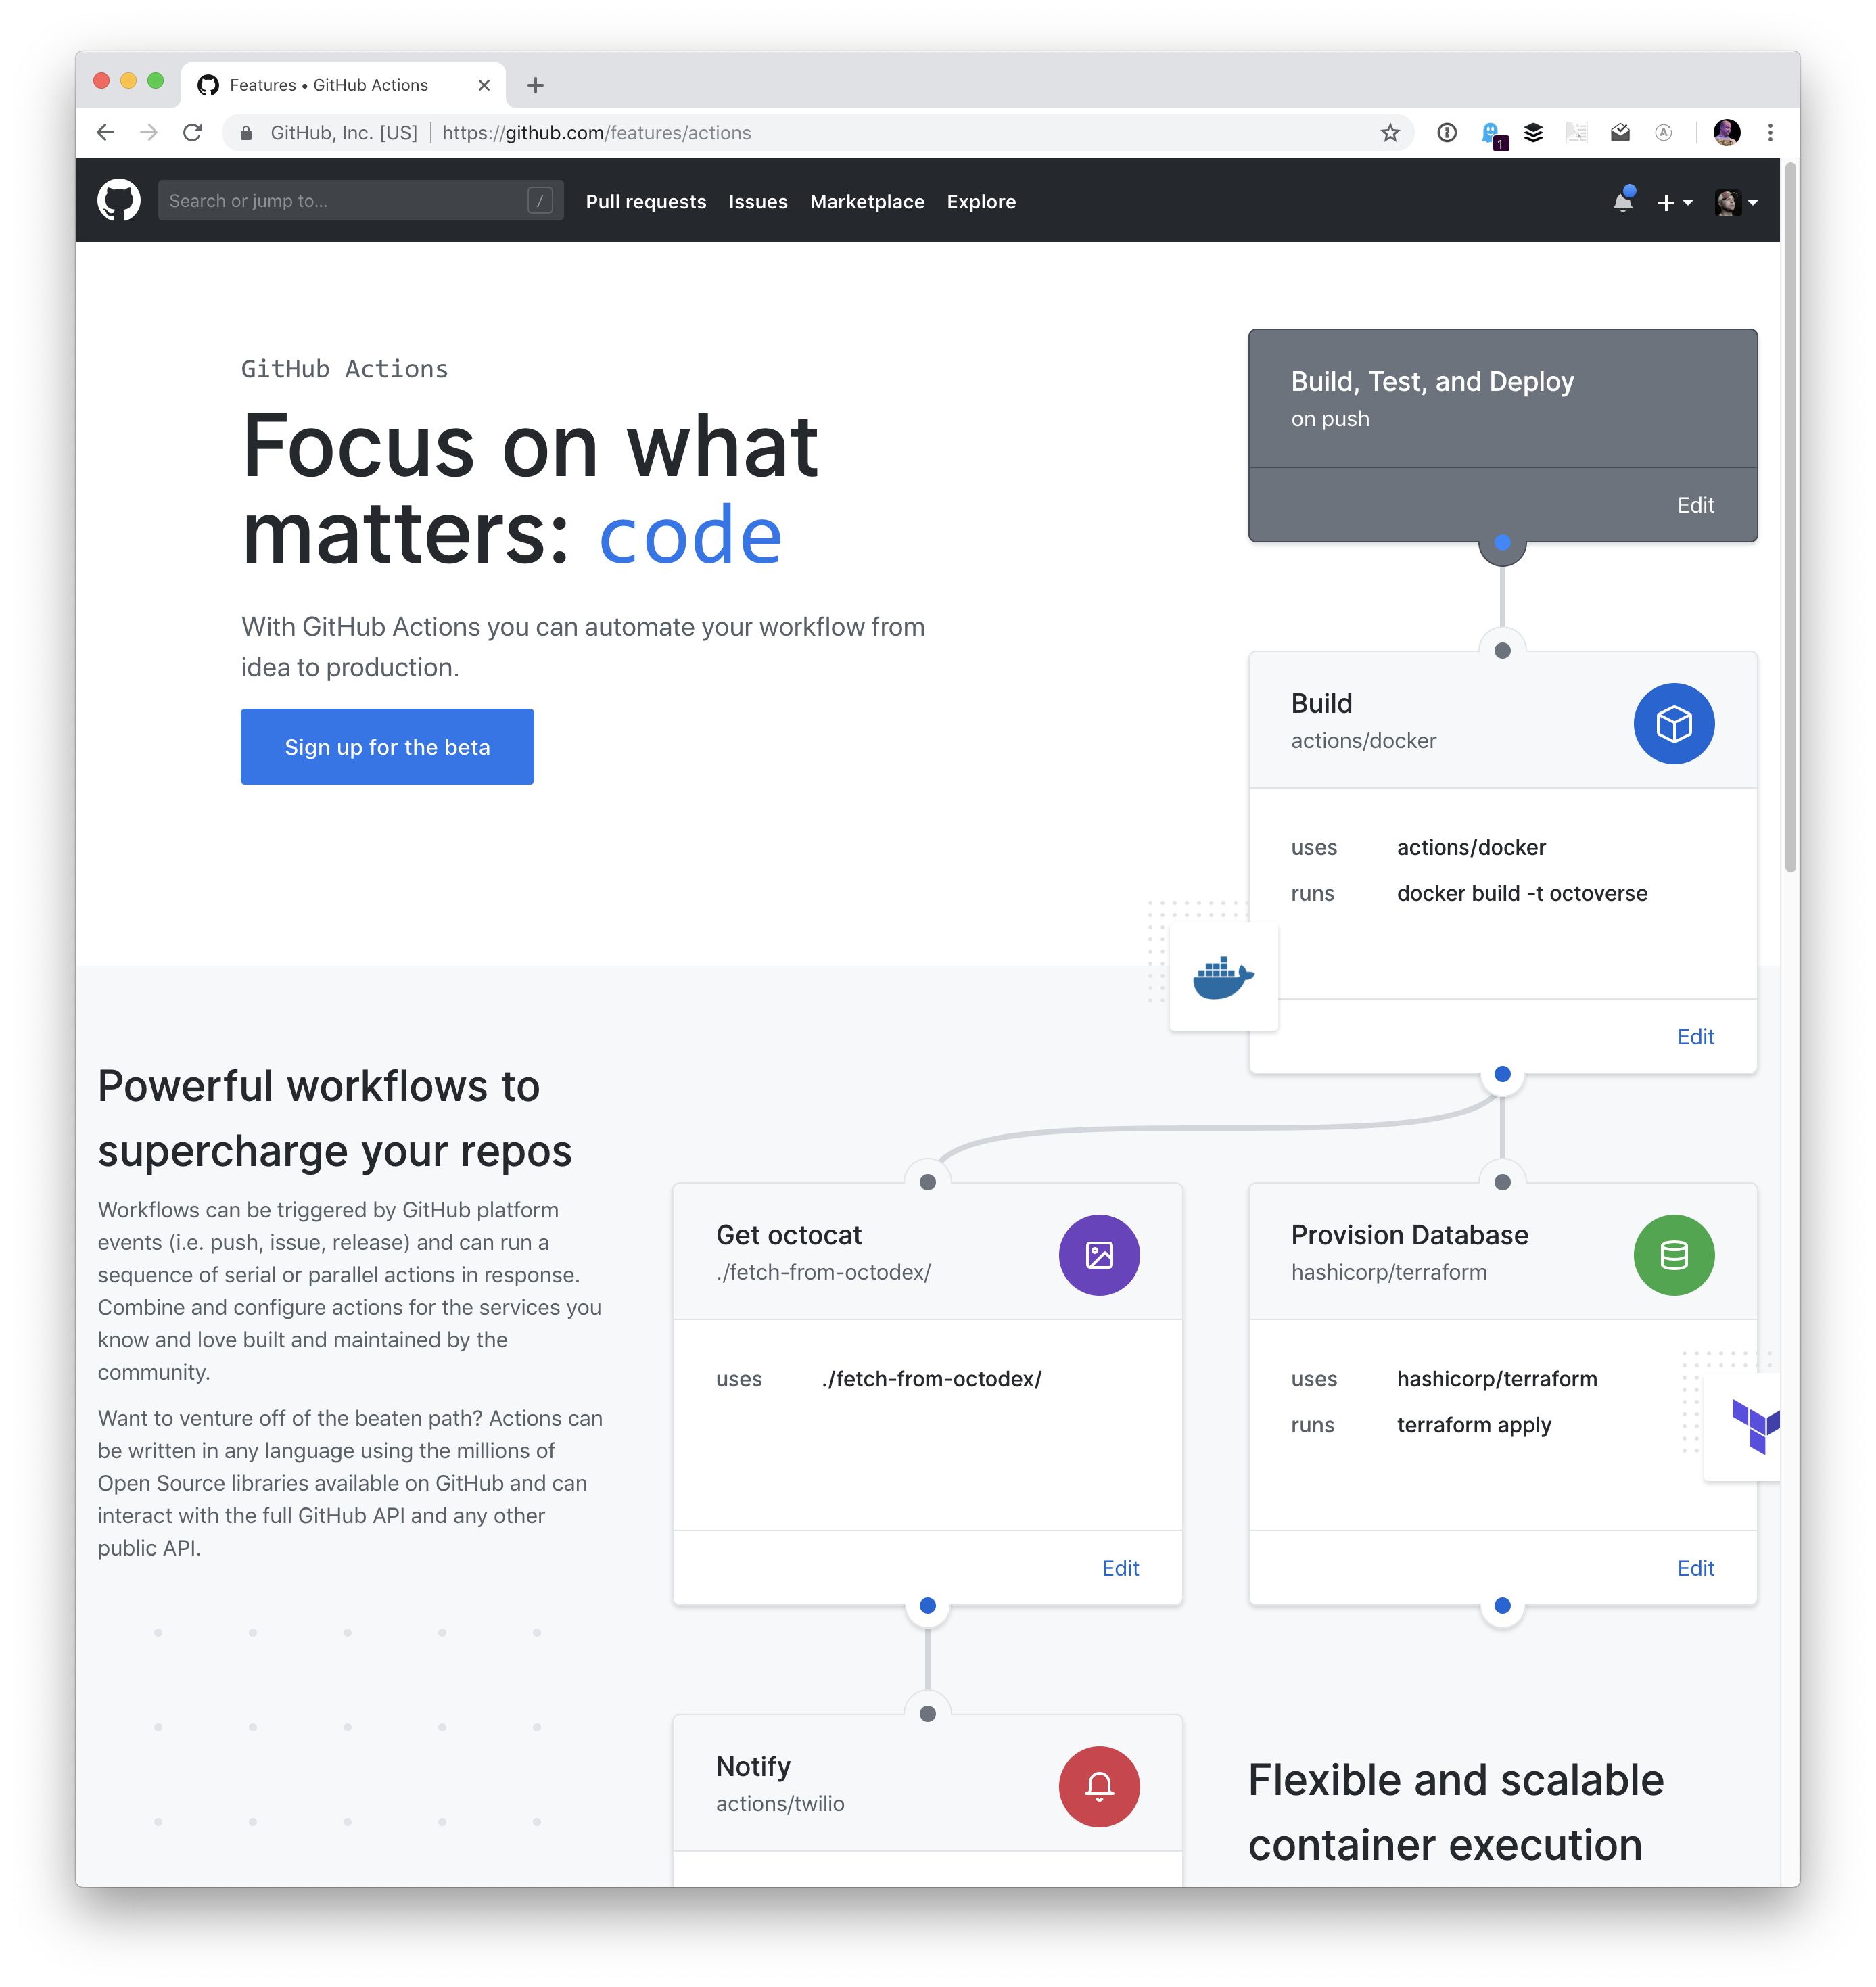
Actions are small bits of code that can be run off of various GitHub events, the the most common of which is pushing to master. But it’s not necessarily limited to that. They’re all directly integrated with GitHub, meaning you no longer need a middleware service or have to write a solution yourself. And they already have many options for you to choose from. For example, you can publish straight to npm and deploy to a variety of cloud services, (Azure, AWS, Google Cloud, Zeit… you name it) just to name a couple.

But actions are more than deploy and publish. That’s what’s so cool about them. They’re containers all the way down, so you could quite literally do pretty much anything — the possibilities are endless! You could use them to minify and concatenate CSS and JavaScript, send you information when people create issues in your repo, and more… they sky really is the limit.

You also don’t need to configure/create the containers yourself, either. Actions let you point to someone else’s repo, an existing Dockerfile, or a path, and the action will behave accordingly. This is a whole new can of worms for open source possibilities, and ecosystems.

Setting up your first action

There are two ways you can set up an action: through the workflow GUI or by writing and committing the file by hand. We’ll start with the GUI because it’s so easy to understand, then move on to writing it by hand because that offers the most control.

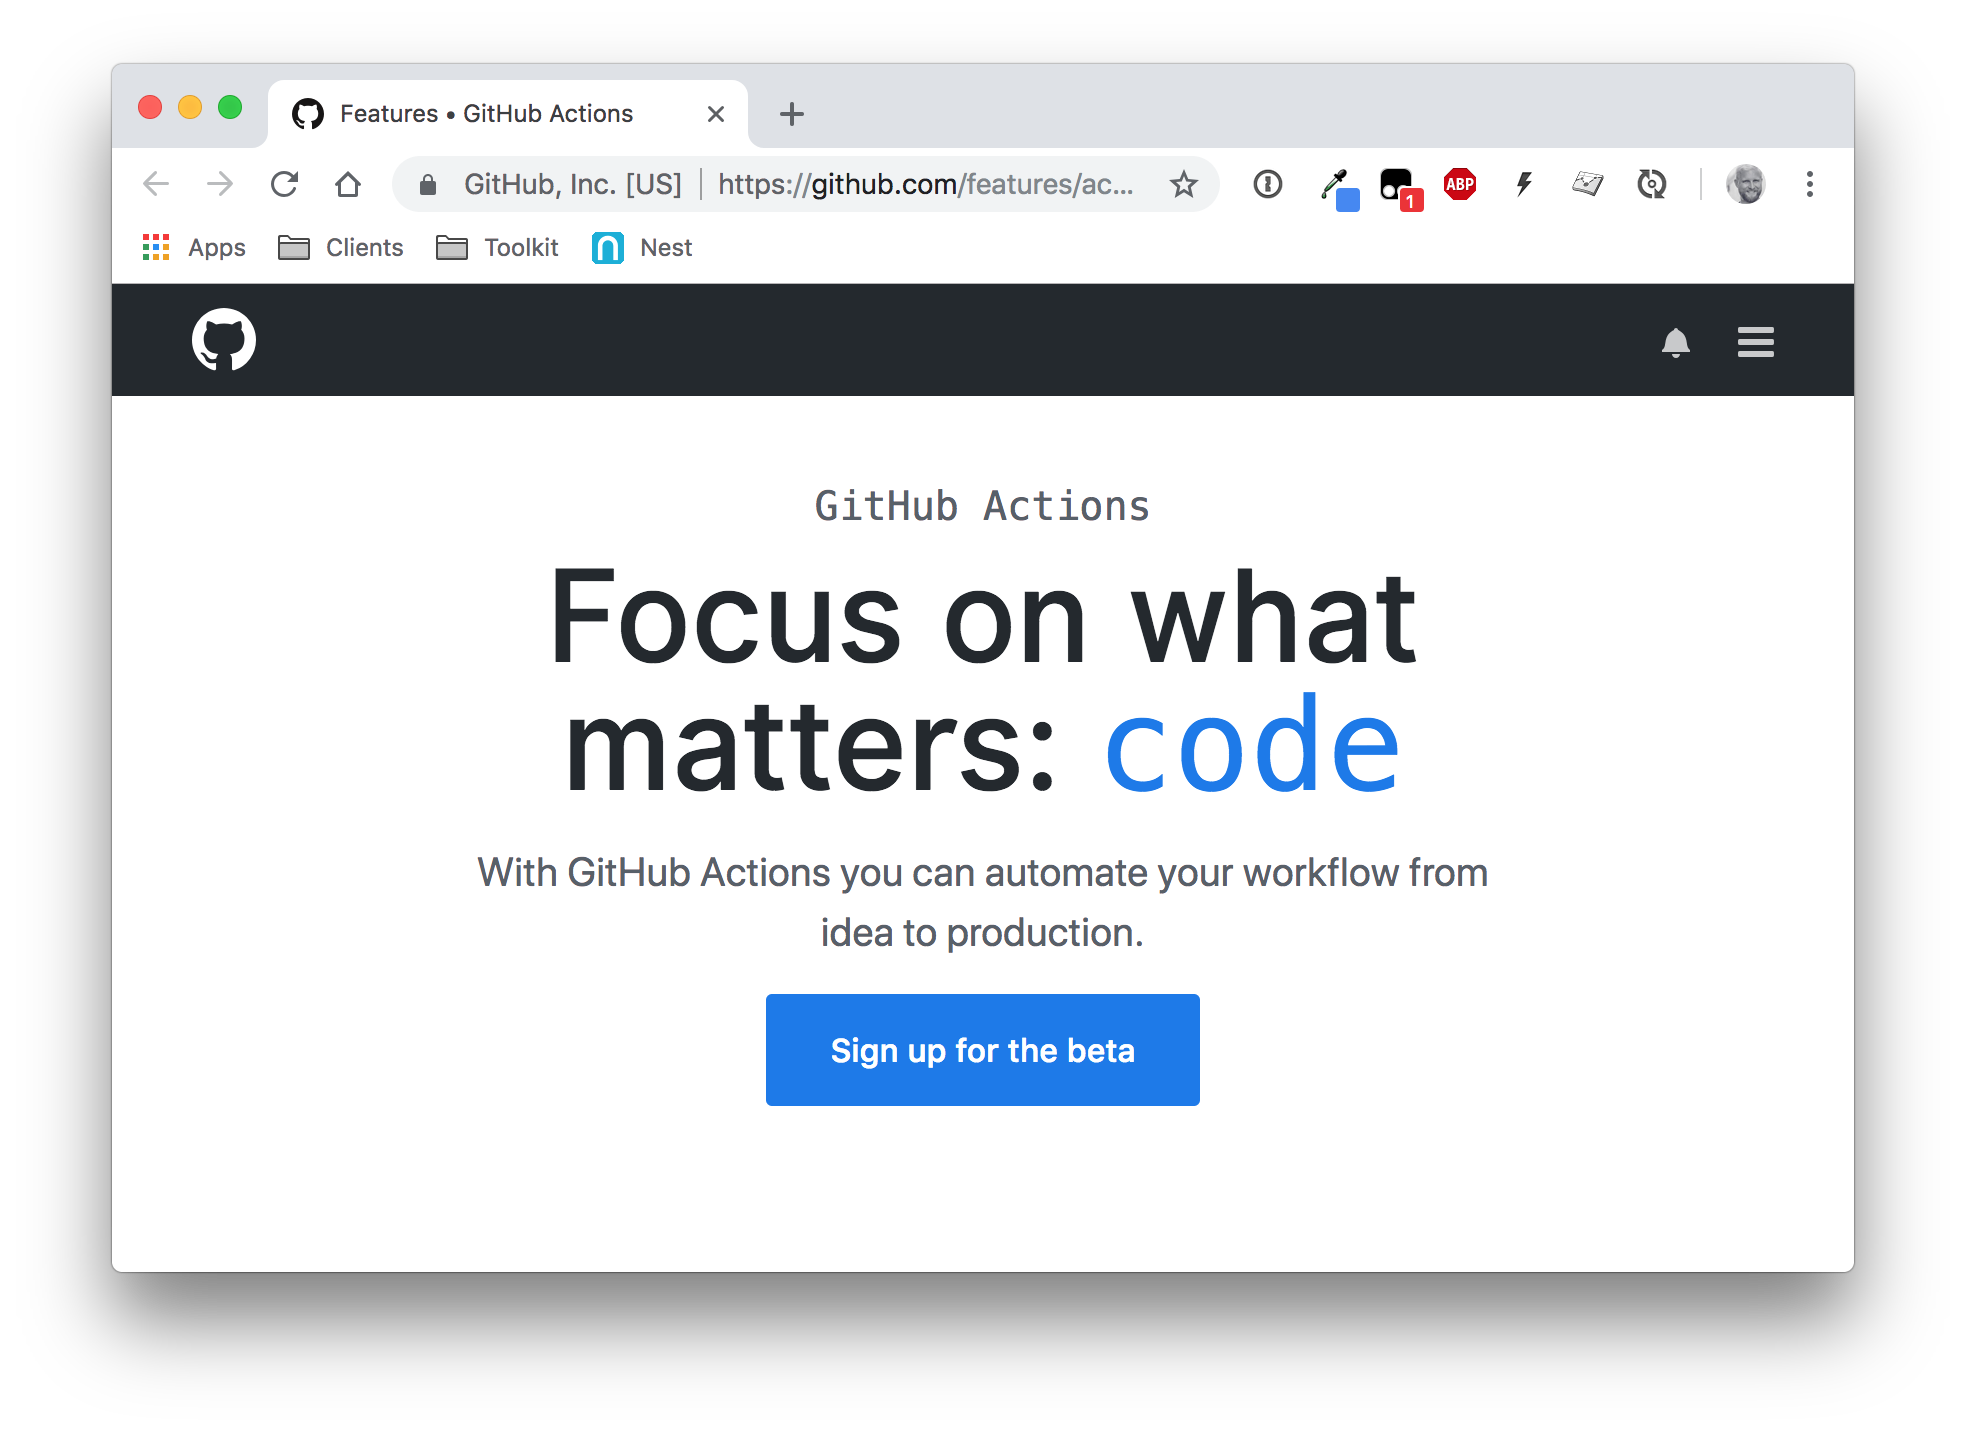
First, we’ll sign up for the beta by clicking on the big blue button here. It might take a little bit for them to bring you into the beta, so hang tight.

A screenshot of the GitHub Actions beta site showing a large blue button to click to join the beta.
The GitHub Actions beta site.

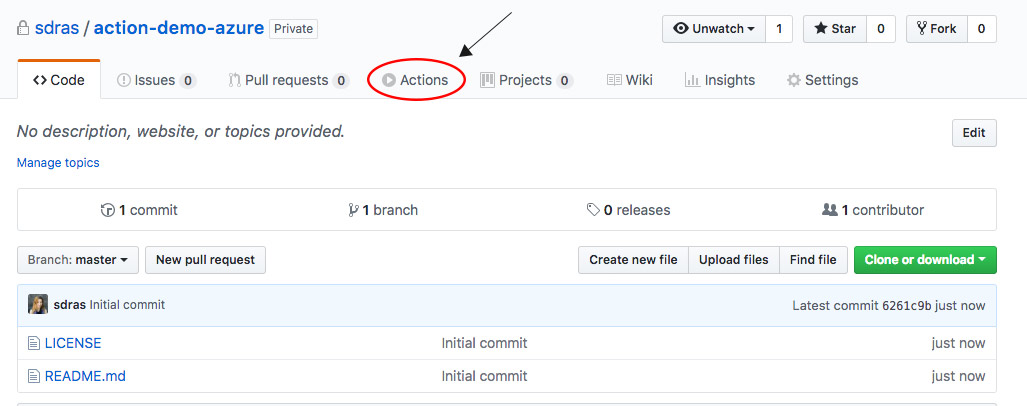
Now let’s create a repo. I made a small demo repo with a tiny Node.js sample site. I can already notice that I have a new tab on my repo, called Actions:

A screenshot of the sample repo showing the Actions tab in the menu.

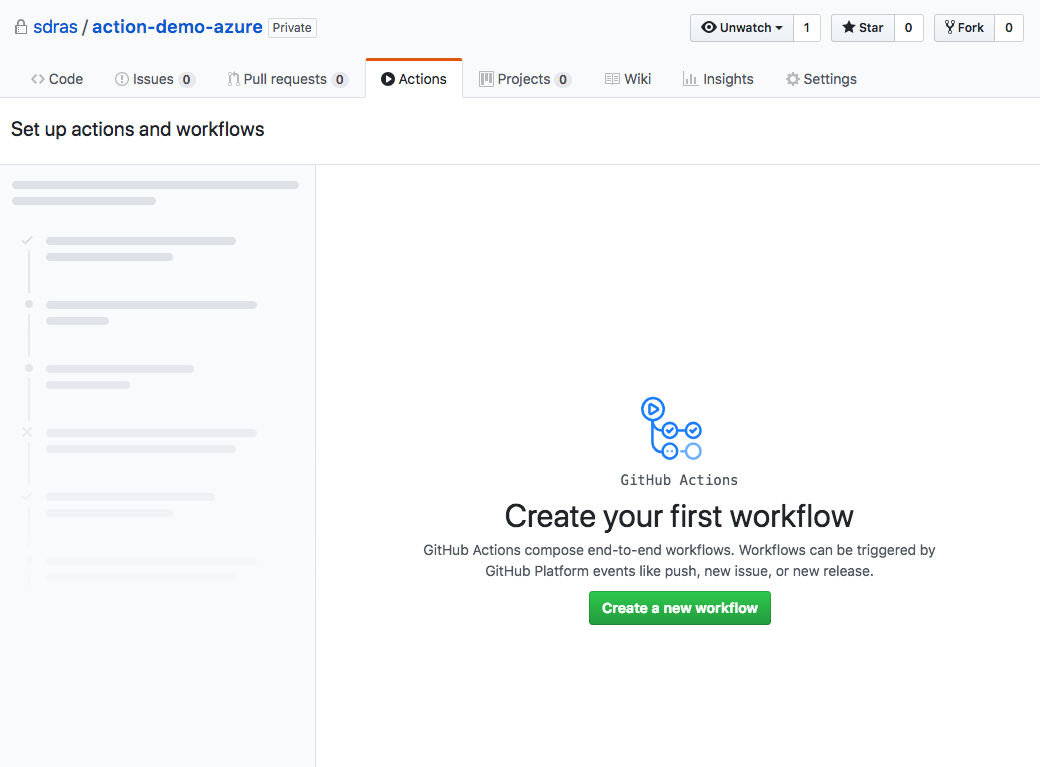
If I click on the Actions tab, this screen shows:

screen that shows

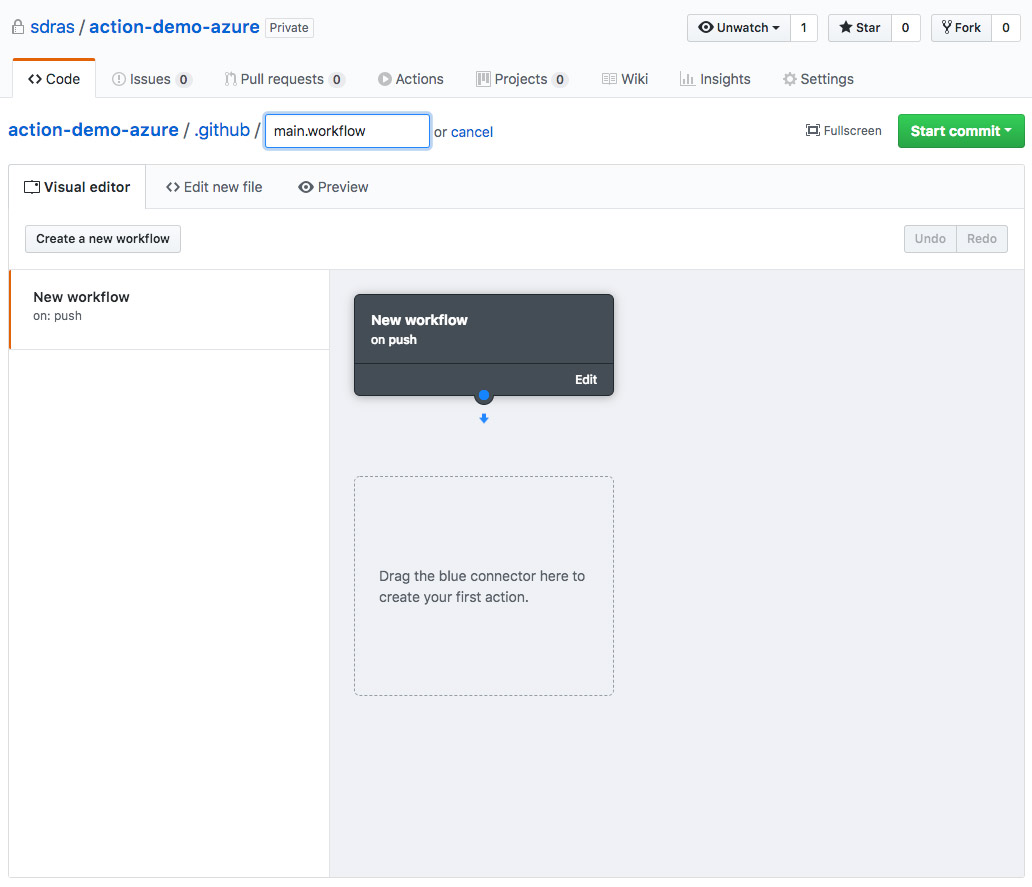
I click “Create a New Workflow,” and then I’m shown the screen below. This tells me a few things. First, I’m creating a hidden folder called .github, and within it, I’m creating a file called main.workflow. If you were to create a workflow from scratch (which we’ll get into), you’d need to do the same.

new workflow

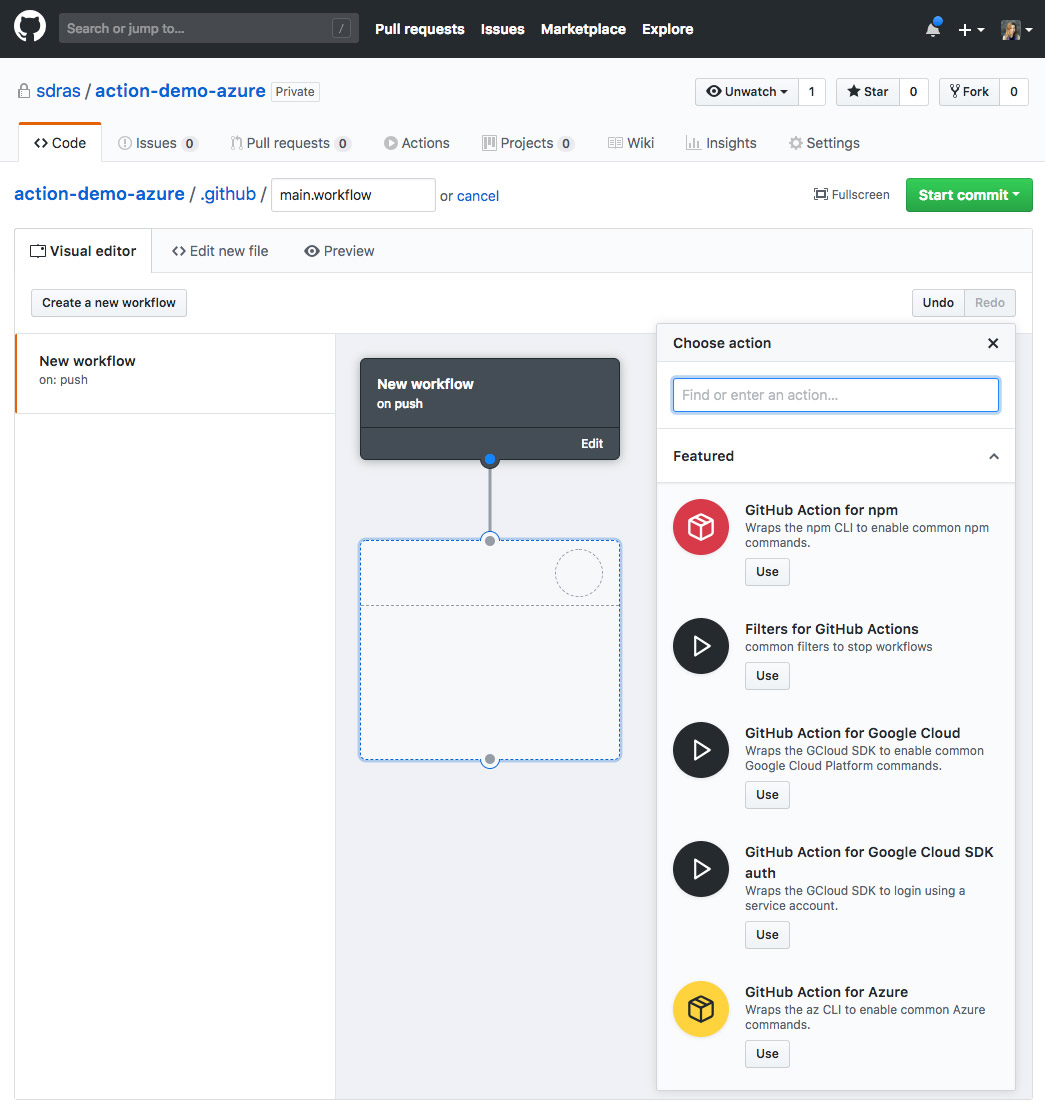
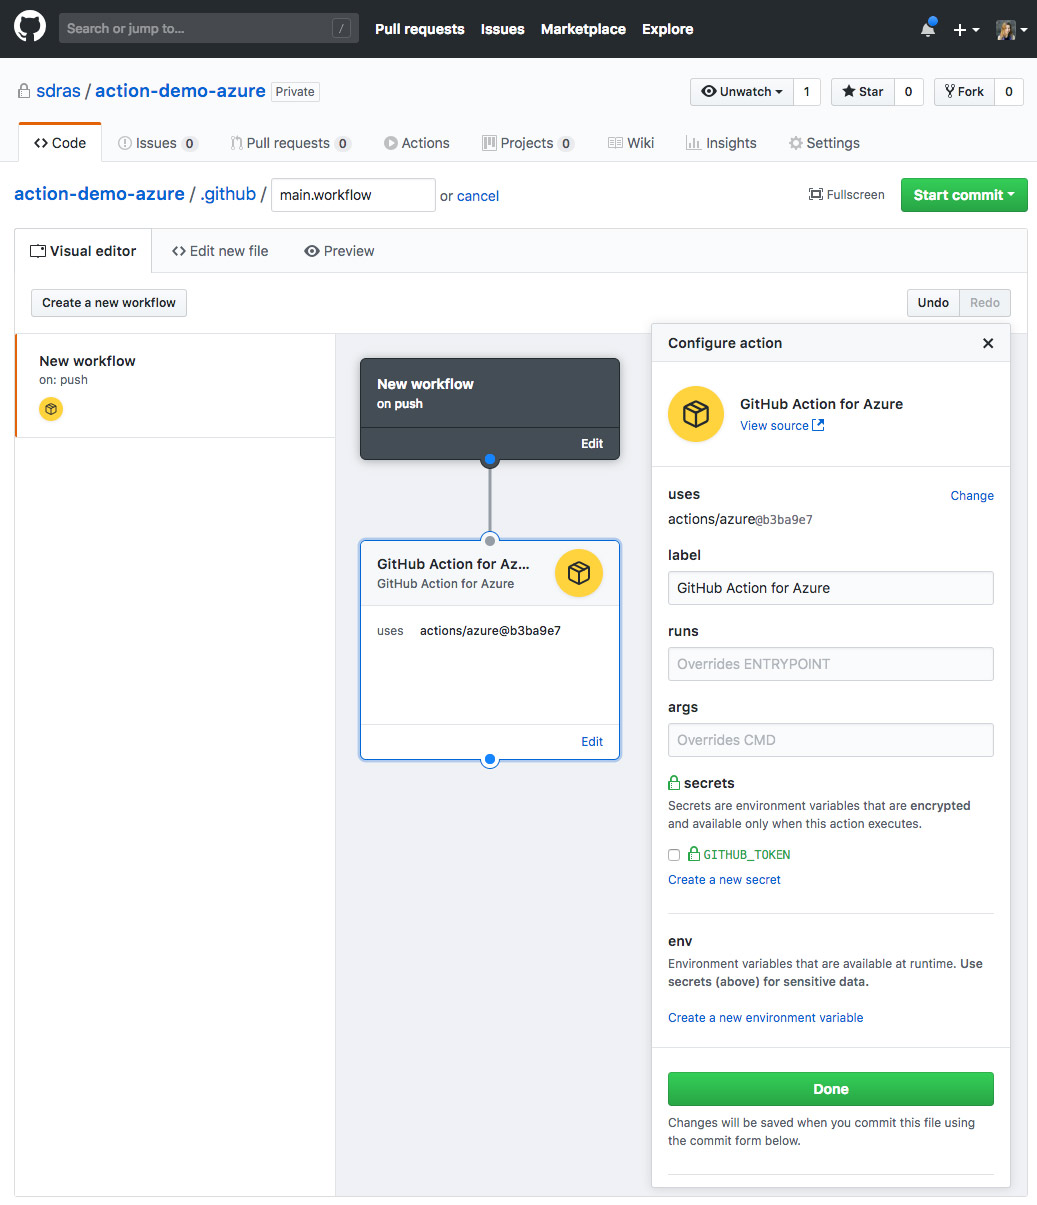
Now, we see in this GUI that we’re kicking off a new workflow. If we draw a line from this to our first action, a sidebar comes up with a ton of options.

show all of the action options in the sidebar

There are actions in here for npm, Filters, Google Cloud, Azure, Zeit, AWS, Docker Tags, Docker Registry, and Heroku. As mentioned earlier, you’re not limited to these options — it’s capable of so much more!

I work for Azure, so I’ll use that as an example, but each action provides you with the same options, which we’ll walk through together.

shows options for azure in the sidebar

At the top where you see the heading “GitHub Action for Azure,” there’s a “View source” link. That will take you directly to the repo that’s used to run this action. This is really nice because you can also submit a pull request to improve any of these, and have the flexibility to change what action you’re using if you’d like, with the “uses” option in the Actions panel.

Here’s a rundown of the options we’re provided:

  • Label: This is the name of the Action, as you’d assume. This name is referenced by the Workflow in the resolves array — that is what’s creating the connection between them. This piece is abstracted away for you in the GUI, but you’ll see in the next section that, if you’re working in code, you’ll need to keep the references the same to have the chaining work.
  • Runs allows you to override the entry point. This is great because if you’d like to run something like git in a container, you can!
  • Args: This is what you’d expect — it allows you to pass arguments to the container.
  • secrets and env: These are both really important because this is how you’ll use passwords and protect data without committing them directly to the repo. If you’re using something that needs one token to deploy, you’d probably use a secret here to pass that in.

Many of these actions have readmes that tell you what you need. The setup for “secrets” and “env” usually looks something like this:

action "deploy" {
  uses = ...
  secrets = [
    "THIS_IS_WHAT_YOU_NEED_TO_NAME_THE_SECRET",
  ]
}

You can also string multiple actions together in this GUI. It’s very easy to make things work one action at a time, or in parallel. This means you can have nicely running async code simply by chaining things together in the interface.

Writing an action in code

So, what if none of the actions shown here are quite what we need? Luckily, writing actions is really pretty fun! I wrote an action to deploy a Node.js web app to Azure because that will let me deploy any time I push to the repo’s master branch. This was super fun because now I can reuse it for the rest of my web apps. Happy Sarah!

Create the app services account

If you’re using other services, this part will change, but you do need to create an existing service in whatever you’re using in order to deploy there.

First you’ll need to get your free Azure account. I like using the Azure CLI, so if you don’t already have that installed, you’d run:

brew update && brew install azure-cli

Then, we’ll log in to Azure by running:

az login

Now, we’ll create a Service Principle by running:

az ad sp create-for-rbac --name ServicePrincipalName --password PASSWORD

It will pass us this bit of output, that we’ll use in creating our action:

{
  "appId": "APP_ID",
  "displayName": "ServicePrincipalName",
  "name": "http://ServicePrincipalName",
  "password": ...,
  "tenant": "XXXXXXXX-XXXX-XXXX-XXXX-XXXXXXXXXXXX"
}

What’s in an action?

Here is a base example of a workflow and an action so that you can see the bones of what it’s made of:

workflow "Name of Workflow" {
  on = "push"
  resolves = ["deploy"]
}

action "deploy" {
  uses = "actions/someaction"
  secrets = [
    "TOKEN",
  ]
}

We can see that we kick off the workflow, and specify that we want it to run on push (on = "push"). There are many other options you can use as well, the full list is here.

The resolves line beneath it resolves = ["deploy"] is an array of the actions that will be chained following the workflow. This doesn’t specify the order, but rather, is a full list of everything. You can see that we called the action following “deploy” — these strings need to match, that’s how they are referencing one another.

Next, we’ll look at that action block. The first uses line is really interesting: right out of the gate, you can use any of the predefined actions we talked about earlier (here’s a list of all of them). But you can also use another person’s repo, or even files hosted on the Docker site. For example, if we wanted to execute git inside a container, we would use this one. I could do so with: uses = "docker://alpine/git:latest". (Shout out to Matt Colyer for pointing me in the right direction for the URL.)

We may need some secrets or environment variables defined here and we would use them like this:

action "Deploy Webapp" {
  uses = ...
  args = "run some code here and use a $ENV_VARIABLE_NAME"
  secrets = ["SECRET_NAME"]
  env = {
    ENV_VARIABLE_NAME = "myEnvVariable"
  }
}

Creating a custom action

What we’re going to do with our custom action is take the commands we usually run to deploy a web app to Azure, and write them in such a way that we can just pass in a few values, so that the action executes it all for us. The files look more complicated than they are- really we’re taking that first base Azure action you saw in the GUI and building on top of it.

In entrypoint.sh:

#!/bin/sh

set -e

echo "Login"
az login --service-principal --username "${SERVICE_PRINCIPAL}" --password "${SERVICE_PASS}" --tenant "${TENANT_ID}"

echo "Creating resource group ${APPID}-group"
az group create -n ${APPID}-group -l westcentralus

echo "Creating app service plan ${APPID}-plan"
az appservice plan create -g ${APPID}-group -n ${APPID}-plan --sku FREE

echo "Creating webapp ${APPID}"
az webapp create -g ${APPID}-group -p ${APPID}-plan -n ${APPID} --deployment-local-git

echo "Getting username/password for deployment"
DEPLOYUSER=`az webapp deployment list-publishing-profiles -n ${APPID} -g ${APPID}-group --query '[0].userName' -o tsv`
DEPLOYPASS=`az webapp deployment list-publishing-profiles -n ${APPID} -g ${APPID}-group --query '[0].userPWD' -o tsv`

git remote add azure https://${DEPLOYUSER}:${DEPLOYPASS}@${APPID}.scm.azurewebsites.net/${APPID}.git

git push azure master

A couple of interesting things to note about this file:

  • set -e in a shell script will make sure that if anything blows up the rest of the file doesn’t keep evaluating.
  • The lines following “Getting username/password” look a little tricky — really what they’re doing is extracting the username and password from Azure’s publishing profiles. We can then use it for the following line of code where we add the remote.
  • You might also note that in those lines we passed in -o tsv, this is something we did to format the code so we could pass it directly into an environment variable, as tsv strips out excess headers, etc.

Now we can work on our main.workflow file!

workflow "New workflow" {
  on = "push"
  resolves = ["Deploy to Azure"]
}

action "Deploy to Azure" {
  uses = "./.github/azdeploy"
  secrets = ["SERVICE_PASS"]
  env = {
    SERVICE_PRINCIPAL="http://sdrasApp",
    TENANT_ID="72f988bf-86f1-41af-91ab-2d7cd011db47",
    APPID="sdrasMoonshine"
  }
}

The workflow piece should look familiar to you — it’s kicking off on push and resolves to the action, called “Deploy to Azure.”

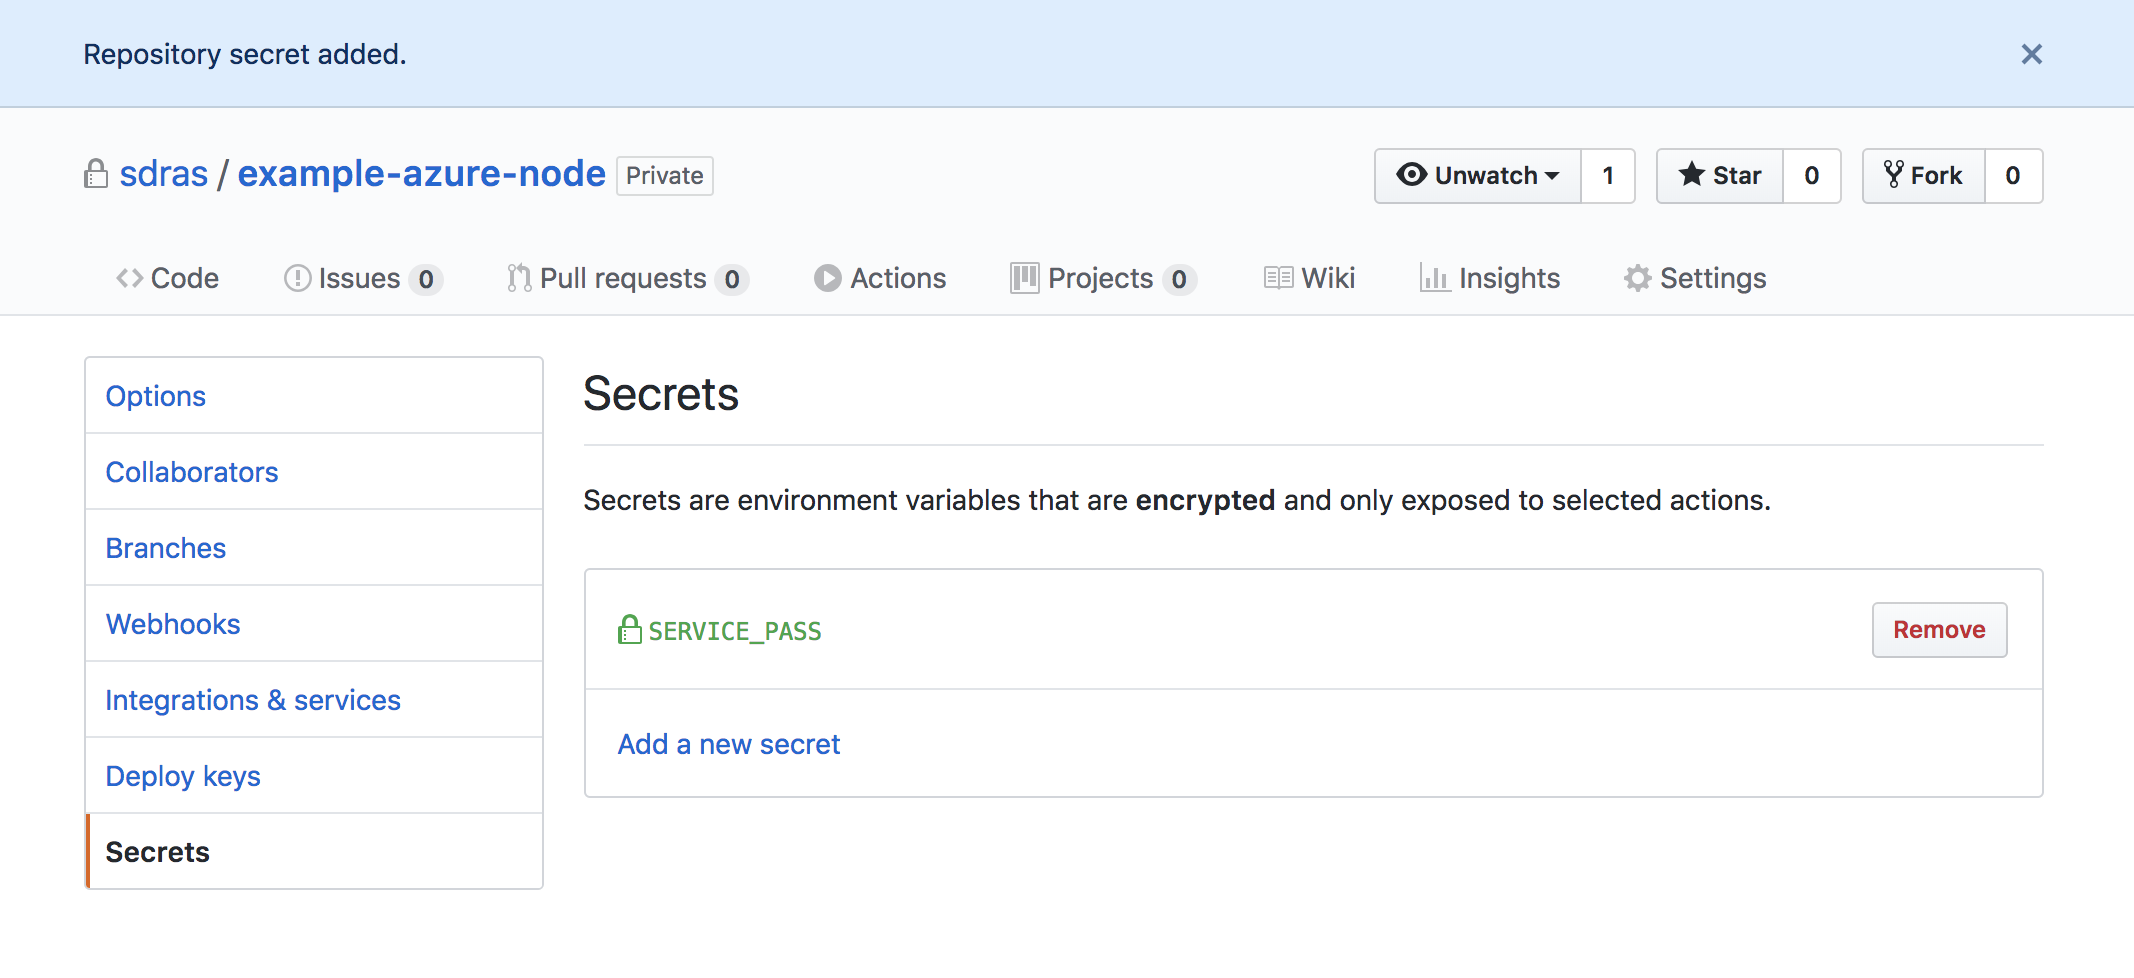
uses is pointing to within the directory, which is where we housed the other file. We need to add a secret, so we can store our password for the app. We called this service pass, and we’ll configure this by going here and adding it, in settings:

adding a secret in settings

Finally, we have all of the environment variables we’ll need to run the commands. We got all of these from the earlier section where we created our App Services Account. The tenant from earlier becomes TENANT_ID, name becomes the SERVICE_PRINCIPAL, and the APPID is actually whatever you’d like to name it 🙂

You can use this action too! All of the code is open source at this repo. Just bear in mind that since we created the main.workflow manually, you will have to also edit the env variables manually within the main.workflow file — once you stop using GUI, it doesn’t work the same way anymore.

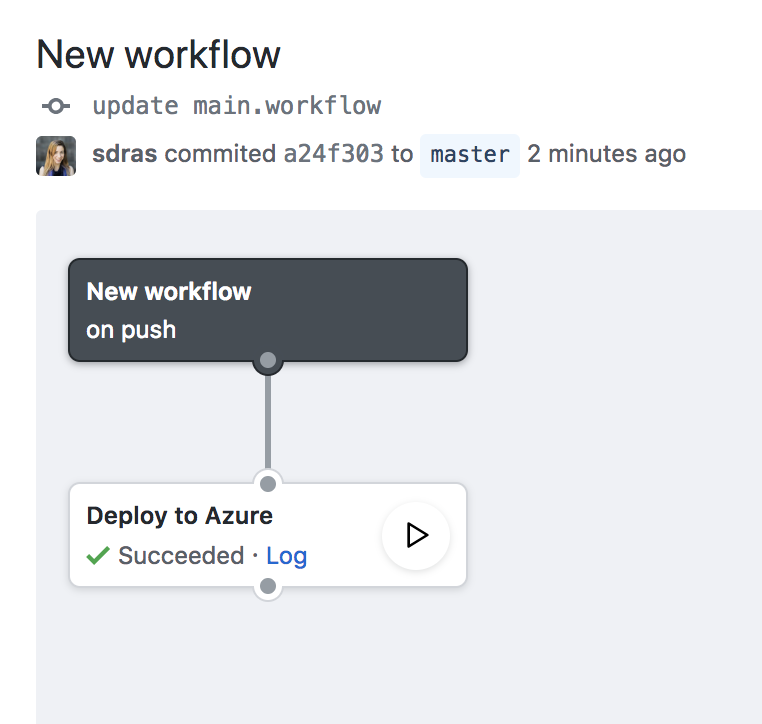
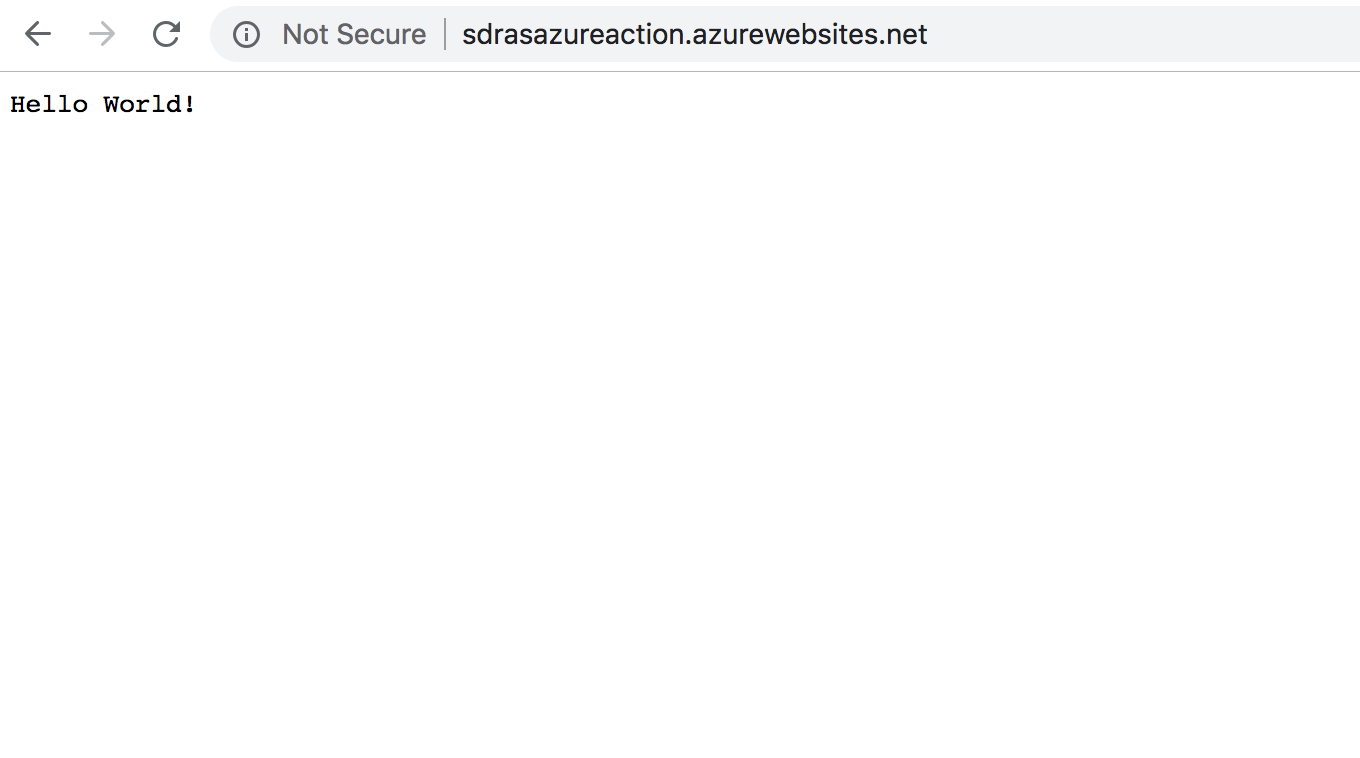
Here you can see everything deploying nicely, turning green, and we have our wonderful “Hello World” app that redeploys whenever we push to master ?

successful workflow showing green
Hello Work app screenshot

Game changing

GitHub actions aren’t only about websites, though you can see how handy they are for them. It’s a whole new way of thinking about how we deal with infrastructure, events, and even hosting. Consider Docker in this model.

Normally when you create a Dockerfile, you would have to write the Dockerfile, use Docker to build the image, and then push the image up somewhere so that it’s hosted for other people to download. In this paradigm, you can point it at a git repo with an existing Docker file in it, or something that’s hosted on Docker directly.

You also need to host the image anywhere as GitHub will build it for you on the fly. This keeps everything within the GitHub ecosystem, which is huge for open source, and allows for forking and sharing so much more readily. You can also put the Dockerfile directly in your action which means you don’t have to maintain a separate repo for those Dockerfiles.

All in all, it’s pretty exciting. Partially because of the flexibility: on the one hand you can choose to have a lot of abstraction and create the workflow you need with a GUI and existing action, and on the other you can write the code yourself, building and fine-tuning anything you want within a container, and even chain multiple reusable custom actions together. All in the same place you’re hosting your code.

The post Introducing GitHub Actions appeared first on CSS-Tricks.

Categories: Designing, Others Tags:

How to Import a Sass File into Every Vue Component in an App

October 17th, 2018 No comments

If you’re working on a large-scale Vue application, chances are at some point you’re going to want to organize the structure of your application so that you have some globally defined variables for CSS that you can make use of in any part of your application.

This can be accomplished by writing this piece of code into every component in your application:

<style lang="scss">
  @import "./styles/_variables.scss";
</style>

But who has time for that?! We’re programmers, let’s do this programmatically.

Why?

You might be wondering why we would want to do something like this, especially if you’re just starting out in web development. Globals are bad, right? Why would we need this? What even are Sass variables? If you already know all of this, then you can skip down to the next section for the implementation.

Companies big and small tend to have redesigns at least every one-to-two years. If your code base is large, managed by many people, and you need to change the line-height everywhere from 1.1rem to 1.2rem, do you really want to have to go back into every module and change that value? A global variable becomes extraordinarily useful here. You decide what can be at the top-level and what needs to be inherited by other, smaller, pieces. This avoids spaghetti code in CSS and keeps your code DRY.

I once worked for a company that had a gigantic, sprawling codebase. A day before a major release, orders came down from above that we were changing our primary brand color. Because the codebase was set up well with these types of variables defined correctly, I had to change the color in one location, and it propagated through 4,000 files. That’s pretty powerful. I also didn’t have to pull an all-nighter to get the change through in time.

Styles are about design. Good design is, by nature, successful when it’s cohesive. A codebase that reuses common pieces of structure can look more united, and also tends to look more professional. If you have to redefine some base pieces of your application in every component, it will begin to break down, just like a phrase does in a classic game of telephone.

Global definitions can be self-checking for designers as well: “Wait, we have another tertiary button? Why?” Leaks in cohesive UI/UX announce themselves well in this model.

How?

The first thing we need is to have vue-cli 3 installed. Then we create our project:

npm install -g @vue/cli
# OR
yarn global add @vue/cli

# then run this to scaffold the project
vue create scss-loader-example

When we run this command, we’re going to make sure we use the template that has the Sass option:

? Please pick a preset: Manually select features
? Check the features needed for your project:
  ◉ Babel
  ◯ TypeScript
  ◯ Progressive Web App (PWA) Support
  ◯ Router
  ◉ Vuex
❯ ◉ CSS Pre-processors
  ◉ Linter / Formatter
  ◯ Unit Testing
  ◯ E2E Testing

The other options are up to you, but you need the CSS Pre-processors option checked. If you have an existing vue cli 3 project, have no fear! You can also run:

npm i node-sass sass-loader
# OR
yarn add node-sass sass-loader

First, let’s make a new folder within the src directory. I called mine styles. Inside of that, I created a _variables.scss file, like you would see in popular projects like bootstrap. For now, I just put a single variable inside of it to test:

$primary: purple;

Now, let’s create a file called vue.config.js at the root of the project at the same level as your package.json. In it, we’re going to define some configuration settings. You can read more about this file here.

Inside of it, we’ll add in that import statement that we saw earlier:

module.exports = {
  css: {
    loaderOptions: {
      sass: {
        data: `@import "@/styles/_variables.scss";`
      }
    }
  }
};

OK, a couple of key things to note here:

  • You will need to shut down and restart your local development server to make any of these changes take hold.
  • That @/ in the directory structure before styles will tell this configuration file to look within the src directory.
  • You don’t need the underscore in the name of the file to get this to work. This is a Sass naming convention.
  • The components you import into will need the lang="scss" (or sass, or less, or whatever preprocessor you’re using) attribute on the style tag in the .vue single file component. (See example below.)

Now, we can go into our default App.vue component and start using our global variable!

<style lang="scss">
#app {
  font-family: "Avenir", Helvetica, Arial, sans-serif;
  -webkit-font-smoothing: antialiased;
  -moz-osx-font-smoothing: grayscale;
  text-align: center;
  //this is where we use the variable
  color: $primary;
  margin-top: 60px;
}
</style>

Here’s a working example! You can see the text in our app turn purple:

Shout out to Ives, who created CodeSandbox, for setting up a special configuration for us so we could see these changes in action in the browser. If you’d like to make changes to this sandbox, there’s a special Server Control Panel option in the left sidebar, where you can restart the server. Thanks, Ives!

And there you have it! You no longer have to do the repetitive task of @import-ing the same variables file throughout your entire Vue application. Now, if you need to refactor the design of your application, you can do it all in one place and it will propagate throughoutyour app. This is especially important for applications at scale.

The post How to Import a Sass File into Every Vue Component in an App appeared first on CSS-Tricks.

Categories: Designing, Others Tags:

Why Using reduce() to Sequentially Resolve Promises Works

October 17th, 2018 No comments

Writing asynchronous JavaScript without using the Promise object is a lot like baking a cake with your eyes closed. It can be done, but it’s gonna be messy and you’ll probably end up burning yourself.

I won’t say it’s necessary, but you get the idea. It’s real nice. Sometimes, though, it needs a little help to solve some unique challenges, like when you’re trying to sequentially resolve a bunch of promises in order, one after the other. A trick like this is handy, for example, when you’re doing some sort of batch processing via AJAX. You want the server to process a bunch of things, but not all at once, so you space the processing out over time.

Ruling out packages that help make this task easier (like Caolan McMahon’s async library), the most commonly suggested solution for sequentially resolving promises is to use Array.prototype.reduce(). You might’ve heard of this one. Take a collection of things, and reduce them to a single value, like this:

let result = [1,2,5].reduce((accumulator, item) => {
  return accumulator + item;
}, 0); // <-- Our initial value.

console.log(result); // 8

But, when using reduce() for our purposes, the setup looks more like this:

let userIDs = [1,2,3];

userIDs.reduce( (previousPromise, nextID) => {
  return previousPromise.then(() => {
    return methodThatReturnsAPromise(nextID);
  });
}, Promise.resolve());

Or, in a more modern format:

let userIDs = [1,2,3];

userIDs.reduce( async (previousPromise, nextID) => {
  await previousPromise;
  return methodThatReturnsAPromise(nextID);
}, Promise.resolve());

This is neat! But for the longest time, I just swallowed this solution and copied that chunk of code into my application because it “worked.” This post is me taking a stab at understanding two things:

  1. Why does this approach even work?
  2. Why can’t we use other Array methods to do the same thing?

Why does this even work?

Remember, the main purpose of reduce() is to “reduce” a bunch of things into one thing, and it does that by storing up the result in the accumulator as the loop runs. But that accumulator doesn’t have to be numeric. The loop can return whatever it wants (like a promise), and recycle that value through the callback every iteration. Notably, no matter what the accumulator value is, the loop itself never changes its behavior — including its pace of execution. It just keeps rolling through the collection as fast as the thread allows.

This is huge to understand because it probably goes against what you think is happening during this loop (at least, it did for me). When we use it to sequentially resolve promises, the reduce() loop isn’t actually slowing down at all. It’s completely synchronous, doing its normal thing as fast as it can, just like always.

Look at the following snippet and notice how the progress of the loop isn’t hindered at all by the promises returned in the callback.

function methodThatReturnsAPromise(nextID) {
  return new Promise((resolve, reject) => {
    setTimeout(() => {

      console.log(`Resolve! ${dayjs().format('hh:mm:ss')}`);

      resolve();
    }, 1000);
  });
}

[1,2,3].reduce( (accumulatorPromise, nextID) => {

  console.log(`Loop! ${dayjs().format('hh:mm:ss')}`);

  return accumulatorPromise.then(() => {
    return methodThatReturnsAPromise(nextID);
  });
}, Promise.resolve());

In our console:

"Loop! 11:28:06"
"Loop! 11:28:06"
"Loop! 11:28:06"
"Resolve! 11:28:07"
"Resolve! 11:28:08"
"Resolve! 11:28:09"

The promises resolve in order as we expect, but the loop itself is quick, steady, and synchronous. After looking at the MDN polyfill for reduce(), this makes sense. There’s nothing asynchronous about a while() loop triggering the callback() over and over again, which is what’s happening under the hood:

while (k < len) {
  if (k in o) {
    value = callback(value, o[k], k, o);
  }
  k++;
}

With all that in mind, the real magic occurs in this piece right here:

return previousPromise.then(() => {
  return methodThatReturnsAPromise(nextID)
});

Each time our callback fires, we return a promise that resolves to another promise. And while reduce() doesn’t wait for any resolution to take place, the advantage it does provide is the ability to pass something back into the same callback after each run, a feature unique to reduce(). As a result, we’re able build a chain of promises that resolve into more promises, making everything nice and sequential:

new Promise( (resolve, reject) => {
  // Promise #1
  
  resolve();
}).then( (result) => { 
  // Promise #2
  
  return result;
}).then( (result) => { 
  // Promise #3
  
  return result;
}); // ... and so on!

All of this should also reveal why we can’t just return a single, new promise each iteration. Because the loop runs synchronously, each promise will be fired immediately, instead of waiting for those created before it.

[1,2,3].reduce( (previousPromise, nextID) => {

  console.log(`Loop! ${dayjs().format('hh:mm:ss')}`);
  
  return new Promise((resolve, reject) => {
    setTimeout(() => {
      console.log(`Resolve! ${dayjs().format('hh:mm:ss')}`);
      resolve(nextID);
    }, 1000);
  });
}, Promise.resolve());

In our console:

"Loop! 11:31:20"
"Loop! 11:31:20"
"Loop! 11:31:20"
"Resolve! 11:31:21"
"Resolve! 11:31:21"
"Resolve! 11:31:21"

Is it possible to wait until all processing is finished before doing something else? Yes. The synchronous nature of reduce() doesn’t mean you can’t throw a party after every item has been completely processed. Look:

function methodThatReturnsAPromise(id) {
  return new Promise((resolve, reject) => {
    setTimeout(() => {
      console.log(`Processing ${id}`);
      resolve(id);
    }, 1000);
  });
}

let result = [1,2,3].reduce( (accumulatorPromise, nextID) => {
  return accumulatorPromise.then(() => {
    return methodThatReturnsAPromise(nextID);
  });
}, Promise.resolve());

result.then(e => {
  console.log("Resolution is complete! Let's party.")
});

Since all we’re returning in our callback is a chained promise, that’s all we get when the loop is finished: a promise. After that, we can handle it however we want, even long after reduce() has run its course.

Why won’t any other Array methods work?

Remember, under the hood of reduce(), we’re not waiting for our callback to complete before moving onto the next item. It’s completely synchronous. The same goes for all of these other methods:

But reduce() is special.

We found that the reason reduce() works for us is because we’re able to return something right back to our same callback (namely, a promise), which we can then build upon by having it resolve into another promise. With all of these other methods, however, we just can’t pass an argument to our callback that was returned from our callback. Instead, each of those callback arguments are predetermined, making it impossible for us to leverage them for something like sequential promise resolution.

[1,2,3].map((item, [index, array]) => [value]);
[1,2,3].filter((item, [index, array]) => [boolean]);
[1,2,3].some((item, [index, array]) => [boolean]);
[1,2,3].every((item, [index, array]) => [boolean]);

I hope this helps!

At the very least, I hope this helps shed some light on why reduce() is uniquely qualified to handle promises in this way, and maybe give you a better understanding of how common Array methods operate under the hood. Did I miss something? Get something wrong? Let me know!

The post Why Using reduce() to Sequentially Resolve Promises Works appeared first on CSS-Tricks.

Categories: Designing, Others Tags:

Live Accessibility And Performance Audits At SmashingConf Toronto

October 17th, 2018 No comments
Smashing Editorial

Live Accessibility And Performance Audits At SmashingConf Toronto

Live Accessibility And Performance Audits At SmashingConf Toronto

Markus Seyfferth

2018-10-17T13:20:35+02:002018-10-19T13:34:15+00:00

Earlier this year, many of your favorite speakers were featured at SmashingConf Toronto, however, things were quite different this time. The speakers had been asked to present without slides. It was interesting to see the different ways our speakers approached the challenge.

Two of our speakers chose to demonstrate how they audit a site or application live on stage: Marcy Sutton on accessibility, and Tim Kadlec on performance. Watch the videos to see an expert perform these audits, and see if there is anything you can take back to your own testing processes.

To watch all of the videos recorded in Toronto, head on over to our SmashingConf Vimeo channel.

Accessibility: Marcy Sutton

Marcy took two example components, built using React, and walked us through how these components could be made more accessible with some straightforward changes.

Performance: Tim Kadlec

Tim demonstrates how to test the performance of a site, and find bottlenecks leading to poor experiences for visitors. If you have ever wondered how to get started testing for performance, this is a talk you will find incredibly useful.

Enjoyed watching these talks? There are many more videos from SmashingConf Toronto on Vimeo. We’re also getting ready for SmashingConf New York next week — see you there? 😉

(ra, il)
Categories: Others Tags:

CSS Border-Radius Can Do That?

October 17th, 2018 No comments

TL/DR: When you use eight values specifying border-radius in CSS, you can create organic looking shapes. WOW. No time to read it all ??—?we made a visual tool for you. Find it here.

During this year’s Frontend Conference Zurich Rachel Andrew talked about Unlocking the Power of CSS Grid Layout. At the end of her talk, she mentioned something about an old CSS property that got stuck in my head:

The Image is set round just by using the well-supported border-radius. Don’t forget that old CSS still exists and is useful. You don’t need to use something fancy for every effect.

?—?Rachel Andrew

Shortly after I heard this talk, I thought that you certainly could create more than just circles and started to dig deeper into what can be done using border-radius.

Mastering Border-Radius

Single Value

Let’s start with the basics. Hopefully this will not bore you. You are probably familiar with CSS, and you also know border-radius. It has been around for some years now, mostly used with a single value like this: border-radius: 1em and was maybe one of the most discussed/loved CSS3 features back in 2010 when css3please.com was your best friend.

Whenever you only use a single value, all corners are rounded by this value:

As you can see in the example above, next to fixed length values like px, rem or em you can also use percentages. Those are mostly used to create a circle by setting border-radius to 50%. The percentage value is based on the width and height of the given element. So when you use it on a rectangle, you will no longer have symmetrical corners. Here’s an example showing the difference between border-radius: 110px and border-radius: 30% applied to a rectangle.

Notice that the corners on the right side are not symmetrical and keep that in mind. We’ll come back to this later.

Four Different Values

When you use more than one value, you start setting values for each corner, beginning in the top left corner and then moving clockwise. Again you can also use percentages, and you could also mix percentages with fixed-length values.

Eight Values Separated by a Slash (This is Where it Gets Interesting)

I think most of you have already done everything I explained above. Now we get to the exciting part. What happens, if you separate values with a slash and specify up to eight values? Let’s see, what the spec says about that:

If values are given before and after the slash, then the values before the slash set the horizontal radius and the values after the slash set the vertical radius. If there is no slash, then the values set both radii equally.

W3C

So, values before the slash are responsible for horizontal distances whereas values after the slash define the vertical lengths. But what does that mean? Remember percentage values on rectangular shapes? We had different absolute values for vertical and horizontal distances and asymmetrically rounded corners, and that is precisely what you get when you use the slash syntax.

So when you compare border-radius: 4em 8em to border-radius: 4em / 8em the results are quite different.

The symmetrical corners on the left form quarter of a circle, whereas the asymmetrical corners on the right are part of an ellipsis.

The shapes that you get with this look a little odd, to be honest. But remember the circles you create with border-radius: 50%. You get a circle because both values defining one side add up to 100% (50% + 50% = 100%) and there is no straight line left, that reminds you of the original square. If you apply the same logic to the full eight value border-radius syntax, you can create a shape that looks a little like a plectrum or an organic cell:

In the end it is four overlapping ellipses that build the final shape. Easy ha!

Don’t Panic…We Made a Visual Generator for You

It took me some time to get used to this syntax. Somehow it is not that intuitive. To make things a little easier for you, we built a little tool, that helps you create your very own organic shape.

Do(n’t) Cross The Streams

Now that you know about the 8 values in total, you might feel a little sad, because our border-radius-tool doesn’t give you the option to set each value separately…Sit tight, here is the 8-POINT-FULL-CONTROL version.

If you’re old enough, you might remember this quote from the 1984 Ghostbusters movie:

“Don’t Cross The Streams.”?—?“Why?”?—?“It would be bad.”

There is something similar going on here: If you cross the handles on one side, the shape behaves…let’s say unpredictably. But see for yourself, after all, it’s not going to end up in total protonic reversal or something, but don’t say, that I didn’t warn you.

PS. Many Thanks to simurai. Back in 2010, he created some CSS3 BonBon Buttons. Even though they look a little outdated, it is the only place I ever encountered and learned about the slash syntax.

See This Cool Feature in Action

Photos by gratisography.com

See the Pen border-radius by Nils (@enbee81) on CodePen.

This article was originally published on Medium, reposted with the author’s permission.

Add Realistic Chalk and Sketch Lettering Effects with Sketch’it – only $5!

Source

Categories: Designing, Others Tags:

Why don’t we add a `lovely` element to HTML?

October 16th, 2018 No comments

, , , … It’s not hard to come up with a list of HTML elements that you think would be useful. So, why don’t we?

Bruce Lawson has a look. The conclusion is largely that we don’t really need to and perhaps shouldn’t.

By my count, we now have 124 HTML elements, many of which are unknown to many web authors, or regularly confused with each other—for example, the difference between

and

. This suggests to me that the cognitive load of learning all these different elements is getting too much.

Direct Link to ArticlePermalink

The post Why don’t we add a `lovely` element to HTML? appeared first on CSS-Tricks.

Categories: Designing, Others Tags:

WordPress.com

October 16th, 2018 No comments

Hey! Chris here, with a big thanks to WordPress, for not just their sponsorship here the last few months, but for being a great product for so many sites I’ve worked on over the years. I’ve been a web designer and developer for the better part of two decades, and it’s been a great career for me.

I’m all about learning. The more you know, the more you’re capable of doing and the more doors open for you, so to speak, for getting things done as a web worker. And yet it’s a dance. Just because you know how to do particular things doesn’t mean that you always should. Part of this job is knowing what you should do yourself and what you should outsource or rely on for a trustworthy service.

With that in mind, I think if you can build a site with WordPress.com, you should build your site on WordPress.com. Allow me to ellaborate.

Do I know how to build a functional contact form from absolute scratch? I do! I can design the form, I can build the form with HTML and style it with CSS, I can enhance the form with JavaScript, I can process the form with a backend language and send the data where I need it. It’s a tremendous amount of work, which is fine, because hey, that’s the job sometimes. But it’s rare that I actually do all of that work.

Instead of doing everything from scratch when I need a form on a site I’m building, I often choose a form building service that does most of this work for me and leaves me with just the job of designing the form and telling it where I want the data collected to go. Or I might build the form myself but use some sort of library for processing the data. Or I might use a form framework on the front end but handle the data processing myself. It depends on the project! I want to make sure whatever time I spend working on it is the most valuable it can be &mdash not doing something rote.

Part of the trick is understanding how to evaluate technology and choose things that serve your needs best. You’ll get that with experience. It’s also different for everyone. We all have different needs and different skills, so the technology choices you make will likely be different than what choices I make.

Here’s one choice that I found to be in many people’s best interest: if you don’t have to deal with hosting, security, and upgrading all the underlying software that powers a website…don’t! In other words, as I said, if you can use WordPress.com, do use WordPress.com.

This is an often-quoted fact, but it bears repeating: WordPress powers about a third of the Internet, which is a staggering feature. There are an awful lot of people that are happily running their sites on WordPress and that number wouldn’t be nearly so high if WordPress wasn’t flexible and very usable.

There are some sites that WordPress.com isn’t a good match for. Say you’re going to build the next big Fantasy Football app with real-time scores, charts and graphs on dashboards, and live chat rooms. That’s custom development work probably suited for different technology.

But say you want to have a personal portfolio site with a blog. Can WordPress.com do that? Heck yes, that’s bread and butter stuff. What if you want to sell products? Sure. What if you want to have a showcase for your photography? Absolutely. How about the homepage for a laundromat, restaurant, bakery, or coffeeshop? Check, check, check and check. A website for your conference? A place to publish a book chapter by chapter? A mini-site for your family? A road trip blog? Yes to all.

So, if you can build your site on WordPress.com, then I’m saying that you should because what you’re doing is saving time, saving money, and most importantly, saving a heaping pile of technical debt. You don’t deal with hosting, your site will be fast without you ever having to think about it. You don’t deal with any software upgrades or weird incompatibilities. You just get a reliable system.

The longer I work in design and development, the more weight I put on just how valuable that reliability is and how dangerous technical debt is. I’ve seen too many sites fall off the face of the Earth because the people taking care of them couldn’t deal with the technical debt. Do yourself, your client and, heck, me a favor (seriously, I’ll sleep better) and build your site on WordPress.com.

The post WordPress.com appeared first on CSS-Tricks.

Categories: Designing, Others Tags: