Using the Web Speech API for Multilingual Translations
Since the early days of science fiction, we have fantasized about machines that talk to us. Today it is commonplace. Even so, the technology for making websites talk is still pretty new.
We can make our pages on the web talk using the SpeechSynthesis part of the Web Speech API. This is still considered an experimental technology but it has great support in the latest versions of Chrome, Safari, and Firefox.
The fun part for me is using this technology with foreign languages. For that, Mac OSX has great support for this on all browsers. On Windows, you have to use Chrome. We’re going to walk through a three-step process to create a page that speaks the same text in multiple languages. Some of the basic code is derived from documentation found here but the final product adds some fun features and can be viewed at my Polyglot CodePen here.
Step 1: Start Simple
Let’s create a basic page with a for the text we want the page to speak and include a button to click to trigger the speech.
<div id="wrapper">
<h1>Simple Text To Speech</h1>
<p id="warning">Sorry, your browser does not support the Web Speech API.</p>
<textarea id="txtFld">I love the sound of my computer-generated voice.</textarea>
<label for="txtFld">Type text above. Then click the Speak button.</label>
<div>
<button type="button" id="speakBtn">Speak</button>
<br>
<p>Note: For best results on a Mac, use the latest version of Chrome, Safari, or FireFox. On Windows, use Chrome.</p>
</div>
</div>
The paragraph with ID warning
will be shown only if the JavaScript detects no support for the Web Speech API. Also, note the ID values for the textarea
and the button
as we will use those in our JavaScript.
Feel free to style the HTML any way you’d like. You’re also free to work off the demo I created:
See the Pen
Text-To-Speech Part 1 by Steven Estrella (@sgestrella)
on CodePen.
Adding a style rule for the disabled state of the button is a good idea to avoid confusion for the few people who still use incompatible browsers, like the now-quaint Internet Explorer. Also, let’s use a style rule to hide the warning by default so we can control when it’s actually needed.
button:disabled {
cursor: not-allowed;
opacity: 0.3;
}
#warning {
color: red;
display: none;
font-size: 1.4rem;
}
Now on to the JavaScript! First, we add two variables to serve as references to the “Speak” button that triggers the speech and to the element. An event listener at the bottom of the code tells the document to wait until the DOM elements load before calling the
init()
function. I used a handy utility function I call “qs” that is defined at the bottom of the code. It is a shortcut alternative to document.querySelector
and it selects whatever selector value I pass to it and returns an object reference. Then we’ll add an event listener to the speakBtn
object to make the button call the talk()
function.
The talk()
function creates a new instance of the SpeechSynthesisUtterance
object that is part of the Web Speech API. It adds the text from the (using ID
txtFld
) to the text property. Then the utterance is passed to the speechSynthesis
method of the window object and we hear the spoken text. The specific voice you hear will vary by browser and operating system. On my Mac, for example, my default language is set to American English and the default voice for English is Alex. In Step 2, we will add code to create a menu to help the user choose voices for all available languages.
let speakBtn, txtFld;
function init() {
speakBtn = qs("#speakBtn");
txtFld = qs("#txtFld");
speakBtn.addEventListener("click", talk, false);
if (!window.speechSynthesis) {
speakBtn.disabled = true;
qs("#warning").style.display = "block";
}
}
function talk() {
let u = new SpeechSynthesisUtterance();
u.text = txtFld.value;
speechSynthesis.speak(u);
}
// Reusable utility functions
function qs(selectorText) {
// Saves lots of typing for those who eschew jQuery
return document.querySelector(selectorText);
}
document.addEventListener('DOMContentLoaded', function (e) {
try {init();} catch (error) {
console.log("Data didn't load", error);
}
});
Step 2: A Menu of International Voices
If we want to use anything other than the default language and speaking voice, we will have to add a bit more code. So that’s what we’re going tackle next.
We’re going to add a select
element to hold the menu of voice options:
<h1>Multilingual Text To Speech</h1>
<div class="uiunit">
<label for="speakerMenu">Voice: </label>
<select id="speakerMenu"></select> speaks <span id="language">English.</span>
<!-- etc. -->
</div>
Before we create the code to populate the menu options, we should take care of the code that will help us connect language codes to their corresponding names. Each language is identified by a two-letter code such as “en” for English or “es” for Español (Spanish). We will take a simple list of these codes and their corresponding languages and make an array of objects of the form: {"code": "pt", "name": "Portuguese"}
. Then we’ll need a utility function to help us search an array of objects for the value of a given property. We will use it in a few minutes to quickly find the language name that matches the language code of the selected voice. Copy the code below so that the two functions are just above and just below the // Generic Utility Functions
comment.
function getLanguageTags() {
let langs = ["ar-Arabic","cs-Czech","da-Danish","de-German","el-Greek","en-English","eo-Esperanto","es-Spanish","et-Estonian","fi-Finnish","fr-French","he-Hebrew","hi-Hindi","hu-Hungarian","id-Indonesian","it-Italian","ja-Japanese","ko-Korean","la-Latin","lt-Lithuanian","lv-Latvian","nb-Norwegian Bokmal","nl-Dutch","nn-Norwegian Nynorsk","no-Norwegian","pl-Polish","pt-Portuguese","ro-Romanian","ru-Russian","sk-Slovak","sl-Slovenian","sq-Albanian","sr-Serbian","sv-Swedish","th-Thai","tr-Turkish","zh-Chinese"];
let langobjects = [];
for (let i=0;i<langs.length;i++) {
let langparts = langs[i].split("-");
langobjects.push({"code":langparts[0],"name":langparts[1]});
}
return langobjects;
}
// Generic Utility Functions
function searchObjects(array, prop, term, casesensitive = false) {
// Searches an array of objects for a given term in a given property
// Returns an array of only those objects that test positive
let regex = new RegExp(term, casesensitive ? "" : "i");
let newArrayOfObjects = array.filter(obj => regex.test(obj[prop]));
return newArrayOfObjects;
}
Now we can build out the options for the select
element using JavaScript. We need to declare variables at the top of our JavaScript to hold references to the #speakerMenu
select element, the #language
span element, the array of synthesized voices (allVoices
), an array of codes to identify the languages (langtags
), and a place to keep track of the currently selected voice (voiceIndex
). Add those just after the two variable declarations we created in Step 1.
let speakBtn, txtFld, speakerMenu, language, allVoices, langtags;
let voiceIndex = 0;
The updated init()
function sets some additional references to the #speakerMenu
and the #language
span and places all the language codes into an array of objects called langtags
. The feature detection part of the code changes here, too. If the Web Speech API is supported, the setUpVoices()
function is called. Also, for Chrome, we have to listen for changes to the loaded voices and repeat the setup when needed. Chrome polls the available voices every time you switch between one of its remote voices (the ones listed with the Google prefix while you are in Chrome) and all the other voices which are stored locally in the user’s operating system.
function init() {
speakBtn = qs("#speakBtn");
txtFld = qs("#txtFld");
speakerMenu = qs("#speakerMenu");
language = qs("#language");
langtags = getLanguageTags();
speakBtn.addEventListener("click", talk, false);
speakerMenu.addEventListener("change", selectSpeaker, false);
if (window.speechSynthesis) {
if (speechSynthesis.onvoiceschanged !== undefined) {
// Chrome gets the voices asynchronously so this is needed
speechSynthesis.onvoiceschanged = setUpVoices;
}
setUpVoices(); // For all the other browsers
} else{
speakBtn.disabled = true;
speakerMenu.disabled = true;
qs("#warning").style.display = "block";
}
}
The setUpVoices()
function gets an array of what are called SpeechSynthesisVoice
objects by calling the getVoices()
method of the speechSynthesis
object. This is done in our code using the getAllVoices()
function. Unfortunately, I have found that the speechSynthesis.getVoices()
method sometimes returns duplicates in the list, so I devoted nine lines of code to eliminate the those. Finally, at the end of getAllVoices()
, I added a unique identifier number to each of the SpeechSynthesisVoice
objects. That will help us in Step 3 when we need to filter the list of voices to only show voices for a given language. When complete, the allVoices
array will contain objects that look like the ones below. Each object has id
, voiceURI
, name
, and lang
attributes. The localService
attribute indicates whether the code for the voice is stored on the user’s computer or remotely on Google’s servers. Notice the lang
attribute. The value consists of a two-letter language code (e.g. “es” for Spanish) followed by a dash and a region code (e.g. “MX” for Mexico). This identifies the language and regional accent of each voice.
{id:48, voiceURI:"Paulina", name:"Paulina", lang: "es-MX", localService:true},
{id:52, voiceURI:"Samantha", name:"Samantha", lang: "en-US", localService:true},
{id:72, voiceURI:"Google Deutsch", name:"Google Deutsch", lang: "de-DE", localService:false}
The last line of setUpVoices()
calls a function to create the list of options that will appear in the #speakerMenu
select element. The value of the id
attribute for each voice is placed in the value
attribute for the option. The name
and lang
attributes are the visible text items that appear in each option along with “(premium)” for those voices that are marked that way on some operating systems and browsers.
function setUpVoices() {
allVoices = getAllVoices();
createSpeakerMenu(allVoices);
}
function getAllVoices() {
let voicesall = speechSynthesis.getVoices();
let vuris = [];
let voices = [];
voicesall.forEach(function(obj,index) {
let uri = obj.voiceURI;
if (!vuris.includes(uri)) {
vuris.push(uri);
voices.push(obj);
}
});
voices.forEach(function(obj,index) {obj.id = index;});
return voices;
}
function createSpeakerMenu(voices) {
let code = ;
voices.forEach(function(vobj,i) {
code += `<option value=${vobj.id}>`;
code += `${vobj.name} (${vobj.lang})`;
code += vobj.voiceURI.includes(".premium") ? ' (premium)' : ;
code += `</option>`;
});
speakerMenu.innerHTML = code;
speakerMenu.selectedIndex = voiceIndex;
}
You might recall that in the init()
function, we had set up an event listener to call selectSpeaker()
whenever the speakerMenu
changes. The selectSpeaker()
function stores the selectedIndex
of the #speakerMenu
select element. Next, it gets the value of the selected item which will be an integer that corresponds to the index of that voice in the allVoices()
array. So, now we have retrieved the SpeechSynthesisVoice
we want. We then grab the first two letters of the lang
attribute (e.g. “en,” “es,” “ru,” “de,” “fr”) and use that code to search the langtags
array of language objects to find the appropriate language name. The searchObjects()
function returns an array that will likely have only one entry. Regardless, the first entry (langcodeobj[0]
) is all we need. Finally, we assign that name to the innerHTML
attribute of the language
span
and it shows on the screen as expected.
// Code for when the user selects a speaker
function selectSpeaker() {
voiceIndex = speakerMenu.selectedIndex;
let sval = Number(speakerMenu.value);
let voice = allVoices[sval];
let langcode = voice.lang.substring(0,2);
let langcodeobj = searchObjects(langtags, "code", langcode);
language.innerHTML = langcodeobj[0].name;
}
The only thing left for Step 2 to be complete is to make sure the talk()
function works when we click the “Speak” button. Modify the talk()
function to add attributes to the utterance to control which voice and language are used and how fast to speak the text. In my testing, a rate range of 0.5 to 2 works reliably well. I found that a rate below 0.5 has no effect. I think 0.8 works as a nice default for many languages, but as we’ll see in Step 3, there’s an easy way to let the user decide.
function talk() {
let sval = Number(speakerMenu.value);
let u = new SpeechSynthesisUtterance();
u.voice = allVoices[sval];
u.lang = u.voice.lang;
u.text = txtFld.value;
u.rate = 0.8;
speechSynthesis.speak(u);
}
That’s it for Step 2! Here’s the result of what we’ve done so far:
See the Pen
Text-To-Speech Part 2 by Steven Estrella (@sgestrella)
on CodePen.
Play around with it a bit. Sometimes it is fun to type an English phrase and then assign a French or German speaker to say it. Conversely, if you want to hear your worst first-year Spanish student, type a Spanish phrase and assign it to be spoken by an English voice.
Step 3: The Complete Polyglot
We’re in the final stretch! Some of the things we do in this step will be bits of polish to the UI but there are some functional things we need to do as well to button everything up. specifically, we’re going to:
- Create a menu of available language options
- Allow users to define the speed of the speech
- Define a default phrase in the textarea that translates on language selection
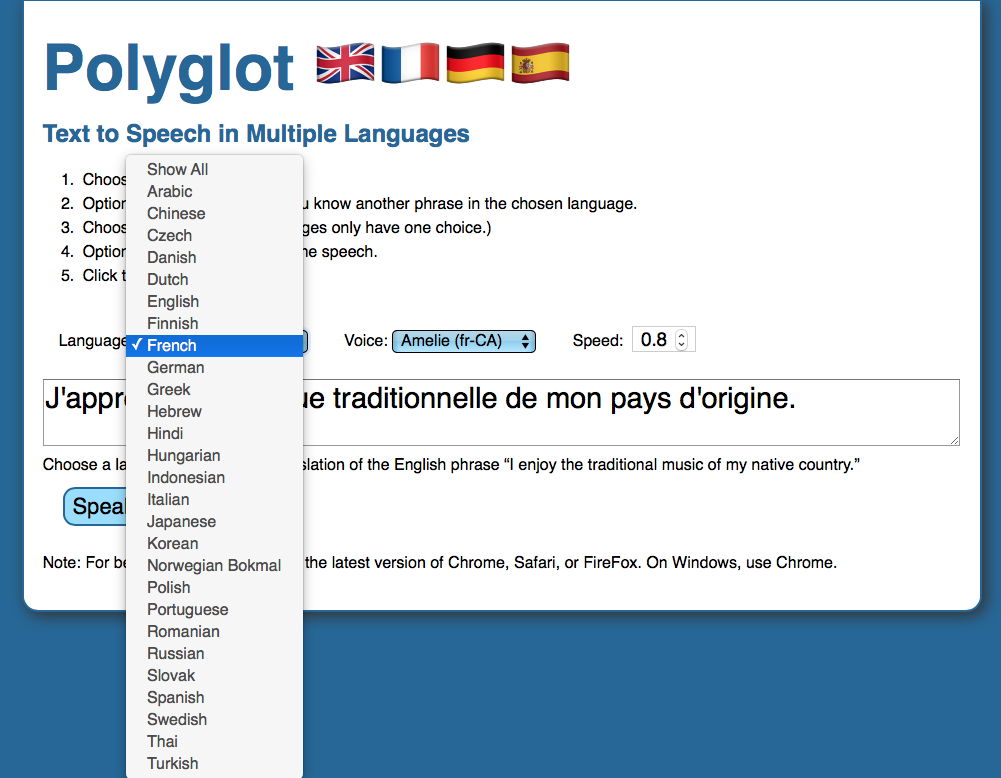
Here’s what we’re looking at:
In the HTML, we’re going to add a new element for the language menu and a number
input
(which will be used later to set the rate of speech). Notice we have deleted the #language
span as it is no longer relevant once the language menu is working.
<div class="uiunit">
<label for="languageMenu">Language: </label>
<select id="languageMenu">
<option selected value="all">Show All</option>
</select>
</div>
<div class="uiunit">
<label for="speakerMenu">Voice: </label><select id="speakerMenu"></select>
</div>
<div class="uiunit">
<label for="rateFld">Speed: </label>
<input type="number" id="rateFld" min="0.5" max="2" step="0.1" value="0.8" />
</div>
In the JavaScript, we will need to modify the variable declarations. We will keep track of all dialects in the allLanguages
array and just the main languages in the primaryLanguages
array. The langhash
and langcodehash
arrays will serve as hash tables so we can quickly get a language name when all we know is the two-letter language code and vice versa. We should only need to setup the languages menu once so a Boolean flag for initialSetup
will come in handy.
let speakBtn, txtFld, speakerMenu, allVoices, langtags;
let voiceIndex = 0;
let allLanguages, primaryLanguages, langhash, langcodehash;
let rateFld, languageMenu, blurbs;
let initialSetup = true;
let defaultBlurb = "I enjoy the traditional music of my native country.";
In the new init()
function, let’s remove the line language = qs("#language");
then add the new code as seen here to create the blurbs, reference the rateFld
number input
and languageMenu
select
, and create hash tables for looking up language names and tags.
function init() {
// ...keep existing content but delete language = qs("#language");
createBlurbs();
rateFld = qs("#rateFld");
languageMenu = qs("#languageMenu");
languageMenu.addEventListener("change", selectLanguage, false);
langhash = getLookupTable(langtags, "name");
langcodehash = getLookupTable(langtags, "code");
if (window.speechSynthesis) {
// ...keep existing content
} else{
// ...keep existing content
languageMenu.disabled = true;
}
}
The setUpVoices()
function needs some work to accommodate the new languages menu and to trigger the filterVoices()
function which we will use now to populate the #speakerMenu
element. Also, we’re going to add the new functions: getAllLanguages()
and getPrimaryLanguages()
. The first one assembles an array of the unique values for the lang
attribute found in the allVoices
array of objects. Notice the return statement uses the spread operator combined with a new Set
object to ensure that the returned array has no duplicates. The getPrimaryLanguages()
function returns an array of the two-letter country codes. That makes a smaller list of just the main languages without reference to regional dialects.
function setUpVoices() {
allVoices = getAllVoices();
allLanguages = getAllLanguages(allVoices);
primaryLanguages = getPrimaryLanguages(allLanguages);
filterVoices();
if (initialSetup && allVoices.length) {
initialSetup = false;
createLanguageMenu();
}
}
function getAllLanguages(voices) {
let langs = [];
voices.forEach(vobj => {
langs.push(vobj.lang.trim());
});
return [...new Set(langs)];
}
function getPrimaryLanguages(langlist) {
let langs = [];
langlist.forEach(vobj => {
langs.push(vobj.substring(0,2));
});
return [...new Set(langs)];
}
The setUpVoices()
function calls two additional functions. The filterVoices()
function gets the two-letter language code from the current value of the #languageMenu
select menu and uses it to filter the allVoices
array and return only the available voice options for the chosen language. It then passes that array to the createSpeakerMenu()
function (unchanged from Step 2) which populates the #speakerMenu
with options. Then filterVoices()
gets the blurb associated with the chosen language and places it in the textarea where it can be edited or replaced.
And, in case Chrome rebuilds this menu, the stored voiceIndex
is used to restore the current selection. Next the createLanguageMenu()
function uses our hash tables to create the needed menu options for the languageMenu
select
element. The selectLanguage()
function is triggered whenever the user chooses a language. It then triggers filterVoices()
and sets the #speakerMenu
to display the first available option.
function filterVoices() {
let langcode = languageMenu.value;
voices = allVoices.filter(function (voice) {
return langcode === "all" ? true : voice.lang.indexOf(langcode + "-") >= 0;
});
createSpeakerMenu(voices);
let t = blurbs[languageMenu.options[languageMenu.selectedIndex].text];
txtFld.value = t ? t : defaultBlurb;
speakerMenu.selectedIndex = voiceIndex;
}
function createLanguageMenu() {
let code = `<option selected value="all">Show All</option>`;
let langnames = [];
primaryLanguages.forEach(function(lobj,i) {
langnames.push(langcodehash[lobj.substring(0,2)].name);
});
langnames.sort();
langnames.forEach(function(lname,i) {
let lcode = langhash[lname].code;
code += `<option value=${lcode}>${lname}</option>`;
});
languageMenu.innerHTML = code;
}
function selectLanguage() {
filterVoices();
speakerMenu.selectedIndex = 0;
}
In the utility functions section of the code toward the bottom, add the following code. This generic little utility will help you the next time you need to create a lookup table for an array of objects. In our case, we will use this to allow us to easily match a language code with its corresponding language name and vice versa.
function getLookupTable(objectsArray, propname) {
return objectsArray.reduce((accumulator, currentValue) => (accumulator[currentValue[propname]] = currentValue, accumulator),{});
}
I added an array of text phrases, each of which is a translation of the English phrase, “I enjoy the traditional music of my native country.” The language it’s displayed in will correspond to what’s selected in the language men.
Here we see the beauty of UTF-8 on full display. Above the getLanguagesTags()
function, let’s add the code that generates all those translated blurbs. I only read Spanish, English, some Portuguese, and very little German, so I have to take on faith that Google Translate is providing accurate translations for the rest. If any of these is your native language, feel free to leave corrections in the comments.
function createBlurbs() {
blurbs = {
"Arabic" : "أنا أستمتع بالموسيقى التقليدية لبلدي الأم.",
"Chinese" : "我喜歡我祖國的傳統音樂。",
"Czech" : "Mám rád tradiční hudbu mé rodné země.",
"Danish" : "Jeg nyder den traditionelle musik i mit hjemland.",
"Dutch" : "Ik geniet van de traditionele muziek van mijn geboorteland.",
"English" : "I enjoy the traditional music of my native country.",
"Finnish" : "Nautin kotimaassani perinteistä musiikkia.",
"French" : "J'apprécie la musique traditionnelle de mon pays d'origine.",
"German" : "Ich genieße die traditionelle Musik meiner Heimat.",
"Greek" : "Απολαμβάνω την παραδοσιακή μουσική της πατρίδας μου.",
"Hebrew" : "אני נהנה מהמוסיקה המסורתית של מולדתי.",
"Hindi" : "मैं अपने मूल देश के पारंपरिक संगीत का आनंद लेता हूं।",
"Hungarian" : "Élvezem az én hazám hagyományos zenéjét.",
"Indonesian" : "Saya menikmati musik tradisional negara asal saya.",
"Italian" : "Mi piace la musica tradizionale del mio paese natale.",
"Japanese" : "私は母国の伝統音楽を楽しんでいます。",
"Korean" : "나는 내 조국의 전통 음악을 즐긴다.",
"Norwegian Bokmal" : "Jeg liker den tradisjonelle musikken i mitt hjemland.",
"Polish" : "Lubię tradycyjną muzykę mojego kraju.",
"Portuguese" : "Eu gosto da música tradicional do meu país natal.",
"Romanian" : "Îmi place muzica tradițională din țara mea natală.",
"Russian" : "Мне нравится традиционная музыка моей родной страны.",
"Slovak" : "Mám rád tradičnú hudbu svojej rodnej krajiny.",
"Spanish" : "Disfruto de la música tradicional de mi país natal.",
"Swedish" : "Jag njuter av traditionell musik i mitt hemland.",
"Thai" : "ฉันเพลิดเพลินกับดนตรีดั้งเดิมของประเทศบ้านเกิดของฉัน",
"Turkish" : "Ülkemdeki geleneksel müzikten zevk alıyorum."
};
}
There’s one last thing: the numeric input for controlling the playback speed of the speech. Modify the talk()
function to get the speech rate from the number input and we’re good to go!
Here’s the final product:
function talk() {
...// no changes except for the rateFld.value reference
u.rate = Number(rateFld.value);
speechSynthesis.speak(u);
}
See the Pen
Polyglot: Text-To-Speech in Multiple Languages by Steven Estrella (@sgestrella)
on CodePen.
A Real World Application
My interest in this technology started many years ago in 1990 when I created a 26-lesson curriculum as part of my dissertation. It was delivered using my first programming language, HyperCard, on a Macintosh Plus which had a primitive text-to-speech feature. I used that feature to provide some feedback to the user while they progressed through the material. More recently, in 2018, I created a free progressive web app called Buenos Verbos that helps Spanish language students search and filter a database of 766 verbs. The chosen verb is then fully conjugated and the user can click the forms to hear them spoken. So perhaps web pages might like to talk and with some imagination you may find reasons to encourage them. The question is: what will you make your website say next?
The post Using the Web Speech API for Multilingual Translations appeared first on CSS-Tricks.