Archive

Archive for September, 2019

Ghost Buttons with Directional Awareness in CSS

September 13th, 2019 No comments

It would surprise me if you’d never come across a ghost button ?. You know the ones: they have a transparent background that fills with a solid color on hover. Smashing Magazine has a whole article going into the idea. In this article, we’re going to build a ghost button, but that will be the easy part. The fun and tricky part will be animating the fill of that ghost button such that the background fills up in the direction from which a cursor hovers over it.

Here’s a basic starter for a ghost button:

See the Pen
Basic Ghost Button ?
by Jhey (@jh3y)
on CodePen.

In most cases, the background-color has a transition to a solid color. There are designs out there where the button might fill from left to right, top to bottom, etc., for some visual flair. For example, here’s left-to-right:

See the Pen
Directional filling Ghost Button ?
by Jhey (@jh3y)
on CodePen.

There’s a UX nitpick here. It feels off if you hover against the fill. Consider this example. The button fills from the left while you hover from the right.

Hover feels off ?

It is better if the button fills from our initial hover point.

Hover feels good ?

So, how can we give the button directional awareness? Your initial instinct might be to reach for a JavaScript solution, but we can create something with CSS and a little extra markup instead.

For those in camp TL;DR, here are some pure CSS ghost buttons with directional awareness!

See the Pen
Pure CSS Ghost Buttons w/ Directional Awareness ???
by Jhey (@jh3y)
on CodePen.

Let’s build this thing step by step. All the code is available in this CodePen collection.

Creating a foundation

Let’s start by creating the foundations of our ghost button. The markup is straightforward.

<button>Boo!</button>

Our CSS implementation will leverage CSS custom properties. These make maintenance easier. They also make for simple customization via inline properties.

button {
  --borderWidth: 5;
  --boxShadowDepth: 8;
  --buttonColor: #f00;
  --fontSize: 3;
  --horizontalPadding: 16;
  --verticalPadding: 8;

  background: transparent;
  border: calc(var(--borderWidth) * 1px) solid var(--buttonColor);
  box-shadow: calc(var(--boxShadowDepth) * 1px) calc(var(--boxShadowDepth) * 1px) 0 #888;
  color: var(--buttonColor);
  cursor: pointer;
  font-size: calc(var(--fontSize) * 1rem);
  font-weight: bold;
  outline: transparent;
  padding: calc(var(--verticalPadding) * 1px) calc(var(--horizontalPadding) * 1px);
  transition: box-shadow 0.15s ease;
}

button:hover {
  box-shadow: calc(var(--boxShadowDepth) / 2 * 1px) calc(var(--boxShadowDepth) / 2 * 1px) 0 #888;
}

button:active {
  box-shadow: 0 0 0 #888;
}

Putting it all together gives us this:

See the Pen
Ghost Button Foundation ?
by Jhey (@jh3y)
on CodePen.

Great! We have a button and a hover effect, but no fill to go with it. Let’s do that next.

Adding a fill

To do this, we create elements that show the filled state of our ghost button. The trick is to clip those elements with clip-path and hide them. We can reveal them when we hover over the button by transitioning the clip-path.

Child element with a 50% clip

They must line up with the parent button. Our CSS variables will help a lot here.

At first thought, we could have reached for pseudo-elements. There won’t be enough pseudo-elements for every direction though. They will also interfere with accessibility… but more on this later.

Let’s start by adding a basic fill from left to right on hover. First, let’s add a div. That div will need the same text content as the button.

<button>Boo!
  <div>Boo!</div>
</button>

Now we need to line our div up with the button. Our CSS variables will do the heavy lifting here.

button div {
  background: var(--buttonColor);
  border: calc(var(--borderWidth) * 1px) solid var(--buttonColor);
  bottom: calc(var(--borderWidth) * -1px);
  color: var(--bg, #fafafa);
  left: calc(var(--borderWidth) * -1px);
  padding: calc(var(--verticalPadding) * 1px) calc(var(--horizontalPadding) * 1px);
  position: absolute;
  right: calc(var(--borderWidth) * -1px);
  top: calc(var(--borderWidth) * -1px);
}

Finally, we clip the div out of view and add a rule that will reveal it on hover by updating the clip. Defining a transition will give it that cherry on top.

button div {
  --clip: inset(0 100% 0 0);
  -webkit-clip-path: var(--clip);
  clip-path: var(--clip);
  transition: clip-path 0.25s ease, -webkit-clip-path 0.25s ease;
  // ...Remaining div styles
}

button:hover div {
  --clip: inset(0 0 0 0);
}

See the Pen
Ghost Button w/ LTR fill ?
by Jhey (@jh3y)
on CodePen.

Adding directional awareness

So, how might we add directional awareness? We need four elements. Each element will be responsible for detecting a hover entry point. With clip-path, we can split the button area into four segments.

Four :hover segments

Let’s add four spans to a button and position them to fill the button.

<button>
  Boo!
  <span></span>
  <span></span>
  <span></span>
  <span></span>
</button>
button span {
  background: var(--bg);
  bottom: calc(var(--borderWidth) * -1px);
  -webkit-clip-path: var(--clip);
  clip-path: var(--clip);
  left: calc(var(--borderWidth) * -1px);
  opacity: 0.5;
  position: absolute;
  right: calc(var(--borderWidth) * -1px);
  top: calc(var(--borderWidth) * -1px);
  z-index: 1;
}

We can target each element and assign a clip and color with CSS variables.

button span:nth-of-type(1) {
  --bg: #00f;
  --clip: polygon(0 0, 100% 0, 50% 50%, 50% 50%);
}
button span:nth-of-type(2) {
  --bg: #f00;
  --clip: polygon(100% 0, 100% 100%, 50% 50%);
}
button span:nth-of-type(3) {
  --bg: #008000;
  --clip: polygon(0 100%, 100% 100%, 50% 50%);
}
button span:nth-of-type(4) {
  --bg: #800080;
  --clip: polygon(0 0, 0 100%, 50% 50%);
}

Cool. To test this, let’s change the opacity on hover.

button span:nth-of-type(1):hover,
button span:nth-of-type(2):hover,
button span:nth-of-type(3):hover,
button span:nth-of-type(4):hover {
  opacity: 1;
}
So close

Uh-oh. There’s an issue here. If we enter and hover one segment but then hover over another, the fill direction would change. That’s going to look off. To fix this, we can set a z-index and clip-path on hover so that a segment fills the space.

button span:nth-of-type(1):hover,
button span:nth-of-type(2):hover,
button span:nth-of-type(3):hover,
button span:nth-of-type(4):hover {
  --clip: polygon(0 0, 100% 0, 100% 100%, 0 100%);
  opacity: 1;
  z-index: 2;
}

See the Pen
Pure CSS Directional Awareness w/ clip-path ?
by Jhey (@jh3y)
on CodePen.

Putting it all together

We know how to create the fill animation, and we know how to detect direction. How can we put the two together? Use the sibling combinator!

Doing so means when we hover a directional segment, we can reveal a particular fill element.

First, let’s update the markup.

<button>
  Boo!
  <span></span>
  <span></span>
  <span></span>
  <span></span>
  <div>Boo!</div>
  <div>Boo!</div>
  <div>Boo!</div>
  <div>Boo!</div>
</button>

Now, we can update the CSS. Referring to our left-to-right fill, we can reuse the div styling. We only need to set a specific clip-path for each div. I’ve approached the ordering the same as some property values. The first child is top, the second is right, and so on.

button div:nth-of-type(1) {
  --clip: inset(0 0 100% 0);
}
button div:nth-of-type(2) {
  --clip: inset(0 0 0 100%);
}
button div:nth-of-type(3) {
  --clip: inset(100% 0 0 0);
}
button div:nth-of-type(4) {
  --clip: inset(0 100% 0 0);
}

The last piece is to update the clip-path for the relevant div when hovering the paired segment.

button span:nth-of-type(1):hover ~ div:nth-of-type(1),
button span:nth-of-type(2):hover ~ div:nth-of-type(2),
button span:nth-of-type(3):hover ~ div:nth-of-type(3),
button span:nth-of-type(4):hover ~ div:nth-of-type(4) {
  --clip: inset(0 0 0 0);
}

Tada! We have a pure CSS ghost button with directional awareness.

See the Pen
Pure CSS Ghost Button w/ Directional Awareness ?
by Jhey (@jh3y)
on CodePen.

Accessibility

In its current state, the button isn’t accessible.

The extra markup is read by VoiceOver.

Those extra elements aren’t helping much as a screen reader will repeat the content four times. We need to hide those elements from a screen reader.

<button>
  Boo!
  <span></span>
  <span></span>
  <span></span>
  <span></span>
  <div aria-hidden="true">Boo!</div>
  <div aria-hidden="true">Boo!</div>
  <div aria-hidden="true">Boo!</div>
  <div aria-hidden="true">Boo!</div>
</button>

No more repeated content.

See the Pen
Accessible Pure CSS Ghost Button w/ Directional Awareness ?
by Jhey (@jh3y)
on CodePen.

That’s it!

With a little extra markup and some CSS trickery, we can create ghost buttons with directional awareness. Use a preprocessor or put together a component in your app and you won’t need to write out all the HTML, too.

Here’s a demo making use of inline CSS variables to control the button color.

See the Pen
Pure CSS Ghost Buttons w/ Directional Awareness ???
by Jhey (@jh3y)
on CodePen.

The post Ghost Buttons with Directional Awareness in CSS appeared first on CSS-Tricks.

Categories: Designing, Others Tags:

Monthly Web Development Update 9/2019: Embracing Basic And Why Simple Is Hard

September 13th, 2019 No comments
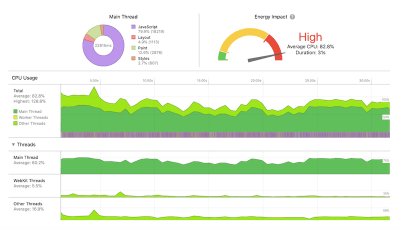
Visualization of high impact on the battery when scrolling a page with complex rendering and video playback.

Monthly Web Development Update 9/2019: Embracing Basic And Why Simple Is Hard

Monthly Web Development Update 9/2019: Embracing Basic And Why Simple Is Hard

Anselm Hannemann

2019-09-13T13:17:00+02:002019-09-14T13:49:45+00:00

Editor’s note: Please note that this is the last Monthly Web Development Update in the series. You can still follow the Web Development Reading List on Anselm’s site at https://wdrl.info. Watch out for a new roundup post format next month here on Smashing Magazine. A big thank-you to Anselm for sharing his findings and his thoughts with us during the past four years.

Do we make our lives too complex, too busy, and too rich? More and more people working with digital technology realize over time that a simple craft and nature are very valuable. The constant hunt to do more and get more productive, with even leisure activities that are meant to help us refuel our energy turning into a competition, doesn’t seem to be a good idea, yet currently, this is a trend in our modern world. After work, we feel we need to do two hours of yoga and be able to master the most complex of poses, we need a hobby, binge-watch series on Netflix, and a lot more. That’s why this week I want to encourage you to embrace a basic lifestyle.

“To live a life in which one purely subsists on the airy cream puffs of ideas seems enviably privileged: the ability to make a living merely off of one’s thoughts, rather than manual or skilled labor.”

Nadia Eghbal in “Basic”

What does basic stand for? Keep it real, don’t constantly do extra hours, don’t try to pack your workday with even more tasks or find more techniques to make it more efficient. Don’t try to hack your productivity, your sleep, let alone your meditation, yoga, or other wellness and sports activities. Do what you need to do and enjoy the silence and doing nothing when you’re finished. Living a basic life is a virtue, and it becomes more relevant again as we have more money to spend on unnecessary goods and more technology that intercept our human, basic thoughts on things.

News

General

  • Chris Coyier asks the question if a website should work without JavaScript in 2019. It breaks down to a couple of thoughts that mainly conclude with progressive enhancement being more important than making a website work for users who actively turned off JavaScript.

Privacy

UI/UX

  • In our modern world, it’s easy to junk things up. We’re quick to add more questions to research surveys, more buttons to a digital interface, more burdens to people. Simple is hard.

Web Performance

  • So many users these days use the Internet with a battery-driven device. The WebKit team shares how web content can affect power usage and how to improve the performance of your web application and save battery.

Visualization of high impact on the battery when scrolling a page with complex rendering and video playback.

Scrolling a page with complex rendering and video playback has a significant impact on battery life. But how can you make your pages more power efficient? (Image credit)

JavaScript

Tooling

  • There’s a new tool in town if you want to have a status page for your web service: The great people from Oh Dear now also provide status pages.
  • Bastian Allgeier shares his thoughts on simplicity on the web, where we started, and where we are now. Call it nostalgic or not, the times when we simply uploaded a file via FTP and it was live on servers were easy days. Now with all the CI/CD tooling around, we have gotten many advantages in terms of security, version management, and testability. However, a simple solution looks different.

Accessibility

  • Adrian Roselli shares why we shouldn’t under-engineer text form fields and why the default CSS that comes with the browser usually isn’t enough. A pretty good summary of what’s possible, what’s necessary, and how to make forms better for everyone visiting our websites. It even includes high-contrast mode, dark mode, print styles, and internationalization.

Work & Life

Going Beyond…

—Anselm

(cm)
Categories: Others Tags:

15 Best APIs for Web Designers and Developers

September 13th, 2019 No comments

With an API, you create a connection between your website and an application for the purposes of drawing on its data or features. This allows you to not only enhance the on-site experience, but to streamline a lot of the processes that would otherwise require much tedious hand-holding behind the scenes. Many of you are probably familiar with the multitude of APIs Google has created.

But it’s not just Google that’s trying to make it easier for web developers and designers to create impressive online experiences. According to APIHound, it has a repository of over 50,000 APIs while ProgrammableWeb lists over 22,000. Even if only the top 1% are usable, that’s still 200 to 500 high-quality APIs you could be leveraging to build websites.

That said, I’m not going to leave you to figure out which ones are worth your time. Below, you’ll find the 15 best APIs for web design and development:

1. Google Analytics

Tracking visitor activity on a website with Google Analytics is non-negotiable these days. But there’s more to get out of this platform than just watching web traffic go up and down. You can use the Google Analytics APIs to:

  • Monitor custom data, like e-commerce conversion rates and lifetime value calculations.
  • Create special tracking dashboards for the backend of your website.
  • Go deeper with sales funnel tracking and analysis.

2. Google Geo-location (Maps)

Google Maps is the more commonly recognized geo-location API from Google. However, there are other ways to use this API to your advantage:

  • Make embedded maps look however you like (e.g. street view enabled, 360-degree pivot, etc.)
  • Show route data along with real-time traffic insights.
  • Equip search fields and forms with pre-populated geo-location data that matches real world locations.

3. Google Fonts

The Google Fonts API gives developers a way to call on a Google Font from the directory. This way, you don’t need to host any cumbersome font files on your server. Google handles the load.

4. Google Translate

Building an international website and need a quick and convenient way to translate it into numerous languages? You can use Google’s Cloud Translation and API service to help. All you need is an HTML and Google Translate will take care of the rest.

5. Google Calendar

For a business that hosts lots of events — online or in-person — a calendar would come in handy for the website. With the Google Calendar API, you can instantly make that connection and start displaying public or private events.

6. G Suite Apps

Google’s suite of apps have their own corresponding APIs, too. So, let’s say you have a contact form that provides your client with important information prior to a sales call. You could configure the Google Sheets API to capture the data submitted by users, which would help the sales rep or business owner in preparing for the call ahead of time.

7. YouTube

You know it’s not a very good idea to upload video files to your server. Thanks to the YouTube API, you can easily embed video players into your website and customize the playback settings. You can also use the API to pull in data from YouTube to your website’s dashboard.

8. Vimeo

Vimeo is another popular video playback solution that has its own API. If your clients would prefer to manage their video content with Vimeo, know that you have the ability to leverage the API to embed videos on the site, pull in usage data, and customize playback.

9. Facebook Messenger

Want to build a Facebook Messenger chatbot for your website? With the Messenger API, you can do that. What’s more, you can program how the bot interacts with visitors, so it doesn’t just end up being a holding queue for visitors waiting to connect with a real person through the site or over on Facebook.

10. Facebook Apps and Plugins

Facebook provides developers with APIs so they can get more out of their marketing efforts on the social media platform itself. However, it also provides a set of APIs and SDKs that can be used on websites. With them, you can:

  • Add a Facebook login.
  • Embed social media feeds and posts.
  • Track website conversions in relation to Facebook.

11. Twitter

Truth be told, all of the leading social media platforms have their own APIs. But if we’re looking at the more valuable ones to include on your website, Facebook and Twitter are probably them. That said, Twitter’s offering for web developers is a bit lighter than Facebook’s. With it, you’ll gain the ability to embed Twitter feeds, posts, as well as share buttons.

12. Twilio

If you’re not familiar with it, the Twilio API is an incredibly powerful tool for businesses that want to integrate voice, SMS, chat, or AI bots into their websites.

For instance, think about a website that allows visitors to schedule appointments. By asking for a phone number in the request, you can program your API to automatically send appointment reminders via text.

You could also use this for something like a free SaaS trial. You include a few additional fields like Business Name, Company Size, and Phone Number in the signup form. Then, a few hours after the visitor signs up, a sales rep follows up by phone to see how they’re enjoying it.

13. Dropbox

Do you need a secure place to store files from your website? You could use the Dropbox API to make that happen with ease. You can also use the API to handle more complex tasks like enabling website visitors to upload documents to your Dropbox account (like resume files). You could also use it to get prospective employees, tenants, or clients to e-sign documents.

14. MailChimp

There are different ways you may want users to engage with your website, but most of them are likely to end in a form — lead gen, contact, or e-commerce.

If you’re using MailChimp to power your email marketing efforts, then connecting its API to your form and website would be useful. You can manage your email lists and automate how your site and email work together through it.

15. Payment Processors (Stripe and PayPal)

There’s no reason to manually process payment information anymore when payment processors have created such a reliable means of connecting their platforms to our websites. The APIs for payment processors like Stripe and PayPal are what enable developers to do more than just collect payments, too. You can enable tracking, handle refunds and disputes, and more.

Wrap-Up

The above list covers the essentials you’re going to need when building a website and adding all those critical features your clients desire. But there are so many more APIs you can leverage.

If you’re new to this and want an easy way to work with lesser known APIs, consider leveraging IFTTT or Zapier. These tools help you create “recipes” that connect your website to existing APIs. Think of them as a friendly go-between.

Featured image via Unsplash.

Source

Categories: Designing, Others Tags:

Weekly Platform News: Apple Deploys Web Components, Progressive HTML Rendering, Self-Hosting Critical Resources

September 12th, 2019 No comments

In this week’s roundup, Apple gets into web components, how Instagram is insta-loading scripts, and some food for thought for self-hosting critical resources.

Apple deploys web components built using Stencil

The new Apple Music web app (beta) uses a JavaScript framework (Ember.js) but also standard web components such as that are built using Stencil, a web component compiler.

Stencil is a build-time tool that generates standard web components with minimal overhead, while providing core features such as templating, state management, and routing, as well as performance features such as code-splitting and lazy-loading.

Apple just deployed into production nearly 50 web components powering a major app they have a significant amount of revenue and strategic value riding on. You can’t say that “no one uses web components” or they are “solving problems that don‘t exist or have been solved better in user land” with a straight face anymore.

(via Max Lynch)

Instagram makes use of chunked transfer encoding and progressive HTML rendering

Instagram’s website uses HTTP chunked transfer encoding to stream the contents of the HTML document to the browser as each part of the page is generated on the server.

We can flush the HTML to the browser almost immediately … This allows the browser to start downloading scripts and stylesheets while the server is busy generating the dynamic data in the rest of the page.

They also use this technique to flush JSON data to the page in elements. The client script waits for this data (using Promise) instead of requesting it via XHR.

(via Glenn Conner)

Consider self-hosting your critical resources

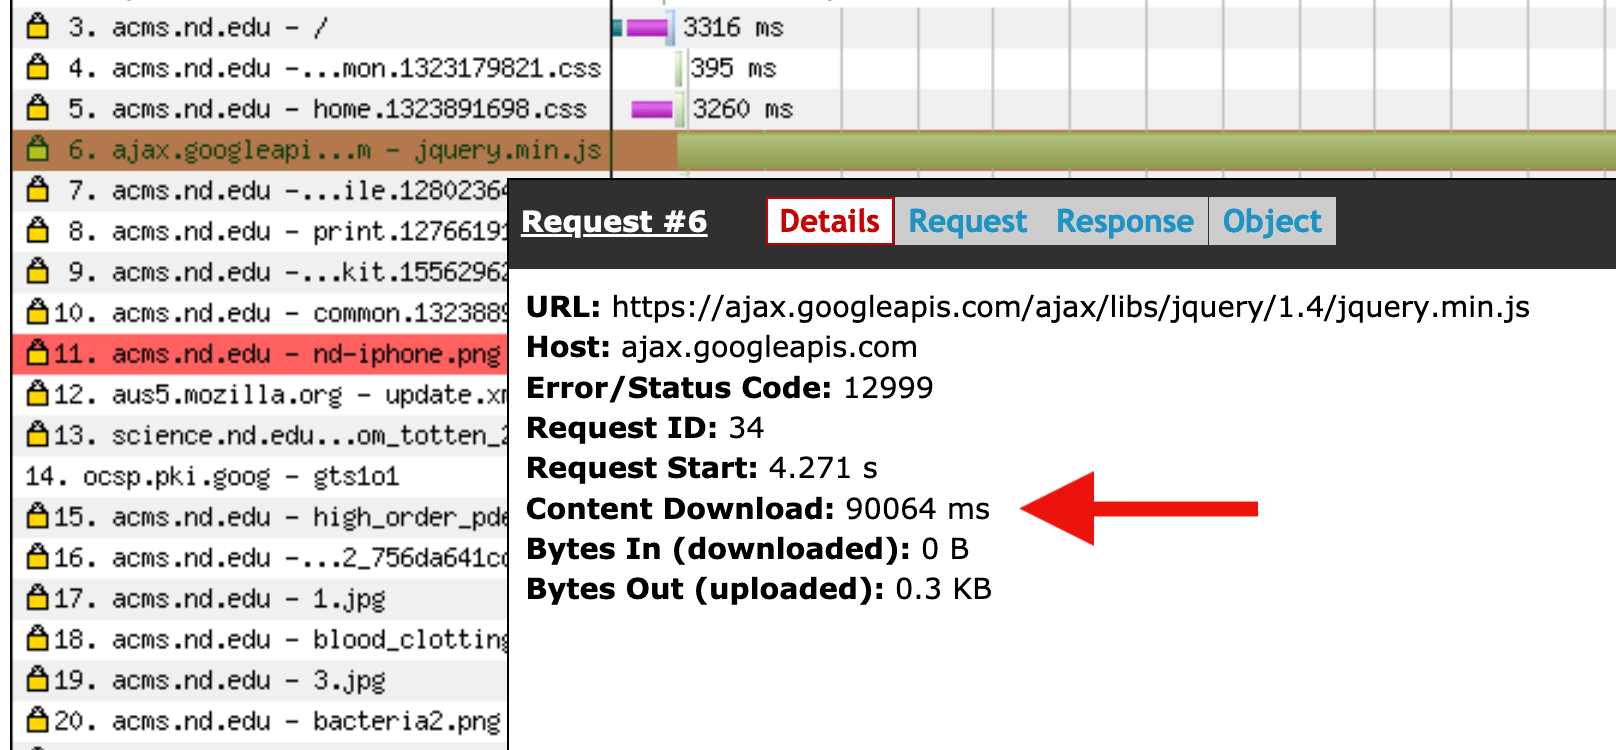
One section of University of Notre Dame’s website used to load jQuery from Google’s CDN, which could result in very long loading times (100+ seconds) when visiting the site from China. They’ve resolved the issue by self-hosting jQuery instead.

(via Erik Runyon)


Read even more news in my weekly Sunday issue. Visit webplatform.news for more information.

The post Weekly Platform News: Apple Deploys Web Components, Progressive HTML Rendering, Self-Hosting Critical Resources appeared first on CSS-Tricks.

Categories: Designing, Others Tags:

Simplicity

September 12th, 2019 No comments

Earlier this week, Bastian Allgeier published some interesting thoughts about complexity in web development and how changing simple things can often feel far more difficult than they need to be:

You want to build a JS file? Please update Webpack first. Oh, that new version of Webpack is no longer compatible with your Node version. Oh, your new Node version is no longer compatible with that other dependency. Oh, now you have 233 detected security issues in all your node_modules but you can’t fix them because that would break something completely unrelated.

It’s a UX nightmare and I haven’t found a single exception yet. Vue Cli or Parcel are the most positive examples, where positive means: not as horrible as the rest.

This dependency hell is also the reason why old projects are almost like sealed capsules. You can hardly let a project lie around for more than a year, because afterwards it’s probably broken.

A couple of weeks ago, I returned to a web app that was built with a variety of tools I hadn’t updated in quite some time and realized that it would be an enormous effort to fix all the packages and dependencies; instead I should just start over again. I can certainly empathise with Bastian on this stuff.

This reminds me that Chris wrote a great essay not so long about simple web development and collected a ton of thoughts from other developers out there.

Direct Link to ArticlePermalink

The post Simplicity appeared first on CSS-Tricks.

Categories: Designing, Others Tags:

Using Custom Properties to Wrangle Variations in Keyframe Animations

September 12th, 2019 No comments

Have you ever wondered how to customize CSS animations keyframes without using any preprocessor feature, like mixins? I keep reaching for preprocessors for this reason, but it would so nice to drop yet one more dependency and go with vanilla CSS.

Well, I found a way to account for variations within a keyframe animation using nothing but CSS and it’s thanks to custom properties! Let’s learn a little more about how CSS keyframes work and how we can enhance them with CSS and a touch of custom properties.

Understanding CSS animations inheritance

When we assign an animation to an element, we can customize some of its properties such as duration, delay, and so on. Let me show you a dummy example: we have two classes: .walk and .run. Both share the same animation (named breath) and .run executes the animation faster than .walk (0.5s to 2s, respectively).

@keyframes breath {
  from {
    transform: scale(0.5);
  }
  to {
    transform: scale(1.5);
  }
}

/* Both share the same animation, but walking is _slower_ than running */
.walk {
  animation: breath 2s alternate;
}

.run {
  animation: breath 0.5s alternate;
}

Each time we reuse an animation, it can behave differently based on the properties we assign it. So, we can say that an animation inherits its behavior based on the element where it’s applied.

But what about the animation *rules* (the scale in this case)? Let’s go back to the breath animation example: The .walk class executes breath slower but it also needs to be deeper, so we need to change its scale value to be larger than it is for the .run class, which takes smaller, more frequent breaths.

The common approach in plain CSS is to duplicate the original animation and tweak the values directly in the class:

@keyframes breath {
  /* same as before... */
}

/* similar to breath, but with different scales */
@keyframes breathDeep {
  from {
    transform: scale(0.3);
  }
  to {
    transform: scale(1.7);
  }
}

.walk {
  animation: breathDeep 2s alternate;
}

.run {
  animation: breath 0.5s alternate;
}

While this works fine, there’s a better solution which allow us to reuse both the animation’s properties and its values! How? By taking advantage of CSS variables inheritance! Let’s see how:

/* breath behaves based on the
CSS variables values that are inherited */
@keyframes breath {
  from {
    transform: scale(var(--scaleStart));
  }
  to {
    transform: scale(var(--scaleEnd));
  }
}

.walk {
  --scaleStart: 0.3;
  --scaleEnd: 1.7;
  animation: breath 2s alternate;
}

.run {
  --scaleStart: 0.8;
  --scaleEnd: 1.2;
  animation: breath 0.5s alternate;
}

Cool, right? Now we don’t need to write duplicate animations to get varying effects from the same animation!

If you need to go even further, remember that we can also update CSS custom properties with JavaScript. Not only root variables, but also in specific elements. I find this incredible powerful because we can create more efficient animations by taking advantage of JavaScript without losing the native optimizations from CSS animation. It’s a win-win!

See the Pen
Dynamic CSS @keyframes w/ CSS Vanilla
by Sandrina Pereira (@sandrina-p)
on CodePen.

The post Using Custom Properties to Wrangle Variations in Keyframe Animations appeared first on CSS-Tricks.

Categories: Designing, Others Tags:

Fast Static Sites with Netlify and AnyMod

September 12th, 2019 No comments

In about 10 minutes, we’ll set up a workflow that makes static sites dead simple.

You’ll get the following:

  • Free https
  • Free or cheap hosting
  • Build sites quickly
  • Edit with live reload
  • Edit when you’ve forgotten everything in 6 months

Start: signups

We can get all this by using Netlify (really simple static hosting) along with AnyMod (100s of website sections).

Set up deploy pipeline

We’ll create a basic HTML file, track it with GitHub, and then auto-deploy with Netlify.

(If you prefer a manual setup, you can skip this step and instead deploy to Netlify by dragging/dropping into the Netlify folder.)

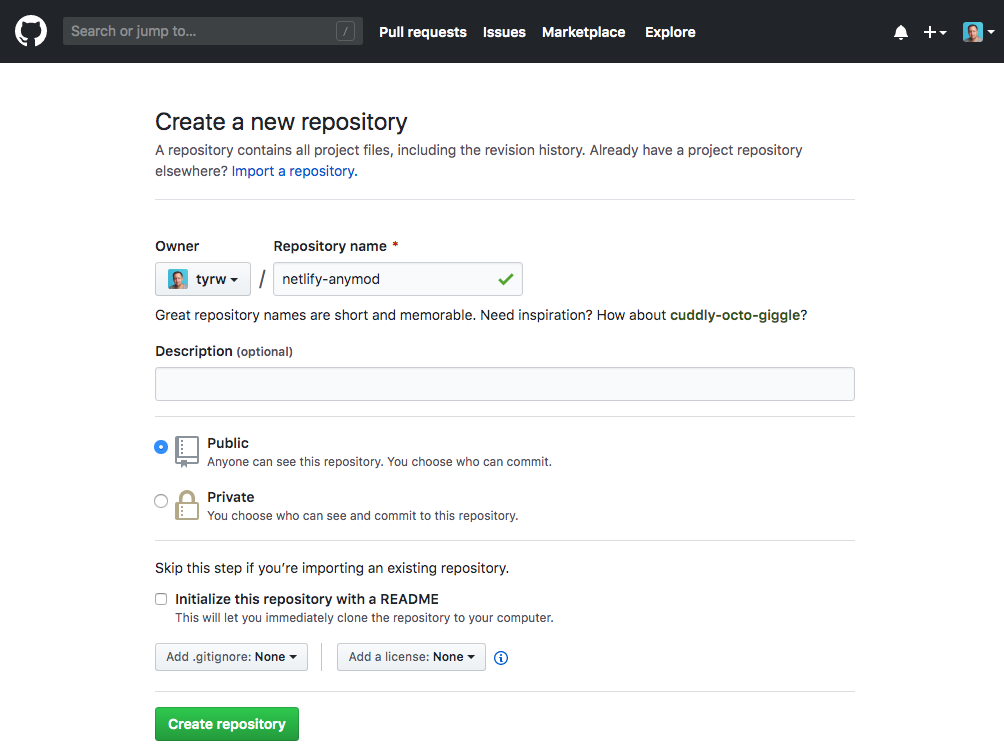
1. Create an empty repo in GitHub.

Go to https://github.com/new and Name it netlify-anymod:

GitHub setup

2. Connect Netlify to your repo.

You will do this from the Netlify start screen.

Netlify setup

3. Create a folder on your computer and add a file named index.html.

You can run the following in your terminal to do this:

mkdir netlify-anymod
cd netlify-anymod
touch index.html

Now edit the index.html file to add some basic HTML structure:

<!DOCTYPE html>
<html lang="en">
  <head>
    <meta charset="UTF-8" />
    <meta name="viewport" content="width=device-width, initial-scale=1.0" />
    <meta http-equiv="X-UA-Compatible" content="ie=edge" />
    <title>Netlify & AnyMod | CSS Tricks</title>
  </head>

  <body>
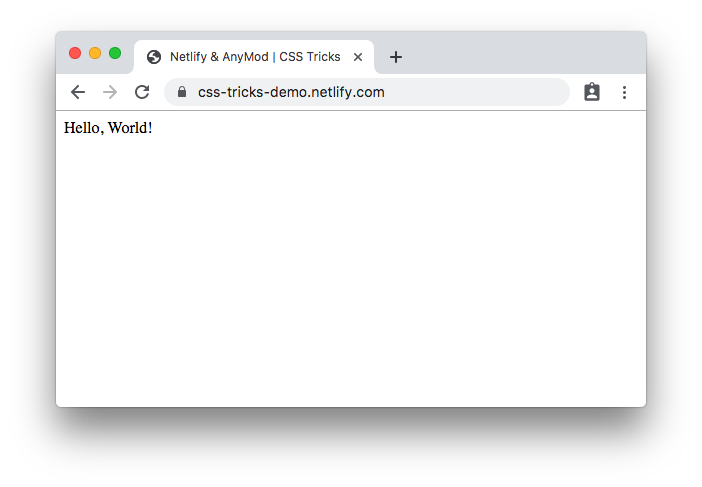
    Hello, World!
  </body>
</html>

4. Track it with git and deploy to GitHub

git init
git remote add origin https://github.com/tyrw/netlify-anymod.git
git add -A
git commit -m "Initial commit"
git push --set-upstream origin master

Note: use your own repo URL for git remote add origin).

Check your Netlify URL after a minute or so, and your site should be live!

Live site

Add section “mods”

Now that we have our deploy setup, we can build the page itself. We’ll do this with ready-to-use modules (“mods”) on AnyMod.

There are a lot to choose from, but we’ll use mods from the Editorial theme:

Navigation

(View this mod)

Intro / Hero unit

(View this mod)

Form

(View this mod)

Image gallery

(View this mod)

Clone and add mods

Add these mods by clicking “Clone” for each one and then scroll down and copy/paste the installation code into the index.html file. Also copy and paste your project script at the top.

Your index.html should now look something like this:

<!DOCTYPE html>
<html lang="en">
  <head>
    <meta charset="UTF-8" />
    <meta name="viewport" content="width=device-width, initial-scale=1.0" />
    <meta http-equiv="X-UA-Compatible" content="ie=edge" />
    <title>Netlify & AnyMod | CSS Tricks</title>

    <!-- AnyMod -->
    <script id="AnyMod-script">
      (function (m,o,d,u,l,a,r,i,z,e) {
        u[m]={Project:o,rq:[],Opts:r,ready:function(j){u[m].rq.push(j)}};function j(s){return encodeURIComponent(btoa(s))};z=l.getElementById(m+'-'+a);r=u.location;
        e=[d+'/page/'+o+'/'+j(r.pathname)+'/'+j(r.host)+'?t='+Date.now(),d];e.map(function(w){i=l.createElement(a);i.defer=1;i.src=w;z.parentNode.insertBefore(i,z);});
      })('AnyMod','82PEPN','https://cdn.anymod.com/v2',window,document,'script',{ toolkit: true, tips: true, priority: 3 });
    </script>
    <!-- /AnyMod -->
  </head>
  <body>
    <!-- Professional side nav -->
    <div id="anymod-mlrnbm"></div>

    <!-- Intro section -->
    <div id="anymod-ormard"></div>

    <!-- Contact form -->
    <div id="anymod-ralmam"></div>

    <!-- Card section -->
    <div id="anymod-balmaa"></div>
  </body>
</html>

And the page is ready to go.

Now save and push to GitHub to deploy the site:

git add -A
git commit -m "Added mods"
git push origin

Wait a minute, and your site should be ready to use. Here is the demo page.

See Demo

Editing content

Now you can live edit the content and code for each mod. When viewing your own page (while also logged into AnyMod), you see a pencil on the right side:

AnyMod pencil

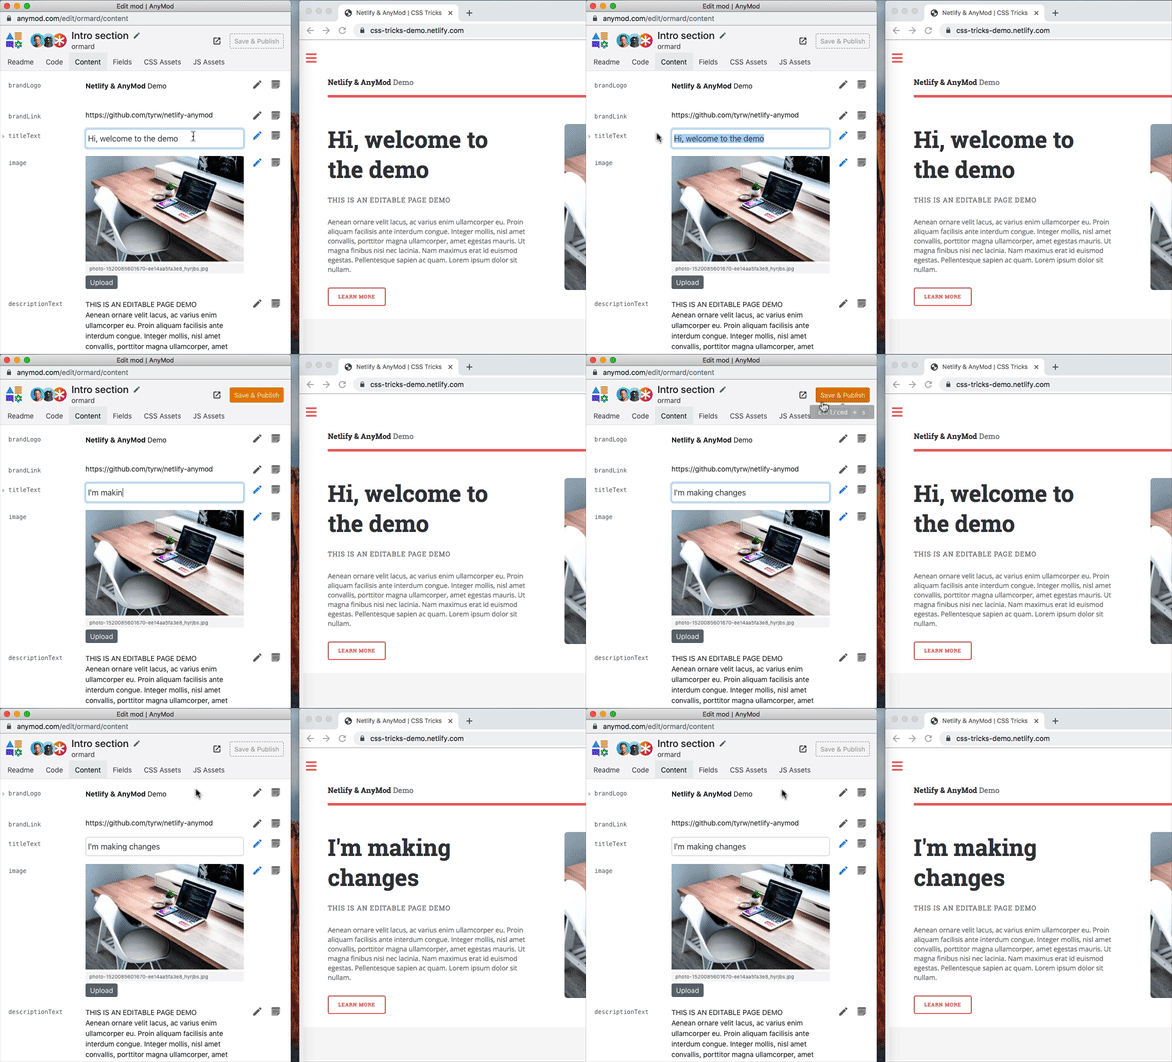
Click the pencil and choose a mod. Now try making some edits to the content (or code) and notice that it updates on the page automatically in real time.

AnyMod live edit

You can use this method to make edits now or in 6 months when you’ve forgotten how the project is set up.

Form

The form also works automatically. Try submitting a message on your own page; the response will be emailed to you right away.

Conclusion

You now have a great way to build fast, reliable, secure static sites.

Remember: with great power comes great responsibility.

The post Fast Static Sites with Netlify and AnyMod appeared first on CSS-Tricks.

Categories: Designing, Others Tags:

A Re-Introduction To Destructuring Assignment

September 12th, 2019 No comments
Smashing Editorial

A Re-Introduction To Destructuring Assignment

A Re-Introduction To Destructuring Assignment

Laurie Barth

2019-09-12T14:00:59+02:002019-09-12T13:06:38+00:00

If you write JavaScript you’re likely familiar with ES2015 and all the new language standards that were introduced. One such standard that has seen incredible popularity is destructuring assignment. The ability to “dive into” an array or object and reference something inside of it more directly. It usually goes something like this.

const response = {
   status: 200
   data: {}
}

// instead of response.data we get...
const {data} = response //now data references the data object directly


const objectList = [ { key: 'value' }, { key: 'value' }, { key: 'value' } ]

// instead of objectList[0], objectList[1], etc we get...
const [obj, obj1, obj2] = objectList // now each object can be referenced directly

However, destructuring assignment is such a powerful piece of syntax that many developers, even those who have been using it since it was first released, forget some of the things it can do. In this post, we’ll go through five real-world examples for both object and array destructuring, sometimes both! And just for fun, I’ll include a wonky example I came across just the other day.

1. Nested Destructuring

Being able to access a top-level key inside an object, or the first element of an array is powerful, but it’s also somewhat limiting. It only removes one level of complexity and we still end up with a series of dots or [0] references to access what we’re really after.

As it turns out, destructuring can work beyond the top level. And there can be valid reasons for doing so. Take this example of an object response from an HTTP request. We want to go beyond the data object and access just the user. So long as we know the keys we’re looking for, that isn’t a problem.

const response = {
  status: 200,
  data: { 
    user: {
       name: 'Rachel', 
      title: 'Editor in Chief' 
    }, 
    account: {},
    company: 'Smashing Magazine' 
  }
}

const {data: {user}} = response // user is { name: 'Rachel', title: 'Editor in Chief'}

The same can be done with nested arrays. In this case, you don’t need to know the key since there is none. What you need to know is the position of what you’re looking for. You’ll need to provide a reference variable (or comma placeholder) for each element up and until the one you’re looking for (we’ll get to that later). The variable can be named anything since it is not attempting to match a value inside the array.

const smashingContributors = [['rachel', ['writer', 'editor', 'reader']], ['laurie', ['writer', 'reader']]]

const [[rachel, roles]] = smashingContributors
// rachel is 'rachel'
// roles is [ 'writer', 'editor', 'reader' ]

Keep in mind that these features should be used judiciously, as with any tool. Recognize your use case and the audience of your code base. Consider readability and ease of change down the road. For example, if you’re looking to access a subarray only, perhaps a map would be a better fit.

2. Object And Array Destructuring

Objects and arrays are common data structures. So common, in fact, that one often appears inside the other. Beyond nested destructuring, we can access nested properties even if they are in a different type of data structure than the external one we’re accessing.

Take this example of an array inside an object.

const organization = { 
    users: ['rachel', 'laurie', 'eric', 'suzanne'],
    name: 'Smashing Magazine',
    site: 'https://www.smashingmagazine.com/' 
}

const {users:[rachel]} = organization // rachel is 'rachel'

The opposite use case is also valid. An array of objects.

const users = [{name: 'rachel', title: 'editor'}, {name: 'laurie', title: 'contributor'}]

const [{name}] = users // name is 'rachel'

As it turns out, we have a bit of a problem in this example. We can only access the name of the first user; otherwise, we’ll attempt to use ‘name’ to reference two different strings, which is invalid. Our next destructuring scenario should sort this out.

3. Aliases

As we saw in the above example (when we have repeating keys inside different objects that we want to pull out), we can’t do so in the “typical” way. Variable names can’t repeat within the same scope (that’s the simplest way of explaining it, it’s obviously more complicated than that).

const users = [{name: 'rachel', title: 'editor'}, {name: 'laurie', title: 'contributor'}]

const [{name: rachel}, {name: laurie}] = users // rachel is 'rachel' and laurie is 'laurie'

Aliasing is only applicable to objects. That’s because arrays can use any variable name the developer chooses, instead of having to match an existing object key.

4. Default Values

Destructuring often assumes that the value it’s referencing is there, but what if it isn’t? It’s never pleasant to litter code with undefined values. That’s when default values come in handy.

Let’s look at how they work for objects.

const user = {name: 'Luke', organization: 'Acme Publishing'}
const {name='Brian', role='publisher'} = user
// name is Luke
// role is publisher

If the referenced key already has a value, the default is ignored. If the key does not exist in the object, then the default is used.

We can do something similar for arrays.

const roleCounts = [2]
const [editors = 1, contributors = 100] = roleCounts
// editors is 2
// contributors is 100

As with the objects example, if the value exists then the default is ignored. Looking at the above example you may notice that we’re destructuring more elements than exist in the array. What about destructuring fewer elements?

5. Ignoring Values

One of the best parts of destructuring is that it allows you to access values that are part of a larger data structure. This includes isolating those values and ignoring the rest of the content, if you so choose.

We actually saw an example of this earlier, but let’s isolate the concept we’re talking about.

const user = {name: 'Luke', organization: 'Acme Publishing'}
const {name} = user
// name is Luke

In this example, we never destructure organization and that’s perfectly ok. It’s still available for reference inside the user object, like so.

user.organization

For arrays, there are actually two ways to “ignore” elements. In the objects example we’re specifically referencing internal values by using the associated key name. When arrays are destructured, the variable name is assigned by position. Let’s start with ignoring elements at the end of the array.

const roleCounts = [2, 100, 100000]
const [editors, contributors] = roleCounts
// editors is 2
// contributors is 100

We destructure the first and second elements in the array and the rest are irrelevant. But how about later elements? If it’s position based, don’t we have to destructure each element up until we hit the one we want?

As it turns out, we do not. Instead, we use commas to imply the existence of those elements, but without reference variables they’re ignored.

const roleCounts = [2, 100, 100000]
const [, contributors, readers] = roleCounts
// contributors is 100
// readers is 100000

And we can do both at the same time. Skipping elements wherever we want by using the comma placeholder. And again, as with the object example, the “ignored” elements are still available for reference within the roleCounts array.

Wonky Example

The power and versatility of destructuring also means you can do some truly bizarre things. Whether they’ll come in handy or not is hard to say, but worth knowing it’s an option!

One such example is that you can use destructuring to make shallow copies.

const obj = {key: 'value', arr: [1,2,3,4]}
const {arr, arr: copy} = obj
// arr and copy are both [1,2,3,4]

Another thing destructuring can be used for is dereferencing.

const obj = {node: {example: 'thing'}}
const {node, node: {example}} = obj
// node is { example: 'thing' }
// example is 'thing'

As always, readability is of the utmost importance and all of these examples should be used judicially. But knowing all of your options helps you pick the best one.

Conclusion

JavaScript is full of complex objects and arrays. Whether it’s the response from an HTTP request, or static data sets, being able to access the embedded content efficiently is important. Using destructuring assignment is a great way to do that. It not only handles multiple levels of nesting, but it allows for focused access and provides defaults in the case of undefined references.

Even if you’ve used destructuring for years, there are so many details hidden in the spec. I hope that this article acted as a reminder of the tools the language gives you. Next time you’re writing code, maybe one of them will come in handy!

(dm, yk, il)
Categories: Others Tags:

Best B2B wholesale platforms that add strength to Business Startups

September 12th, 2019 No comments

It is a fact that the trend of B2B platforms is at its prime in the present era. B2B platforms currently are mostly seen participating in wholesale trades.

As with time, the business to business portals is also evolving greatly with the integration of advanced technologies changing the functionalities to be better compatible and more convenient for its users.

B2B wholesale platforms have proven to be incredibly useful in providing additional digital trading and branding features. As by these mediums, the outreach method to connect the seller with the targeted audiences have become relatively much for effective and efficient as well. B2B wholesalers have assisted numerous businesses around the globe to excel larger by reaching out to the local and international clients via a single platform.

There are a few major aspects of these B2B wholesale platforms that have strengthened startup businesses to grow and contribute to better stability for businesses. By offering these traits to them that are:-

  • A direct integration of the data from the platform to the computer providing the company with the immediate notice on a lead or transaction attained.
  • Ensuring a larger market audience that creates a higher possibility to receive offers and demands to achieve expansion and growth.
  • Minimizes Hassles: quicker negotiation process, fewer commercial visits, rapid delivery to responses such as price reduction or than immediately providing pricing lists, etc.
  • Reduces personalized interactions that eradicate the possibilities of personal deals and discounts being offered.
  • Secure and spontaneous communications between the distributor and the purchaser.

Due to the market’s obsession to get acquainted with the finest B2B platforms so that they can use it to their advantage. That is to help them boost their business’s presence around the world. Highlighting every aspect of these platforms so that it is easier for everyone to consider which platform will prove to be of better assistance when associated with. The list in no specific order will comprise of the top global B2B platforms.

Here are the 5 fastest growing B2B platforms in alphabetical order:

Alibaba

Alibaba is considerably one of the largest online markets that are residing. As a leading B2B Wholesale website Alibaba has been found to have a huge inventory consisting of every possible goods and product that may be required by a consumer. For quite a few years it was reckoned to be one of the largest marketplaces but with the ongoing competition and rise of the B2B industry, there have been competitors who could match up to Alibaba’s inventory but yet hasn’t been able to overtake it though.

Alibaba originated, in the year 1999. Since its initiation, it has been able to secure a vast international market by attaining customers from around the globe. Alibaba over a decade has been able to grasp customer, even more, to expand its horizons by providing qualitative and standard base services. It has grown to such extent by valuing and keeping the needs in mind of its customers such as providing multiple languages in customer support to international clients.

Alibaba is a B2B platform that presents versatile services. It was able to secure the highest calculated sales in the year 2019 while still having over 35 million users. Alibaba has been seen to distribute goods to numerous and various industries around the world. As it reserves a huge inventory with mostly wholesale products/ goods and they amazingly present them through striking seasonal discounts that trigger to the audience commendable well.

Amazon

Amazon is an entity that nearly every person has heard of that’s how widespread this B2B platform is. Amazon is relatively quite different from the other platforms as it has a certain difference in it such as in its operations and marketing strategies. One of the prime reasons it has been able to dominate the wholesale online marketplace is due to its ability to provide premium delivery services with utmost customer satisfaction.

Since a very long all that one could speak of when spoken of B2B platforms like Amazon or eBay. Making them each other’s biggest rivals for years. The only distinguishing point that could be seen amongst them was their selling process which differed from each other. Amazon catered to its selling process to the best extends as it could rather than having adapted eBay’s unique auctioning selling procedure.

Amazon has strengthened its features to the highest possible reach out as it could. Since it is a B2B platform that doesn’t has auctioning of goods but certainly has a higher amount of wholesale goods and used items available for purchase for its users. Amazon is considered as one of the best platform used to sell bulk wholesale items and used goods.

eBay

eBay is one of the very first B2B platforms residing. It is an e-commerce platform which has surely been able to secure its spot in the competitive B2B wholesale platform. As it most certainly has had a long run for its money in regards to all the competition and advancements that have been encountered since the demand has simple grown ever since the trend of convenient wholesale bulk purchases via these platforms.

eBay has been able to maintain its compatibility against its growing competitions over the years by making the best of its better and innovative market strategies that assist in securing its position and adds up to its expansion. Even though most purchases made on eBay are generalized daily items such as clothing, jewelry, etc. but they also provide and consist of a much larger inventory comprising of a diverse range of goods and products.

The most unique and wholesale aspect of eBay is its distinctive style to auction goods. There this distinctive tactic is a key reason for their success and highly driven customer attraction. With daily consuming products and a wider range of goods such as gadgets and exclusive products eBay also offers wholesale based goods that help extend their inventory while attracting new and larger audiences.

eWorldTrade

eWorldTrade has proven to be truly amazing indeed when spoken of how much it has accomplished over its relative short spam since initiated. It has attained a large market worth due to its extensive growth in regards to the wide-ranging product, service, and demand from customers. This all has added up to its reputation over the years. eWorldTrade has widespread out operations that are distributed all around the world even though it is based in the USA.

A crucial reason why eWorldTrade has been able to drive its sales to such remarkable heights is by presenting the most reasonable wholesale prices which have influenced the audience’s attraction towards it. eWorldTrade has mastered the art to provide its customers with convenient bulk services while not jeopardizing the quality of any of the purchases made. Being the only platform that can cater to every order placed no matter of how quantitative the order is and even then eWorldTrade ensures to deliver as committed during the initial correspondence.

B2B wholesale platforms are known to have a wide range and huge inventory but delivering the goods as promised while maintaining the quality is something the only eWorldTrade has been able to secure with the highest customer satisfaction rate. eWorldTrade has the latest most tech advancements as assistance that allows it to deliver the fastest most delivery services in the industry.

Global Source

Global Source which is also referred to as GSOL. It is privileged enough to be one of the very first B2B platforms to be listed in NASDAQ. Global Source is most recognized for having a wide range of wholesale suppliers who are available from all across every industry. To this point, it is famously found to be of assistance to a business that suppliers are found paying minimal amounts to be presented as a verified supplier over the platform to attract higher consumers.

Global Source has a huge residing presence of suppliers available from which the most suitable according to requirement can be selected from. It consists of an entire dictionary that possesses various manufacturers and suppliers that are mostly based from china and are reputable B2B suppliers. Global Source has achieved numerous global acclamations and awards for its incredible services.

Categories: Others Tags:

The Rise of the Electric Scooter

September 12th, 2019 No comments
ev-battery-costs

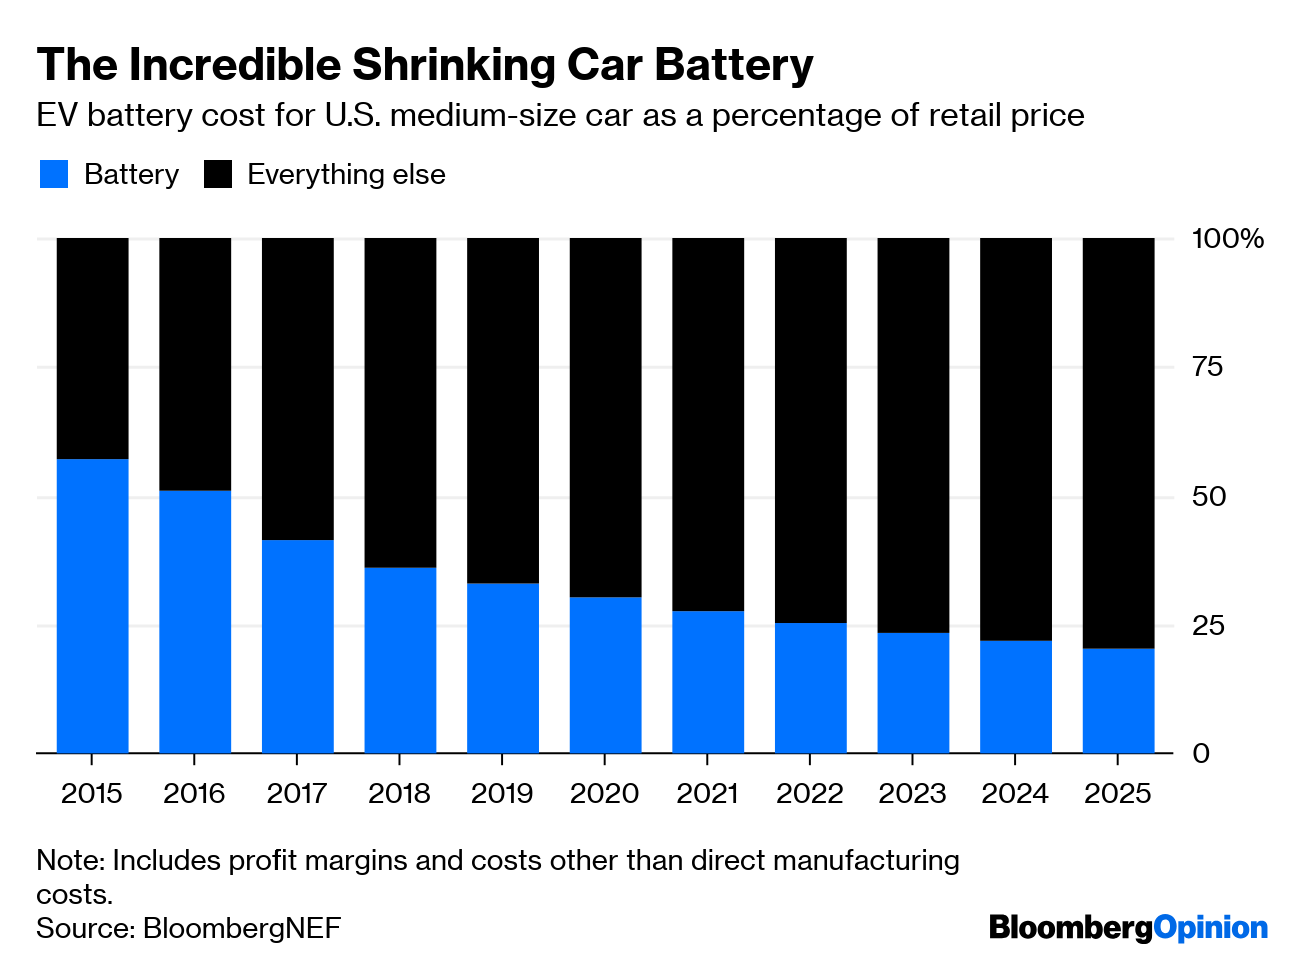
In an electric car, the (enormous) battery is a major part of the price. If electric car prices are decreasing, battery costs must be decreasing, because it’s not like the cost of fabricating rubber, aluminum, and steel into car shapes can decline that much, right?

On an electric scooter, though, the effect of battery price has to be even more dramatic because scooters are such lightweight, compact, and simple machines. They aren’t much more than a battery and an electric motor to begin with. Consider the the Zappy electric scooter from twenty years ago.

zappy-electric-scooter-year-2000

What killed the electric scooter back then is the same thing that killed the electric car of year 2000: terrible lead-acid battery technology. It’s too heavy, it lacks power, it doesn’t have enough range, it takes too long to charge. These are all different ways of saying the same thing: the battery sucks. It wasn’t until Lithium Ion batteries matured that both the electric car and the electric scooter — and pretty much electric everything, if you think about it — became viable.

Thus, one way to see if Lithium Ion battery prices are indeed generally dropping independent of all other manufacturing concerns is to examine the cost of electric scooters over the last few years. Let’s consider one of the most popular models, the Xiaomi Mi M365:

This graph only shows roughly two years, from January 2018 to now; it looks like the original price for the Xiaomi M365 when it hit the US market in early 2017 was around $800. So the price of a popular, common electric scooter has halved in three years. Very good news indeed for electric vehicles of all types!

This dramatic drop in electric scooter price from 2016 to 2019 may not be surprising if you consider the parallel rise of the quasi-legal electric scooter smartphone app rental industry over roughly the same time period, in the form of Bird, Lime, Skip, Spin, Scoot, etc.

electric-scooter-rentals-bird-lime

Early versions of Bird scooters were actual Xiaomi M365s, slightly modified for rental. Only by late 2018 they had migrated to custom built, ruggedized scooters optimized for the rental market. The rental industries have their own challenges, and ironically have started to pivot to monthly rentals rather than the classic 15 cents per minute.

Bird has experimented with its business model in recent months. In early March, the company altered its repair program in Los Angeles, which had relied on gig workers to fix broken scooters. It moved repairs in-house (though scooters are still charged each night by an army of gig workers). Later that month, the company introduced scooters with locks in some markets, in a bid to prevent theft and vandalism.

In April, it announced the launch of a more traditional rental program in San Francisco and Barcelona, in which users could pay $25 per month to rent a Xiaomi m365 from the company rather than paying per ride.

But this isn’t meant to be a blog entry about the viability of scooter rental company business models.

I want to consider a more fundamental question: are electric scooters the future of transportation?

Consider that even Uber, as screwed up of a company as they still are, knows cars are overkill for a lot of basic transportation needs:

Uber believes their current micro fleet of ebikes and scooters can displace trips under 3 miles.

46% of Uber’s rides are under 3 miles ? pic.twitter.com/OFmb8arZ3j

— Micromobility Industries (@MicromobilityCo) April 12, 2019

We have plenty of scooters here at my house, and the family and I enjoy them greatly, but I have never actually ridden or owned an electric scooter. So I bought one. It is of course the popular, inexpensive, and well reviewed Xiaomi Mi M365.

m365-scooter

Here’s a picture of my electric scooter inside my electric car. (I apologize that I didn’t have an electric bicycle to park next to it for maximum smugness, but you can bet your sweet electrons I’ll work on that next!)

electric-scooter-in-electric-car

Here’s the short version of my review: this electric scooter is incredibly fun, works great, and if you can get it for a price around $300, practically a no-brainer. I love it, my kids love it, and as long as you’re conceptually OK with the look, unlike Elon Musk ?? then you’ll probably love it too.

Here’s a neat video covering the “one year later” experience of owning the scooter, and what you might eventually run into or want to tweak.

(The main thing to take away from this video is that flats super suck on tires this small, so be warned. I put Slime in my Mi’s tires out of an abundance of caution, but you could also go with solid tubeless tires – at the cost of some ride comfort – if you’re really worried.)

That’s not to say that the electric scooter experience is perfect. There are some challenges with electric scooters, starting with the big one that your local government has no idea how to regulate the darn things. Even simple questions are difficult to answer:

  • Is this regulated like a bicycle? If not, why not?
  • Are electric scooters allowed on the sidewalk?
  • Do you have to ride them in the road, with cars … uh, depending on the speed limit?
  • Do you need a driver’s license? Do you need a helmet?
  • Are you even allowed to legally ride them in public at all outside of private property?

The answers also vary wildly depending on where you live, and with no consistency or apparent logic. Here are the current electric scooter laws in California, for what it’s worth, which require the rider to have a valid driver’s license (unlike electric bicycles, by the way) and also disallow them from sidewalks, both of which I feel are onerous and unnecessary restrictions.

One aspect of those laws I definitely agree with, however, is the 15 mile per hour speed restriction. That’s a plenty brisk top speed for a standing adult with no special safety equipment. Anything faster starts to get decidedly … uncomfortable. Consider this monster of a 1165Wh electric scooter, with dual motors and dual suspension that goes up to forty freakin’ miles per hour.

That … is … terrifying. Even the reviewer, in full motorcycle safety gear, wasn’t willing to push it all the way to 40 MPH. And I don’t blame him! But now that I’ve shown you the undisputed Honda Civic everyman budget model of electric scooter in the M365, hopefully this gives you a taste of the wider emerging diversity in these kinds of minimalistic electric vehicles. If you want a luxury electric scooter, an ultralight electric scooter, a rugged offroad electric scooter … all things are possible, for a price.

Another reason the M365 is available for so cheap is that is successor, the Xiaomi M365 Pro, was recently released, although it is not quite possible to obtain in the US at the moment.

Having ridden my M365 a fair bit, I can confirm all the Pro improvements are welcome, if incremental: bigger battery and disc brake, more power, better display, improved latch mechanism, etc.

xiaomi-mi-m365-vs-pro

None of those Pro improvements, however, are worth a 2× increase in price so I’d recommend sticking with the M365 for now because its value proposition is off the charts. Did I mention there’s a bluetooth connection, and an app, and it is possible to hack the M365 firmware? Pretty cool how electric vehicles are inherently digital, isn’t it?

Here are a few other observations after riding my M365 around a fair bit:

  • Please be respectful around pedestrians. Most of the sidewalks around here are not busy at all, but the people I encountered on the electric scooter were definitely more freaked out than I’ve seen before when using regular kick scooters (or skateboards) on the sidewalk, which did surprise me. An electric scooter has more heft to it, both physically at 26 pounds, and in the 15 mile per hour speed it can reach – but also mentally in terms of how it looks and how people approach it. I recommend slowing down to just above walking speed when encountering pedestrians, and if there is a bike lane available, I’d definitely recommend using that.

  • Hills work great. The kryptonite of traditional kick scooters is hills, and I’m pleased to report that even with a cough sizable adult such as myself riding, I was able to sustain a respectable above-walking speed on most reasonable hills. Where I looked at a hill and thought “this probably should work”, it did. That’s impressive, considering this isn’t the upgraded Pro model with bigger battery and more powerful motor. On flats and downhills the performance is superb, as you’d expect. That said, if you are a really big or tall adult, wait for the Pro model or an equivalent.

  • Portability is good, but borderline. At ~26 pounds, the electric scooter is reasonably portable, but it’s not something you a) could really get away with taking inside a restaurant / store with you to prevent theft or b) want to be carrying around on your person for any significant length of time. It’s not nearly as nimble or portable as a kick scooter, but that’s a high bar. You’ll need to carry a bike lock and think about how to lock your scooter on bike racks, which turned out to be … more geometrically challenging than I anticipated due to the small tires, disc brakes, and the engine in the front wheel. They need more obvious locking points on the chassis.

To be honest with you I’m still bitter about the whole Segway debacle. There was so much hype back in the day. That ridiculous thing was supposed to change the world. Instead, we got … Paul Blart Mall Cop.

paul-blart-segway

A Segway was $5,000 at launch in 2001, which is a whopping $7,248 in inflation adjusted dollars. Here in 2019, cheap $200 to $300 electric scooters are basically the transformational technology the Segway was supposed to be, aren’t they? Are electric scooters the future of (most) transportation? I’m not sure, but I like where we’re headed, even if it took us twenty years to get there.

Categories: Others, Programming Tags: