Archive

Archive for May, 2020

Inspired Design Decisions With Max Huber: Turning Mundane Subjects Into Exciting Visual Communication

May 22nd, 2020 No comments
designs by Nitsche and Pintori

Inspired Design Decisions With Max Huber: Turning Mundane Subjects Into Exciting Visual Communication

Inspired Design Decisions With Max Huber: Turning Mundane Subjects Into Exciting Visual Communication

Andrew Clarke

2020-05-22T09:00:00+00:00
2020-05-23T19:38:12+00:00

Years ago, I wished I could work on advertising projects for household names because I thought that above-the-line work would bring creative satisfaction. I’ve been lucky to work with many well-known businesses and charities, but looking back, my smaller projects were the most satisfying creatively.

Often, big brands have already established guidelines which mean there’s less room for me to experiment and exercise my creative muscles. I’m not saying brand guidelines are unimportant, but I prefer to work on projects where I feel I add the most value and a little of myself.

These days, product companies seem more interested in refining interfaces and simplifying user experiences. I value those things when I use a product, but I find working on these projects less rewarding. Well-known clients still have a certain allure — and having logos in my portfolio has been good for business — but I now look for projects which offer me the freedom to develop my creative interests.

I’m fascinated by how design can tell engaging stories about products and services, even those which might be considered mundane by some. I enjoy exploring how images, layout, and typography can be used to communicate messages in visually distinctive ways. Above all, I love using my experience and interests in art direction and graphic design to help businesses, charities, and sometimes individuals, who might otherwise be exposed to them.

“I do not attempt to speak on behalf of the machines. Instead, I have tried to make them speak for themselves, through the graphic presentation of their elements, their operations and their use.”

— Giovanni Pintori

Even highly regarded, well-known designers spent time working with mundane subjects and produced iconic work. After moving from Switzerland to the United States, Erik Nitsche for magazines including Harper’s Bazaar, Life, and Vanity Fair. But it’s his work for General Dynamics which became his most recognized. In his five years as an art director at the aerospace and defence company, Nitsche developed an information design system which resulted in annual reports, posters, technical data, and Dynamic America, a 420-page book tracing the company’s history.

Italian designer Giovanni Pintori worked for business products manufacturer Olivetti for 31 years where the simple style and geometric shapes he applied to advertisements, calendars, and posters developed into the company’s design vocabulary.

designs by Nitsche and Pintori

1 & 2: General Dynamics design by Erik Nitsche. 3 & 4: Olivetti designs by Giovanni Pintori. (Large preview)

Born in Switzerland, Max Huber also spent most of his career working in Italy. While his portfolio contains work for many leading Italian brands, his food labels and wrapping paper designs for La Rinascente supermarkets are fascinating too.

What these three designers, and plenty more like them, can teach us that even the most mundane subjects can offer exciting opportunities to communicate through design. And that’s something I try to remember every day.

Read More From The Series

Inspired By Max Huber

Although less well known than many of his contemporaries, Max Huber was one of Switzerland’s most distinguished designers. Born in Baar in 1919, Huber moved between Switzerland and Italy until the end of the Second World War.

In his early career in Milan, Huber worked at the studio of Antonio Boggeri where he was influenced to mix media, including illustration, photography, and typography. From 1950–1954, Huber worked for the high-end Italian department store chain La Rinascente and won the first of its Golden Compass (Compasso d’Oro) awards in 1954.

In the 1940s, Milan was the centre of Italy’s avant-garde movement. While there, Huber mixed with artists, designers, and intellectuals. This mixture stimulated Huber, and he experimented blending creative work from many disciples.

Huber never took these influences at face value. He manipulated photographs, cut subjects from their backgrounds, and mixed them with blocks of color and shapes. Colorful strips add movement to Huber’s designs and his poster designs for Monza Autodromo — Milan’s famous race track — are as exciting as the races themselves.

Huber often used flat shapes — arrows, circles, and swirling patterns — and overlapped them with monochrome and duotone photographs. His record cover designs and the cases he made for his own jazz collection, swing with energy.

While not always recognized for his skill as a typographer, Huber’s work is filled with inspiring typography. He effortlessly switched between modern serif and contemporary sans-serif typefaces and seemed comfortable when using both. While the Swiss style is most associated with Neo-grotesque sans-serif typefaces, Huber’s work with serifs is equally inspiring.

Huber defined grids to emphasise text alignment, then used large headlines followed by text in a strict hierarchy. But he was also unafraid of playing with type, setting it at unusual angles and experimenting with perspective.

From the 1960s until death in 1992, Huber worked on a variety of commissions including a brand redesign and a jazz-based wallpaper design which featured Louis Armstrong, which he called Rhythm. His client, Oscar Braendli, commissioned Huber to design exhibitions.

Huber also designed for Adriano Olivetti and embraced these projects with the same enthusiasm for experimentation. Both are clear examples of how distinctive design can turn even the most mundane subjects into exciting visual communication.

They prove that synergy and trust in a relationship between client and designer can bring extraordinary results which can last for decades.

Although his signature style developed throughout his lifetime, Huber’s commitment to experimenting remained. Even he included individual elements of his style — bold blocks of color, iconic shapes, photographic manipulation, and strong typography — throughout his lifetime, Huber built a portfolio of work which is remarkably varied. In later life, Huber taught graphic design in the southern Swiss town of Lugano, which coincidentally is where I stay when I work in Switzerland. He died in Mendrisio — where my Swiss office is located — in 1992 and there’s a museum dedicated his work in nearby Chiasso.

There’s been only one book on Max Huber and you should find space for it on your bookshelf or coffee table. “Max Huber” (2006) by Stanislaus von Moos, Mara Campana, and Giampiero Bosoni. It’s a thorough catalogue of work from throughout his career written by people who knew Max Huber personally.

magazine covers and a festival poster

From left: Rivoluzione Industriale magazine, 1960. Imbalaggio magazine cover, 1955–65. Electroacoustic Radio and Television: Electronic Parts catalogue cover, 1969. 12th Contemporary Music International Festival poster designed by Max Huber, 1949. (Large preview)
Identifying Old Style (Humanist) Typefaces

The periods where design changes often go step-by-step with advances in technology. What’s true of the web today — and how developments in CSS affect what’s possible online — was also the case with early typography developments. Some early typefaces were Humanist because their origins were in handwriting from the middle of the fifteenth century.

But when steel punchcutting techniques — the metal blocks used for typesetting until the nineteenth century — became more precise, typefaces became more refined.

This precision allowed type designers to add flourishes to what we now call Old style typefaces.

typefaces

Left: Jenson Pro (Humanist) Right: Garamond Pro (Old style). (Large preview)

Whereas Humanist typefaces commonly include a lowercase “e” with a slanted crossbar, Old style typefaces introduced a horizontal crossbar.

Stress in a typeface is the angle drawn between thinner parts of a letter. In typefaces with vertical stress, this line is drawn vertically from top to bottom. In typefaces with a diagonal (Humanist) stress, the line between the thinnest parts of a letter is drawn at an angle.

Old style typefaces continue in the Humanist style of diagonal stress, but have more contrast between their thickest and thinnest strokes. Old style typefaces are frequently bracketed as they have curves which connect their serifs to a stroke.

old style typefaces

Left: Garamond Pro Right: Jenson Pro. (Large preview)

old style typefaces

Left: Minion Pro Right: Palatino. (Large preview)

Baskerville was designed in the 1750s by John Baskerville. His typefaces have remained popular, and there are many modern interpretations. Garamond-style fonts remain popular in print design, and Monotype Garamond is bundled with several Microsoft products.

Old Style Type

design inspired by Max Huber

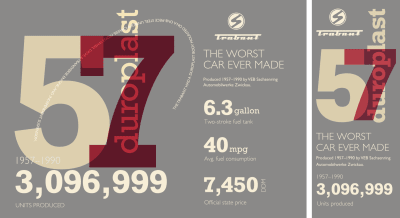
Left: My large-screen design, inspired by Max Huber. Right: A Trabant emblem remains circular while filling any available space. (Large preview)

Despite its unconventional layout, I need only four conventional elements to develop this old-style design. A header, banner division, paragraph, and footer element:

<header>…</header>

<div id="banner">…</div>

<p>…</p>

<footer>
<svg>…</svg>
</footer>

As I’ve shown in past issues, my process begins by adding foundation styles including this Old style typeface:

body {
background-color: #6e2838;
font-family: "old-style";
color: #f7eed7; }

A Trabant header dominates my design on even the smallest screens. This header blends two images. The first is a scalable SVG Trabant logo mark. To hide this presentational image from assistive technology, I add an ARIA role and set its hidden attribute to true. Then, I add a different ARIA role of img to the second image, a picture of what’s been called “the worst car ever made:”

<header>
<img src="header.svg" alt="" role="presentation" aria-hidden="true">
<img src="header.png" alt="Trabant" role="img">
</header>

I need the large Trabant logo to remain perfectly circular whatever the width of its parent element. An aspect ratio is a ratio between an element’s width (x) and height (y.) A 1:1 ratio for squares, 1.618:1 is the golden ratio, and 16:9 for widescreen media.

A popular technique for maintaining intrinsic ratio was developed in 2009 by Thierry Koblentz, and it uses padding-top applied to an element or a pseudo-element inside it. Different padding percentages create different ratios:


1:1          100%
4:3          75%
16:9         56.25%

This logo is circular, so the box it occupies should always remain square. I add a :before pseudo-element and set its top padding to 100%:

header:before {
content: "";
display: block;
padding-top: 100%; }

I now have three elements inside my header. By placing the pseudo-element and my images into the same grid area, CSS Grid makes stacking them easy:

header {
display: grid; }

header:before,
header img {
grid-column: 1;
grid-row: 1; }

To centre these images horizontally and vertically — no matter how wide or tall they might become — I align and justify them both to the center:

header {
align-items: center;
justify-content: center; }

Finally, to blend the photograph of my Trabant and its SVG logo together, I add a mix-blend-mode with a value of overlay:

header img:last-of-type {
mix-blend-mode: overlay; }

My banner division contains a large two-tone headline followed by three short paragraphs:

<div id="banner">
<h1>Sparkplug <span>with a roof</span></h1>
<p>VEB Sachsenring Automobilwerke Zwickau</p>
<p>Manufactured in East Germany</p>
<p>1957–1990</p>
</div>

I align this headline to the right, then tighten its leading to complement its large size. Then, I apply an accent color to the span element inside which adds the two-tone effect:

h1 {
font-size: 4.875rem; 
line-height: 1.1;
text-align: right; }

h1 span {
color: #f85981; }

To de-emphasise the banner’s second paragraph, I use an :nth-of-type pseudo-class selector and reduce its size:

#banner p {
font-size: 1.424rem; }

#banner p:nth-of-type(2) {
font-size: 1rem; }

With those foundation styles in place for every screen size, I introduce layout for medium-size screens by adding a three-column symmetrical grid with three automatically sized rows:

@media (min-width: 48em) {

body {
display: grid;
grid-template-columns: repeat(3, 1fr);
grid-template-rows: auto auto auto;
padding: 4rem; }
}

The header and banner division both fill the full width of my layout. I place the banner into the first row, even though it comes second in my HTML:

header,
#banner {
grid-column: 1 / -1; }

header {
grid-row: 2 / 4; }

#banner {
grid-row: 1; }

Adjusting type sizes to maintain a balanced hierarchy is one of the most satisfying aspects of developing designs across screen sizes. It’s also one of the most challenging. I increase the size of the headline and two paragraphs by moving them up my typographic scale:

h1 {
font-size: 8rem; 
line-height: 1.1;
text-align: center; }

#banner p {
font-size: 2.027rem; }

#banner p:nth-of-type(2) {
font-size: 1.266rem; }

My header dominates a large screen by filling half its width, and I balance its visual weight with the remaining content, including the oversized headline. Although this design appears asymmetrical, it’s grid is symmetrical and contains six even-width columns:

@media (min-width: 82em) {

body {
grid-template-columns: repeat(6, 1fr); 
grid-column-gap: 2vw;
grid-row-gap: 2vh; }
}

The header covers the first three columns and all three rows in my layout:

header {
grid-column: 1 / 4;
grid-row: 1 / 4; }

I need to place the banner’s headline and division onto my grid, and not the banner which contains them. I change the display property of that division to contents, which effectively removes it from the DOM for styling purposes:

#banner {
display: contents; }

I place the banner’s child elements opposite my header using column and row line numbers. Next, I increase the size of my headline again, then place the division and paragraph of running text, leaving the column before them division empty. This creates a space for my footer:

#banner h1 {
grid-column: 4 / -1;
grid-row: 1;
font-size: 6.5rem; }

#banner div {
grid-column: 5 / -1;
grid-row: 2; }

body > p {
grid-column: 5 / -1;
grid-row: 3; }

Finally, I place the footer alongside my running text which adds to the asymmetric look of this Old style design:

footer {
grid-column: 4;
grid-row: 3; }

poster by Max Huber

Poster for Museum Bellerive by Max Huber, 1969. (Large preview)

Fusing illustration and photography with bold shapes and clear typography was a defining aspect of Huber’s signature style. By choosing contemporary Old style typefaces and using today’s technologies — including blend-modes and web fonts — we can follow Huber’s example and create modern-day designs with a classic feel.

Huber's design

From left: Garamond Pro, Jenson Pro, Palatino. (Large preview)
Transitional Typefaces

During the 17th century, The Age of Enlightenment was an intellectual movement which rejected traditional art, literature, and philosophy. In 1692 Louis XIV commissioned a new typeface which was based on scientific principles rather than calligraphy. The result was Romain du Roi, a typeface with letters based on a grid of 2,304 squares.

Romain du Roi was more precise in its design than most previous typefaces and featured strokes with a sharper contrast between thick and thins. It influenced now-famous type designers John Baskerville, Giambattista Bodoni, and William Caslon. Their work removed all traces of Humanist calligraphy to create Transitional (neo-classical) typefaces which took advantage of new inks and better quality papers.

In transitional typefaces, lowercase letters have vertical, or almost vertical, stress. The head serifs on ascending letters including “b,” “d,” “h,” and “l” are usually more horizontal. The ends of many strokes are marked by ball terminals in place of angled or blunt or serifs.

typeface

Mrs Eaves. (Large preview)

typeface

Times New Roman. (Large preview)

Contemporary transitional typefaces are popular, including Cambria which was designed by Jelle Bosma in 2004 for Microsoft’s ClearType Font Collection. Cambria was released with Windows Vista. Georgia was designed by Matthew Carter in 1993. Designed by Zuzana Licko in 1996, Mrs Eaves is a Baskerville variant and was named after Sarah Eaves, John Baskerville’s wife.

Identifying Modern Typefaces

While Old Style and Transitional typefaces heightened the contrast between thick and thin strokes, Modern typefaces took this characteristic to the extreme. The term Modern can be misleading as the first typeface in this style was designed in 1784 by Firmin Didot. Didot was the son of François-Ambroise whom several typefaces including Ambroise and, of course, Didot are named after.

Giambattista Bodoni gave his name to Didone style typefaces with a sudden change in contrast between thick and thin strokes. These typefaces also feature unbracketed serifs with sharp angles between thicks and thins, vertical axes, and small apertures in open letters, including the lowercase letter “a.”

typeface

Left: Ambroise Std. Right: Cabrito Didone. (Large preview)

typeface

Left: Didot. Right: Moderno FB. (Large preview)

Modern typefaces are often seen as elegant and stylish choices. This is why, when you browse shelves full of fashion magazines, you’ll find they often use Didone typefaces for their mastheads.

But those same characteristics — extreme contrast, smaller apertures, and vertical axes — are also found in modern typefaces with very different personalities.

modern typeface

Left: Blenny. Right: Dedica. (Large preview)

modern typeface

Left: Ohno Blazeface. Right: Lust. (Large preview)

Modern Typefaces

design, inspired by Max Huber

Left: My large-screen design, inspired by Max Huber. Right: A blended background adds depth to this design at all screen sizes. (Large preview)

I need just three structural elements to implement my next Huber-inspired design; a header which contains the two Trabant logos, a banner division, and my main content:

<header>
<div><svg>…</svg></div>
<div><svgv…</svg></div>
</header>

<div class="banner">…</div>

<main>
<ul>…</ul>
<p>…</p>
</main>

These foundation styles add personality to every screen, whatever its size. They add a modern high-contrast typeface and a background blending an outline of the Trabant with a linear gradient to adds depth to this design:

body {
background-color: #34020B;
background-image: url(body.svg),
linear-gradient(180deg, #6E2838 0%, #98304D 21%, #34020B 99%);
font-family: "modern";
color: #fff; }

I position the Trabant blueprint half-way horizontally, while the gradient repeats across my page:

body {
background-position: 50vw 2rem, 0 0;
background-repeat: no-repeat, repeat-x; }

The banner includes a large headline. I add explicit line breaks to my HTML and a span element to add color to specific words. Then, I group the paragraphs in my banner into a division. This will allow me to alter its position within my layout on larger screens later in the process:

<div id="banner">
<h1>The worst <span>
car 
ever made</span></h1>
<div>
<p>VEB Sachsenring Automobilwerke Zwickau</p>
<p>Manufactured in East Germany</p>
<p>1957–1990</p>
</div>
</div>

The position of my blueprint background image leaves room for a large headline. To make sure it doesn’t escape the space I’ve allowed for it, I restrict this headline’s maximum width to half the viewport width:

#banner h1 {
max-width: 50vw; }

Then, I add color to the span element and size the banner’s type, increasing the headline size and reducing its leading to create a solid block of text:

#banner h1 {
font-size: 4rem;
line-height: 1;
text-transform: uppercase; }

#banner h1 span {
color: #f85981; }

#banner p {
font-size: 1.424rem; }

#banner p:nth-of-type(2) {
font-size: 1rem; }

This design includes a list of Trabant specifications; its fuel capacity and consumption, plus the car’s price, which was defined by the East German government:

<li>
<h3>Two-stroke fuel tank</h3>
<p><b>6.3</b>gallon</p>
</li>

<li>…</li>
<li>…</li>

This HTML order makes sense when reading without styles, but I need the headline and paragraph combination reversed visually to form a tighter block of copy. I flip the order of my headline and paragraph by specifying list items as flex containers and changing their default direction from row to column-reverse:

li {
display: flex;
flex-direction: column-reverse; }

ul p {
font-size: 1.802rem; }

ul p {
color: #f85981; }

Numeral design is an important consideration when choosing a typeface. Your choice might depend on clarity and readability when the type is set at small sizes. The numerals in many characterful modern typefaces have distinctive curves and other characteristics which can contribute to the personality of a design when used at larger sizes.

I want to make a feature of the numerals in this design, so I oversize the bold element. And while I wouldn’t normally advocate altering the tracking of any typeface, increasing the letter-spacing of these numerals helps to accentuate their character:

ul p b {
font-size: 4.5rem;
letter-spacing: .05em;
line-height: .8;
color: #fff; }

The price in my list of specifications also includes a span element which contains the East German currency code, DDM:

<li>
<h3>Official state price</h3>
<p><b>7,450</b> <small>DDM</small>
</li>

To me, every typographic element — no matter how small — is an opportunity to experiment with interesting type treatments. The tiny footprint of this small element makes it perfect for rotating into a vertical position so it sits neatly alongside the large numeral:

ul p small {
font-size: .889rem;
text-align: right;
transform: rotate(180deg);
writing-mode: vertical-rl; }

This level of typographic detailing might seem excessive for foundation styles, but I put as much thought into designing type for small screens as I do into a layout for larger ones.

storyboard

Before implementing any design, I make a simple storyboard to demonstrate how my elements will flow across a selection of screen sizes. (Large preview)

It also means I need only make minor adjustments for medium-size screens, first by changing the color values in my CSS gradient background and repositioning my Trabant blueprint to the centre of the screen and 30rem from the top:

@media (min-width: 48em) {

body {
background-image: url(body.svg),
linear-gradient(180deg, #6E2838 0%, #98304D 20%, #34020B 100%);
background-position: 50% 30rem, 0 0; }
}

Introducing layout to medium-size screens involves little more than placing the two header logos at opposite sides of the screen. I add two symmetrical columns to the header and align the logos to balance their centre lines:

header {
display: grid;
grid-template-columns: 1fr 1fr;
align-items: center;
width: 100%; }

I align the first logo to the left and the second to the right:

header > *:first-child {
text-align: left; }

header > *:last-child {
text-align: right; }

Supersizing a headline is a fabulous way to showcase the intricate details in many modern typefaces, so I increase its size and utilise the whitespace I added to my HTML to split its words across three lines:

#banner h1 {
white-space: pre;
max-width: 100vw;
font-size: 8rem; }

Whereas on small screens, the banner’s paragraphs follow the headline as they do in the HTML, I want to combine them with my headline to create an interesting typographic element.

I use absolute positioning to move the division which contains these paragraphs into place. The text-based top and left values allow these paragraphs to stay in the correct position when the headline changes size:

#banner {
position: relative;
margin-bottom: 25rem; }

#banner div {
position: absolute;
top: 8.25em;
left: 20em; }

For my final medium-size screen adjustment, I turn my unordered list into a flex container and set its items to occupy an even amount of available horizontal space:

ul {
display: flex; }

li {
flex: 1; }

Adapting a design for several screen sizes is a challenge I really enjoy. To make use of the extra space available on large screens, I apply grid values to the body element to create three symmetrical columns:

@media (min-width: 82em) {

body {
display: grid;
grid-template-columns: repeat(3, 1fr);
grid-column-gap: 2vw; }

Elements in this design don’t overlap, so I use grid-template-areas for their simplicity. This design has nine grid areas, and I give each one a name which reflects its content; header, banner, data, and main:

body {
grid-template-areas: 
"header header ."
"banner  banner data"
". . main"; }

poster by Max Huber

Burattini, marionette, pupi poster designed by Max Huber, 1980. (Large preview)

I place those elements using area names which allows me to change where they appear in my layout without altering their position in my HTML:

header {
grid-area: header; }

#banner {
grid-area: banner; }

main {
display: contents; }

main > p {
grid-area: main; }

ul {
display: block;
grid-area: data; }

design by Max Huber

From left: Cabriro Didone, Didot, Lust. (Large preview)
Spotting Slab Serif (Egyptian) Typefaces

This final serif typeface classification first appeared in early 19th-century advertising posters and — with its blocky letterforms — was designed to capture attention. One defining feature of a Slab serif is an often unbracketed serif which meets the stem at a 90° angle.

serif typeface

Left: Archer. Right: Clarendon URW. (Large preview)

serif typeface

Left: Jubilat Bold. Right: Lexia. (Large preview)

Clarendon isn’t just the name of a typeface but of a style of Slab serif typefaces. While the letterforms in many Slab serifs have an even line width, the Clarendon style breaks convention with a more pronounced difference between the thickest and thinnest strokes. Unlike other Slab serifs, Clarendon has curved brackets.

Archer’s ball terminals give it a distinctive look which is popular with designers in print and online. Sentinel, also by Hoefler & Co., was used by Barack Obama in his 2012 reelection campaign. Like Archer, it comes in a variety of weights and includes an italic.

I chose ITC Officina Serif by Erik Spiekermann and Ole Schäfer for my first book Transcending CSS, even though at the time I wasn’t well-versed in typography design. FF Unit Slab, also by Erik Spiekermann, comes in several weights, italics, and support for 107 different languages.

Dalton Maag is the type foundry whose fonts I use most often. I’ve chosen their Lexia for my most recent book covers, and I love the personality of its thickest Advertising weight, especially in italics. You should be familiar with Mokoko, also by Dalton Maag, as I chose it for the headlines and titles in this series.

While Barack Obama chose his Slab serif from Hoefler & Co., fellow democratic candidate Bernie Sanders chose Jubilat by Joshua Darden for his 2016 presidential campaign. Jubilat is one of the most versatile Slab serifs and comes in 11 weights with matching italics.

serif typeface

Left: Mokoko. Right: Rockwell. (Large preview)

Slab Serifs Demand Attention

slab serif design, inspired by Max Huber

Left: My large-screen slab serif design, inspired by Max Huber. Right: A graphic introduction on small screens. (Large preview)

Developing my final design requires very few structural elements, despite its visual complexity. The elements I chose should seem familiar because I’ve used them already in several combinations.

The header again contains two SVG images, a banner division includes the headline and stand first paragraph, and an unordered list which displays Trabant specifications. This time, I also include two SVG elements. One for the massive 57 numerals, the second for the decorative text which follows a curved path:

<header>
<svg>…</svg>
<svg>…</svg>
</header>

<svg>…</svg>

<div id="banner">…</div>
<div id="content">…</div>

<ul>…</ul>

<div id="curve">
<svg>…</svg>
</div>

Bringing three of those elements together forms a graphic introduction to this design. I start with foundation styles which include color and introduce the slab serif typeface:

body {
background-color: #8a8988;
font-family: "slab";
color: #f7eed7; }

I limit the width of my header to 220px and centrally align its content:

header {
margin-bottom: 2rem; 
width: 220px;
text-align: center; }

To give me accurate control over their appearance, and to enable them to scale to fit the width of any viewport, I developed my oversized numerals using SVG. This scalable graphic includes two paths and to ensure it communicates its content to everybody, I add an ARIA label and a title element to my SVG:

<svg xmlns="http://www.w3.org/2000/svg" viewBox="0 0 750 690" role="img" aria-label="1957. The year Trabants were first produced">
<title>The year 1957</title>
<path d="…"/>
<path d="…"/>
</svg>

The two numerals in this SVG overlap, so to add depth; I lower their opacity, then use a blend-mode to mix their colors:

body > svg path {
opacity: .75; }

body > svg path:nth-of-type(1) {
fill: #f5e3B4; }

body > svg path:nth-of-type(2) {
fill: #ba0e37;
mix-blend-mode: multiply; }

The final component in my introduction graphic is the vertical word “Duroplast,” the fibre-reinforced plastic used to make Trabant bodies. You can look for this element in my HTML, but you won’t find it, because I generate this content using a pseudo-element. I position the generated content, change its writing-mode to vertical, then rotate it by 180 degrees:

body {
position: relative; }

body:after {
content: "duroplast";
position: absolute;
top: 2rem;
right: 2rem;
font-size: 7rem;
transform: rotate(180deg);
writing-mode: vertical-rl; }

As this pseudo-element effectively follows the flow content, it appears above it in the stacking order, making it possible to blend it with other elements and add extra depth to this design:

body:after {
mix-blend-mode: overlay; }

The number of Trabants produced during its lifetime is developed using a lower-level heading, followed by two paragraphs:

<div id="content">
<h3>Units produced</h3>
<p>1957–1990</p>
<p>3,096,999</p>
</div>

The visual order of these elements is different from that HTML, and I use Flexbox to change their order within their parent division. First, I change the flex-direction from the default row to column:

#content {
display: flex;
flex-direction: column; }

Then, I use the order property to reorder the three elements, placing my headline last:

#content h3 {
order: 3;
font-weight: normal;
text-transform: uppercase; }

Finally, I increase the size of my second paragraph to match the list-item numbers below. This gives the impression this content and the unordered list which follows are part of the same element:

#content p:nth-of-type(2) {
font-size: 4.5rem; }

Space on small screens may be at a premium, but that doesn’t mean we can’t be bold with our typography. As screens become larger, there are even more opportunities to be adventurous with typographic designs.

I introduce layout to medium-size screens by applying grid values to the body element to create six symmetrical columns and four automatically sized rows:

@media (min-width: 48em) {

body {
display: grid;
grid-template-columns: repeat(6, 1fr);
grid-template-rows: repeat(4, auto); }
}

Then, I place my header and banner division into the first row using line numbers. My banner occupies the first three columns, while the header fills the last three:

header {
grid-column: 5 / -1;
grid-row: 1; }

#banner {
grid-column: 1 / 4;
grid-row: 1; }

I place the now enormous numerals onto my grid and lower their z-index value so they appear behind other elements in my layout:

body > svg {
grid-column: 1 / -1;
grid-row: 2 / 4;
z-index: -1; }

I replace the previous :after pseudo-class positioning with grid values and increase its font-size to fill more of the space available:

body:after {
position: static;
grid-column: 4;
grid-row: 1 / 3;
z-index: 1;
font-size: 10rem; }

Despite being built on a symmetrical grid, leaving some columns empty creates an unusual asymmetrical design:

#content {
grid-column: 2 / -1;
grid-row: 3;
mix-blend-mode: difference; }

ul {
grid-column: 1 / -1;
grid-row: 4 / -1; }

I then increase the size of my type overall to make a big impression on medium-size screens:

#content h3,
#content p {
color: #31609e; }

#content h3 {
font-size: 1.75rem; }

#content p:nth-of-type(1) {
font-size: 3rem; }

#content p:nth-of-type(2) {
font-size: 8rem; }
SVG Text On Path

SVG text

Text which follows a path is one of the most exciting reasons to use SVG. (Large preview)

One of the most exciting reasons to use SVG for rendering text is so it follows a path, a design device which isn’t possible using CSS alone. My curvy SVG includes a rounded path, plus a text element which contains my content. I enclose this text within an SVG textPath element and use its href attribute value to link it to the ID of the path above:

<div id="curve">
<svg viewBox="0 0 750 700" xmlns="http://www.w3.org/2000/svg">
<path id="curve-path" fill="none" stroke="none" d="…"/>

<text>
<textPath href="#curve-path">…</textPath>
</text>
</svg>
</div>

I don’t want this curve to appear on small screens, so I change its parent division’s display value to none in my foundation styles. Using a min-width media query, I then revert that value to block to reveal it for medium-size screens, placing it onto my grid and increasing its z-index value. This brings it forward in the stacking order:

#curve {
display: none; }

@media (min-width: 48em) {

#curve {
display: block;
grid-column: 1 / 6;
grid-row: 2 / 4;
z-index: 2;
transform: translateY(-1.5rem); }
}

With this text in place, I use familiar font-size and text-transform styles, followed by SVG fill and text-anchor properties which sets my text from the start of its path:

#curve text {
font-size: .889rem;
text-transform: uppercase;
fill: #fff;
text-anchor: start; }

My confident typography choices demand I’m also courageous with my choice of layout for larger screens. The six symmetrical columns and four rows I chose earlier offer the potential to place my elements in any number of ways.

With all my typography styles already defined, all that remains is to move my elements into new positions which place the header, banner division, and unordered list alongside my now gigantic numerals:
record cover designed by Max Huber

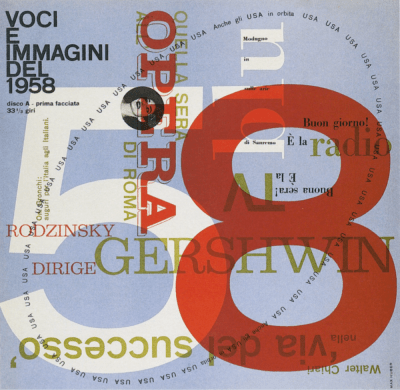
Voices and Images of 1958 record cover designed by Max Huber, 1958. (Large preview)
@media (min-width: 64em) {

body {
grid-column-gap: 2vw;
align-items: start; }

body > svg {
grid-column: 1 / 5;
grid-row: 2 / 5;
z-index: -1; }

header {
grid-column: 5 / -1;
grid-row: 1; }

#banner {
grid-column: 5 / -1;
grid-row: 2; }

#content {
grid-column: 1 / 4;
grid-row: 4; }

#curve {
grid-column: 1 / 5;
grid-row: 1 / 4; }

ul {
grid-column: 5 / -1;
grid-row: 3 / -1;
display: block; }
}

designs by Max Huber

From left: Mokoko, Jubilat Medium, Ohno Blazeface. (Large preview)

NB: Smashing members have access to a beautifully designed PDF of Andy’s Inspired Design Decisions magazine and full code examples from this article. You can also buy the PDF and examples from this, and every issue from Andy’s website.

Read More From The Series

(ra, yk, il)

Categories: Others Tags:

Digital Marketing in 2020 – Possibilities and Opportunities

May 22nd, 2020 No comments

It looks like 2020 is going to be a watershed year in many ways. The pandemic, COVID-19, has disrupted life as we know it, and the road back to normal is going to be a long one.

For companies reaching out to consumers, there are challenges as well as opportunities. Technology has evolved to make it possible to find several new ways to attract eyeballs and build loyalty.

Digital marketing is critical in leveraging and managing this change. As a previous survey indicated, Chief Marketing Officers were preparing for digital to grow to 75% of marketing budgets by 2020.

To overcome the competition, companies big or small cannot ignore the emerging trends. All of them are ways to streamline operations, enhance consumer experiences, and optimize lead acquisition. Services, tools, and techniques to enable all of this will be in high demand.

Possibilities for Small and Medium Businesses in 2020

Clearly, the priority is to contain the immediate fallout of the pandemic. Workplace safety measures and supply chains are among the aspects that are at the top of most lists.

However, augmenting and boosting digital marketing initiatives should not be ignored. A study showed that although 72% of small businesses focus on increasing revenue, they also see great value in establishing new customer relationships (60%) and marketing and advertising (46%).

In 2020, more than ever, small and medium businesses can harness digital marketing services to:

  • Compete with larger businesses in the same sector successfully
  • Learn more about consumer needs and motivations
  • Boost conversions by using an omnichannel approach

The above, as you know, can be done much more efficiently and affordably than traditional advertising. In fact, 70% of consumers prefer to learn about a product or service through content and articles, rather than Ads.

This is why:

  • 61% of small businesses invest in social media marketing.
  • Of the marketing tools employed by small businesses in 2019, 54% used email, 51% had a website, and 48% used social media.
  • Almost 90% of marketers say their social marketing efforts have increased exposure for their business, and 75% say they’ve increased traffic.

The aforementioned trends are only going to continue and grow in 2020.

The New Digital Marketing Landscape

Five trends seem to be the most prominent in defining the world of digital marketing services this year.

Some of these began a short while ago, but 2020 is set to be the time when they come into their own.

1. Marketing to Generation Z

Research has shown that by 2020, Gen-Z will account for 40 percent of all consumers, influencing nearly USD 4 billion in discretionary spending.

This is a generation that has come of age with digital content. It is savvy about issues like tone, language, and authenticity.

Values matter to them, and 68% say that it is important to do their bit to make the world a better place.

Therefore, a digital marketing campaign aimed at such consumers has to demonstrate purpose, personality, and a sense of meaning. It should emphasize experiences over products where possible.

Importantly, 53 percent state their favorite brand is able to “understand them as an individual.” And 76 percent want brands to respond to their voices and feedback. Responsiveness is a metric of a brand’s authenticity.

2. Greater Personalization

Whether it’s Gen Z or any other generation, personalization of marketing messages is important in attracting interest and eventual conversion. Along with investing in SEO services, businesses need to pay attention to content personalization.

According to research, 80% of consumers are more likely to do business with a company if it offers a personalized experience.

In 2020, tools and technology will enable even more data-driven ppc management campaigns that will tailor Ads to individual likes and dislikes.

Automation and machine learning tools can enable even a small company to deliver uniquely personal messages.

Purposeful and relevant content, targeted and useful recommendations, and insightful use of data are the other aspects that will come to the fore.

3. The Rise of Artificial Intelligence

The increasing use of Artificial Intelligence is shaping many of the ways in which digital marketing is evolving.

For example, it is being used to automate tasks, improve sales, and analyze marketing data in a pioneering new fashion.

Already, 54% of executives say that the AI solutions implemented in their businesses have increased productivity. And 61% of business executives say they are using AI to identify data opportunities that would otherwise be missed.

Another example is the way chatbots with machine learning capabilities can engage with previous conversational data to personalize future conversations.

According to Gartner, 85% of customer interactions in 2020 will be managed without a human. For customer service-oriented businesses, chatbots are going to replace a vast percentage of human involvement.

And apart from that, Artificial Intelligence is also expected to drive ideas for new products and services, reduce costs, optimize SEM services, and help businesses retain a competitive advantage.

4. More Interactive Content

Interactive content has been a great tool in terms of attracting and retaining consumers. The ways in which it is used are going to expand in 2020.

It has a 35% stake of the USD 200 billion advertising industry, and this is set to only grow. At present, 91% of buyers say they are looking for more interactive content online.

Social media posts from companies will start to look quite different, and there will be a rise in branded games. Content that is smartly optimized for mobile phone screens will rise. As well as the content used for search engine marketing will be purely interactive.

Other forms of interaction that marketers will explore are shoppable posts, 360-degree videos, AR/VR, polls, and quizzes.

5. Videos Will Grow in Popularity

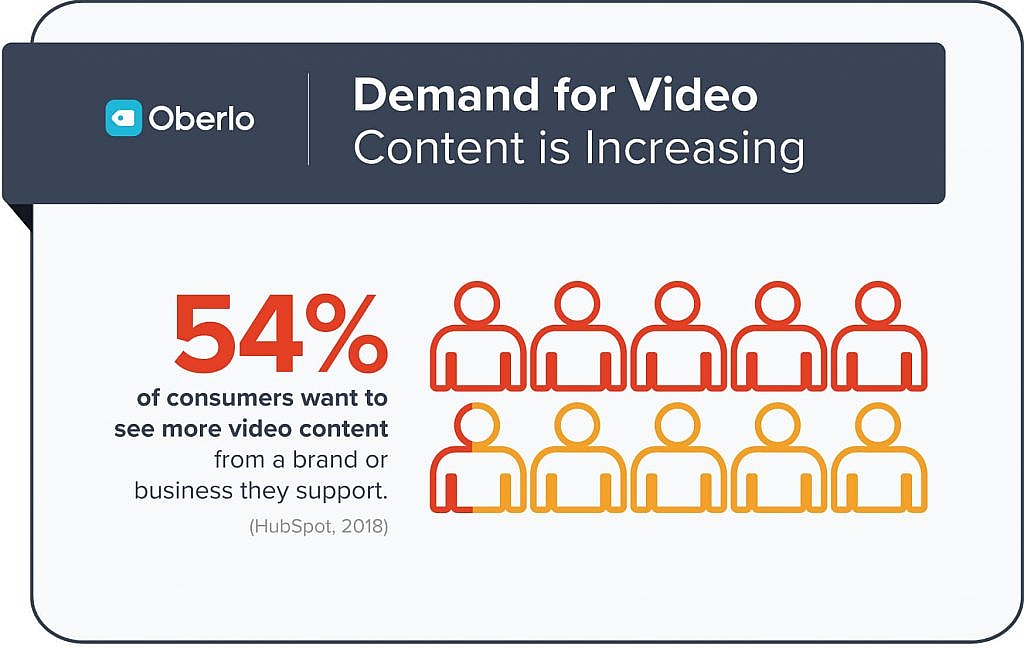
Video marketing strategies have been seen as effective ways of engagement. In fact, 70% of consumers say they have shared a brand’s video online, and 72% of businesses say video has improved their conversion rate.

With the increase in the number of videos, marketers will be making use of the latest techniques and focusing on the right areas to deliver returns.

Image source

Personalization is one of the ways in which videos will change. Further, a data-first approach to ensure that the right message reaches the right consumer at the right time is increasingly going to be applied to video marketing in 2020.

Though short-form videos are the most popular, some companies are also realizing the potential of longer videos in increasing emotional quotient.

Finally, videos will also be used across the social media and search engine marketing funnel to reach consumers at different stages of the buyer’s journey.

With greater personalization and automation, digital marketers are going to find even more effective ways to reach prospects and encourage conversions in 2020. This will have an effect on all sectors in a rapidly evolving digital landscape.

Creator: Aayush – Sr. Manager, Brand & Marketing at Uplers.
Feature Image: Photo by Dominika Roseclay from Pexels

Categories: Others Tags:

6 Tech Trends that are Changing the Remote Work Game

May 22nd, 2020 No comments

It’s no surprise that remote work has become a new norm across the globe. An influx of businesses has implemented remote work practices in the past few months, now allowing employees to work from home or other locations outside of the traditional office setting.

As more companies begin allowing remote work, it appears that the trend is here to stay.

While the benefits of remote work are clear–flexible work schedules, an increase in job candidates, and a healthier workplace–there are some downsides to consider. The ability to interact with coworkers, manage employees, and maintain productivity can all be more difficult when working remotely, than in the office.

Luckily, a variety of technologies are changing the remote work game by making out-of-office work a lot more like working in the office. Keep reading to find out what technologies can improve any company’s remote work experience.

1. Virtual Communication Tools

Virtual communication tools are essential for making remote work a good experience. While traditional email and phone calls can get a company by for a few weeks, employees will quickly start to see the negative impacts of not being able to communicate with coworkers on a more personal level. A great way to avoid this is to implement the proper tools–like web conferencing platforms and chat apps–to promote regular communication across the workplace.

Web conferencing platforms like Zoom can be used to hold both formal and informal meetings from any location. Employees can use this technology to have informal coffee breaks with coworkers or to have client meetings. A web conferencing system allows users to see each other in real-time, which can reinforce coworker relationships and company-wide morale.

In addition to web conferencing, employees should have access to chat apps that allow them to ask managers or coworkers questions in real-time. Instead of waiting for an email to be delivered, with the chance that a coworker doesn’t check it for hours, employees can utilize chat apps to send a quick reminder, question, or thought with the response rate being much higher. Not only are employees more likely to get a speedy response, but they’re also able to engage in an informal conversation the way they would in-office.

Strong communication is essential for any business to have success, but it is especially important for companies to implement across remote teams where communication is more difficult.

2. Process Automation Bots

Staying productive can be difficult for employees when working in a remote environment, especially when they have a variety of different, mundane tasks to complete daily. One way businesses, or even individual employees, can stay on top of their productivity game is to implement process automation bots to manage workflows and complete mundane tasks.

Businesses can implement this technology to automate repetitive tasks across the board. Process automation can complete semi-structured tasks like data migration and excel inputs to reduce the number of mundane tasks that employees are faced with each day. Reducing mundane work allows employees to focus on their thought-driven work, promoting over-all productivity across the company.

Employees can also utilize this technology on an individual basis to help them manage their workflow to promote productivity. Process automation bots can be customized to automatically open different sheets, tasks, and reports that employees may want to focus on at different points in their workday. Having this automatically set can help employees shift their focus and avoid working on one task for too long. This technology can act as a gentle reminder for employees to stay productive when they are working remotely.

3. Project Management Apps

Project management apps can be used as a virtual project manager for employees working remotely. These apps are typically automated and overseen by a company’s project management team, lining up tasks and projects for employees. Using a project management app is especially helpful for keeping employees on task and ready to dive into the next project as soon as a task is completed. Nothing wastes time like waiting around for the next assignment and doing busy work to stay working.

Project management apps aren’t just good for keeping employees tasked and on track, they’re also helpful to project managers who are juggling different teams, clients, and coworkers. Project managers can use these apps to rank which tasks are essential and which can wait until later to be completed. This helps keep projects on track to meet deadlines and ensures that the company is delivering as much value as possible to clients.

4. Performance Tracking Tools

It can be challenging to track and understand how productive employees are when they aren’t in the office. This challenge brings up questions about how employee performance can be accurately evaluated in a remote work environment. Luckily, companies can implement performance tracking tools to help them better understand how well employees are doing their job functions when they aren’t in the office.

Performance tracking tools can track employees’ time, activity, and project completion rate within the same platform so managers will have the ability to see a range of attributes that determine how productive an employee is. Many of these platforms can be automated and customized so they focus on specific aspects of an employee’s workday to gauge how productive they are compared to their coworkers or past productivity patterns.

While employees don’t like feeling “watched” or “analyzed” during work, knowing that their activity is being tracked to determine their performance holds them to a higher level of expectation that can help them stay productive when they aren’t actually in office. As long as employees understand what is expected of them and are aware of performance tracking, this tool can be an effective way to promote productivity and evaluate employee performance.

5. Virtual Private Networks

Virtual private networks (VPNs) can be implemented by any company to help their employees maintain a secure internet connection, no matter where they work. We all know that remote work doesn’t necessarily mean working from home, but what happens when an employee connects to a publicly accessible wireless network? Sometimes, nothing happens. Other times, malicious players are waiting to use the public network to gain access to the employee’s device and all of the information on it.

When companies implement VPNs, they reduce the risk of malicious players gaining access to company devices. This allows workers to safely work from any location where there is a wireless internet connection. VPNs are essential for any company that wants to ensure that their data and information stays secure.

6. Virtual and Augmented Reality

In a remote workforce, it’s likely that teams are spread out across different cities. When this is the case, it can be difficult to effectively onboard and train new employees without meeting up in person. When meeting up isn’t an option, virtual and augmented reality tools can be implemented to help effectively train new hires and get them ready to work as quickly as possible.

While these technologies might seem identical, virtual and augmented reality are different technologies, but they can be used in businesses to achieve the same goal. Virtual reality requires the use of a headset or device that places an employee in a virtual or simulated environment. Augmented reality typically comes in the form of an app that displays a virtual or simulated situation in the real world around an employee.

These technologies can be utilized to immerse employees in a simulated training environment to give them real problems, experiences, and tasks. Both of these technologies can be used to effectively train and prepare employees for their position as quickly as possible.

As remote work continues to be prevalent across industries, technology will follow suit to make it more convenient and seamless than before. Companies who want to promote a successful remote workforce should consider investing in some of these technologies that are changing the remote work game.


Photo by manny PANTOJA on Unsplash

Categories: Others Tags:

Free Design Library: Humaaans

May 22nd, 2020 No comments

Everything is going digital. Every industry, every line of business. In a post-pandemic world, the transformation will only speed up. As businesses adapt and join the world-wide-web, the already crowded place becomes increasingly competitive. The web is a free place where even small businesses or even ordinary people can find success. The problem is that smaller businesses and entrepreneurs usually don’t have the resources to hire a lot of people.

That’s why there’s a lot of free solutions that help such businesses to have a shot at competing. No-coding platforms, free design tools, royalty-free images all serve the purpose of making the normally don’t have the chance to access such services normally.

One recent website, was one of the most exciting ones for us as it’s specifically about design. Humaaans, made by Pablo Stanley, is a free design directory but it comes with a twist.

Humaaans is a design directory of illustrations of people. You can mix & match hair types, postures, clothes, and many more to create your own unique illustrations. It’s an extremely clever project and it’s free! The style of the illustrations are geometric, lively, and matches the current design trends.

You can download the directory for free on its website but its creator accepts donation and considering the quality of the illustrations if you can afford to, you should definitely leave a tip.

We gathered a couple of images that summarize how the illustrations work and look like.

We’re All Humaaans: A Few Illustrations

As we’ve mentioned before, you can create your own unique illustrations by mixing and matching various parts of humans. So, let”s have a look at how they would look.

humaaans gif with changing characters
humaaans description about illustrations
humaaans gif showing different clothings
humaaans use case of illustrations
humaaans showcasing illustrations
choosing hairdos for humaaans illustrations
humaaans picking postures
humaaans illustration example for landing site
completed custom humaaans illustration
we're humaaans

We toyed around with the illustrations and the possibilities seem endless. This project is truly unique in how it might change the design processes of many online businesses, blogs, and websites.

Categories: Others Tags:

A “new direction” in the struggle against rightward scrolling

May 21st, 2020 No comments

You know those times you get a horizontal scrollbar when accidentally placing an element off the right edge of the browser window? It might be a menu that slides in or the like. Sometimes we to overflow-x: hidden; on the body to fix that, but that can sometimes wreck stuff like position: sticky;.

Well, you know how if you place an element off the left edge of a browser window, it doesn’t do that? That’s “data loss” and just how things work around here. It actually has to do with the direction of the page. If you were in a RTL situation, it would be the left edge of the browser window causing the overflow situation and the right edge where it doesn’t.

Emerson Loustau leverages that idea to solve a problem here. I’d be way too nervous messing with direction like this because I just don’t know what the side effects would be. But, hey, at least it doesn’t break position: sticky;.

Direct Link to ArticlePermalink

The post A “new direction” in the struggle against rightward scrolling appeared first on CSS-Tricks.

Categories: Designing, Others Tags:

Flexbox-like “just put elements in a row” with CSS grid

May 21st, 2020 No comments

It occurred to me while we were talking about flexbox and gap that one reason we sometimes reach for flexbox is to chuck some boxes in a row and space them out a little.

My brain still reaches for flexbox in that situation, and with gap, it probably will continue to do so. It’s worth noting though that grid can do the same thing in its own special way.

Like this:

.grid {
  display: grid;
  gap: 1rem;
  grid-auto-flow: column;
}
CodePen Embed Fallback

They all look equal width there, but that’s only because there is no content in them. With content, you’ll see the boxes start pushing on each other based on the natural width of that content. If you need to exert some control, you can always set width / min-width / max-width on the elements that fall into those columns — or, set them with grid-template-columns but without setting the actual number of columns, then letting the min-content dictate the width.

.grid {
  display: grid;
  gap: 1rem;
  grid-auto-flow: column;
  grid-template-columns: repeat(auto-fit, minmax(min-content, 1fr));
}

Flexible grids are the coolest.

Another thought… if you only want the whole grid itself to be as wide as the content (i.e. less than 100% or auto, if need be) then be aware that display: inline-grid; is a thing.

The post Flexbox-like “just put elements in a row” with CSS grid appeared first on CSS-Tricks.

Categories: Designing, Others Tags:

How to Make Taxonomy Pages With Gatsby and Sanity.io

May 21st, 2020 No comments
An array field with references to category documents in the blog studio

In this tutorial, we’ll cover how to make taxonomy pages with Gatsby with structured content from Sanity.io. You will learn how to use Gatsby’s Node creation APIs to add fields to your content types in Gatsby’s GraphQL API. Specifically, we’re going to create category pages for the Sanity’s blog starter.

That being said, there is nothing Sanity-specific about what we’re covering here. You’re able to do this regardless of which content source you may have. We’re just reaching for Sanity.io for the sake of demonstration.

Get up and running with the blog

If you want to follow this tutorial with your own Gatsby project, go ahead and skip to the section for creating a new page template in Gatsby. If not, head over to sanity.io/create and launch the Gatsby blog starter. It will put the code for Sanity Studio and the Gatsby front-end in your GitHub account and set up the deployment for both on Netlify. All the configuration, including example content, will be in place so that you can dive right into learning how to create taxonomy pages.

Once the project is iniated, make sure to clone the new repository on GitHub to local, and install the dependencies:

git clone git@github.com:username/your-repository-name.git
cd your-repository-name
npm i

If you want to run both Sanity Studio (the CMS) and the Gatsby front-end locally, you can do so by running the command npm run dev in a terminal from the project root. You can also cd into the web folder and just run Gatsby with the same command.

You should also install the Sanity CLI and log in to your account from the terminal: npm i -g @sanity/cli && sanity login. This will give you tooling and useful commands to interact with Sanity projects. You can add the --help flag to get more information on its functionality and commands.

We will be doing some customization to the gatsby-node.js file. To see the result of the changes, restart Gatsby’s development server. This is done in most systems by hitting CTRL + C in the terminal and running npm run dev again.

Getting familiar with the content model

Look into the /studio/schemas/documents folder. There are schema files for our main content types: author, category, site settings, and posts. Each of the files exports a JavaScript object that defines the fields and properties of these content types. Inside of post.js is the field definition for categories:

{
  name: 'categories',
  type: 'array',
  title: 'Categories',
  of: [
    {
      type: 'reference',
      to: {
        type: 'category'
      }
    }
  ]
},

This will create an array field with reference objects to category documents. Inside of the blog’s studio it will look like this:

An array field with references to category documents in the blog studio

Adding slugs to the category type

Head over to /studio/schemas/documents/category.js. There is a simple content model for a category that consists of a title and a description. Now that we’re creating dedicated pages for categories, it would be handy to have a slug field as well. We can define that in the schema like this:

// studio/schemas/documents/category.js
export default {
  name: 'category',
  type: 'document',
  title: 'Category',
  fields: [
    {
      name: 'title',
      type: 'string',
      title: 'Title'
    },
    {
      name: 'slug',
      type: 'slug',
      title: 'Slug',
      options: {
        // add a button to generate slug from the title field
        source: 'title'
      }
    },
    {
      name: 'description',
      type: 'text',
      title: 'Description'
    }
  ]
}

Now that we have changed the content model, we need to update the GraphQL schema definition as well. Do this by executing npm run graphql-deploy (alternatively: sanity graphql deploy) in the studio folder. You will get warnings about breaking changes, but since we are only adding a field, you can proceed without worry. If you want the field to accessible in your studio on Netlify, check the changes into git (with git add . && git commit -m"add slug field") and push it to your GitHub repository (git push origin master).

Now we should go through the categories and generate slugs for them. Remember to hit the publish button to make the changes accessible for Gatsby! And if you were running Gatsby’s development server, you’ll need to restart that too.

Quick sidenote on how the Sanity source plugin works

When starting Gatsby in development or building a website, the source plugin will first fetch the GraphQL Schema Definitions from Sanity deployed GraphQL API. The source plugin uses this to tell Gatsby which fields should be available to prevent it from breaking if the content for certain fields happens to disappear. Then it will hit the project’s export endpoint, which streams all the accessible documents to Gatsby’s in-memory datastore.

In order words, the whole site is built with two requests. Running the development server, will also set up a listener that pushes whatever changes come from Sanity to Gatsby in real-time, without doing additional API queries. If we give the source plugin a token with permission to read drafts, we’ll see the changes instantly. This can also be experienced with Gatsby Preview.

Adding a category page template in Gatsby

Now that we have the GraphQL schema definition and some content ready, we can dive into creating category page templates in Gatsby. We need to do two things:

  • Tell Gatsby to create pages for the category nodes (that is Gatsby’s term for “documents”).
  • Give Gatsby a template file to generate the HTML with the page data.

Begin by opening the /web/gatsby-node.js file. Code will already be here that can be used to create the blog post pages. We’ll largely leverage this exact code, but for categories. Let’s take it step-by-step:

Between the createBlogPostPages function and the line that starts with exports.createPages, we can add the following code. I’ve put in comments here to explain what’s going on:

// web/gatsby-node.js

// ...

async function createCategoryPages (graphql, actions) {
  // Get Gatsby‘s method for creating new pages
  const {createPage} = actions
  // Query Gatsby‘s GraphAPI for all the categories that come from Sanity
  // You can query this API on http://localhost:8000/___graphql
  const result = await graphql(`{
    allSanityCategory {
      nodes {
        slug {
          current
        }
        id
      }
    }
  }
  `)
  // If there are any errors in the query, cancel the build and tell us
  if (result.errors) throw result.errors

  // Let‘s gracefully handle if allSanityCatgogy is null
  const categoryNodes = (result.data.allSanityCategory || {}).nodes || []

  categoryNodes
    // Loop through the category nodes, but don't return anything
    .forEach((node) => {
      // Desctructure the id and slug fields for each category
      const {id, slug = {}} = node
      // If there isn't a slug, we want to do nothing
      if (!slug) return

      // Make the URL with the current slug
      const path = `/categories/${slug.current}`

      // Create the page using the URL path and the template file, and pass down the id
      // that we can use to query for the right category in the template file
      createPage({
        path,
        component: require.resolve('./src/templates/category.js'),
        context: {id}
      })
    })
}

Last, this function is needed at the bottom of the file:

// /web/gatsby-node.js

// ...

exports.createPages = async ({graphql, actions}) => {
  await createBlogPostPages(graphql, actions)
  await createCategoryPages(graphql, actions) // <= add the function here
}

Now that we have the machinery to create the category page node in place, we need to add a template for how it actually should look in the browser. We’ll base it on the existing blog post template to get some consistent styling, but keep it fairly simple in the process.

// /web/src/templates/category.js
import React from 'react'
import {graphql} from 'gatsby'
import Container from '../components/container'
import GraphQLErrorList from '../components/graphql-error-list'
import SEO from '../components/seo'
import Layout from '../containers/layout'

export const query = graphql`
  query CategoryTemplateQuery($id: String!) {
    category: sanityCategory(id: {eq: $id}) {
      title
      description
    }
  }
`
const CategoryPostTemplate = props => {
  const {data = {}, errors} = props
  const {title, description} = data.category || {}

  return (
    <Layout>
      <Container>
        {errors && <GraphQLErrorList errors={errors} />}
        {!data.category && <p>No category data</p>}
        <SEO title={title} description={description} />
        <article>
          <h1>Category: {title}</h1>
          <p>{description}</p>
        </article>
      </Container>
    </Layout>
  )
}

export default CategoryPostTemplate

We are using the ID that was passed into the context in gatsby-node.js to query the category content. Then we use it to query the title and description fields that are on the category type. Make sure to restart with npm run dev after saving these changes, and head over to localhost:8000/categories/structured-content in the browser. The page should look something like this:

A barebones category page with a site title, Archive link, page title, dummy content and a copyright in the footer.
A barebones category page

Cool stuff! But it would be even cooler if we actually could see what posts that belong to this category, because, well, that’s kinda the point of having categories in the first place, right? Ideally, we should be able to query for a “pages” field on the category object.

Before we learn how to that, we need to take a step back to understand how Sanity’s references work.

Querying Sanity’s references

Even though we’re only defining the references in one type, Sanity’s datastore will index them “bi-directionally.” That means creating a reference to the “Structured content” category document from a post lets Sanity know that the category has these incoming references and will keep you from deleting it as long as the reference exists (references can be set as “weak” to override this behavior). If we use GROQ, we can query categories and join posts that have them like this (see the query and result in action on groq.dev):

*[_type == "category"]{
  _id,
  _type,
  title,
  "posts": *[_type == "post" && references(^._id)]{
    title,
    slug
  }
}
// alternative: *[_type == "post" && ^._id in categories[]._ref]{

This ouputs a data structure that lets us make a simple category post template:

[
  {
    "_id": "39d2ca7f-4862-4ab2-b902-0bf10f1d4c34",
    "_type": "category",
    "title": "Structured content",
    "posts": [
      {
        "title": "Exploration powered by structured content",
        "slug": {
          "_type": "slug",
          "current": "exploration-powered-by-structured-content"
        }
      },
      {
        "title": "My brand new blog powered by Sanity.io",
        "slug": {
          "_type": "slug",
          "current": "my-brand-new-blog-powered-by-sanity-io"
        }
      }
    ]
  },
  // ... more entries
]

That’s fine for GROQ, what about GraphQL?

Here‘s the kicker: As of yet, this kind of query isn’t possible with Gatsby’s GraphQL API out of the box. But fear not! Gatsby has a powerful API for changing its GraphQL schema that lets us add fields.

Using createResolvers to edit Gatsby’s GraphQL API

Gatsby holds all the content in memory when it builds your site and exposes some APIs that let us tap into how it processes this information. Among these are the Node APIs. It’s probably good to clarify that when we are talking about “node” in Gatsby — not to be confused with Node.js. The creators of Gatsby have borrowed “edges and nodes” from Graph theory where “edges” are the connections between the “nodes” which are the “points” where the actual content is located. Since an edge is a connection between nodes, it can have a “next” and “previous” property.

The edges with next and previous, and the node with fields in GraphQL's API explorer
The edges with next and previous, and the node with fields in GraphQL’s API explorer

The Node APIs are used by plugins first and foremost, but they can be used to customize how our GraphQL API should work as well. One of these APIs is called createResolvers. It’s fairly new and it lets us tap into how a type’s nodes are created so we can make queries that add data to them.

Let’s use it to add the following logic:

  • Check for ones with the SanityCategory type when creating the nodes.
  • If a node matches this type, create a new field called posts and set it to the SanityPost type.
  • Then run a query that filters all posts that has lists a category that matches the current category’s ID.
  • If there are matching IDs, add the content of the post nodes to this field.

Add the following code to the /web/gatsby-node.js file, either below or above the code that’s already in there:

// /web/gatsby-node.js
// Notice the capitalized type names
exports.createResolvers = ({createResolvers}) => {
  const resolvers = {
    SanityCategory: {
      posts: {
        type: ['SanityPost'],
        resolve (source, args, context, info) {
          return context.nodeModel.runQuery({
            type: 'SanityPost',
            query: {
              filter: {
                categories: {
                  elemMatch: {
                    _id: {
                      eq: source._id
                    }
                  }
                }
              }
            }
          })
        }
      }
    }
  }
  createResolvers(resolvers)
}

Now, let’s restart Gatsby’s development server. We should be able to find a new field for posts inside of the sanityCategory and allSanityCategory types.

A GraphQL query for categories with the category title and the titles of the belonging posts

Adding the list of posts to the category template

Now that we have the data we need, we can return to our category page template (/web/src/templates/category.js) and add a list with links to the posts belonging to the category.

// /web/src/templates/category.js
import React from 'react'
import {graphql, Link} from 'gatsby'
import Container from '../components/container'
import GraphQLErrorList from '../components/graphql-error-list'
import SEO from '../components/seo'
import Layout from '../containers/layout'
// Import a function to build the blog URL
import {getBlogUrl} from '../lib/helpers'

// Add “posts” to the GraphQL query
export const query = graphql`
  query CategoryTemplateQuery($id: String!) {
    category: sanityCategory(id: {eq: $id}) {
      title
      description
      posts {
        _id
        title
        publishedAt
        slug {
          current
        }
      }
    }
  }
`
const CategoryPostTemplate = props => {
  const {data = {}, errors} = props
  // Destructure the new posts property from props
  const {title, description, posts} = data.category || {}

  return (
    <Layout>
      <Container>
        {errors && <GraphQLErrorList errors={errors} />}
        {!data.category && <p>No category data</p>}
        <SEO title={title} description={description} />
        <article>
          <h1>Category: {title}</h1>
          <p>{description}</p>
          {/*
            If there are any posts, add the heading,
            with the list of links to the posts
          */}
          {posts && (
            <React.Fragment>
              <h2>Posts</h2>
              <ul>
                { posts.map(post => (
                  <li key={post._id}>
                    <Link to={getBlogUrl(post.publishedAt, post.slug)}>{post.title}</Link>
                  </li>))
                }
              </ul>
            </React.Fragment>)
          }
        </article>
      </Container>
    </Layout>
  )
}

export default CategoryPostTemplate

This code will produce this simple category page with a list of linked posts – just liked we wanted!

The category page with the category title and description, as well as a list of its posts

Go make taxonomy pages!

We just completed the process of creating new page types with custom page templates in Gatsby. We covered one of Gatsby’s Node APIs called createResolver and used it to add a new posts field to the category nodes.

This should give you what you need to make other types of taxonomy pages! Do you have multiple authors on your blog? Well, you can use the same logic to create author pages. The interesting thing with the GraphQL filter is that you can use it to go beyond the explicit relationship made with references. It can also be used to match other fields using regular expressions or string comparisons. It’s fairly flexible!

The post How to Make Taxonomy Pages With Gatsby and Sanity.io appeared first on CSS-Tricks.

Categories: Designing, Others Tags:

Roll Your Own Comments With Gatsby and FaunaDB

May 21st, 2020 No comments

If you haven’t used Gatsby before have a read about why it’s fast in every way that matters, and if you haven’t used FaunaDB before you’re in for a treat. If you’re looking to make your static sites full blown Jamstack applications this is the back end solution for you!

This tutorial will only focus on the operations you need to use FaunaDB to power a comment system for a Gatsby blog. The app comes complete with inputs fields that allow users to comment on your posts and an admin area for you to approve or delete comments before they appear on each post. Authentication is provided by Netlify’s Identity widget and it’s all sewn together using Netlify serverless functions and an Apollo/GraphQL API that pushes data up to a FaunaDB database collection.

I chose FaunaDB for the database for a number of reasons. Firstly there’s a very generous free tier! perfect for those small projects that need a back end, there’s native support for GraphQL queries and it has some really powerful indexing features!

…and to quote the creators;

No matter which stack you use, or where you’re deploying your app, FaunaDB gives you effortless, low-latency and reliable access to your data via APIs familiar to you

You can see the finished comments app here.

Get Started

To get started clone the repo at https://github.com/PaulieScanlon/fauna-gatsby-comments

or:

git clone https://github.com/PaulieScanlon/fauna-gatsby-comments.git

Then install all the dependencies:

npm install

Also cd in to functions/apollo-graphql and install the dependencies for the Netlify function:

npm install

This is a separate package and has its own dependencies, you’ll be using this later.

We also need to install the Netlify CLI as you’ll also use this later:

npm install netlify-cli -g

Now lets add three new files that aren’t part of the repo.

At the root of your project create a .env .env.development and .env.production

Add the following to .env:

GATSBY_FAUNA_DB =
GATSBY_FAUNA_COLLECTION =

Add the following to .env.development:

GATSBY_FAUNA_DB =
GATSBY_FAUNA_COLLECTION =
GATSBY_SHOW_SIGN_UP = true
GATSBY_ADMIN_ID =

Add the following to .env.production:

GATSBY_FAUNA_DB =
GATSBY_FAUNA_COLLECTION =
GATSBY_SHOW_SIGN_UP = false
GATSBY_ADMIN_ID =

You’ll come back to these later but in case you’re wondering

  • GATSBY_FAUNA_DB is the FaunaDB secret key for your database
  • GATSBY_FAUNA_COLLECTION is the FaunaDB collection name
  • GATSBY_SHOW_SIGN_UP is used to hide the Sign up button when the site is in production
  • GATSBY_ADMIN_ID is a user id that Netlify Identity will generate for you

If you’re the curious type you can get a taster of the app by running gatsby develop or yarn develop and then navigate to http://localhost:8000 in your browser.

FaunaDB

So Let’s get cracking, but before we write any operations head over to https://fauna.com/ and sign up!

Database and Collection

  • Create a new database by clicking NEW DATABASE
  • Name the database: I’ve called the demo database fauna-gatsby-comments
  • Create a new Collection by clicking NEW COLLECTION
  • Name the collection: I’ve called the demo collection demo-blog-comments

Server Key

Now you’ll need to to set up a server key. Go to SECURITY

  • Create a new key by clicking NEW KEY
  • Select the database you want the key to apply to, fauna-gatsby-comments for example
  • Set the Role as Admin
  • Name the server key: I’ve called the demo key demo-blog-server-key

Environment Variables Pt. 1

Copy the server key and add it to GATSBY_FAUNA_DB in .env.development, .env.production and .env.

You’ll also need to add the name of the collection to GATSBY_FAUNA_COLLECTION in .env.development, .env.production and .env.

Adding these values to .env are just so you can test your development FaunaDB operations, which you’ll do next.

Let’s start by creating a comment so head back to boop.js:

// boop.js
...
// CREATE COMMENT
createComment: async () => {
  const slug = "/posts/some-post"
  const name = "some name"
  const comment = "some comment"
  const results = await client.query(
    q.Create(q.Collection(COLLECTION_NAME), {
      data: {
        isApproved: false,
        slug: slug,
        date: new Date().toString(),
        name: name,
        comment: comment,
      },
    })
  )
  console.log(JSON.stringify(results, null, 2))
  return {
    commentId: results.ref.id,
  }
},
...

The breakdown of this function is as follows;

  • q is the instance of faunadb.query
  • Create is the FaunaDB method to create an entry within a collection
  • Collection is area in the database to store the data. It takes the name of the collection as the first argument and a data object as the second.

The second argument is the shape of the data you need to drive the applications comment system.

For now you’re going to hard-code slug, name and comment but in the final app these values are captured by the input form on the posts page and passed in via args

The breakdown for the shape is as follows;

  • isApproved is the status of the comment and by default it’s false until we approve it in the Admin page
  • slug is the path to the post where the comment was written
  • date is the time stamp the comment was written
  • name is the name the user entered in the comments from
  • comment is the comment the user entered in the comments form

When you (or a user) creates a comment you’re not really interested in dealing with the response because as far as the user is concerned all they’ll see is either a success or error message.

After a user has posted a comment it will go in to your Admin queue until you approve it but if you did want to return something you could surface this in the UI by returning something from the createComment function.

Create a comment

If you’ve hard coded a slug, name and comment you can now run the following in your CLI

node boop createComment

If everything worked correctly you should see a log in your terminal of the new comment.

{
   "ref": {
     "@ref": {
       "id": "263413122555970050",
       "collection": {
         "@ref": {
           "id": "demo-blog-comments",
           "collection": {
             "@ref": {
               "id": "collections"
             }
           }
         }
       }
     }
   },
   "ts": 1587469179600000,
   "data": {
     "isApproved": false,
     "slug": "/posts/some-post",
     "date": "Tue Apr 21 2020 12:39:39 GMT+0100 (British Summer Time)",
     "name": "some name",
     "comment": "some comment"
   }
 }
 { commentId: '263413122555970050' }

If you head over to COLLECTIONS in FaunaDB you should see your new entry in the collection.

You’ll need to create a few more comments while in development so change the hard-coded values for name and comment and run the following again.

node boop createComment

Do this a few times so you end up with at least three new comments stored in the database, you’ll use these in a moment.

Delete comment by id

Now that you can create comments you’ll also need to be able to delete a comment.

By adding the commentId of one of the comments you created above you can delete it from the database. The commentId is the id in the ref.@ref object

Again you’re not really concerned with the return value here but if you wanted to surface this in the UI you could do so by returning something from the deleteCommentById function.

// boop.js
...
// DELETE COMMENT
deleteCommentById: async () => {
  const commentId = "263413122555970050";
  const results = await client.query(
    q.Delete(q.Ref(q.Collection(COLLECTION_NAME), commentId))
  );
  console.log(JSON.stringify(results, null, 2));
  return {
    commentId: results.ref.id,
  };
},
...

The breakdown of this function is as follows

  • client is the FaunaDB client instance
  • query is a method to get data from FaunaDB
  • q is the instance of faunadb.query
  • Delete is the FaunaDB delete method to delete entries from a collection
  • Ref is the unique FaunaDB ref used to identify the entry
  • Collection is area in the database where the data is stored

If you’ve hard coded a commentId you can now run the following in your CLI:

node boop deleteCommentById

If you head back over to COLLECTIONS in FaunaDB you should see that entry no longer exists in collection

Indexes

Next you’re going to create an INDEX in FaunaDB.

An INDEX allows you to query the database with a specific term and define a specific data shape to return.

When working with GraphQL and / or TypeScript this is really powerful because you can use FaunaDB indexes to return only the data you need and in a predictable shape. This makes data typing responses in GraphQL and / TypeScript a dream… I’ve worked on a number of applications that just return a massive object of useless values which will inevitably cause bugs in your app. blurg!

  • Go to INDEXES and click NEW INDEX
  • Name the index: I’ve called this one get-all-comments
  • Set the source collection to the name of the collection you setup earlier

As mentioned above when you query the database using this index you can tell FaunaDB which parts of the entry you want to return.

You can do this by adding “values” but be careful to enter the values exactly as they appear below because (on the FaunaDB free tier) you can’t amend these after you’ve created them so if there’s a mistake you’ll have to delete the index and start again… bummer!

The values you need to add are as follows:

  • ref
  • data.isApproved
  • data.slug
  • data.date
  • data.name
  • data.comment

After you’ve added all the values you can click SAVE.

Get all comments

// boop.js
...
// GET ALL COMMENTS
getAllComments: async () => {
   const results = await client.query(
     q.Paginate(q.Match(q.Index("get-all-comments")))
   );
   console.log(JSON.stringify(results, null, 2));
   return results.data.map(([ref, isApproved, slug, date, name, comment]) => ({
     commentId: ref.id,
     isApproved,
     slug,
     date,
     name,
     comment,
   }));
 },
...

The breakdown of this function is as follows

  • client is the FaunaDB client instance
  • query is a method to get data from FaunaDB
  • q is the instance of faunadb.query
  • Paginate paginates the responses
  • Match returns matched results
  • Index is the name of the Index you just created

The shape of the returned result here is an array of the same shape you defined in the Index “values”

If you run the following you should see the list of all the comments you created earlier:

node boop getAllComments

Get comments by slug

You’re going to take a similar approach as above but this time create a new Index that allows you to query FaunaDB in a different way. The key difference here is that when you get-comments-by-slug you’ll need to tell FaunaDB about this specific term and you can do this by adding data.slug to the Terms field.

  • Go to INDEX and click NEW INDEX
  • Name the index, I’ve called this one get-comments-by-slug
  • Set the source collection to the name of the collection you setup earlier
  • Add data.slug in the terms field

The values you need to add are as follows:

  • ref
  • data.isApproved
  • data.slug
  • data.date
  • data.name
  • data.comment

After you’ve added all the values you can click SAVE.

// boop.js
...
// GET COMMENT BY SLUG
getCommentsBySlug: async () => {
  const slug = "/posts/some-post";
  const results = await client.query(
    q.Paginate(q.Match(q.Index("get-comments-by-slug"), slug))
  );
  console.log(JSON.stringify(results, null, 2));
  return results.data.map(([ref, isApproved, slug, date, name, comment]) => ({
    commentId: ref.id,
    isApproved,
    slug,
    date,
    name,
    comment,
  }));
},
...

The breakdown of this function is as follows:

  • client is the FaunaDB client instance
  • query is a method to get data from FaunaDB
  • q is the instance of faunadb.query
  • Paginate paginates the responses
  • Match returns matched results
  • Index is the name of the Index you just created

The shape of the returned result here is an array of the same shape you defined in the Index “values” you can create this shape in the same way you did above and be sure to add a value for terms. Again be careful to enter these with care.

If you run the following you should see the list of all the comments you created earlier but for a specific slug:

node boop getCommentsBySlug

Approve comment by id

When you create a comment you manually set the isApproved value to false. This prevents the comment from being shown in the app until you approve it.

You’ll now need to create a function to do this but you’ll need to hard-code a commentId. Use a commentId from one of the comments you created earlier:

// boop.js
...
// APPROVE COMMENT BY ID
approveCommentById: async () => {
  const commentId = '263413122555970050'
  const results = await client.query(
    q.Update(q.Ref(q.Collection(COLLECTION_NAME), commentId), {
      data: {
        isApproved: true,
      },
    })
  );
  console.log(JSON.stringify(results, null, 2));
  return {
    isApproved: results.isApproved,
  };
},
...

The breakdown of this function is as follows:

  • client is the FaunaDB client instance
  • query is a method to get data from FaunaDB
  • q is the instance of faunadb.query
  • Update is the FaundaDB method up update an entry
  • Ref is the unique FaunaDB ref used to identify the entry
  • Collection is area in the database where the data is stored

If you’ve hard coded a commentId you can now run the following in your CLI:

node boop approveCommentById

If you run the getCommentsBySlug again you should now see the isApproved status of the entry you hard-coded the commentId for will have changed to true.

node boop getCommentsBySlug

These are all the operations required to manage the data from the app.

In the repo if you have a look at apollo-graphql.js which can be found in functions/apollo-graphql you’ll see the all of the above operations. As mentioned before the hard-coded values are replaced by args, these are the values passed in from various parts of the app.

Netlify

Assuming you’ve completed the Netlify sign up process or already have an account with Netlify you can now push the demo app to your GitHub account.

To do this you’ll need to have initialize git locally, added a remote and have pushed the demo repo upstream before proceeding.

You should now be able to link the repo up to Netlify’s Continuous Deployment.

If you click the “New site from Git” button on the Netlify dashboard you can authorize access to your GitHub account and select the gatsby-fauna-comments repo to enable Netlify’s Continuous Deployment. You’ll need to have deployed at least once so that we have a pubic URL of your app.

The URL will look something like this https://ecstatic-lewin-b1bd17.netlify.app but feel free to rename it and make a note of the URL as you’ll need it for the Netlify Identity step mentioned shortly.

Environment Variables Pt. 2

In a previous step you added the FaunaDB database secret key and collection name to your .env files(s). You’ll also need to add the same to Netlify’s Environment variables.

  • Navigate to Settings from the Netlify navigation
  • Click on Build and deploy
  • Either select Environment or scroll down until you see Environment variables
  • Click on Edit variables

Proceed to add the following:

GATSBY_SHOW_SIGN_UP = false
GATSBY_FAUNA_DB = you FaunaDB secret key
GATSBY_FAUNA_COLLECTION = you FaunaDB collection name

While you’re here you’ll also need to amend the Sensitive variable policy, select Deploy without restrictions

Netlify Identity Widget

I mentioned before that when a comment is created the isApproved value is set to false, this prevents comments from appearing on blog posts until you (the admin) have approved them. In order to become admin you’ll need to create an identity.

You can achieve this by using the Netlify Identity Widget.

If you’ve completed the Continuous Deployment step above you can navigate to the Identity page from the Netlify navigation.

You wont see any users in here just yet so lets use the app to connect the dots, but before you do that make sure you click Enable Identity

Before you continue I just want to point out you’ll be using netlify dev instead of gatsby develop or yarn develop from now on. This is because you’ll be using some “special” Netlify methods in the app and staring the server using netlify dev is required to spin up various processes you’ll be using.

  • Spin up the app using netlify dev
  • Navigate to http://localhost:8888/admin/
  • Click the Sign Up button in the header

You will also need to point the Netlify Identity widget at your newly deployed app URL. This was the URL I mentioned you’ll need to make a note of earlier, if you’ve not renamed your app it’ll look something like this https://ecstatic-lewin-b1bd17.netlify.app/ There will be a prompt in the pop up window to Set site’s URL.

You can now complete the necessary sign up steps.

After sign up you’ll get an email asking you to confirm you identity and once that’s completed refresh the Identity page in Netlify and you should see yourself as a user.

It’s now login time, but before you do this find Identity.js in src/components and temporarily un-comment the console.log() on line 14. This will log the Netlify Identity user object to the console.

  • Restart your local server
  • Spin up the app again using netlify dev
  • Click the Login button in the header

If this all works you should be able to see a console log for netlifyIdentity.currentUser: find the id key and copy the value.

Set this as the value for GATSBY_ADMIN_ID = in both .env.production and .env.development

You can now safely remove the console.log() on line 14 in Identity.js or just comment it out again.

GATSBY_ADMIN_ID = your Netlify Identity user id

…and finally

  • Restart your local server
  • Spin up the app again using netlify dev

Now you should be able to login as “Admin”… hooray!

Navigate to http://localhost:8888/admin/ and Login.

It’s important to note here you’ll be using localhost:8888 for development now and NOT localhost:8000 which is more common with Gatsby development

Before you test this in the deployed environment make sure you go back to Netlify’s Environment variables and add your Netlify Identity user id to the Environment variables!

  • Navigate to Settings from the Netlify navigation
  • Click on Build and deploy
  • Either select Environment or scroll down until you see Environment variables
  • Click on Edit variables

Proceed to add the following:

GATSBY_ADMIN_ID = your Netlify Identity user id

If you have a play around with the app and enter a few comments on each of the posts then navigate back to Admin page you can choose to either approve or delete the comments.

Naturally only approved comments will be displayed on any given post and deleted ones are gone forever.

If you’ve used this tutorial for your project I’d love to hear from you at @pauliescanlon.


By Paulie Scanlon (@pauliescanlon), Front End React UI Developer / UX Engineer: After all is said and done, structure + order = fun.

Visit Paulie’s Blog at: www.paulie.dev

The post Roll Your Own Comments With Gatsby and FaunaDB appeared first on CSS-Tricks.

Categories: Designing, Others Tags:

How Does Chat Help in Conversational Marketing?

May 21st, 2020 No comments

Trends in the online industry show that 79% of the customers prefer to use live chat during their online purchases compared to email or phone calls. Amid these statistics, there are also some companies that haven’t yet integrated chat into their website.

In this article, we are going to know about the inside out of the growing trend of chat integration and reveal whether implementing it into your website is worth it or futile.

Some Interesting Stats About Chat Integration & Its Results

Before going deeper into the article, let’s reflect on what the statistics say about it.

  • About 86% of the customers don’t prefer to shop with a brand that has poor customer experience.
  • Brands that have integrated live chat into their websites have witnessed a noticeable 20% of growth.
  • 62% of the online shoppers have accepted that they are more likely to finish the purchase if there is a live chat option available.
  • Shoppers who chat on the websites are 3X more likely to convert to a buyer.

Well, if we go with the statistics, we can say that the integration of the live chat on the website attracts more customers and enhances customer experience and conversion rate. Let’s go further and know why chat in marketing plays a significant role and how it aids in your business.

Customers favor Chat

Consumers really love chat compared to the Email ( It is and always will be an effective tool in marketing )and phone support. When asked why customers said, they prefer to chat because they get everything they want immediately within seconds. They don’t have to browse through the whole website to find any important information. As per the report, 79% of the customers preferred chat due to its convenience and effectiveness.

Chat helps customers ask important questions on the go. Unlike email, it takes little time to know any answers to the query. People know that in a phone call they have to wait for a few minutes or sometimes more.

Shoppers, when they are shopping, have tons of product-related questions not to mention the price. If your store has live chat options, your customer service agents can handle the customers effectively and help you convert the potential customers into buyers.

Reduce Operational Cost

With live chat, it is possible to tackle multiple consumers at a time. Even, only one customer support person is enough for it. Now, just think of handling multiple customers by a single customer service agent on a phone? Seems impossible right?

The point is, by integrating Chat into your brand, you not only guarantee good customer experience but also save money and time for your business. You get enhanced output with less staff. You save the operational cost of new resources which could be better utilized in other important stuff of your business.

There is no need for hiring more staff. All you have to pay for is the monthly subscription charges to the chat company which is much lower than hiring, training, and managing new resources.

Better Understanding of Customer Psychology

Through chat, you know more about your customers because you are interacting with them naturally and in a more casual way. Therefore, you can extract their behavior, their likes, dislikes, their age, and other important components that help you understand your customers.

Also, through chat, you can guide your customers for purchasing the right product or service. If a customer wants to purchase something, and you think there is a better choice available that is cheaper, then by suggesting that to your customer, you introduce trust into them. They would think you as a brand that actually helps customers to find the ideal product without caring too much about the money. So, chat allows you to downsell your products by gaining the customer’s trust.

Not only downsell, but if you think your customers should buy another product that is better for their preference although its price is higher than their budget, then you can suggest them. They may think of purchasing that quality product irrespective of their budget. So, chat allows you to upsell your products or service.

Helps Reduce Product Returns

There are high chances of conversion rate if a customer that comes to your website understands your product better. Often, business owners confess that due to their poor website design and lack of proper navigation, users leave the website.

In this situation, the live chat comes as a silver bullet solution for your business. A customer support representative can ask a casual question to customers about product preference. E.g I see you are searching for this product and its price. How can I help you? Or seems like you are not finding what you are looking for, let me help you. This kind of casual tone makes customers believe that there is actually a live customer support team that is interested in helping them find the best product.

One thing you must remember that your chat should not be forceful and aggressive and disturb the customers during the purchase. Your customers should be able to minimize the chat box when they want. Also, let your customers know that the small chat button on the bottom right corner would be there when they have any queries. So the more a customer knows about your product, the less is the possibility of returning.

Expand Global Reach

If you are thinking of your service or product to reach an international market, then having a multilingual chat could be a good step.

There are many countries that prefer to read and talk about their native languages. By providing customer support in their language, you connect more with them. It allows companies to break the language barrier and sell more products with the help of live chat. Customers should be able to select their preferred language and start asking what they want to know.

Get Advantage Over Competitors

As I have told you earlier that it is surprising that today many companies still haven’t integrated live chat into their business. By doing so they are missing out on a massive opportunity to gain more buyers for their products or services.

However, it does not mean you should shut down your phone support as phone support is also imperative in case of a clear conversation.

However live chat should be considered as another supporting channel for conversion besides phone support.

Check out this image to understand

Now, if you offer live chat support and your competitors don’t, then you definitely have an edge over them and it will reflect in your lead conversions. Customers will know the difference between your competitors’ and your website.

So these are the few of many advantages of live chat in your customer support strategy. Let’s know how to maximize the benefits of live chat for your brand.

How to Get Maximum Benefits Out of Your Chat Support

Here we have listed some points you should follow while you are using chat for customer support.

  • Initiate the Chat when you find a customer is struggling to find something.
  • Respond as fast as possible. What good is your chat integration if you don’t answer quickly to your customer’s query.
  • Use previous chat history in your favour.
  • Have a more casual tone than robotic.
  • Try asking open ended questions. I.e What can I do for you? Also, try avoiding questions which can be answered in Yes or No.
  • Do not try to be funny or sarcastic with conversation.
  • Keep the answers short and to the point.

Now you might ask which live chat service or company I should choose to integrate in my website. So, I have carried out research and come up with these popular and effective chat services that many small businesses and large businesses use.

1. Drift

Drift is a leading conversational marketing tool that allows you to generate more qualified leads without forms. Apart from the Chatbots and live chat, the one thing I love about this service is their schedule meeting option. Through using a scheduled meeting option a customer can arrange a brief talk session regarding their business with the company’s sales rep.

If your goal is to incorporate only one to one chat with customers, there is a free plan available in Drift chat. Other plans have more features for sales & marketing teams that are charged annually. The pais plans Essential and premium plan respectively charges $400 and $1500 per month. There is also a custom plan which lets you choose only needed features and tools.

2. Crisp

Crisp is yet another freemium live chat platform service that provides its ingenious live chat services to small businesses. The chatbot provider company provides its services to startups, marketing teams, sales teams and customer support teams to generate more quality leads and convert them through it.

By integrating Crisp chat, you can not only provide customers with personalized chat support with live chat but there are also crisp chat bots that provide automation in the customer support. You can also build personal and modern conversational experiences with videos and GIFs. Moreover, Crisp chat allows you to send file image documents through the chat and connect to social media platforms like facebook & twitter. Your customers can play an offline game named Crispy Bird in case of internet problems.

Price: Basic- Free
Pro- $25 per month per website
Unlimited- $95 per month per website

3. FreshChat

Fresh chat is a live chat service of the company named Freshworks which also provides a suite of other marketing and sales solutions. The chat app allows you to chat with the customers using customer support agents or AI powered bots. It also provides customers timeline view, in-app campaigns, customizable bots, and more to get more users.

The service helps your team by allowing us to use smart plugs, labels, private notes and desktop notification to be more productive. Freshchat comes with many pricing models with the free version.

4. Livechat

Live chat is considered as the industry leader in the chat domain. You can simply integrate with your WordPress site using its plugIn.

Livechat provides live chat support apps you and your customer support agent can use on your desktops, laptops, mobiles and tablets. That means you can chat with your potential customers on the go. You don’t need to log in to your WordPress dashboard.

Also, the app has the facility of adding surveys from before and after the chat session. So you can know how your support team is doing. It integrated dozens of other services like CRM software, Zen desk, Google analytics, and other email marketing services. The speed of Livechat is considered to be the best compared to other Chat services. It opens and closes instantly.

Its basic plan comes with $16 per month per agent billed annually but if you prefer paying monthly then it will be $19. Also all plans have a 14 days free trial period so you can understand the platform.

5. Chaport

If you are searching for the free live chat support service for getting more customers then Chaport is the best alternative to Crisp. They have a free forever plan with unlimited chat, history, notification, unlimited registered operations. It allows 5 operators online at the same time.

Chaport includes all the basic requirements, live chat support for mobile devices, report & analytics, and third party integration with tools like zapier. Paid plans have even more features.

The company also offers a free plan and a premium plan starting from $9.80 per agent / month.

You Can Build Your Own Live Chat App?

Yes, you can develop your live chat app as per your requirements, designs, and features.

It is not necessary that you can only purchase the subscription-based chat service for your business. You can add any features you want to convert more website visitors to buyers. The benefit of creating a custom live chat app is that you don’t need to pay a monthly charge for it and have access to unlimited customer support agents. In the subscription plan as your business increases, you need a bigger support team and hence a costly plan.

The cost of an app for live chat is worth it because it increases your conversion rate as high as 40%. You can approach any popular mobile or web app development company who can build you a chat app as per your requirement.

Conclusion

Implementing live chat in your business is imperative for your business, especially in this competitive market. As we have seen in this article there are innumerable reasons you should integrate chat in your business as soon as possible.

Live chat has a great effect on the quality of the service you offer to your customers which will ultimately result in better business.

Do you use live chat for your brand? What are the results you have got with chat integration? Comment your opinion about it.


Photo by Austin Distel on Unsplash

Categories: Others Tags:

Understanding Machines: An Open Standard For JavaScript Functions

May 21st, 2020 No comments
Smashing Editorial

Understanding Machines: An Open Standard For JavaScript Functions

Understanding Machines: An Open Standard For JavaScript Functions

Kelvin Omereshone

2020-05-21T10:30:00+00:00
2020-05-21T12:08:57+00:00

As developers, we always seek ways to do our job better, whether by following patterns, using well-written libraries and frameworks, or what have you. In this article, I’ll share with you a JavaScript specification for easily consumable functions. This article is intended for JavaScript developers, and you’ll learn how to write JavaScript functions with a universal API that makes it easy for those functions to be consumed. This would be particularly helpful for authoring npm packages (as we will see by the end of this article).

There is no special prerequisite for this article. If you can write a JavaScript function, then you’ll be able to follow along. With all that said, let’s dive in.

What Are Machines?

Machines are self-documenting and predictable JavaScript functions that follow the machine specification, written by Mike McNeil. A machine is characterized by the following:

  • It must have one clear purpose, whether it’s to send an email, issue a JSON Web Token, make a fetch request, etc.
  • It must follow the specification, which makes machines predictable for consumption via npm installations.

As an example, here is a collection of machines that provides simple and consistent APIs for working with Cloudinary. This collection exposes functions (machines) for uploading images, deleting images, and more. That’s all that machines are really: They just expose a simple and consistent API for working with JavaScript and Node.js functions.

Features of Machines

  • Machines are self-documenting. This means you can just look at a machine and knows what it’s doing and what it will run (the parameters). This feature really sold me on them. All machines are self-documenting, making them predictable.
  • Machines are quick to implement, as we will see. Using the machinepack tool for the command-line interface (CLI), we can quickly scaffold a machine and publish it to npm.
  • Machines are easy to debug. This is also because every machine has a standardized API. We can easily debug machines because they are predictable.

Are There Machines Out There?

You might be thinking, “If machines are so good, then why haven’t I heard about them until now?” In fact, they are already widely used. If you’ve used the Node.js MVC framework Sails.js, then you have either written a machine or interfaced with a couple. The author of Sails.js is also the author of the machine specification.

In addition to the Sails.js framework, you could browse available machines on npm by searching for machinepack, or head over to http://node-machine.org/machinepacks, which is machinepack’s registry daemon; it syncs with npm and updates every 10 minutes.

Machines are universal. As a package consumer, you will know what to expect. So, no more trying to guess the API of a particular package you’ve installed. If it’s a machine, then you can expect it to follow the same easy-to-use interface.

Now that we have a handle on what machines are, let’s look into the specification by analyzing a sample machine.

The Machine Specification

    module.exports = {
  friendlyName: 'Do something',
  description: 'Do something with the provided inputs that results in one of the exit scenarios.',
  extendedDescription: 'This optional extended description can be used to communicate caveats, technical notes, or any other sort of additional information which might be helpful for users of this machine.',
  moreInfoUrl: 'https://stripe.com/docs/api#list_cards',
  sideEffects: 'cacheable',
  sync: true,

  inputs: {
    brand: {
      friendlyName: 'Some input',
      description: 'The brand of gummy worms.',
      extendedDescription: 'The provided value will be matched against all known gummy worm brands. The match is case-insensitive, and tolerant of typos within Levenstein edit distance 

The snippet above is taken from the interactive example on the official website. Let’s dissect this machine.

From looking at the snippet above, we can see that a machine is an exported object containing certain standardized properties and a single function. Let’s first see what those properties are and why they are that way.

  • friendlyName
    This is a display name for the machine, and it follows these rules:

    • is sentence-case (like a normal sentence),
    • must not have ending punctuation,
    • must be fewer than 50 characters.
  • description
    This should be a clear one-sentence description in the imperative mood (i.e. the authoritative voice) of what the machine does. An example would be “Issue a JSON Web Token”, rather than “Issues a JSON Web Token”. Its only constraint is:

    • It should be fewer than 80 characters.
  • extendedDescription (optional)
    This property provides optional supplemental information, extending what was already said in the description property. In this field, you may use punctuation and complete sentences.

    • It should be fewer than 2000 characters.
  • moreInfoUrl (optional)
    This field contains a URL in which additional information about the inner workings or functionality of the machine can be found. This is particularly helpful for machines that communicate with third-party APIs such as GitHub and Auth0.

  • sideEffects (optional)
    This is an optional field that you can either omit or set as cacheable or idempotent. If set to cacheable, then .cache() can be used with this machine. Note that only machines that do not have sideEffects should be set to cacheable.
  • sync (optional)
    Machines are asynchronous by default. Setting the sync option to true turns off async for that machine, and you can then use it as a regular function (without async/await, or then()).

inputs

This is the specification or declaration of the values that the machine function expects. Let’s look at the different fields of a machine’s input.

  • brand
    Using the machine snippet above as our guide, the brand field is called the input key. It is normally camel-cased, and it must be an alphanumeric string starting with a lowercase letter.

    • No special characters are allowed in an input key identifier or field.
  • friendlyName
    This is a human-readable display name for the input. It should:

    • be sentence-case,
    • have no ending punctuation,
    • be fewer than 50 characters.
  • description
    This is a short description describing the input’s use.
  • extendedDescription
    Just like the extendedDescription field on the machine itself, this field provides supplemental information about this particular input.
  • moreInfoUrl
    This is an optional URL that provides more information about the input, if needed.
  • required
    By default, every input is optional. What that means is that if, by runtime, no value is provided for an input, then the fn would be undefined. If your inputs are not optional, then it’s best to set this field as true because this would make the machine throw an error.
  • example
    This field is used to determined the expected data type of the input.
  • whereToGet
    This is an optional documentation object that provides additional information on how to locate adequate values for this input. This is particularly useful for things like API keys, tokens, and so on.
  • whereToGet.description
    This is a clear one-sentence description, also in the imperative mood, that describes how to find the right value for this input.
  • extendedDescription
    This provides additional information on where to get a suitable input value for this machine.

exits

This is the specification for all possible exit callbacks that this machine’s fn implementation can trigger. This implies that each exit represents one possible outcome of the machine’s execution.

  • success
    This is the standardized exit key in the machine specification that signifies that everything went well and the machine worked without any errors. Let’s look at the properties it could expose:

    • outputFriendlyName
      This is simply a display name for the exit output.
    • outputDescription
      This short noun phrase describes the output of an exit.

Other exits signify that something went wrong and that the machine encountered an error. The naming convention for such exits should follow the naming convention for the input’s key. Let’s see the fields under such exits:

  • description
    This is a short description describing when the exit would be called.
  • extendedDescription
    This provides additional information about when this exit would be called. It’s optional. You may use full Markdown syntax in this field, and as usual, it should be fewer than 2000 characters.

You Made It!

That was a lot to take in. But don’t worry: When you start authoring machines, these conventions will stick, especially after your first machine, which we will write together shortly. But first…

Machinepacks

When authoring machines, machinepacks are what you publish on npm. They are simply sets of related utilities for performing common, repetitive development tasks with Node.js. So let’s say you have a machinepack that works with arrays; it would be a bundle of machines that works on arrays, like concat(), map(), etc. See the Arrays machinepack in the registry to get a full view.

Machinepacks Naming Convention

All machinepacks must follow the standard of having “machinepack-” as a prefix, followed by the name of the machine. For example, machinepack-array, machinepack-sessionauth.

Our First Machinepack

To better understand machines, we will write and publish a machinepack that is a wrapper for the file-contributors npm package.

Getting Started

We require the following to craft our machinepack:

  1. Machinepack CLI tool
    You can get it by running:
    npm install -g machinepack
    
  2. Yeoman scaffolding tool
    Install it globally by running:
     npm install -g yo
    
  3. Machinepack Yeomen generator
    Install it like so:
    npm install -g generator-machinepack
    

Note: I am assuming that Node.js and npm are already installed on your machine.

Generating Your First Machinepack

Using the CLI tools that we installed above, let’s generate a new machinepack using the machinepack generator. Do this by first going into the directory that you want the generator to generate the files in, and then run the following:

yo machinepack

The command above will start an interactive process of generating a barebones machinepack for you. It will ask you a couple of questions; be sure to say yes to it creating an example machine.

Note: I noticed that the Yeoman generator has some issues when using Node.js 12 or 13. So, I recommend using nvm, and install Node.js 10.x, which is the environment that worked for me.

If everything has gone as planned, then we would have generated the base layer of our machinepack. Let’s take a peek:

DELETE_THIS_FILE.md
machines/
package.json
package.lock.json
README.md
index.js
node_modules/

The above are the files generated for you. Let’s play with our example machine, found inside the machines directory. Because we have the machinepack CLI tool installed, we could run the following:

machinepack ls

This would list the available machines in our machines directory. Currently, there is one, the say-hello machine. Let’s find out what say-hello does by running this:

machinepack exec say-hello

This will prompt you for a name to enter, and it will print the output of the say-hello machine.

As you’ll notice, the CLI tool is leveraging the standardization of machines to get the machine’s description and functionality. Pretty neat!

Let’s Make A Machine

Let’s add our own machine, which will wrap the file-contributors and node-fetch packages (we will also need to install those with npm). So, run this:

npm install file-contributors node-fetch --save

Then, add a new machine by running:

machinepack add

You will be prompted to fill in the friendly name, the description (optional), and the extended description (also optional) for the machine. After that, you will have successfully generated your machine.

Now, let’s flesh out the functionality of this machine. Open the new machine that you generated in your editor. Then, require the file-contributors package, like so:

const fetch = require('node-fetch');
const getFileContributors = require('file-contributors').default;

global.fetch = fetch; // workaround since file-contributors uses windows.fetch() internally

Note: We are using node-fetch package and the global.fetch = fetch workaround because the file-contributors package uses windows.fetch() internally, which is not available in Node.js.

The file-contributors’ getFileContributors requires three parameters to work: owner (the owner of the repository), repo (the repository), and path (the path to the file). So, if you’ve been following along, then you’ll know that these would go in our inputs key. Let’s add these now:

...
 inputs: {
    owner: {
      friendlyName: 'Owner',
      description: 'The owner of the repository',
      required: true,
      example: 'DominusKelvin'
    },
    repo: {
      friendlyName: 'Repository',
      description: 'The Github repository',
      required: true,
      example: 'machinepack-filecontributors'
    },
    path: {
      friendlyName: 'Path',
      description: 'The relative path to the file',
      required: true,
      example: 'README.md'
    }
  },
...

Now, let’s add the exits. Originally, the CLI added a success exit for us. We would modify this and then add another exit in case things don’t go as planned.

exits: {

    success: {
      outputFriendlyName: 'File Contributors',
      outputDescription: 'An array of the contributors on a particular file',
      variableName: 'fileContributors',
      description: 'Done.',
    },

    error: {
      description: 'An error occurred trying to get file contributors'
    }

  },

Finally let’s craft the meat of the machine, which is the fn:

 fn: function(inputs, exits) {
    const contributors = getFileContributors(inputs.owner, inputs.repo, inputs.path)
    .then(contributors => {
      return exits.success(contributors)
    }).catch((error) => {
      return exits.error(error)
    })
  },

And voilà! We have crafted our first machine. Let’s try it out using the CLI by running the following:

machinepack exec get-file-contributors

A prompt would appear asking for owner, repo, and path, successively. If everything has gone as planned, then our machine will exit with success, and we will see an array of the contributors for the repository file we’ve specified.

Usage In Code

I know we won’t be using the CLI for consuming the machinepack in our code base. So, below is a snippet of how we’d consume machines from a machinepack:

    var FileContributors = require('machinepack-filecontributors');

// Fetch metadata about a repository on GitHub.
FileContributors.getFileContributors({
  owner: 'DominusKelvin',
  repo: 'vue-cli-plugin-chakra-ui',
   path: 'README.md' 
}).exec({
  // An unexpected error occurred.
  error: function (){
  },
  // OK.
  success: function (contributors){
    console.log('Got:n', contributors);
  },
});

Conclusion

Congratulations! You’ve just become familiar with the machine specification, created your own machine, and seen how to consume machines. I’ll be glad to see the machines you create.

Resources

Check out the repository for this article. The npm package we created is also available on npm.

(ra, il, al)

Categories: Others Tags: