Archive

Archive for May, 2020

WordPress Block Transforms

May 19th, 2020 No comments

This has been the year of Gutenberg for us here at CSS-Tricks. In fact, that’s a goal we set at the end of last year. We’re much further along that I thought we’d be, authoring all new content in the block editor¹, enabling the block editor for all content now. That means when we open most old posts, we see all the content in the “Classic” block. It looks like this:

A post written on CSS-Tricks before we were using the block editor.

The entire contents of the post is in a single block, so not exactly making any use of the block editor. It’s still “visual,” like the block editor, but it’s more like the old visual editor using TinyMCE. I never used that as it kinda forcefully mangled HTML in a way I didn’t like.

This is the #1 thing I was worried about

Transforming a Classic block into new blocks is as trivial as selecting the Classic block and selecting the “Convert to Blocks” option.

Select the option and the one block becomes many blocks.

How does the block editor handle block-izing old content, when we tell it to do that from the “Convert to Blocks” option? What if it totally screws up content during the conversion? Will we ever be able to switch?

The answer: it does a pretty darn good job. But… there are still issues. Not “bugs” but situations where we have custom HTML in our old content and it doesn’t know what to do with it — let alone how to convert it into exactly the blocks we wish it would. There is a way!

Basic Block Transforms

That’s where this idea of “Block Transforms” comes in. All (well, most?) native blocks have “to” and “from” transformations. You’re probably already familiar with how it manifests in the UI. Like a paragraph can transform “to” a quote and vice versa. Here’s a super meta screenshot of this very paragraph:

Those transforms aren’t magic; they are very explicitly coded. When you register a block, you specify the transforms. Say you were registering your own custom code block. You’d want to make sure that you could transform it…

  • From and to the default built-in code block, and probably a handful of others that might be useful.
  • Back to the built-in code block.

Which might look like:

registerBlockType("my/code-block", {
  title: __("My Code Block"),
  ...
  transforms: {
    from: [
      {
        type: "block",
        priority: 7,
        blocks: ["core/code", "core/paragraph", "core/preformatted"],
        transform: function (attributes) {
          return createBlock("my/code-block", {
            content: attributes.content,
          });
        },
      },
    ],
    to: [
      {
        type: "block",
        blocks: ["core/code"],
        transform: ({ content }) => createBlock("core/code", { content }),
      },
    ],
   
   ...

Those are transforms to and from other blocks. Fortunately, this is a pretty simple block where we’re just shuffling the content around. More complex blocks might need to pass around more data, but I haven’t had to deal with that yet.

The more magical stuff: Block Transforms from raw code

Here’s the moment of truth for old content:

The “Convert to Blocks” option.

In this situation, blocks are being created not from other blocks, but from raw code. Quite literally, the HTML is being looked at and choices are being made about what blocks to make from chunks of that HTML. This is where it’s amazing the block editor does such a good job with the choices, and also where things can go wrong and it can fail, make wrong block choices, or mangle content.

In our old content, a block of code (a super very important thing) in a post would look like this:

<pre rel="JavaScript"><code class="language-javascript" markup="tt">
  let html = `<div>cool</div>`;
</code></pre>

Sometimes the block conversion would do OK on those, turning it into a native code block. But there were a number of problems:

  1. I don’t want a native code block. I want that to be transformed into our own new code block (blogged about that here).
  2. I need some of the information in those attributes to inform settings on the new block, like what kind of code it is.
  3. The HTML in our old code blocks was not escaped and I need it to not choke on that.

I don’t have all the answers here, as this is an evolving process, but I do have some block transforms in place now that are working pretty well. Here’s what a “raw” transform (as opposed to a “block” transform) looks like:

registerBlockType("my/code-block", {
  title: __("My Code Block"),
  // ...
  transforms: {
    from: [
      {
        type: "block",
        priority: 7,
        // ...
      },
      {
        type: "raw",
        priority: 8,
        isMatch: (node) =>
          node.nodeName === "PRE" &&
          node.children.length === 1 &&
          node.firstChild.nodeName === "CODE",
        transform: function (node) {
          let pre = node;
          let code = node.querySelector("code");

          let codeType = "html";
          if (pre.classList.contains("language-css")) {
            codeType = "css";
          }
          if (pre.getAttribute("rel") === "CSS") {
            codeType = "css";
          }
          if (pre.classList.contains("language-javascript")) {
            codeType = "javascript";
          }
          if (code.classList.contains("language-javascript")) {
            codeType = "javascript";
          }
          // ... other data wrangling...

          return createBlock("csstricks/code-block", {
            content: code.innerHTML,
            codeType: codeType,
          });
        },
      },
    ],
    to: [
      // ... 
    ],
   
   // ...

}

That isMatch function runs on every node in the HTML it finds, so this is the big opportunity to return true from that in the special situations you need to. Note in the code above that I’m specifically looking for HTML that looks like

. When that matches, the transform runs, and I can return a createBlock call that passes in data and content I extract from the node with JavaScript. 

Another example: Pasting a URL

“Raw” transforms don't only happen when you “Convert to Blocks.” They happen when you paste content into the block editor too. You've probably experienced this before. Say you have copied some table markup from somewhere and paste it into the block editor -— it will probably paste as a table. A YouTube URL might paste into an embed. This kind of thing is why copy/pasting from Word documents and the like tend to work so well with the block editor.

Say you want some special behavior when a certain type of URL is pasted into the editor. This was the situation I was in with our custom CodePen Embed block. I wanted it so if you pasted a codepen.io URL, it would use this custom block, instead of the default embed.

This is a “from” transform that looks like this:

{
  type: "raw",
  priority: 8, // higher number to beat out default
  isMatch: (node) =>
    node.nodeName === "P" &&
    node.innerText.startsWith("https://codepen.io/"),

  transform: function (node) {
    return createBlock("cp/codepen-gutenberg-embed-block", {
      penURL: node.innerText,
      penID: getPenID(node.innerText), // helper function
    });
  },
}

So…

Is it messy? A little. But it's as powerful as you need it to be. If you have an old site with lots of bespoke HTML and shortcodes and stuff, then getting into block transforms is the only ticket out.

I'm glad I went to WPBlockTalk and caught K. Adam White's talk on shortcodes because there was just one slide that clued me into that this was even possible. There is a little bit of documentation on it.

One thing I'd like to figure out is if it's possible to run these transforms on all old content in the database. Seems a little scary, but also like it might be a good idea in some situations. Once I get my transformations really solid, I could see doing that so any old content ready-to-go in the block editor when opening it up. I just have no idea how to go about it.

I'm glad to be somewhat on top of this though, as I friggin love the block editor right now. It's a pleasure to write in and build content with it. I like what Justin Tadlock said:

The block system is not going anywhere. WordPress has moved beyond the point where we should consider the block editor as a separate entity. It is an integral part of WordPress and will eventually touch more and more areas outside of the editing screen.

It's here to stay. Embracing the block editor and bending it to our will is key.

  1. What are we calling it anyway? “Gutenberg” doesn't seem right anymore. Feels like that will fade away, even though the development of it still happens in the Gutenberg plugin. I think I'll just call it “the block editor” unless specifically referring to that plugin.

The post WordPress Block Transforms appeared first on CSS-Tricks.

Categories: Designing, Others Tags:

How to Build a Chrome Extension

May 19th, 2020 No comments

I made a Chrome extension this weekend because I found I was doing the same task over and over and wanted to automate it. Plus, I’m a nerd during a pandemic, so I spend my weird pent-up energy building things. I’ve made five Chrome extensions with that energy, yet I still find it hard to locate the docs to make them. Some things are outdated or deprecated. Some things are simply buried. I’m writing this as a bit of tutorial (1) in case it’s helpful to others and certainly (2) for myself the next time I want to build a Chrome extension.

Let’s get started.

Create the manifest

The very first step is creating a manifest.json file in a project folder. This serves a similar purpose to a package.json, only it provides the Chrome Web Store with critical information about the project, including the name, version, the required permissions, and so forth. Here’s an example:

{
 "manifest_version": 2,
 "name": "Sample Name",
 "version": "1.0.0",
 "description": "This is a sample description",
 "short_name": "Short Sample Name",
 "permissions": ["activeTab", "declarativeContent", "storage", "<all_urls>"],
 "content_scripts": [
   {
     "matches": ["<all_urls>"],
     "css": ["background.css"],
     "js": ["background.js"]
   }
 ],
 "browser_action": {
   "default_title": "Does a thing when you do a thing",
   "default_popup": "popup.html",
   "default_icon": {
     "16": "icons/icon16.png",
     "32": "icons/icon32.png"
   }
 }
}

You might notice a few things, like not all of that data is necessary. The names and descriptions can be anything you’d like.

The permissions depend on what the extension needs to do. We have ["activeTab", "declarativeContent", "storage", ""] in this example because this particular extension needs information about the active tab, needs to change the page content, needs to access localStorage, and needs to be active on all sites. If it only need it to be active on one site at a time, then there’s no need for that line and it can be removed altogether.

A list of all of the permissions and what they mean can be found in Chrome’s extension docs.

"content_scripts": [
  {
    "matches": ["<all_urls>"],
    "css": ["background.css"],
    "js": ["background.js"]
  }
],

The content_scripts section sets the sites where the extension should be active. If you want a single site, like Twitter for example, you would say ["https://twitter.com/*"]. The CSS and JavaScript files are everything needed for extensions. For instance, my productive Twitter extension uses these files to override Twitter’s default appearance.

"browser_action": {
  "default_title": "Does a thing when you do a thing",
  "default_popup": "popup.html",
  "default_icon": {
    "16": "icons/icon16.png",
    "32": "icons/icon32.png"
  }
}

There are things in browser_action that are also optional. For example, if the extension doesn’t need a popup for its functionality, then both the default_title and default_popup can be removed. In that case, all that’s needed the icon for the extension. If the extension only works on some sites, then Chrome will grey out the icon when it’s inactive.

Debugging

Once the manifest, CSS and JavaScript files are ready, head over to chrome://extensions/from the browser’s address bar and enable developer mode. That activates the “Load unpacked” button to add the extension files. It’s also possible to toggle whether or not the developer version of the extension is active.

I would highly recommend starting a GitHub repository to version control the files at this point. It’s a good way to save the work.

The extension needs to be reloaded from this interface when it is updated. A little refresh icon will display on the screen. Also, if the extension has any errors during development, it will show an error button with a stack trace and more info here as well.

Popup functionality

If the extension need to make use of a popup, it’s thankfully fairly straightforward. After designating the name of the file with browser_action in the manifest file, a page can be built with whatever HTML and CSS… including a popup!

Now, we’ll probably want to add some functionality to a popup. That make take some JavaScript, so make sure the JavaScript file is designated in the manifest file and is linked up in your popup file as well, like this:

In that file, start to creating functionality and we’ll have access to the popup DOM like this:

document.addEventListener("DOMContentLoaded", () => {
 var button = document.getElementById("submit")

 button.addEventListener("click", (e) => {
   console.log(e)
 })
})

If we create a button in the popup.html file, assign it an ID called submit, and then return a console log, you might notice that nothing is actually logged in the console. That’s because we’re in a different context, meaning we’ll need to right-click on the popup and open up DevTools.

Showing the "Inspect" option to open DevTools after right-clicking on an element on the page.

We now have access to logging and debugging! Keep in mind, though, that if anything is set in localStorage, then it will only exist in the extension’s localStorage; not the user’s browser localStorage. (This bit me the first time I tried!)

Running scripts outside the extension

This is all fine and good, but say we want to run a script that has access to information on the current tab? Here’s a couple of ways we would do this. I would typically call a separate function from inside the DOMContentLoaded event listener:

Example 1: Activate a file

function exampleFunction() {
 chrome.tabs.executeScript(() => {
   chrome.tabs.executeScript({ file: "content.js" })
 })
}

Example 2: Just execute a bit of code

This way is great if there’s only a small bit of code to run. However, it quickly gets tough to work with since it requires passing everything as a string or template literal.

function exampleFunction() {
 chrome.tabs.executeScript({
   code: `console.log(‘hi there')`
  })
}

Example 3: Activate a file and pass a parameter

Remember, the extension and tab are operating in different contexts. That makes passing parameters between them a not-so-trivial task. What we’ll do here is nest the first two examples to pass a bit of code into the second file. I will store everything I need in a single option, but we’ll have to stringify the object for that to work properly.

function exampleFunction(options) {
 chrome.tabs.executeScript(
   { code: "var options = " + JSON.stringify(options) },
   function() {
     chrome.tabs.executeScript({ file: "content.js" })
   }
 )
}

Icons

Even though the manifest file only defines two icons, we need two more to officially submit the extension to the Chrome Web Store: one that’s 128px square, and one that I call icon128_proper.png, which is also 128px, but has a little padding inside it between the edge of the image and the icon.

Keep in mind that whatever icon is used needs to look good both in light mode and dark mode for the browser. I usually find my icons on the Noun Project.

Submitting to the Chrome Web Store

Now we get to head over to the Chrome Web Store developer console to submit the extension! Click the “New Item” button, the drag and drop the zipped project file into the uploader.

From there, Chrome will ask a few questions about the extension, request information about the permissions requested in the extension and why they’re needed. Fair warning: requesting “activeTab” or “tabs” permissions will require a longer review to make sure the code isn’t doing anything abusive.

That’s it! This should get you all set up and on your way to building a Chrome browser extension!

The post How to Build a Chrome Extension appeared first on CSS-Tricks.

Categories: Designing, Others Tags:

User agents

May 19th, 2020 No comments

Jeremy beating the classic drum:

For web development, start with HTML, then CSS, then JavaScript (and don’t move on to JavaScript too quickly—really get to grips with HTML and CSS first).

And then…

That’s assuming you want to be a good well-rounded web developer. But it might be that you need to get a job as quickly as possible. In that case, my advice would be very different. I would advise you to learn React.

JEREMY! HAS YOUR WEBSITE BEEN STOLEN? BLINK TWICE IF YOU NEED HELP.

Just kidding, just kidding. I don’t disagree at all. I’m a fan of React, if you couldn’t tell. But I’ve also been around the block a few times and like to think I have a decent sense of what the right tools for the job are most of the time.

Make sure to read Jeremy’s post to see why it’s called “User agents.” He means it quite literally.

Direct Link to ArticlePermalink

The post User agents appeared first on CSS-Tricks.

Categories: Designing, Others Tags:

Using BugHerd to Track Visual Feedback on Websites

May 19th, 2020 No comments

BugHerd is about collecting visual feedback for websites.

If you’re like me, you’re constantly looking at your own websites and you’re constantly critiquing them. I think that’s healthy. Nothing gets better if you look at your own work and consider it perfectly finished. This is where BugHerd shines. With BugHerd, anytime you have one of those little “uh oh this area is a little rough” moments while looking at your site, you can log it to be dealt with.

Let’s take a look at a workflow like that. I’m going to assume you’ve signed up for a BugHerd account (if not grab a free trial here) and either installed the script on your site or have installed the browser extension and are using that.

I’ve done that for this very site. So now I’m looking at a page like our Archives Page, and I spot some stuff that is a little off.

I’ve taken a screenshot and circled the things that I think are visually off:

  1. The “Top Tags” and dropdown arrow are pretty far separated with nothing much connecting them. Maybe dropdowns like that should have a background or border to make that more clear.
  2. There is a weird shadow in the middle of the bottom line.

With BugHerd, I can act upon that stuff immediately. Rather than some janky workflow involving manual screenshots and opening tickets on some other unrelated website, I can do it right from the site itself.

  1. I open the BugHerd sidebar
  2. I click the green + button
  3. Select the element around where I want to give the visual feedback
  4. Enter the details of the bug

Their help video does a great job of showing this.

Here’s me logging one of those bugs I found:

Now, the BugHerd website becomes my dashboard for dealing with visual bugs. This unlocks a continual cycle of polish that that is how great websites get great!

Note the kanban board setup, which is always my prefered way to work on any project. Cards are things that need to be worked on and there are columns for cards that aren’t started, started, and finished. Perhaps your team works another way though? Maybe you have a few more columns you generally kanban with, or you name them in a specific way? That’s totally customizable in BugHerd.

I love that BugHerd itself is customizable, but at a higher level, the entire workflow is customizable and that’s even better.

  • I can set up BugHerd just for myself and use it for visual improvement work on my own projects
  • I can set up BugHerd for just the design team and we can use it among ourselves to track visual issues and get them fixed.
  • I can set up BugHerd for the entire company, so everyone feels empowered to call out visual rough spots.
  • I can set up BugHerd for clients, if I’m a freelancer or agency worker, so that the clients themselves can use it to report visual feedback.
  • I can open up BugHerd wide open so that guests of these websites can use it to report visual problems.

Check out this example of a design team with core members and guests and their preferred workflow setup:

It’s hard to imagine a better dedicated tool than BugHerd for visual feedback.

The post Using BugHerd to Track Visual Feedback on Websites appeared first on CSS-Tricks.

Categories: Designing, Others Tags:

Can Data Visualization Improve The Mobile Web Experience?

May 19th, 2020 No comments
Visual.ly infographic: web designer vs. web developer job statistics

Can Data Visualization Improve The Mobile Web Experience?

Can Data Visualization Improve The Mobile Web Experience?

Suzanne Scacca

2020-05-19T11:30:00+00:00
2020-05-21T07:12:38+00:00

It can be tough to prioritize the mobile experience when it often feels like a compromise. Don’t include as much text. Remove some of your images. Stay away from features that get in the mobile visitor’s way. It’s kind of like a parent who tells you, “Go out and have a good time, but don’t do X, Y or Z!”

It’s not necessarily that a mobile visitor needs a shorter page, less text or fewer images to more easily consume content on a smartphone. They just need the content you give them to not feel like so much work.

If you look more closely at your pages, you may find that some of the written content can be converted into data visualizations. So, today we’re going to look at some things you can do to start converting more of your content into graphics and enhance mobile visitors’ experiences in the process.

Quantitative Data Tools

Many UX designers are somewhat afraid of data, believing it requires deep knowledge of statistics and math. Although that may be true for advanced data science, it is not true for the basic research data analysis required by most UX designers. ?

1. Go Beyond Traditional Data Visualization Formats

When you think about displaying data in a graphical format, what do you envision? Probably graphs and charts like this:

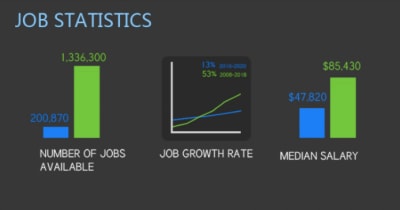
Visual.ly infographic: web designer vs. web developer job statistics

A snapshot of an infographic from Visual.ly that displays web designer vs. web developer job statistics. (Image source: Visual.ly) (Large preview)

This screenshot comes from a Visual.ly infographic comparing web designers and developers. This particular piece of it deals with jobs-related statistical data, so it makes sense that it would be translated into bar graph and line chart formats.

As a writer, I’m a huge fan of this kind of data visualization because having to write out stats can be a major bummer. Like I know there’s a significant difference between the data points, but I can only use bold fonts and bulletpoints so many times before readers start to look for the next new interesting thing to focus on.

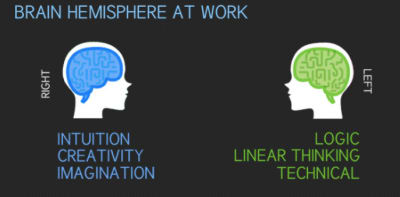
When strong data sets are designed rather than written, readers are less likely to skip over and unintentionally miss critical information. But it’s not just data that can be visualized. Take this other segment from the infographic, for example:

 Visual.ly infographic: web designer vs. web developer right vs. left brain

A snapshot of an infographic from Visual.ly that displays web designer vs. web developer right vs. left brain thinking. (Image source: Visual.ly) (Large preview)

This could’ve been written as a paragraph (e.g. “_In general, web designers are right brain thinkers, leveraging intuition, creativity, blah blah blah…_”). It could’ve also been displayed as a table:

Web Designer Web Developer
Brain Hemisphere Right Left
Driven By Intuition Logic
Approach Creativity Linear Thinking
Strength Imagination Technical

While this would’ve perhaps been easier to read than a wall of text, it’s not nearly as interesting as the graphic above.

In order to identify different kinds of data worth turning into graphics, it’s going to require web designers to do some thinking outside the box. I’d recommend you start by acquainting yourself with the different kinds of data visualizations that exist. You can use The Duke University Library for that. It has an entire page that shows how different kinds of information can be translated into graphics, like this example of a scatter plot:

Duke University Library - scatter plot visualization example

The Duke University Library provides an example of a scatter plot visualization. (Image source: Duke University Library) (Large preview)

The Pudding took this basic concept of charting data points over time and turned it into something unique in its “Colorism in High Fashion” article.

This is a graphic that represents the spectrum of skin tones that have been presented on the cover of Vogue:

The Pudding “Colorism in High Fashion” graphic - trends in skin tones

The Pudding depicts trends in the skin tones of Vogue cover models in its article “Colorism in High Fashion”. (Image source: The Pudding) (Large preview)

This is a much more effective and eye-catching way to relay this information than to have a writer say, “Over the magazine’s 200-plus issues, 75% of Vogue’s cover models tend more towards fairer skin tones.”

That said, this graphic on its own isn’t a scatter plot as it only depicts quantity and trends. However, scrolling does eventually turn it into a scatter plot:

The Pudding “Colorism in High Fashion” graphic - skin tones scatter plot graphic

The Pudding uses a scatter plot to display how Vogue cover model skin tones have changed over time. (Image source: The Pudding) (Large preview)

Notice how each of the orbs has been pulled out onto a timeline, representing the faces of the models on the magazine covers. This is not the traditional way to use a scatter plot chart, but, in this case, it works really well. And, again, it does a much more effective job in getting the point across on mobile than a wall of text.

As you look for ways to do this in your own work, hone in on the following elements:

  • Statistical data,
  • Short bulleted lists,
  • Highly complex topics,
  • Step-by-step explainers,
  • Page or topic summaries.

These present the best opportunities for turning essential data or topics into visualizations.

2. Design Your Data Visualizations To Be Filterable

Of course, you don’t want to overdo it. In your mission to preserve your website’s message on mobile, you don’t want to create so many graphics that it compromises page speed or that they start to feel overwhelming.

One solution to data visualization overload is to create a single graphic, but use filters to control which data sets are displayed. Not only does this enable you to deliver a ton of visual information in a smaller amount of space, but it can become a competitive edge, too. Let me show you an example.

The reason why a CDN is useful is because it puts your website geographically closer to your target audience. If the CDN doesn’t have the reach to do that, then it’s not worth the trouble. That’s why, of all the considerations people have to make when finding a provider, they have to look at where their points of presences actually are.

This is how Google Cloud displays this information for its content delivery network:

Google Cloud CDN PoP locations

Google Cloud uses a static map to display its CDN PoP locations to prospective users. (Image source: Google Cloud) (Large preview)

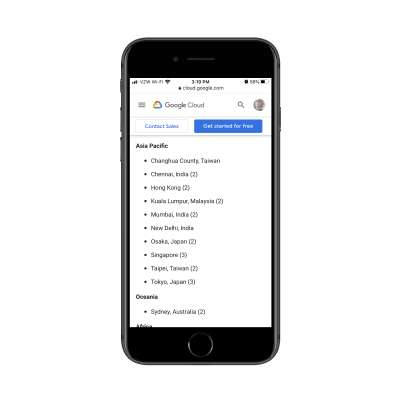
This is a great graphic as it shows where its cache locations are and how broad of an area the network covers. However, this is a static image, so what you see is what you get. Google has to use the rest of the page to list off all the major cities where it has a CDN presence:

Google Cloud CDN caching - list of cities

Google Cloud publishes a list of all its CDN cache locations around the world. (Image source: Google Cloud) (Large preview)

But this is what I’m talking about. This list should be part of the visualization.

Akamai, a competitor to Google Cloud CDN, has designed its media network map this way:

Akamai media delivery network map - media and storage locations

Akamai’s media delivery network map shows all its media and storage point of presences. (Image source: Akamai) (Large preview)

On this map, you can see Akamai’s media delivery network (in orange) and its media and storage locations (in pink).

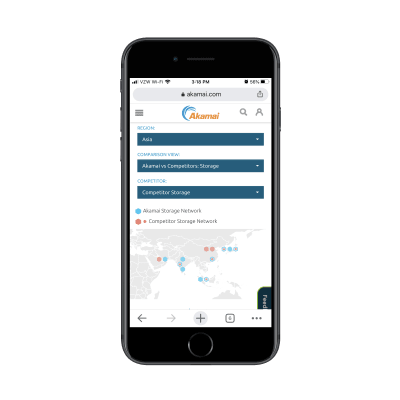
Prospective users interested in going deeper into the data can use the filters at the top of the page. For instance, this is what the map looks like when someone searches the Asia region:

Akamai media delivery network map - Asia region

Akamai’s media delivery network map with a focus on the Asia region. (Image source: Akamai) (Large preview)

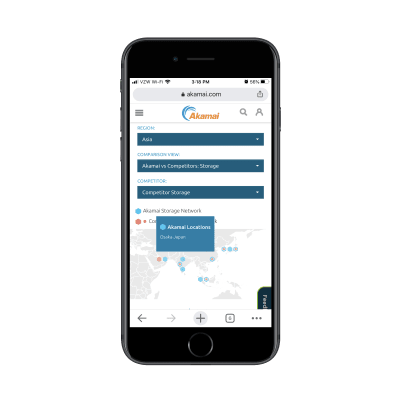
And this is what they see when they choose to view Akamai’s storage network against its competitors:

Akamai media delivery network map - Asia storage vs. competitors

Akamai’s media delivery network map set to view Akamai’s Asian storage network against its competitors. (Image source: Akamai) (Large preview)

Not only does this data visualization design let visitors closely survey the data that’s most relevant to them, but it aids in their decision-making process, too.

This approach is really useful if you want to turn a whole bunch of data into a data visualization without having to overwhelm the page with it. And with this particular model of filtering, you can spare your visitors the trouble of having to pinch to zoom in and out of the graphic. They can customize the view on their own and get to the most relevant bits with ease.

3. Make Your Data Visualizations Interactive

Another thing you can do to pack a ton of information into a single graphic is to make your data visualizations interactive. Not only will this declutter your mobile UI, but it’ll get your visitors to pause and really take time to understand the information they’re being shown.

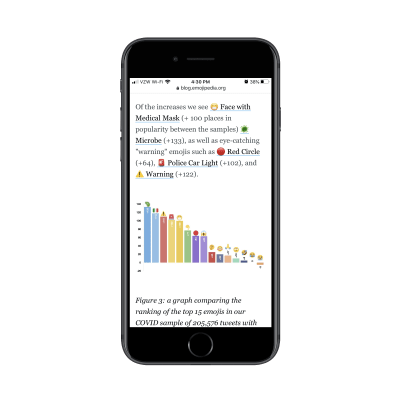
This is a recent post from Emojipedia. The article shares the results of a study they conducted on emoji usage during the coronavirus. It’s a fantastic read and it’s chock-full of data visualizations like this one:

Emojipedia article - coronavirus emoji trends

An Emojipedia article on coronavirus emoji usage includes data visualizations throughout. (Image source: Emojipedia) (Large preview)

The design is certainly attractive, but it’s not easy to see all the details within the graphic on mobile. This is where interactivity would come in handy.

By making each of the bars in the graph clickable, people could get more information about the emoji, see the percentage increases clearly, and so on.

Something I didn’t show you in the last point is that the Akamai CDN map is interactive:

Interactive Akamai media delivery network map - locations in Osaka, Japan

Akamai’s media delivery network map is interactive. (Image source: Akamai) (Large preview)

This is the exact approach I would suggest for the Emojipedia bar graph. By turning each data point into a clickable element, users don’t have to struggle to gain all the information they need nor do you have to overwhelm them with too much data within a single graphic.

What’s nice about interactivity is that you can apply it to a wide array of data visualizations, too.

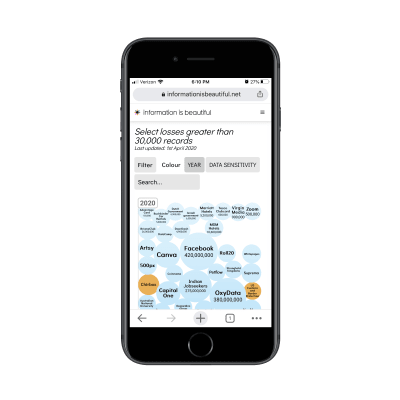
Here’s an example of a bubble chart from Information Is Beautiful:

Information Is Beautiful - bubble chart of most serious global data breaches

A graphic from Information Is Beautiful that depicts the most serious data breaches around the world in bubble chart format. (Image source: Information Is Beautiful) (Large preview)

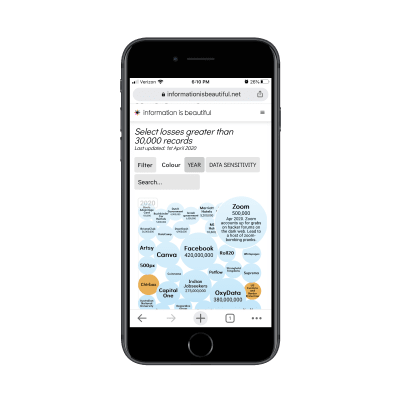
When visitors click on any of the bubbles, more information is revealed about the security breach:

Information Is Beautiful - Zoom security breach and data loss information

A graphic from Information Is Beautiful with information on a major Zoom security breach and data loss. (Image source: Information Is Beautiful) (Large preview)

One of the great things about prioritizing the mobile experience is that it allows us to find creative solutions to designing minimally. And interactions are a really good way to pull that off as the UI remains clear and easy to navigate, but tucked within it are juicy little nuggets waiting to be discovered.

Is Data Visualization The Key To A Better Mobile Experience?

There are a lot of things we can do to improve the mobile user’s experience. If you haven’t considered data visualization part of that strategy, now would be a good time to as it enables you to:

  • Condense the amount of space and time it takes to get your point across,
  • Design your pages to be more visually engaging,
  • Preserve the full integrity of your copy for mobile and desktop visitors.

That, of course, doesn’t mean that you should stop looking for ways to reduce content on mobile. If it’s unnecessary or doesn’t add value, it should go. What remains can then be evaluated for a data visualization makeover.

(ra, il)

Categories: Others Tags:

Smashing Podcast Episode 16 With Ben Frain: How Can I Optimize My Home Workspace?

May 19th, 2020 No comments
Photo of Ben Frain

Smashing Podcast Episode 16 With Ben Frain: How Can I Optimize My Home Workspace?

Smashing Podcast Episode 16 With Ben Frain: How Can I Optimize My Home Workspace?

Drew McLellan

2020-05-19T05:00:00+00:00
2020-05-21T07:12:38+00:00

In this episode of the Smashing Podcast, we’re talking about shaping our physical spaces when working from home. What can you do to take a step up from working at your kitchen table? I spoke to workspace geek Ben Frain to find out.

Show Notes

Weekly Update

Transcript

Drew McLellan: He is a web developer, author, and public speaker who specializes in CSS architecture, methodology, and training. Hailing from the UK, he currently works as a UI UX design technical lead at Bet365, but you might know him better from his books such as Responsive Web Design With HTML5 and CSS, and Enduring CSS, both from Packt publishing. He also writes for Smashing Magazine, and you may remember his series last year on building progressive web apps without a framework. We know he knows his way around the bottom web development landscape, but did you know he owns more trousers than socks? My Smashing friends, please welcome, Ben Frane. Hi Ben, how are you?

Ben Frain: I’m smashing, Drew.

Drew: I wanted to talk to you today about something slightly different from your usual specialism of CSS architecture. With social distancing measures in effect, many of us are finding ourselves needing to spend some serious time working from home. And in a quest to be productive, we might quickly find that our home workspaces aren’t necessarily the best equipped or configured to help us to work well and remain healthy. So, I wanted to talk to you a little bit about workspaces, and generally the things people might want to think about when they find themselves working from home. This is something of an interest of yours, isn’t it?

Ben: It is a little bit. I’m what you might describe as a mechanical keyboard aficionado, but I’m also tend to get myself quite obsessed about getting a physical workspace right. Obviously, a great, many of us, myself included, have been dumped in our home offices or whatever we deem to be our home offices for the foreseeable. And so, you’re continually making that trade off of trying to decide what do I invest in to make myself comfortable and get work done without wanting to spend thousands and thousands of pounds, dollars on stuff that potentially you’re not going to use for a long time. So, I think everybody or a lot of people are making these decisions about what stuff they can grab from somewhere else and what things it’s worth investing in to make things more comfortable. The old adage is always spend your money on your chair and not your desk, and I think things like that are good advice.

Drew: I mean, transitioning to working from home, I think many of us find ourselves working from a sofa or hunched over a laptop at the kitchen table. That’s not really the best way to work, is it?

Ben: No, it isn’t. I mean, I can remember the old house where I used to live, because I had a day job, like a lot of other people and then I’m writing books in the evening, and I can remember spending months at a time where I would put a bread board on my desk hub and my laptop on top of that, and that was my standing desk in the evenings, which actually wasn’t so bad because it did force me to be up right for decent portions of the day. I was looking at before the whole COVID thing came about, because I’d started to write another book in the evenings. I’d made the deal with myself that I would buy one of these electronically adjustable standing desks which I found great utility in. It was a lot of money at the time for a desk because … I mean, obviously, people decide what they want to spend the money on differently, but it always felt like a bit of an indulgence.

Ben: But having had it now, I think it’s worth every penny and I really enjoy the fact that I can sit for a bit and then stand for a bit, and there’s not … You can get the manual ones where you crank a handle like an old 1920s car to get the desk up and down. I went for the electronic one even though it’s quite a bit extra, but I’m glad I did because I’m lazy and I probably would never use that handle.

Drew: So, if we’re looking to move off our kitchen table and think about getting some sort of desk, sit stand is one thing to bear in mind, are there other considerations we should make with a desk?

Ben: Yeah, I mean, I think the actual sort of the desk top itself, you can get very inexpensively, even places like Ikea, which have obviously been thrashed with everybody trying to get hold of an inexpensive desk at the moment, but you can still get a slab of wood fairly inexpensively. I mean, chair is obviously the big one. I mean, I’m lucky in that touch wood, I’ve never had any problems with back or any of that thing that is typical of people that work at computers all day. But I think even things like a popular one that you see is like the Herman Miller Aeron, is one of the very popular maker chair, but really quite expensive. But you can pick them up around $300, something like that refurbished, which is probably when you’re trying to decide where to put your money to be comfortable for a whole day’s work, it perhaps isn’t as bad as it sounds. And then obviously the same, I know some people struggle with RSI, so I know a lot of colleagues of mine have got the vertical mice which is they’re relatively popular to prevent that, which again, more expensive than your typical mouse, but people don’t always consider the fact that.

Ben: I know trades people who work as builders and that they will think nothing of spending a few thousand pounds on a particular piece of kit. And yet often we will just use whatever comes stocked with a computer that we have and we’ll bulk at the idea of spending a hundred dollars on a mouse or $200 on a keyboard. And yet really we have a relatively low entry point in terms of cost in order to do what we do. I think we have a tendency to be a little bit perhaps cheapskate in that regard. But if you find yourself getting physical problems or you’re not as comfortable as you may be, it perhaps is worth thinking about those things before buying other things I guess.

Drew: I guess preventative expenditure on decent chair for example, will save you an awful lot when it comes to medical bills and physiotherapy or anything like that that is required to put the problem right.

Ben: Yeah. And I suppose it’s all conducive to you being good at what you do or being the best that you can at what you do. If your limitation is a kit that you use, and you can alleviate that limit, then it seems sensible to do so.

Drew: So if we’re thinking about spending money on our work environment, if we’re currently sat at the kitchen table on a wooden chair or whatever, you’d reckon a chair is the best place to start?

Ben: That would be my advice. Yeah. I mean, I can’t profess to be an authority on these things, but it seems it’s a sensible, it’s probably the single most important thing you could do to make yourself comfortable throughout the day. You can start with something fairly expensive. I made the same mistake and I ended up getting a 45 pound office chair from Amazon and I didn’t realize that it didn’t have a tilt forward, whatever the right word for that thing is, on the axis. So what I found is it was digging into the underside of my thighs, behind my knees and I was thinking, why are my legs going dead after 45 minutes of sitting in that thing? And you just don’t, I think particularly if you work for a company that provides decent office chairs, you just take them for granted and it isn’t until you look at that particular make and brand that you go, “Oh my God, this is a $700 chair.” When you realize that crikey, people have thought about this and done a lot for you and then obviously you come to your home environment and you think, “Why not spending X hundred dollars on a chair?” But maybe it is worth it. Particularly if you’re here for the long haul.

Drew: And we talk a lot as developers, don’t we? About this productivity consideration of being in the zone and being able to get in the flow of writing code or working on a thing and time just seems to pass by and you can be super productive. Well, one thing I’ve found that can pull you out of that zone quite quickly is needing to stop and stretch because your legs have gone dead or your back’s aching. That can really disrupt your productivity as well as the longer health implications of that.

Ben: I mean, what have you found true in your situation? What have you done? What have you found the most effective?

Drew: So at the moment during lockdown I am staying with my parents, so I’m on my mother’s desk, which has a filing cabinet on one end and a bookcase on the other. So it’s all a bit makeshift. But at home normally, I do just have a couple of the cheapest Ikea desks organized in an L shape. So I tend to work with a couple of computers, and I have one on one and one on the other and spin between them. I used to have a lower back complaint quite regularly in my twenties where I would be sat on my desk for long periods and occasionally every few months I would find I couldn’t get out of bed in the morning because something in my back had gone. And the thing that immediately helped with that was, as you were saying, the tip forward seat angle on a chair. So having a chair that did that immediately helped because I think it resolved my posture.

Drew: So that helped immediately, but longterm what has helped and what means I don’t have any back problems at all now is just improving my personal level of fitness and activity. And that just having a bit more core strength and being just a bit more fitter and a bit more active has meant that I can actually, I can sit in some fairly bad chairs and things for a while and survive it. Yes, very much immediately having a chair that would tilt forward just to bring my back up and get me into a good posture, that was a definite, definite improvement for my back immediately.

Ben: Yeah. I mean, that’s interesting because it’s another thing that I guess a lot of us are missing now is, I mean, I’m by no means a gym rat at all. I just go because I don’t want to die essentially. But things like good barbells with plate weights, I naively thought, well, I’ll just go to my local shop. I’ll be able to get some of those maybe a hundred pounds and then you realize that a decent barbell itself is $200 at least. But obviously stuff like that and keeping yourself in a decent physical shape whilst you’re a couch potato is quite important as well. So much to think about for the people that have not been working from home and all these things become apparent very quickly.

Drew: Definitely. And in terms of working from home, one of the things I find that I’m doing a lot lately is spending time in virtual meetings via Zoom or Skype or whatever. Are there any things, any considerations you’ve made in terms of making the environment better for being on calls?

Ben: I suppose. I mean, obviously putting your screen away from all your socks and pants, that’s probably quite important. I mean, I’ve found as well that perhaps try and be conscious of the fact that at first I was raising the desk because I’ve got this desk that will raise up and a couple of people said to me, it looks like you’re about to tell me off because I was looming over them because the … long story short, I suppose making sure that when you take calls, it’s quite nice to be looking directly into the webcam. I always tend to ask people if possible, if we can do a face to face call because I think one of the things we’re incredibly lucky in this situation about is that speaking on a video call now is so much better or even when you didn’t even have it 20 years ago. And being able to see this nuance in people’s expressions is so much more useful on a remote call than just hearing the voice. And so if you’re going to do that obviously, being able to look straight down the camera or so that they can see you not at some weird awkward angle and there’s some okay lighting in the room, I say this as I look at myself half and dark in this situation, but those sorts of things are worth thinking about I think.

Drew: One thing I’ve found has really helped with my setup is I’ve got a big LED panel light. It’s called an Elgato key light, which is on a big stand.

Ben: Oh, like a big uplighter sort of thing?

Drew: It clamps onto the desk and is on a big pole and then sits above the monitor and shines a blanket of light down on there.

Ben: Oh, that’s pretty good. So it’s more like a daylight kind of light I take it?

Drew: Well, yes. You can actually adjust the color temperature and the brightness of it from software on your desktop.

Ben: How can you tell a difference if you use that light? Does it feel better?

Drew: It makes a big difference. Yes, especially you get often with webcams. You get the situation where the background is more lit by the windows in the room than you are and the camera doesn’t expose for the right thing. So making sure that you as the subject and nice and bright in the frame really helps the camera to get good focus and therefore your facial features are clearer and you can communicate well that way.

Ben: These are like Hollywood techniques, truths. Incredible. I mean, does that help as well with things like glare on your screen because you get in a more even diffused light in the room? Or have you not noticed?

Drew: It’s not particularly lighting the screen. No.

Ben: Okay.

Drew: I mean, glare on the screen is a definite thing that we should really think about in terms of workspaces. Where I am here, I’ve got conservatory windows at the end of the rooms. There’s a lot of light flooding in there.

Ben: I was just going to say, just what you need.

Drew: First thing in the morning, it can be very, very difficult. I have my editor set on a dark theme usually. My code editor. And so then I often find that I’m not using the left hand side of my screen, which is slightly washed out by the windows and I move everything over to the right side.

Ben: And do you think that’s a subconscious thing? Just because I just can’t see it so I’ll concentrate my efforts elsewhere.

Drew: But actually probably what I should be doing is switching to the opposite color scheme in my editor. I should be switching to dark text on a light background perhaps during the day.

Ben: They’re not cool anymore though Drew. Or didn’t you get that memo?

Drew: It’s not cool, no. But neither is failing eyesight.

Ben: No, no, definitely not.

Drew: One of the sorts of things in people’s workspaces that perhaps they don’t think of so readily when you think about optimizing how you work is perhaps one of the most common input devices, which is the keyboard. You wrote recently for Smashing Magazine on the subject of mechanical keyboards, which are seeing something of a Renaissance, aren’t they?

Ben: Yes, that’s right. It is funny because I always say to people, I get… because in my circles, people that I know, people are aware of my minor obsession with these things. And so I get asked quite a lot about them. And over the months and months of this, I thought, it’s one of these sorts of areas, which is because it is quite niche you tend to end up on a particular forum for this topic and you very quickly feel like, “Oh my God, this is a level of geekery beyond something that I’m comfortable with.” And that comes from somebody who’s relatively geeky. But I think there’s definite merit in them in terms of, I would never say to somebody, this is something you absolutely need to make you better at what you do. It more falls into the camp of, because you can get a mechanical keyboard, which makes you feel productive and in some weird pseudo way that makes you more productive. So many of us take the keyboard that comes with our system.

Ben: I never think about it any more than that. And just off we go. But I was surprised once I started looking at all the plethora of different layouts that you can get because I just wasn’t aware of the fact you can get these tiny little 40% size ones, you can get 65% ones which do have the arrow keys and some of the others, but lose the function keys. And it was only when I really started to analyze what I did with a keyboard and the keys that I pressed that I realized there was whole areas of keyboard, which is taking up often a substantial portion of your free desk space where you might prefer to jot stuff down and all the rest of it. And I realized that this big desk commander that I was using with a dedicated number pad was just an indulgence really. And I thought I needed those keys and it turns out I actually didn’t.

Ben: So, aside from the physical considerations, there’s just a very nice, I mean, mechanical keyboards often, you put one in front of somebody who’s not seen one before and they just laugh and think that it’s something out of war games from the 1980s. But once you overcome the fact that it isn’t a sleek, minimal thing like that and you actually use it and you get a feel for the key travel and stuff, you actually realize that there’s a rhythm that you can get with them, which you can’t get with these very shallow chiclet keys that we’re used to on keyboards nowadays and often things like iMac and the light ship with these very, very slim keyboards with very minimal travel on the keys, which are fine but this is obviously, we’re talking about keyboards that are the other end of the scale.

Ben: So I always say to people, let’s be clear, this isn’t an exercise in good economics because they’re very expensive when you can go and get a 15 pound keyboard from your Tesco’s, Walmart, et cetera. But it is an investment in your own sort of, I mean, the joke I allude to in the Smashing Magazine article is the Rifleman’s Creed, which is a soldiers tool as it’s rifle. And for us more than anything else, it’s the keyboard. And so it’s finding something that particularly suits your needs and you enjoy using and you take care of and get the most out of as you can.

Drew: As you say, I think of mechanical keyboards a bit like using the keyboards that were on computers when I was growing up in the 1980s, A really retro style of technology. Hasn’t technology moved on, on the keyboards, that ship with modern computers just better than that old technology?

Ben: Well, I think the funny thing is, better is a subjective term. And so typically we have become accustomed to these very, taking the ones that ship with an iMac for example, which are incredible pieces of design, very slim, very elegant looking, but in terms of actual feedback to the user, the key travel that you get, I’ve just found it’s incomparable “proper keyboard”. And so once you kind of, if you eliminate, if you can embrace that aesthetic of the retro keyboard if you like and get over that and actually just use one for a little bit, I don’t know many people, well, I don’t know anybody that’s gone down that path and then backed back out and gone, “Actually I prefer the really shallow travel, I like the really cramped arrow key set up.” Because for what we do, whilst it’s lovely on a laptop because it lets you have a lovely sleek laptop that you can take different places, if you’re sat in front of a machine and you’re using that, and code is more than anyone else because we tend to have less reliance on the mouse.

Ben: Those keys are doing stuff for you. They’re working for you. So I don’t think you want a tiny little arrow key cluster. I don’t think you want a page up and page down doubled up on another key. These are the sorts of things that once you try and analyze how you work with your keyboard, it opens your eyes a little bit. So it’s a bit of an undoing of the aesthetic norm and the, what society tells you your keyboard should look at and how it actually works for you. I don’t know if that makes much sense?

Drew: Is it just for programmers that the mechanical keyboards are useful or do they have wider appeal than that?

Ben: Oh, I mean, the writers are the big proponents of them I suppose. I know for example, I think there was an anecdote of Terry Pratchett. He famously, once he found the keyboard that he liked, he bought 10 of them just because he never wanted to not have that keyboard because it was like you’re saying it’s about you don’t want that friction. You don’t want something to throw you out of your zone. It’s basically anybody who types on a keyboard for a long period of time rather than just casual use I think. Whether you’d go the route, if you’re somebody that’s jotting about to lots of different locations, you can get fairly compact mechanical keyboards as well that have got Bluetooth. I mean what keyboard do you use at the minute Drew? What’s your sort of-

Drew: Up until very recently, I’ve been using the iMac flat.

Ben: Yeah, the chiclet key one.

Drew: But after reading your article on Smashing and chatting to some colleagues at Netlify, a lot of them are very big mechanical keyboard nerds.

Ben: Oh, Okay.

Drew: I’ve decided to dip my toe in and I’ve got a mechanical keyboard on my main development machine. I’ve been using it about four weeks, I think about four weeks. And I’m finding that I’m very slow and making a lot of typos because it is so different from the very flat. I mean, the keyboard that I’m used to is basically like what comes with a laptop, just so flat, very low travel. And I’ve been using a keyboard of that style for maybe 10 years since Apple first started doing those as external keyboards. So then moving to something with much further travel and finding a keyboard with an angle to the keys is quite strange. I’ve had to prop it up quite a lot at the back to bring the keys forward to me a bit because I was finding that the whole angle was very strange and that has helped. But I’m finding I’m very slow, but I am getting faster and I am making fewer mistakes. I’m getting used to it. But I’m actually enjoying a lot of utility. The particular keyboard I’ve got has got a screenshot button.

Ben: Never knew you needed.

Drew: No, I know. There’s a key combination to activate during the screen capture, but this keyboard has got a button that does it. Actually, it’s something I do multiple times a day. In pull requests we tend to include a screenshot. This is what it looked like before, this is what it looked like after.

Ben: Right. Okay.

Drew: So it’s something I’m doing all the time. So having a dedicated key for it I found is actually incredibly useful and I’m feeling the benefit of that.

Ben: I think one of the other things that’s really good in some of the modern mechanical keyboards as well is they often have, they’re entirely re mappable so that you can put macros onto keys and you can, like for example, I have the shift key on mine set so that if I just tap it, it gives me a right bracket or parentheses and U S terminology, which in itself is quite useful for functions and all the rest of it. But if you’re using them and you want to skip along in normal mode through sentences, it’s that key that you do, which would normally be a hold on the shift and press the bracket key. So again, it’s about trying to analyze what you’re pressing day to day and thinking around that.

Drew: Mechanical keyboards in my experience tend to be a bit noisier.

Ben: They can be.

Drew: Is that a consideration? And if you’re working in a shared workspace, are all mechanical keyboards loud by definition?

Ben: No, they’re certainly not. And I think like all of us, when you first think of mechanical keyboards, if you have any idea of what they are, you think of these giant clicky clucky. When you’ve got the keyboard warrior that you’re speaking to on a screen share and you can barely hear the voice because all you can hear is this machine gun of keys. However, the main switch types or the clicky ones, which are the ones that we’re talking about there.

Ben: There’s then tactile switches, which give you the same travel, but you don’t get the physical and audible click as you push a key down. But then there’s also linear keys, which are just straight up and down, but you can also get silent variants of nearly all of them. If you are somebody who needs to sit in an office next to somebody, they’re probably the sort of one that you should go for. And then they’re no less, they’re physically just as nice to use I would say. I know that some people say they actually, the rhythm of the sound helps them to feel productive. Which I do understand that, but obviously if you’re working amongst other people, your productive might be somebody else’s disruptive.

Drew: What are the things that somebody should look for in terms of mechanical keyboard? I mean, it all starts with the keys, the bits you actually touch. And they can vary quite a lot.

Ben: Absolutely. So there’s the aesthetic side of it, which typically we developers and designers, we have opinions about what we like and every conceivable color and the way even that the legends are printed on the keys. You get some hot shots that just do away with the legends altogether and they just like some blind magician know which buttons to press. I’m not one of those. You also get people that can put the legends on the front side of the keys. And there’s also little things that for the longest time, looking at this keyboard, I’ve got on the J key and the F key, a little hump, which I assumed that was something to do with the manufacturing process.

Ben: But it turns out they’re homing keys so that you can rest your fingers on them and feel where you are on the keyboard. And then there’s also different sorts of plastic. There’s different angles to the keys themselves. I suppose if I was speaking to somebody who’d never had of mechanical keyboard before, although it sounds like a copout, I would probably just say, pick one you like the look of to begin with because the chances are you don’t really know what you like until you try it and try a few and sadly that’s where the cost of this obsession comes into play because you might find yourself going through three or four keyboards until you find one that you feel really suits not just the key switch type but the key cut material, the layout size, how customizable it is or isn’t. And a bit like the code editors, you have to be conscious of the fact that I could quite easily spend two days just messing around, setting my code editor up. Whereas really I should myself a big slap around the face and after a very limited amount of time, just get on with using it.

Ben: So it’s like all of these things you do have to be conscious of the fact that you can indulge yourself too much into these things. So I would say get one, use it. The primary concern that, as you alluded to before, should probably be whether you want a silent one or a clicky one to begin with because that’s the thing you can’t easily undo. A lot of them these days also have what’s called hot swap sockets, so that if you get yourself a keyboard and decide you actually hate the feel of these switches, you can pull them all out and put a different set of switches in, which is not necessarily cheap, but it’s a lot cheaper than getting a whole new keyboard. But the resale value in these things is typically very good anyway. So if you spend a couple hundred dollars on a keyboard, you probably get 150 back, even like six, eight months down the line if you needed to.

Drew: As you mentioned, there are all sorts of different types of switches that can exist under these keys. They’re called key caps, aren’t they on the top? Which is the bit that you actually touch. But then underneath those you’ve got different switches.

Ben: Yes.

Drew: I found personally that I had no way of being able to comprehend what switches I might want without being able to try them out. And of course at the moment in particular, it’s very difficult to try out anything. You can’t go into a store. I mean, even if you could find one. Is there any default switch you’d recommend for somebody if they didn’t know where to start?

Ben: Yeah, I think I would say that if the idea of a clicky one appeals, what you should be looking for, it is a slightly confusing thing. There’s basically colors which … so Cherry MX who were the original makers of the majority of keyboard switches that you get in mechanical keyboards, they designated MX Blue as the clicky switches. And what you get now is even though other companies are now making what’s called MX compatible switches, which is a different company creating the same style of switches, they follow on that coloring convention. So typically blue switches, whether it’s Kaihl or Cherry or somebody else, or your clicky sort, a brown will be tactile, what’s called a tactile switch, which is you get that same resistance at the top of the key press, but without the click sound.

Ben: If you like the idea of a key which doesn’t have any resistance and it just travels up and down in a linear fashion, a linear switch, you’d be looking for something which is called an MX Red or equivalent. And then something which is more silent, they’re typically designated as quiet switches or silent switches. There’s a whole different camp of keyboard switches by a company called Topre, which is based in Japan. But that’s probably something I would say not to worry about for now because they tend to be both more expensive, harder to come by and I would probably try and rule out by saying go for one of the easier to come by MX variants first.

Drew: I chose MX Brown for my first keyboard.

Ben: Yes, I think I did the same as well.

Drew: I’ve no idea whether I like them or not because the whole thing is so new. The one thing we need to keep in mind I guess is different layouts of keyboards. I mean, I work with MX and obviously lots of people got PCs and various other things. Is that something to bear in mind when choosing a keyboard?

Ben: It’s almost a non problem these days. It used to be that some of the manufacturers, Filco for example, which they’re a good manufacturer of mechanical keyboards, but they used to have problems with Mac compatibility. Which you could work around with software for the Mac. It was a tool that used to be called Key Remap or something like that. It’s now called Karabiner, it’s a freeware piece of software which gets around the problem, but it was just an extra little bit of faff that you had to do. But typically nowadays with either dip switches on the bat, which are little tiny physical switches or the keyboard will have their own way of pressing certain key combos to program where the super key is so if you’re on Lenox it’s super key or we have the Mac key or the Windows key and you can typically swap all those sorts of things around with no problem at all. So it’s really more a case of … I mean, the example I gave in the article was there was a freeway piece of software which lets you, you stick it on to record and it logs your key process, which obviously you need to be sure that you’re comfortable with that to begin with.

Ben: But you can leave that thing running and it will produce a heat map of which keys you press and how often you’ve pressed them and all the rest of it. And often you’ll find that your expectation doesn’t match with the actual data. And that can therefore influence whether you want a keyboard that’s got a big number pad. If you’re somebody that works with Excel all the time, you more than likely going to make use of that. But if not, you might find that actually you just don’t need that whole section of the keyboard and you can go for something more compact. Also, the other thing going back to comfort is ergonomic keyboards, which most of us at some point have seen somebody with one other Microsoft natural keyboards where you’ve got the slightly turned sets of keys for left and right hand.

Ben: In the mechanical world there’s a few different ergonomic keyboards. The big one being the Ergodox EZ which again we mentioned in the article, but that’s not only two separate keyboard panels, but it also lets you adjust the rake of the key panel as well. So you can very easily change exactly the shape of those key pads and where they are. So again, although they’re not cheap, if you’re somebody that suffers with RSI and the light doing a lot of keyboard work, it’s perhaps worth looking at one of those.

Drew: Now, when I was looking at mechanical keyboards, I discovered that there were lots and lots of options I could build that came pre-assembled, ready to go, just plug in an and off we go. But there were also lots that seemed to come essentially as kits or as just a board and you could buy just switches and you could buy just key caps and you assemble it all yourself. That sounds pretty daunting.

Ben: Yeah, I mean it is and I would certainly say if it’s your first mechanical keyboard, don’t go there. It’s too much to take on at once. If you do find yourself enjoying keyboards as it were, it’s a bit like a Lego or a Meccano set. I recently did the first keyboard build of my own, having had them for four or five years. And that involves soldiering the switches onto the board and all sorts, which is not a level of geekery that I would suggest for the casual use. Just get a keyboard and make use of it and see how you like it first. But because they are getting more and more popular, gaming in particular is where they’re really starting to find a market now because you’ve got gamers who are obsessed with the shortest possible input lag of them pressing the space bar or whatever they’re pressing to nuke somebody or whatever it is that kids these days do. I’m out of that loop now. But that’s where they’re gaining notoriety and popularity and you’re getting the big peripheral brands like Logitech getting involved and Corsair that now make mechanical keyboards. So you’re getting more and more of this stuff is more easily accessible and easy to get a hold of.

Drew: Moving on from keyboards slightly or I mean perhaps, maybe not. Earlier in the year, you had an accident didn’t you? And lost most your finger, is that right?

Ben: Yeah. So I’ll give you the short, your notes version of it because it’s quite a story. I was essentially, it was early February and it was one of the first days in the UK, we had snow that year. And as is typical in the UK, if a snowflake falls, the entire infrastructure grinds to a halt. And so we were stuck in traffic having come back from the gym at lunch, it was five of us in the car. And we said, well, we’ve got a meeting at three o’clock and it was like five to three, we weren’t far from the office. Let’s just take a shortcut through this bit of land, which we’ve done many times before and we’ll get back to the office. And as we went through the other lads went one way. Three of them went one way and I carried on the way that I already knew and got to a bit and a new fence had been installed, but it wasn’t a sketchy walking fence, it was an every day, brand new, no sharp, edgy bits, nothing like that. Lots of footholds. It was maybe six foot tall, this sort of fence is an average person.

Ben: You’ve probably been over a hundred times before and would’ve thought nothing of it. So I climbed at one side, hung on the other and then I was maybe three or four inches from the floor and dropped off. I felt a bit of a weird twang in my hand, so I wondered, “Oh, I caught my wedding ring there on the fence, I wonder if I put a mark on it?” Glanced down and there was very little of my finger left. So it turned out that on the side of the fence I couldn’t see there was, where the crosses terminate, I had caught my wedding ring on it and it essentially yeah, removed the biggest part on my finger. And so very, very bizarre set of circumstances as it was then trying not bleed everywhere. At the same time find the other part of my finger and hopefully could stick it back on. In my naivety, I thought, “Well, as long as I can find the finger, this is easy these days, they’ll just few stitches, I’ll be back in the game.” But it turns out when you do it’s called a ring avulsion. And I don’t know, it’s actually quite common.

Ben: They told me up at the hospital that I went to that they get at least one a weekend, which I was crikey, I really would’ve liked to receive that memo. I perhaps would have thought twice about wearing a wedding ring. But because it’s sort of, without being too grim about it because it’s torn away from your hand, the ligaments get pulled from down in the palm of your hand as well. So it’s almost impossible for them to put it back. So long story short, it’s by no means fixed now, but it’s on the way. It’s probably going to be 12 months until it feels, I wouldn’t say painful. It’s uncomfortable more than anything. And obviously getting used to the fact every day you wake up in the morning and like look and “Oh my God.” Mentally, it’s quite a hard adjustment to make. But very quickly I was able to use the keyboard. But it’s funny because your mind still thinks you’re at the end of your finger as where it used to be.

Ben: And so you’re missing a lot of keys as you type and you have to make that adjustment that Oh, actually that finger’s not there anymore. So these particular key combos that I’m used to doing and have been ingrained in my mind for years and years and years, you have to unpick and redo. But I guess the human mind has an incredible capacity to work around these problems. And I don’t feel now even just … so that was 10th of February. Here we are beginning of May, I don’t feel now like it’s a hindrance, particularly on the keyboard. Things like lifting waits or rowing or something like that, you can certainly still tell a difference. And I think it’ll take a while for my hand to get stronger again.

Drew: Were there any adaptations that you needed to make other than the mental adaptations when it comes to typing? Is there anything else about your workspace or anything that you’ve noticed you needed to change?

Ben: I don’t think there has been really, I mean, in an odd way I’ve been very lucky because that particular finger is probably the weakest finger that you have anyway. And it’s on for me, my nondominant hand. I didn’t realize at the time, but apparently your little finger is 40% of your lifting ability. It comes from your little finger. So they said, “If you’d had lost your little finger, it would have been far greater implications.” And obviously your thumb is a really big deal. So in a weird way they said, “If you were going to lose a finger, that’s the one to go for.” Great. But the funny thing is in terms of actually your typing speed or whatever, your brain almost didn’t have to consciously do anything at all. It just remapped over maybe three or four weeks. I was away from work for two weeks, but I still had a book to finish. And so I was using that as my practice. Trying to get back up to speed as soon as I could. But yeah, a very bizarre set of circumstances. You always arrogantly assume these kinds of things out into other people and then one day it happens to you.

Drew: Exactly. Yeah, I think so many people who note the fact that they are suddenly needing to benefit from what we consider to be accessibility features of the work that we do. It’s not because they’ve had an incredibly traumatic life changing incident or there’s not that they were born in a particular way, but just something smaller, a minor break of an arm or a losing a finger or any of these things. Failing eyesight can just bring home the need that actually, accessibility is something that we all rely on even just as we age.

Ben: Yeah, absolutely. I mean, it’s funny because I’ve always been mindful of accessibility for sure. But I don’t think I was perhaps as acutely aware as you say of just the fact that you can become that same situation yourself like you say, it’s my own arrogance that you think you can go on forever feeling just fine. But yeah, I suppose it’s not a bad thing to get a slap in the face from time to time and makes you reappraise things.

Drew: Definitely. Yeah. So I’ve been learning all about optimizing my workspace. What have you been learning about lately?

Ben: Well I’ve got a book that I wrote the first edition of in 2012, the one that you mentioned at the start of the show. And the publishers hassled me every three or four years to do it. Another version of it, which I always grumble and roll my eyes about and I think this is done, like there’s nothing new to add here. But it turns out things move on quite a lot. And I think the majority of my time at the minute has been, I’ve learned a hell of a lot about CSS Grid, which I know Rachel of this parish is a big proponent and has been heavily involved in. And I think the sort of thing that I’ve said to people is that it’s probably, getting a good handle on CSS Grid is probably the biggest upgrade to your CSS skills you can do if you don’t already know Grid. That’s been fantastic.

Ben: And then for the last sort of, I started out like a lot of people my age, I didn’t go into web development as an intention. I find myself there. And so for the longest time I stayed away from what we’d call real programming languages, and it’s only in the last two or three years that I’ve got into JavaScript and TypeScript and so classes and things like that in JavaScript, which I’ve just tried to steer away from the longest time. That’s the stuff I’ve been looking at and trying to really wrap my head around destructuring and all this stuff. There’s no end in sight for learning in web dev world, that’s for sure.

Drew: That is definitely for sure. If you, dear listener, would like to hear more from Ben, you can follow him on Twitter where he’s at. Ben Frane, and find his personal website at benfrane.com. Thanks for joining us today. Ben, do you have any parting words?

Ben: No, just if you wear a wedding ring, maybe think about perhaps not.

(il)

Categories: Others Tags:

First Steps into a Possible CSS Masonry Layout

May 18th, 2020 No comments

It’s not at the level of demand as, say, container queries, but being able to make “masonry” layouts in CSS has been a big ask for CSS developers for a long time. Masonry being that kind of layout where unevenly-sized elements are layed out in ragged rows. Sorta like a typical brick wall turned sideways.

The layout alone is achievable in CSS alone already, but with one big caveat: the items aren’t arranged in rows, they are arranged in columns, which is often a deal-breaker for folks.

/* People usually don't want this */

1  4  6  8
2     7
3  5     9
/* They want this *.

1  2  3  4
5  6     7
8     9

If you want that ragged row thing and horizontal source order, you’re in JavaScript territory. Until now, that is, as Firefox rolled this out under a feature flag in Firefox Nightly, as part of CSS grid.

Mats Palmgren:

An implementation of this proposal is now available in Firefox Nightly. It is disabled by default, so you need to load about:config and set the preference layout.css.grid-template-masonry-value.enabled to true to enable it (type “masonry” in the search box on that page and it will show you that pref).

Jen Simmons has created some demos already:

CodePen Embed Fallback

Is this really a grid?

A bit of pushback from Rachel Andrew

Grid isn’t Masonry, because it’s a grid with strict rows and columns. If you take another look at the layout created by Masonry, we don’t have strict rows and columns. Typically we have defined rows, but the columns act more like a flex layout, or Multicol. The key difference between the layout you get with Multicol and a Masonry layout, is that in Multicol the items are displayed by column. Typically in a Masonry layout you want them displayed row-wise.

[…]

Speaking personally, I am not a huge fan of this being part of the Grid specification. It is certainly compelling at first glance, however I feel that this is a relatively specialist layout mode and actually isn’t a grid at all. It is more akin to flex layout than grid layout.

By placing this layout method into the Grid spec I worry that we then tie ourselves to needing to support the Masonry functionality with any other additions to Grid.

None of this is final yet, and there is active CSS Working Group discussion about it.

As Jen said:

This is an experimental implementation — being discussed as a possible CSS specification. It is NOT yet official, and likely will change. Do not write blog posts saying this is definitely a thing. It’s not a thing. Not yet. It’s an experiment. A prototype. If you have thoughts, chime in at the CSSWG.

Houdini?

Last time there was chatter about native masonry, it was mingled with idea that the CSS Layout API, as part of Houdini, could do this. That is a thing, as you can see by opening this demo (repo) in Chrome Canary.

I’m not totally up to speed on whether Houdini is intended to be a thing so that ideas like this can be prototyped in the browser and ultimately moved out of Houdini, or if the ideas should just stay in Houdini, or what.

The post First Steps into a Possible CSS Masonry Layout appeared first on CSS-Tricks.

Categories: Designing, Others Tags:

Unprefixed `appearance `

May 18th, 2020 No comments

It’s interesting how third-parties are sometimes super involved in pushing browser things forward. One big story there was how Bloomberg hired Igalia to implement CSS grid across the browsers.

Here’s another story of Bocoup doing that, this time for the appearance property. The story is told in a Twitter thread, but the thread is broken somehow (looks like a deleted Tweet), so your best bet is to go to this one, then scroll up and down to see the whole thing. Gosh, I hope they blog it.

It took literally years of work:

2 years ago, @firefox asked us to work on a project to fix problems within the CSS appearance property. The issue came when we found out that each browser has its own implementation of how the appearance property should work on forms.

They had to do tons of research, write tests, and ultimately overhaul HTML and CSS specs. Then they needed to prove that, with those changes, browsers could un-prefix the property without breaking websites — the first attempt at this broke websites and was reverted. Then they actually get all three major browsers to do it.

Really goes to show just how long and grueling this work can be because it’s so crucial to get it right. If you’re into this stuff, listen to ShopTalk 407 with Brian Kardell.

The post Unprefixed `appearance ` appeared first on CSS-Tricks.

Categories: Designing, Others Tags:

Tackling Authentication With Vue Using RESTful APIs

May 18th, 2020 No comments

Authentication (logging in!) is a crucial part of many websites. Let’s look at how to go about it on a site using Vue, in the same way it can be done with any custom back end. Vue can’t actually do authentication all by itself, —we’ll need another service for that, so we’ll be using another service (Firebase) for that, but then integrating the whole experience in Vue.

Authentication works quite differently on Single Page Applications (SPAs) than it works on sites that reload every page. You don’t have to make an SPA with Vue, but we will in this tutorial.

Here’s the plan. We’ll build a UI for users to log in and the submitted data will be sent to a server to check if the user exists. If yes, we’ll be sent a token. That’s very useful, because it’s going to be used throughout our site tocheck if the user is still signed in. If no, the user can always sign up. In other words, it can be used in lots of conditional contexts. Beyond that, if we need any information from the server that requires been logged in, the token is sent to the server through the URL so that information can be only sent to logged in users.

The complete demo of this tutorial is posted on GitHub for those that who are comfortable reading through the code. The rest of us can follow through with the article. The starter file is also on GitHub so you can follow through as we code together.

After downloading the repo, you’ll run npm install in your terminal. If you’re going to build this application completely on your own, you’ll have to install Vuex, Vue Router, and axios. We’ll also use Firebase for this project, so take a moment to set up a free account and create a new project in there.

After adding the project to Firebase, go to the authentication section, and set up a sign in method where we would be using the traditional email/password provider, that’ll be stored on our Firebase servers.

After that we’ll then go to the Firebase Auth REST API documentation to get our sign up and sign in API endpoints. We’ll need an API key to use those endpoints in our app and it can be found in the Firebase project settings.

Firebase offers authentication over the SDK, but we’re using the Auth API to demonstrate authentication over any custom back end server.

In our stater file, we have the sign up form below. We’re keeping things pretty simple here since we’re focusing on learning the concepts.

<template>
  <div id="signup">
    <div class="signup-form">
      <form @submit.prevent="onSubmit">
        <div class="input">
          <label for="email">Mail</label>
          <input
             type="email"
             id="email"
             v-model="email">
        </div>
        <div class="input">
          <label for="name">Your Name</label>
          <input
            type="text"
            id="name"
            v-model.number="name">
        </div>
        <div class="input">
          <label for="password">Password</label>
          <input
            type="password"
            id="password"
            v-model="password">
        </div>
        <div class="submit">
          <button type="submit">Submit</button>
        </div>
      </form>
    </div>
  </div>
</template>

If we weren’t working with an SPA, we would naturally use axios to send our data inside the script tag like this:

axios.post('https://identitytoolkit.googleapis.com/v1/account
  s:signUp?key=[API_KEY]', {
    email: authData.email,
    password: authData.password,
    returnSecureToken: true
  })
  .then(res => {
    console.log(res)
  })
  .catch(error => console.log(error))        
  }
}

Sign up and log in

Working with an SPA (using Vue in this case) is very different from the above approach. Instead, we’ll be sending our authorization requests using Vuex in our actions in the store.js file. We’re doing it this way because we want the entire app to be aware of any change to the user’s authentication status.

actions: {
  signup ({commit}, authData) {
    axios.post('https://identitytoolkit.googleapis.com/v1/accounts:signUp?key=[API_KEY]', {
      email: authData.email,
      password: authData.password,
      returnSecureToken: true
    })
    .then(res => {
      console.log(res)
      router.push("/dashboard")
    })
    .catch(error => console.log(error))
  },
  login ({commit}, authData) {
    axios.post(https://identitytoolkit.googleapis.com/v1/accounts:signIn?key=[API_KEY]', {
      email: authData.email,
      password: authData.password,
      returnSecureToken: true
    })
    .then(res => {
      console.log(res)
      router.push("/dashboard")
    })
    .catch(error => console.log(error))
  }
}

We can use pretty much the same thing for the sign in method, but using the sign in API endpoint instead. We then dispatch both the sign up and log in from the components, to their respective actions in the store.

methods : { 
  onSubmit () {
    const formData = {
      email : this.email,
      name : this.name,     
      password : this.password
    }
    this.$store.dispatch('signup', formData)
    }
  }
}

formData contains the user’s data.

methods : {
  onSubmit () {
    const formData = {
      email : this.email,
      password : this.password
    }
    this.$store.dispatch('login', {email: formData.email, password: formData.password})
  }
}

We’re taking the authentication data (i.e. the token and the user’s ID) that was received from the sign up/log in form, and using them as state with Vuex. It’ll initially result as null.

state: {
  idToken: null,
  userId: null,
  user: null
}

We now create a new method called authUser in the mutations that’ll store the data that’s collected from the response. We need to import the router into the store as we’ll need that later.

import router from '/router'


mutations : {
  authUser (state, userData) {
    state.idToken = userData.token
    state.userId = userData.userId
  }
}

Inside the .then block in the signup/login methods in our actions, we’ll commit our response to the authUser mutation just created and save to local storage.

actions: {
  signup ({commit}, authData) {
    axios.post('https://identitytoolkit.googleapis.com/v1/accounts:signUp?key=[API_KEY]'), {
      email: authData.email,
      password: authData.password,
      returnSecureToken: true
    })
    .then(res => {
      console.log(res)
      commit('authUser', {
        token: res.data.idToken,
        userId: res.data.localId
      })
      localStorage.setItem('token', res.data.idToken)
      localStorage.setItem('userId', res.data.localId)
      router.push("/dashboard")
    })
    .catch(error => console.log(error))
  },
  login ({commit}, authData) {
    axios.post('https://identitytoolkit.googleapis.com/v1/accounts:signIn?key=[API_KEY]'), {
      email: authData.email,
      password: authData.password,
      returnSecureToken: true
    })
    .then(res => {
      console.log(res)
      commit('authUser', {
        token: res.data.idToken,
        userId: res.data.localId
      })
        localStorage.setItem('token', res.data.idToken)
        localStorage.setItem('userId', res.data.localId)
        router.push("/dashboard")
      })
    .catch(error => console.log(error))
  }
}

Setting up an Auth guard

Now that we have our token stored within the application, we’re going touse this token while setting up our Auth guard. What’s an Auth guard? It protects the dashboard from unauthenticated users access it without tokens.

First, we’ll go into our route file and import the store. The store is imported because of the token that’ll determine the logged in state of the user.

import store from './store.js'

Then within our routes array, go to the dashboard path and add the method beforeEnter which takes three parameters: to, from and next. Within this method, we’re simply saying that if the tokens are stored (which is automatically done if authenticated), then next, meaning it continues with the designated route. Otherwise, we’re leading the unauthenticated user back to the sign up page.

{
  path: '/dashboard',
  component: DashboardPage,
  beforeEnter (to, from, next) {
    if (store.state.idToken) {
      next()
    } 
    else {
      next('/signin')
    }
  }
}

Creating the UI state

At this point, we can still see the dashboard in the navigation whether we’re logged in or not, and that’s not what we want. We have to add another method under the getters called ifAuthenticated which checks if the token within our state is null, then update the navigation items accordingly.

getters: {
  user (state) {
    return state.user
  },
  ifAuthenticated (state) {
    return state.idToken !== null
  }
}

Next, let’s open up the header component and create a method called auth inside the computed property. That will dispatch to the ifAuthenticated getters we just created in the store. ifAuthenticated will return false if there’s no token, which automatically means auth would also be null, and vice versa. After that, we add a v-if to check if auth is null or not, determining whether the dashboard option would show in the navigation.

<template>
  <header id="header">
    <div class="logo">
      <router-link to="/">Vue Authenticate</router-link>
    </div>
    <nav>
      <ul>
        <li v-if='auth'>
          <router-link to="/dashboard">Dashboard</router-link>
        </li>
        <li  v-if='!auth'>
          <router-link to="/signup">Register</router-link>
        </li>
        <li  v-if='!auth'>
          <router-link to="/signin">Log In</router-link>
        </li>
      </ul>
    </nav>
  </header>
</template>
<script>
  export default {
    computed: {
      auth () {
        return this.$store.getters.ifAuthenticated
      }
    },
  }
</script>

Logging out

What’s an application without a logout button? Let’s create a new mutation called clearAuth, which sets both the token and userId to null.

mutations: {
  authUser (state, userData) {
    state.idToken = userData.token
    state.userId = userData.userId
  },
  clearAuth (state) {
    state.idToken = null
    state.userId = null
  }
}

Then, in our logout action , we commit to clearAuth, delete local storage and add router.replace('/') to properly redirect the user following logout.

Back to the header component. We have an onLogout method that dispatches our logout action in the store. We then add a @click to the button which calls the to the onLogout method as we can see below:

<template>
  <header id="header">
    <div class="logo">
      <router-link to="/">Vue Authenticate</router-link>
    </div>
    <nav>
      <ul>
        <li v-if='auth'>
          <router-link to="/dashboard">Dashboard</router-link>
        </li>
        <li  v-if='!auth'>
          <router-link to="/signup">Register</router-link>
        </li>
        <li  v-if='!auth'>
          <router-link to="/signin">Log In</router-link>
        </li>
         <li  v-if='auth'>
          <ul @click="onLogout">Log Out</ul>
        </li>
      </ul>
    </nav>
  </header>
</template>
<script>
  export default {
    computed: {
      auth () {
        return this.$store.getters.ifAuthenticated
      }
    },
    methods: {
      onLogout() {
        this.$store.dispatch('logout')
      }
    }
  }
</script>

Auto login? Sure!

We’re almost done with our app. We can sign up, log in, and log out with all the UI changes we just made. But, when we refresh our app, we lose the data and are signed out, having to start all over again because we stored our token and Id in Vuex, which is JavaScript. This means everything in the app gets reloaded in the browser when refreshed.

What we’ll do is to retrieve the token within our local storage. By doing that, we can have the user’s token in the browser regardless of when we refresh the window, and even auto-login the user as long as the token is still valid.

Create a new actions method called AutoLogin, where we’ll get the token and userId from the local storage, only if the user has one. Then we commit our data to the authUser method in the mutations.

actions : {
  AutoLogin ({commit}) {
    const token = localStorage.getItem('token')
    if (!token) {
      return
    }
    const userId = localStorage.getItem('userId')
    const token = localStorage.getItem('token')
    commit('authUser', {
      idToken: token,
      userId: userId
    })
  }
}

We then go to our App.vue and make a created method where we’ll dispatch the autoLogin from our store when the app is loaded.

created () {
  this.$store.dispatch('AutoLogin')
}

Yay! With that, we’ve successfully implemented authentication within our app and can now deploy using npm run build. Check out the live demo to see it in action.

The example site is purely for demonstration purposes. Please do not share real data, like your real email and password, while testing the demo app.

The post Tackling Authentication With Vue Using RESTful APIs appeared first on CSS-Tricks.

Categories: Designing, Others Tags:

How To Create A Mobile App In Expo And Firebase (For iOS And Android)

May 18th, 2020 No comments
Storing Expo push token

How To Create A Mobile App In Expo And Firebase (For iOS And Android)

How To Create A Mobile App In Expo And Firebase (For iOS And Android)

Chafik Gharbi

2020-05-18T13:00:00+00:00
2020-05-21T07:12:38+00:00

Maybe you’ve heard of or worked with React, the JavaScript framework developed by Facebook. The social media company took it even further by releasing React Native, which quickly became the most popular framework for building mobile apps with JavaScript. Many companies embraced the idea and started building their apps with it.

In this article, we’ll get an idea of how to develop an application for Android and iOS using Expo and Firebase, based on my own experience of creating an application with these technologies. If you haven’t worked with Firebase before, please look at its guide to JavaScript projects before we dive in.

If you are new to JavaScript, make sure you’re clear on the basics of ECMAScript 6’s features, such as class importing and arrow functions. You can learn React Native from the official documentation, which has a section on React fundamentals, in case you haven’t worked with React. Don’t worry about how to build an app with Android Studio or Xcode, because we will be using the Expo framework.

Recommended reading on SmashingMag:

Brief Description of Project

We can describe our project as an on-demand transporter — you could say Uber for merchandise transportation. The user will choose transportation information, such as the type of vehicle and loading and unloading locations, and then nearby transportation vehicles will appear on the map. The user confirms their request, and the drivers receive notifications one by one. Each driver’s notification is active for 25 seconds. If they ignore or decline the request, the system selects another driver, and so on. When a driver accepts the request, the user can monitor the entire transportation process on the map, including via the web application.

Expo Installation And Configuration

First, we need to install the command line interface (CLI) for Expo, which will help us test to the app in a simulator or on real devices and to build our app in the cloud.

npm install -g expo-cli

Let’s create our Expo project.

expo init

The cool part is that all of your app’s configurations can be done in a single JSON file, app.json. Below are some tips I learned that could increase your chances of being accepted in the App Store and Google Play and to help you avoid some common problems.

  • If you are using Google Maps in your app, be sure to provide the API in the app.json configuration file, in order to make it work properly. Google won’t charge you for native map rendering unless you’re rendering directions or using other paid API services.
    ...
    "ios": {
        ...
        "config": {
            "googleMapsApiKey": "YOUR_API_KEY"
        }
    },
    "android": {
        ...
        "config": {
           "googleMaps": {
              "apiKey": "YOUR_API_KEY"
           }
        }
    }
  • To make location updates, or any other background tasks, work in the background in iOS, add the following keys under ios.infoPlist:
    ...
    "ios": {
        ...
        "infoPlist": {
            ...
            "UIBackgroundModes": [
              "location",
              "fetch"
            ]
        }
    }
  • If you don’t define which permissions your app will use, then Expo’s generated app will use all available authorizations by default. As a result, Google Play will reject your app. So, specify your required permissions.
    ...
    "android": {
        ...
        "permissions": [...],
     }
  • Apple requires you to provide a message that tells the user why the app is requesting this access, or else you will be rejected.
    ...
    "ios": {
        ...
        "infoPlist": {
            ...
            "NSCameraUsageDescription": "Why are you requesting access to      the device's camera?",
            "NSLocationWhenInUseUsageDescription": "Why are you requesting access to the device's camera?"
          }
    }
  • Make sure to increment the android.versionCode key before you publish a new version to Google Play.
  • All updates can be done with Expo over the air, without passing by Google Play or the App Store, unless you make the following changes:
    • upgrade the Expo SDK version;
    • change anything under the ios, android, or notification keys;
    • change the app’s splash;
    • change the app’s icon;
    • change the app’s name;
    • change the app’s owner;
    • change the app’s scheme;
    • change the facebookScheme;
    • change your bundled assets under assetBundlePatterns.
  • I prefer not to interpret the user experience by setting fallbackToCacheTimeout to 0 under the updates key. This will allow your app to start immediately with a cached bundle, while downloading a newer one in the background for future use.

And here is a complete example of the configuration in app.json:

{
  "expo": {
    "name": "Transportili",
    "slug": "transportili",
    "scheme": "transportili",
    "privacy": "public",
    "sdkVersion": "36.0.0",
    "notification": {
      "icon": "./assets/notification-icon.png",
      "androidMode": "default"
    },
    "platforms": [
      "ios",
      "android",
      "web"
    ],
    "version": "0.3.2",
    "orientation": "portrait",
    "icon": "./assets/icon.png",
    "splash": {
      "image": "./assets/splash.png",
      "resizeMode": "contain",
      "backgroundColor": "#ffffff"
    },
    "updates": {
      "fallbackToCacheTimeout": 0
    },
    "assetBundlePatterns": [
      "**/*"
    ],
    "ios": {
      "bundleIdentifier": "com.transportili.driver",
      "supportsTablet": false,
      "infoPlist": {
        "UIBackgroundModes": [
          "location",
          "fetch"
        ],
        "LSApplicationQueriesSchemes": [
          "transportili"
        ],
        "NSCameraUsageDescription": "L'application utilise l'appareil photo pour prendre une photo ou numériser vos documents.",
        "NSLocationWhenInUseUsageDescription": "L'application utilise votre position pour aider les chauffeurs ou les transporteurs à vous trouver sur la carte."
      },
      "config": {
        "googleMapsApiKey": "AIzaSyA8Wcik6dTuxBKolLSm5ONBvXNz8Z0T-6c"
      }
    },
    "android": {
      "googleServicesFile": "./google-services.json",
      "package": "com.transportili.driver",
      "versionCode": 6,
      "permissions": [
        "ACCESS_COARSE_LOCATION",
        "ACCESS_FINE_LOCATION"
      ],
      "config": {
        "googleMaps": {
          "apiKey": "AIzaSyA8Wcik6dTuxBKolLSm5ONBvXNz8Z0T-6c"
        }
      }
    },
    "description": "",
    "githubUrl": "https://github.com/chafikgharbi/transportili-native.git"
  }
}

Let’s move on to installing Firebase, using the following command:

expo install firebase

I prefer to create a firebase.js file in the app’s root folder that contains all Firebase configurations. In this case, I’m using only the Firestore and Storage services.

const firebaseConfig = {
    apiKey: "api-key",
    authDomain: "project-id.firebaseapp.com",
    databaseURL: "https://project-id.firebaseio.com",
    projectId: "project-id",
    storageBucket: "project-id.appspot.com",
    messagingSenderId: "sender-id",
    appId: "app-id",
    measurementId: "G-measurement-id"
};

Now, whenever we want to use Firebase, we just import this file, as follows:

import { firebase, firestore, storage } from "./firebase";

The documentation has a more detailed explanation of using Firebase with Expo.

The Application’s Database

You can store your data directly in the cloud using Firebase, which offers two types of databases. One is the real-time database, and the other is Firestore, which is considered to be the improved version of the real-time database, with more advanced functionality. Both are NoSQL databases with data sync and instant changes listeners. They have different mechanisms: The real-time database stores data as a JSON object, whereas Firestore stores data as documents in collections. They also calculate usage and cost differently: The former is based on the quantity of data exchanged, and the latter is based on the number of operations in the documents (reads, writes, and deletes).

In my case, I used the Firestore database to store users, requests, vehicles, and other application data. (I was trying to be smart by putting all of my data in one document to decrease operation usage, but then I discovered that each document can store only 1 MB.)

In addition to storing strings, numbers, objects, and so on in Firebase, you can also store a geoPoint, which is an object that contains the coordinates of geographic points (latitude and longitude). Despite this, unfortunately, you cannot make geographic queries, such as retrieving nearby users.

To do that, we can use GeoFirestore. But we have to take into account that this package restricts the document structure of the user to this:

User: {
d: {all user data here}
g: (location geohash)
l: {firstore location geopoint}
}

So, if you’re going to implement it directly in your user collection, like I did, then you’ll need to put all of the user’s data in the d key.

Last but not least, don’t forget to optimize your code to avoid unexpected operations:

  • Use offline persistence. On the web, offline persistence is disabled; be sure to enable it.
  • Use cursor pagination in Firestore queries. Don’t get all data at once.
  • Always unsubscribe listeners, when done, or unmounted components.

The Application’s Back End

You can manage the Firestore database, send notifications with Expo, and perform certain operations directly from the front end or the mobile application, but there are other operations that we cannot do without a back end and a server. This is why Firebase offers functions — a cloud back end that allows you to execute Node.js code on a scalable server. I’ve used the Firebase functions for the following:

  • Send notifications (see example below)
    To send notifications, we will use push notifications, a tool that helps an app’s owner send messages to their users. It appear in the notifications section of the device, even if the application is not active. We don’t want this process to be stopped by a sudden interruption in connectivity, so we’ll have to use a server.
  • Run cron jobs
    Using cron jobs helps me to manage scheduled requests and notifications.
  • Sanitize the database
    This includes removing useless and ignored requests.
  • Run sensitive, expensive, or continuous tasks
    This includes registering, retrieving users, and scheduling orders. All of these are sensitive operations. If you make them directly from your app or front end, there is a risk of security vulnerability and broken tasks.

Joaquin Cid’s article “How to Build a Role-based API With Firebase Authentication” will give you details on how to get started with Firebase functions and how to create a back-end API using Express. It uses TypeScript, but converting TypeScript to JavaScript is not hard.

Push Notifications

Expo sends a notification to the user’s device from its servers. It identifies the user’s device with a token. When someone uses the application, the app would execute code to obtain the device’s token, and then store this token on the server. I’ve used Firestore as usual to store the token and compare incoming tokens to check whether the user has logged in from another device.

Storing Expo push token

Data to be stored for subsequent push-notification requests. (Large preview)

We get our token using the following function:

token = await Notifications.getExpoPushTokenAsync();

Don’t forget to request permission to push notifications. The documentation has example usage.

Whenever you want to send a notification to this user, you would make a request to Expo’s server, which contains the user’s device token already stored on your server.

curl -H "Content-Type: application/json" -X POST "https://exp.host/--/api/v2/push/send" -d '{ "to": "ExponentPushToken[xxxxxxxxxxxxxxxxxxxxxx]", "title":"hello", "body": "world" }'

The following is a simple example that sends notifications to all users using Firebase functions. This example is not secure. If you want to implement authorization and authentication, please follow Cid’s article mentioned above.

After initializing our project using the Firebase CLI, let’s install the Express framework to handle our API.

npm install express

We need to support CORS and add JSON body-parser middleware. This way, we can make requests from any URL and parse JSON-formatted requests.

npm install --save cors body-parser
npm install --save-dev @types/cors

This is the main index.js file of our functions directory:

const express = require("express");
const cors = require("cors");
const bodyParser = require("body-parser");
const admin = require("firebase-admin");
const functions = require("firebase-functions");

// Initialize the firebase-admin SDK module
admin.initializeApp(functions.config().firebase);

// Set the Express app
const app = express();
app.use(bodyParser.json());
app.use(cors({ origin: true }));

// Handle push notifications request
app.post("/pushNotifications", require("./controllers/pushNotifications"));

// Handle another request
// app.post("/anotherRoute", require("./controllers/anotherController"));

// Export the https endpoint API handled by the Express app
export const api = functions.https.onRequest(app);

And this is the pushNotifications.js controller, located in the controllers folder.

const admin = require("firebase-admin");
const axios = require("axios");
const chunkArray = require("./chunkArray");
const firestore = admin.firestore();

async function pushNotifications(req, res) {
  try {
    const data = req.body;

    // Get users from Firestore, then build notifications array
    await firestore
      .collection("users").get()
      .then((querySnapshot) => {
        if (querySnapshot.size) {

          // This array will contain each user's notification
          let notificationsArray = [];

          querySnapshot.forEach((doc) => {
            let docData = doc.data();
            if (docData && docData.d) {
              let userData = docData.d;

              // The pushNotificationsToken retrieved from the app and stored in Firestore
              if (userData.pushNotificationsToken) {
                notificationsArray.push({
                  to: userData.pushNotificationsToken,
                  ...data,
                });
              }
            }
          });

          // Send notifications to 100 users at a time (the maximum number that one Expo push request supports)
          let notificationsChunks = chunkArray(notificationsArray, 100);
          notificationsChunks.map((chunk) => {
            axios({
              method: "post",
              url: "https://exp.host/--/api/v2/push/send",
              data: chunk,
              headers: {
                "Content-Type": "application/json",
              },
            });
          });
          return res.status(200).send({ message: "Notifications sent!" });
        } else {
          return res.status(404).send({ message: "No users found" });
        }
      })
      .catch((error) => {
        return res
          .status(500)
          .send({ message: `${error.code} - ${error.message}` });
      });
  } catch (error) {
    return res
      .status(500)
      .send({ message: `${error.code} - ${error.message}` });
  }
}

module.exports = pushNotifications;

In the controller above, we got all of the app’s users from Firestore. Each user has a push token. We divided this list into sets of 100 users, because a single request to Expo can hold only 100 notifications. Then, we sent these notifications using Axios.

The following is the chunkArray function:

function chunkArray(myArray, chunk_size) {
  var index = 0;
  var arrayLength = myArray.length;
  var tempArray = [];

  for (index = 0; index 

This is an example of how to send notifications via our API using Axios.

axios({
  method: "post",
  url: "https://...cloudfunctions.net/api/pushNotifications",
  data: {
    title: "Notification title",
    body: "Notification body",
  },
});

Maps and Geolocation

Render Native Google Maps in React Native

To render Google Maps in the mobile application, I used react-native-maps, and to render directions, I used the react-native-maps-directions package. For a web application, I would use pure JavaScript.

npm install react-native-maps react-native-maps-directions

Then, import these packages:

import MapView, { Marker, PROVIDER_GOOGLE } from "react-native-maps";
import MapViewDirections from "react-native-maps-directions";

We’ll render the map with markers and directions:

<MapView
   style={mapStyle}
   // Reference is useful for controlling the map like mapView.fitToCoordinates(...)
   ref={(ref) => (mapView = ref)}
   // For better performance, avoid using default map on iOS
   provider={PROVIDER_GOOGLE}
   // Show the blue dot that represents the current location on the map
   showsUserLocation={true}
   initialRegion={{
   ...this.state.currentLocation,
   latitudeDelta: LATITUDE_DELTA,
   longitudeDelta: LONGITUDE_DELTA,
   }}
   /*
   * Watch region change when the user moves the map
   * for example, to get the address with reverse geocoding.
   */
   onRegionChangeComplete={(region) => {
   console.log(
       `Map center: latitude: ${region.latitude}${region.latitude}
       longitude: ${region.latitude}${region.longitude}`
   );
   }}
   // Map edge paddings
   mapPadding={{
   top: 20,
   right: 20,
   bottom: 20,
   left: 20,
   }}
>
{/* Render marker with custom icon */}
   {this.state.marker && (
   <Marker
       title={this.state.marker.title}
       coordinate={{
       latitude: this.state.marker.latitude,
       longitude: this.state.marker.longitude,
       }}
   >
       <MaterialIcons name="place" size={40} color="green" />
   </Marker>
   )}

 {/* Render multiple markers */}
   {this.state.markers.map((marker, index) => {
   return (
       <Marker
       key={index}
       title={marker.address}
       coordinate={{
           latitude: marker.latitude,
           longitude: marker.longitude,
       }}
       >
       <MaterialIcons name="place" size={40} color="green" />
       </Marker>
   );
   })}

 {/* Render directions from array of points */}
   {this.state.directions.length >= 2 && (
   <MapViewDirections
       origin={this.state.directions[0]}
       destination={
       this.state.directions[this.state.directions.length - 1]
       }
       waypoints={
       this.state.directions.length > 2
           ? this.state.directions.slice(1, -1)
           : null
       }
       optimizeWaypoints={true}
       apikey={GOOGLE_MAPS_APIKEY}
       strokeWidth={5}
       strokeColor="green"
       onReady={(result) => {
       console.log(
           `Distance "${result.distance} km", "${result.duration} min"`
       );
       }}
       onError={(errorMessage) => {
       console.log(errorMessage);
       }}
   />
   )}
</MapView>

Watch User’s Location in Foreground and Background

The Expo framework supports background location updates, I want to use this feature to get the user’s position. Even if the app is not in the foreground or the phone is locked, the application should always send the location to the server.

import * as Location from "expo-location";
import * as TaskManager from "expo-task-manager";
import geohash from "ngeohash";
import { firebase, firestore } from "../firebase";


let USER_ID = null;
let LOCATION_TASK = "background-location";

let updateLocation = (location) => {
  if (USER_ID) {
    firestore
      .collection("users")
      .doc(USER_ID)
      .update({
        "d.location": new firebase.firestore.GeoPoint(
          location.latitude,
          location.longitude
        ),
        g: geohash.encode(location.latitude, location.longitude, 10),
        l: new firebase.firestore.GeoPoint(
          location.latitude,
          location.longitude
        ),
      });
  }
};

TaskManager.defineTask(LOCATION_TASK, ({ data, error }) => {
  if (error) {
    // Error occurred - check `error.message` for more details.
    return;
  }
  if (data) {
    const { locations } = data;

    // Current position with latitude and longitude
    currentLocation = {
      latitude: locations[0].coords.latitude,
      longitude: locations[0].coords.longitude,
    };
    updateLocation(currentLocation);
  }
});

export default async function watchPosition(userid) {
  // Set user ID
  USER_ID = userid;

  // Ask permissions for using GPS
  const { status } = await Location.requestPermissionsAsync();
  if (status === "granted") {
    // watch position in background
    await Location.startLocationUpdatesAsync(LOCATION_TASK, {
      accuracy: Location.Accuracy.BestForNavigation,
      distanceInterval: 10,
      showsBackgroundLocationIndicator: true,
      foregroundService: {
        notificationTitle: "Title",
        notificationBody: "Explanation",
        notificationColor: "#FF650D",
      },
    });
    // Watch position in foreground
    await Location.watchPositionAsync(
      {
        accuracy: Location.Accuracy.BestForNavigation,
        distanceInterval: 10,
      },
      (location) => {
        let currentLocation = {
          latitude: location.coords.latitude,
          longitude: location.coords.longitude,
        };
        updateLocation(currentLocation);
      }
    );
  } else {
    // Location permission denied
  }
}

If you’ll notice, I’ve used different structures when updating the location to Firestore. That’s because I’m using the GeoFirestore package to query nearby users.

Using WebView in React Native

The application is not only for mobile users, but also for desktop users. So, let’s not spend time developing another application that shares much of the same functionality, such as login and registration, profiles and settings, and orders history.

On the app website, we check whether the user came from a desktop browser or the mobile application. We then redirect them to the corresponding application.

For a mobile application, we have to implement some sort of communication between the native app and WebView app, thanks to the JavaScript injection of postMessage and onMessage in WebView. But be careful when and how you use it:

Security Warning: Currently, onMessage and postMessage do not allow specifying an origin. This can lead to cross-site scripting attacks if an unexpected document is loaded within a WebView instance. Please refer to the MDN documentation for Window.postMessage() for more details on the security implications of this.

React Native documentation

We’ll send data from web JavaScript to React Native. Here is an example of sending a user ID:

window.ReactNativeWebView.postMessage(
    JSON.stringify({
        action: "setUserID",
        data: user.uid
    })
);

We’ll listen to data coming from the web in WebView.

<WebView
  ref={(reference) => (webview = reference)}
  onMessage={(event) => {
    let message = JSON.parse(event.nativeEvent.data);
    switch (message.action) {
      case "setUserID":
        let id = message.data;
        break;
      case "anotherAction":
        //
        break;
    }
  }}
/>;

Let’s send data from React Native to the web. The following example sends a location retrieved from React Native.

let location = JSON.stringify({ latitude: 36.742022, longitude: 3.103771 });
webview.injectJavaScript(`
  window.injectData({
    action: "setLocation",
    data: JSON.stringify(${location})
  })
`);

We’ll read the location on the web:

window.injectData = (message) => {
  switch (message.action) {
    case "setLocation":
      let location = JSON.parse(message.data);
      break;
    case "anotherAction":
      //
      break;
  }
};

The Web Application and Website

All web-related parts, from the website to the web application, were made with Next.js and hosted on Netlify for three main raisons:

  • cost-effectiveness
    There is no server to maintain, and Netlify’s free plan is more than enough for my needs. Unlimited private repositories are now free on GitHub, so nothing to worry about there.
  • effortless development
    Commit, push, and let Netlify do the rest. Is anything simpler than that?
  • speed
    The websites are static and all hosted on a content delivery network (CDN). When a user requests these websites, the CDN directs them to the nearest copy in order to minimize latency. So, the websites are extremely fast.

Limitations of Expo

There are two approaches to building an app with Expo: the managed workflow, where you write only JavaScript, and Expo tools and services do the rest for you, and the bare workflow, where you have full control over all aspects of the native project, and where Expo tools can’t help as much. If you plan to follow the first approach, then consider Expo’s limitations, because some functionality that exists in major apps, such as Spotify (for example, music playing in the background) and Messenger (call notifications), cannot be done yet.

Conclusion

Expo is an excellent choice if you are not familiar with native development and you want to avoid all of the headaches associated with creating and regularly deploying an application. Firebase can save you a lot of time and work, because of its scalability and variety of services. However, both are third-party services, over which you have no control, and Firestore is not designed for complex queries and data relationships.

Thanks for your attention. I hope you’ve enjoyed this article and learned something new.

(ra, yk, il, al)

Categories: Others Tags: