Archive

Archive for July, 2020

Making lil’ me

July 15th, 2020 No comments

Cassie Evans made a lovely illustration of herself and then used Greensock to add a flourish of animations to polish it off. Cassie wrote a series of posts about how she did it:

In this post we’ll cover how to get values from the mouse movement and plug them into an animation. This is my favourite thing about SVG animation. Not mouse movement in particular, but interactivity. Exporting animation as an mp4 is cool and all. But you can’t play with it. Animating on the web opens up so many cool possibilities!

Speaking of combining great illustrations with impressive animations, Jhey Tompkins recently shared a bunch of tips he’s learned from building complex CSS illustrations. This first piece of advice? It takes time and have patience. I’m sure he needed all the patience in the world to pull off his animated Matryoshka dolls.

Direct Link to ArticlePermalink


The post Making lil’ me appeared first on CSS-Tricks.

You can support CSS-Tricks by being an MVP Supporter.

Categories: Designing, Others Tags:

Make Jamstack Slow? Challenge Accepted.

July 15th, 2020 No comments
Screenshot of a Lighthouse audit showing a score of 100 out of 100.

“Jamstack is slowwwww.” That’s not something you hear often, right? Especially, when one of the main selling points of Jamstack is performance. But yeah, it’s true that even a Jamstack site can suffer hits to performance just like any other site.

Don’t think that by choosing Jamstack you no longer have to think about performance. Jamstack can be fast — really fast — but you have to make the right choices. Let’s see if we can spot some of the poor decisions that can lead to a “slow” Jamstack site.

To do that, we’re going to build a really slow Gatsby site. Seems strange right? Why would we intentionally do that!? It’s the sort of thing where, if we make it, then perhaps we can gain a better understanding of what affects Jamstack performance and how to avoid bottlenecks.

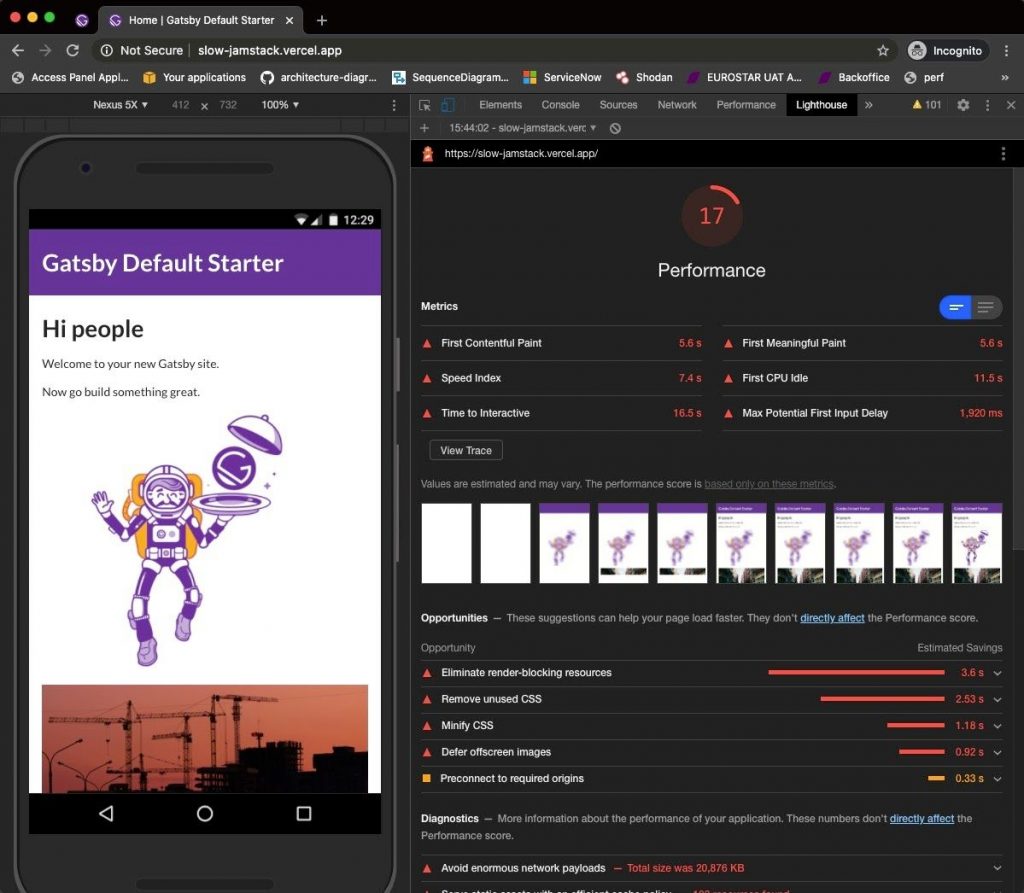
We will use continuous performance testing and Google Lighthouse to audit every change. This will highlight the importance of testing every code change. Our site will start with a top Lighthouse performance score of 100. From there, we will make changes until it scores a mere 17. It is easier to do than you might think!

Let’s get started!

Creating our Jamstack site

We are going to use Gatsby for our test site. Let’s start by installing the Gatsby CLI installed:

npm install -g gatsby-cli

We can up a new Gatsby site using this command:

gatsby new slow-jamstack

Let’s cd into the new slow-jamstack project directory and start the development server:

cd slow-jamstack
gatsby develop

To add Lighthouse to the mix, we need a Gatsby production build. We can use Vercel to host the site, giving Lighthouse a way to runs its tests. That requires installing the Vercel command-line tool and logging in:

npm install -g vercel-cli
vercel

This will create the site in Vercel and put it on a live server. Here’s the example I’ve already set up that we’ll use for testing.

We’ve gotta use Chrome to access directly from DevTools and run a performance audit. No surprise here, the default Gatsby site is fast:

A score of 100 is the fastest you can get. Let’s see what we can do to slow it down.

Slow CSS

CSS frameworks are great. They can do a lot of heavy lifting for you. When deciding on a CSS framework use one that is modular or employs CSS-in-JS so that the only CSS you need is what’s loaded.

But let’s make the bad decision to reach for an entire framework just to style a button component. In fact, let’s even grab the heaviest framework while we’re at it. These are the sizes of some popular frameworks:

Framework CSS Size (gzip)
Bootstrap 68kb (12kb)
Bulma 73kb (10kb)
Foundation 30kb (7kb)
Milligram 10kb (3kb)
Pure 17kb (4kb)
SemanticUI 146kb (20kb)
UIKit 33kb (6kb)

Alright, SemanticUI it is! The “right” way to load this framework would be to use a Sass or Less package, which would allow us to choose the parts of the framework we need. The wrong way would be to load all the CSS and JavaScript files in the of the HTML. That’s what we’ll do with the full SemanticUI stylesheet. Plus, we’re going to link up jQuery because it’s a SemanticUI dependency.

We want these files to load in the head so let’s jump into the html.js file. This is not available in the src directory until we run a command to copy over the default from the cache:

cp .cache/default-html.js src/html.js

That gives us html.js in the src directory. Open it up and add the required stylesheet and scripts:

<link rel="stylesheet" href="https://cdn.jsdelivr.net/npm/semantic-ui@2.4.2/dist/semantic.css"></link>
<script src="https://code.jquery.com/jquery-3.1.1.js"></script>
<script src="https://cdn.jsdelivr.net/npm/semantic-ui@2.4.2/dist/semantic.js"></script>  

Now let’s push the changes straight to our production URL:

vercel --prod

OK, let’s view the audit…

Screenshot of a Lighthouse report showing a score of 66 out of 100.
Zoikes! A 33% reduction!

We have reduced the speed of the site down to a score of 66. Remember that we are not even using this framework at the moment. All we have done is load the files in the head and that reduced the performance score by one-third. Our Time to Interactive (TTI) jumped from a quick 1.9 seconds to a noticeable 4.9 seconds. And look at the possible savings we could get with from Lighthouse’s recommendations.

Slow marketing dependencies

Next, we are going to look at marketing tags and how these third-party scripts can affect performance. Let’s pretend we work with a marketing department and they want to start measuring traffic with Google Analytics. They also have a Facebook campaign and want to track it as well.

They give us the details of the scripts that we need to add to get everything working. First, for Google Analytics:

<script async src="https://www.googletagmanager.com/gtag/js?id=UA-4369823-4"></script>
<script
  dangerouslySetInnerHTML={{ __html: `
  window.dataLayer = window.dataLayer || [];
  function gtag(){dataLayer.push(arguments);}
  gtag('js', new Date());
  gtag('config', 'UA-4369823-4');
  `}}
/>

Then for the Facebook campaign:

<script
  dangerouslySetInnerHTML={{ __html: `
    !function(f,b,e,v,n,t,s)
    {if(f.fbq)return;n=f.fbq=function(){n.callMethod?
    n.callMethod.apply(n,arguments):n.queue.push(arguments)};
    if(!f._fbq)f._fbq=n;n.push=n;n.loaded=!0;n.version='2.0';
    n.queue=[];t=b.createElement(e);t.async=!0;
    t.src=v;s=b.getElementsByTagName(e)[0];
    s.parentNode.insertBefore(t,s)}(window, document,'script',
    'https://connect.facebook.net/en_US/fbevents.js');
    fbq('init', '3180830148641968');
    fbq('track', 'PageView');
    `}}
/>

<noscript><img height="1" width="1" src="https://www.facebook.com/tr?id=3180830148641968&ev=PageView&noscript=1"/></noscript>

We’ll place these scripts inside html.js, again in the section, before the closing tag.

Just like before, let’s push to Vercel and re-run Lighthouse:

vercel --prod
Screenshot of a Lighthouse audit showing a score of 51 out of 100.

Wow, the site is already down to 51 and all we’ve done is tack on one framework and a couple of measly scripts. Together, they/ve reduced the score by a whopping 49 points, nearly half of where we started.

Slow images

We haven’t added any images to the site yet but we know we absolutely would in a real-life scenario. We are going to add 100 images to the page. Sure, 100 is a lot for a single page but, then again, we know that images are often the biggest culprits of bloated web pages so we might as well let them shine.

We’ll make things a little worse by hot loading the images directly from https://placeimg.com instead of serving them on our own server.

Let’s crack open index.js and drop this code in, which will loop through 100 instances of images:

const IndexPage = () => {
  const items = []
  for(var i = 0; i < 100; i++) {
    const url = `http://placeimg.com/640/360/any?=${i}`
    items.push(<img key={i} alt={i} src={url} />)
  }
  
  return (
    <Layout>
      // ...
      {items}
      // ...
    </Layout>
  )
}

The 100 images are all different and will all load as the page loads, thereby blocking the rendering. OK, let’s push to Vercel and see what’s up.

vercel --prod
Screenshot of a Lighthouse audit showing a score of 17 out of 100.
That score deserves a sad trombone. ?

OK, we now have a very slow Jamstack site. The images are blocking the rendering of the page and the TTI is now a whopping 16.5 seconds. We have taken a very fast Jamstack site and dropped it to a Lighthouse score of 17 — a reduction of 83 points!

Now, you may be think that you would never make these poor decisions when building an app. But you are missing the point. Every choice we make has an impact on performance. It’s a balance and performance does not come free. Even on Jamstack sites.

Making Jamstack fast again

You have seen that we cannot ignore client-side performance when using Jamstack.

So why do people say that Jamstack is fast? Well, the main advantage of Jamstack — or using static site generators in general — is caching. Static files are cached on the edge reducing Time to First Byte (TTFB).

This is always going to be faster than going to a single-origin web server before generating the page. This is a great feature of Jamstack and gives you a fighting chance to create a page that can hit 100 in Lighthouse. (But, hey, as a side note, remember that great scores aren’t always indicative of an actual user experience.)


See, I told you we could make Jamstack slow! There are also many other things that can slow it down, but hopefully this drives home the point.

While we’re talking about performance, here are a few of my favorite performance articles on here at CSS-Tricks:


The post Make Jamstack Slow? Challenge Accepted. appeared first on CSS-Tricks.

You can support CSS-Tricks by being an MVP Supporter.

Categories: Designing, Others Tags:

10+ Examples of Responsive Websites That Nailed It

July 15th, 2020 No comments

You would naturally like to see that your website will look good on every browser and device. Especially so if it’s an eCommerce website.

The following responsive web design examples are designed to provide you with information you can use to accomplish just that.

There’s more than just a few specifications and requirements to be attended to in today’s competitive climate; particularly in the area of responsive website design.

Meeting each requirement and checking everything twice to make sure you’ve left nothing out can be a daunting task.

It’s important however to make every effort to do so. According to data from StatCounter, mobile usage now accounts for more than half of all website traffic.

Yes, you can still focus primarily on desktop design, but don’t expect to get anywhere near the traffic responsive design allows you to experience.

Thankfully, a top-of-the-line WordPress theme like BeTheme makes it almost ridiculously easy to meet the myriad of technical requirements and specifications you might otherwise tend to consider to be somewhat of a bother.

You’d make Google happy too. Responsive, mobile-friendly websites have a habit of getting the high search rankings website owners covet.

Responsive web design is imperative.

Applying mobile design rules and specs doesn’t mean totally ignoring desktop usage. Go about it right and you can enjoy the best of both worlds – as you will see in the examples presented here.

Let’s take a closer look at how to go about making good things happen.

Responsive web designs that encourage leaner desktop experiences

There are some that think that good design means making use of every pixel. Quite the opposite is true when you are designing for both desktop and mobile. The more informational content you try to cram onto a desktop page, the harder it will be to meaningfully display that page on a mobile device.

Rather than worry about “wasted” pixels, designers will benefit from creating simpler and more efficient experiences, as is the case with designer/developer Rob Grabowski‘s site.

It looks like this on a mobile screen:

And like this on a desktop.

The lesson: consistency in design promotes seamless transition when viewing on one device, and then on another.

Mobile web designs that improve the decision-making process

Online users are occasionally (perhaps quite often) susceptible to experiencing information overload. A website page featuring an overabundance of information can actually make it more difficult for a visitor to find what he or she is looking for.

Good responsive design practices significantly mitigate information overload problems. As the screen size shrinks, it becomes easier and easier to find what you’re looking for.

BeRepair, one of BeTheme’s 500+ pre-built sites, provides an excellent demonstration of this.
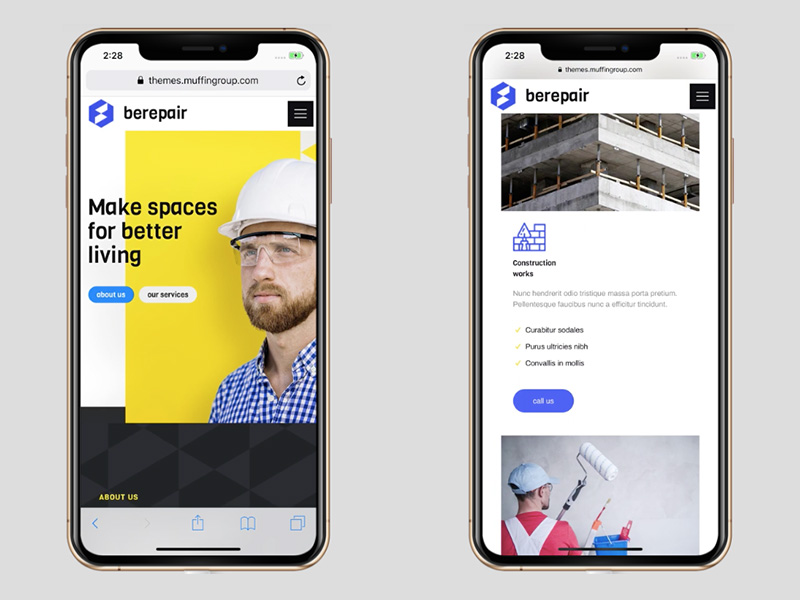
Note how a responsive layout makes it much easier for a visitor to avoid distractions and focus on information of particular interest.

This design concept works with the BeRestaurant pre-built desktop site as well:

This desktop version is obviously an appealing design for a restaurant’s website.

What’s missing in the mobile version? Very little, if anything.
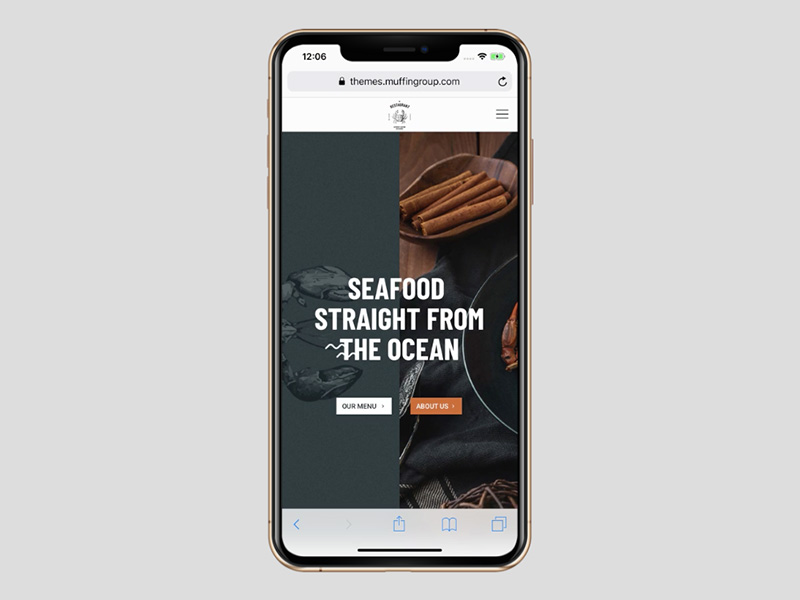
Granted, the menu on the right appears to be “missing”, but rather than trying to cram it into the mobile display it has simply been tucked into the top-right hamburger menu icon, from where a visitor can scan it without any distractions.

Responsive designs that eliminate the excess

Think about the kinds of paintings you’ve probably encountered in a museum or an art gallery:

  • The landscape paintings often feature a central focus surrounded by beautiful details that enhance rather than detract from it.
  • Portraits on the other hand typically have a singular focus; sometimes surrounded by intimate or relevant details.

Think of a desktop display as being akin a landscape and a mobile display as more like a portrait. To make the transition from desktop to mobile it’s usually necessary to maintain the central focus while trimming away many of the beautiful surroundings.

Which is what BeITService does.

First, the desktop display:

Next, how the page is displayed on mobile:
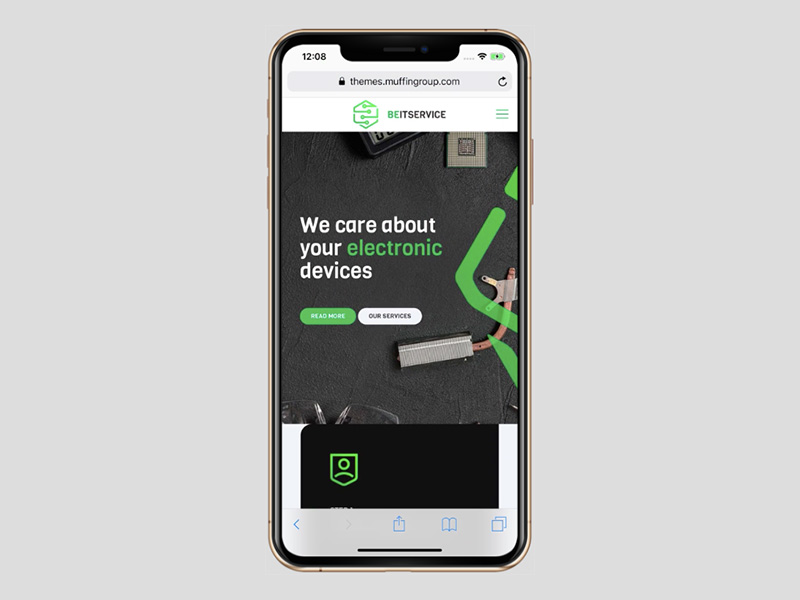
Although the original image is not replicated in full, nothing of real significance has been lost. The message being conveyed is front and center and unaltered.

Culturally Connected takes a somewhat similar approach:

Like in a landscape painting, the central focus (the message) is surrounded by a beautiful background graphic.

On the corresponding mobile display, you get this:
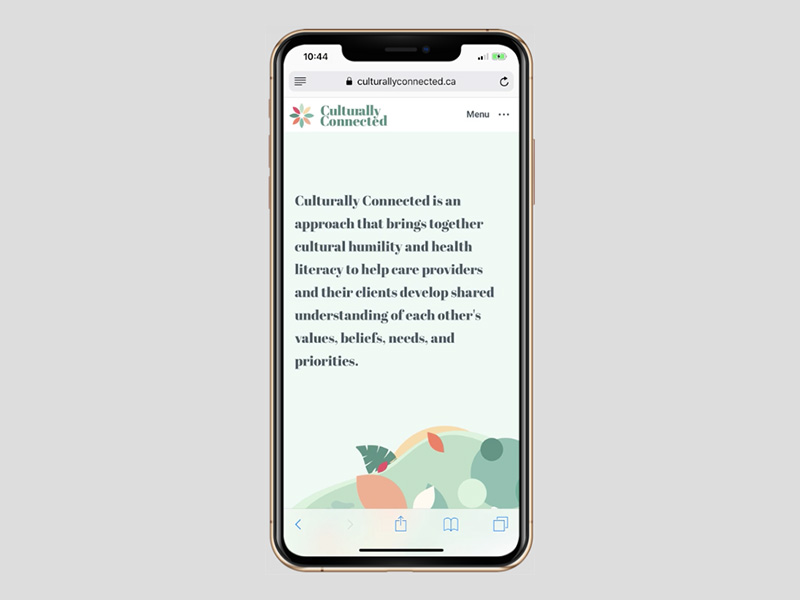
The portion of the graphic that has been retained is moved to the bottom, where it nicely complements and underpins the main message.

BeTutor is another useful example. Its desktop version looks like this:

Center the graphic below the main message, and you get the mobile view.

The mobile view remains uncluttered and the primary subject matter has been retained.

Responsive websites that leverage their space

Although reducing desktop display content is often required when designing for the small screen, using different ratios to leverage the available space can be a good option.

1987 Masters provides a good example of this leveraging approach.

With a bit of astute leveraging, content has actually been added in the mobile version to provide the visitor with an option to learn even more about what the company has to offer.

As you can see, a mobile design doesn’t have to show the same or less content to work well.

Designers have the option to use this greater ratio of vertical space to their advantage; like in this example of BeCosmetics.

The desktop view:

The mobile, having more vertical space, allows the designer to show the button inviting the user to explore further, together with some added introductory content.

As you can see, less space doesn’t always mean the mobile user has to be satisfied with less meaningful content.

Responsive websites can also exhibit enhanced readability

When laying out a desktop website design you sometimes have to be careful about how much information you intent to show a visitor at one time. Putting too many words on a line or cramping letters together can make your message less readable and therefore easier for a reader to simply skip over.

Clear, easily readable text balanced by supporting visual elements should be the goal, a good example being the BeDanceSchool site:
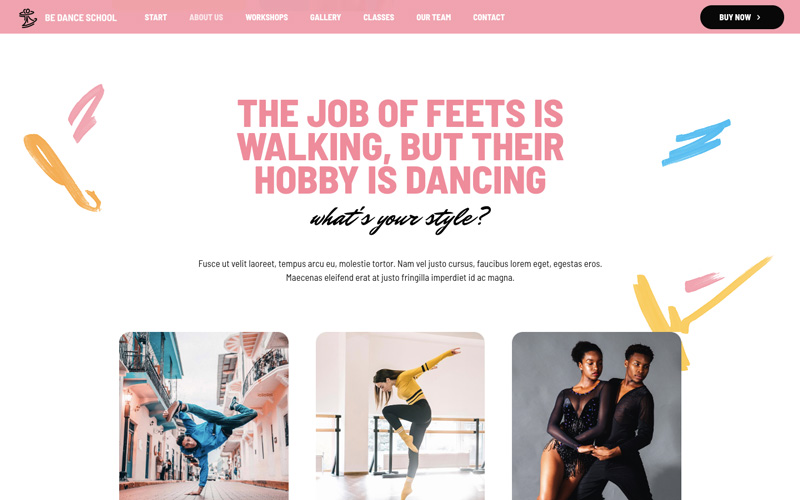
This is a good desktop layout. The eye-catching images nicely support the text, but there’s simply too much information for a mobile display to handle without having a negative impact on readability.

This is how the message can be effectively presented on mobile:
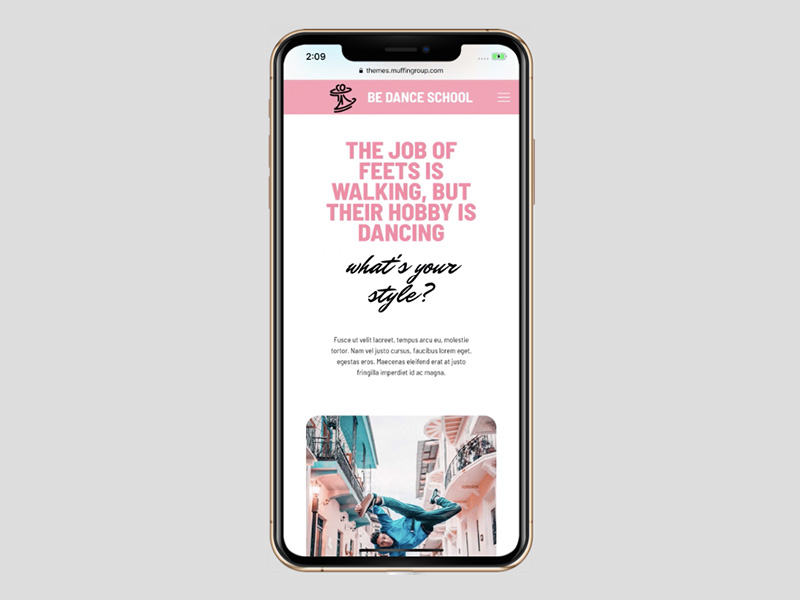
The pared-back mobile design is just as readable and equally engaging. Proper uses of font styles and sizes are important as well; as Base Coat demonstrates:

You do have to be careful about using the added vertical spacing for your text. On mobile its important that the visitor can see where it ends without having to scroll down.

Mobile site examples in which the visual content is spotlighted

The effectiveness of storytelling is well known, and visual storytelling elements can be made to fit hand in glove on mobile.

Visitors see this BeBand website on the desktop:

While on a mobile display they see this:

Everything is there; just nicely rearranged.

Videos also work well on mobile. First-time visitors to The Scott Resort are invited to watch a video.

The type of device the visitor is on doesn’t matter since the video will automatically conform to the width of the screen.

Here is what it looks like on a desktop:

And here is how the same video appears on mobile:

With a mobile responsive design it can be easy to let your content adapt to a device in a way that allows users to have the experience you want them to have.

Examples of mobile responsive sites that have been designed to collect more leads

Try as you might, no matter how much traffic comes from your responsive mobile device designs, desktop displays still account for the majority of user conversions.

Don’t lose heart. That will change, and there’s nothing to keep you from creating responsive designs that will capture leads and improve conversion rates.

Check out this pre-built site for BeClub:
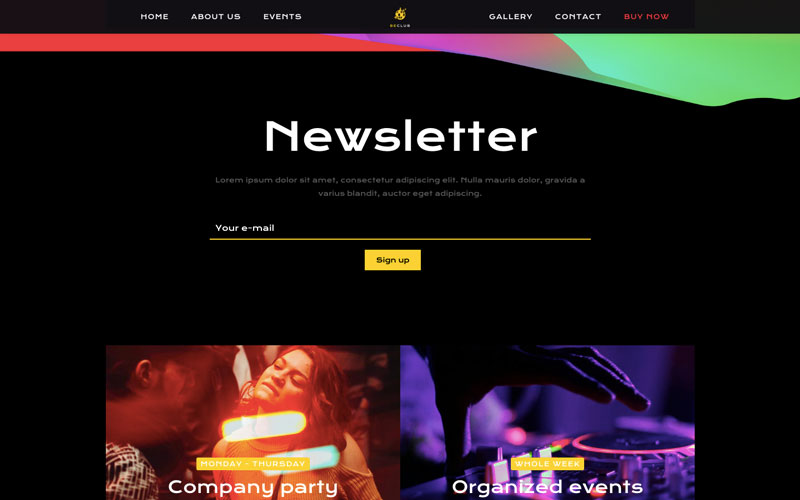
The “Newsletter” signup section is attractively highlighted and practically begs visitors to sign up.

You’ll naturally want to get the same visitor response on mobile. As the following example illustrates, that will not be a problem:
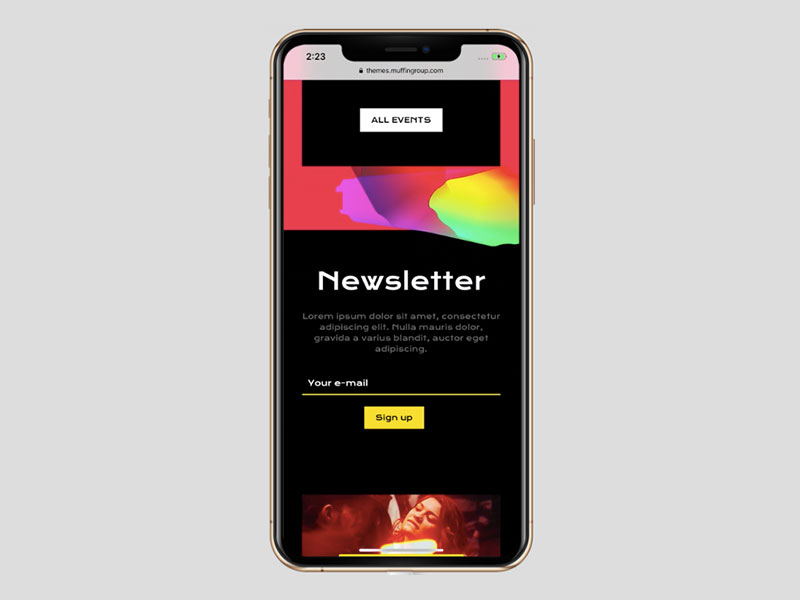
If anything, the mobile version might be more effective than the desktop. Making it easy for a visitor to get on your email list is a good way to increase conversion rates from users who prefer to work with mobile devices.

Responsive web designs that can make winning a habit

What do WordPress users look for in a theme that can help them design their website? They look for:

  • A flat or shallow learning curve and ease of use
  • Cost effectivness
  • Features that adequately address their needs
  • Flexibility and customizability
  • Overall design quality

Not every WordPress theme has each of these qualities, nor does every theme adequately address website responsiveness. Some are great for desktop users but fall flat with respect to providing mobile users with a satisfying experience.

BeTheme is different. Every one of its 500+ pre-built sites has mobile responsiveness baked in.

BeTheme has all the other design and performance features WordPress users look for, so when you use it you won’t be wasting time worrying about how to make your website emulate the responsive designs we’ve featured here.

You can let BeTheme do much of the heavy lifting and devote your time to getting your new website up and running and in front of those eager to see what you have to offer.

Read More at 10+ Examples of Responsive Websites That Nailed It

Categories: Designing, Others Tags:

An Introduction To Stimulus.js

July 15th, 2020 No comments
Smashing Editorial

An Introduction To Stimulus.js

An Introduction To Stimulus.js

Mike Rogers

2020-07-15T10:30:00+00:00
2020-07-15T16:33:48+00:00

The web moves pretty fast and picking an approach for your frontend that will feel sensible in a year’s time is tricky. My biggest fear as a developer is picking up a project that hasn’t been touched for a while, and finding the documentation for whatever approach they used is either non-existent or is not easily found online.

About a year ago, I started using Stimulus and I felt really happy about the code I was shipping. It’s a ~30kb library which encourages small reusable sprinkles of JavaScript within your app, organized in such a way that it leaves little hints in your accessible HTML as to where to find the JavaScript it’s connected to. It makes understanding how a piece of JavaScript will interact with your page almost like reading pseudocode.

Stimulus was created by the team at Basecamp — they recently released the HEY email service — to help maintain the JavaScript they write for their web applications. Historically, Basecamp has been quite good around maintaining their open-source projects, so I feel quite confident that Stimulus has been tested thoroughly, and will be maintained for the next few years.

Stimulus has allowed me to build applications in a way that feels reusable and approachable. While I don’t think Stimulus will take over the web like React and Vue have, I think it is a worthwhile tool to learn.

Terminology

Like all frameworks, Stimulus has preferred terms for describing certain things. Luckily (and one of the main reasons I’ve taken to liking Stimulus), there are only two you’ll need to know about:

  • Controller
    This refers to instances of JavaScript classes which are the building blocks of your application. It’s safe to say that when we talk about Stimulus Controllers, we’re talking about JavaScript classes.
  • Identifier
    This is the name we’ll use to reference our controller in our HTML using a data attribute that is common to Stimulus codebases.

Let’s Jump Into Stimulus!

In the following few examples, I’m going to use code you can drop into the browser to get started right away via the library distributed via unpkg.com. Later on, I’ll cover the webpack approach which is highly encouraged as it allows for improved organization of your code and is the approach used in the Stimulus Handbook.

The Boilerplate

See the Pen [The Boilerplate – Stimulus](https://codepen.io/smashingmag/pen/abdjXvP) by Mike Rogers.

See the Pen The Boilerplate – Stimulus by Mike Rogers.

Once you understand the gist of the above snippet, you’ll have the knowledge to be comfortable picking up a project that uses Stimulus.

Pretty awesome, right? Let’s jump into what everything is doing!

application.start

This line tells Stimulus to add the listeners to the page. If you call it just once at the top of your page before you add any Stimulus code, it’ll return an instance of the main Stimulus controller which includes the method register that is used to tell Stimulus about the classes you’d like to connect to it.

Controllers

The data-controller attribute connects our HTML element to an instance of our JavaScript class. In this case, we used the identifier “counter” to hook up an instance of the CounterController JavaScript class to our div element. We told Stimulus about the connection between this identifier and the controller via the application.register method.

Stimulus will continuously monitor your page for when elements with this attribute are added and removed. When a new piece of HTML is added to the page with a data-controller attribute, it’ll initialize a new instance of the relevant controller class, then connect the HTML element. If you remove that element from the page, it’ll call the disconnect method on the controller class.

Actions

Stimulus uses a data attribute data-action to clearly define which function of the controller will be run. Using the syntax event->controller#function anyone reading the HTML will be able to see what it does. This is especially useful as it reduces the risk of unexpected code from other files, making it easier to navigate the codebase. When I first saw the approach Stimulus encourages, it felt almost like reading pseudocode.

In the above example, when the button fires the “click” event, it will be passed onto the addOne function within our “counter” controller.

Targets

Targets are a way to explicitly define which elements are going to be available to your controller. Historically I’ve used a mix of ID, CSS class names and data attributes to achieve this, so having a single “This is the way to do it” which is so explicit makes the code a lot more consistent.

This requires defining your target names within your controller class via the targets function and adding the name to an element via the data-target.

Once you’ve got those two pieces setup, your element will be available in your controller. In this case, I’ve set up the target with the name “output” and it can be accessed by this.outputTarget within the functions in our controller.

Duplicate Targets

See the Pen [Duplicate Targets – Stimulus](https://codepen.io/smashingmag/pen/ExPprPG) by Mike Rogers.

See the Pen Duplicate Targets – Stimulus by Mike Rogers.

If you have multiple targets with the same name, you can access them by using the plural version of the target method, in this case when I call this.outputTargets, it’ll return an array containing both my divs with the attribute data-target="hello.output".

Event Types

You listen for any of the events you’d commonly be able to attach via the JavaScript method addEventListener. So for example, you could listen for when a button is clicked, a form is submitted or an input is changed.

See the Pen [Event types – Stimulus](https://codepen.io/smashingmag/pen/wvMxNGJ) by Mike Rogers.

See the Pen Event types – Stimulus by Mike Rogers.

To listen to window or document events (such as resizing, or the user going offline), you’ll need to append “@window” or “@document” to the event type (e.g. resize@window->console#logEvent will call the function logEvent) on the console controller when the window is resized.

There is a shorthand way to attach common events, where you are able to omit the event type and it has a default action for the element type. However, I strongly discourage using the event shorthand, as it increases the amount of assumptions someone who is less familiar with Stimulus needs to make about your code.

Uses Multiple Controllers In The Same Element

Quite often you may want to break out two pieces of logic into separate classes, but have them appear close to each other within the HTML. Stimulus allows you to connect elements to multiple classes by placing references to both within your HTML.

See the Pen [Multiple Controllers – Stimulus](https://codepen.io/smashingmag/pen/XWXBOjy) by Mike Rogers.

See the Pen Multiple Controllers – Stimulus by Mike Rogers.

In the above example, I’ve set up a basket object which only concerns itself with counting the total number of items in the basket, but also added a child object that shows the amount of bags per item.

Passing Data To Your Object

See the Pen [Passing Data – Stimulus](https://codepen.io/smashingmag/pen/mdVjvOP) by Mike Rogers.

See the Pen Passing Data – Stimulus by Mike Rogers.

Stimulus provides the methods this.data.get and this.data.set within the controller class, this will allow you to change data attributes which are within the same namespace as the identifier. By this I mean if you want to pass data to your stimulus controller from your HTML, just add an attribute like data-[identifier]-a-variable to your HTML element.

When calling this.data.set, it will update the value in your HTML so you can see the value change when you inspect the element using your browser development tools.

Using namespaced data attributes is a really nice way to help make it really clear which data attribute is for what piece of code.

Initialize, Connected, Disconnected

As your application grows, you’ll probably need to hook into ‘lifecycle events’ to set defaults, fetch data, or handle real-time communication. Stimulus has three build-in methods which are called throughout the lifecycle of a Stimulus class.

See the Pen [Initialize, Connected, Disconnected – Stimulus
](https://codepen.io/smashingmag/pen/ZEQjwBj) by Mike Rogers.

See the Pen Initialize, Connected, Disconnected – Stimulus
by Mike Rogers.

When Stimulus sees an element with a matching data-controller attribute, it will create a new version of your controller and call the initialize function. This will often run when you first load the page, but will also be run if you were to append new HTML to your page (e.g. via AJAX) containing a reference to your controller. It will not run when you move an element to a new position within your DOM.
After a class has been initialized, Stimulus will connect it to the HTML element and call the connect function. It’ll also call connect if you were to move an element within your DOM. So if you were to take an element, remove it from one element, then append it somewhere else, you’d notice only connect will be called.

The disconnect function will be run when you remove an element from your page, so for example, if you were to replace the body of your HTML, you could tear down any code which might need to be rerun if the element isn’t in the same position. For example, if you had a fancy WYSIWYG editor which adds lots of extra HTML to an element, you could revert it to its original state when disconnect was called.

Inheriting Functionality

On occasion, you may want to share a little common functionality between your Stimulus controllers. The cool thing about Stimulus is that (under the hood) you’re connecting somewhat vanilla JavaScript classes to HTML elements, so sharing functionality should feel familiar.

See the Pen [Inheriting functionality – Stimulus](https://codepen.io/smashingmag/pen/JjGBxbq) by Mike Rogers.

See the Pen Inheriting functionality – Stimulus by Mike Rogers.

In this example, I set up a parent class named ParentController, which is then extended by a child class named ChildController. This let me inherit methods from the ParentController so I didn’t have to duplicate code within my ChildController.

Using It In Production

I demonstrated some fairly stand-alone examples of how to use Stimulus above, which should give you a taste of what you can achieve. I also thought I should touch on how I use it in production and how it has worked out for me.

Webpack

If you’re using Webpack, you’re in for a treat! Stimulus was totally made to be used with Webpack. Their documentation even has a lovely starter kit for Webpack. It’ll allow you to break your controllers into separate files and Stimulus will decide on the correct name to use as an identifier.

You don’t have to use webpack if you want to use Stimulus, but it cleans up the experience a bunch. Personally, Stimulus was the library that helped introduce me to Webpack and really feel the value it offered.

Filename Conventions

I mentioned in the introduction of this article that I enjoyed using Stimulus because it felt organized. This really becomes apparent when you are combining it with Webpack, which enables auto loading and registration of controllers.

Once you’ve set up Stimulus in Webpack, it’ll encourage you to name your files like [identifier]_controller.js, where the identifier is what you’ll pass into your HTMLs data-controller attribute.

As your project grows, you may also want to move your Stimulus controllers into subfolders. In a magical way, Stimulus will convert underscores into dashes, and folder forward slashes into two dashes, which will then become your identifier. So for example, the filename chat/conversation_item_controller.js will have the identifier chat--conversation-item.

Maintaining Less JavaScript

One of my favorite quotes is “The Best Code is No Code At All”, I try to apply this approach to all my projects.

Web browsers are evolving a lot, I’m pretty convinced that most of the things I need to write JavaScript for today will become standardized and baked into the browser within the next 5 years. A good example of this is the details element, when I first started in development it was super common to have to manually code that functionality by hand using jQuery.

As a result of this, if I can write accessible HTML with a sprinkling of JavaScript to achieve my needs, with the mindset of “This does the job today, but in 5 years I want to replace this easily” I’ll be a happy developer. This is much more achievable when you’ve written less code to start with, which Stimulus lends itself to.

HTML First, Then JavaScript

One aspect I really like about the approach Stimulus encourages, is I can focus on sending HTML down the wire to my users, which is then jazzed up a little with JavaScript.

I’ve always been a fan of using the first few milliseconds of a user’s attention getting what I have to share with them — in front of them. Then worrying setting up the interaction layer while the user can start processing what they’re seeing.

Furthermore, if the JavaScript were to fail for whatever reason, the user can still see the content and interact with it without JavaScript. For example, instead of a form being submitted via AJAX, it’ll submit via a traditional form request which reloads the page.

Conclusion

I love building sites that need just small sprinkles of maintainable JavaScript to enhance the user experience, sometimes it’s nice to just build something which feels simpler. Having something lightweight is great, I really love that without too much cognitive load it’s pretty clear how to organize your files, and set up little breadcrumbs that hint about how the JavaScript will run with a piece of HTML.

I’ve really enjoyed working with Stimulus. There isn’t too much to it, so the learning curve is fairly gentle. I feel pretty confident that if I was to pass my code onto someone else they’ll be happy developers. I’d highly recommend giving it a try, even if it’s just out of pure curiosity.

The elephant in the room is how does it stack up compared to the likes of React and Vue, but in my mind, they’re different tools for a different requirement. In my case, I’m often rendering out HTML from my server and I’m adding a little JavaScript to improve the experience. If I was doing something more complex, I’d consider a different approach (or push back on the requirements to help keep my code feeling simple).

Further Reading

  • Stimulus Homepage
    They have a fantastic handbook that goes into the concepts I’ve outlined above into a lot more depth.
  • Stimulus GitHub Repository
    I’ve learned so much about how Stimulus works by exploring their code.
  • Stimulus Cheatsheet
    The handbook summarized on a single page.
  • Stimulus Forum
    Seeing other people working with Stimulus has made me really feel like it’s being used in the wild.

(sh, ra, yk, il)

Categories: Others Tags:

Netlify Does Cache Invalidation For You

July 15th, 2020 No comments

This is one of my favorite Netlify features. Say you’re working on a site and you change as asset like a CSS, JavaScript, or image file. Ya know, like do our job. On Netlify, you don’t have to think about how that’s going to play out with deployment, browsers, and cache. Netlify just handles it for you.

Netlify calls this Instant Cache Invalidation, part of the “rocketjuice” of Netlify.

On all the sites I work on that aren’t on Netlify, I do have to think about it (ugh). If you look at this very websites source, you’ll see a link to a stylesheet something like this:

<link href="https://css-tricks.com/wp-content/themes/CSS-Tricks-17/style.css?cache_bust=1594590986788"> rel="stylesheet"

See that ?cache_bust= stuff at the end of the stylesheet URL? Those are just gibberish characters I put into that URL manually (based on a Date() call) so that when I push a change to the file, it breaks both the CDN and people’s own browser cache and they get the new file. If I didn’t do that, the changes I push won’t be seen until all the cache expires or is manually removed by users, which is… bad. I might be fixing a bug! Or releasing a new feature! It’s extra bad because that CSS might go along with some HTML which doesn’t cache as aggressively and could lead to a mismatch of HTML and expected CSS.

I work on some sites where I change that cache-busting string by hand because I’m too lazy to automate it. Usually, I do automate it though. I recently shared my Gulpfile which I hand-wrote, and part of which deals with this cache-busting. It is work to write, work to maintain, and work to use during development. You can even read the comments on that post and see other people’s strategies for doing the same thing that are different than how I do it. Errrrrrybody be cache-busting.

Not on Netlify.

Again, you change an asset, push it up, Netlify knows it’s changed and does all the cache busting for you. So your stylesheet can be linked up like:

<link href="dont-even-worry-about-it.css" rel="stylesheet" />


The post Netlify Does Cache Invalidation For You appeared first on CSS-Tricks.

You can support CSS-Tricks by being an MVP Supporter.

Categories: Designing, Others Tags:

How to Create a USP For Your Business?

July 14th, 2020 No comments

Every business faces fierce competition, especially when everything can be bought online. Customers are overwhelmed with the number of options available. They want to understand why they should buy from you and not from any other brand. This is where Public Relations and USP are so important.

It is crucial to create a USP for your business that helps your customers make decisions quickly.

What Is a USP?

Your USP (Unique Selling Proposition) is the one thing that differentiates your business from your competitors. An excellent value proposition encourages customers to buy your products as suggested in this article by Maryville University. It tells your potential customers what’s so special about your product/service.

Until you create a USP for your business and capitalize on it, it would be difficult for you to create a name in the industry or even convince people to buy from you.

Your USP helps marketers sell your products easily as the customers can clearly understand the benefits of buying from you.

Now that you know what a USP is and how it can benefit you let’s have a look at how to create it.

1. Understand Your Target Audience

Before you even start crafting your USP, you need to have a good understanding of your target audience. This helps in creating a USP that they want to hear, which, in turn, will boost the conversion rate.

Here are a few questions you must ask to understand your target audience better.

  • What does your ideal customer really want?
  • How does your product solve their problems?
  • What factors influence their buying decisions?
  • Why do your existing customers choose you over your competitors?
  • Where do they spend most of their time online (social media or any other website)?
  • Is there anything stopping them from buying your services (such as high price)?

While most of the answer lies in your website’s analytics, you can also use JotForm Survey Maker to create a survey and send it to your existing customers via emails.

To target new website visitors, it helps you display the form as a popup on your website.

2. Explain The Problem Your Business Solves

People don’t buy products. They buy a solution to their problems. Take the automobile industry for example. They don’t just sell vehicles: they sell comfort and luxury.

Considering it in a problem-solving context: people who want to travel comfortably and look financially stable are more likely to buy a car.

Similarly, you need to show your customers how your product can meet their needs and solve their problems.

As someone said, “sell Benefits, not features”. This concept is also applicable when creating a USP for your business.

3. List What Makes You Different From Your Competitors

The next step is to list at least three to five things that differentiate you from your competitors. What benefits your customers cannot get from any other company but only from your brand?

One of the excellent examples of a brand explaining the benefits they sell is FedEx. There are lots of delivery services companies but what makes them different from others is their slogan (USP).

FedEx’s USP (tagline) was “when it absolutely, positively has to be overnight”. It guarantees their customers that their packages will be delivered overnight. However, FedEx doesn’t use this slogan anymore.

4. Create An Elevator Pitch

Finally, it’s time to craft an elevator pitch that attracts your target audience’s attention immediately. It should be something that explains the problem you solve, differentiates you from your competitors, and is unique.

Make sure your USP is as specific and simple as possible. Also, try to include a promise in your USP.

For example, a moving supply company can have a USP that says, “Sturdy boxes in 24 hours”. This is an excellent USP because it guarantees boxes within a day that won’t collapse. Even if you fell short of boxes while moving your house, this company has got you covered.

Nerd Fitness surely knows how to create an elevator pitch. It says, “we help nerds, misfits, and mutants lose weight, get strong, and get healthy permanently”. This is great because it explains who should choose them and why and guarantees to make them healthy permanently.

The Best USP Examples

Beardbrand is one of the brands that have nailed the art of crafting a USP. Their product ethos reads, “Many competing products are formulated to address a man’s insecurities rather than helping them embrace their own awesomeness. We think you are awesome, and our products are designed to help you be the man you want to be.

This is great because it explains what makes them different from other similar products and how their product can benefit the customer.

GoPro is yet another brand that has an expertise in creating a USP. They know their audience consists of young, thrill-seeking adventurers who have a strong preference for social media. They created a simple USP: “A portable camera that’s small, easy to use and robust”.

Bellroy understands their products and target audience really well. They know people carry important items in their wallets. Most often, pockets get full and clumsy. Their website reads, “Don’t let leather weigh you down. We’ve eliminated those extra layers of leather between your cards to give you a slimmer silhouette”.

Dollar Shave Club definitely knows what influences its target audience into purchasing. The Dollar Shave Club is a subscription-based service that delivers grooming products to customers through the mail. Their USP is “Our goal is to make sure you always have everything you need to look, feel, and smell your best”. This is a great USP because everyone wants to look their best every time.

Wrapping Up

Irrespective of which industry you’re in, it is vital to create a USP that defines your brand. Understand what your target audience’s problem is, specify what makes you better than other similar companies, and explain the problem you are solving in the best possible way.

Categories: Others Tags:

Grab Free SSL Certificates From ZeroSSL

July 14th, 2020 No comments

Like it or not, we’re slowly edging towards a two-tier web: those sites that are secure, and…everything else.

There was a time on the web, when we didn’t have SSL certificates, and lots of people’s data got stolen. To address the problem, and regain users’ trust SSL certificates were introduced to secure sites handling sensitive data. And because they were initially a niche technology, you paid through the nose for them.

(An SSL certificate, for those that don’t know, is the difference between http:// and https://)

Then, thanks in part to privacy initiatives, and in part to high-profile data breaches, a few big players decided that all data should be protected. And the next thing you know, Google’s using SSL certificates as a ranking factor. And then suddenly browsers are warning people that non-SSL certified sites are insecure and they should “Get Out of Here!” And before long your hobby blog about cat-friendly board games is being billed hundreds of dollars a year just to be seen on the web.

Choosing whether to jump on the SSL bandwagon is simple: you have to have one. Finding an affordable SSL certificate, now that’s a challenge.

Most hosting companies will provide you with an SSL certificate as an add-on, and they’ll charge you anything up to $200 per year for it.

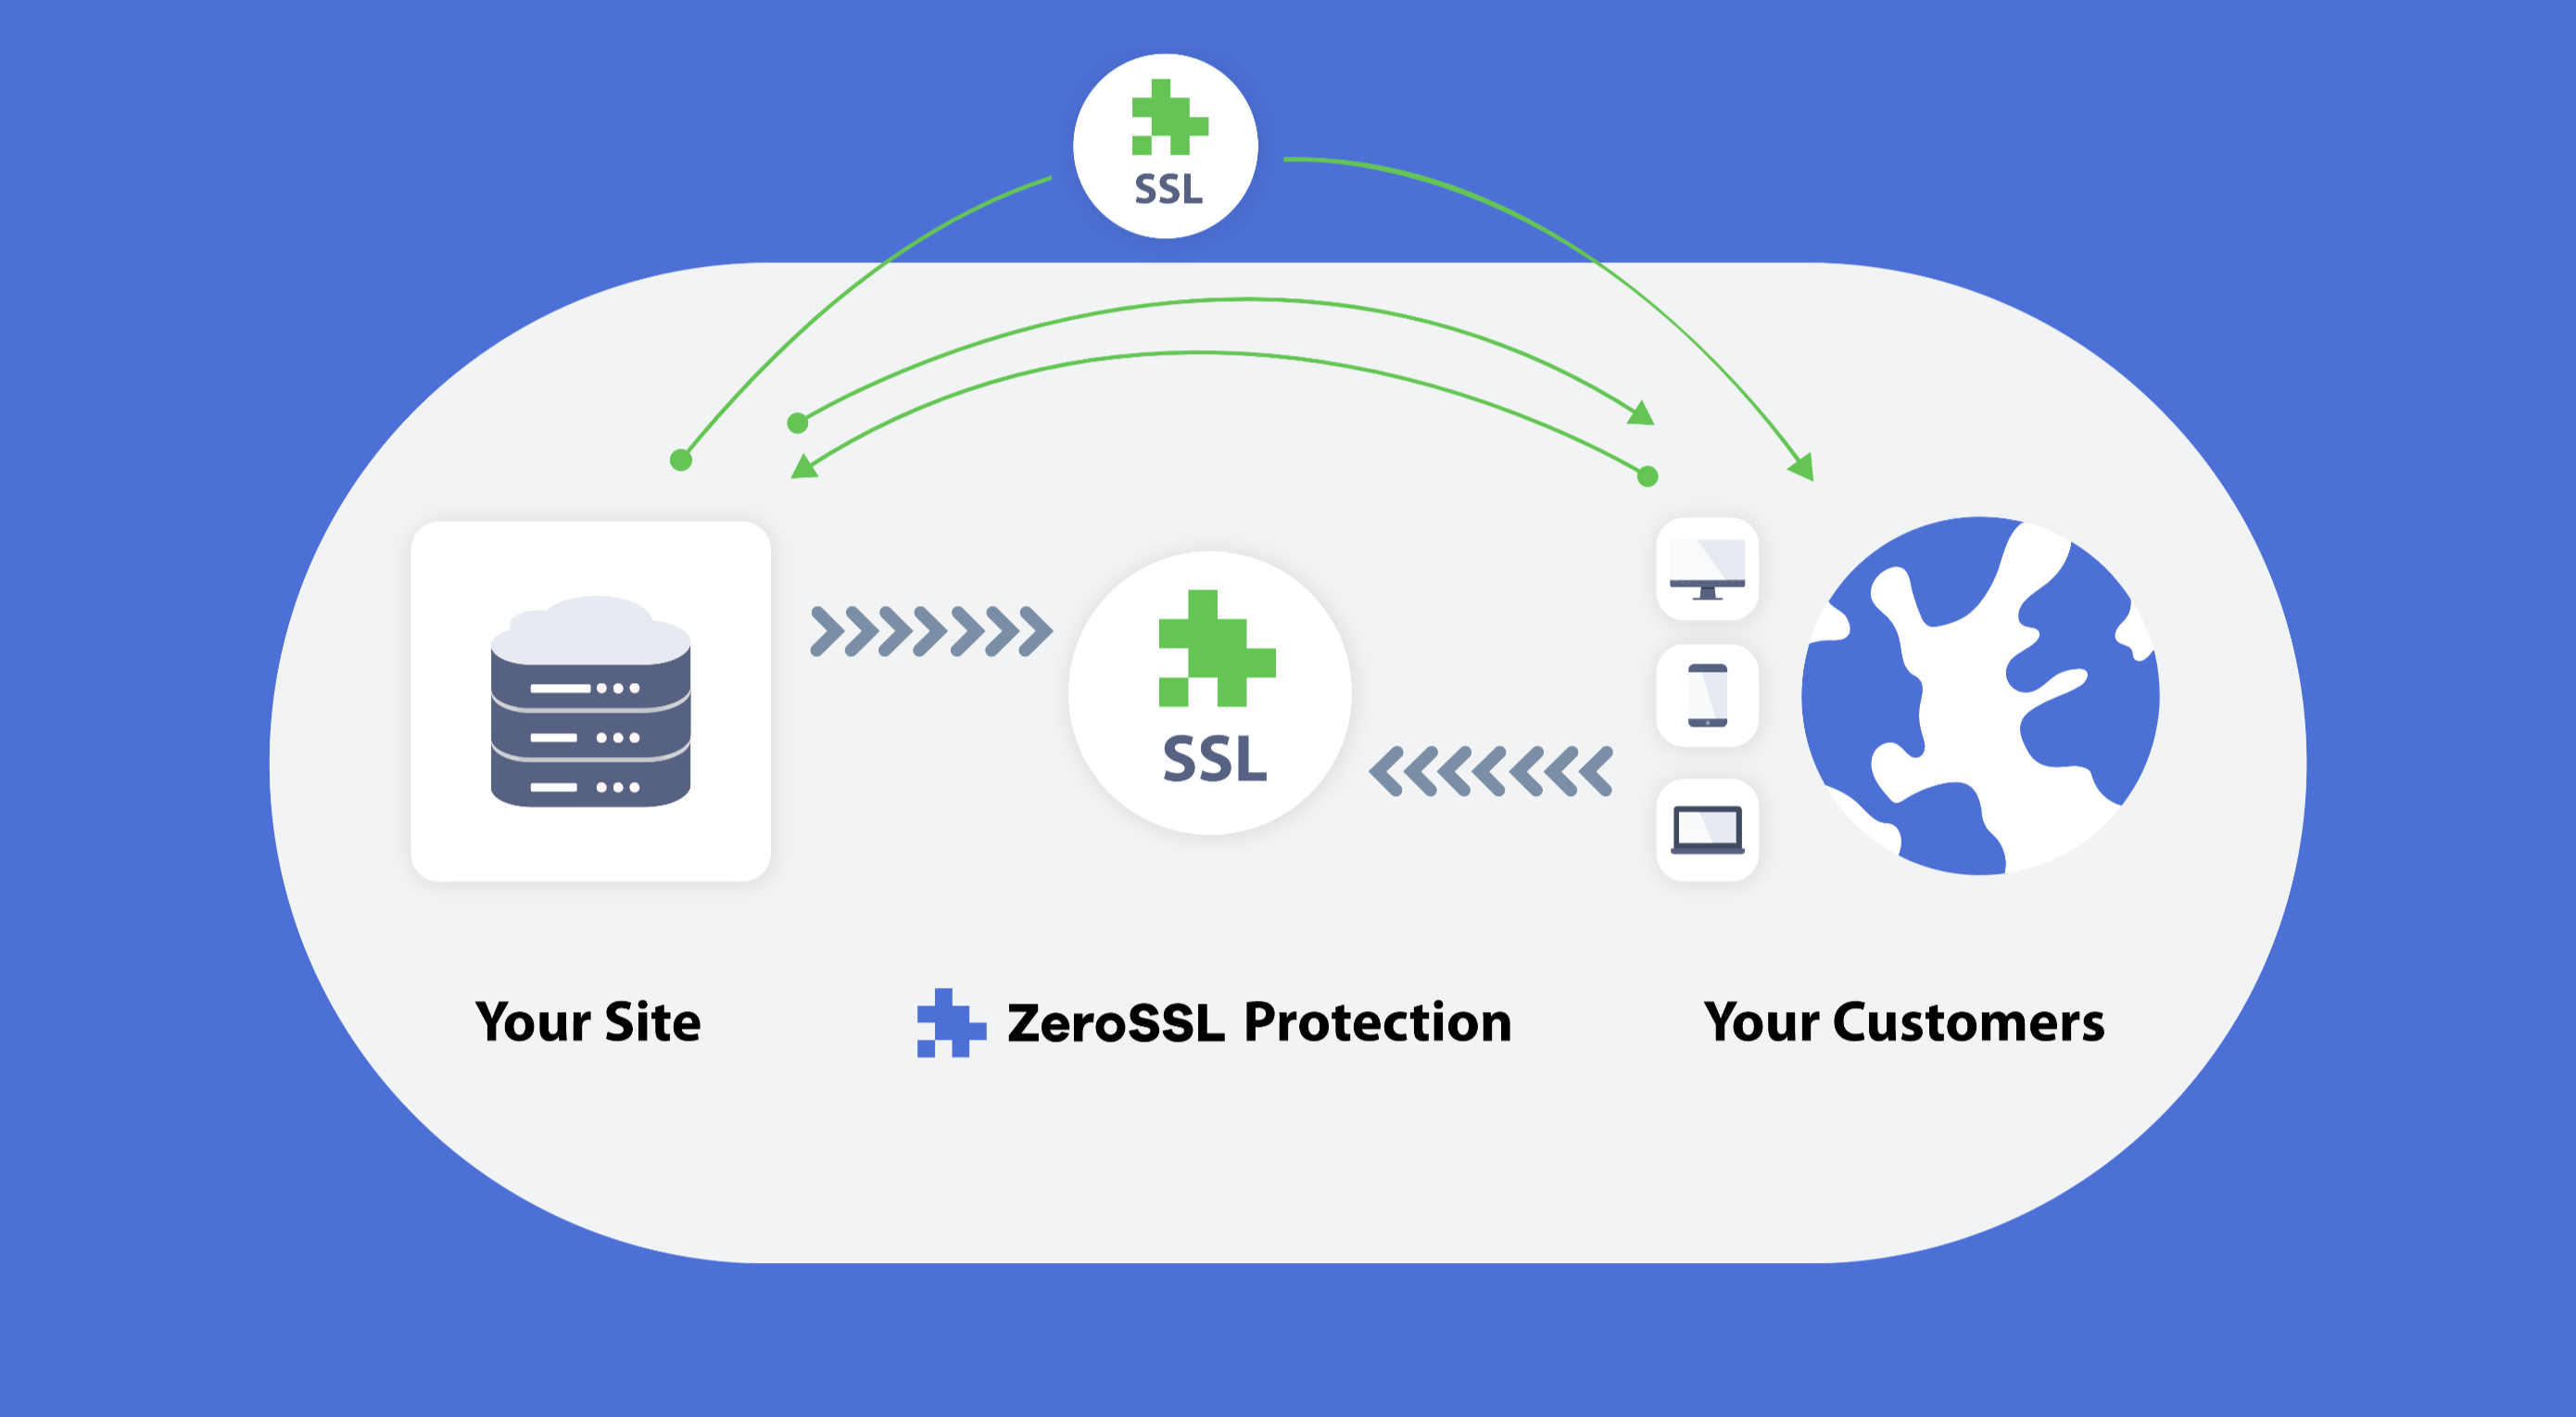
That’s why we’re blown away by ZeroSSL, because ZeroSSL is the first practical opportunity to grab an SSL certificate for your site, for free!

Get an SSL Certificate for Free

Now, it must be said that ZeroSSL isn’t the first place to offer a free SSL certificate. Plenty of hosts offer a “free” SSL certificate for the first year, when you pay for premium hosting. And there’s Let’s Encrypt which offers free certificates if you can work out how to access them.

ZeroSSL is just the first place to offer a genuinely free SSL certificate that you don’t need a post-grad degree in server engineering in order to use.

Get a Free SSL Certificate from ZeroSSL

Using ZeroSSL’s free-forever plan you can register three 90-day certificates entirely free. You’ll never need to pay for them, just renew every few months.

ZeroSSL also offers a variety of packages for simplifying your SSL management. The Basic package for example starts at $8/month and offers unlimited 90-day certificates, and even three 1-year certificates so you can renew annually and forget about them the rest of the time.

ZeroSSL also scales; if you need unlimited 1-year certificates — because you have, erm, unlimited websites? — that’s possible too.

Where ZeroSSL Excels

ZeroSSL offers a number of benefits over its competitors.

Firstly there’s the full-featured management console, that makes SSL management transparent. It sounds like a little thing, but with many other suppliers the first thing you know about your SSL certificate expiring is your site breaking.

ZeroSSL…makes managing your certificates…insanely easy.

ZeroSSL has an easy-to-use REST API, which can be used with the language of choice: PHP, Ruby, ASP, anything. It makes managing your certificates for multiple sites insanely easy.

Verifying SSL certificates can be confusing, and technically difficult. But ZeroSSL streamlines the process with automatic CSRs and one-step email validation (even for multiple domains) — considerably faster and easier than industry standard DNS validation. There’s even a one-click check to make sure your certificate is installed correctly.

Most importantly, ZeroSSL offers superb technical support on all of its paid plans. So if you’re one of the many people who started reading this post without fully understanding what an SSL certificate is, you can be confident that if you run into difficulties getting set up, there’s someone available 24/7 to dig you out of the hole.

Getting Started with ZeroSSL

If by now you’re planning to try ZeroSSL, the best place to start is the free-forever plan. ZeroSSL allows you to upgrade, downgrade, or cancel at any time, so it makes sense to start with the no-credit-card option and upscale if you need it.

Using ZeroSSL’s dashboard you can create a free 90-day SSL certificate in minutes, and the step-by-step installation instructions will guide you all the way through.

ZeroSSL’s 1-year certificates are the gold-standard of SSL protection

ZeroSSL auto-generates certificates in different formats depending on your choice of platform, to speed up installation.

You can register certificates for multiple domains — you will have to verify each domain individually, but it’s simple to setup. Premium plan users can even use wildcards, allowing you to secure a site with multiple sub-domains, from a single certificate.

ZeroSSL’s 1-year certificates are the gold-standard of SSL protection and are the option that most site owners will come to rely on.

If you’re running an agency and you’re responsible for maintaining multiple client sites, ZeroSSL is made for you. ZeroSSL’s dashboard gives you one central location to monitor the status of all of your SSL certificates, and you can set expiry reminders to notify you by email when a certificate is about to expire.

Automated SSL Renewal with ZeroSSL

If that sounds too much work, and you’d like to automate your SSL certificates, ZeroSSL has you covered.

ZeroSSL works with both its own dedicated ACME Certbot, and more than ten other third-party ACME clients to fully automate your SSL certificates absolutely free, on a rolling 90-day schedule.

If you really know what you’re doing, you might even consider the ZeroSSL’s REST API. It enables certificate creation, validation, renewal, and management using HTTPS Get calls and JSON responses. The API handles millions of requests per month using 256-bit bank-level HTTPS encryption. You can access the API for free, and the Pro plan offers unlimited access.

Go Get Certified

There are millions of sites that drop traffic every month because they lack an SSL certificate.

Whatever your site, it’s not a question of whether you need an SSL certificate, it’s how you can affordably manage to create, install, and monitor a certificate.

ZeroSSL solves all of the problems of SSL certificate management, and for the majority of users, its free-forever plan is all you’ll ever need.

Head over to zerossl.com today to boost your traffic with a free SSL certificate.

[– This is a sponsored post on behalf of ZeroSSL –]

Source

Categories: Designing, Others Tags:

Three CSS Alternatives to JavaScript Navigation

July 14th, 2020 No comments

Hey quick! You’ve gotta create the navigation for the site and you start working on the mobile behavior. What pattern do you choose? If you’re like most folks, it’s probably the “hamburger” menu that, when clicked, uses a little JavaScript to expand a vertical list of navigation links.

But that’s not the only option.

Depending on the context and contents of the navigation, there may be a JavaScript-free method that gets the job done while providing a more accessible experience.

It is considered best practice to use a progressive enhancement approach, building webpages for users with the oldest and least capable technology first, then introducing additional enhancements as support allows. If you can provide a quality experience for users with basic technology, then you might consider whether or not your webpage even requires JavaScript functionality at all. Leaving JavaScript out of the navigation can ensure that users are able to navigate your website even if JavaScript is disabled or network issues prevent scripts from loading — which are definitely wins.

Let’s look at three alternative patterns to the JavaScript-powered hamburger menu.

Alternative 1: Put the menu on a separate page

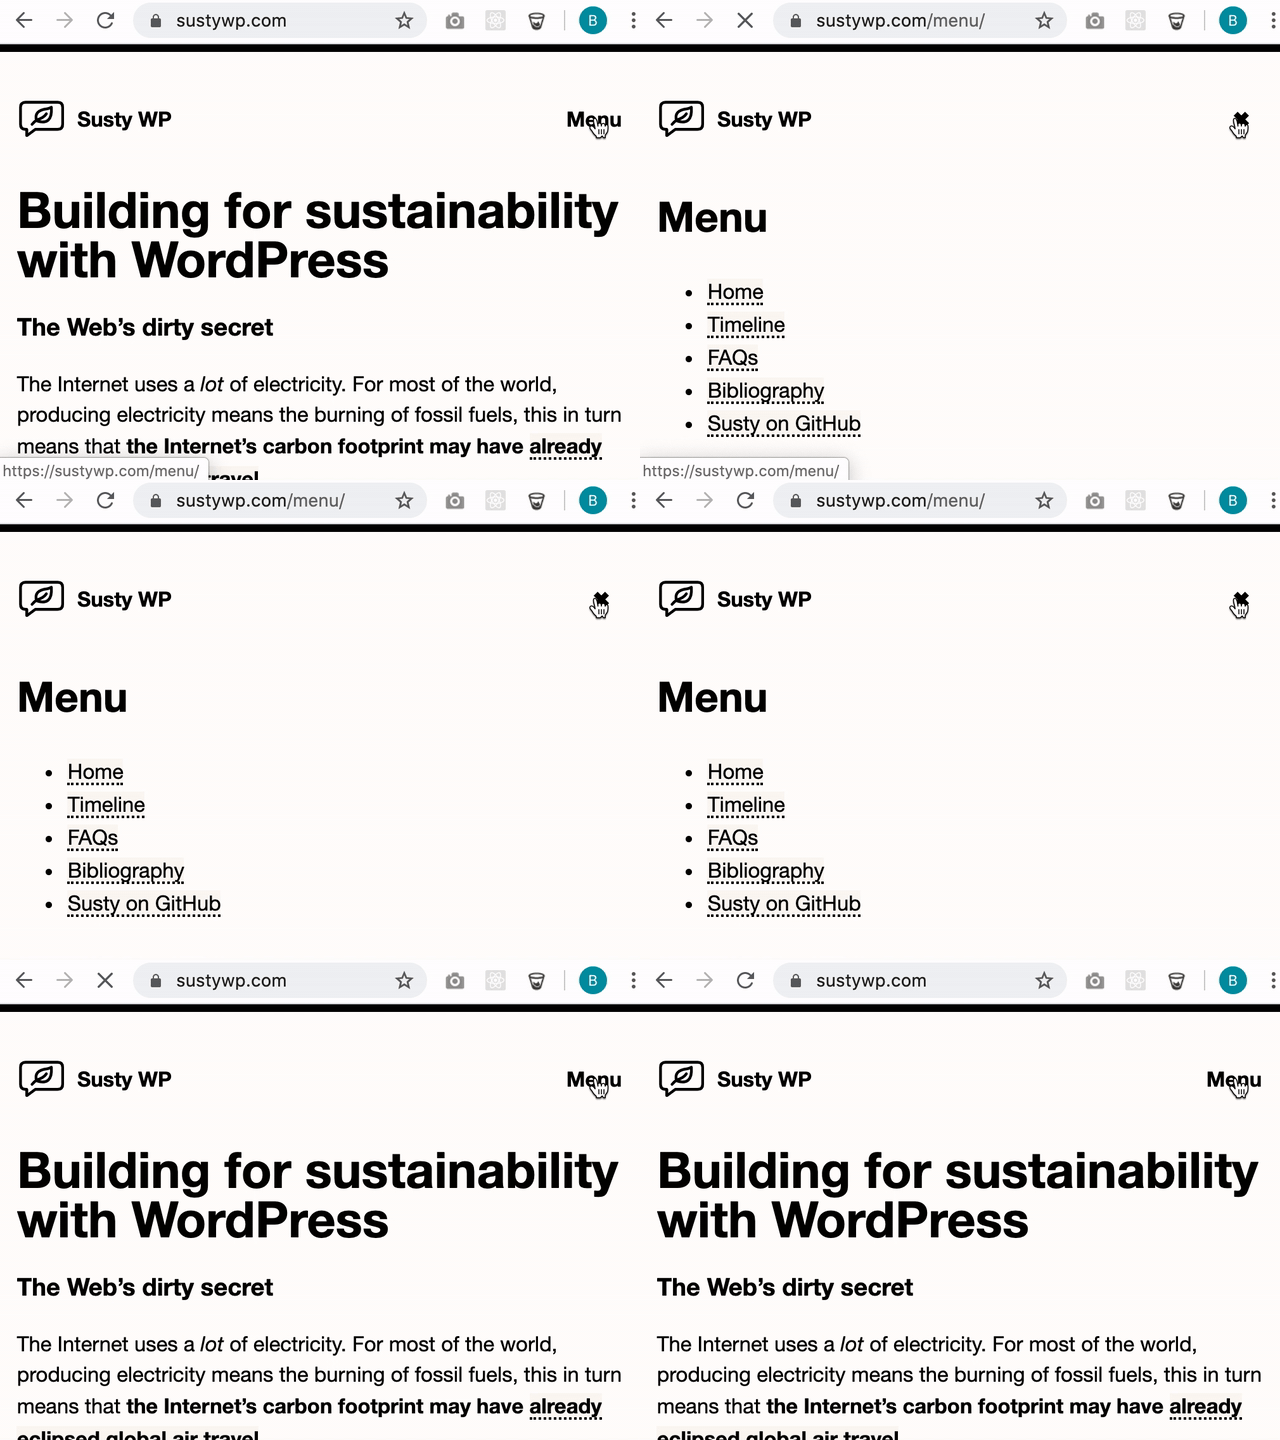
Who said navigation has to be in the header of every page? If your front end is extremely lightweight or if you have a long list of menu items to display in your navigation, the most practical method might be to create a separate page to list them all. The lightweight WordPress theme Susty utilizes this method for its navigation.

This pattern is especially useful for static websites that use filesystem routing. If the project is built using a static site generator, the page load might be imperceptible to the user and have the added benefit of keeping your templates as modular as possible.

All this takes is basically replacing the “Menu” button with a close button instead when the user is on the menu page. When clicked, we can take the user back to the last page they were on in a couple of ways. If we are using a server-side CMS, like WordPress, then we can grab the last URL using $_SERVER['HTTP_REFERER'] and set it as the “close” button URL.

But if we’re not using a server-side setup then, yeah, we might need a few lines of JavaScript to get that last URL.

<a href="https://MyHomePage.com" onclick="handleClick(event)">×</a>


<script>
  function handleClick(event) {
    // Don't follow the link
    event.preventDefault();
    // Go back to last visited page  
    window.history.back(); 
    // Bail out of the function
    return false;
  }
</script>

So, while I like this method and pattern, it might require JavaScript depending on the project.

Alternative 2: The horizontal scroller

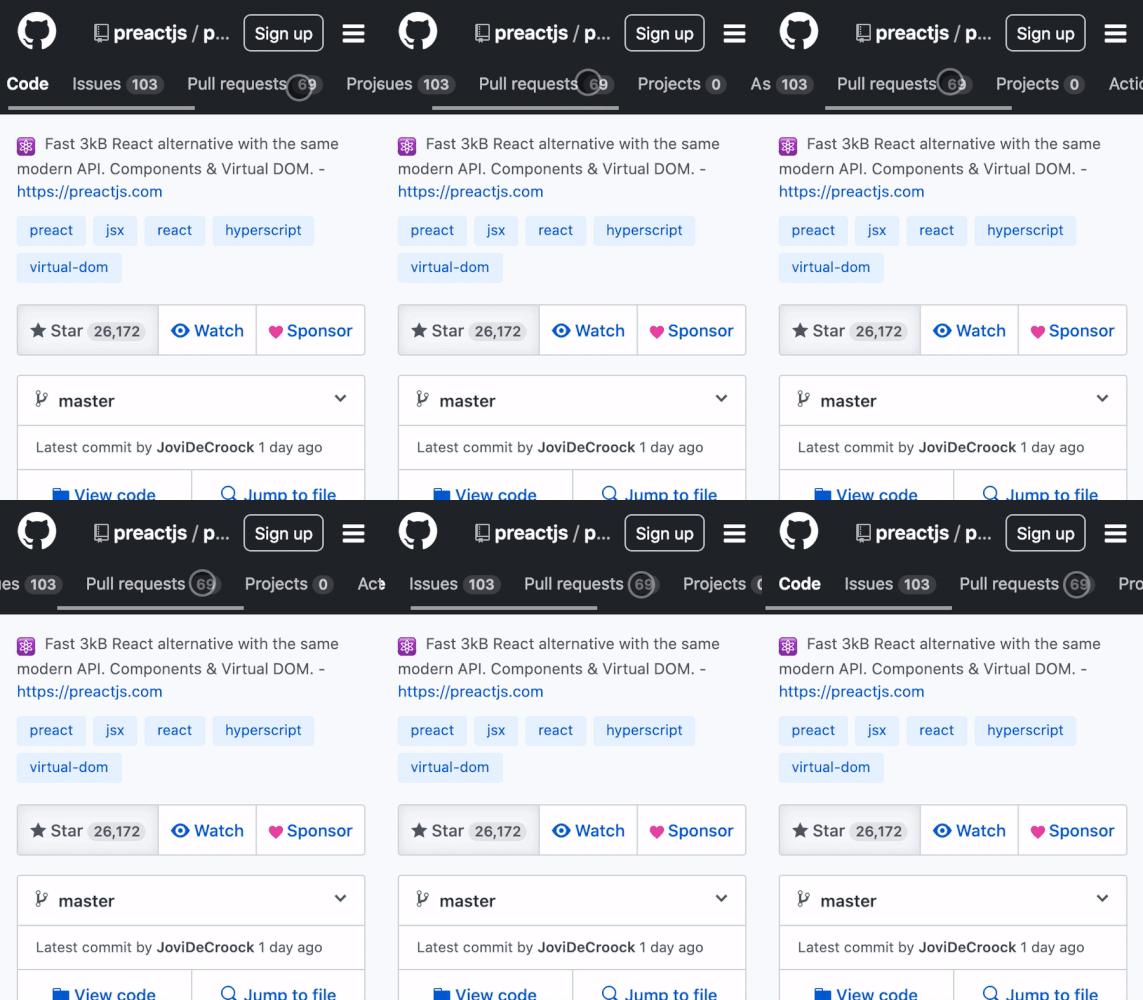
This approach is perfect for shorter link lists and allows users to access all of the navigation items without opening anything or clicking away from where they are. GitHub uses this approach for sub-menus.

Using flexbox combined with a scrolling overflow in CSS will do the trick!

CodePen Embed Fallback

Alternative 3: The CSS-only hamburger menu

Just because the hamburger menu pattern is often done with JavaScript doesn’t mean we have to use JavaScript. Using CSS pseudo-selectors and an HTML , we can create a rich mobile menu and save JavaScript for other functionality that actually requires it.

CodePen Embed Fallback

See? Just because a convention is popular doesn’t mean it is the only way to do things. There are often simpler, more accessible methods, especially when it comes to navigation. It’s not much work to create functional, lightweight, immersive navigation without JavaScript and we get some nice benefits along the way. If you’ve created any interesting CSS-only navigation patterns, I’d love to see them — please share in the comments!


The post Three CSS Alternatives to JavaScript Navigation appeared first on CSS-Tricks.

You can support CSS-Tricks by being an MVP Supporter.

Categories: Designing, Others Tags:

Open Prioritization

July 14th, 2020 No comments

Like Kickstarter, but for Web Platform Features.

That’s about the quickest way to sum up Open Prioritization from Igalia. Igalia is an independent company that works on browsers. They literally commit to all the different open source browsers to implement (and fix) features that we all use. Now they are asking: what browser features are important to you? Are they important enough for you to pledge some money to get it implemented?

I think it’s a clever idea and I’d love for it to get enough legs that it actually starts working and that enough money comes in that Igalia is able to throw resources behind the features that people have voted are the most important with their money.

For example, I pledged $20 to get d: path(); support in Firefox. Heck yeah, that would be awesome! If it starts edging closer to that goal, I know I’d be tempted to up that to get it over the line, but some momentum needs to start building first.

Is this all sunshine and roses? Perhaps not. Some of the pushback I’ve heard so far is about the message this sends to the massive companies behind these browsers. Rather than the message being “please fix these features of your incredibly important piece of software, it will make things better for everyone including you,” the message becomes, “I guess we’ll spend our own money and band together to try to get a third-party to fix your software for you.” A bit like when school teachers need to buy their own classroom supplies.

Rachel Andrew talked to Brian Kardell about some of this nuance in her coverage on Smashing Magazine.


And, oh hey, in related news, I recently came across this Web Platform Contribution Guide. What a nice resource for people looking to get into helping the web literally and directly.

Direct Link to ArticlePermalink


The post Open Prioritization appeared first on CSS-Tricks.

You can support CSS-Tricks by being an MVP Supporter.

Categories: Designing, Others Tags:

SmashingConf Fully Online For 2020

July 14th, 2020 No comments

SmashingConf Fully Online For 2020

SmashingConf Fully Online For 2020

Rachel Andrew

2020-07-14T14:30:00+00:00
2020-07-15T16:33:48+00:00

2020 has been quite the year, and it’s only July. None of us can be certain what the rest of the year looks like, in particular for travel and events where lots of folks gather together. Given the uncertainty and the success of our online workshop series and Meets events, we’re taking all of our 2020 conferences online. How will that work? Read on to find out!

All of our online conference events will take place on the Hopin platform. We roadtested this platform for our Smashing Meets, and we love the way it allows for social chat and side events alongside the main conference. It’s as close as we can get to an in-person experience.

I just attended my second meetup with @hopinofficial and I can say this is the future of conferences.

Such a great experience!

— Pablo E. Carvallo (@pabloecarvallo) June 4, 2020

First Up: The Rescheduled SmashingConf Live!

We will be presenting SmashingConf Live on August 20th-21st. Two half-days, with four talks each day on UX, data visualization, CSS, and JavaScript.

Meet other people in our chat or network on our event platform. Join in on our Design and Coding Tournament, or enjoy watching folks taking part.

Join one of the many sessions! Listen to one of the fireside chats on privacy, web performance, and Machine Learning (ML). Get your website reviewed by one of our speakers.

Take a look at the full schedule. If you have bought a ticket to the postponed SmashingConf Live, your ticket will still be valid. We still have tickets available: register here and we will see you at the event.

We are still scheduling new workshops and repeats of our most popular workshops. Purchase a workshop with your conference ticket and save 100USD.

Then, we have moved our in-person events online. These will be as close as possible to the in-person experience, with side-events, a mystery speaker, and all the fun you expect from a SmashingConf.

September 7th–8th: SmashingConf Freiburg Online

The Freiburg conference is moving online on the original dates: September 7th–8th. One track, two days and 13 speakers, with all of the actionable insights you expect from SmashingConf. We’ll be running the event tied to the timezone in Germany — making this a great event for Europeans. Check out the schedule, and buy tickets here.

October 13th–14th: SmashingConf Austin (and New York) Online

We have combined the programming for New York and Austin as these two events were so close together and similar to each other. We’ll be running this event in Central time, just as if we were all in Austin. Check out the schedule, and buy tickets here. We’d love to see you in October!

November 10th–11th: SmashingConf San Francisco Online

SmashingConf San Francisco Online 2020In PST join us for a virtual San Francisco event on November 10th–11th. The schedule and tickets are online for you to take a look. We’ll be sure to have a great celebration for our final event of 2020!

Existing Ticketholders

We have moved your in-person ticket to the 2021 edition of your chosen conference and in order that you don’t miss out this year, you are invited to the online version of the event you registered for. Two for the price of one as our thanks for your support. If that doesn’t work out for you, we do have options as explained in the email. Didn’t get the email? Drop the team a line at hello@smashingconf.com and we will get back to you.

Join Us!

There are tickets now on sale for all of the above events — we are really looking forward to all of them! One thing we have learned with our online workshops is that taking events online means that lots of people can attend who can’t travel to conferences even in more usual times. That’s really exciting, and we look forward to sharing some days of learning and fun with you all!

Smashing Editorial
(cr, aa, il)
Categories: Others Tags: