Archive

Archive for May, 2021

Create Beautiful WordPress Pages with Optimized Images Using Elementor and ImageEngine

May 6th, 2021 No comments

WordPress powers nearly 40% of all websites, thanks to its commitment to making publication possible for everyone, for free. Combined with premium plugins and themes, it’s possibly the ultimate tool for building attractive, unique, and feature-rich websites without any coding or design experience.

However, you do pay the price for this experience, with WordPress and its third-party products not always being built for performance – whether it’s page loading times or SEO.

Image optimization is a particularly big concern. Images are one, if not the largest, contributors to page weight, and it’s growing significantly by the year. So, while images are crucial for beautifying your website pages, they are also one of the biggest factors slowing it down.

In terms of image optimization, WordPress+Elementor brings very little to the table. WordPress core now comes with both responsive syntax and lazy-loading. Elementor itself also only comes with responsive syntax out-of-the-box. However, these are baseline techniques for image optimization that will deliver the bare minimum of improvements.

This means that, while Elementor makes it easy to design sweet-looking WordPress pages (with tonnes of creatively utilized images), you will probably pay the price when it comes to performance. But don’t worry. We will show you how to dramatically improve web performance by over 30 points on scoring tools like Google’s PageSpeed Insight

Why Optimize Your Elementor Images with ImageEngine?

In general, image CDNs use various techniques to get image payloads as small as possible and deliver image content faster, all while minimizing the visual impact. ImageEngine is no different in that regard.

Firstly, ImageEngine, when used in auto mode, will apply all of the following optimizations that web performance tools like Google’s PageSpeed Insight recommend. For example:

  • Properly size images – ImageEngine automatically resizes images for optimal size-to-quality ratios depending on the screen size of the user device. ImageEngine supports Retina devices.
  • Efficiently encode images – Applies different rates of compression depending on the PPI of the user devices. For example, ImageEngine adapts and more aggressively compresses on higher PPI devices without losing visual quality.
  • Next-gen format conversion – Automatically converts images to the optimal next-gen format according to the browser, device, or OS. ImageEngine can convert images to WebP or JPEG-2000 as well as GIFs to MP4 or WebP.  AVIF is also available in a manual directive mode.
  • Strip unnecessary metadata

While these features are standard for most image CDNs, ImageEngine is unique for its use of WURFL device detection. This gives ImageEngine much deeper insight into the user device accessing a website page and, by extension, its images. Using the screen size, resolution, PPI, etc., ImageEngine can make more intelligent decisions regarding how to reduce image payloads while maintaining visual quality.

This is why ImageEngine brands itself as an “intelligent, device-aware” image CDN and why it can reduce image payloads by as much as 80% (if not more).

ImageEngine also provides a proprietary CDN service to accelerate image delivery. The CDN consists of 20 globally positioned PoPs with the device-aware logic built-in. This allows you to deliver image content faster in different regions while also serving images straight from the cache with a ~98% hit ratio.

ImageEngine also supports Chrome’s save data setting. If someone has a slow connection or has activated this setting, ImageEngine will automatically compress image payloads even more, to provide a better user experience on slower connections.

How to Use ImageEngine with WordPress and Elementor

If you’re using WordPress and Elementor, then chances are you want to spend as little time on development and other technicalities as possible. Luckily, ImageEngine is a highly streamlined tool that requires little to no effort to integrate or maintain with a WordPress site.

Assuming you already have a WordPress website with Elementor, here are the step-by-step instructions to use ImageEngine:

  1. Go to ImageEngine.io and sign up for a 30-day free trial.
  2. Provide ImageEngine with the URL of the website you want to optimize.
  3. Create an account (or sign up with your existing Google, GitHub, or ScientiaMobile account).
  4. Provide ImageEngine with the current origin where your images are served from. If you upload images to your WordPress website as usual, then that means providing your WordPress website address again.
  5. Finally, ImageEngine will generate an ImageEngine delivery address for you from where your optimized images will be served. This typically takes the form of: {randomstring}.cdn.imgeng.in. You can change the delivery address to something more meaningful from the dashboard, such as myimages.cdn.imgeng.in.

Now, to set up ImageEngine on your WordPress website:

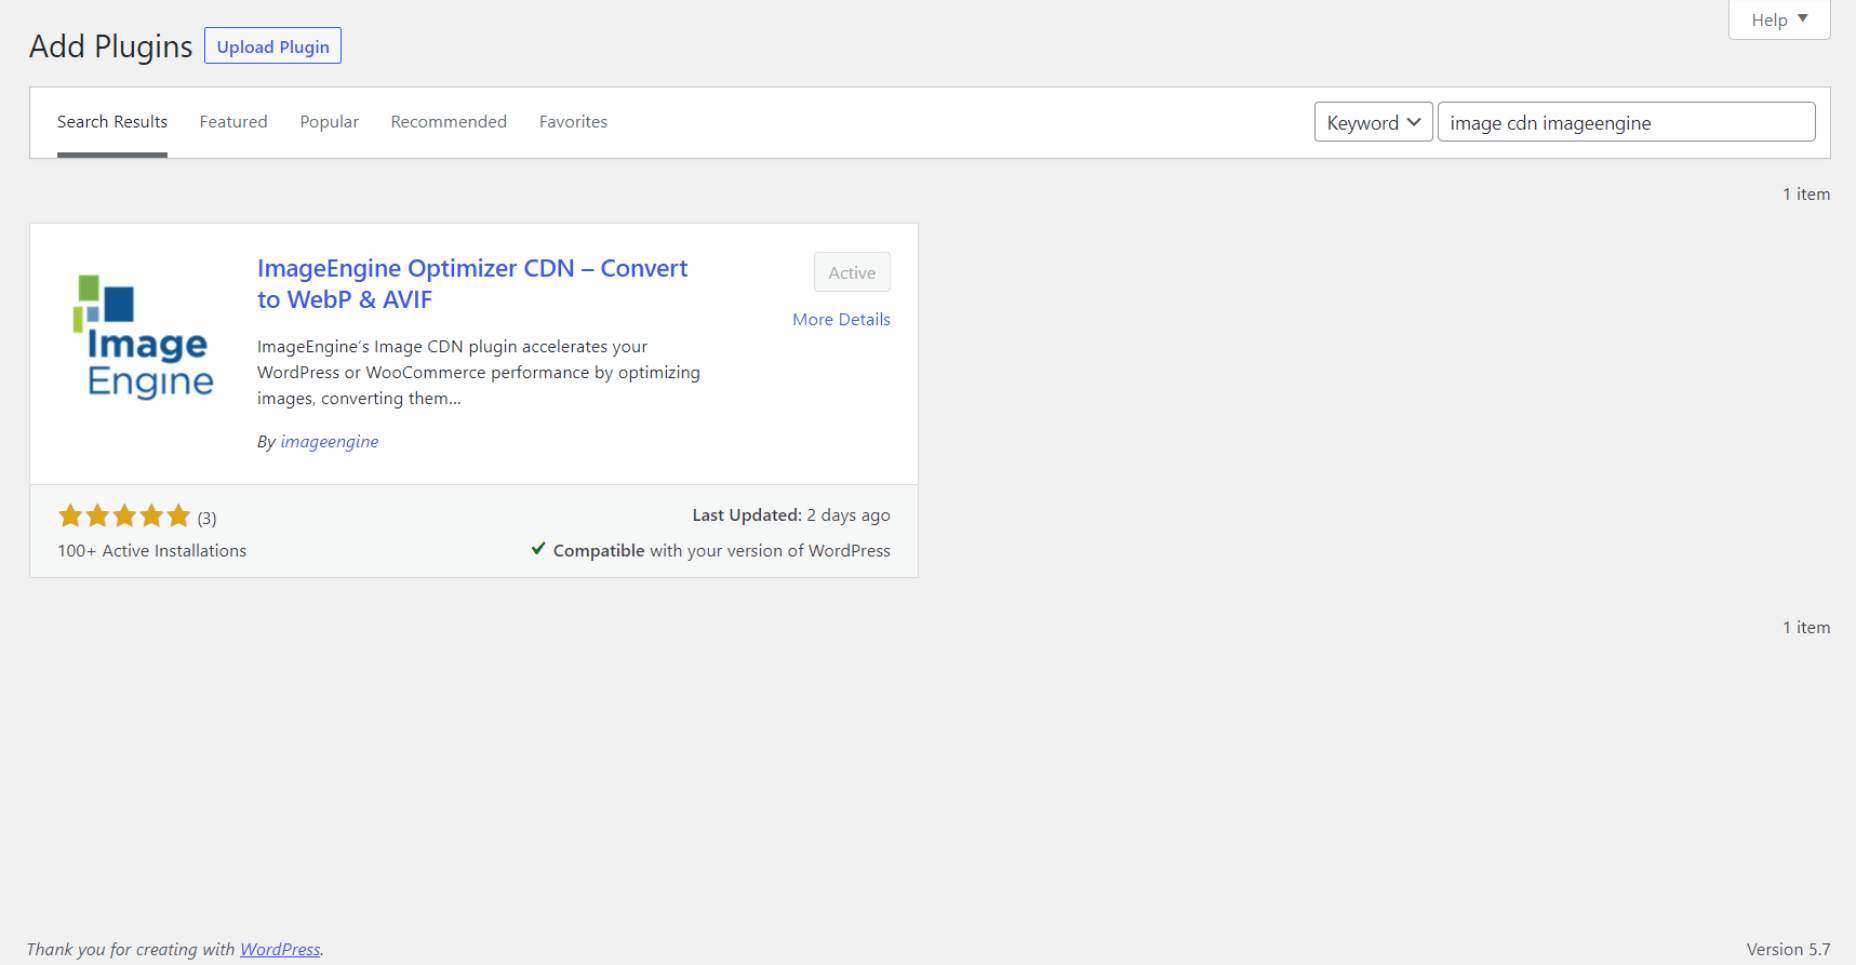
  1. Go to the WordPress dashboard and head to Plugins -> Add New.
  2. Search for the “Image CDN” plugin by ImageEngine. When you find it, install and activate the plugin.
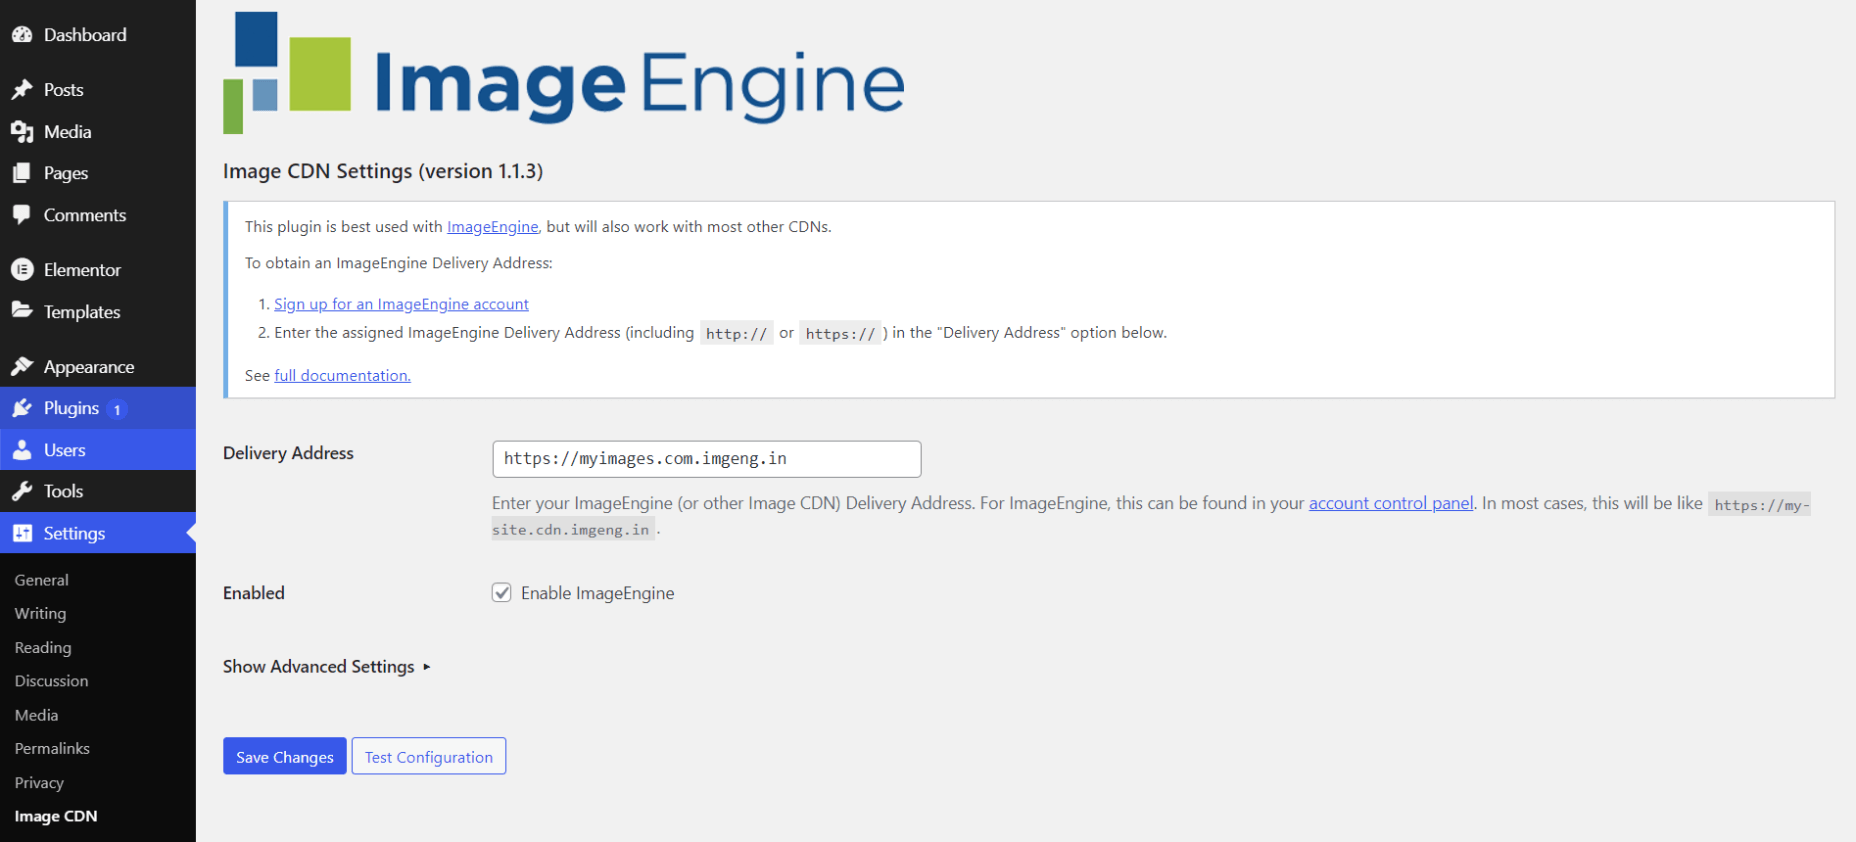
  1. Go to Settings -> Image CDN. OK, so this is the ImageEngine plugin dashboard. To configure it, all you need to do is:

a. Copy the delivery address you got from ImageEngine above and paste it in the “Delivery Address” field.

b. Tick the “Enable ImageEngine” box.

That’s literally it. All images that you use on your WordPress/Elementor pages should now be served via the ImageEngine CDN already optimized. 

ImageEngine is largely a “set-it-and-forget-it” tool. It will provide the best results in auto mode with no user input. However, you can override some of ImageEngine’s settings from the dashboard or by using URL directives to manipulate images.

For example, you can resize an image to 300 px width and convert it to WebP by changing the src attribute like this:

<img src="https://myimages.cdn.imgeng.in/wp-content/uploads/2021/03/banner-logo.png?imgeng=/w_300/f_webp">

However, use this only when necessary, as doing so will limit ImageEngine’s adaptability under different conditions.

What Improvement Can You Expect?

Let’s see what results you can expect from using an image CDN to improve your page loading times.

For this, I created two identical WordPress pages using the Elementor theme. The one page purely relied on WordPress and Elementor, while I installed and set up ImageEngine for the other. The page had some galleries as well as full-size images:

The pages used many high-quality images, as you might expect to find on a professional photography gallery, photography blog, stock photo website, large e-commerce site, etc. I then ran page performance tests using Chrome’s built-in Lighthouse audit tool, choosing scores representing the average results I got for each page.

For thoroughness, I tested both the mobile and desktop performance. However, I focused on the mobile results as these showcase more of the image CDN’s responsive capabilities. Mobile traffic also accounts for the majority share of internet traffic and seems to be the focus for search engines going forward.

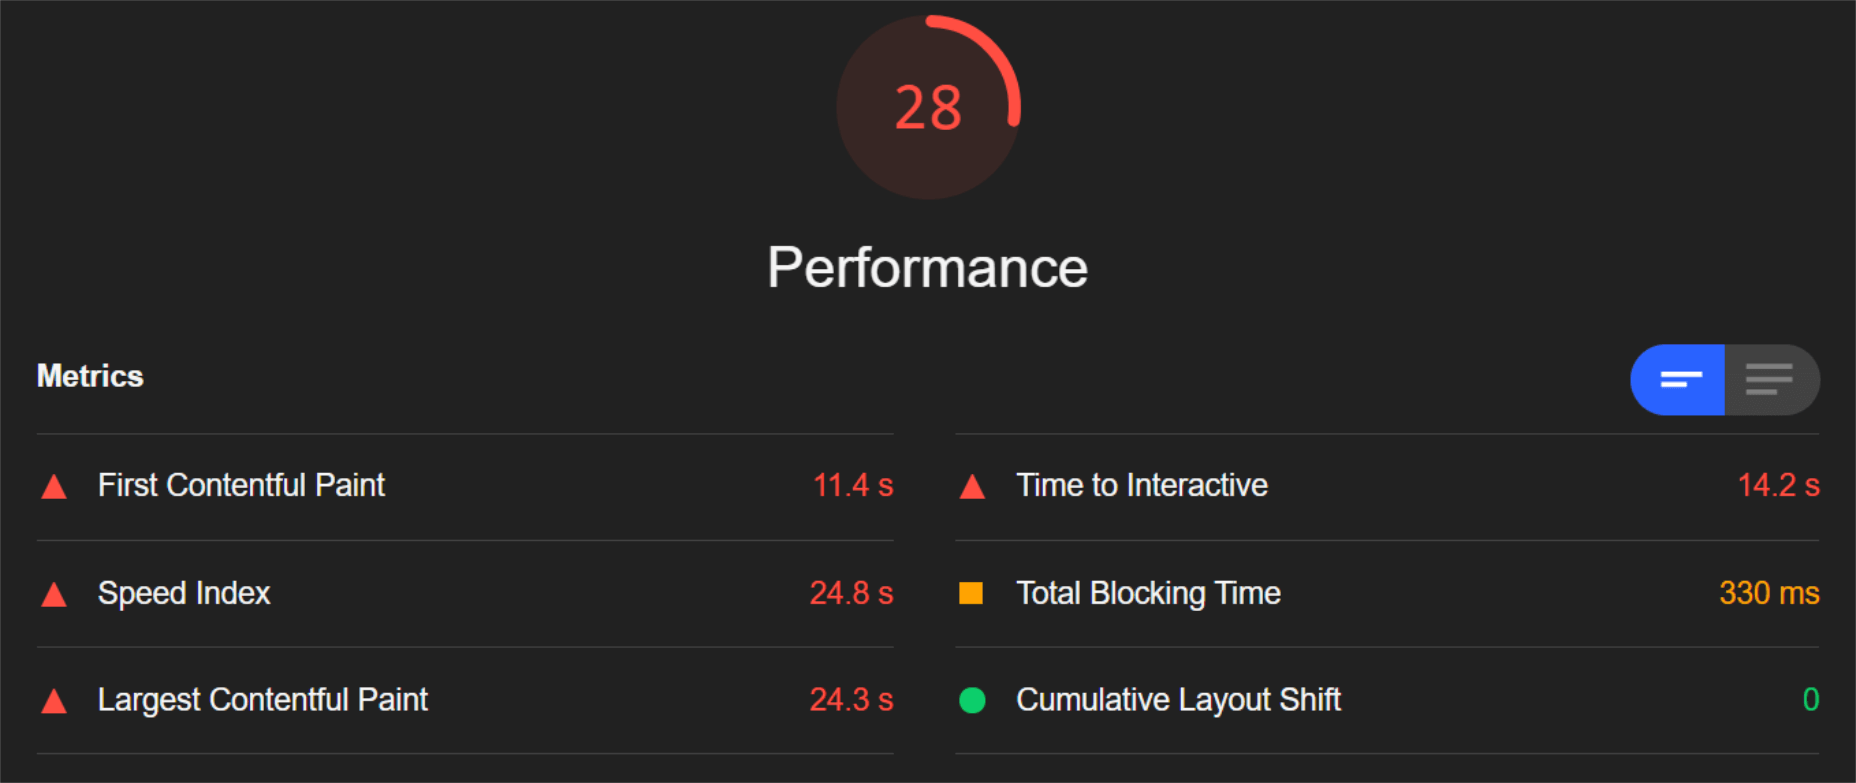
So, first of all, let’s see the mobile score for the page without ImageEngine:

As you can see, there was definitely a struggle to deliver the huge amount of image content. Google has shown that 53% of mobile users abandon a page that takes more than 3s to load. So, clearly, this page has major concerns when it comes to user experience and retaining traffic.

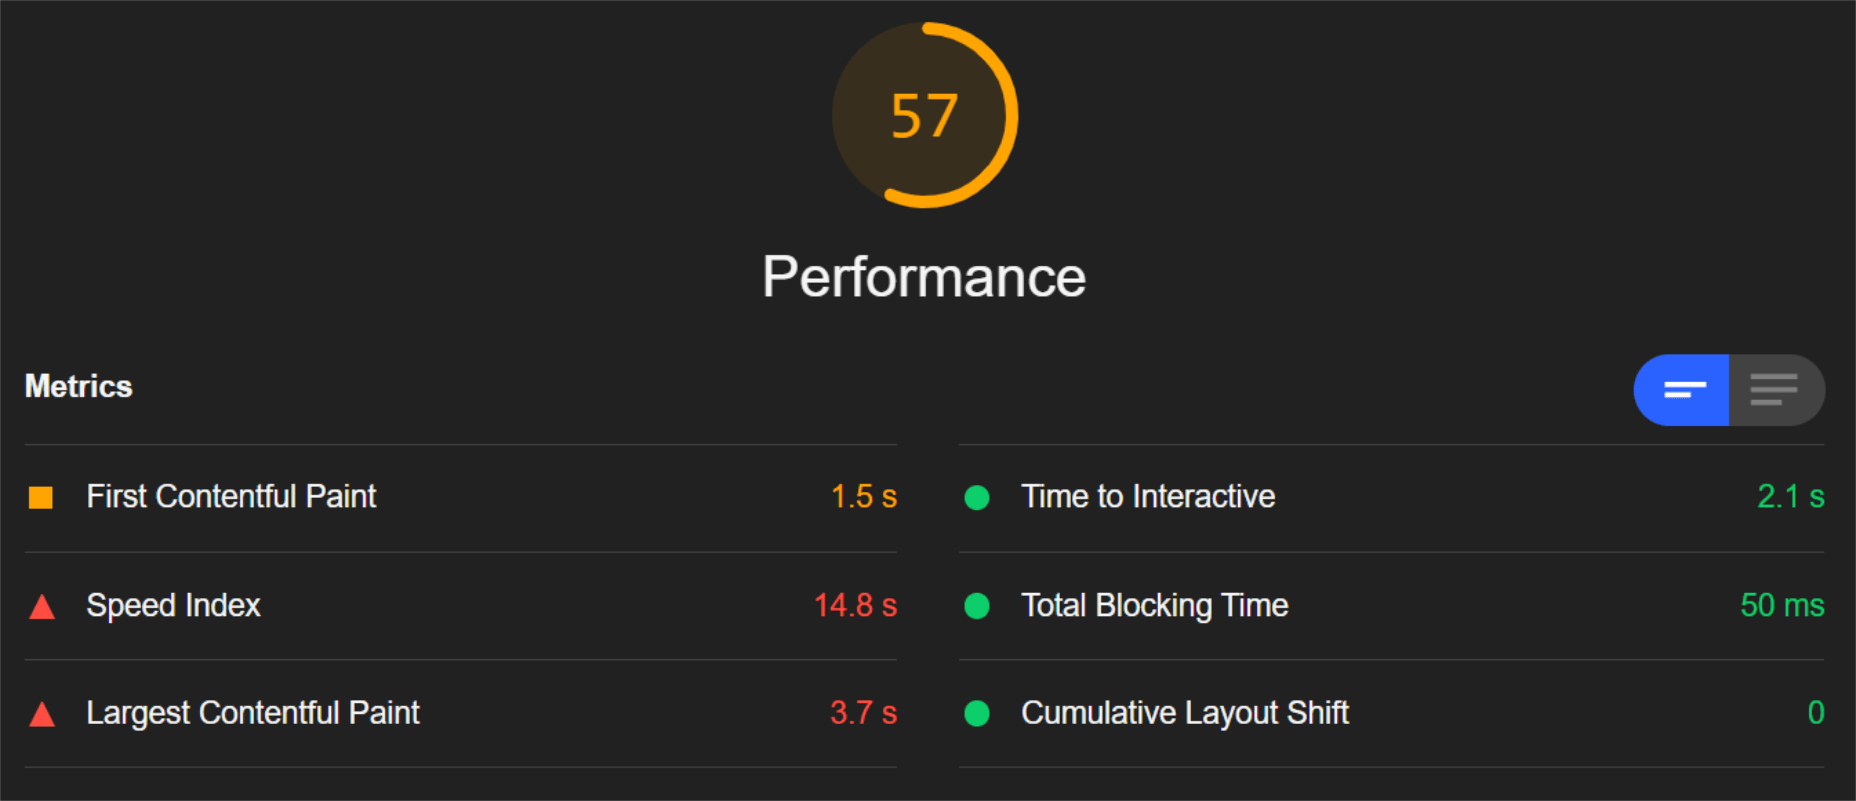
The desktop version fared much better, although it still left much to be desired:

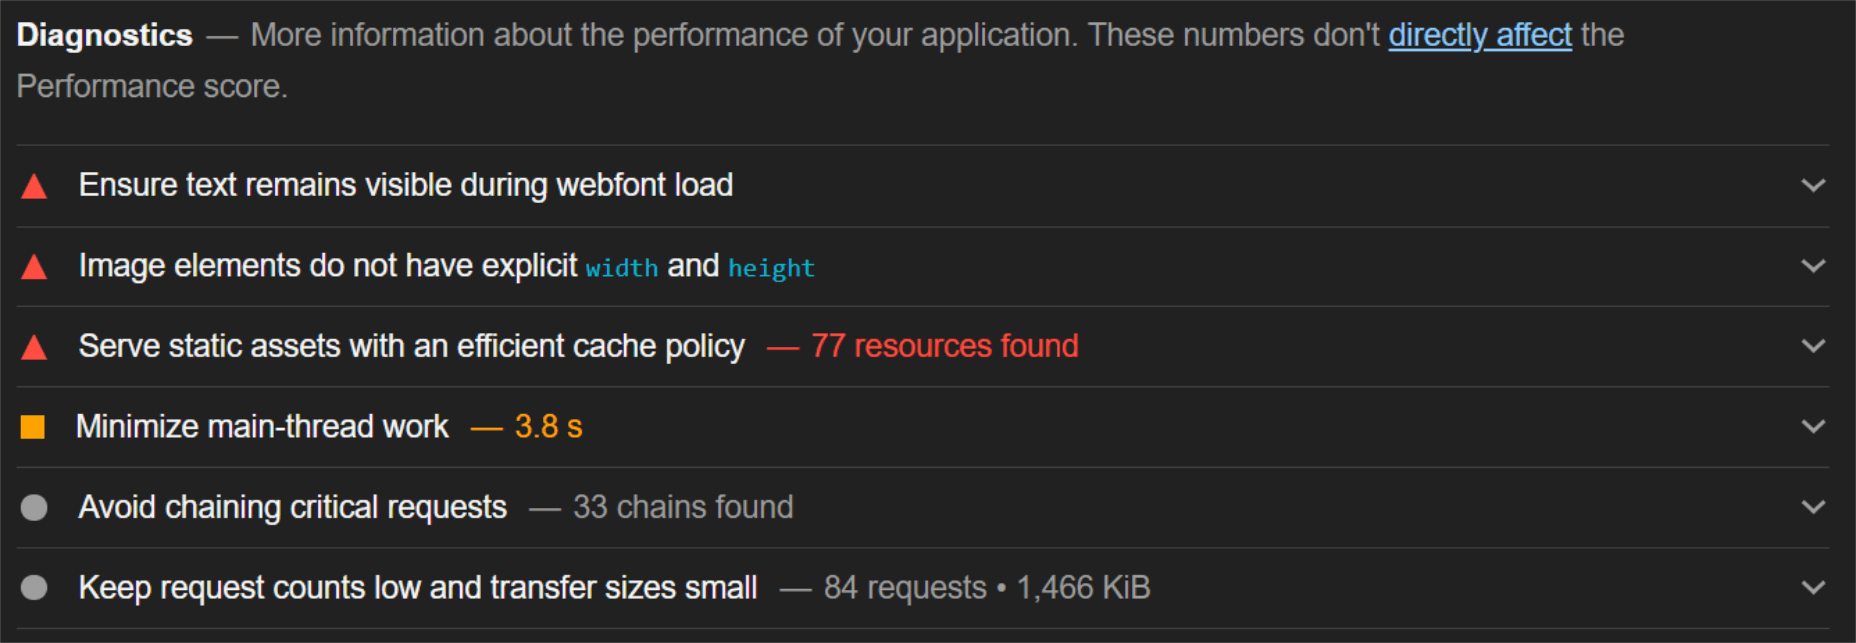
When digging into the reasons behind the slowdown, we can identify the following problems:

Most of the issues related somehow to the size and weight of the images. As you can see, Lighthouse identified a 3.8 MB payload while the total image payload of the entire page was close to 40 MB.

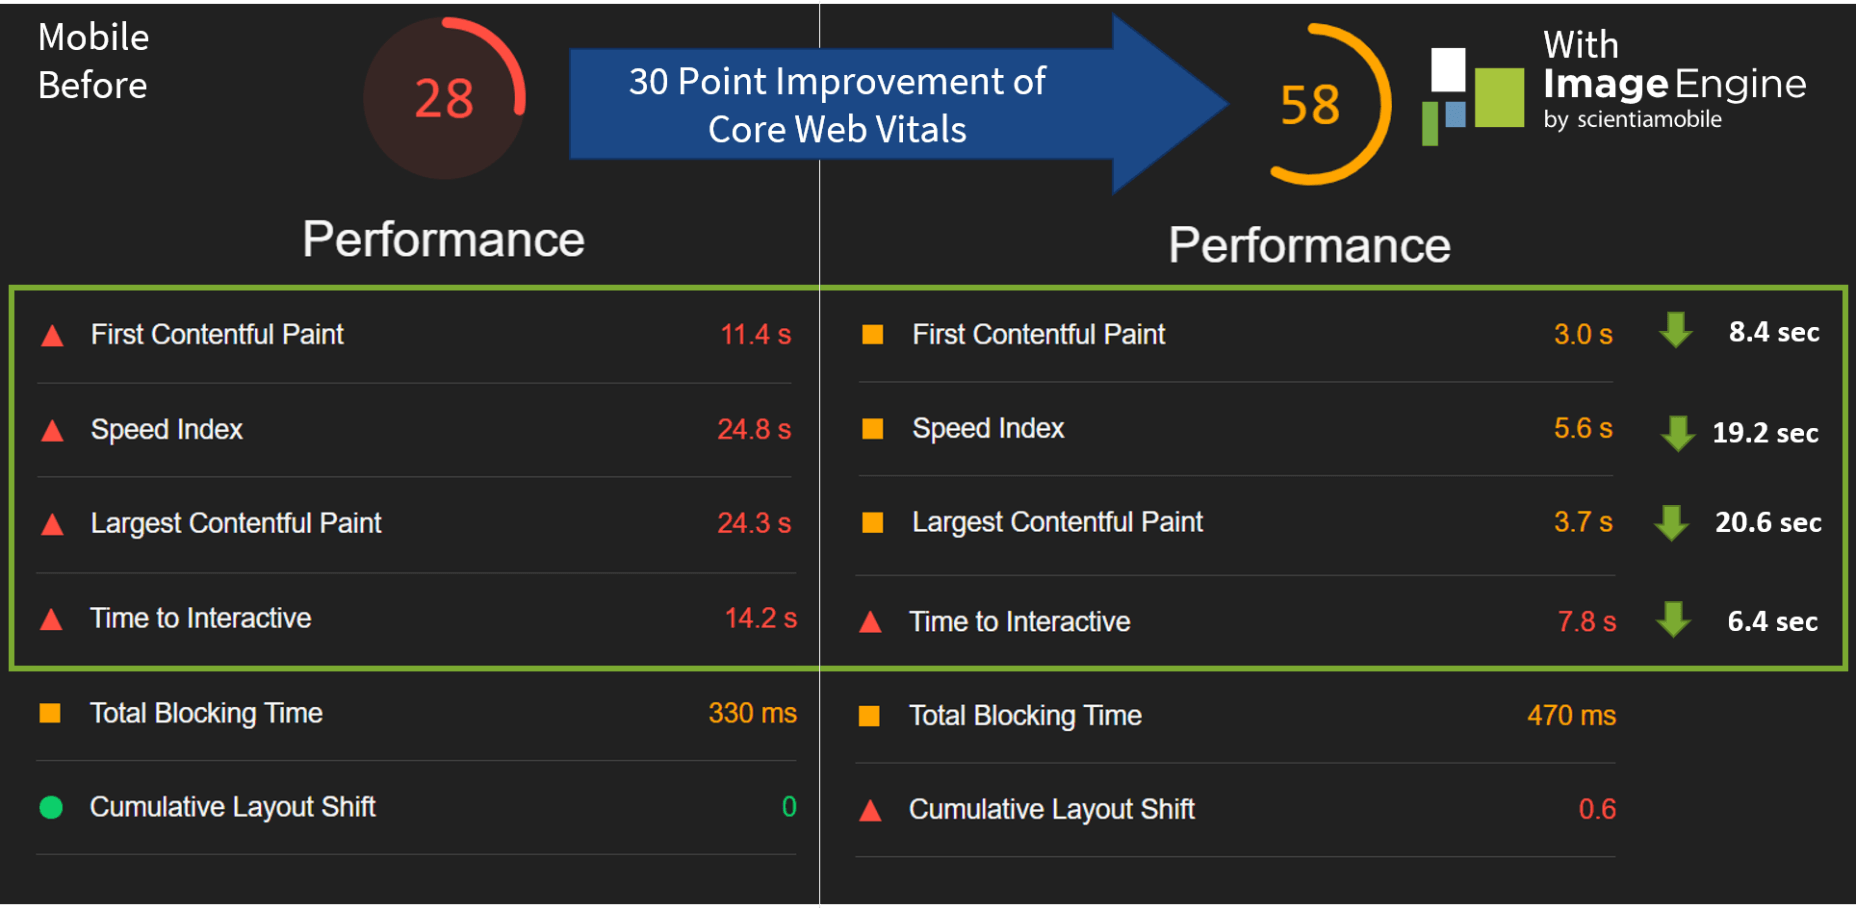
Now, let’s see what kind of improvement ImageEngine can make to these issues by looking at the mobile score first:

So, as you can see, a major improvement of 30 points over the standard WordPress/Elementor page. The time to load images was cut down by roughly 80% across the key core web vital metrics, such as FCP, LCP, and the overall Speed Index.

In fact, we just reached that critical 3s milestone for the FCP (the largest element on the visible area of the page when it initially loads), which creates the impression that the page has finished loading and will help you retain a lot of mobile traffic.

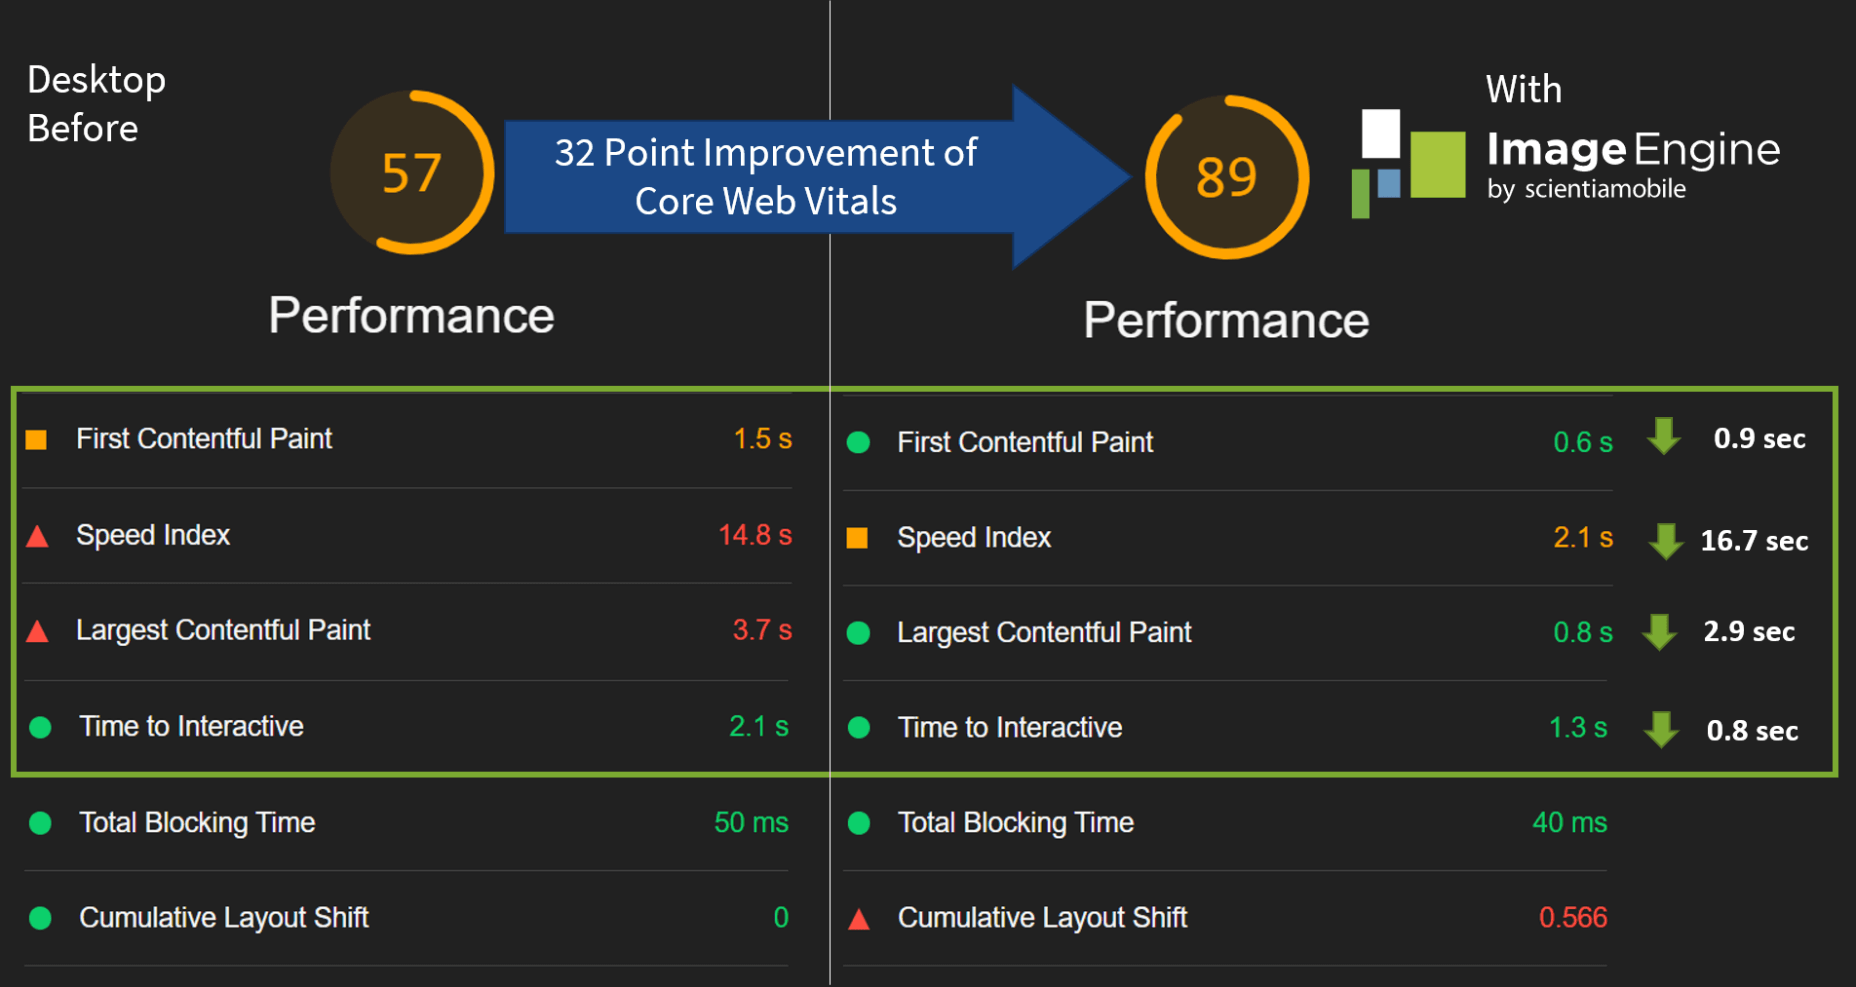
The desktop score was also much higher, and there was further improvement across the key performance metrics.

If we look at the performance problems still present, we see that images are almost completely removed as a concern. We also managed to bring down the initial 3.8 MB payload to around 1.46 MB, which is a ~62% reduction:

An unfortunate side effect of using WordPress and WordPress plugins is that you will almost inevitably face a performance hit due to all the additional JavaScript and CSS. This is part of the reason why we didn’t see even larger improvements. That’s the price you pay for the convenience of using these tools.

That being said, the more images you have on your pages, and the larger their sizes, the more significant the improvement will be.

It’s also worth noting that lazy-loaded images were loaded markedly faster with ImageEngine if you quickly scroll down the page, again making for an improved user experience.

Thanks to its intelligent image compression, there was also no visible loss in image quality, as you can see from this comparison:

Conclusion

So, as you can see, we can achieve significant performance improvements on image-heavy websites by using the ImageEngine image CDN, despite inherent performance issues using a CMS. This will translate to happier users, better search engine rankings, and an overall more successful website.

The best part is that ImageEngine stays true to the key principles of WordPress. You don’t have to worry about any of the nuts and bolts on the inside. And, ImageEngine will automatically adjust automation strategies as needed, future-proofing you against having to occasionally rework images for optimization.

Source

The post Create Beautiful WordPress Pages with Optimized Images Using Elementor and ImageEngine first appeared on Webdesigner Depot.
Categories: Designing, Others Tags:

Custom State Pseudo-Classes in Chrome

May 6th, 2021 No comments

There is an increasing number of “custom” features on the web platform. We have custom properties (--my-property), custom elements (), and custom events (new CustomEvent('myEvent')). At one point, we might even get custom media queries (@media (--my-media)).

But that’s not all! You might have missed it because it wasn’t mentioned in Google’s “New in Chrome 90” article (to be fair, declarative shadow DOM stole the show in this release), but Chrome just added support for yet another “custom” feature: custom state pseudo-classes (:--my-state).

Built-in states

Before talking about custom states, let’s take a quick look at the built-in states that are defined for built-in HTML elements. The CSS Selectors module and the “Pseudo-classes” section of the HTML Standard specify a number of pseudo-classes that can be used to match elements in different states. The following pseudo-classes are all widely supported in today’s browsers:

User action
:hover the mouse cursor hovers over the element
:active the element is being activated by the user
:focus the element has the focus
:focus-within the element has or contains the focus
Location
:visited the link has been visited by the user
:target the element is targeted by the page URL’s fragment
Input
:disabled the form element is disabled
:placeholder-shown the input element is showing placeholder text
:checked the checkbox or radio button is selected
:invalid the form element’s value is invalid
:out-of-range the input element’s value is outside the specificed range
:-webkit-autofill the input element has been autofilled by the browser
Other
:defined the custom element has been registered

Note: For brevity, some pseudo-classes have been omitted, and some descriptions don’t mention every possible use-case.

Custom states

Like built-in elements, custom elements can have different states. A web page that uses a custom element may want to style these states. The custom element could expose its states via CSS classes (class attribute) on its host element, but that’s considered an anti-pattern.

Chrome now supports an API for adding internal states to custom elements. These custom states are exposed to the outer page via custom state pseudo-classes. For example, a page that uses a element can declare styles for that element’s custom --loading state.

live-score {
  /* default styles for this element */
}

live-score:--loading {
  /* styles for when new content is loading */
}

Let’s add a --checked state to a element

The Custom State Pseudo Class specification contains a complete code example, which I will use to explain the API. The JavaScript portion of this feature is located in the custom element‘s class definition. In the constructor, an “element internals” object is created for the custom element. Then, custom states can be set and unset on the internal states object.

Note that the ElementInternals API ensures that the custom states are read-only to the outside. In other words, the outer page cannot modify the custom element’s internal states.

class LabeledCheckbox extends HTMLElement {
  constructor() {
    super();

    // 1. instantiate the element’s “internals”
    this._internals = this.attachInternals();

    // (other code)
  }

  // 2. toggle a custom state
  set checked(flag) {
    if (flag) {
      this._internals.states.add("--checked");
    } else {
      this._internals.states.delete("--checked");
    }
  }

  // (other code)
}

The web page can now style the custom element’s internal states via custom pseudo-classes of the same name. In our example, the --checked state is exposed via the :--checked pseudo-class.

labeled-checkbox {
  /* styles for the default state */
}

labeled-checkbox:--checked {
  /* styles for the --checked state */
}
Try the demo in Chrome

This feature is not (yet) a standard

Browser vendors have been debating for the past three years how to expose the internal states of custom elements via custom pseudo-classes. Google’s Custom State Pseudo Class specification remains an “unofficial draft” hosted by WICG. The feature underwent a design review at the W3C TAG and has been handed over to the CSS Working Group. In Chrome’s ”intent to ship” discussion, Mounir Lamouri wrote this:

It looks like this feature has good support. It sounds that it may be hard for web developers to benefit from it as long as it’s not widely shipped, but hopefully Firefox and Safari will follow and implement it too. Someone has to implement it first, and given that there are no foreseeable backward incompatible changes, it sounds safe to go first.

We now have to wait for the implementations in Firefox and Safari. The browser bugs have been filed (Mozilla #1588763 and WebKit #215911) but have not received much attention yet.


The post Custom State Pseudo-Classes in Chrome appeared first on CSS-Tricks.

You can support CSS-Tricks by being an MVP Supporter.

Categories: Designing, Others Tags:

The Complete B2B Strategy on How to Use Video Marketing to Build Your Brand

May 6th, 2021 No comments

The message is clear at this point: B2B organizations can’t afford to leave video out of their marketing efforts. More marketers incorporate video into their content strategies every year, and the results speak for themselves.

According to recent research by Wyzowl, 86% of video marketers say that video increases web traffic, 78% say that it has improved their annual sales numbers, and a whopping 94% say it helps users understand their products or services better. 

There are plenty of undebatable benefits involved with video marketing, but there’s a catch to it. It requires strategy. It’s one thing to develop a beautiful and engaging video, but that won’t do much good for your organization without a concrete plan to help you make the most of it.

So, how do you develop a B2B video marketing strategy to build your brand? It doesn’t have to be as complicated as it might seem at the outset. Instead, taking a basic step-by-step approach can help you build a successful strategy to promote your brand, grow your business, and generate exposure through video marketing.

If you’re looking to dive into the vibrant and fast-growing video marketing landscape, then here is everything you need to know.

Why Invest in Video Marketing?

Maybe you’re already satisfied with your existing content strategy. Perhaps your blogs, case studies, and newsletters are bringing in more than enough leads, engagements, and sales for your needs. Even if that’s the case, it’s still vital to incorporate video into your marketing efforts if you hope to continue connecting with your target audience.

Consider the following reasons that video marketing is becoming the primary B2B communication strategy:

  • Well-made videos can simplify the buyer journey and streamline the purchase process by seamlessly communicating product benefits.
  • Informative videos like explainer videos and product showcases make it easier for audiences to understand your brand.
  • Videos can boost your brand’s exposure by putting your product in front of a range of audiences across platforms.
  • Video tends to yield far higher engagement than written content, so video can be vital for engaging your audience.
  • Your existing content, such as blogs and newsletters, can be supplemented with video marketing that increases click and open rates.

Your Step-by-Step B2B Video Marketing Strategy to Boost Your Brand

Now that we’ve established the importance of video marketing in the B2B sphere, let’s walk through what it takes to develop an actionable strategy. The best B2B video marketing plans include the following steps:

1. Create Buyer Personas

Whenever you develop any piece of communication, it’s vital to determine who you hope your message will reach – and that’s precisely why buyer personas are essential to video marketing. Developing accurate and detailed personas is always vital for helping you maximize the impact of your videos.

When you create any video marketing strategy, your first step should be to perform in-depth market research into your target audience’s wants, needs, habits, and demographics to create comprehensive customer personas. This activity will equip you to target your video marketing efforts directly toward your target audience.

2. Make Videos For Each Step of the Funnel

Most potential customers won’t become loyal patrons the moment they discover your offering. Instead, most will have to go through the old-fashioned marketing funnel from need recognition to their first purchase. However, you don’t have to make your audience go through this entire process on their own. Instead, you can create videos to help them along to their first transaction.

Marketing videos are remarkably effective at helping push your customers through the marketing funnel, so make sure that you plan to create videos for each phase of the marketing funnel. For example, you might want to produce an introductory product overview video for the need recognition phase of the funnel or a deep-dive presenter video for the information search.

Simply targeting your customers with specialized videos based on their position in the funnel can have a massive impact on your engagements and conversions.

3. Reuse Existing Content in Video Form

After you’ve assembled your personas and planned out what kinds of videos you want to make, you’ll now have the daunting video production process ahead of you. However, making videos doesn’t have to be so scary – in fact, you might not even have to start from scratch! If your business already has plenty of blogs, white papers, case studies, and newsletters in your content archives, then don’t be afraid to recycle those posts and turn them into videos.

Reusing your existing content is a fast and effective way to flesh out your video library without having to break the bank on scripting and filming brand-new videos. Producing videos this way can be as simple as using the original content as a script and having a speaker read it over simple animations, graphics, or film footage

4. Identify Distribution Platforms

Once you’ve begun building a library of videos you’ve produced, your next step is to determine where you want to distribute them. This factor will vary depending on what you want to achieve with your videos. If you want them to reach as wide of an audience as possible, then you might want to post them natively on social media platforms like LinkedIn (remember that LinkedIn is easily the best social platform for B2B marketing). Meanwhile, if you want your communications to be a bit more targeted, you may choose to distribute your videos through email marketing or on your landing pages.

In any case, ensure that your chosen distribution method aligns with your preferred video marketing goals.

5. Measure Your Results

Lastly, after you’ve gone through all the effort of determining what videos to make and where to post them, it’s time to look over your campaign’s results and measure your success. Remember that every video should have its own unique measurement of success: you might want to check and see how many shares your social ad got, while you may be more interested in view counts of your general product overview videos. 

As you look through your videos’ analytics, take note of what went well and what could be improved. Then, apply those lessons to your next productions!
It’s always an intimidating prospect to develop any new kind of content strategy, but if you take it slow and focus on the most critical steps, you can steer your efforts in the right direction. After all, video marketing is the future of B2B, so don’t get left behind!


Photo by Sam McGhee on Unsplash

Categories: Others Tags:

The Next Big Thing in Magento

May 5th, 2021 No comments

Magento is one of the platforms designed to help eCommerce platforms conduct business more efficiently and in a conducive manner. An open-source platform, it assists business or ECommerce merchants to design a portable and easy cart, along with quality understandable content.

The authority over the appearance and functionality of the eCommerce website is entirely dependent on the merchant who has the basic utilities of Magento on his website.

Magento is a very flexible platform that provides some excellent features for out-of-the-box thinking for both users and developers. There are different types of add-ons and plug-in features that are associated very closely with Magento. Most of these added features can help to improve the experience of working with Magento.

You might be thinking right now that these features are obtainable on any eCommerce platform. What is so special about Magento? Well, let us introduce you to some of the best features of Magento that prove it is one of the best platforms for eCommerce websites and pages.

Benefits of Magento

Following are the Basic benefits of the older version of Magento. We will list the “Next Big Thing of Magento” in the later sections.

  • Easy to Install: 

    Magento is a platform that is extremely easy to install. It has several added features that can add good dimensions to the eCommerce page.

  • Open Sourced: 

    Open Source is one of the added benefits obtained after the use of Magento. You do not need any extra cost to install the Magento application on your device. The solutions of eCommerce in the case of Magento are adjustable and scalable, which makes it a better option than usual.

  • Multiple Payment gateway:

    In terms of payments, there are more than fifty channels that can help the developers to pay.

  • Cost-Effective Platform:

    Magento platform is one of the most effective platforms that are extremely cost-effective as well. The costs which are associated with Magento are nearly negligible as well.

Thus, these are some of the ideas which are associated with the older version of Magento. It can help to manage the customized products sold on the online platform. With the help of the Magento platform, the customized products are easier to sell. There are some new additional features on this platform that make it the next big thing in the world of Magento.

The New Features of Magento Platform (2.4 Version)

  • Media Gallery is improved

    The media gallery which shows the images and videos of the Magento platform is way more improved than any other eCommerce building platform. It is easier to drive a content-driven audience on the new Magento platform now. The improved gallery can be opened up at 30 times the greater speed compared to the older version. This feature has boosted up the popularity of the platform up to a few notches.

  • Two Factor Authentication

    The new Magento platform has a two-factor authentication to secure the Magento admin account. The entire process which is associated with the Magento platform can be considered to be equal to the 2FA services. This is quite helpful for the entire process since the system-generated code cannot be hacked by outsiders. The authentication code can always help to add an extra layer of security to the Magento account. Hence, no one can steal your ideas by any chance.

  • Seller Assisted Shopping

    One of the best features that are added to the Magento platform is the customer service representative. This particular feature can help to log into the account of specific consumers and provide guidance about the shopping procedures. This feature can gain some personal insight into the selling habits of the individuals and create orders on their behalf. It is almost like the addition of a new automatic feature that can help individuals in shopping.

  • Improved Search Engine

    Before you install Magento on your computer now, you have to install Elasticsearch as well. You are no longer required to add MySQL for the usability of the platform. The search engine is way more improved and no longer powered by the smaller add-ons. The new Magento platform also helps to handle the server easily.

  • Purchasing Approval Workflow

    Among the new additions, this is the best feature that can be used to control the Business to Business or B2B buying companies. The approval mechanisms are very closely related to the spending control of the user and can work wonders in terms of individual purchases. The options which are provided in terms of purchase approval are quite innovative.

  • Higher technological Representation

    Magento looks into many new features in terms of technology in the latest models. The platform upgrades are more developed and the PHP programming language enhanced with the new MySQL database. The latest versions of Magento can turn out to be more technologically advanced compared to the older platforms.

  • Updated PWA
    The updated version of the PWA studio is one of the best features added by the new version of Magento. This feature allows the Magento platform to be updated very easily and it also adds the new Venia storefronts. Experienced and accelerated user notions can also be formed with the help of the updated PWA. 

Few Final Words

Therefore these are some of the ‘Next Big Things’ in the Magento platform. You can experience a definite shift in the acceptance of your eCommerce platform when you start using the Magento features. The added features in the next and more developed version can bring a very plausible change in the style of business pursued by your eCommerce website. You have to keep in mind that an expertmagento developer can help you to gain a huge amount of popularity on the internet platform for your eCommerce business.


Photo by Jungwoo Hong on Unsplash

Categories: Others Tags:

Progress Delayed Is Progress Denied

May 5th, 2021 No comments

The bombshell article of the week is from Alex Russell of Google/Chrome. Alex has long been super critical of Apple, particularly about how there is literally no option to run any other browser than Safari on iOS. This article isn’t just fist-waving about that, but a dissertation accusing Apple of real harm to the web platform by sluggish progress on Safari and a no-web-apps App Store.

Apple’s iOS browser (Safari) and engine (WebKit) are uniquely under-powered. Consistent delays in the delivery of important features ensure the web can never be a credible alternative to its proprietary tools and App Store.

I appreciate Alex’s take here. It gives credit where credit is due, it places blame where it feels most fair to place it, and brings data to a complex conversation that deserves it. It’s hard not to get through the article and think that the web would be in a better place should Apple…

  1. Allow alternative browsers on iOS
  2. Allow web apps in the App Store
  3. Move faster with web platform features in Safari

Taking them one at a time…

  1. Do I want this? Yes. It seems reasonable that my $1,000 extremely powerful computer phone should be able to run whatever browser I want, particularly one from a company that makes a really good one and very much wants to ship it on my phone. In reality, I’m sure the complications around this are far beyond my understanding. I always think about that Chrome update that literally broke macOS. Could that happen on iOS? While lack of features might abstractly make for unhappy customers, a bricked phone very directly makes for unhappy customers. I suspect it more boils down to the fact that Google is an advertising company that innovates on tracking technology and Apple is a hardware company that innovates on privacy. That’s a rock-and-hard-place situation and this browser situation is one of the consequences.
  2. Do I want this? Yes. I don’t even know how to make native apps aside from software that turns web apps into native apps with magic. If web apps could go in the Apple App Store, it opens the door for people like me (and there are a lot of me). In reality, I’m sure the complications around this are far beyond my understanding. Is quality control harder? I gotta imagine it is. Is security harder to lock down? I gotta imagine it is. Are customers clamoring for it? I’m not sure I hear them very loudly. People do have a choice, as well: iOS is only 15% of the phone market. If you want an alternative browser and an alternative app store, you can have it.
  3. Do I want this? Yes. Heck, we celebrate little wins that Safari ships. I certainly don’t want to wait years for every clearly-useful feature. It will be interesting to measure the time for contain and container queries. That one looms large for me as I want to use it as soon as possible without polyfills, once it stabilizes. I know the joke goes that “Safari is the new IE”, but I don’t tend to feel that day to day in my typical web dev work. I feel like I can ship extremely capable websites to all browsers including Safari and not worry terribly about Safari being a second-class experience (I don’t make games or VR/AR experiences, though). I’m honestly more worried about Firefox here. Apple and Google have more money than God. It’s Mozilla I worry about being DDoS’d with web-feature onslaught, although to be fair, they seem to be doing fine at the moment.

As far as Safari-behind-ness goes, I think more about the DevTools than I do web platform features.

There is the Apple-is-restrictive angle (fair enough), but also the Apple-is-slow angle here. Slow is a relative term. Slow compared to what? Slow compared to Chrome. Which begs the question: why does Chrome get to dictate the exact speed of the web? I always think of Dave’s “Slow, like brisket.”

There’s a lot of value in slow thinking. You use the non-lizard side of your brain. You make more deliberate decisions. You prioritize design over instant gratification. You can check your gut instincts and validate your hypothesis before incurring mountains of technical debt.

I think just enough iteration before a release produces better products. Because once it’s out, it’s out. There’s no turning back or major API changes. 

Maybe a slower-moving web is frustrating sometimes, but does it mean we get a better one in the end? My baby bear brain tells me there is a just right somewhere in the middle.

Direct Link to ArticlePermalink


The post Progress Delayed Is Progress Denied appeared first on CSS-Tricks.

You can support CSS-Tricks by being an MVP Supporter.

Categories: Designing, Others Tags:

How To Power Through Designer Apathy

May 5th, 2021 No comments

Sometimes you just don’t give a damn anymore. Possibly the only thing worse than designer’s block is designer’s apathy: that sinking feeling you get when you realize that you just don’t care about this particular piece of work anymore is disheartening.

The dread of going back to it is paralyzing.

There are many reasons you can stop caring about your work. Maybe you’ve just done the same thing too many times in a row. Maybe your client is insisting on asking for things you know won’t work for them. Maybe something much more important just happened in your life, and you’ve got bigger things to worry about. You could be discouraged by the apparent ‘sameness’ of bandwagon-hopping designs.

I’ve been not caring about my work ever since I was first asked to pick up my toys

Whatever the reason, we all experience times when we know exactly what we have to do… we just don’t care.

I’m something of an expert on this phenomenon. I’ve been not caring about my work ever since I was first asked to pick up my toys. Worse, I have the attention span of a goldfish, even now.

Web design is different. When I discovered it, it was new, exciting, and I could do it on the computer. I loved it, and I still do. Writing code that makes design happen in a browser window will never get old for me.

But even so, sometimes, a particular project will make me want to throw up my hands in exasperation and play video games ‘til Judgement Day. I’d welcome Skynet with tacos and RPGs.

So what do we do about it? First, answer this question: who is the project for?

For A Client

If the project is for a client, it’s just gotta get done. There’s no way around that. You made a commitment. You’re going to follow through and give it your best possible effort because you’re a professional. Anything less would be wrong.

However, that doesn’t mean you have to just power through with only coffee and misery for company. There are things you can do to make the work easier on yourself. The less miserable you are while you work, the better quality you can deliver.

For Yourself

There are a couple of schools of thought here. The first is that it’s perfectly fine to give up on personal projects when you stop caring. I mean, it’s your free time. Why spend it on something you don’t care about?

On the other hand, is a commitment made to yourself any less important than a commitment made to someone else? Many people seem to be perfectly fine with breaking promises to themselves when they’d never willingly do that to a client. Is that wrong?

I usually buy myself a drink and forgive myself, but it’s worth thinking about.

The deciding factor for me is whether my personal project will have any sort of lasting benefit. If whatever I’m designing, writing, or making counts as a long-term investment in my career or quality of life, then it absolutely has to get done, even when I’m not feeling it. Otherwise, I call it a learning experience and move on.

How To Power Through

So, for whatever reason — whether because you have to, or you want to — you’re gonna power through. Here are five ways to do it in style:

1. Start

The hardest part of doing work you don’t care about is starting. This is when you’ll be tempted to procrastinate until the last minute. Try not to.

2. Switch To A Different Part Of The Project

If you can safely (without causing problems) work on a different aspect of the project for a while, try that. The mere variety, the break from the work in front of you before, can boost your morale.

Indeed, working on a different part of the project can give you ideas of getting the most troubling bits done faster or more easily.

3. Do Something Old In A New Way

This one has its pros and cons.

Pro: You can look at this project as a chance to try out a new grid framework, script, code editor, or another tool of some kind. Injecting the process of discovery into an otherwise boring project can make it a lot more fun and even make you look forward to working on it.

Con: You’ll need to plan for extra hours and use some version control; because bringing a new tool or process into play is almost guaranteed to make something interesting go wrong — when this happens, you probably shouldn’t bill the client for the extra hours spent on StackOverflow.

4) Make Like Aziz Ansari And Treat Yo’self

Celebrate the milestones of your project. Don’t celebrate with video games if you need to get any more work done that day. That can go very wrong. But do celebrate. Reward yourself because you’re doing something difficult.

Have a snack. Give yourself a round of applause. Whatever it takes, make yourself look forward.

5) Outsource It

As a last resort, you can always outsource the project to someone else. Just make sure it’s someone you can trust to deliver the same quality of work you would normally provide yourself. Make sure to check it over before handing it off to a client.

Alternatively, you could just outsource the bits of the work that you don’t like. Either way, this is a risky strategy because whoever you outsource to might experience delays or, ironically, not care about the project.

Conclusion

You can do it! I believe in you. The really, really boring projects can seem like huge sinkholes of sadness, but they don’t last forever.


Featured image via Pexels.

Source

The post How To Power Through Designer Apathy first appeared on Webdesigner Depot.

Categories: Designing, Others Tags:

Jetpack Backup: Roll Back Your WooCommerce Site Without Losing Orders

May 4th, 2021 No comments

Here’s a dilemma: what happens if your WooCommerce site has a problem and the quickest and best way to fix it is to roll back to a previous version? The dilemma is, if you roll back the database, you would lose literal customer orders that are stored in the database. That’s not acceptable for an eCommerce store.

Good news: Jetpack Backup won’t do you wrong like that. You can still restore to a prior point, but you won’t lose any customer order or product data.

Do you lose all the orders that came in since that last backup? Nope.

Will the inventory get all screwed up? Nope.

What about the new products that were added after the restore point? Still there.

All that data is treated as immutable. The way that it plays out is that the database is restored to that point (along with everything else) and that all the new product and order data that has changed since then is replayed on top of the database after the restore.

With Jetpack Backup, there’s absolutely no guesswork. Its real-time snapshots feature has a unique feature that protects WooCommerce customer and product data when rolling back things back so you get the best-case scenario: readily available backups that preserves customer orders and product information.

That’s just one of the magical benefits you get from such a deep integration between Jetpack and WooCommerce. There are others, of course! But you can imagine just what a big deal this specific integration for any WooCommerce-powered store.

And, hey, Jetpack Backup is sold à la carte. So, if backups are all you want from Jetpack, then you can get just that and that alone.


The post Jetpack Backup: Roll Back Your WooCommerce Site Without Losing Orders appeared first on CSS-Tricks.

You can support CSS-Tricks by being an MVP Supporter.

Categories: Designing, Others Tags:

Let’s use (X, X, X, X) for talking about specificity

May 4th, 2021 No comments

I was just chatting with Eric Meyer the other day and I remembered an Eric Meyer story from my formative years. I wrote a blog post about CSS specificity, and Eric took the time to point out the misleading nature of it (I remember scurrying to update it). What was so misleading? The way I was portraying specificity as a base-10 number system.

Say you select an element with ul.nav. I insinuated in the post that the specificity of that selector was 0011 (eleven, essentially), which is a number in a base-10 system. So I was saying tags = 0, classes = 10, IDs = 100, and a style attribute = 1000. If specificity was calculated in a base-10 number system like that, a selector like ul.nav.nav.nav.nav.nav.nav.nav.nav.nav.nav.nav (11 class names) would have a specificity of 0111, which would be the same as ul#nav.top. That’s not true. The reality is that it would be (0, 0, 11, 1) vs. (0, 1, 0, 1) with the latter easily winning.

That comma-separated syntax like I just used solves two problems:

  1. It doesn’t insinuate a base-10 number system (or any number system)
  2. It has a distinct and readable look

I like the (X, X, X, X) look. I could see limiting it to (X, X, X) since a style attribute isn’t exactly a selector and usually isn’t talked about in the same kind of conversations. The parens make it more clear to me, but I could also see a X-X-X (dash-separated) syntax that wouldn’t need them, or a (X / X / X) syntax that probably would benefit from the parens.

Selectors Level 3 uses dashes briefly. Level 2 used both dashes and commas in different places.

Anyway, apparently I get the bug to mention this every half-decade or so.


The post Let’s use (X, X, X, X) for talking about specificity appeared first on CSS-Tricks.

You can support CSS-Tricks by being an MVP Supporter.

Categories: Designing, Others Tags:

Creating Colorful, Smart Shadows

May 4th, 2021 No comments

A bona fide CSS trick from Kirupa Chinnathambi here. To match a colored shadow with the colors in the background-image of an element, you inherit the background in a pseudo-element, kick it behind the original, then blur and filter it.

.colorfulShadow {
  position: relative;
}

.colorfulShadow::after {
  content: "";
  width: 100%;
  height: 100%;
  position: absolute;
  background: inherit;
  background-position: center center;
  filter: drop-shadow(0px 0px 10px rgba(0, 0, 0, 0.50)) blur(20px);
  z-index: -1;
}

Negative z-index is always a yellow flag for me as that only works if there are no intermediary backgrounds. But the trick holds. There would always be some other way to layer the backgrounds (like a or whatever).

For some reason this made me think of a demo I saw (I can’t remember who to credit!). Emojis had text-shadow on them, which really made them pop. And those shadows could also be colorized to a similar effect.

CodePen Embed Fallback

Direct Link to ArticlePermalink


The post Creating Colorful, Smart Shadows appeared first on CSS-Tricks.

You can support CSS-Tricks by being an MVP Supporter.

Categories: Designing, Others Tags:

13 eCommerce Site Search Strategies to Boost Revenue from Existing Visitors

May 4th, 2021 No comments

Let’s be clear about something right at the start: If you’re not optimizing your site search to convert more visitors into buyers, you’re missing out on sales.

People who use site search are telling you they want to buy.

3 Numbers to Show You Why You MUST Optimize Your Site Search

We can’t blame you for wanting proof. Internal Site search sounds boring. It’s just a little bar everyone sticks at the top of the page, right?

Have a look at these site search stats from Shopify:

Clearly, if you want to maximize the revenue you get from the people who already come to your site, then you need a site search tool to help you.

So what does a site search tool need to do?

What Does Your Search Bar Need to Do?

Searching changed during the past few years. People expect super helpful results to their searches. Queries should recognize the keyword the customer is using and return great search results. The entire process should feel seamless and easy. Your internal search tool should also give you clear, actionable data.

So what does a modern, capable site search tool do? Here are a few necessary functions:

  • Your tool should have an advanced search algorithm that can find relevant content and relevant results based on user searches.
  • Understand searches beyond keyword matching. It should discover the user intent behind the searches your customers make to give them the search results they’re looking for.
  • Site search reports are a necessary part of eCommerce. Site search tracking helps with product placement, searchandising, and understanding the website’s visitors.

There are two different ways to understand what your internal site search tool should do.

First, it should serve your customers great search results. This is its primary purpose. When users search your site, they are looking for something specific and probably want to buy it. When they type their query into the search box, they are having an “I want this” moment. Relevant results turn that moment into a sale.

Second, it should serve the interests of the business. Specifically, it should tell you what people want to buy and how they try to find it. Armed with this information, you will be in a better position to stock the right products and stack up the profits.

How Can You Improve Your eCommerce Site Search Functionality?

We’re going to show you how to make your search platform work better for you. Along the way, if you read something and think, “Dang! My site search platform can’t do that,” then you should go find a better search platform.

Let’s get it started with simple UI fixes for your search box.

Sort Out Your Search Box User Interface

People don’t want to search for your search box. Put it in an obvious place, give it some contrast to the surrounding content, and provide an example search query to help people know your search box is the place their search starts. 

Let’s dive into those three tips quickly:

  1. Put your search box in an obvious place. Don’t hide your search box behind a small magnifying glass icon or bury it at the bottom of the page. Highlight it at the top of the page so people can find the search function.
  2. Give it some contrast to the surrounding content. Make your search box stand out by making it a different color, using a dark border, or something else that draws attention.
  3. Provide an example search query. Use something visual to showcase your search function. Words like “Find me a …” or “Tell me what you’re looking for…” will help users search faster.

User interface upgrades are all about getting people into your search bar as quickly as possible. Once they begin using your search function, you can do a few more things to help them find the right products and make a purchase.

Implement Predictive Search Autocomplete to Help Users

About 30% of your store visitors will use your site search function and 25% of them will click on a search result. This is a massive opportunity for you – if your search results show them what they’re looking for.

The enemy of great site search is the dreaded zero results page. This is when the customer sees no search results for their search query. To avoid zero results pages and help your users, implement a predictive text autocomplete.

Predictive text autocomplete will attempt to finish the user’s query while they are typing. The search bar will show users fast ways to finish their search query. Faster, simpler searches are better for users, especially on mobile devices where typing might be irritating.

Predictive text autocomplete is also better for you because you control those suggestions. Every suggestion should lead to a valid page or product on your website. Eliminating zero results pages leads users to your products so they can buy them.

Prefixbox, providers of a very effective site search solution, have a great guide for using predictive search autocomplete here.

Typo Tolerance for Deeper Engagement

Search engines that understand errors help deeper engagement with customers. Search engines that don’t, send customers to other websites to find what they want to buy. Your site search should have language modeling intelligence so it can understand a query even if words are misspelled.

Users make mistakes and it’s easy to help them. Your preferred tool should produce site search reports that will show you the misspelled queries. Once you see the mistakes people make when they are searching, you can assign keywords to the misspelled words. Then people can make mistakes, find your products anyway, and buy them from you.

Handling Long Tail Semantic Searches

What in the heck is a long tail semantic search? Here are some examples:

  • men’s shoes size 11 black Nike
  • children’s vest high vis safety age 4

These user searches contain loads of useful information if your tool can understand it. A successful tool will see these long-tail searches and adjust the query parameters to find the best match.

In the men’s shoes example, each word becomes a query parameter for the search. So, the results page is going to show products according to these query parameters:

  • Must be men’s shoes
  • Must be size 11 shoes
  • Must be black shoes
  • Must be Nike shoes

From the user’s perspective, a list of black size 11 Nikes for men would be the perfect search results.

If your site search tool doesn’t do this, maybe you should find a new one. A study by Retail Integration Online found websites with semantic site search tools had a 2% cart abandonment rate as opposed to normal text-based websites with abandonment rates of around 40%.

Use A/B Testing to Tweak, Review, and Maximize Profits

Internal search analytics and site search reports lead to trying out different methods. You might find a search query leads to a specific product that isn’t an ideal fit. Change the query’s results to lead people to a different product on the results page. Then compare your results. Which query led to the most conversions and sales?

Here are some examples of A/B testing on the results page:

  • Move your own branded products to the top of the search list. Measure total sales and specific sales of your own brands.
  • Highlight special offers in the search results pages. Test the conversions of these products.

Those are two simple tests you could use on your website. Testing these changes and producing reports will help you understand how to continue to tweak your site search to get the best results.

Some form of A/B testing is important for your site. Without the ability to test your results, you cannot get the best data for your website. A/B testing your site search will show you which internal search changes made the most impact on your sales.

A/B Testing comes with some site search providers, but not all. We recommend going with a solution that gives you A/B testing because of the power of accurate data for your website.

Natural Language Processing for More Accurate Search Results

Natural language processing (NLP) is a massive boost to the functionality of site search because it means the site search function can understand user intent beyond keywords in the query.

Here’s an example: “40th birthday gifts for women.” This query shows results across different categories. There are slippers, wine glasses, teacups, and funny cards. The ability to connect different search results across categories by a ‘meta’ mashup of birthday/40/women separates NLP site search functionality from a basic search.

NLP moves beyond the keyword and into the search intent of your visitors. Displaying results across categories and showing results within a category but limited by a query parameter like color or size are hallmarks of NLP search.

NLP dominates search in the present and it’s hard to see anything different in the future.

Suggest Search Queries

You can access two kinds of data about your visitors:

  • Individual data from their current or previous sessions. You can track their previous purchases, searches, and viewed items. You may also have access to information such as their gender, age, or location.
  • Aggregate data from all visitors to your website. You should know what people are searching for, which categories are most popular, and which pages on your website get the most traffic.

Use these two types of data to create search queries for your users. We call these zero-character searches. As soon as someone highlights the search box, suggestions appear. Sites with this function are making the customer journey even faster by eliminating the need for a search query.

What content type could you suggest?

  • You can suggest popular search queries with an introductory phrase like “People are searching for…”
  • You can suggest the most popular categories on your website with some pictures of products.
  • You can suggest the customer’s previous search queries.

Suggesting search queries will help your visitors move through your site even faster – as long as the queries have relevant products.

Exclude Irrelevant Search Results

No one should use your site search and feel disappointed with the results. If the results for search queries are not relevant, then you should eliminate them. Tweak your search results pages to show people the most relevant results possible.

Imagine someone types “Spaghetti blouse” into the search bar. They’re not looking for pasta. So your site search function should see the query parameter [blouse] and limit the results accordingly.

Site search reports should show you which searches produce irrelevant results. A good place to start is by examining long-tail searches that produce a huge number of results.

Some site search solutions can do this automatically. They do this by tying into the next point: synonyms.

Synonym Management Produces Relevant Answers

Synonyms are words that mean the same or similar things. For example, color synonyms would connect the word “light” to colors like white, light blue, or pale yellow. Your site search should connect these synonyms.

Let’s come back to one of the primary purposes of site search optimization: making the user experience frictionless. So, imagine the user who types in this query:

“dark sneakers”

They want to see black, dark grey, or charcoal-colored shoes. If they see a zero results page because none of your shoes have ‘dark’ in their metadata, that’s frustrating. Likewise, if they see blue, green, and pink shoes, then they have to wade through pages of irrelevant answers.

Set up your site search with synonym management to help connect users to products beyond the keywords they actually type.

Breadcrumbs Help People Navigate

What are breadcrumbs? They are the list of categories at the top of the page showing where people have come from to reach their current page. 

Here is an example:

Home –> Groceries –> Produce –> Vegetables –> Potatoes

Someone seeing this could find their way from the potato section back to the rest of the vegetables easily. This will help people navigate backward from a mistake or navigate backward to find a product related to the one they’ve already found.

Place breadcrumbs at the top of your page. Highlight the specific search the user typed at the end of the breadcrumb chain. These small things help people feel comfortable on your website.

Create a Great Mobile Search Experience

People use their mobile devices for shopping more and more. Everyone knows this. Not everyone seems to connect this to their search bar. Pick up your own phone and test your search box yourself.

Is it easy to use?

Does it have the same features as the desktop version?

What irritates you?

There are a few things we can think of right away to make the mobile search experience better:

  • Limit the search results page to avoid excessive scrolling and loading. Show 3-5 products to avoid overwhelming the user.
  • Features like autocorrect and zero-character searches will save users on typing time.
  • Strong error tolerance will make people feel better because autocorrect mistakes and typos are more common on mobile devices.

No one should feel disadvantaged because they have come to your mobile website. Brilliant customer service means creating a great search experience on mobile devices, too.

Machine Learning for 10x Personalization

Machine learning analyzes user behavior and creates responses to drive sales. What responses could happen?

  • On-site messaging, such as a discount pop-up when someone searches for a specific product or category.
  • Suggesting related products based on user behavior analysis.

For example, imagine a man browsing through a sporting goods store. He checks out the product pages for three Reebok products. As he carries on searching, Reebok products get boosted in the results because he seems to prefer them.

Machine learning is better for these kinds of changes because it can happen quickly and on a large scale.

Use Site Search Analytics to Dig Into Revenue

Your analytics will show you what’s working and what’s not. Most sites are familiar with Google analytics. Your site search function should come with analytics like this to help you see the right data.

Which data points are the most helpful?

  • Most Searched Keywords
  • Clicks to Conversion
  • Geographical Locations
  • Query/Product Relationships
  • Zero Results Pages
  • Number of Searches Per User

All these, and more, will give you the right analytics reports to make better tweaks to your site search and query connections.

Site Search Drives Conversions and Revenue Growth

Every study conducted so far tells us site search is a key part of eCommerce success. Site search users buy more often, spend more money, and convert to loyal customers. 

If your site search isn’t on point yet, we strongly recommend following these 13 tips to get it sorted out as quickly as possible.


Photo by Myriam Jessier on Unsplash

Categories: Others Tags: