Archive

Archive for July, 2021

How to Get a Pixel-Perfect, Linearly Scaled UI

July 15th, 2021 No comments

Dynamically scaling CSS values based on the viewport width is hardly a new topic. You can find plenty of in-depth coverage right here on CSS-Tricks in articles like this one or this one.

Most of those examples, though, use relative CSS units and unitless values to achieve fluid scaling. That loses pixel perfection and usually introduces text wrapping and layout shifts once the screen goes below or above a certain threshold.

But what if we really do want pixel perfection? What if, let’s say, we are developing a complex real-time analytics dashboard to be viewed on large TVs at a conference room or as some PWA to be opened exclusively on mobile and tablet devices, as opposed to text-heavy blogs and news websites? Those are cases where we need more precision.

In other words, what if we want to scale designs uniformly? Of course, one can scale the content with CSS transforms based on the available width as covered in this article — this way, the correct ratios are preserved.

However, we can also achieve fluid proportional scaling UIs using pixel values in CSS. They scale appropriately based on the device screen real estate, all while preserving their pixel-perfect proportions. Further, we can still use pixel values and automatically convert them to relative CSS units if working in pixels is more comfortable or familiar.

Scaling our UI

Let’s try to implement this awesome dashboard, courtesy of Craftwork. We need to make it in such a way that it scales perfectly and preserves all the texts line counts, margins, image sizes, etc.

Let’s work in CSS pixel values and use SCSS for speed and convenience. So, if we are to target the title of one of these card widgets, our SCSS might look something like this:

.cardWidget {
  .cardHeading {
    font-size: 16px;
  }
}

Nothin’ fancy. Nothing we have not seen before. Being a pixel value, this will not scale.

This design was created with a container that’s 1600px wide. Let’s assume that at 1600px, the ideal font size for the titles of the cards should be 16px since that’s how it’s designed.

Now that we have the “ideal” container width font size for this width, let’s scale our CSS pixel values accordingly using the current* viewport width:

/*
  1600px is the ideal viewport width that the UI designers who
  created the dashboard used when designing their Figma artboards

  Please not we are not using pixel units here, treating it purely
  as a numeric value.
*/
--ideal-viewport-width: 1600;
/*
  The actual width of the user device
*/
--current-viewport-width: 100vw;

.cardWidget {
  .cardHeading {
    /*
      16px is the ideal font size that the UI designers want for
      1600px viewport width.

      Please note that we are not using pixel units here,
      treating it purely as a numeric value.
    */
    --ideal-font-size: 16;
    /*
      Calculate the actual font size:

      We take our idealFontSize and multiply it by the difference
      between the current viewport width and the ideal viewport width.
    */
    font-size: calc(
      var(--ideal-font-size) * (var(--current-viewport-width) / var(--ideal-viewport-width)
    );
  }
}

As you can see, we treat the ideal font size we obtained from the design as a base and multiply it by the difference between the current and ideal viewport widths. How does this look mathematically? Let’s say we are viewing this web app on a screen with the exact same width as the mockup:

--current-device-width: 100vw; // represents 1600px or full width of the screen
--ideal-viewport-width: 1600; // notice that the ideal and current width match
--ideal-font-size: 16;
// this evaluates to:
font-size: calc(16 * 1600px / 1600);
// same as:
font-size: calc(16 * 1px);
// final result:
font-size: 16px;

So, since our viewport width matches perfectly, our font-size ends being exactly 16px at the ideal viewport width of 1600px.

As another example, let’s say we are viewing the web app on a smaller laptop screen that’s 1366px wide. Here is the updated math:

font-size: calc(16 * 1366px / 1600);
// same as:
font-size: calc(16 * 0.85375px);
// final result:
font-size: 13.66px;

Or let’s say we are viewing this on a full high-definition display at 1920px wide:

font-size: calc(16 * 1920px / 1600);
// same as:
font-size: calc(16 * 1.2px);
// final result:
font-size: 19.2px;

You can see for yourself how even though we use pixel values as reference, we are actually able to proportionally scale our CSS values based on the difference in width between the ideal and current viewport sizes.

Here is a small demo I built to illustrate the technique:

CodePen Embed Fallback

Here’s a video for convienence:

Clamping the min and max viewport width

Using this current approach, the design scales to match the viewport size, no matter how big or small the viewport gets. We can prevent this with CSS clamp() which allows us to set a minimum width of 350px and maximum width of 3840px. This means that if we are to open the web app on a device with 5000px width, our layout will stay locked at 3840px:

--ideal-viewport-width: 1600;
--current-viewport-width: 100vw;
/*
  Set our minimum and maximum allowed layout widths:
*/
--min-viewport-width: 350px;
--max-viewport-width: 3840px;

.cardWidget {
  .cardHeading {
    --ideal-font-size: 16;
    font-size: calc(
      /*
        The clamp() function takes three comma separated expressions
        as its parameter, in the order of minimum value, preferred value
        and maximum value:
      */
      --clamped-viewport-width: clamp(var(--min-viewport-width), var(--current-viewport-width), var(--max-viewport-width);
      /*
        Use the clamped viewport width in our calculation
      */
      var(--ideal-font-size) * var(--clamped-viewport-width) / var(--ideal-viewport-width)
    );
  }
}

Let’s make a helper for the unit conversions

Our code is quite verbose. Let’s write a simple SCSS function that converts our values from pixels to relative units. That way, we can import and reuse anywhere this anywhere without so much duplication:

/*
  Declare a SCSS function that takes a value to be scaled and
  ideal viewport width:
*/
@function scaleValue(
  $value,
  $idealViewportWidth: 1600px,
  $min: 350px,
  $max: 3840px
) {
  @return calc(
    #{$value} * (clamp(#{$min}, 100vw, #{$max}) / #{$idealViewportWidth})
  );
}

/*
  We can then apply it on any numeric CSS value.

  Please note we are passing not pixel based, but numeric values:
*/
.myElement {
  width: #{scaleValue(500)};
  height: #{scaleValue(500)};
  box-shadow: #{scaleValue(2)} #{scaleValue(2)} rgba(black, 0.5);
  font-size: #{scaleValue(24)};
}

Porting this to Javascript

Sometimes CSS doesn’t cut it and we have to use JavaScript to size a component. Let’s say we are constructing an SVG dynamically and we need to size its width and height properties based on an ideal design width. Here is the JavaScript to make it happen:

/*
  Our helper method to scale a value based on the device width
*/
const scaleValue = (value, idealViewportWidth = 1600) => {
  return value * (window.innerWidth / idealViewportWidth)
}

/*
  Create a SVG element and set its width, height and viewbox properties
*/
const IDEAL_SVG_WIDTH = 512
const IDEAL_SVG_HEIGHT = 512

const svgEl = document.createElement('svg')
/* Scale the width and height */
svgEl.setAttribute('width', scaleValue(IDEAL_SVG_WIDTH))
svgEl.setAttribute('height', scaleValue(IDEAL_SVG_WIDTH))

/*
  We don't really need to scale the viewBox property because it will
  perfectly match the ratio of the scaled width and height
*/
svg.setAttribute('viewBox', `0 0 ${IDEAL_SVG_WIDTH} ${IDEAL_SVG_HEIGHT}`)

The drawbacks of this technique

This solution is not perfect. For example, one major drawback is that the the UIs are no longer zoomable. No matter how much the user zooms, the designs will stay locked as if they are viewed at 100% zoom.

That said, we can easily use traditional media queries, where we set different ideal numeric values at different viewport widths:

.myElement {
  width: #{scaleValue(500)};
  height: #{scaleValue(500)};
  box-shadow: #{scaleValue(2)} #{scaleValue(2)} rgba(black, 0.5);
  font-size: #{scaleValue(24)};
  @media (min-width: 64em) {
    width: #{scaleValue(800)};
    font-size: #{scaleValue(42)};
  }
}

Now we can benefit from both media queries and our pixel-perfect linear scaling.

Wrapping up

All of this is an alternative way to implement fluid UIs. We treat the pixel-perfect values as pure numeric values, and multiply them by the difference between the current viewport width and the “ideal” viewport width from the designs.

I have used this technique extensively in my own work and hope that you will find some use of it too.


The post How to Get a Pixel-Perfect, Linearly Scaled UI appeared first on CSS-Tricks. You can support CSS-Tricks by being an MVP Supporter.

Categories: Designing, Others Tags:

Is Squarespace a Nice Alternative to WordPress? Let’s Differentiate Both

July 14th, 2021 No comments

Living in the internet world, you might know 75% of a company’s brand image is evaluated based on websites.

If your website fails to deliver a top-notch user experience, you might leave behind in the competitive race. We are aware of this digital environment; having fresh content and aesthetic web design is necessary for survival. And to make a website beautiful, you need the best website creation platform.

When we talk about the best website creation platform, our hands immediately go down on WordPress, and why not? We all know about its soaring popularity. This is one of the best user-friendly content management systems, boasting 39.5% of the internet in 2021. But that does not mean other website builders are of no use. 

Usually, entrepreneurs are inclined towards cost-effective solutions when it comes to building a website. Hence, they choose a platform that fulfills all their needs and does not cost much. As they don’t prefer huge chunks of money on custom website creation tools. Hence they opt for readymade or else cost-effective platforms for their website development. Numerous platforms are available in the market, such as WordPress, Squarespace, Wix, and a list goes on. 

Intro of WordPress

From its launch in 2003 as a simple blogging platform, WordPress has gained massive attention globally as today it contains more than 455 million websites online. From impressive themes to plugins to advanced levels of security, WordPress has become one of the best content management systems that offer some great advantages such as,

  • Simple to utilize
  • Pocket-friendly solution
  • Expanded site security
  • Community support 
  • Scalability
  • Design flexibility

Intro of Squarespace

Squarespace is relatively new in the website builder domain but one of the best SaaS-based content management systems which offer appealing features and tools to create a beautiful website. Along with website design, it also offers logo-making options. As we all know how conventional businesses are jumping onto the bandwagon of digitization, Squarespace helps them a lot. 

Most restaurant businesses have chosen this platform to start services like ubereats as it offers many services in one plan. Squarespace also offers some advantages, such as 

  • Responsive templates
  • Quick set up
  • Dedicated support
  • No coding skill required 
  • Scalable and flexible 

It seems like both content management systems offer great advantages to their users, but without a detailed comparison between both, you can’t choose the best for you. In this detailed guide, we will take a close look at two popular content management systems, WordPress vs. Squarespace, so that you can decide which one is best for your next project without brainstorming. 

WordPress vs. Squarespace: A Quick Comparison 

In order to make it simple to understand the major differences between both CMS, here we have divided this post into certain segments that will help you compare both website builders quickly. 

  • Themes and templates 
  • Content management
  • Security
  • Plans and pricing
  • eCommerce

Based on the above main segments, let’s compare both website builders so that you can build a beautiful website for your enterprise as quickly as possible. 

WordPress vs. Squarespace: Themes and Templates 

Both come with lots of mobile-friendly themes and templates that help you customize the website as per your requirements. WordPress offers more than 6800+ free templates and hundreds of premium templates for all industries. In WordPress, you can customize free templates with easy drag and drop options. This makes the overall process smooth and friendly. 

Squarespace also offers an extensive range of templates categorized into different groups. But Squarespace offers limited pre-made templates than WordPress. Secondly, customization is not possible in Squarespace. You can only change colors, fonts, and other basic functions. 

Verdict: WordPress 

WordPress vs. Squarespace: Content Management 

As mentioned earlier, WordPress is best for bloggers as it lets them manage content with ease. In WordPress, you are provided with both visual and text editors so you can write articles with ease, and you can still add custom HTML anytime. WordPress takes care of your content and saves posts automatically. If something happens with your content, you can rely on WordPress without having any fear. 

Squarespace is not the first choice of the blogger as there is no autosave option. It won’t let you use revisions, and you are restricted from running your own HTML and CSS from the page. Moreover, in WordPress, you can use the image you have previously used, while Squarespace is not good for the media as well. You can’t use the image twice. 

Verdict: WordPress 

WordPress vs. Squarespace: Security 

WordPress is a self-hosted platform, which means users need to think about security and support. Users need to update plugins and pay attention to security to protect their data and website. No doubt, there are lots of tutorials, and how-to articles that help you overcome the issue but backing up data is an important step. 

Squarespace is a hosted platform, so the users don’t need to worry about security. They also don’t need to back up their own data. Further, users also get instant support from the customer care executives and discuss their issues. 

Verdict: Squarespace 

WordPress vs. Squarespace: Plans and Pricing

WordPress is free to install; all you need to do is purchase your domain name and hosting. After that, you also need to pay some money for themes and plugins to create an exceptional website, but overall pricing plans are cost-effective. 

While Squarespace comes with four plans, plans start from personal plans, business plans, basic and advanced. You can use the 14-day trial version, but after that, you need to choose one of these plans to create an amazing website. 

Verdict: WordPress 

WordPress vs. Squarespace: eCommerce

It seems like WordPress has become a synonym of eCommerce due to its well-known plugins such as WooCommerce and BigCommerce. Using these plugins, you can transform a basic website into a fully-featured online store. 

Squarespace also has an excellent in-built eCommerce system, but it has certain limitations like it only supports limited payment gateways such as Stripe, PayPal, and Apple Pay. but if you are a retailer and engaged with the restaurant industry, it would be a solid option. While WordPress supports multiple payment gateways and you don’t need to pay transaction fees. 

Verdict: WordPress

WordPress vs. Squarespace: Crucial Differences 

Before we declare our winner, let’s have a quick comparison of both content management systems. Check out the below table so you can decide which one best matches your needs. 

WordPress Squarespace 
Ease of use Beginner-friendly  Perfect for novices 
Themes and plugins  Extensive range  Limited options
Data management  Revisions, autosave, and HTML No revision or autosave
Customer support  Paid support  Dedicated team support 
Cost-effectiveness  From $2 per month  From $12 per month 
eCommerce  Scope for customizations  Limited options 
SEO SEO plugins can help you increase the visibility of your website  Inbuilt SEO features, you can manage them with ease 

From the above quick comparison, it is pretty simple to decide the winner. WordPress beats Squarespace in every aspect. From theme customization to plugins to pricing, it is the one-stop solution for enterprises. 

Which One is Best for You

After discussing the major differences between both website builders, it can be said that in what market you are and what are your exact requirements and what your budget is. Further, your technical skills matter while choosing the platform. If you opt for WordPress, you should have basic HTML, CSS, and PHP knowledge, while you don’t need any coding knowledge to use Squarespace. 

If you just want to create a static website with limited features, Squarespace is the best option. But most developers choose WordPress for:

  • Features and functionaries
  • Flexibility 
  • Ownership 
  • Cost-effectiveness 

So what’s your call? What do you think is best when it comes to choosing between Squarespace vs. WordPress? Indeed, the popularity of WordPress is much higher, but it would be better if we focus on business requirements rather than features because both are better for different kinds of site owners. 

Categories: Others Tags:

Build Complex CSS Transitions using Custom Properties and cubic-bezier()

July 14th, 2021 No comments

As you can see, we can combine two different timing functions (created using cubic-bezier() ) to create a third one, complex enough to achieve a fancy transition. The combinations (and possibilities) are unlimited!

In that last example, I wanted to demonstrate how adding two opposite functions lead to the logical result of a constant function (no transition). Hence, the flat line.

Let’s add more variables!

You thought we’d stop at only two variables? Certainly not! We can extend the logic to N variables. There is no restriction—we define each one with a timing function and sum them up.

An example with three variables:

CodePen Embed Fallback

In most cases, two variables are plenty to create a fancy curve, but it’s neat to know that the trick can be extended to more variables.

Can we subract, multiply and divide variables?

Of course! We can also extend the same idea to consider more operations. We can add, subtract, multiply, divide—and even perform a complex formula between variables.

Here, we’re multiplying values:

CodePen Embed Fallback

We can also use one variable and multiply it by itself to get a quadratic function!

CodePen Embed Fallback

Let’s add more fun in there by introducing min()/max() to simulate an abs() function:

CodePen Embed Fallback

Notice that in the second box we will never get higher than the center point on the y-axis because top is always a positive value. (I added a margin-top to make the center of box the reference for 0.)

I won’t get into all the math, but you can imagine the possibilities we have to create any kind of timing function. All we have to do is to find the right formula either using one variable or combining multiple variables.

Our initial code can be generalized:

@property --d1 { /* we do the same for d2 .. dn */
  syntax: '<number>';
  inherits: false;
  initial-value: i1; /* the initial value can be different for each variable */
}

.box {
  --duration: 1s; /* the same duration for all */
  property: calc(f(var(--d1),var(--d2), .. ,var(--dn))*[1UNIT]);
  transition:
    --d1 var(--duration) cubic-bezier( ... ),
    --d2 var(--duration) cubic-bezier( ... ),
    /* .. */
    --dn var(--duration) cubic-bezier( ... );
}
.box:hover {
  --d1:f1;
  --d2:f2;
  /* .. */
  --dn:f3;
}

This is pseudo-code to illustrate the logic:

  1. We use @property to define numeric custom properties, each with an initial value.
  2. Each variable has its own timing function but the same duration.
  3. We define an f function that is the formula used between the variables. The function provides a number that we use to multiply the relevant unit. All this runs in calc() applied to the property.
  4. We update the value of each variable on hover (or toggle, or whatever).

Given this, the property transitions from f(i1,i2,…,in) to f(f1,f2,..,fn) with a custom timing function.

Chaining timing functions

We’ve reached the point where we were able to create a complex timing function by combining basic ones. Let’s try another idea that allow us to have more complex timing function: chaining timing functions together.

The trick is to run the transitions sequentially using the transition-delay property. Let’s look back at the interactive demo and apply a delay to one of the variables:

CodePen Embed Fallback

We are chaining timing functions instead of adding them together for yet another way to create more complex timing functions! Mathematically, it’s still a sum, but since the transitions do not run at the same time, we will be summing a function with a constant, and that simulates the chaining.

Now imagine the case with N variables that we are incrementally delayed. Not only can we create complex transitions this way, but we have enough flexibility to build complex timelines.

Here is a funny hover effect I built using that technique:

CodePen Embed Fallback

You will find no keyframes there. A small action scene is made entirely using one element and a CSS transition.

Here is a realistic pendulum animation using the same idea:

CodePen Embed Fallback

Or, how about a ball that bounces naturally:

CodePen Embed Fallback

Or maybe a ball rolling along a curve:

CodePen Embed Fallback

See that? We just created complex animations without a single keyframe in the code!

That’s a wrap!

I hope you took three key points away from this article and the

I recently illustrated how we can achieve complex CSS animations using cubic-bezier() and how to do the same when it comes to CSS transitions. I was able to create complex hover effect without resorting to keyframes. In this article, I will show you how to create even more complex CSS transitions.

This time, let’s use the @property feature. It’s only supported on Chrome-based browsers for now but we can still play with it and demonstrate how it, too, and can be used to build complex animations.

I highly recommend reading my previous article because I will be referring to a few concepts I explained in detail there. Also, please note that the demos in this article are best viewed in Chromium-based browsers while @property support is still limited.

Let’s start with a demo:

CodePen Embed Fallback

Click on the button (more than once) and see the “magic” curve we get. It may look trivial at first glance because we can achieve such effect using some complex keyframes. But the trick is that there is no keyframe in there! That animation is done using only a transition.

Awesome right? And this is only the beginning, so let’s dig in!

The main idea

The trick in the previous example relies on this code:

@property --d1 {
  syntax: '<number>';
  inherits: false;
  initial-value: 0;
}
@property --d2 {
  syntax: '<number>';
  inherits: false;
  initial-value: 0;
}

.box {
  top: calc((var(--d1) + var(--d2)) * 1%);
  transition:
    --d1 1s cubic-bezier(0.7, 1200, 0.3, -1200),
    --d2 1s cubic-bezier(0.5, 1200, 0.5, -1200);
}
.box:hover {
  --d1: 0.2;
  --d1: -0.2;
}

We’re defining two custom properties, --d1 and --d2. Then, we declare the top property on a .box element using the sum of both those properties. Nothing overly complex yet—just calc() applied to two variables.

The two properties are defined as and I multiply those values by 1% to convert them into a percentage. We could define these as right away to avoid the multiplication. But I’ve chosen numbers instead in favor of more flexibility for more complex operations later.

Notice that we apply a different transition to each variable—more precisely, a different timing-function with the same duration. It’s actually a different sinusoidal curve for both variables which is something I get deep into in my previous article.

From there, the property values change when the .box is hovered, triggering the animation. But why do we get the result we see in the demo?

It’s all about math. We are adding two functions to create a third one. For --d1, we have a function (let’s call it F1); for --d2 , we have another one (let’s call it F2). That means the value of top is F1 + F2.

An example to better illustrate:

CodePen Embed Fallback

The first two transitions illustrate each variable individually. The third one is the sum of them. Imagine that at in each step of the animation we take the value of both variables and we add them together to get each point along the final curve.

Let’s try another example:

CodePen Embed Fallback

This time, we combine two parabolic curve to get a… well, I don’t know its name it but it’s another complex curve!

This trick is not only limited to the parabolic and sinusoidal curve. It can work with any kind of timing function even if the result won’t always be a complex curve.

CodePen Embed Fallback

This time:

  • --d1 goes from 0 to 30 with an ease-in timing function
  • --d2 goes from 0 to -20 with an ease-out timing function

The result? The top value goes from 0 to 10 (30-20) with a custom timing function (the sum of ease-in and ease-out).

We are not getting a complex transition in this case—it’s more to illustrate the fact that it’s a generic idea not only limited to cubic-bezier().

I think it’s time for an interactive demo.

CodePen Embed Fallback

All you have to do is to adjust a few variables to build your own complex transition. I know cubic-bezier() may be tricky, so consider using this online curve generator and also refer to my previous article.

Here are some examples I made:

As you can see, we can combine two different timing functions (created using cubic-bezier() ) to create a third one, complex enough to achieve a fancy transition. The combinations (and possibilities) are unlimited!

In that last example, I wanted to demonstrate how adding two opposite functions lead to the logical result of a constant function (no transition). Hence, the flat line.

Let’s add more variables!

You thought we’d stop at only two variables? Certainly not! We can extend the logic to N variables. There is no restriction—we define each one with a timing function and sum them up.

An example with three variables:

CodePen Embed Fallback

In most cases, two variables are plenty to create a fancy curve, but it’s neat to know that the trick can be extended to more variables.

Can we subract, multiply and divide variables?

Of course! We can also extend the same idea to consider more operations. We can add, subtract, multiply, divide—and even perform a complex formula between variables.

Here, we’re multiplying values:

CodePen Embed Fallback

We can also use one variable and multiply it by itself to get a quadratic function!

CodePen Embed Fallback

Let’s add more fun in there by introducing min()/max() to simulate an abs() function:

CodePen Embed Fallback

Notice that in the second box we will never get higher than the center point on the y-axis because top is always a positive value. (I added a margin-top to make the center of box the reference for 0.)

I won’t get into all the math, but you can imagine the possibilities we have to create any kind of timing function. All we have to do is to find the right formula either using one variable or combining multiple variables.

Our initial code can be generalized:

@property --d1 { /* we do the same for d2 .. dn */
  syntax: '<number>';
  inherits: false;
  initial-value: i1; /* the initial value can be different for each variable */
}

.box {
  --duration: 1s; /* the same duration for all */
  property: calc(f(var(--d1),var(--d2), .. ,var(--dn))*[1UNIT]);
  transition:
    --d1 var(--duration) cubic-bezier( ... ),
    --d2 var(--duration) cubic-bezier( ... ),
    /* .. */
    --dn var(--duration) cubic-bezier( ... );
}
.box:hover {
  --d1:f1;
  --d2:f2;
  /* .. */
  --dn:f3;
}

This is pseudo-code to illustrate the logic:

  1. We use @property to define numeric custom properties, each with an initial value.
  2. Each variable has its own timing function but the same duration.
  3. We define an f function that is the formula used between the variables. The function provides a number that we use to multiply the relevant unit. All this runs in calc() applied to the property.
  4. We update the value of each variable on hover (or toggle, or whatever).

Given this, the property transitions from f(i1,i2,…,in) to f(f1,f2,..,fn) with a custom timing function.

Chaining timing functions

We’ve reached the point where we were able to create a complex timing function by combining basic ones. Let’s try another idea that allow us to have more complex timing function: chaining timing functions together.

The trick is to run the transitions sequentially using the transition-delay property. Let’s look back at the interactive demo and apply a delay to one of the variables:

CodePen Embed Fallback

We are chaining timing functions instead of adding them together for yet another way to create more complex timing functions! Mathematically, it’s still a sum, but since the transitions do not run at the same time, we will be summing a function with a constant, and that simulates the chaining.

Now imagine the case with N variables that we are incrementally delayed. Not only can we create complex transitions this way, but we have enough flexibility to build complex timelines.

Here is a funny hover effect I built using that technique:

CodePen Embed Fallback

You will find no keyframes there. A small action scene is made entirely using one element and a CSS transition.

Here is a realistic pendulum animation using the same idea:

CodePen Embed Fallback

Or, how about a ball that bounces naturally:

CodePen Embed Fallback

Or maybe a ball rolling along a curve:

CodePen Embed Fallback

See that? We just created complex animations without a single keyframe in the code!

That’s a wrap!

I hope you took three key points away from this article and the previous one:

  1. We can get parabolic and sinusoidal curves using cubic-bezier() that allow us to create complex transitions without keyframes.
  2. We can create more curves by combining different timing functions using custom properties and calc().
  3. We can chain the curves using the transition-delay to build a complex timeline.

Thanks to these three features, we have no limits when it comes to creating complex animations.

CodePen Embed Fallback

The post Build Complex CSS Transitions using Custom Properties and cubic-bezier() appeared first on CSS-Tricks. You can support CSS-Tricks by being an MVP Supporter.

Categories: Designing, Others Tags:

A Bashful Button Worth $8 Million

July 14th, 2021 No comments

Most of us grumble when running across a frustrating UX experience online (like not being able to complete a transaction because of a misplaced button). We might pen a whiny tweet. Jason Grigsby is like I’m going to write 2,000 words on this and show them what’s what. And of course, he has a strong point. An out-of-viewport button that you need to press to complete an order, on a checkout experience for some major restaurant brand, even with estimates that are conservative at every angle, is worth millions of dollars in lost sales.

Direct Link to ArticlePermalink


The post A Bashful Button Worth $8 Million appeared first on CSS-Tricks. You can support CSS-Tricks by being an MVP Supporter.

Categories: Designing, Others Tags:

Links on React and JavaScript

July 13th, 2021 No comments

As a day-job, React-using person, I like to stay abreast of interesting React news. As such, I save a healthy amount of links. Allow me to dump out my latest pile. Most of this is about React but not all of it.

  • The Plan for React 18 — A bunch of people from the React team put this post out giving us all a heads up of what’s coming. Alpha is out, beta is months away. I thought Cassidy’s article on it was the most clear about what we’re likely to care about.
  • React Query — Looks like a pretty robust tool… “the missing data-fetching library for React.” Don’t know how I missed it as it even seems more popular than Apollo. I’ve been pretty happy with using Apollo (as a user, my biggest pain is unclear error reporting), and it seems like that’s probabably the right choice if you’re heavy into GraphQL, but React Query looks awfully nice with clear docs and nice DevTools.
  • Data Fetching in Redux Made Easy With RTK Query — Matt Stobbs looks at RTK Query, which looks like yet another alternative to the Apollo / React Query stuff. Take a look at the Redux store in an app you’re working on now. If it’s anything like mine, you’ll see a mix of data from the backend (which is behaving as a cache) and UI state (the data that isn’t persisted when the page reloads). These two types of data are treated as if they are the same, which ends up making both more complicated.
  • Just-In-Time translations and code that writes itself — Dan Laush looks at a bunch of modern options for conditional and lazy loading JavaScript. This stuff is probably more complicated than it should be, but it’s getting better. Suspense in React 18 will be helpful. Top-level await is helpful. Load what you need when you need it. Astro is good at this. And, speaking of all this, Nicholas C. Zakas’ “The lazy-loading property pattern in JavaScript” is a great read with a clever pattern for defining objects that only do expensive things once, lazily when asked, then redefine that property on themselves with the result.
  • Bringing JSX to Template Literals — People think of JSX as a React thing, which is kinda fair, but it’s really a separate thing that can be useful with other frameworks (certainly Preact and even Vue). We looked at how it can be fun with even no framework at all in a previous video. Andrea Giammarchi goes deep here and shows how it can work with the already nicely-ergnomic template literals. “You can see it working in CodePen via uhtmlulandube, or lit-html.”
  • React Hooks: Compound Components — Shout out to Kent Dodds! We’ve started using this in our pattern library at CodePen. It’s been nice for keeping components a bit more consolidated rather than a sprawling tree of similarly-named sub components with hand-rolled state sharing.
  • JavaScript: What is the meaning of this? — Jake Archibald puts out the canonical article on this.
  • Human-Readable JavaScript: A Tale of Two Experts — Laurie Barth compares examples of code that do the same thing, but have different levels of readability. There isn’t always a straight answer “… but when you’re looking at code that is functionally identical, your determination should be based on humans—how humans consume code.”
  • petite-vue — jQuery was amazing and there is plenty of perfectly fine jQuery code, but the reason jQuery is a bit looked down upon these days is the messy code bases that were made with it. Some lessons were learned. While inline JavaScript handlers were once heavily scorned, nearly every popular JavaScript library today has brought them back. But let’s say something like React is too heavy-handed for you—what is the jQuery of light on-page interactivity stuff? Vue sort of walks the line between that and being more of a “big framework.” Alpine.js is probably the main player. But here comes Vue again with a poke at Alpine with a version of itself that is pretty darn small and does the same sort of stuff.

The post Links on React and JavaScript appeared first on CSS-Tricks. You can support CSS-Tricks by being an MVP Supporter.

Categories: Designing, Others Tags:

10 Cool WordPress Plugins You Should Check Out

July 13th, 2021 No comments

If you have a WordPress website, you’re obviously aware of the benefits this premier open-source website-building platform brings to the table.

But are you aware of the legion of website and business enhancement tools lying in wait among the thousands of cool WordPress plugins currently on the market; one or more of which could easily take your site or business to the next level?

What’s out there? Quite a bit, obviously. 

Which useful WordPress plugins are “must-haves” for me? It could take you a ton of time to find the answer to that one. 

That’s what we’re here for.

10 essential WordPress plugins are admittedly a small sample size. But these are 10 of the very best, and we’re guessing that one or more of them could be just what you’ve been looking for.

1. Amelia WordPress Booking Plugin

This game-changing booking plugin fully automates your business’s interaction with existing and potential clients and allows you to focus on key business operations instead of having to constantly interrupt your workflow to manage appointments.

  • Installing and configuring Amelia can be done with just a few clicks. You don’t have to know anything about coding.
  • Amelia can manage an unlimited number of appointments for an unlimited number of clients, an unlimited number of employees, and at multiple locations.
  • Clients can book appointments 24/7 and manage their own appointments as well as their profiles from the front end.
  • Amelia accepts deposit payments, sends out appointment reminders, and can charge different rates for different appointments.
  • If you have a global clientele, Amelia takes into account customer time zones as well as manages translated notifications if you have a multilingual site.
  • Amelia also manages event bookings, whether they are recurring or one-time.

In the unlikely event you encounter a problem with Amelia, the customer support team stands ready to help.

2. wpDataTables

The wpDataTables WordPress plugin allows users to quickly and easily create responsive, interactive, and highly customizable tables and charts from large amounts of data.

Key features include:

  • The ability to create tables that allow front-end editing, whether they are created manually or are MySQL-based
  • Advanced filtering capabilities that enable front-end users to filter table data by single or multiple column values
  • Automatic syncing of created and published Google Sheets
  • Simple wpDataTables wizards to access the HighCharts, Chart.js, and Google free charts libraries

wpDataTables’ many other features include:

  • Connection support to MySQL, MS SQL, and PostgreSQL databases
  • Responsive design from any data source
  • Creating tables from CSV, JSON, MySQL, and Excel and Google spreadsheet data
  • Formidable Forms plugin support
  • Sorting by single or multiple columns
  • Data color-coding using conditional formatting

More than 50,000 companies and individuals have placed their trust in wpDataTables.

3. Visual Composer Website Builder

Visual Composer is a new, ReactJS-based intuitive drag and drop website builder that enables you to create a website quickly, easily, and hassle-free.

This website-building popular plugin:

  • Enables business owners to showcase their brand online with its drag and drop editor and professional templates.
  • Its feature-rich design controls enable designers to achieve pixel-perfect perfection as they bring their projects to life.
  • Its top-of-the-line marketing content elements give its users the ability to create high-conversion landing pages, integrate with social platforms, and more.
  • Makes building a beautiful WooCommerce-based online store a piece of cake.
  • Features a library of 500+ content elements and templates that is downloadable from the cloud
  • Offers free and premium versions for business owners to start easily and scale their online presence

Your site will be SEO-friendly, fast, and responsive, and the support is terrific. Free and Premium versions (Starting at $49) are available.

4. Slider Revolution

Slider Revolution can do more than create sliders. A lot more.

  • It can add impressive (read that WOW) effects to an already notable website design.
  • It can give you new and unusual visual editing capabilities without requiring any coding on your part.
  • With its collection of hero blocks, sliders, WooCommerce carousels, and more, it brings beauty to any WordPress website.

5. Logic Hop

Logic Hop lets you customize your site’s content for individual customers or customer types.

  • Logic Hop supports personalizing your site in response to dozens of criteria so you can tailor your content to address a unique audience.
  • Logic Hop works with Gutenberg, Divi, Elementor, Beaver Builder, and every other page builder.

Any design or content element you can customize in WordPress can be customized in Logic Hop in minutes.

6. Stacks

The Stacks drag and drop native mobile app builder offers a full package of features to help you design your website or mobile app without coding.

  • Stacks works perfectly with WooCommerce and WordPress
  • Certificates required for Google Play Store or Apple Appstore are automatically generated
  • It takes but a single click to generate and upload the Android & iOS Application Package (APK & IPA)
  • Notifications to customers are easy to generate and send, and Stacks utilizes WooCommerce payment gateways.

7. Heroic Inbox

The Heroic Inbox plugin enables a business to manage all of its emails in shared inboxes right inside WordPress.

  • Customer data is presented on the sidebar next to your ongoing chat or message.
  • Key performance metrics are tracked so the team and overall company performance can be assessed.
  • Zero Inbox status can be quickly achieved and maintained.

8. Tablesome

This powerful WordPress table plugin allows you to quickly create a table and embed it in a post or page.

  • Tables can be imported from CSV and XLSX files.
  • Types of tables that can be created include large data tables, product catalogs, comparison tables, sports statistics, and more.
  • A shortcode builder for table and table element customizing is included

Tablesome is performance-optimized and SEO friendly and works smoothly with any WordPress theme.

9. Ads Pro Plugin – Multi-Purpose WordPress Advertising Manager

Ads Pro is the best ad manager for WordPress you are likely to come across.

Ads Pro features:

  • An intuitive backend Admin Panel that allows you to manage an unlimited number of ad spaces
  • A frontend User’s Panel from which you can control access to manage ads
  • 25+ user-friendly and responsive Ad Templates in 8 categories
  • 20 ad display options
  • 3 Billing Models (CPC, CPM, CPD) and 4 Payment Methods (PayPal, Stripe, Bank Transfer, WooCommerce)

10. Static Pages

Static pages/sites do not require any web programming or database design.

  • The Static Pages plugin allows you to publish any static page on a WordPress website in a matter of seconds.
  • You can improve sales by adding a beautiful landing page to your existing shop or blog or add a page with a Mailchimp subscribe form.
  • Or use Static Pages as an easy way to test something quickly and easily.

Have you been searching for a top-of-the-line WordPress plugin that will help you take your business to the next level?

There are 58,000+ useful WordPress plugins for you to choose from. That would be good news, except you could easily be overwhelmed trying to find just the right plugin for your website.

This post features a collection of top plugins for WordPress websites. Chances are good, you’ll find something here that will make your day.


[– This is a sponsored post on behalf of BAW media –]

Source

The post 10 Cool WordPress Plugins You Should Check Out first appeared on Webdesigner Depot.

Categories: Designing, Others Tags:

Jamstack Community Survey 2021

July 13th, 2021 No comments

(This is a sponsored post.)

The folks over at Netlify have opened up the Jamstack Community Survey for 2021. More than 3,000 front-enders like yourself took last year’s survey, which gauged how familiar people are with the term “Jamstack” and which frameworks they use.

This is the survey’s second year which is super exciting because this is where we start to reveal year-over-year trends. Will the percentage of developers who have been using a Jamstack architecture increase from last year’s 71%? Will React still be the most widely used framework, but with one of the lower satisfaction scores? Or will Eleventy still be one of the least used frameworks, but with the highest satisfaction score? Only your answers will tell!

Plus, you can qualify for a limited-edition Jamstack sticker with your response. See Netlify’s announcement for more information.

Direct Link to ArticlePermalink


The post Jamstack Community Survey 2021 appeared first on CSS-Tricks. You can support CSS-Tricks by being an MVP Supporter.

Categories: Designing, Others Tags:

Jamstack Community Survey 2021

July 13th, 2021 No comments

The folks over at Netlify have opened up the Jamstack Community Survey for 2021. More than 3,000 front-enders like yourself took last year’s survey, which gauged how familiar people are with the term “Jamstack” and which frameworks they use.

This is the survey’s second year which is super exciting because this is where we start to reveal year-over-year trends. Will the percentage of developers who have been using a Jamstack architecture increase from last year’s 71%? Will React still be the most widely used framework, but with one of the lower satisfaction scores? Or will Eleventy still be one of the least used frameworks, but with the highest satisfaction score? Only your answers will tell!

Plus, you can qualify for a limited-edition Jamstack sticker with your response. See Netlify’s announcement for more information.


The post Jamstack Community Survey 2021 appeared first on CSS-Tricks. You can support CSS-Tricks by being an MVP Supporter.

Categories: Designing, Others Tags:

9 Customer Service Metrics You Should be Tracking in 2021

July 13th, 2021 No comments

In today’s competitive landscape of commerce, businesses should focus on adding new customers while retaining their original customer base (this helps improve profit margin). In order to achieve this, satisfactory customer service is the only solution. The ROI for providing exemplary customer service is clear.

  • 73% of companies with above-average customer experience perform better financially than their competitors.
  • Loyal customers are 5x more likely to make a repeat purchase and 4x more likely to tell a friend about their experience
  • 77% of consumers respect and view favorably brands that seek out and act upon customer feedback
  • Customers will spend up to 140% more after a positive experience than customers who have a negative experience.

While the reasons to improve customer experiences are clear, finding areas in your business that impact this metric can be difficult.

This is where KPIs or Key Performance Indicators come in. 

Different sectors have their own KPIs to measure how they contribute to the growth of a business. Customer service KPIs are part of this list too. If you are not sure about what metrics to analyze, we have got you covered. Let us dive into the details.

What is a Customer Service KPI?

A KPI is a business tool. It is a measurable value to determine whether business goals are being achieved. Thus, businesses use customer service KPIs to measure whether the team is successful. This helps judge the departmental performance for better management. It reduces costs while improving job satisfaction.

KPIs give access to information like sales, customer retention, and lifetime customer value (LTV). These metrics are important factors in determining the growth of businesses. Here are the top customer service metrics to track 

1. First Call Resolution (FCR)

First call resolution measures the percentage of customer complaints that teams resolve during the first contact. Customers can make contact via live calls and web chats. We then challenge representatives with resolving the issue before consumers hang up. Often, customers end the chat without the need to follow up. An email marketing expert then tries to resolve matters with a single but detailed response. 

Support teams divide issues they solve in the first contact with the total FCR eligible cases. For example, if customers provide wrong details, it no longer remains eligible for FCR. This metric directly correlates to customer satisfaction and ensures they’re pleased with problem resolutions at first contact. Here are a few First Call Resolution metrics to keep as a rule of thumb:

  • Industry Standard –  80% of calls answered in 20 seconds
  • Email – 100% of Emails in 24 Hours (the best achieve 80% of emails within 15 minutes)
  • Live Chat – 80% of Chats in 20 Seconds
Image Source  

2. Customer Satisfaction Score (CSAT)

It’s hard to find out whether or not customers are fully satisfied; a CSAT score makes it simpler. Businesses refer to it as Happy Customer KPI. Here, eCommerce platforms ask direct questions. Sometimes they conduct mini-surveys to see how they feel about services and products. 

Usually, customers express answers to questions using star ratings or emojis; CSAT scores are an average of these responses. But, businesses should calculate it based on those who display satisfaction. A good CSAT score (depending on industry) will be between 75% and 85%.

3. Rate of Customer Retention 

Image Source

Good quality products can reel in customers, but retaining them depends on the customer experience. Clients go away if there are bad experiences with customer service which remains true even if you use funnels to increase sales (there is no secret sauce here, just good customer care!). Thus, this KPI is crucial to measure how many customers stick to your business over time. 

Customer retention can increase revenue over a 1.5-2 year period by up to 80% and reduce the cost to acquire a customer by nearly 30%.  In addition, increasing customer retention rates by just 5% increases profits by up to 95%.

Existing customers also spend 31% more than new leads, and when you release a new product, your loyal customers are 50 % more likely to give it a shot.

You can calculate this rate weekly or monthly. Take the number of customers at the start (CS) of the tracking period, then calculate how many customers get added during the period (which is denoted as CN). Afterwards, measure (CE) the number of customers at the end of the period. The retention rate would then be (CE-CN)/CS multiplied by a hundred. 

4. SERVQUAL 

Image source

This KPI is multidimensional and measures whether a service has subjective elements. Customers get a questionnaire with five different aspects. Reliability comes first and customers answer how the company delivers on the promised products. 

If employees are knowledgeable and courteous, they can create trust and confidence. The physical appearance of facilities also matters here. Customers tend to judge on the basis of equipment, business environment, and employees but empathy or the attention and care given to individual customers also matters. 

Responsiveness or how willing staff members are to help customers goes a long way. It helps understand how customers perceive offered services and what they expect. If expectations exceed perceptions then businesses can improve.

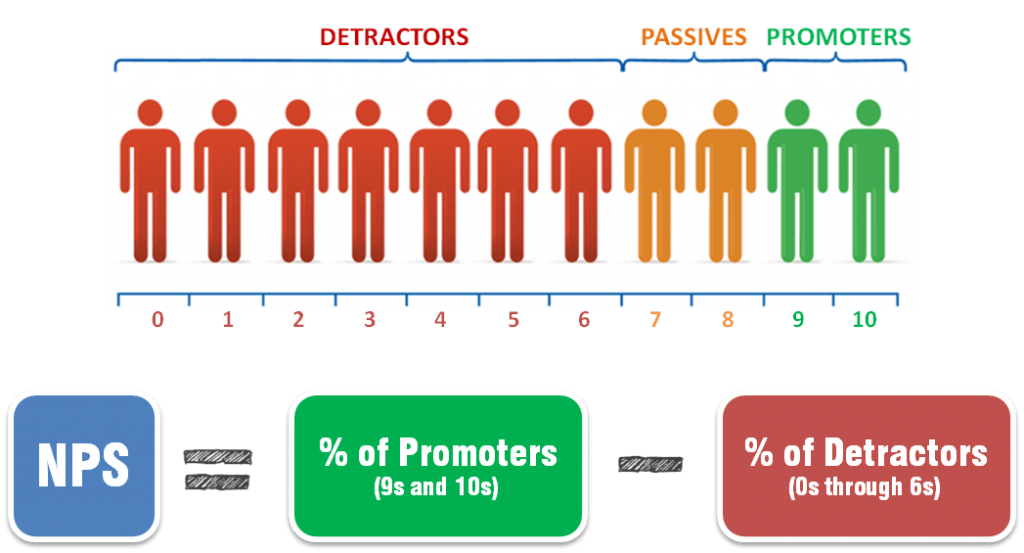
5. Net Promoter Score (NPS)

Image Source 

Over 92% of consumers report trusting family and friends above all other forms of advertising.

It is like an electronic signature measuring customer loyalty to brands or companies. It helps businesses figure out whether customers will refer their products to others. Surveys measure answers on an eleven-point scale. 

Businesses subtract the percentage of detractors from the percentage of business promoters. 54% of customers expect more from a company’s customer service team than they did a year ago. Even more so, this percentage increases to 66% for consumers in the age group of 18 to 34 years old.

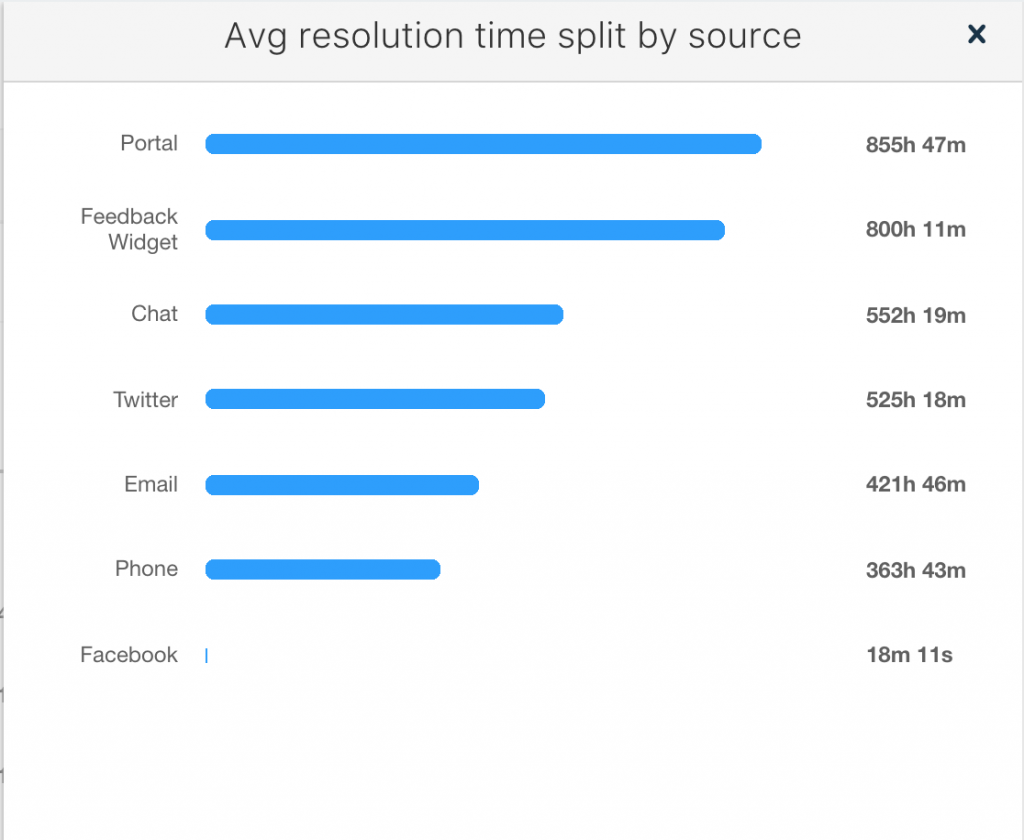
6. Average Resolution Time (ART)

Image Source

This is one of the most important KPIs. It measures how long representatives take to solve customer issues. Good customer service has a direct correlation to timeliness. Such speed plays a positive role in impressing customers, improving loyalty and retention. Linx Legal has focused on efforts to improve the time it takes to resolve a customer issue. “ Customer service metrics is something that our company has struggled with. Of course, the happiest customer is the one that has a positive outcome. In our case, that end outcome may take 1-2 years to be completed. So, we needed a way to measure satisfaction before the process was complete. We use Zapier integrations to gauge satisfaction levels and set up automated emails, SMS messaging, and surveys to accomplish this. This has helped us to identify at what point in the process customers begin to get impatient, and to laser focus our customer service efforts during these times”.

7. Customer Churn Rate 

Image Source

If you want hard truths about your business then keep an eye on this KPI. The churn rate tells companies how many customers they’ve lost within a time frame. It gives a fair idea of retentive abilities. You can calculate this by dividing the number of customers lost by those present at the start. The number is then multiplied by a hundred. 

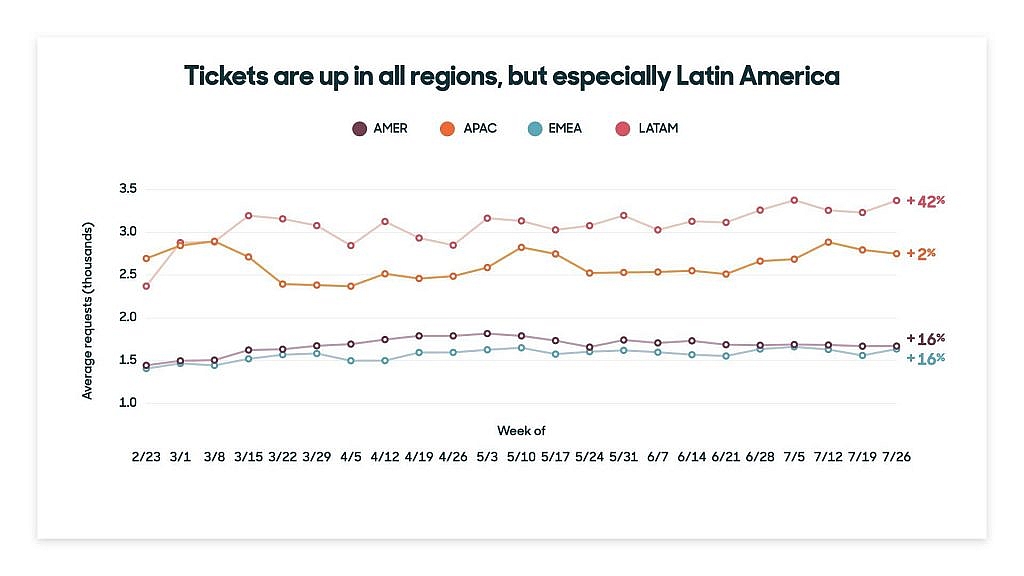
8. Ticket Backlog 

Image Source

This KPI gives an idea of how many customer tickets have stayed beyond normal response times. Backlogs can happen for various reasons – from teams being inadequate to high volumes of tickets. Sometimes, customer care needs a more detailed touch, which takes time. 

Familiarizing yourself with this metric helps understand if you need more members. Often improving their knowledge is the solution. 

9. Rate of Resolution 

Image Source

You can calculate the percentage of issues resolved by customer service using this metric. It measures how productive and efficient individual agents can be. The functioning of customer service teams also comes to light. Here, you have to divide the number of resolved issues by the total number of tickets. Then, multiply the result by a hundred. To improve your customer resolution rate, use opportunities to connect with customers via live chat that is available 24/7 or by phone when an issue arises. Here is an example of what this can look like on a webpage:

Source

You can also implement easy-to-follow guides on your website or educational videos that show how to resolve simple (but common) problems with your product or service.

Wrap Up  

While there are several other indicators that help measure customer service,  the metrics listed above are definitely crucial in 2021 for companies looking to build a brand. They’ll definitely help businesses cater to customers better. 

Great customer service comes down to people rather than numbers. If you want to retain your customers, go out of your way to show how much you care about their needs. They will end up choosing the service provider that delivers the greatest overall experience.

Categories: Others Tags:

Meet `:has`, A Native CSS Parent Selector

July 12th, 2021 No comments

The reasons that are often cited that make container queries difficult or impossible is things like infinite loops—e.g. changing the width of an element, invalidating a container query, which changes the width again, which makes the container query take effect, etc. But that was solved with containment. A “parent selector”, or :has as it is now been officially dubbed (I like it, that’s how jQuery rolled, although Adrian pointed out a tweet noting that it’s more versatile), has traditionally had similar problems. Things like requiring “multiple pass” rendering which is too slow to be acceptable.

Brian Kardell says:

Primarily, even without :has() it’s pretty hard to live up to performance guarantees of CSS, where everything continue to evaluate and render “live” at 60fps. If you think, mathematically, about just how much work is conceptually involved in applying hundreds or thousands of rules as the DOM changes (including as it is parsing), it’s quite a feat as is.

Engines have figured out how to optimize this based on clever patterns and observations that avoid the work that is conceptually necessary – and a lot of that is sort of based on these subject invariants that has() would appear to throw to the wind.

The fact that there is a spec now is super encouraging, and that it has Igalia’s eye on it. Apparently, some of the performance problems have either been surmounted or, through testing, determined to be negligible enough to remain a shippable feature.

Adrian Bece digs into it all!

The team at Igalia has worked on some notable web engine features like CSS grid and container queries, so there is a chance for :has selector to see the light of day, but there is still a long way to go.

What makes relational selector one of the most requested features in the past few years and how are the developers working around the missing selector? In this article, we’re going to answer those questions and check out the early spec of :has selector and see how it should improve the styling workflow once it’s released.

Let’s cross our fingers. I’ve been watching this for 10 years and trying to document use cases.

Direct Link to ArticlePermalink


The post Meet `:has`, A Native CSS Parent Selector appeared first on CSS-Tricks. You can support CSS-Tricks by being an MVP Supporter.

Categories: Designing, Others Tags: