Archive

Archive for March, 2023

Creating a Clock with the New CSS sin() and cos() Trigonometry Functions

March 8th, 2023 No comments
Large tomato colored circle with a vertical list of numbers 1-12 on the left.

CSS trigonometry functions are here! Well, they are if you’re using the latest versions of Firefox and Safari, that is. Having this sort of mathematical power in CSS opens up a whole bunch of possibilities. In this tutorial, I thought we’d dip our toes in the water to get a feel for a couple of the newer functions: sin() and cos().

There are other trigonometry functions in the pipeline — including tan() — so why focus just on sin() and cos()? They happen to be perfect for the idea I have in mind, which is to place text along the edge of a circle. That’s been covered here on CSS-Tricks when Chris shared an approach that uses a Sass mixin. That was six years ago, so let’s give it the bleeding edge treatment.

Here’s what I have in mind. Again, it’s only supported in Firefox and Safari at the moment:

CodePen Embed Fallback

So, it’s not exactly like words forming a circular shape, but we are placing text characters along the circle to form a clock face. Here’s some markup we can use to kick things off:

<div class="clock">
  <div class="clock-face">
    <time datetime="12:00">12</time>
    <time datetime="1:00">1</time>
    <time datetime="2:00">2</time>
    <time datetime="3:00">3</time>
    <time datetime="4:00">4</time>
    <time datetime="5:00">5</time>
    <time datetime="6:00">6</time>
    <time datetime="7:00">7</time>
    <time datetime="8:00">8</time>
    <time datetime="9:00">9</time>
    <time datetime="10:00">10</time>
    <time datetime="11:00">11</time>
  </div>
</div>

Next, here are some super basic styles for the .clock-face container. I decided to use the  tag with a datetime attribute. 

.clock {
  --_ow: clamp(5rem, 60vw, 40rem);
  --_w: 88cqi;
  aspect-ratio: 1;
  background-color: tomato;
  border-radius: 50%;
  container-type: inline;
  display: grid;
  height: var(--_ow);
  place-content: center;
  position: relative;
  width var(--_ow);
}

I decorated things a bit in there, but only to get the basic shape and background color to help us see what we’re doing. Notice how we save the width value in a CSS variable. We’ll use that later. Not much to look at so far:

It looks like some sort of modern art experiment, right? Let’s introduce a new variable, --_r, to store the circle’s radius, which is equal to half of the circle’s width. This way, if the width (--_w) changes, the radius value (--_r) will also update — thanks to another CSS math function, calc():

.clock {
  --_w: 300px;
  --_r: calc(var(--_w) / 2);
  /* rest of styles */
}

Now, a bit of math. A circle is 360 degrees. We have 12 labels on our clock, so want to place the numbers every 30 degrees (360 / 12). In math-land, a circle begins at 3 o’clock, so noon is actually minus 90 degrees from that, which is 270 degrees (360 - 90).

Let’s add another variable, --_d, that we can use to set a degree value for each number on the clock face. We’re going to increment the values by 30 degrees to complete our circle:

.clock time:nth-child(1) { --_d: 270deg; }
.clock time:nth-child(2) { --_d: 300deg; }
.clock time:nth-child(3) { --_d: 330deg; }
.clock time:nth-child(4) { --_d: 0deg; }
.clock time:nth-child(5) { --_d: 30deg; }
.clock time:nth-child(6) { --_d: 60deg; }
.clock time:nth-child(7) { --_d: 90deg; }
.clock time:nth-child(8) { --_d: 120deg; }
.clock time:nth-child(9) { --_d: 150deg; }
.clock time:nth-child(10) { --_d: 180deg; }
.clock time:nth-child(11) { --_d: 210deg; }
.clock time:nth-child(12) { --_d: 240deg; }

OK, now’s the time to get our hands dirty with the sin() and cos() functions! What we want to do is use them to get the X and Y coordinates for each number so we can place them properly around the clock face.

The formula for the X coordinate is radius + (radius * cos(degree)). Let’s plug that into our new --_x variable:

--_x: calc(var(--_r) + (var(--_r) * cos(var(--_d))));

The formula for the Y coordinate is radius + (radius * sin(degree)). We have what we need to calculate that:

--_y: calc(var(--_r) + (var(--_r) * sin(var(--_d))));

There are a few housekeeping things we need to do to set up the numbers, so let’s put some basic styling on them to make sure they are absolutely positioned and placed with our coordinates:

.clock-face time {
  --_x: calc(var(--_r) + (var(--_r) * cos(var(--_d))));
  --_y: calc(var(--_r) + (var(--_r) * sin(var(--_d))));
  --_sz: 12cqi;
  display: grid;
  height: var(--_sz);
  left: var(--_x);
  place-content: center;
  position: absolute;
  top: var(--_y);
  width: var(--_sz);
}

Notice --_sz, which we’ll use for the width and height of the numbers in a moment. Let’s see what we have so far.

Large tomato colored circle with off-centered hour number labels along its edge.

This definitely looks more like a clock! See how the top-left corner of each number is positioned at the correct place around the circle? We need to “shrink” the radius when calculating the positions for each number. We can deduct the size of a number (--_sz) from the size of the circle (--_w), before we calculate the radius:

--_r: calc((var(--_w) - var(--_sz)) / 2);
Large tomato colored circle with hour number labels along its rounded edge.

Much better! Let’s change the colors, so it looks more elegant:

A white clock face with numbers against a dark gray background. The clock has no arms.

We could stop right here! We accomplished the goal of placing text around a circle, right? But what’s a clock without arms to show hours, minutes, and seconds?

Let’s use a single CSS animation for that. First, let’s add three more elements to our markup,

<div class="clock">
  <!-- after <time>-tags -->
  <span class="arm seconds"></span>
  <span class="arm minutes"></span>
  <span class="arm hours"></span>
  <span class="arm center"></span>
</div>

Then some common markup for all three arms. Again, most of this is just make sure the arms are absolutely positioned and placed accordingly:

.arm {
  background-color: var(--_abg);
  border-radius: calc(var(--_aw) * 2);
  display: block;
  height: var(--_ah);
  left: calc((var(--_w) - var(--_aw)) / 2);
  position: absolute;
  top: calc((var(--_w) / 2) - var(--_ah));
  transform: rotate(0deg);
  transform-origin: bottom;
  width: var(--_aw);
}

We’ll use the same animation for all three arms:

@keyframes turn {
  to {
    transform: rotate(1turn);
  }
}

The only difference is the time the individual arms take to make a full turn. For the hours arm, it takes 12 hours to make a full turn. The animation-duration property only accepts values in milliseconds and seconds. Let’s stick with seconds, which is 43,200 seconds (60 seconds * 60 minutes * 12 hours).

animation: turn 43200s infinite;

It takes 1 hour for the minutes arm to make a full turn. But we want this to be a multi-step animation so the movement between the arms is staggered rather than linear. We’ll need 60 steps, one for each minute:

animation: turn 3600s steps(60, end) infinite;

The seconds arm is almost the same as the minutes arm, but the duration is 60 seconds instead of 60 minutes:

animation: turn 60s steps(60, end) infinite;

Let’s update the properties we created in the common styles:

.seconds {
  --_abg: hsl(0, 5%, 40%);
  --_ah: 145px;
  --_aw: 2px;
  animation: turn 60s steps(60, end) infinite;
}
.minutes {
  --_abg: #333;
  --_ah: 145px;
  --_aw: 6px;
  animation: turn 3600s steps(60, end) infinite;
}
.hours {
  --_abg: #333;
  --_ah: 110px;
  --_aw: 6px;
  animation: turn 43200s linear infinite;
}

What if we want to start at the current time? We need a little bit of JavaScript:

const time = new Date();
const hour = -3600 * (time.getHours() % 12);
const mins = -60 * time.getMinutes();
app.style.setProperty('--_dm', `${mins}s`);
app.style.setProperty('--_dh', `${(hour+mins)}s`);

I’ve added id="app" to the clockface and set two new custom properties on it that set a negative animation-delay, as Mate Marschalko did when he shared a CSS-only clock. The getHours() method of JavaScipt’s Date object is using the 24-hour format, so we use the remainder operator to convert it into 12-hour format.

In the CSS, we need to add the animation-delay as well:

.minutes {
  animation-delay: var(--_dm, 0s);
  /* other styles */
}

.hours {
  animation-delay: var(--_dh, 0s);
  /* other styles */
}

Just one more thing. Using CSS @supports and the properties we’ve already created, we can provide a fallback to browsers that do not supprt sin() and cos(). (Thank you, Temani Afif!):

@supports not (left: calc(1px * cos(45deg))) {
  time {
    left: 50% !important;
    top: 50% !important;
    transform: translate(-50%,-50%) rotate(var(--_d)) translate(var(--_r)) rotate(calc(-1*var(--_d)))
  }
}

And, voilà! Our clock is done! Here’s the final demo one more time. Again, it’s only supported in Firefox and Safari at the moment.

CodePen Embed Fallback

What else can we do?

Just messing around here, but we can quickly turn our clock into a circular image gallery by replacing the  tags with  then updating the width (--_w) and radius (--_r) values:

CodePen Embed Fallback

Let’s try one more. I mentioned earlier how the clock looked kind of like a modern art experiment. We can lean into that and re-create a pattern I saw on a poster (that I unfortunately didn’t buy) in an art gallery the other day. As I recall, it was called “Moon” and consisted of a bunch of dots forming a circle.

A large circle formed out of a bunch of smaller filled circles of various earthtone colors.

We’ll use an unordered list this time since the circles don’t follow a particular order. We’re not even going to put all the list items in the markup. Instead, let’s inject them with JavaScript and add a few controls we can use to manipulate the final result.

The controls are range inputs () which we’ll wrap in a and listen for the input event.

<form id="controls">
  <fieldset>
    <label>Number of rings
      <input type="range" min="2" max="12" value="10" id="rings" />
    </label>
    <label>Dots per ring
      <input type="range" min="5" max="12" value="7" id="dots" />
    </label>
    <label>Spread
      <input type="range" min="10" max="40" value="40" id="spread" />
    </label>
  </fieldset>
</form>

We’ll run this method on “input”, which will create a bunch of

  • elements with the degree (--_d) variable we used earlier applied to each one. We can also repurpose our radius variable (--_r) .

    I also want the dots to be different colors. So, let’s randomize (well, not completely randomized) the HSL color value for each list item and store it as a new CSS variable, --_bgc:

    const update = () => {
      let s = "";
      for (let i = 1; i <= rings.valueAsNumber; i++) {
        const r = spread.valueAsNumber * i;
        const theta = coords(dots.valueAsNumber * i);
        for (let j = 0; j < theta.length; j++) {
          s += `<li style="--_d:${theta[j]};--_r:${r}px;--_bgc:hsl(${random(
            50,
            25
          )},${random(90, 50)}%,${random(90, 60)}%)"></li>`;
        }
      }
      app.innerHTML = s;
    }

    The random() method picks a value within a defined range of numbers:

    const random = (max, min = 0, f = true) => f ? Math.floor(Math.random() * (max - min) + min) : Math.random() * max;

    And that’s it. We use JavaScript to render the markup, but as soon as it’s rendered, we don’t really need it. The sin() and cos() functions help us position all the dots in the right spots.

    CodePen Embed Fallback

    Final thoughts

    Placing things around a circle is a pretty basic example to demonstrate the powers of trigonometry functions like sin() and cos(). But it’s really cool that we are getting modern CSS features that provide new solutions for old workarounds I’m sure we’ll see way more interesting, complex, and creative use cases, especially as browser support comes to Chrome and Edge.


    Creating a Clock with the New CSS sin() and cos() Trigonometry Functions originally published on CSS-Tricks, which is part of the DigitalOcean family. You should get the newsletter.

  • Categories: Designing, Others Tags:

    8 Branding Strategies for Startups to Build Trust with a New Audience

    March 8th, 2023 No comments

    Trust. It’s the backbone of any relationship. Whether you’re talking about a romantic connection, a friendship, or even the connection between a business and its customers. Simply put, if people don’t trust you, they’re not going to spend their hard-earned money on your products or services. 

    But trust isn’t just freely given, especially not in the world of business. It’s cultivated over long periods and fed with honesty, effective service, and quality products. There are many instances where trust will need to be established from nothing in the business world. 

    In the case of startup businesses, it’s even more important, as you don’t have any previous successes or experiences to draw on when trying to woo your target audience. 

    So how can you start building trust with a new audience as a startup business owner? In this article, we’ll walk you through several branding strategies that can jumpstart your trust-building efforts, creating a sustainable and loyal customer base that will return to you over and over again.

    How Important is Brand Trust?

    Brand trust is absolutely vital to the ongoing success of your business. This has been true since the earliest days of general stores and local mom-and-pop businesses. When people find a business they trust, they repeatedly return and often give it the benefit of the doubt when it makes a mistake.

    Despite the shift from brick-and-mortar commerce to online commerce, brand loyalty and trust is still a factor online. In fact, consumers are 30% more likely to return to a site where they’ve shopped before and had a positive experience.

    Source

    The unknown can be scary when it comes to spending money. Often, people want to return to a company they know is safe, honest, and of a certain quality rather than chase the latest deal and throw money away on a potentially inferior product. 

    Brand trust is the secret to generating repeat business, which is crucial for your ongoing profitability. If your business is a revolving door, where customers come and go and constantly need replacing, you’ll be spending a lot more on marketing, and remaining in the black will be a constant struggle.

    It’s far more cost-effective to hold onto an existing customer than it is to bring in someone completely new. That’s why businesses work so hard to establish trust in their audience. While you should always be trying to attract new customers, you also need to serve your existing clientele as they provide a source of recurring revenue without having to be wooed through the sales funnel all over again. 

    When there’s a change in business ownership, the new business owners will need to decide whether they would like to continue the same branding strategy as their predecessor to create less friction or if they will completely rebrand the business and target a new audience. If they choose the latter option, trust will need to be re-established. This is a huge risk that new business owners take, as the trust-building process isn’t easy. 

    But when you’re a startup owner, you have no choice in the matter. You’re starting from square one with these people, and you must employ the following strategies to get them on your side. 

    Strategies for Building Trust With a New Audience

    Deliver On Time or Early

    One of the main secrets of startup success is to offer a product or service to customers for which demand is high, and supply is low. Noble Gold Investments got off to an incredibly strong start in 2016 with this tactic and is competing with companies that entered the market several years ago. You can read more about it in this Noble gold investments review. 

    Whenever someone orders such products from a new online store, whether they decide to pay through traditional methods or using revvi credit card type systems, they’re going to have a few questions, like: 

    • How long will it take to receive my order?
    • What state will my order be in when it arrives?
    • Will my order ever arrive?

    By providing a great delivery experience, where items arrive either on time or early, you’ve taken the first steps needed to build trust with your new audience. The best way to ensure this is to partner with reliable shipping companies that can get your products out the door and into the hands of your customers quickly without breaking the bank. 

    Consider an alliance with a courier service. This can help you offer same-day delivery on products and also handle sensitive documents without any action taken by your new customers. 

    Shipping efficiency creates reliability, one of the most important elements in building trust. 

    Keep Brand Imagery Consistent

    Your brand imagery is an important part of establishing trust in a new company. When new customers stumble onto one of your ads or social media posts, they won’t trust you immediately. There are a lot of scams out there, and modern consumers know this. That means they’re always going to be hesitant. 

    Now, imagine you’re feeling this hesitancy, and the moment you click on an exciting ad, it takes you to a site that looks nothing like the branding that initially caught your eye. The colors are different, the logos are different, and the verbiage and tone have completely shifted away from what initially drew your attention. 

    Source

    That’s going to shatter the trust of your prospective customers right away. It should all look consistent when they click through your website or a landing page. 

    Consistency is crucial because your potential customers should know what they can expect from you. Aside from your message and tone, the imagery you share across your social platforms and website must be consistent as well. Using mood boards and free poster templates for your brand will not only help you boost credibility but also make your brand look polished and professional. 

    Create a Blog

    If you want your audience to learn more about your company, the value of your services, and the culture you’re working so hard to establish, it might be time to create a blog. Blogs are an excellent way to establish yourself as an expert in the field and a trusted place to shop.

    If your customers have doubts about your industry knowledge and expertise, a blog can be a great place to put those fears to bed. Think about your customers’ questions and the pain points that drive them toward your business. Those are the questions and topics you should be addressing in your blog. 

    Make the content relatable, informative, and easily shareable. You should also stick to a regular posting schedule. This will help you establish a routine that your readers can rely on and ultimately come to trust. 

    Comment sections are also helpful with blogs. Your customers can ask questions or share their own experiences. This could even translate into them forming connections with other customers and starting conversations on your platform. Make sure you’re responding to these comments as well, engaging with your audience regularly to establish even more familiarity and trust. 

    Create a Podcast

    In the same vein as creating a blog, you should also consider podcasting. Podcasts are a popular and growing medium. People typically enjoy these on-demand audio shows in the car or while working out, and they can be a great way to establish trust. 

    Source

    More so than on a blog, when someone can only read your words, a podcast allows them to hear your voice and lets your personality shine through. People tend to trust the podcasters they frequent, and they start to feel a connection to them, almost as though they know them personally. 

    When you’re podcasting, you’re demonstrating your expertise while forging personal connections with the people you’re trying to market to. That makes it an invaluable resource in the neverending quest to build trust with your audience. 

    Focus on Customer Service

    Customer service is an important part of the business trust puzzle. People need to know that when they have an issue or a question in relation to your company or products, they’ll be able to get satisfactory aid through your customer service department. 

    One bad customer service interaction is typically enough to make a customer abandon a brand. That’s why you want to make sure that your customer support representatives are well trained and have access to the tools needed. They should be kind, courteous, and knowledgeable. 

    Source

    If it’s within your budget, consider a 24/7 customer support AI chatbot that can help you answer some of the more simple or common questions posed by your audience. This will ensure that you’ll be able to provide some form of support, even when your call center is closed for the day. 

    Personalize Advertising

    General advertising cast out to the entire world at once doesn’t do anyone a lick of good. In 2023 ads need to be personalized to inspire customers to purchase. You need to let that specific person know what you can do for their specific issues. 

    Doing this is not only more effective from a conversion standpoint, but it can also help you establish trust with members of your audience. If customers believe that you know what they need and provide a service to meet those needs, they’ll have more trust in your brand and turn to you more often. 

    That means your advertising should be targeted. Through platforms like Facebook and Google, you can set specific ads to only run for specific people based on criteria like: 

    • Age
    • Marital status
    • Geographic area
    • Gender
    • Interests
    • Search history
    • Income
    • Profession
    • Buying habits
    • And much more

    You should have your audience segmented into various buyer personas and create ad campaigns specifically targeted and personalized to these groups. Using a customer data platform is an easy way to collect and store customer data and to build out detailed customer profiles. 

    Engage on Social Media 

    Every business needs a solid social media strategy. Obviously, you want your audience to engage with your social posts, sharing them, liking them, commenting on them, etc. 

    But when people take this desired action, there’s something you can do to help generate trust and endear your brand to these customers — engage with them. 

    Source

    Respond to social media comments, answer their questions, or just thank them for their observation if no question was asked. You can also pose your own questions to keep the conversation going. The beauty of public comments is that they’re public. You can establish trust with the customers you’re interacting with while also establishing trust with those who are just viewing the comments and seeing how attentive you are. 

    This also applies to the direct messages you receive. Make sure you’re responding to them promptly. It’s also a good idea to set up an automatic message that goes out whenever you get a new message from a customer. Tell them you’ve received the message and will get back to

    them ASAP. Then, when you respond, be thorough and kind. Check for their responses and work to resolve whatever issue they’re having quickly. 

    List Reviews (Even Bad Ones)

    Reviews are a powerful form of social proof that can be a lot more effective than corporate branding in establishing trust with your audience. The words of a peer carry a lot more weight than a company that is only trying to promote itself. 

    That’s why you should have review pages on your website, and also embrace Google reviews. Make sure you’re responding to all of your reviews, both positive and negative. Responding to a positive review is easy. You can just thank them for the feedback and continued use of your services. 

    With bad reviews, you have an excellent opportunity to establish trust with your audience. Address the concerns raised in the review and apologize for the experience falling short. Provide the user with resources that might help and offer to make the situation right for them. If you can turn around their perception, ask them to update their review. 

    Source

    Doing this publicly can make a huge impact on potential customers. They’re watching you handle harsh reviews in a respectful manner with no defensiveness whatsoever. They see you go to lengths to make it right, showing that you genuinely care about your customers. Bad reviews might seem like the end of the world, but they can be an amazing opportunity to improve the public perception of your business and generate trust with new customers. 

    Conclusion

    Trust is a vital piece of the modern business puzzle, and you can establish that trust by following the strategies highlighted above. 

    To review, when trying to establish trust with your audience: 

    • Ensure that deliveries arrive on time or early
    • Keep your branding consistent along platforms
    • Create a blog
    • Create a podcast
    • Focus on customer service
    • Personalize your advertising
    • Engage with the audience on social media
    • List your reviews and respond to them. Even the bad ones.

    By doing this, you’ll be able to establish long-term trust with your audience and propel your startup business into the stratosphere. 

    The post 8 Branding Strategies for Startups to Build Trust with a New Audience appeared first on noupe.

    Categories: Others Tags:

    Why You Should Consider Graphs For Your Next GraphQL Project

    March 7th, 2023 No comments

    This article is a sponsored by Neo4j

    The explosion of GraphQL over the past few years has introduced many front-end developers to the concepts of data modeling and storage, turning front-end developers into full-stack developers.

    GraphQL provides developers working on a simple contract with a database, guaranteeing consistency and predictability of the data returned while also managing persistence and data fetching. The developer trusts the API to store and retrieve the data most efficiently.

    But convenience comes at a cost. One day, your side project hits the front page of Hacker News, and a sudden influx of users grinds your database to a halt. Sometimes, the remedy is as simple as using the right underlying database for the loads.

    In this article, I will look at the Graph behind GraphQL and demonstrate why Neo4j is the best fit for your next project.

    The Graph In GraphQL

    GraphQL itself is a database-agnostic query language. Many database companies and startups now offer libraries that convert a GraphQL query or mutation into a query language that works with the underlying data store, whether that be SQL for relational databases, Cypher for graph databases, or any number of proprietary query languages.

    Graphs provide a natural way to represent data, where Nodes (or vertices) that represent entities or things are connected together by Relationships (or edges). Depending on the underlying data storage in your GraphQL library of choice, a certain amount of gymnastics may be involved. Suddenly, unnatural tables with strange names are created, or data is duplicated to improve query response times, introducing technical debt along the way.

    This is where Neo4j comes in. Neo4j is a native Graph Database. Graph Databases are in a category all of their own, and for a good reason.

    Graph databases treat the connections between data as first-class citizens, storing relationships so that highly connected datasets can be queried in real-time.

    An Example: Movie Recommendations

    Say we’re sick of scrolling through an endless list of thumbnails on our favorite streaming platform looking for something to watch. We decided to build a new website where users can register, provide movie ratings, and in return, receive movie recommendations based on users who have similar ratings.

    In our GraphQL schema, we define types that represent movie information. Users provide movie ratings, each with a score between 1 and 5. Movies can have one or more actors and one or more directors. Movies are also tagged with one or more genres.

    Note: Luckily, this Recommendations dataset already exists as a free Neo4j Sandbox. Neo4j Sandbox instances are free of charge, initially run for three days, and can be extended up to 10 days.

    type User {
      userId: ID!
      name: string
      email: string
      ratings: [Rating]
    }
    
    type Rating {
      user: User!
      movie: Movie!
      rating: Int
      createdAt: Date
    }
    type Movie {
      movieId: ID!
      title: String
      released: Date
      actors: [Role]
      directors: [Person]
    }
    
    type Role {
      person: Person!
      movie: Movie!
      roles: [String]
    }
    type Person {
      personId: ID!
      name: String!
      born: Date!
      roles: [Role]
      directed: [Movie]
    }
    

    Let’s take a look at how this data will be stored in a relational database, a document store, and a graph and see where we might hit a problem when trying to generate recommendations.

    In A Relational Database

    Relational databases provide a structured method of data storage where data is organized into tables. Tables conform to strict rules known as a database schema, where each row contains a set number of columns, each with a set data type. Where a value may not exist, nullable columns can be used.

    The underlying database schema provides a perfect base to map GraphQL Type Definitions. Each field within a type description will map one-to-one with a column. Those Type Definitions can be quickly translated into an SQL query (SQL stands for Structured Query Language) to insert or retrieve data.

    A JOIN is constructed at read-time for nested types, joining two tables using foreign keys to find the corresponding records in a database. Here comes the first potential problem.

    Let’s look at an Entity Relationship Diagram (ERD) that describes how the data may be stored in a relational database.

    The tables highlighted in yellow represent the main entities in the data model: users, people, and movies. The tables highlighted in green represent the JOIN tables required to facilitate the many-to-many relationships between the entities.

    There are two potential pitfalls here. First, let’s talk about naming. The example above is fairly straightforward, but say we have a many-to-many relationship in our data model between Products and Orders — an order may contain one or more products, and a product may appear in many orders. What do we call that table? order_products, order_line? This feels unnatural, and instantly you are adding tribal knowledge to the database, making it harder for others to understand.

    When you use that table to find an actor for a particular movie, you start to hit the O(n) problem.

    JOINs & The O(n) Problem

    GraphQL is designed to be a flexible query language that allows you to retrieve an infinite level of nested values. The more nested items retrieved, the more joins are queried. Therefore the longer the query takes. Furthermore, the more data added to the database, the larger the underlying indexes become and the longer the query will take to return a result.

    This is known as the Big O notation or O(n) notation — the number of computational resources required to compute the JOINs is relative to the size of the input data. The more data added to the database, the more data needs to be processed, and the slower the database will become.

    Many relational databases support subqueries or window functions, but these must still be constructed in memory at query time, which can be an expensive operation.

    This problem can be partially resolved by database tuning, partitioning, or denormalizing data to improve response times, at which point you’ll need to become a database expert.

    In A Document Store

    Document stores, such as MongoDB or CouchDB, differ from Relational databases in that they are designed to store unstructured or semi-structured data. Data is organized into collections, each of which consists of many documents. Each document in a collection represents a single record, which can have its own unique set of key-value pairs. This approach is more flexible than relational databases, but as the data is schema-less, you must be careful to enforce consistency through your application layer.

    You would most likely create collections to store users, movies, and people.

    Data Duplication for Query Performance

    Document Stores can also fall foul of the O(n) problem. NoSQL databases, in general, are all designed to provide various their own solutions to the problems of read and write performance.

    A common approach to solve the O(n) problem is to duplicate data across collections to speed up query responses. For example, the movies collection may store directors as an array of string values.

    {
      "_id": ObjectId("63da26bc2e002491266b6205"),
      "title": "Toy Story",
      "released": "1996-03-22",
      "directors": ["Tom Lasseter"]
    }
    

    This is perfect if you only want to display the data within a UI. But if we need to ask more complex questions, for example, how many movies has Tom Lasseter directed? — things start to get complicated. Do we loop through every movie record and check the directors array for a name? What if two directors share the same name?

    If you want to query across collections, you would usually store a reference to the unique ID of the record in the corresponding collection. Take the user example below: the ratings for that user can be stored as an array against the user document, making it easy to access. Each rating contains a reference (in this case, a MongoDB DBRef to reference the ObjectId of the document in the movies collection).

    {
     "_id": ObjectId("63da267a89f7381acf7ab183"),
     "email": "john.doe@example.com",
     "name": "John Doe",
     "ratings": [
       {
         "movie": {
           "$ref": "movies",
           "$id": ObjectId("63da2681680f57e194eb3199"),
           "$db": "neoflix"
         },
         "rating": 5
       },
       {
         "movie": {
           "$ref": "movies",
           "$id": ObjectId("63da26b613fe29cf79d92e2f"),
           "$db": "neoflix"
         },
         "rating": 3
       },
     ]
    }
    

    Document stores support pipelines or map-reduce functions that allow you to compute the JOIN at read time. But these can become unwieldy quickly and hard to reason about, and take time to compute. These read-time JOINs also fall victim to the O(n) problem. Each reference must be looked up in an index to find the corresponding record, which must also be decoded. The larger the collection, the larger the index and the longer each lookup may take. Multiply that time and complexity by the number of nested items, and all of a sudden, we’ve got a slow and complicated pipeline or map/reduce function.

    To avoid this complexity, you could also store some of the required properties for the movie, for example, the movie title, in the rating object.

    You may also store the movie title as a key in the rating to balance out the ease of readability and data duplication. But now we also have to make difficult decisions on what data to duplicate to speed up. If the use case changes in any way, a mountain of work is required to fit the new use case. What if we want to query from movie to rating?

    You may also want to fan out your writes, duplicating data across collections to speed up the read-time performance, but that also comes with its own maintenance headaches and a whole load of potential for technical debt.

    The Case for Graphs

    Now, let’s look at this data as a graph. The data structure of Nodes and Relationships fits this problem well. Rather than creating JOIN tables to handle many-to-many relationships or storing duplicated data for reference, the verbs in the use case are stored as relationships:

    More Natural Modeling

    The data model above is easier to understand and reason about. At a quick glance, you can see that a User may have one or more REVIEWED relationships pointing to a Movie node. Nodes and relationships can both contain properties stored as key-value pairs. We can use this to store the rating and createdAt properties of the review directly on the relationship.

    Constant Query Times

    Remember how I mentioned earlier that relationships are treated as first-class citizens? When a relationship is created in Neo4j, a pointer is appended to the node at each end of the relationship, ensuring that every node is aware of every relationship going out from or coming into it.

    This enables the query engine to quickly lookup relationships without relying on an index. This ensures that query response times remain constant to the amount of the graph touched during the query rather than the data size overall.

    Querying a Neo4j graph is also different from relational databases and document stores. Neo4j uses a proprietary language called Cypher. Cypher is similar in structure to SQL, but instead of starting with a SELECT statement and using JOINs to combine data, a Cypher statement begins with a MATCH clause, which defines a pattern of data to return.

    Neo4j will then parse the query, examine the database schema and use database statistics to determine the most efficient way to traverse the pattern. Regardless of the way the pattern is written, the query will be executed in the same way.

    Let’s look at the SQL and Cypher statements required to retrieve the data side by side. Both queries will find the names of actors from the movie The Matrix.

    SQL Cypher
    SELECT p.name, p.born, r.roles, m.title
    FROM people p
    INNER JOIN roles r on p.id = r.person_id
    INNER JOIN movies m on r.movie_id = m.id
    WHERE m.title = ‘The Matrix’
    MATCH (p:Person)-[r:ACTED_IN]->(m:Movie)
    WHERE m.title = ‘The Matrix’
    RETURN p.name, p.born, r.roles

    In a Cypher statement, you use an ASCII-art style syntax to draw the pattern you would like to read from the graph. Nodes are surrounded by parentheses ( ( and ) ), and relationships are drawn using dashes and an arrow to represent the direction. This declarative approach differs from a Pipeline in MongoDB, where you must express exactly how the data should be retrieved.

    This is only a trivial example, but the more complex the use case becomes, the more a Cypher statement comes into its own. I have shown Cypher statements to business owners, architects, and even C-level executives, who have all quickly understood what the statement is doing, which cannot be said for an SQL statement and certainly cannot be said for a pipeline.

    Suddenly the barrier to data engineering doesn’t seem so high.

    Conclusion

    My mantra has always been to use the best tool for the job, particularly when it comes to databases. You may feel that my opinion is a little biased, as I am literally paid to have this opinion. But since first installing Neo4j around a decade ago, I’ve started to see the value of connections everywhere.

    A simple network of nodes and relationships is surprisingly powerful when storing data. Graph databases allow you to avoid much additional work to model your use case to work with a database and naturally handle performance and scale.

    If you would like to learn more about Neo4j, you can check Neo4j GraphAcademy, where we have constructed Beginners courses that will give you the confidence to import and query data in Neo4j, and the Developer courses teach you will show you how to connect to Neo4j using one of the five official drivers: Java, JavaScript, Python, .NET, and Go.

    You can create an AuraDB Free instance pre-populated with data, which will hold 200k nodes and 400k relationships, and it’s free for as long as you need.

    So, if you are working with a complex, highly connected dataset or would like to futureproof your project against complicated database migrations and refactoring in the future, why not put the Graph into GraphQL?

    Categories: Others Tags:

    Inspiring Web Design And UX Showcases

    March 6th, 2023 No comments

    Design inspiration! Where do you find interesting websites? Here’s a list of showcases that we frequently visit for inspiration.

    No matter if you’re looking for effective, unpretentious designs, websites that have that extra bit of fun built-in, examples of good e-commerce UX, interaction scenarios, or if you want to leave your own comfort zone and dive deeper into designs that go beyond the Latin writing system, you’ll surely find something in this post to tickle your ideas. Happy browsing!

    Table Of Contents

    You can jump directly to the topic you’re interested in to find relevant showcases or browse the complete list. Enjoy!

    Japanese Design

    The web spans the entire globe, however, when we talk about web design, the examples usually revolve around the 26 characters of the Latin alphabet. Other writing systems are often not part of the discussion — with the effect that a lot of brilliant websites stay unnoticed for a lot of us. Time to change that. If you’re up for a journey through Japanese web design, Responsive Web Design JP is for you. The examples in the collection shine with a unique lightness and concentration on the essential, and, even if you don’t master Japanese, you can browse the showcase by technique.

    Cyrillic Design

    Another site that grants us a look at web design beyond the Latin writing system is Cyrillic Design, dedicated to sites that use Cyrillic typefaces. Lots of beautiful designs can be discovered in there and it’s particularly interesting to see how type is used to make bold statements. A great reminder to look for inspiration outside our own comfort zones.

    Design Made In Germany

    Design Made In Germany compiles the best design work from German agencies and designers. Apart from covering website design, there are also collections featuring stellar pieces of brand design, print design, packaging, logos, posters, movies, typefaces, and illustrations.

    Dark Mode Design

    Dark Mode Design showcases beautifully designed websites that are either exclusively in dark mode or have the ability to switch. Wonderful examples that dark mode is not an add-on to a “regular” light design but a style with lots of creative possibilities.

    Minimal Design

    Dominic Whittle and Tom Fitzgerald, curators of Httpster, love good typography and effective, unpretentious design. More than ten years ago, they started emailing links of nice sites to each other but quickly realized that they needed a better system for sharing and tagging the things they get inspired by. That’s when Httpster was born.

    Low-Carbon Websites

    With big JavaScript libraries, large unoptimized images, and auto-playing videos, many incredible websites are heavier than they could be, creating a large, hidden carbon footprint. And then there are websites that prove that good design can also be achieved while keeping the carbon impact on the planet low. Lowwwcarbon features examples of sustainably built, low-impact websites. And if that’s not enough inspiration yet, Lowww is also dedicated to sustainable web design.

    One Page Love

    One Page Love showcases websites that get by with just one single page. The beauty of “one-pagers” lies in promoting one thing, straight to the point, without any clutter. Rob Hope founded One Page Love back in 2008 and continues to add one-page websites and resources daily. If you need some landing page inspiration or are looking for templates, this place has got you covered.

    Fine Web And Interaction Design

    Almost 8,000 sites that run the spectrum from fun and novel to clean and simple are waiting to be discovered on Siteinspire. Curated by Howells—Studio, you can browse them by style, type, or subject, or just see the very best.

    Alternative Design

    If you’re looking for extraordinary designs that experiment with interactivity and content in new and interesting ways, Hoverstat.es never ceases to inspire. The site describes itself as “the home of alternative design, code and content on the world wide web” and features everything from a portfolio with layered 3D preview to delightful little details like a slick looping scroller or menus that think outside the box.

    Whimsical Design

    “The web needs to take itself less seriously” is the message of The Whimsical Web. The site showcases websites that have that extra bit of fun that we often miss on the web these days. So if you’re up for some little surprises and weird details, Whimsical Design will leave you with a smile on your face and some new ideas.

    Personal Sites

    Your personal site needs an update? Personalsit.es has some new ideas in store for you. Built to share and revel in each others’ personal sites, the collection is jam-packed with inspiration — from simple and minimalistic to bold.

    Site Of The Day

    Every day, Awwwards awards the title “Site of the Day” to an outstanding website, rating its design, usability, creativity, and content and highlighting some of the details that make it outstanding, among them typography and color palette.

    Website Roundups

    In her Inspirational Website Roundups, Manoela Ilic presents websites with exceptional designs and interactions. Each edition is a surprise bag of the most beautifully designed and thoughtfully crafted websites.

    UX In The Wild

    Waveguide documents UX examples on different platforms and in different contexts, shining a light on remarkable interaction scenarios. From load-more pagination to QR code login, JJ. Ramirez, curator of Waveguide, explores every example in detail.

    UI Patterns

    From launch screens to error messages, from settings to radio buttons — no matter what kind of UI pattern you’re looking for, UI Garage features more than 6,700 patterns for web, mobile, and tablet, categorized and handpicked. Another great stop for some UI inspiration is Design Vault. The ever-growing collection features designs and patterns from products like Netflix, Pinterest, Medium, GitHub, and many more.

    E-Commerce UX

    The Baymard Institute maintains a database of 12,000+ full-page design examples, documenting e-commerce designs from 2012 to today. The examples are organized across 57 page types ranging from homepage and category to accounts and self-service and include desktop, mobile web, and mobile apps. Each example highlights what the page design does well from a UX perspective and what could be improved.

    E-Commerce Inspiration

    Ecomm.design unites design and tech inspiration in one place. The site showcases more than 3,800 e-commerce websites, along with their tech stack. You can browse the examples by e-commerce platform, category, technologies, and traffic.

    Landing Pages

    Landbook showcases different types of websites, browsable by color, typography, style, and industry. Among the examples are landing pages, portfolios, blogs, product pages, and more. For more landing page inspiration, also be sure to browse by Landings. The site collects hundreds of landing pages created by leading companies. You can browse them by color, light, and dark mode.

    Mobile Inspiration

    Mobbin is a library of more than 100,000 fully searchable mobile and web screenshots. The screenshots are organized by app categories, screen patterns, and user flows. Login is required; the free plan includes the latest app designs of the week.

    Page Flows

    Page Flows was created to help you design better user flows by learning from proven products. The library features more than 3,300 recordings and emails of tried and tested products to give you inspiration for anything from onboarding to upgrading and inviting friends. A membership is required to access all user flows.

    User Journeys

    UI Sources has got your back when it comes to designing common flows. The site features recordings of end-to-end user journeys to help you gain insights and identify trends. A subscription is required to access some of the features.

    SaaS Interfaces

    Do you need some inspiration for SaaS interfaces? SaaS App Design Inspiration collects UI and UX design examples from some of the best SaaS products. A subscription is required to access the complete gallery. Lookin’ for more? Saas Landing Page Examples features UI examples created by SaaS companies. Plenty of inspiration for anything from landing pages and pricing to “About Us” pages, features, testimonials, and more.

    Weekly Showcase

    Do you want to get design inspiration delivered directly to your inbox? The UIJar newsletter brings you design updates, articles, and design resources every week. The accompanying online showcase features handpicked websites, branding, and curated collections, among them brutalist websites, websites with big typography, or websites with lots of whitespace.

    Fonts In Use

    There are so many fantastic typefaces out there that decisions can be hard. Fonts In Use is here to help. The independent archive indexes typography by typeface, format, industry, and period. Perfect for discovering new fonts and font pairings.

    Wrapping Up

    Do you have a favorite showcase that you keep visiting for web design inspiration? Or maybe you’ve been curating one yourself? Let us know in the comments below! We’d love to help spread the word.

    Categories: Others Tags:

    Exciting New Tools for Designers, March 2023

    March 6th, 2023 No comments

    This month’s edition of Exciting New Tools for Designers and Developers focuses on getting work done smarter.

    We have invoicing apps and scheduling tools. Some resources will save you the trouble of hiring a designer or developer. And there are some really helpful testing and prototyping tools.

    Glaze

    Rise

    Rise is an intelligent time tracker that helps you maximize your productivity. It’s an excellent solution for freelancers hoping to improve their income.

    Relicx

    Relicx is a testing app that tracks down the UX issues in your product using real user journeys. It’s 10x more effective than beta testing.

    Relicx

    Outerbase

    Outerbase is a GUI for your database. Easily view, edit, and manage all of the data in your database without needing to know SQL.

    Outerbase

    Selldone

    Selldone is an enterprise-grade service for building large-volume ecommerce experiences. It’s no-code, white-labeled, and can handle millions of orders.

    Selldone

    Cakedesk

    Cakedesk is an excellent invoicing app for freelancers. You can send invoices and proposals and build a database of clients.

    Cakedesk

    Roastd

    Roastd is a feedback service that’s not for the faint of heart. You can pay for brutally honest feedback, and although it may hurt, acting on it will improve your conversions.

    Roastd

    Galileo AI

    Galileo AI is a new service that promises to design user interfaces for you. Trained on thousands of designs, it uses AI to create a design based on a text prompt.

    Galileo AI

    Sizzy

    Sizzy is a powerful browser for web development that packs all the tools you need into a single app. You can test different device sizes, debug, and it integrates with lots of devtools.

    Sizzy

    Linke

    Linke is a link manager that lets you create fully branded short links that you can share on social media, your website, or via email. You’ll get notified whenever it’s clicked.

    Linke

    AssemblyAI

    AssemblyAI is a speech recognition API that uses AI to detect speech, transcribe it to text, and understand it. It’s an incredible resource for anyone building customer service apps.

    Assembly AI

    Freelance Brain

    Freelance Brain is an add-on for Notion that helps you manage your freelance business. You can manage clients and projects for a more straightforward work life.

    Freelance Brain

    Glint

    Glint is an excellent free GUI for Git. It allows you to version control your files in a visual manner, so you don’t need to mess around with the command line.

    Glint

    Maya

    Maya is an AI assistant for startups. So instead of spending valuable time hunting through your data for answers, ask Maya and get better answers faster.

    Maya

    PersonaGen

    PersonaGen is a fantastic alternative to spending hours writing personas for user testing. It uses the power of AI to create your personas in seconds.

    PersonaGen
    Categories: Designing, Others Tags:

    Free Download: Budget Planner UI Kit

    March 3rd, 2023 No comments

    Designing an onboarding process can be tricky; there are so many different options, and if you get it wrong, you could turn users off. This freebie is a great starting point for your own designs, either for prototyping or as a sanity check to ensure that you’ve included the essentials.

    This awesome UI kit designed by Premium UI Kits features 28 mobile screens. The designs are based on the onboarding process for a budget planner, but they’re super easy to customize and can easily be transformed into any onboarding or sign-up process.

    The design is in the popular minimal-tech style and features pill-shaped buttons and subtle gradients that make the screens feel both familiar and fresh.

    All of the graphics are 100% vector-based, using customizable symbols for Sketch and Figma users.

    You can use the Budget Planner Mobile UI Kit on your sites for free. Download it here now.

    Categories: Designing, Others Tags:

    How AI Technology Will Transform Design

    March 3rd, 2023 No comments

    AI-generated art is everywhere on the web. If you are an active Instagram, Twitter, or Pinterest user, you likely saw interesting artworks created using text-based tools like DALLE, Midjourney, or Stable Diffusion. The magic of these tools is that to generate images, all you need to do is to provide a string of text that describes what the image is all about. Many AI-generated works look stunning, but it’s only the beginning. In the foreseeable future, AI tools will be so intuitive that everyone can express their ideas. The rise of tools that have AI at their core makes design practitioners wonder if AI will replace designers.

    In this article, we will overview the current state of design, answer common questions designers have about AI tools and share practical tips on how designers can make the most of using AI tools.

    Design Tools Learning Curve And Creativity

    Mastering any skill takes time, and design is no exception. Designers have a lot of great tools in their arsenal, but the process of honing design talent takes years. You need to invest years of your life to get to the point when you can create decent artwork.

    Human-made design: glass reflection CGI. A few seconds of rendering was 87 hours on 5 RTX. (Image by Gleb Kuznetsov)

    No matter how creative you are, you must spend time creating something using your hand. Most of the time, it’s impossible to go from idea to solution in a few minutes. As a result, sometimes it feels like design is 95% craft and only 5% art.

    Much energy goes into the visualization of ideas, and it can be very frustrating to learn that your idea doesn’t resonate with the audience. Once you publish your work, you might learn that it’s not something your audience wants. An unsuccessful design pitch leads to a situation when your work goes straight to the garbage bin.

    But in the near future, you will be able to use shortcuts and go from your idea to the final work in a minute rather than hours or days. You will be able to avoid the tedious process of physically making art and instead become a visioner who tells the computer what you want to build and lets the computer do the work for you. And you can experience the power of AI tools even today. Use Dalle.2 by OpenAI, Midjourney, or Stable Diffusion.

    Let’s answer a few popular questions that designers have regarding AI.

    Can I Take Credit For Artworks Created By AI?

    The answer is yes, you can, but you shouldn’t. Many AI artwork generation tools available on the market don’t give designers much freedom to control the process of artwork creation. As a designer, you explain your intention to the AI system through plain words and let the tool do its magic. You have limited or no information on how the tool works.

    Because modern AI tools don’t give you much freedom to impact the design direction, the final result misses the human touch. Right now, you cannot convey a lot of personality in works generated by AI tools. At the same time, it doesn’t mean this will be true in the future. We will likely see the tools that give designers more control over the process of creating visual assets.

    Will AI Take My Job?

    Many professional artists panic because they see how good artificial intelligence has become at creating artwork. AI-generated art fills the market and takes potential clients. Instead of hiring a human digital artist, many companies ‘hire’ AI to do the job because it can do design work for a fraction of the cost. This trend not only takes jobs but also lowers the market value of the art — the artworks become less valuable because people see how easy it is to generate artwork using AI.

    What happens right now is a predictable situation. It’s just how business works. If a business can save money by following a more effective approach, it will do it. During the industrial revolution of the 19th century, some English textile workers intentionally destroyed textile machines because they were afraid that machines would replace them. Of course, machines replaced some of the roles (typically, roles where heavy lifting or monotonous work was required), but they didn’t replace humans. The same is true for AI tools. AI won’t completely replace human ingenuity; it will complement human potential.

    The true power of AI is not about replacing humans but instead giving them a massive boost in productivity.

    If you think about the primary reason why people invented new tools in the first place, it becomes evident that work efficiency was the number one reason — the same works for AI. AI will help us work more efficiently.

    The quality of your ideas and your ability to understand user problems and create solutions that help people is critically important at any age of product design, including the age of AI design.

    Will AI Tools Lead Us To Generic Design?

    When designers use the same tools and data inputs, they could easily end up making a homogenized design that looks generic.

    But the problem of homogenized design is not new. Dribbblisation of design was a massive topic in the design field for a few years. Many people in the industry worry about the situation when a vast majority of the product design work on Dribbble looks the same (the same styles are applied).

    Will the problem become worse when AI tools are popularized? The answer is no. If you look closer at the artists who publish their work at Dribbble, you will notice that there aren’t many artists who set trends. Once a new trend emerges and it resonates with the audience, many designers start to follow it and designs that look trendy.

    “Out in the sun, some painters are lined up. The first is copying nature; the second is copying the first; the third is copying the second.”
    — Paul Gauguin

    AI tools won’t replace all designers anytime soon because imagination and creativity will still be the powerful properties of the artist’s mind. Until AI technology becomes sophisticated enough to do creative thinking, we don’t have to worry about creating AI trends. The point is, soon, it will be possible to curate the data you will provide as an input to the system, and the AI system will learn from you, so the results will include a lot of your personality.

    Can We Face Legal Troubles Using AI Tools?

    Early in 2023, a group of artists filed a class-action lawsuit against Midjourney and Stability AI, claiming copyright infringement. Both Midjourney and Stability AI were trained using billions of internet images, and this suit alleges that the companies behind those tools “violated the rights of millions of artists” who created the original images. Whether or not AI art tools violate copyright law can be challenging to determine because the database used for training is massing (billions of images). But one thing is for sure — the AI tools create new images based on the knowledge they learned due to the training.

    Can designers face legal troubles using AI tools in the future? So far, there is no single correct answer to this question, but the world is quickly embracing AI art (i.e., stock photo banks will start selling AI-generated stock imagery), and we will likely have more clear rules on how to use AI-generated images in the future.

    The New Chapter In Design: Co-creation With AI

    When Steve Jobs explained the power of computers, he said,

    “What a computer is to me is it’s the most remarkable tool that we’ve ever come up with, and it’s the equivalent of a bicycle for our minds.”
    — Steve Jobs

    It’s possible to rephrase this quote in the context of AI, saying that AI is a bicycle for our creativity — our ability to create something new. Creativity is based on life experiences and ideas that creators have. AI cannot replace humans because it uses the work that humans create as an input to produce new designs. But AI can boost creativity greatly because it becomes a sort of ‘second brain’ that works with a creator and provides new inputs.

    Of course, modern AI tools don’t give us much freedom to tweak the AI engine, but they still give us a lot of power. They can provide us with ideas we didn’t think of. It makes AI an excellent tool for discovery and exploration.

    Here are just a few directions of how humans and machines can work together in the future:

    Conduct Visual Exploration

    AI tools capture the collective experience of millions of images from photo banks and give creators a unique opportunity to quickly explore the desired direction without spending too much energy. AI becomes your creative assistant during the process of visual exploration. You prompt the system with various directions you want to pursue and let the system generate various outcomes for you. You evaluate each direction and choose the best to pursue. The process of co-creation can be iterative. For example, once you see a particular design direction, you can tell the system to dive into it to explore it.

    There are two ways you can approach visual exploration, either by following text-to-image or image-to-image scenarios.

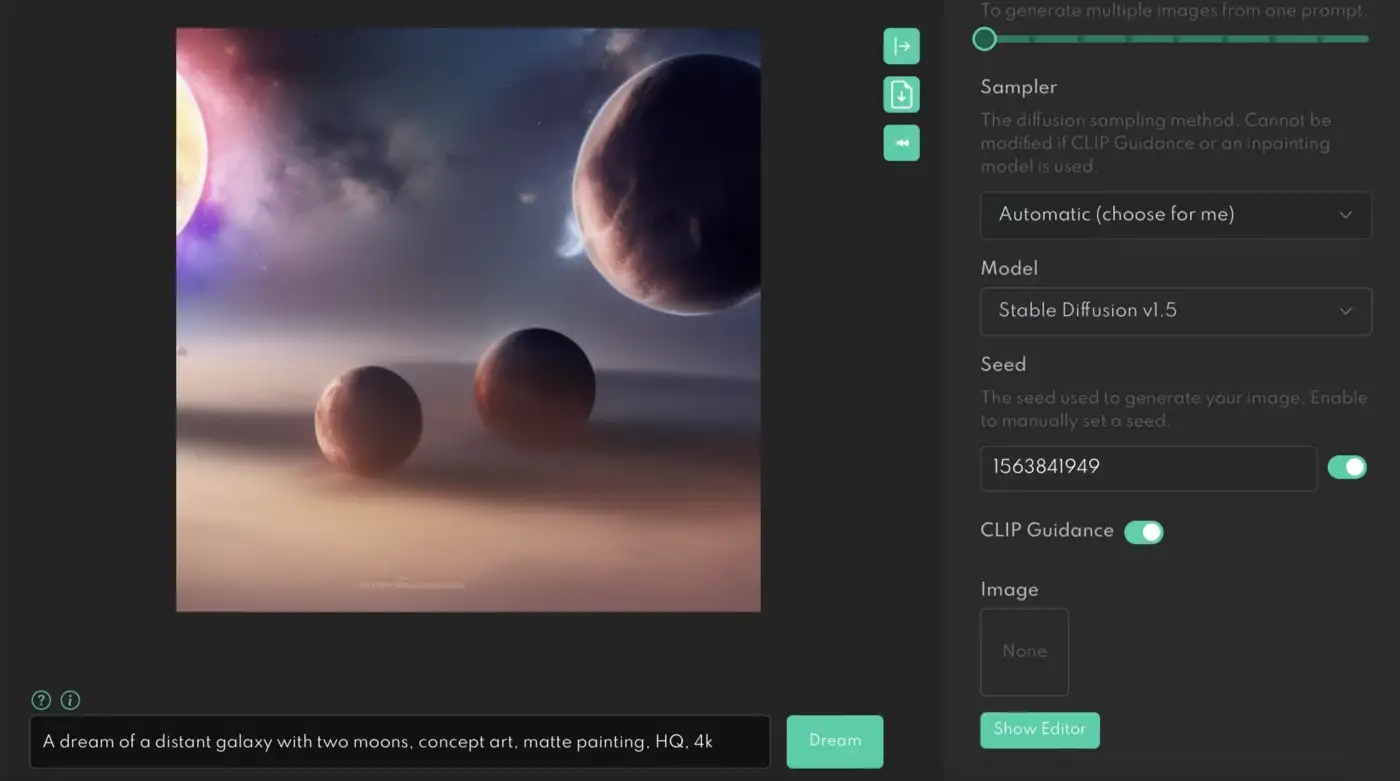
    In an image-to-text scenario, you provide a prompt and tweak some settings to produce an image. Let’s discuss the most important properties of this scenario:

    • Prompt
      A prompt is a text string that we submit to the system so that it can create an image for you. Generally, the more specific details you provide, the better results the system will generate for you. You can use resources like Lexica to find a relevant prompt.
    • Steps
      Think of steps as iterations of the image creation process. During the first steps, the image looks very noisy, and many elements in the image are blurry. The system refines it with every iteration by altering the visual details of the image. If you use Stable Diffusion, set steps to 60 or more.

    • Seed
      You can use the Seed number to create a close copy of a specific picture. For example, if you want to generate a copy of the image you saw on Lexica, you need to specify the prompt and seed number of this image.

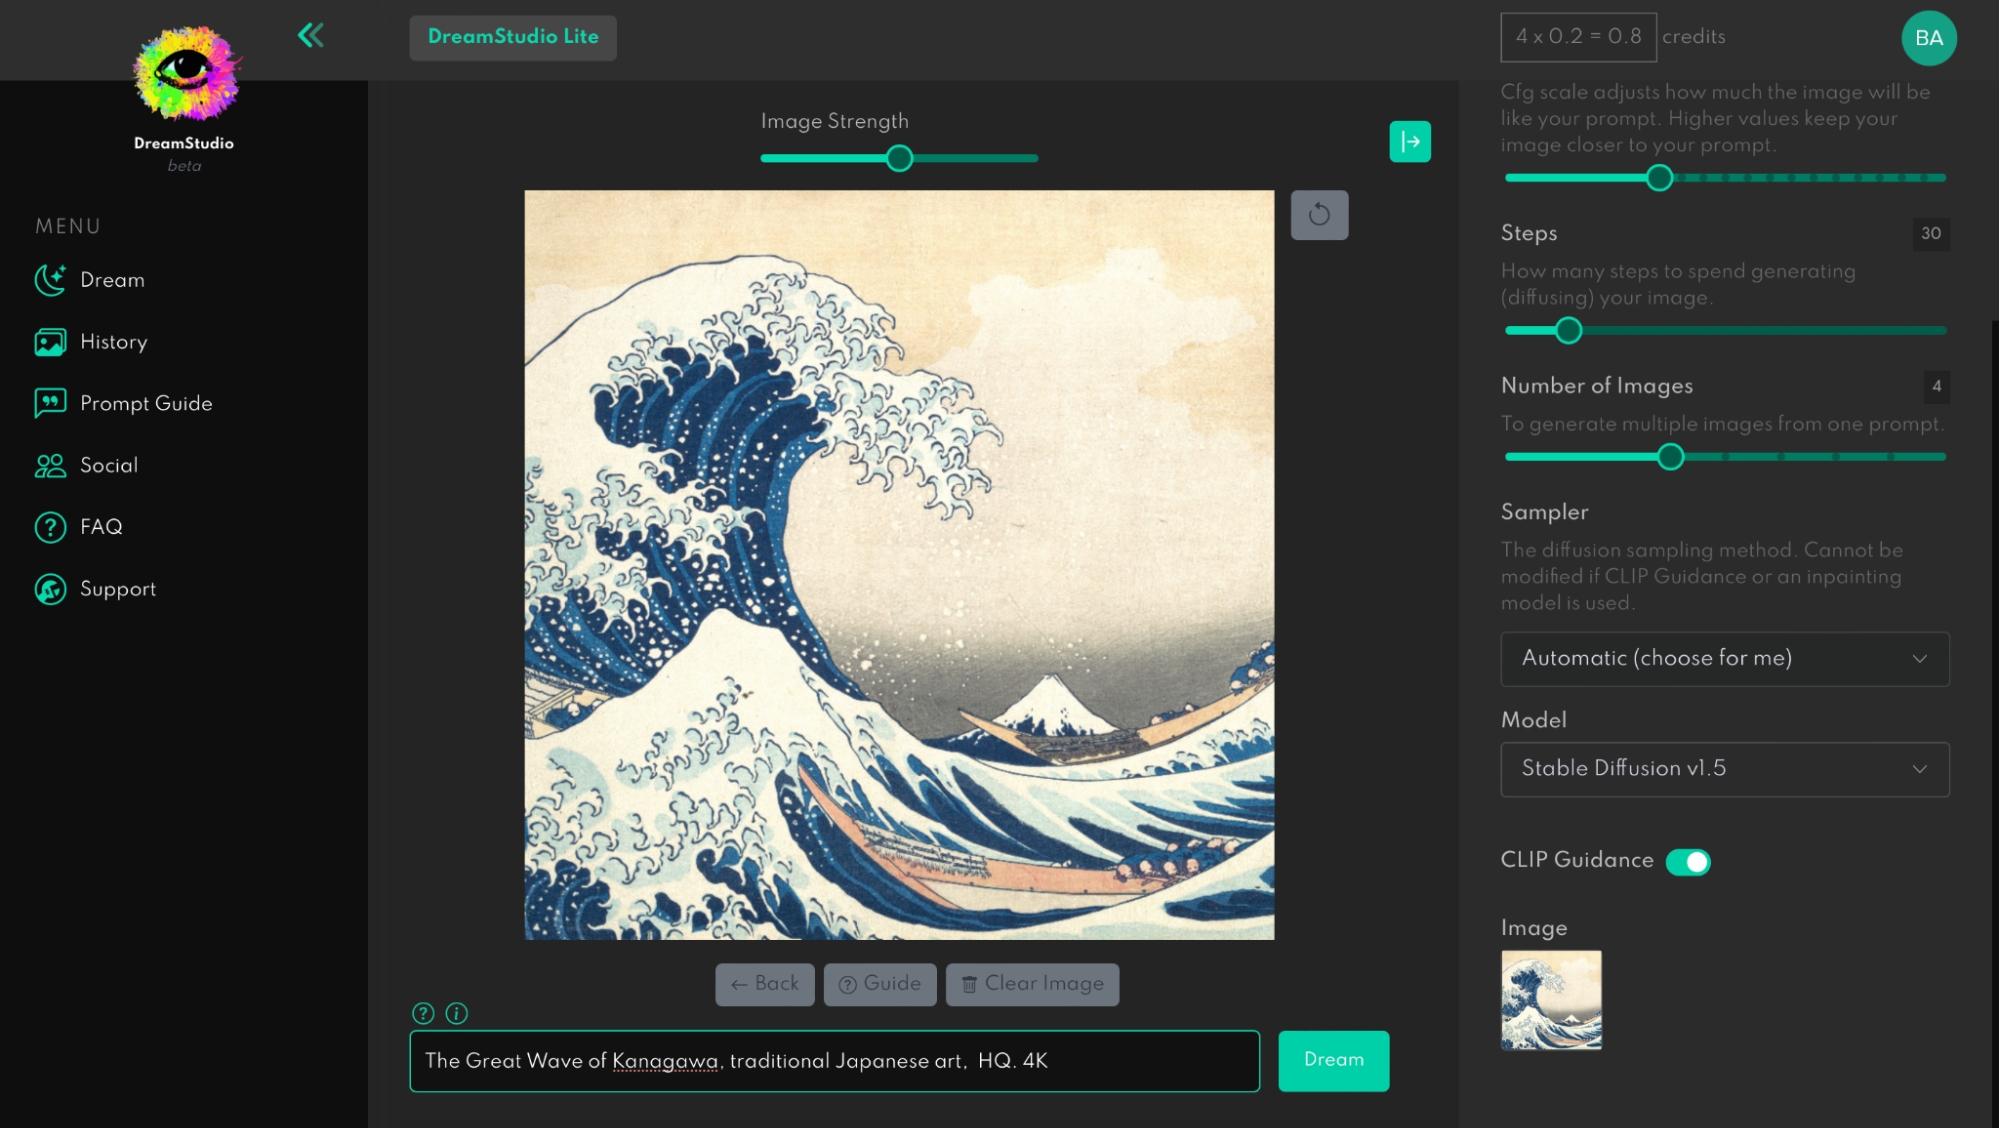
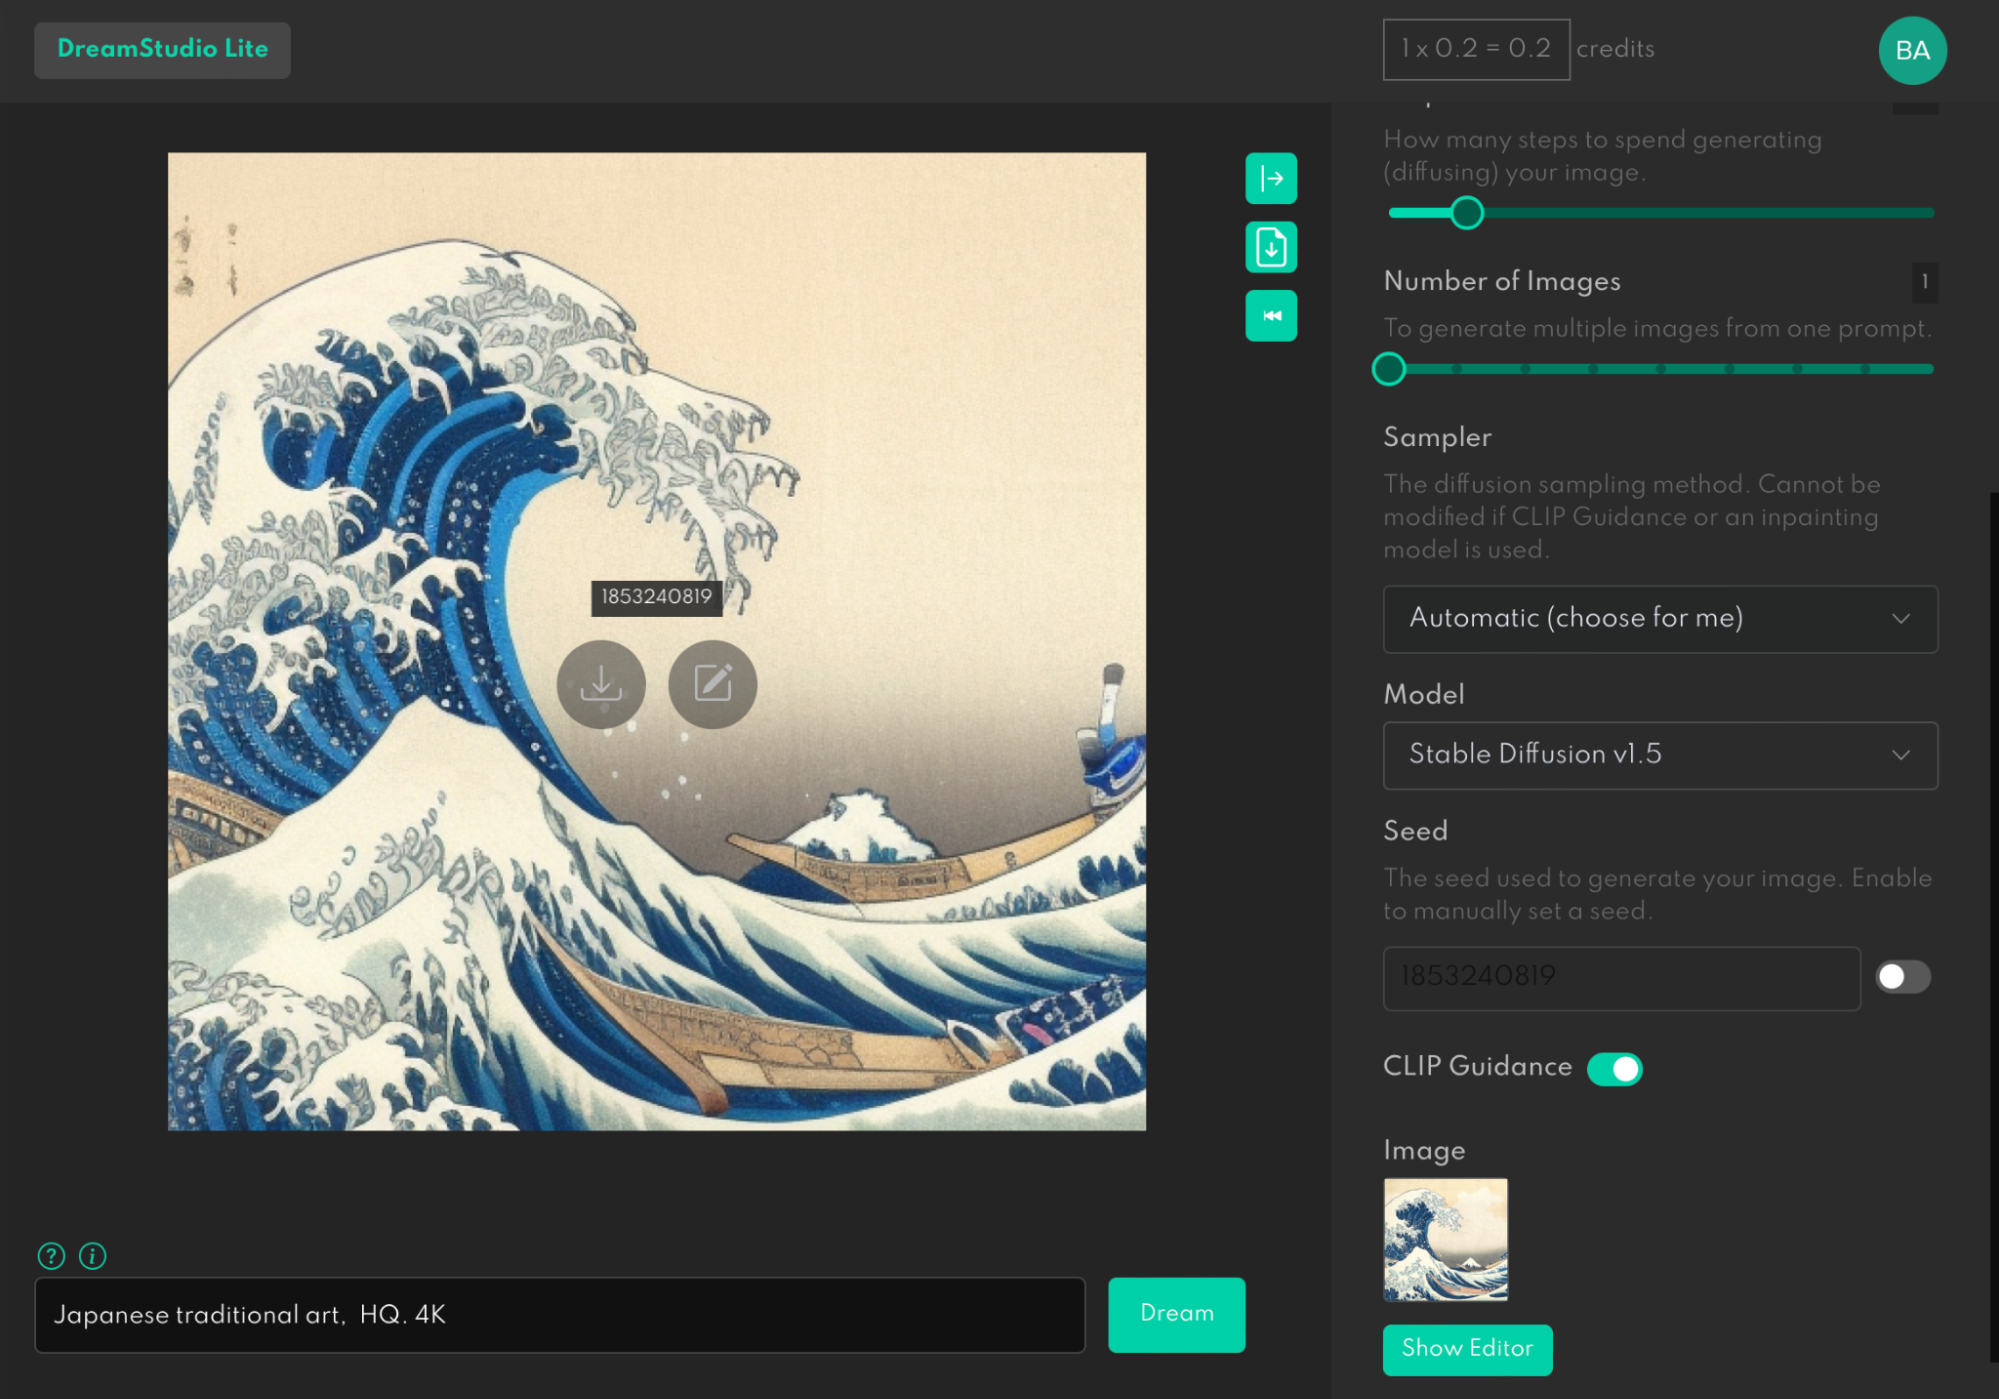
    In the image-to-image (img2img) scenario, AI will use your image as a source and produce variations of the image based on it. For example, here is how we can use a famous painting, Under the Wave off Kanagawa, as a source for Stable Diffusion.

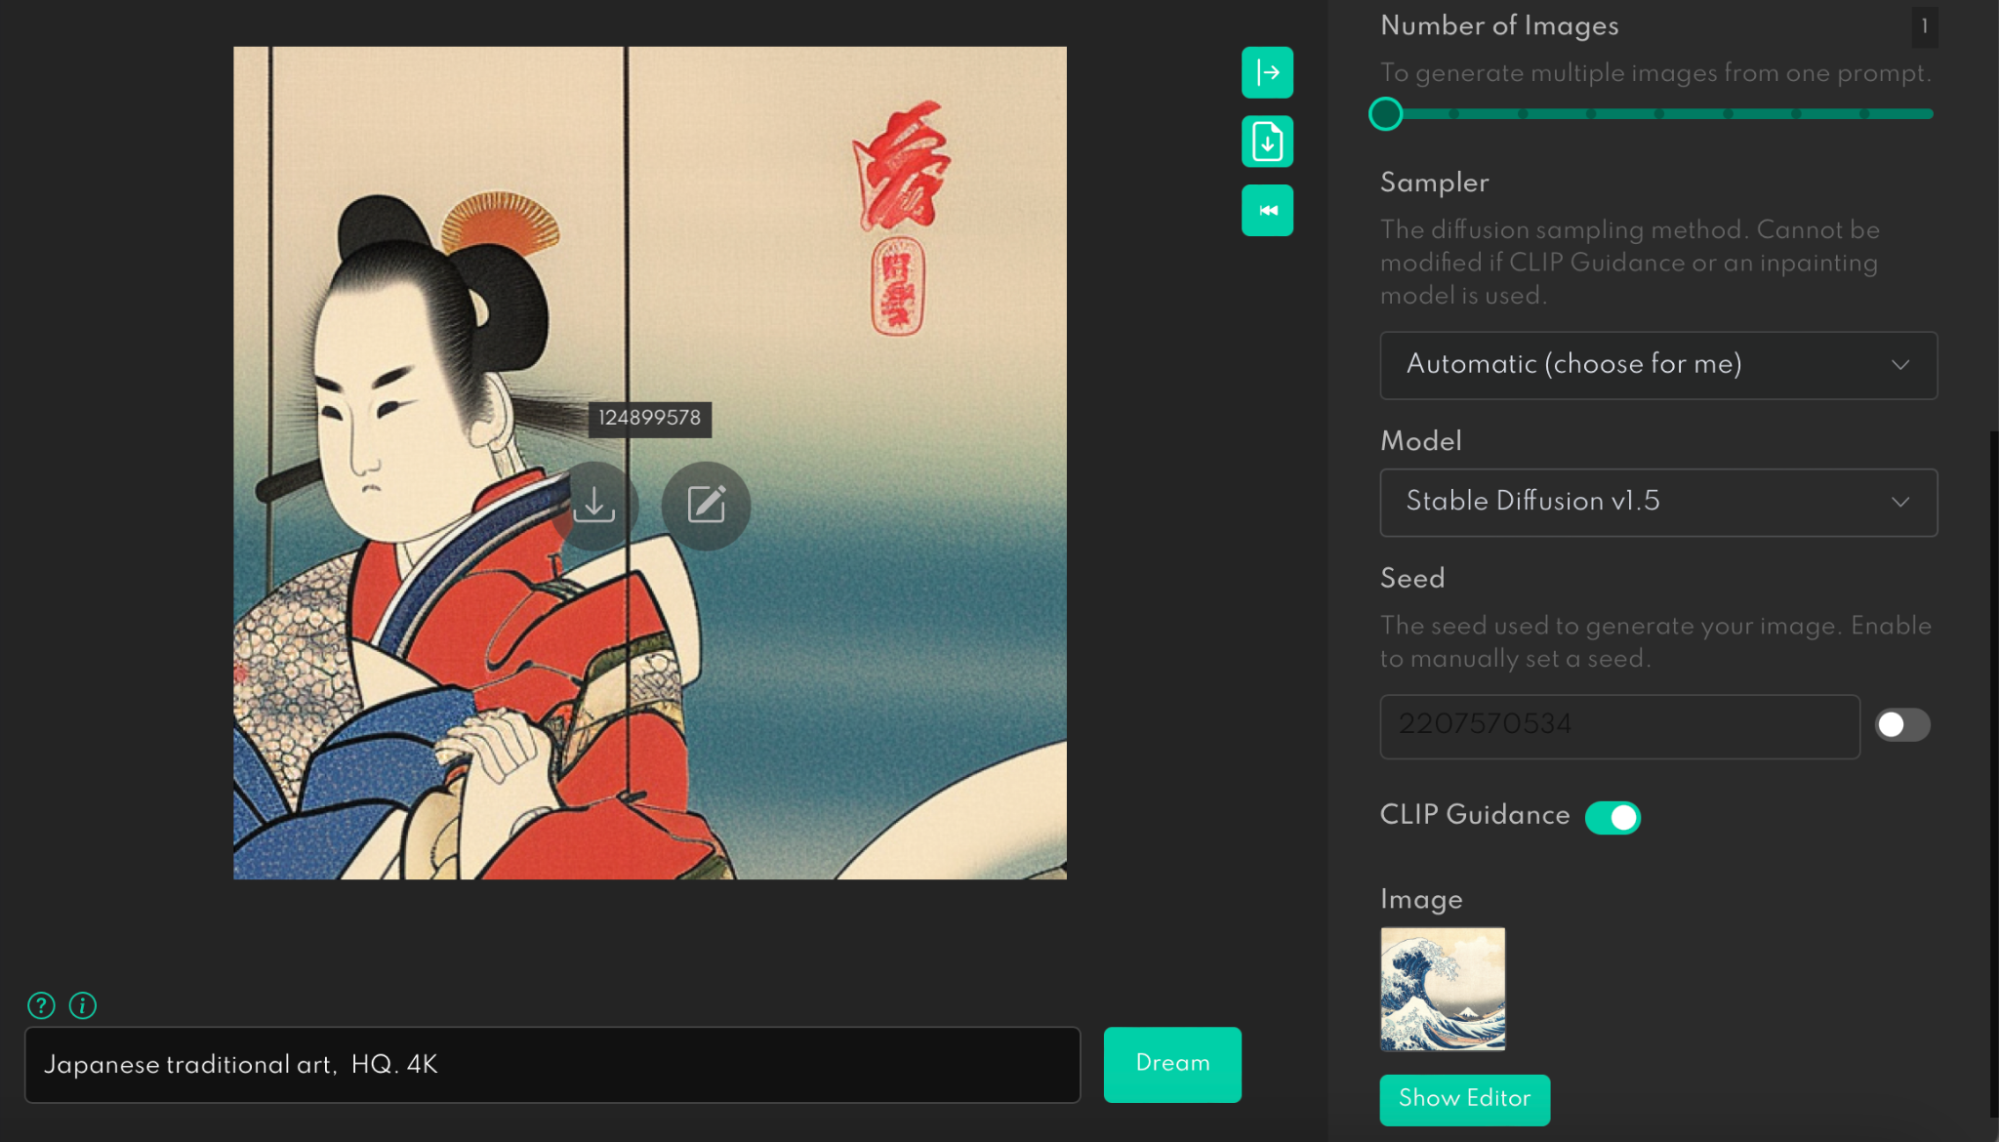
    We can play with Image Strength by setting it close to 0 so that AI can have more freedom in the way it can interpret the image. As you can see below, the image that the system generated for us has only a few visual attributes of the original image.

    Or set Image Strength up to 95% so that AI can only create a slightly different version of the original image.

    Our experiment clearly proves that AI tools have an opportunity to replace mood boards. You no longer need to create mood boards (at least do it manually using tools like Pinterest) but rather tell the system to find ideas you want to explore.

    Create A Complete Design For Your Product

    AI can be an excellent tool to implement ideas quickly. Today we have a long and painful product design process. Going from idea to implementation takes weeks. But with AI, it can take minutes. You can create a storyboard with your product, specify the context of use for your future product, and let AI design a product.

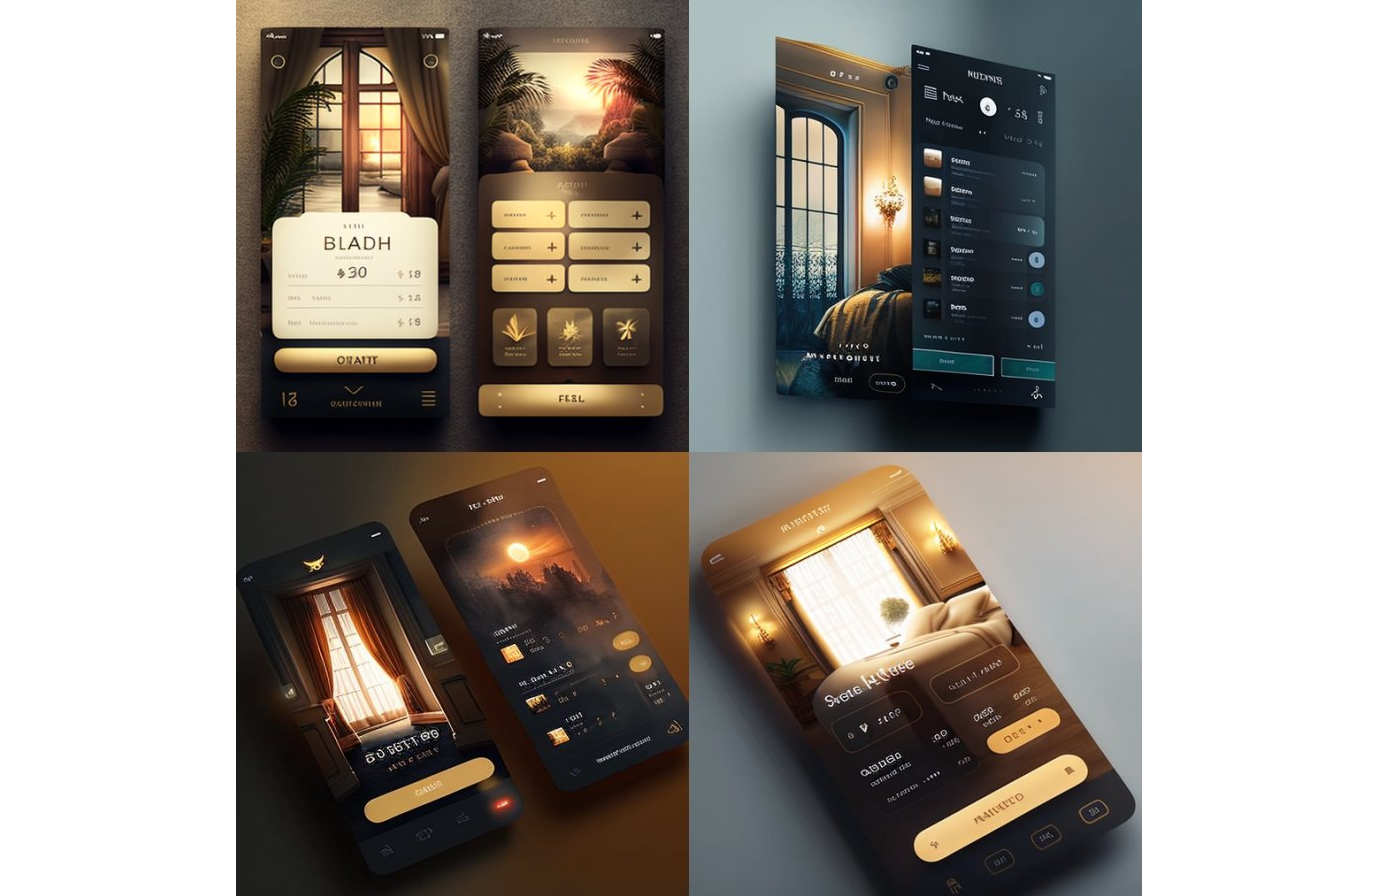
    Providing these details is important because AI should understand the nature of the problem you’re trying to solve with this design. For example, below are the visuals that you can create right now using a tool called Midjourney. All you need to do is to specify the text prompt “mobile app UI design, hotel booking, Dribbble, Behance –v 4 –q 2”.

    I think that part “mobile app UI design, hotel booking, Dribbble, Behance” is self-explanatory. But you might wonder what –v and –q means.

    • –v means a version of the Midjourney.
      On November 10, 2022, the alpha iteration of version 4 was released to users.
    • –q means quality.
      This setting specifies how much rendering quality time you want to spend. The default number is 1. Creating the image in higher values takes more time and costs more.

    It’s important to mention a couple of common issues that images generated by Midjourney have:

    • Gibberish texts
      You likely noticed that the text on mobile app screens in the above example is not English.
    • Extra fingers
      If you generate an image of a person, you will likely see extra fingers on their hands and legs.

    In the foreseeable future, a design created by AI will automatically inherit all industry best practices, freeing designers from time-consuming activities like UI design audits. AI tools will significantly speed up the user research and design exploration phase because the tools analyze massive amounts of data and can easily provide relevant details for a particular product (i.e., create a user persona, draft a user journey, and so on). As a result, it will be possible to develop new products right during brainstorming sessions, so designers are no longer limited to low-fidelity wireframes or paper sketches. The product team members will be able to see how the product will look and work right during the session.

    Create Virtual Worlds And Virtual People In It

    No doubt that the metaverse will be the next big thing. It will be the most sophisticated digital platform humans have ever created, and content production will be an integral part of the platform design. Designers will have to find ways to speed up the creation of virtual environments and activities in them. At first, designers will likely try to recreate real-world places in the virtual world, but after that, they will rely on AI to do the rest. The role of designers in the metaverse will be more like a director (a person who will tailor the results) rather than a craftsman who does it with their hand. Imagine that you can create large virtual areas such as cities and get a sense of the scale of the city by experiencing it.

    It’s Time To Open A New Chapter In Design

    AI-powered design solutions have an opportunity to become much more than just tools designers use to create assets. They have the chance to become a natural extension of the team. I believe that the true power of AI tools will shine when tools will learn from a creator and will be able to reflect the creator’s personality in the final design. Next-gen AI will learn both about you and from you and create works that functionality and aesthetics meet your needs and taste. As a result, the output the tools will produce will have a more authentic human fingerprint.

    The future of design is bright because technology will allow more people to express their creativity and make our world more interesting and richer.

    Further Reading On SmashingMag

    Categories: Others Tags:

    Moving From Vue 1 To Vue 2 To Vue 3: A Case Study Of Migrating A Headless CMS System

    March 2nd, 2023 No comments

    This article is a sponsored by Storyblok

    One of the greatest challenges in software development is not in creating new functionality but in maintaining and upgrading existing systems. With growing dependencies and complexity, it can be a tedious task to continuously keep everything updated. This becomes even more challenging when upgrading a base technology that the whole system runs on.

    In this article, we will discuss how Storyblok solved the challenges of migrating the front-end interface of our headless content management system from Vue 1 to Vue 2 to Vue 3 within six years of growing the startup.

    While migrating larger front-end systems can be a daunting task, it can be helpful to understand the reasons and strategies behind it. We’ll delve into the considerations and steps involved in such a migration and explore the potential benefits and drawbacks. With a clear understanding of the process, we can approach the migration with more confidence and ensure a smooth transition for our users and stakeholders.

    The Vue Ecosystem & Storyblok’s Early Days

    The Vue.js framework’s first large pre-beta release happened in late 2016, and Storyblok began work on a full prototype built on top of Vue in late 2015. At the time, Vue was still a relatively new framework, and other more established options like React were available. Despite this, Storyblok decided to take a chance on Vue and built their own prototype on top of it. This turned out to be a good decision, as the prototype worked well, and up to today, Vue is kept as the underlying framework for the front-end interface.

    Over the years, Storyblok has played a key role in the growth and development of Vue, participating in forums, conferences, and meetups, sponsoring certain projects, as well as contributing to the Vue ecosystem through open-source projects and other initiatives. As Storyblok grew together with the Vue community over the years, Vue started upgrading its framework, and Storyblok began growing out of its prototype to become a fully-fledged product. This is where our migration story starts.

    Ground-up Migration vs. Soft Migration

    There were two main points in time when Storyblok was facing large migration challenges. The first one was when the upgrade from Vue 1 to Vue 2 happened. This went hand in hand with the update from Storyblok Version 1 to Storyblok Version 2. The decision was to completely rebuild the system from scratch. This is what we’ll call Ground-up migration. The second large migration happened when going from Vue 2 to Vue 3, where the front-end interface did not change. The existing codebase was updated in the background without visual changes for the user, and this is what we’ll call Soft migration.

    Ground-up migration allows for greater flexibility and control over the design and architecture of the new system, but it can be a time-consuming and resource-intensive process. For Storyblok, it allowed the development of an open-source Blok Ink design system as the core of the new system. This design system could then simultaneously be used by our customers to build their own extensions.

    Soft migration, on the other hand, can be quicker and more cost-effective, but it’s strongly limited and influenced by the current design and architecture of the existing system. Upgrading large codebases and all their dependencies can take months to achieve, and the time for this can be hard to find in a growing business. When thinking about customers, soft migration tends to be easier because the user doesn’t have to relearn a whole new interface, and no large marketing and communication resources need to be allocated towards this kind of migration.

    How were these migration decisions made from a business perspective? After Storyblok was launched as a product in 2017 with Vue 1, it was continuously improved and extended with new features. In 2019, the team received its first seed investment, which allowed them to hire more developers to work on Storyblok. In 2020, work began on Storyblok V2 with Vue 2, with around five developers starting on the project for the first time. Instead of updating the old codebase from Vue 1 to Vue 2, the team decided to start with a completely new codebase. This gave the new team two main benefits:

    1. The developers were fully involved in creating the architecture of the new system;
    2. They learned how the system worked by rebuilding it.

    In the core, the decision to make a ground-up migration was correct because the flexibility of that migration allowed the team to build a better, newer, and more stable version of the prototype while also understanding how it works. The main drawbacks of the ground-up migration were the cost of time and resources and getting the buy-in from the customers to switch from the old to the new version.

    As Storyblok continued to evolve and improve, the codebase needed to be upgraded from Vue 2 to Vue 3. Migrating to the new version involved updating large amounts of code and ensuring that everything continued to work as expected. In this migration, we had to invest a lot of resources in retesting the interface, as well as allocating time for the developers to learn and understand the changes in Vue 3. This can be especially challenging when working with a large team, as there may be different codebases and business needs to consider.

    Ultimately, the decision between these two approaches will depend on the specific needs and circumstances of the migration, including the following:

    • Resources and expertise available,
    • Complexity and size of the system,
    • Desired level of control and flexibility over the design and architecture of the new system.

    It’s important to have a clear plan in place to guide the migration process and ensure a smooth transition, so in the next chapter, we will look into what that plan looked like for us.

    Strategies For Large Migrations

    These five factors are essential to consider when planning a migration:

    Time Creating a timeline for the migration
    Functionality Identify and prioritize critical parts of the system to migrate
    Resources Use automation and tools to support the migration
    Acceptance Engage and communicate with users
    Risk Monitor and evaluate the migration process

    Creating A Timeline

    One of the main challenges of migration is getting the buy-in from the organization, clients, and teams. Since migrations aren’t adding any new functionality, it can be hard to convince a team and the product owners of the importance of migration. However,

    In the long term, migrations are necessary, and the longer you put them off, the harder they will become.

    Secondly, migrations tend to take more than a few weeks, so it’s a harder and more tedious process that has to be planned with all the developers and stakeholders. Here is what our timeline looked like:

    Going from Vue 1 to Vue 2

    This process took us around two years from start to finish:

    • Before Mid–2020: Develop new features in the old version.
    • 2020 June: Identify and develop ‘core’ components in a new open-source design system.
    • 2020 November: Create a new Vue 2 project.
    • 2020 Nov — 2021 August: Redevelop all parts of the old app in the new app with the new design system.
    • 2021 August: Beta Release of parts of the new application (e.g., our Visual Editor).
    • 2021 August — 2022 August: Add all the missing functionality from the old app, add new features, and improve overall UX through customer feedback.
    • 2022 August: Official release of the new app.
    • During that time: onboard 20+ developers, designers, QAs, and product owners.

    Going from Vue 2 to Vue 3

    This process took us around eight months:

    • 2022 July — 2022 November: Start migrating the Design System to Vue 3.
    • 2022 November — 2023 January: remove all the ‘old’ breaking functionality and update or replace old dependencies that depend on Vue 2.
    • 2022 December: Several meetings to explain what changed in Vue 3 with developers and stakeholders and how the transition will happen.
    • 2023 January: Introduce the Vue 3 codebase, switch developers to the new codebase, and thoroughly test and start developing in Vue 3.
    • 2023 February: Launch the Vue 3 version into production.

    To create a timeline, you need to identify all the parts of the migration first. This can be done in an excel sheet or a planning tool like Jira. Here is an example of a simple sheet that could be used for creating a rough timeline. It can be useful to split different areas to separate sheets to divide them into the teams they belong to.

    Identifying And Prioritizing Functionality to Migrate

    In order to manage the cost and resources required for the migration, it is essential to identify and prioritize the critical features and functionality of the system that need to be migrated. For us, it meant starting bit by bit with more important functionality. When we built the new version of Storyblok, we started with our most important core feature, the “Visual Editor,” and built an entirely new version of it using our Design System. In any migration, you should ask yourself these questions to find out what the priorities are:

    • Is the goal to create a completely new version of something?
    • What parts does the system have? Can some of them be migrated separately?
    • Which parts of the system are most important to the customer?
    • Who knows the system well and can help with the migration?
    • Does every developer need to work on the migration, or can a few ‘experts’ be selected to focus on this task?
    • Can I estimate how long the migration will take? If not, can I break down the parts of the system more to find out how long smaller parts of the system can be migrated?

    If you have multiple sub-parts that can be migrated separately, it’s easier to split them to different people to work on the migration. Another big decision is who is working on the migration. For our Vue 1 to Vue 2 migration, all our developers worked on creating the new functionality, but on the Vue 2 to Vue 3, it was one expert (the person who is writing this article) who did most of the migration and then it was handed over to the teams to finish and retest the whole application to see if everything was still working as it should.

    At the same time, I organized some training for the developers to dive deeper into Vue 3 and the breaking changes in the system.

    The core of the migration strategy always depends on the knowledge of the system as well as the importance of the features to be migrated.

    More important features will be migrated and worked on first, and less important things can be kept to be improved in the end.

    Use Automation And Tools to Support The Migration

    Since a migration process is always very time-consuming, it pays off to invest in some automation of tedious tasks to find out all the problems of the migration. For our migration from Vue 2 to Vue 3, the migration build and its linting were very helpful in finding all the potential problem areas in the app that needed to be changed. We also worked with hand-written scripts that iterate through all Vue files in the project (we have over 600 of them) to automatically add all missing emit notations, replace event names, that updated in Vue 3 and update common logic changes in the unit tests, like adding the global notation.

    These scripts were a large timesaver since we didn’t have to touch hundreds of files by hand, so investing time in writing such scripts can really pay off. In the core, utilizing regex to find and replace large logic chunks can help, but for the last final stretch, you will still spend hours fixing some things manually.

    In the final part, all the unit and end-to-end tests we already had, helped to find some of the potential problems in the new version of our app. For unit testing, we used Jest with the built-in Test Utils as well as the Vue Testing Library, for the e2e tests, we’re using Cypress with different plugins.

    Engage And Communicate With Users

    If you create a new version of something, it’s essential to make sure that the experience is not getting worse for the customer. This can involve providing training and support to help users understand and use the new version, as well as collecting feedback and suggestions from users to help improve the new system. For us, this was a very important learning during the ground-up migration from Vue 1 to Vue 2 because we continuously collected feedback from the customer while rebuilding the app at the same time. This helped us to ensure that what we were building was what the customers wanted.

    Another way was to have the beta version accessible way ahead of the new version being finished. In the beginning, we only made the Partner Portal available, then the Visual Editor, then the Content Editing, and lastly, the missing parts of the app. By gradually introducing the new parts, we could collect feedback during the development time and adjust things where the customer experience was not perfect yet.

    In any scenario, it will be important to ask yourself these questions in a ground-up migration:

    • How can we collect feedback from our customers early and often to ensure what we’re building is working?
    • How can we communicate with the existing customers to make them aware of using the new version?
    • What are the communication channels for the update? Can we leverage the update with the marketing team to make users more excited about it?
    • Who do we have internally that handles communication, and who are the stakeholders who should be updated regularly on the changes?

    For us, this meant building ‘feedback buttons’ into the interface to collect feedback from the users starting to use the new version. It pointed to a form where the users could rate specific parts but also give open feedback. This feedback was then handed back to the design team to evaluate and forward if it was valid feedback. Further, we added channels in our Discord to hear directly from developers using the system and introduced ‘tour’ functionalities that showed users where all the buttons and features are located and what they do. Finally, we added buttons to the old app to seamlessly switch between the old and new versions. We did various campaigns and videos on social media to hype our community about using the new version.

    In all cases, it’s crucial to find out who the core stakeholders and communicators of the migration are. You can find that out with a simple impact/influence matrix. This matrix documents who is impacted by the migration and who should have how much influence over the migration. This can indicate who you should be in close contact with and who might only need to be communicated with occasionally.

    Monitor And Evaluate The Migration Process

    Since a migration process will always take a few months or even years to accomplish, it’s essential to monitor the process and make sure that after a few months, it’s still going in the right direction.

    Here are some questions that can help you figure out if you’re on the right track:

    • Have all the areas and functionalities that need to be migrated been defined? How are we tracking the process of each area?
    • Are all stakeholders, including users and other teams, being effectively communicated with and their concerns addressed?
    • Are there unexpected issues that have arisen during the migration that require you to adjust the budget and time frame of the migration?
    • Is the new version being properly tested and validated before being put into production?
    • Are the final results of the migration meeting the expectations of the users and stakeholders?

    During the different migration phases, we hit several roadblocks. One of them was the customer’s expectations of having the exact same functionality from the old app in the new app. Initially, we wanted to change some of the UX and deprecate some features that weren’t satisfying to us. But over time, we noticed that it was really important to customers to be close to what they already knew from the older version, so over time, we moved many parts to be closer to how the customer expected it to be from before.

    The second big roadblock in the migration from Vue 2 to Vue 3 was the migration of all our testing environments. Initially, we didn’t expect to have to put so much effort into updating the unit tests, but updating them was, at times, more time-consuming than the app itself. The testing in the “soft migration” had to be very extensive, and it took us more than three weeks to find and fix all the issues. During this time, we depended heavily on the skills of our QA engineers to help us figure out anything that might not work anymore.

    The final step in the migration from Vue 2 to Vue 3 was to put the new version of the app into production. Since we had two versions of our app, one in Vue 2 and one in Vue 3, which looked essentially the same, we decided to do a blue/green deployment. This means that we transferred a subset of the user traffic to the new app while the majority of the users were still using the stable old app. We then tested this in production for a week with only a small subset of our users.

    By slowly introducing the new version to just a percentage of the users, we could find more potential issues without disrupting all of our users. The essential part here was to have direct communication with our Sales and Support teams, who are in direct contact with important clients.

    Lessons Learnt

    Migration to Vue 2

    The core lesson when we completely rebuilt Storyblok in Vue 2 was that migrating a large system can be a significant challenge for the development team that consists of new developers who are not familiar with the system yet. By handing the power over to the developers, they could be directly involved in forming the architecture, quality, and direction of the product. In any migration or significant change, the onboarding and training of developers will be an essential part of making the migration successful.

    Another big lesson was the involvement of the existing users to improve the quality of the newer version we were building. By slowly introducing the new design and features in different areas of the system, the customers had the opportunity to get used to the new version gradually. With this gradual change, they could give feedback and report any issues or problems they encountered.

    Overall, customers have a number of expectations when it comes to software, including:

    • Reliability and stability,
    • Ease of use,
    • Regular updates and improvements,
    • Support and assistance,
    • Security and privacy.

    Migrating a large system can impact these expectations, and it’s important to carefully consider the potential impacts on customers and take steps to ensure a smooth transition for them.

    Migration to Vue 3

    As we got more teams and more customers, it kept getting more critical to keep our production version of the app as stable as possible, so testing was an important part of making sure the quality was monitored and bugs were eliminated. All that time we had invested in unit and e2e testing in the Vue 2 version helped us to find problems and bugs during the migration process to Vue 3.

    We found that it was essential to test the migrated system extensively to ensure that it was functioning correctly and meeting all of the required specifications. By carefully planning and executing our testing process, we were able to identify and fix the majority of the issues before the migrated system was released to production.

    During the Vue 3 migration, we also saw the advantages of having a ‘separate’ part of the system, our design system, that could be migrated first. This allowed us to learn and study the migration guide there first and then move to the more complex migration of the app itself.

    Lastly, a big thing we learned was that communication is essential. We started creating internal communication channels on Slack to keep marketing and other teams up to date on all the functionality changes and new features. Certain people could then weigh in on the ways new features were built.

    Conclusion

    Migrating Storyblok from Vue 1 to Vue 2 to Vue 3 was a significant challenge for the whole organization. A well-formed migration plan should outline the steps to be taken, the areas and functionalities that need to be migrated and in what way (rebuild or create a new version), the people to be involved, and the expected timeline.

    For us, some key takeaways were the importance of involving the development team in forming the architecture and direction of the product, as well as onboarding and training them properly. It was also essential to communicate effectively with stakeholders, including users and other teams, to address their concerns and ensure their expectations were met.

    Testing plays a crucial role in ensuring the migrated system functions correctly, and the better your QA engineers, the more smoothly the migration will go. Gradually introducing the new version to a subset of users before a full release can help identify any potential issues without disrupting all users. Another approach is gradually introducing new parts of the system one by one. We made use of both of them.

    If you’re planning a large system migration, starting with a well-defined plan is important. Make sure to consider budget and time frame, build in time for testing and validation, continuously monitor the progress of the migration and adjust the plan as necessary.

    It’s also important to involve existing users in the migration process to gather feedback and identify any potential issues. Make sure your migration is actually improving the experience for the users or developers. Internal communication is key in this process, so ensure that all stakeholders are effectively communicated with throughout the migration to make sure everyone is on board. Consider gradually migrating different parts of the system to help manage complexity or introducing a new system only to a subset of users first.

    And lastly, work with your team. Migrating really takes a lot of hands and time, so the better your teams can work together, the smoother the transition will go.

    Categories: Others Tags: