7 things you should know when getting started with Serverless APIs
I want you to take a second and think about Twitter, and think about it in terms of scale. Twitter has 326 million users. Collectively, we create ~6,000 tweets every second. Every minute, that’s 360,000 tweets created. That sums up to nearly 200 billion tweets a year. Now, what if the creators of Twitter had been paralyzed by how to scale and they didn’t even begin?
That’s me on every single startup idea I’ve ever had, which is why I love serverless so much: it handles the issues of scaling leaving me to build the next Twitter!
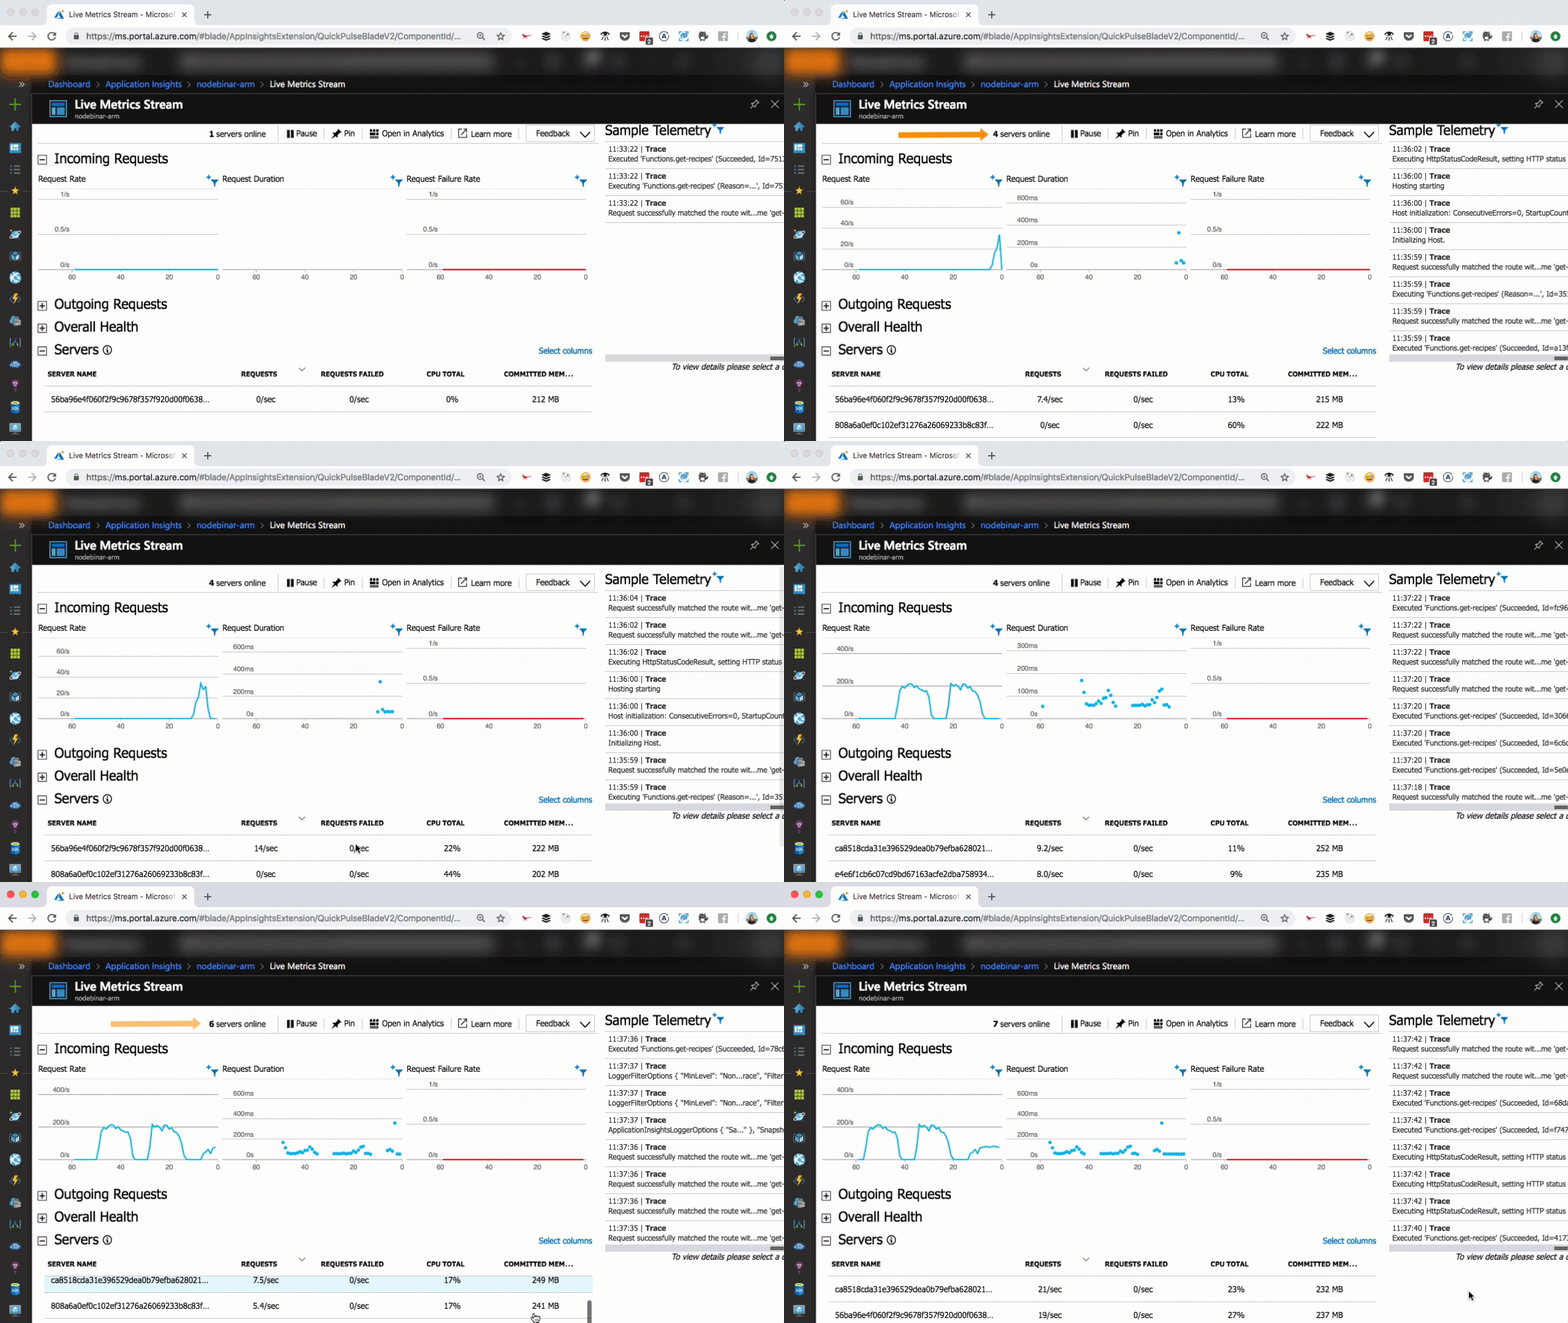
As you can see in the above, we scaled from one to seven servers in a matter of seconds, as more user requests come in. You can scale that easily, too.
So let’s build an API that will scale instantly as more and more users come in and our workload increases. We’re going to do that is by answering the following questions:
- How do I create a new serverless project?
- How do I run and debug code locally?
- How do I install dependencies?
- How do I connect to third-party services?
- Where can I save connection strings?
- How do I customize the URL path?
- How can I deploy to the cloud?
How do I create a new serverless project?
With every new technology, we need to figure out what tools are available for us and how we can integrate them into our existing tool set. When getting started with serverless, we have a few options to consider.
First, we can use the good old browser to create, write and test functions. It’s powerful, and it enables us to code wherever we are; all we need is a computer and a browser running. The browser is a good starting point for writing our very first serverless function.
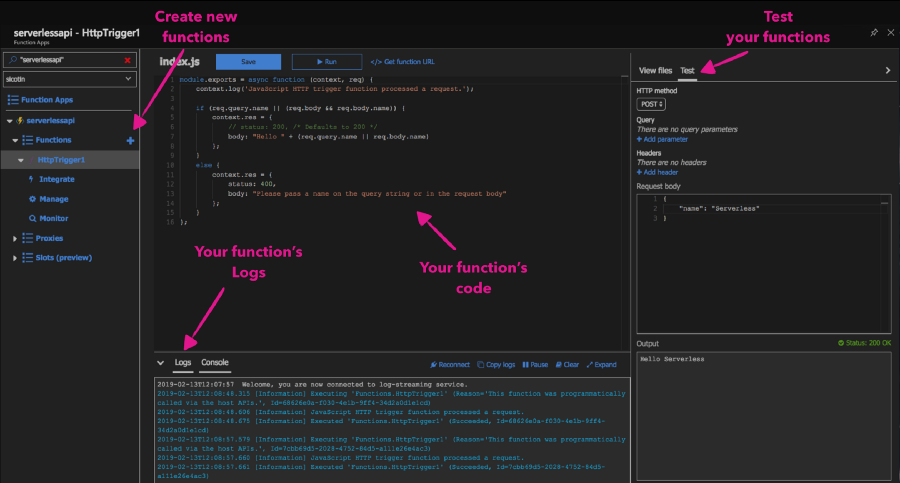
Next, as you get more accustomed to the new concepts and become more productive, you might want to use your local environment to continue with your development. Typically you’ll want support for a few things:
- Writing code in your editor of choice
- Tools that do the heavy lifting and generate the boilerplate code for you
- Run and debug code locally
- Support for quickly deploying your code
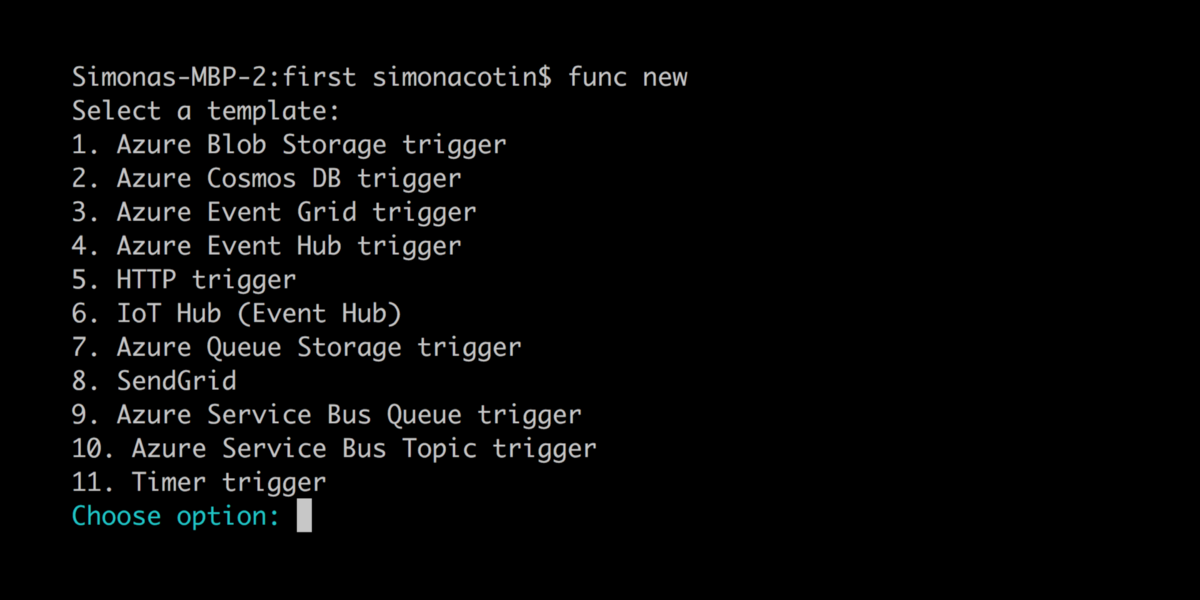
Microsoft is my employer and I’ve mostly built serverless applications using Azure Functions so for the rest of this article I’ll continue using them as an example. With Azure Functions, you’ll have support for all these features when working with the Azure Functions Core Tools which you can install from npm.
npm install -g azure-functions-core-toolsNext, we can initialize a new project and create new functions using the interactive CLI:
If your editor of choice happens to be VS Code, then you can use it to write serverless code too. There’s actually a great extension for it.
Once installed, a new icon will be added to the left-hand sidebar?—?this is where we can access all our Azure-related extensions! All related functions can to be grouped under the same project?(also known as a function app). This is like a folder for grouping functions that should scale together and that we want to manage and monitor at the same time. To initialize a new project using VS Code, click on the Azure icon and then the folder icon.
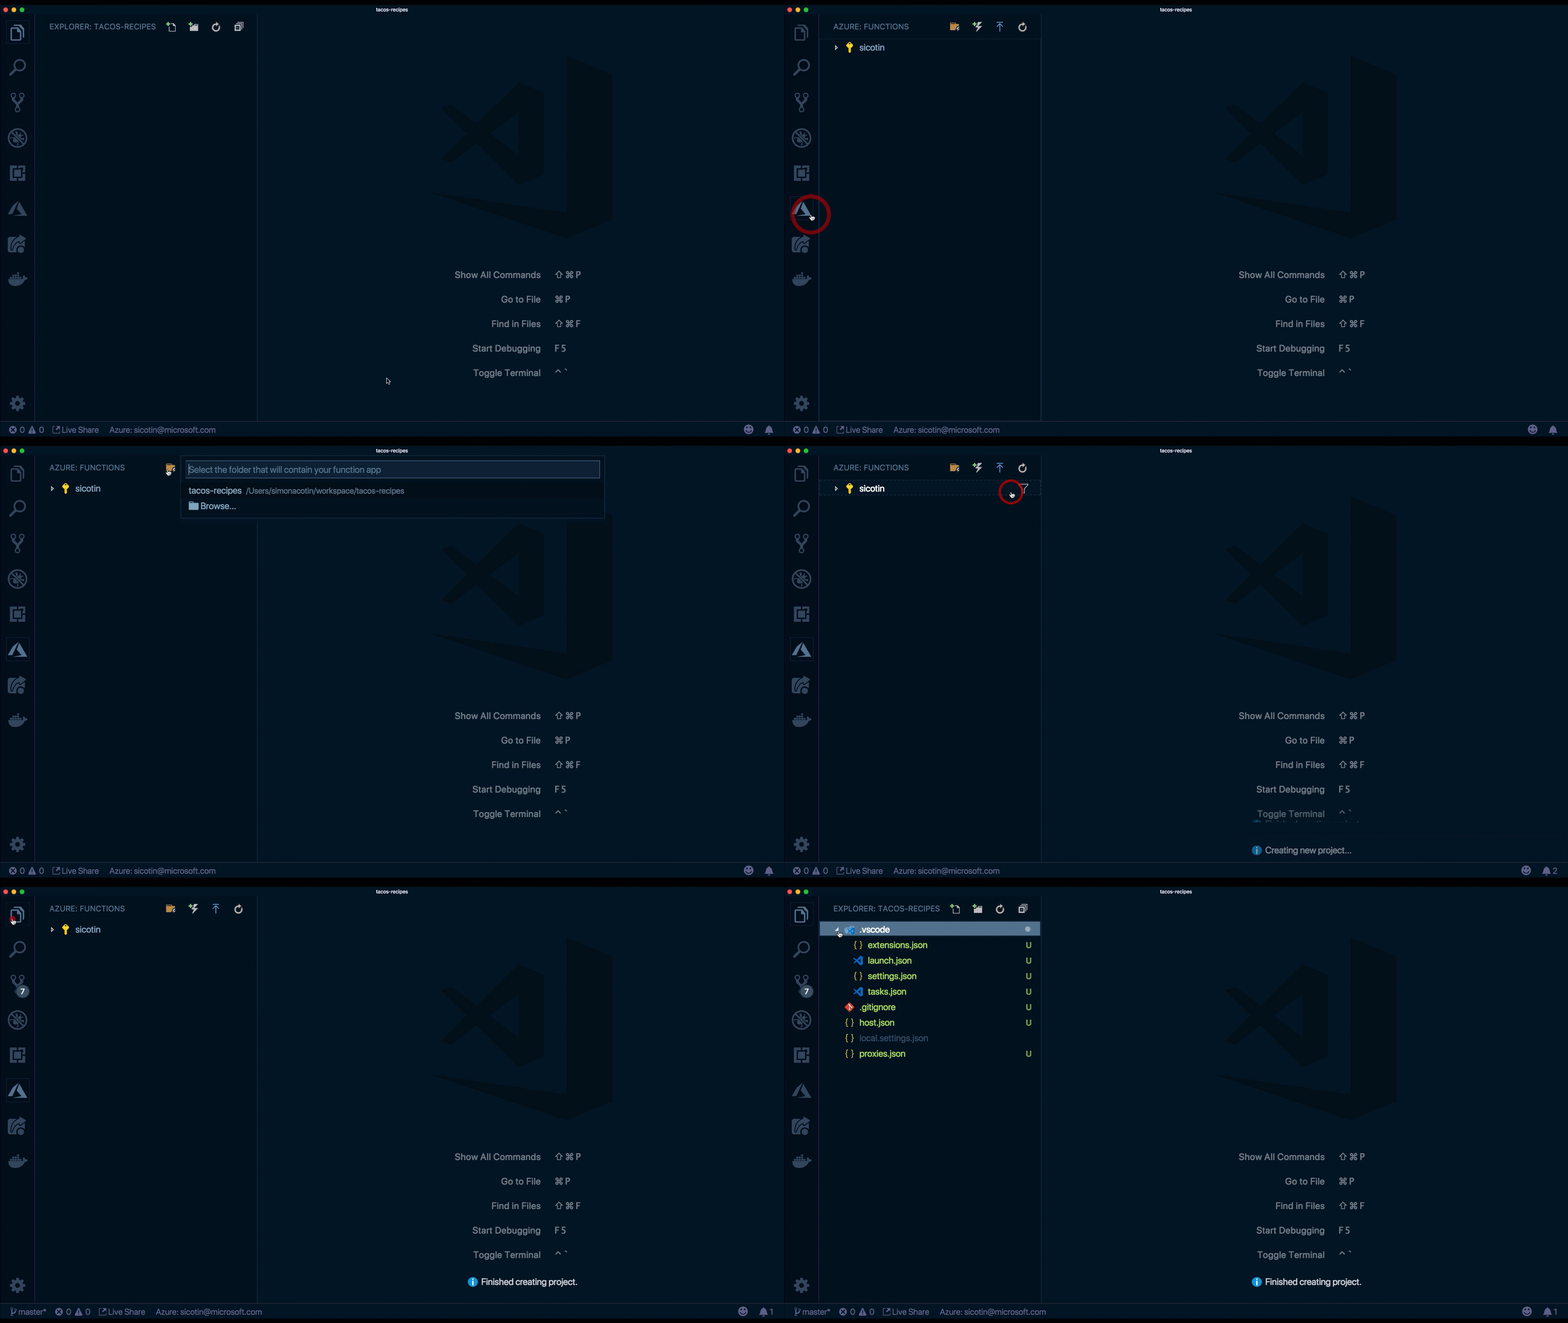
This will generate a few files that help us with global settings. Let’s go over those now.
host.json
We can configure global options for all functions in the project directly in the host.json file.
In it, our function app is configured to use the latest version of the serverless runtime?(currently 2.0). We also configure functions to timeout after ten minutes by setting the functionTimeout property to 00:10:00?—?the default value for that is currently five minutes (00:05:00).
In some cases, we might want to control the route prefix for our URLs or even tweak settings, like the number of concurrent requests. Azure Functions even allows us to customize other features like logging, healthMonitor and different types of extensions.
Here’s an example of how I’ve configured the file:
// host.json
{
  "version": "2.0",
  "functionTimeout": "00:10:00",
  "extensions": {
  "http": {
    "routePrefix": "tacos",
    "maxOutstandingRequests": 200,
    "maxConcurrentRequests": 100,
    "dynamicThrottlesEnabled": true
  }
}
}
Application settings
Application settings are global settings for managing runtime, language and version, connection strings, read/write access, and ZIP deployment, among others. Some are settings that are required by the platform, like FUNCTIONS_WORKER_RUNTIME, but we can also define custom settings that we’ll use in our application code, like DB_CONN which we can use to connect to a database instance.
While developing locally, we define these settings in a file named local.settings.json and we access them like any other environment variable.
Again, here’s an example snippet that connects these points:
// local.settings.json
{
  "IsEncrypted": false,
  "Values": {
    "AzureWebJobsStorage": "your_key_here",
    "FUNCTIONS_WORKER_RUNTIME": "node",
    "WEBSITE_NODE_DEFAULT_VERSION": "8.11.1",
    "FUNCTIONS_EXTENSION_VERSION": "~2",
    "APPINSIGHTS_INSTRUMENTATIONKEY": "your_key_here",
    "DB_CONN": "your_key_here",
  }
}
Azure Functions Proxies
Azure Functions Proxies are implemented in the proxies.json file, and they enable us to expose multiple function apps under the same API, as well as modify requests and responses. In the code below we’re publishing two different endpoints under the same URL.
// proxies.json
{
  "$schema": "http://json.schemastore.org/proxies",
  "proxies": {
    "read-recipes": {
      "matchCondition": {
        "methods": ["POST"],
        "route": "/api/recipes"
      },
      "backendUri": "https://tacofancy.azurewebsites.net/api/recipes"
    },
    "subscribe": {
      "matchCondition": {
        "methods": ["POST"],
        "route": "/api/subscribe"
      },
      "backendUri": "https://tacofancy-users.azurewebsites.net/api/subscriptions"
    }
  }
}
Create a new function by clicking the thunder icon in the extension.
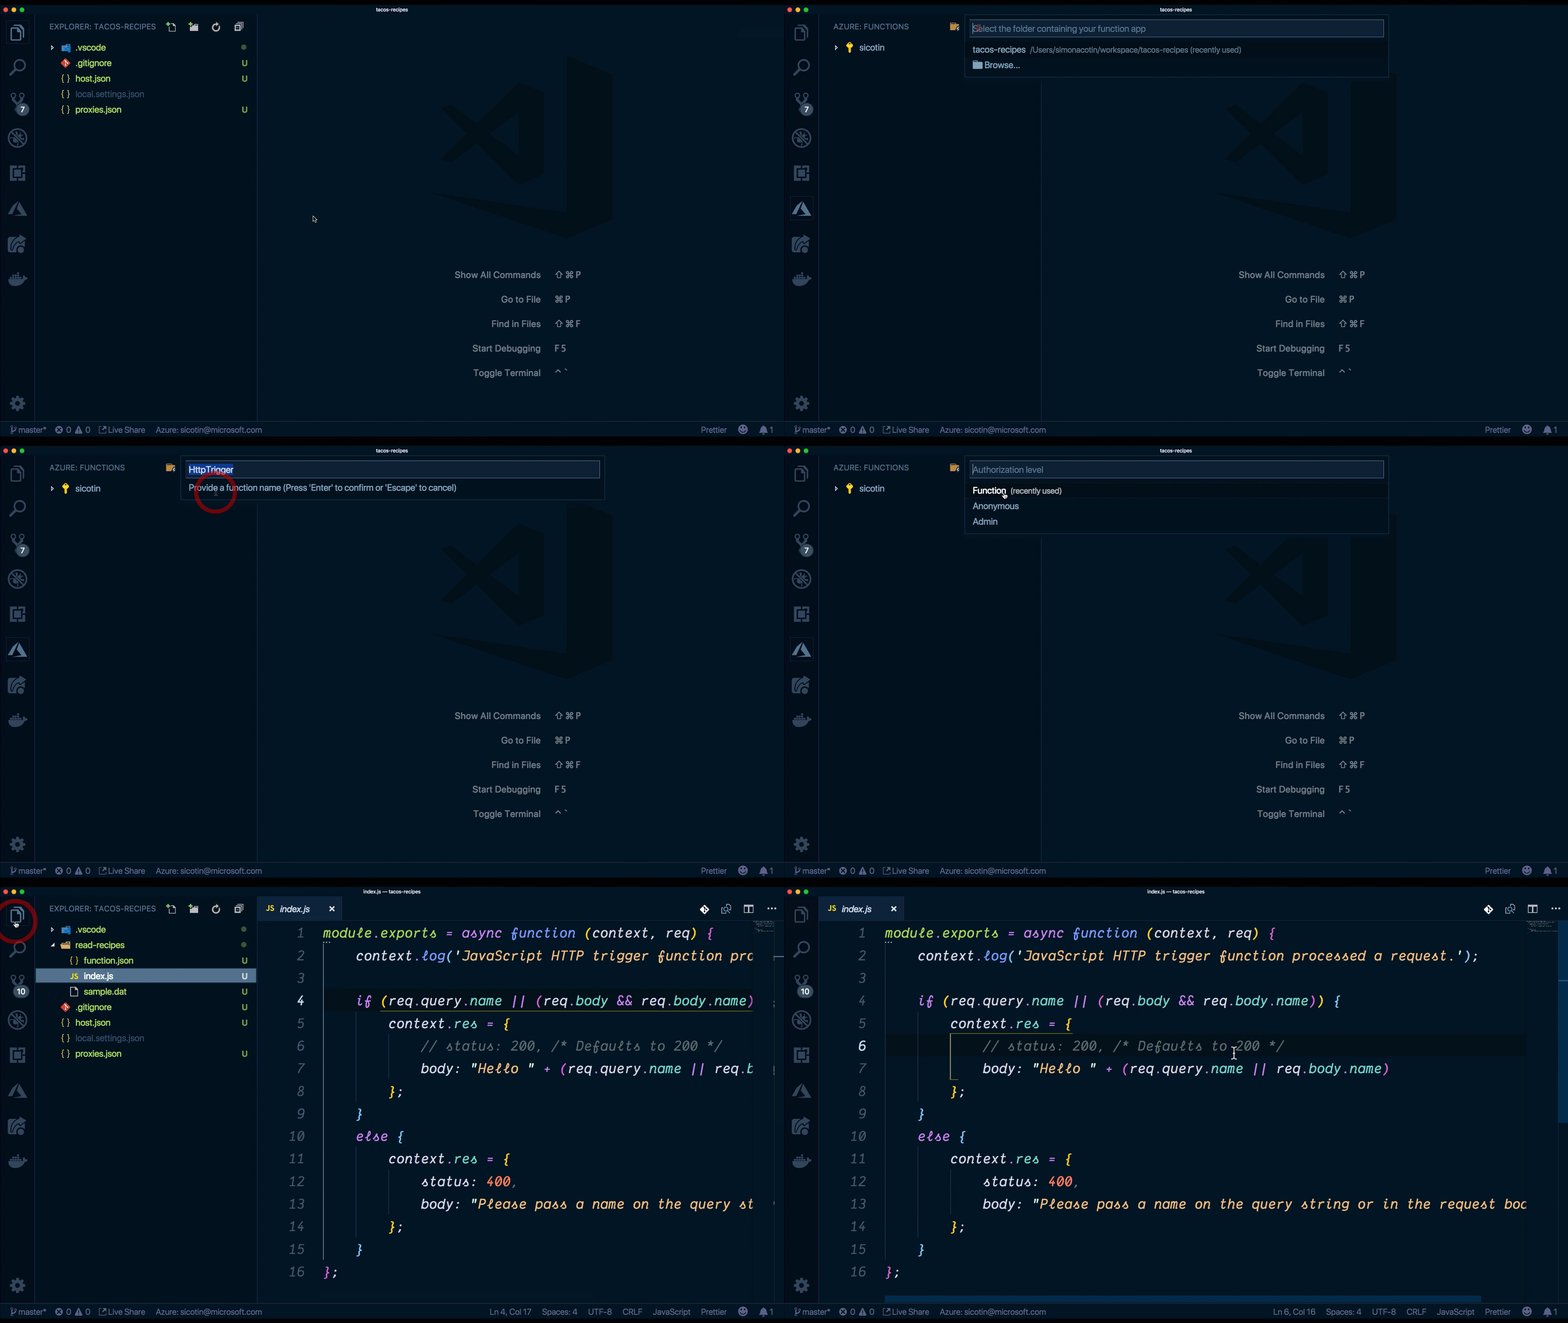
The extension will use predefined templates to generate code, based on the selections we made?—?language, function type, and authorization level.
We use function.json to configure what type of events our function listens to and optionally to bind to specific data sources. Our code runs in response to specific triggers which can be of type HTTP when we react to HTTP requests?—?when we run code in response to a file being uploaded to a storage account. Other commonly used triggers can be of type queue, to process a message uploaded on a queue or time triggers to run code at specified time intervals. Function bindings are used to read and write data to data sources or services like databases or send emails.
Here, we can see that our function is listening to HTTP requests and we get access to the actual request through the object named req.
// function.json
{
  "disabled": false,
  "bindings": [
    {
      "authLevel": "anonymous",
      "type": "httpTrigger",
      "direction": "in",
      "name": "req",
      "methods": ["get"],
      "route": "recipes"
    },
    {
      "type": "http",
      "direction": "out",
      "name": "res"
    }
  ]
}
index.js is where we implement the code for our function. We have access to the context object, which we use to communicate to the serverless runtime. We can do things like log information, set the response for our function as well as read and write data from the bindings object. Sometimes, our function app will have multiple functions that depend on the same code (i.e. database connections) and it’s good practice to extract that code into a separate file to reduce code duplication.
//Index.js
module.exports = async function (context, req) {
  context.log('JavaScript HTTP trigger function processed a request.');

  if (req.query.name || (req.body && req.body.name)) {
      context.res = {
          // status: 200, /* Defaults to 200 */
          body: "Hello " + (req.query.name || req.body.name)
      };
  }
  else {
      context.res = {
          status: 400,
          body: "Please pass a name on the query string or in the request body"
      };
  }
};
Who’s excited to give this a run?
How do I run and debug Serverless functions locally?
When using VS Code, the Azure Functions extension gives us a lot of the setup that we need to run and debug serverless functions locally. When we created a new project using it, a .vscode folder was automatically created for us, and this is where all the debugging configuration is contained. To debug our new function, we can use the Command Palette (Ctrl+Shift+P) by filtering on Debug: Select and Start Debugging, or typing debug.
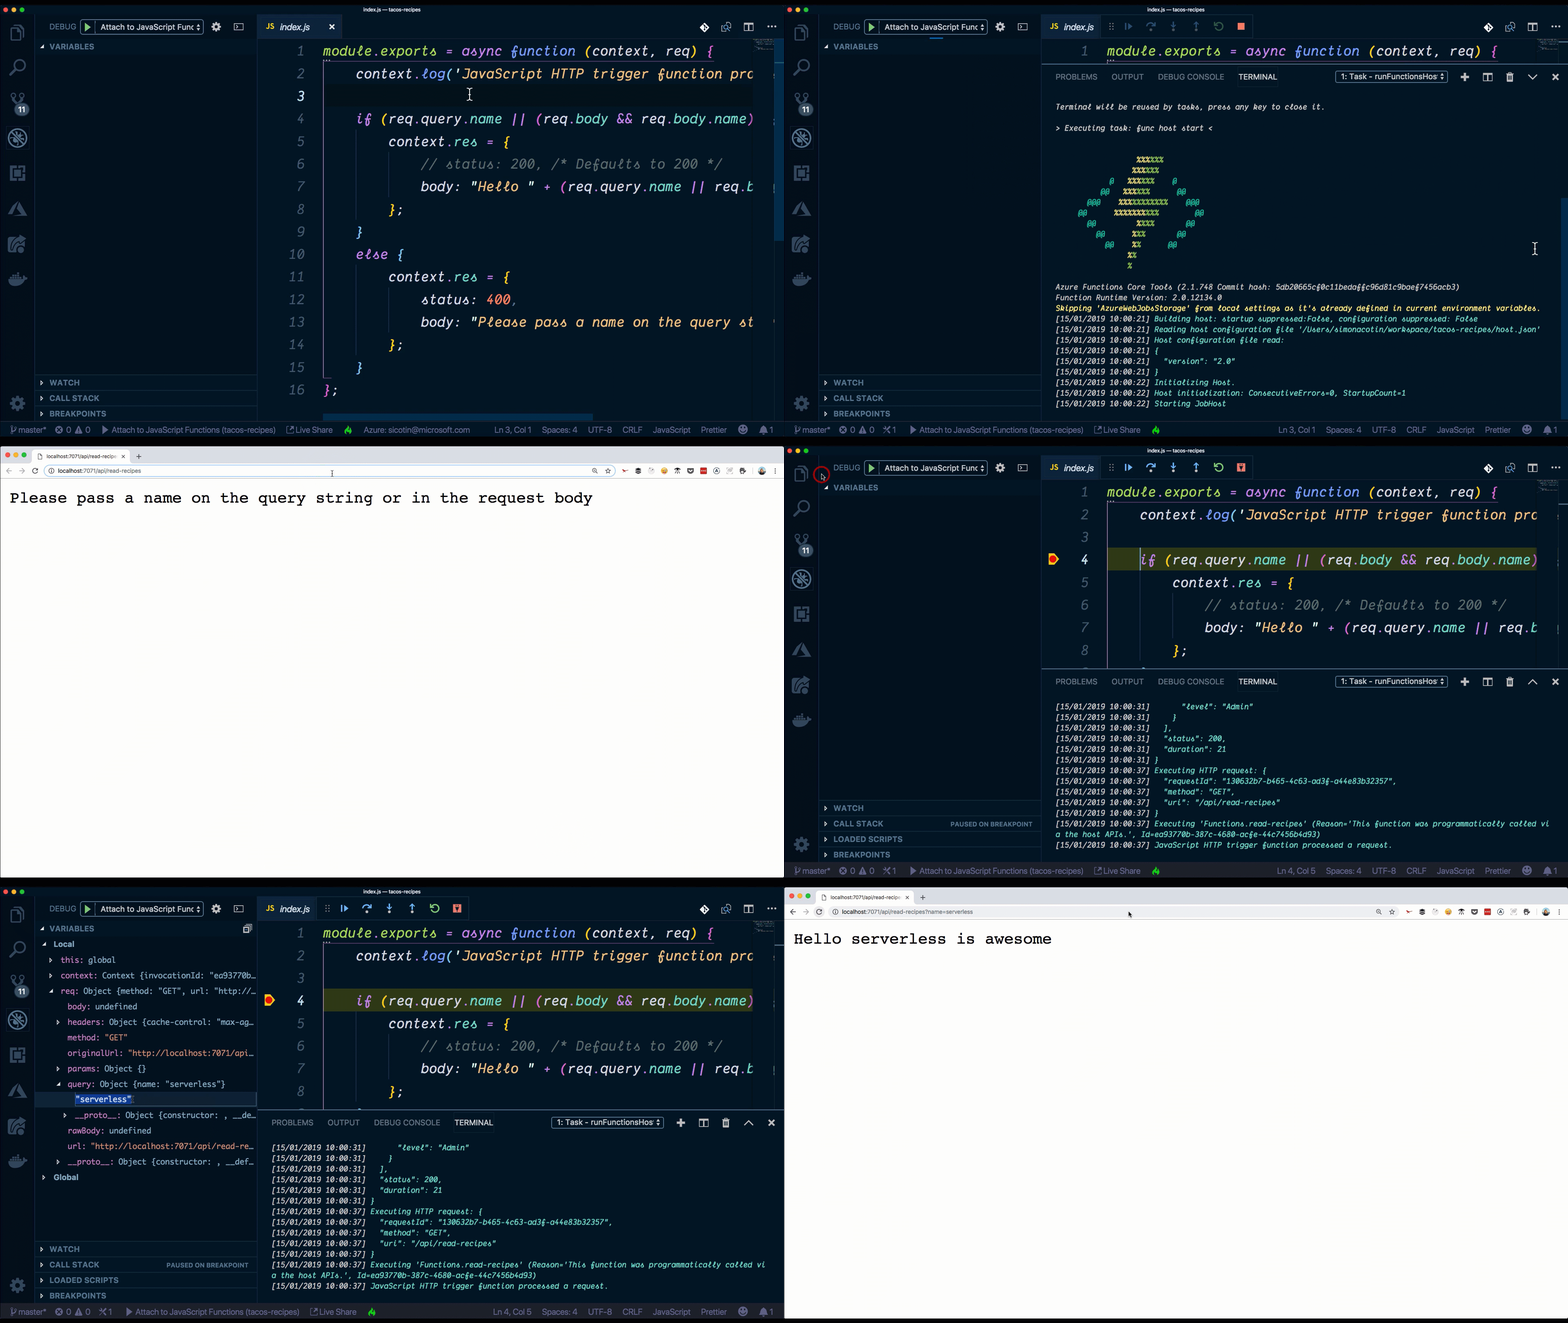
One of the reasons why this is possible is because the Azure Functions runtime is open-source and installed locally on our machine when installing the azure-core-tools package.
How do I install dependencies?
Chances are you already know the answer to this, if you’ve worked with Node.js. Like in any other Node.js project, we first need to create a package.json file in the root folder of the project. That can done by running npm init -y?—?the -y will initialize the file with default configuration.
Then we install dependencies using npm as we would normally do in any other project. For this project, let’s go ahead and install the MongoDB package from npm by running:
npm i mongodbThe package will now be available to import in all the functions in the function app.
How do I connect to third-party services?
Serverless functions are quite powerful, enabling us to write custom code that reacts to events. But code on its own doesn’t help much when building complex applications. The real power comes from easy integration with third-party services and tools.
So, how do we connect and read data from a database? Using the MongoDB client, we’ll read data from an Azure Cosmos DB instance I have created in Azure, but you can do this with any other MongoDB database.
//Index.js
const MongoClient = require('mongodb').MongoClient;

// Initialize authentication details required for database connection
const auth = {
  user: process.env.user,
  password: process.env.password
};

// Initialize global variable to store database connection for reuse in future calls
let db = null;
const loadDB = async () => {
  // If database client exists, reuse it
  if (db) {
    return db;
  }
  // Otherwise, create new connection
  const client = await MongoClient.connect(
    process.env.url,
    {
      auth: auth
    }
  );
  // Select tacos database
  db = client.db('tacos');
  return db;
};

module.exports = async function(context, req) {
  try {
    // Get database connection
    const database = await loadDB();
    // Retrieve all items in the Recipes collection
    let recipes = await database
      .collection('Recipes')
      .find()
      .toArray();
    // Return a JSON object with the array of recipes
    context.res = {
      body: { items: recipes }
    };
  } catch (error) {
    context.log(`Error code: ${error.code} message: ${error.message}`);
    // Return an error message and Internal Server Error status code
    context.res = {
      status: 500,
      body: { message: 'An error has occurred, please try again later.' }
    };
  }
};
One thing to note here is that we’re reusing our database connection rather than creating a new one for each subsequent call to our function. This shaves off ~300ms of every subsequent function call. I call that a win!
Where can I save connection strings?
When developing locally, we can store our environment variables, connection strings, and really anything that’s secret into the local.settings.json file, then access it all in the usual manner, using process.env.yourVariableName.
local.settings.json
{
  "IsEncrypted": false,
  "Values": {
    "AzureWebJobsStorage": "",
    "FUNCTIONS_WORKER_RUNTIME": "node",
    "user": "your-db-user",
    "password": "your-db-password",
    "url": "mongodb://your-db-user.documents.azure.com:10255/?ssl=true"
  }
}
In production, we can configure the application settings on the function’s page in the Azure portal.
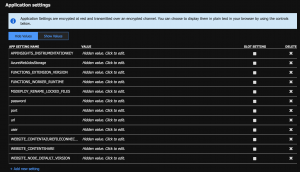
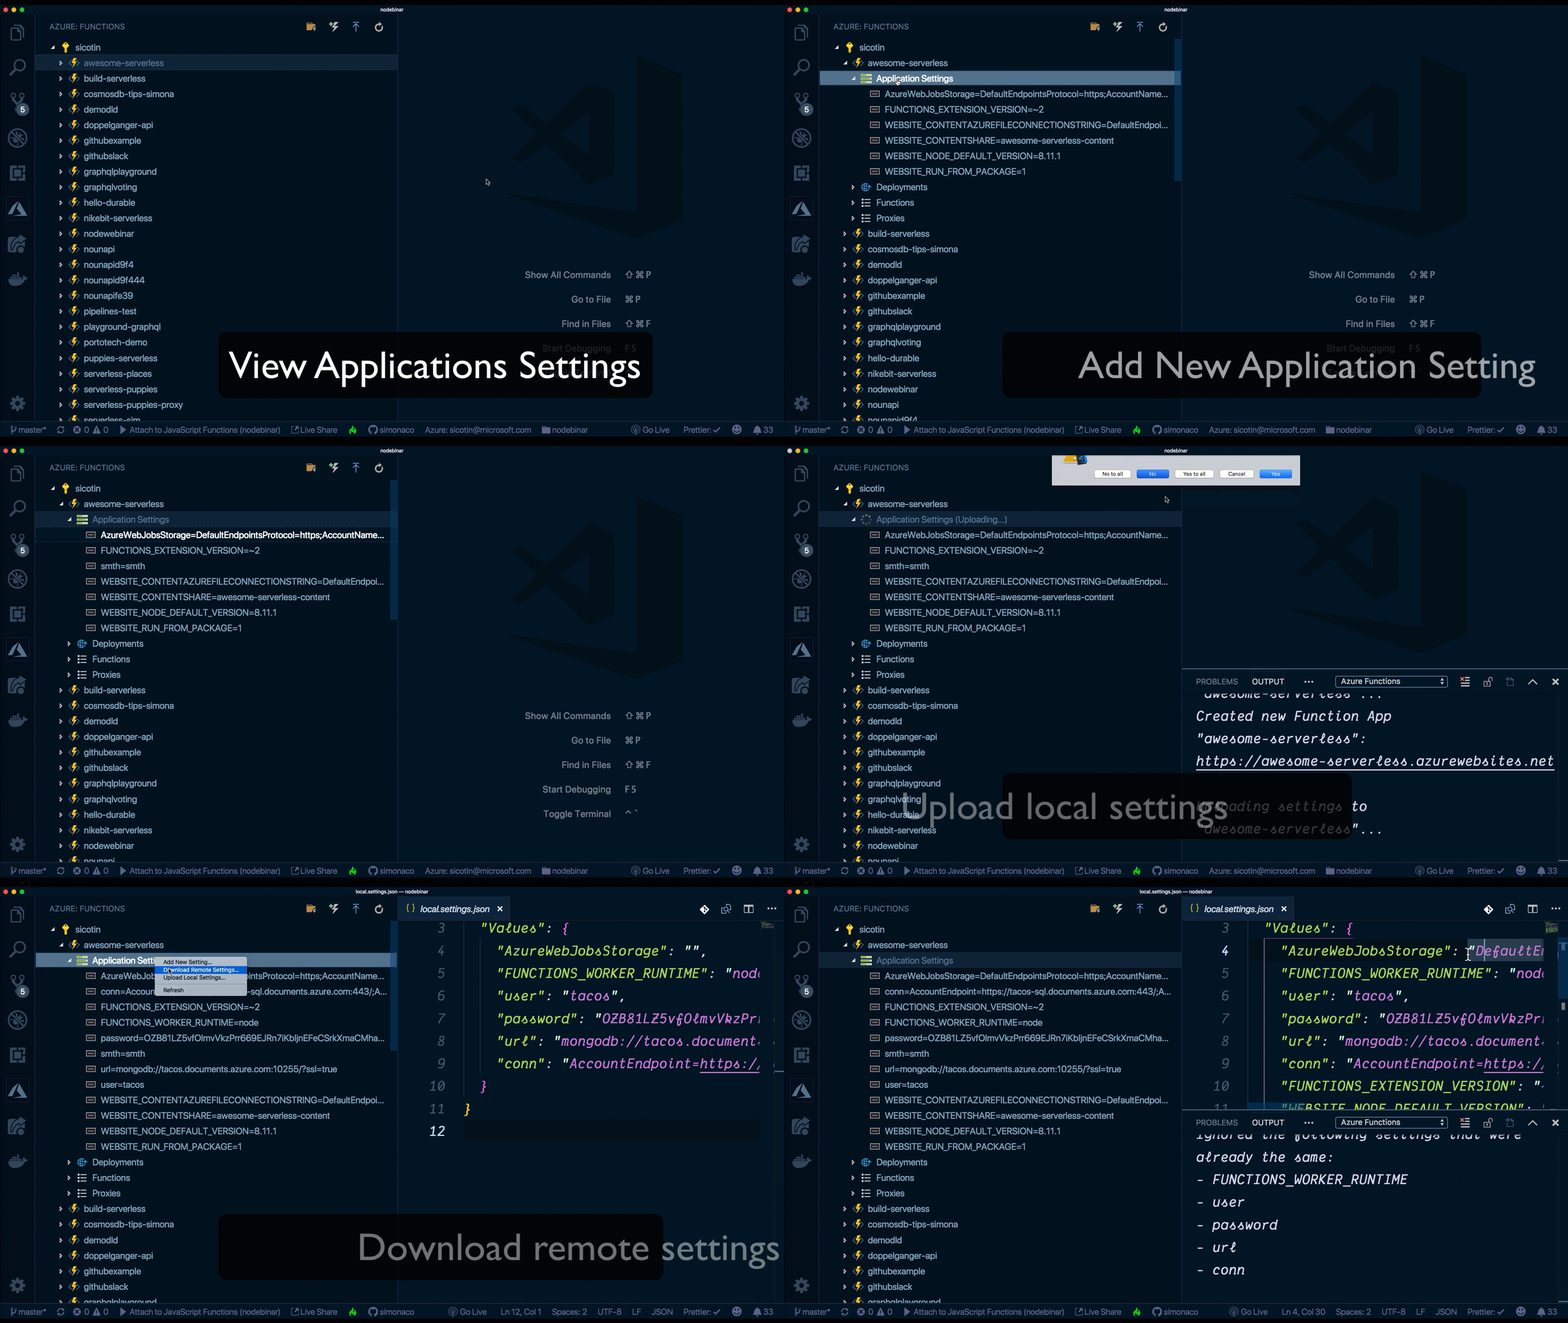
However, another neat way to do this is through the VS Code extension. Without leaving your IDE, we can add new settings, delete existing ones or upload/download them to the cloud.
How do I customize the URL path?
With the REST API, there are a couple of best practices around the format of the URL itself. The one I settled on for our Recipes API is:
GET /recipes:?Retrieves a list of recipesGET /recipes/1:?Retrieves a specific recipePOST /recipes:?Creates a new recipePUT /recipes/1: Updates recipe with ID 1DELETE /recipes/1: Deletes recipe with ID 1
The URL that is made available by default when creating a new function is of the form http://host:port/api/function-name. To customize the URL path and the method that we listen to, we need to configure them in our function.json file:
// function.json
{
  "disabled": false,
  "bindings": [
    {
      "authLevel": "anonymous",
      "type": "httpTrigger",
      "direction": "in",
      "name": "req",
      "methods": ["get"],
      "route": "recipes"
    },
    {
      "type": "http",
      "direction": "out",
      "name": "res"
    }
  ]
}
Moreover, we can add parameters to our function’s route by using curly braces: route: recipes/{id}. We can then read the ID parameter in our code from the req object:
const recipeId = req.params.id;How can I deploy to the cloud?
Congratulations, you’ve made it to the last step! ? Time to push this goodness to the cloud. As always, the VS Code extension has your back. All it really takes is a single right-click we’re pretty much done.
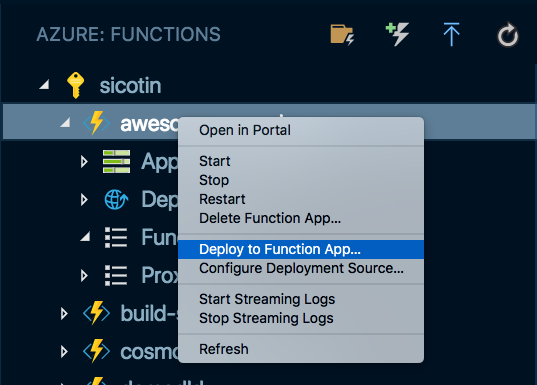
The extension will ZIP up the code with the Node modules and push them all to the cloud.
While this option is great when testing our own code or maybe when working on a small project, it’s easy to overwrite someone else’s changes by accident — or even worse, your own.
Don’t let friends right-click deploy!
?—?every DevOps engineer out there
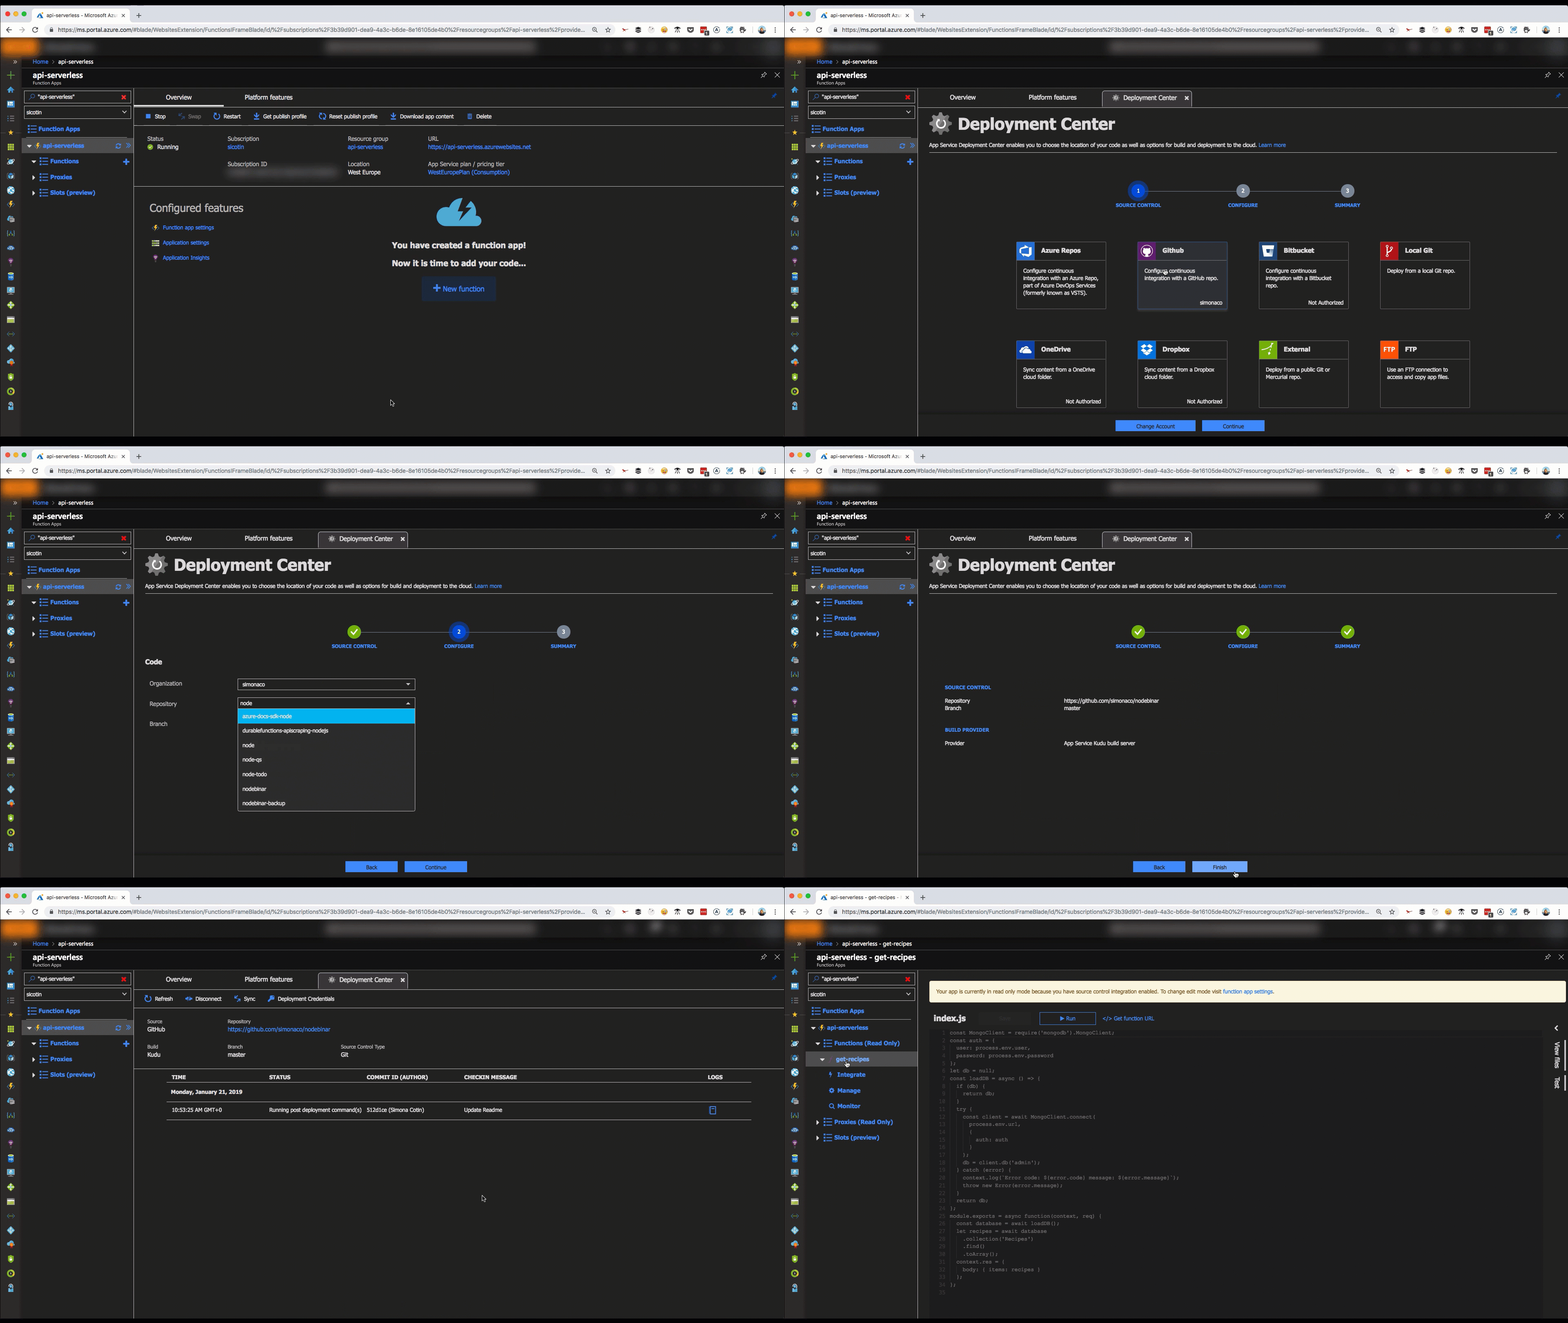
A much healthier option is setting up on GitHub deployment which can be done in a couple of steps in the Azure portal, via the Deployment Center tab.
Are you ready to make Serverless APIs?
This has been a thorough introduction to the world of Servless APIs. However, there’s much, much more than what we’ve covered here. Serverless enables us to solve problems creatively and at a fraction of the cost we usually pay for using traditional platforms.
Chris has mentioned it in other posts here on CSS-Tricks, but he created this excellent website where you can learn more about serverless and find both ideas and resources for things you can build with it. Definitely check it out and let me know if you have other tips or advice scaling with serverless.
The post 7 things you should know when getting started with Serverless APIs appeared first on CSS-Tricks.
