Building A Facial Recognition Web Application With React
Building A Facial Recognition Web Application With React
Adeneye David Abiodun 2020-06-11T10:00:00+00:00
2020-06-15T05:34:05+00:00
If you are going to build a facial recognition web app, this article will introduce you to an easy way of integrating such. In this article, we will take a look at the Face Detection model and Predict API for our face recognition web app with React.
What Is Facial Recognition And Why Is It Important?
Facial recognition is a technology that involves classifying and recognizing human faces, mostly by mapping individual facial features and recording the unique ratio mathematically and storing the data as a face print. The face detection in your mobile camera makes use of this technology.
How Facial Recognition Technology Works
Facial recognition is an enhanced application bio-metric software that uses a deep learning algorithm to compare a live capture or digital image to the stored face print to verify individual identity. However, deep learning is a class of machine learning algorithms that uses multiple layers to progressively extract higher-level features from the raw input. For example, in image processing, lower layers may identify edges, while higher layers may identify the concepts relevant to a human such as digits or letters or faces.
Facial detection is the process of identifying a human face within a scanned image; the process of extraction involves obtaining a facial region such as the eye spacing, variation, angle and ratio to determine if the object is human.
Note: The scope of this tutorial is far beyond this; you can read more on this topic in “Mobile App With Facial Recognition Feature: How To Make It Real”. In today’s article, we’ll only be building a web app that detects a human face in an image.
A Brief Introduction To Clarifai
In this tutorial, we will be using Clarifai, a platform for visual recognition that offers a free tier for developers. They offer a comprehensive set of tools that enable you to manage your input data, annotate inputs for training, create new models, predict and search over your data. However, there are other face recognition API that you can use, check here to see a list of them. Their documentation will help you to integrate them into your app, as they all almost use the same model and process for detecting a face.
Getting Started With Clarifai API
In this article, we are just focusing on one of the Clarifai model called Face Detection. This particular model returns probability scores on the likelihood that the image contains human faces and coordinates locations of where those faces appear with a bounding box. This model is great for anyone building an app that monitors or detects human activity. The Predict API analyzes your images or videos and tells you what’s inside of them. The API will return a list of concepts with corresponding probabilities of how likely it is that these concepts are contained within the image.
You will get to integrate all these with React as we continue with the tutorial, but now that you have briefly learned more about the Clarifai API, you can deep dive more about it here.
What we are building in this article is similar to the face detection box on a pop-up camera in a mobile phone. The image presented below will give more clarification:
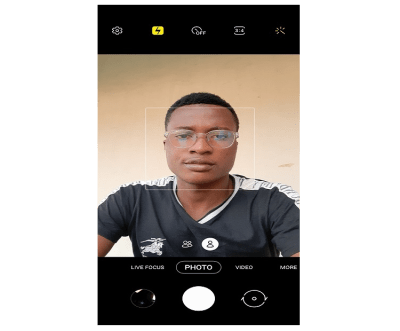
You can see a rectangular box detecting a human face. This is the kind of simple app we will be building with React.
Setting Development Environment
The first step is to create a new directory for your project and start a new react project, you can give it any name of your choice. I will be using the npm package manager for this project, but you can use yarn depending on your choice.
Note: Node.js is required for this tutorial. If you don’t have it, go to the Node.js official website to download and install before continuing.
Open your terminal and create a new React project.
We are using create-react-app which is a comfortable environment for learning React and is the best way to start building a new single-pageapplication to React. It is a global package that we would install from npm. it creates a starter project that contains webpack, babel and a lot of nice features.
/* install react app globally */
npm install -g create-react-app

/* create the app in your new directory */
create-react-app face-detect

/* move into your new react directory */
cd face-detect

/* start development sever */
npm start
Let me first explain the code above. We are using npm install -g create-react-app to install the create-react-app package globally so you can use it in any of your projects. create-react-app face-detect will create the project environment for you since it’s available globally. After that, cd face-detect will move you into our project directory. npm start will start our development server. Now we are ready to start building our app.
You can open the project folder with any editor of your choice. I use visual studio code. It’s a free IDE with tons of plugins to make your life easier, and it is available for all major platforms. You can download it from the official website.
At this point, you should have the following folder structure.
FACE-DETECT TEMPLATE
├── node_modules
├── public
├── src
├── .gitignore
├── package-lock.json
├── package.json
├── README.md
Note: React provide us with a single page React app template, let us get rid of what we won’t be needing. First, delete the logo.svg file in src folder and replace the code you have in src/app.js to look like this.
import React, { Component } from "react";
import "./App.css";
class App extends Component {
  render() {
    return (


    );
  }
}
export default App;What we did was to clear the component by removing the logo and other unnecessary code that we will not be making use of. Now replace your src/App.css with the minimal CSS below:
.App {
  text-align: center;
}
.center {
  display: flex;
  justify-content: center;
}
We’ll be using Tachyons for this project, It is a tool that allows you to create fast-loading, highly readable, and 100% responsive interfaces with as little CSS as possible.
You can install tachyons to this project through npm:
# install tachyons into your project
npm install tacyons
After the installation has completely let us add the Tachyons into our project below at src/index.js file.
import React from "react";
import ReactDOM from "react-dom";
import "./index.css";
import App from "./App";
import * as serviceWorker from "./serviceWorker";
// add tachyons below into your project, note that its only the line of code you adding here
import "tachyons";

ReactDOM.render(<App />, document.getElementById("root"));
// If you want your app to work offline and load faster, you can change
// unregister() to register() below. Note this comes with some pitfalls.
// Learn more about service workers: https://bit.ly/CRA-PWA
serviceWorker.register();
The code above isn’t different from what you had before, all we did was to add the import statement for tachyons.
So let us give our interface some styling at src/index.css file.
body {
  margin: 0;
  font-family: "Courier New", Courier, monospace;
  -webkit-font-smoothing: antialiased;
  -Moz-osx-font-smoothing: grayscale;
  background: #485563; /* fallback for old browsers */
  background: linear-gradient(
    to right,
    #29323c,
    #485563
  ); /* W3C, IE 10+/ Edge, Firefox 16+, Chrome 26+, Opera 12+, Safari 7+ */
}
button {
  cursor: pointer;
}
code {
  font-family: source-code-pro, Menlo, Monaco, Consolas, "Courier New",
    monospace;
}In the code block above, I added a background color and a cursor pointer to our page, at this point we have our interface setup, let get to start creating our components in the next session.
Building Our React Components
In this project, we’ll have two components, we have a URL input box to fetch images for us from the internet — ImageSearchForm, we’ll also have an image component to display our image with a face detection box — FaceDetect. Let us start building our components below:
Create a new folder called Components inside the src directory. Create another two folders called ImageSearchForm and FaceDetect inside the src/Components after that open ImageSearchForm folder and create two files as follow ImageSearchForm.js and ImageSearchForm.css.
Then open FaceDetect directory and create two files as follow FaceDetect.js and FaceDetect.css.
When you are done with all these steps your folder structure should look like this below in src/Components directory:
src/Components TEMPLATE

├── src
  ├── Components
    ├── FaceDetect
      ├── FaceDetect.css
      ├── FaceDetect.js
    ├── ImageSearchForm
      ├── ImageSearchForm.css
      ├── ImageSearchForm.js
At this point, we have our Components folder structure, now let us import them into our App component. Open your src/App.js folder and make it look like what I have below.
import React, { Component } from "react";
import "./App.css";
import ImageSearchForm from "./components/ImageSearchForm/ImageSearchForm";
// import FaceDetect from "./components/FaceDetect/FaceDetect";

class App extends Component {
  render() {
    return (
      <div className="App">
        <ImageSearchForm />
        {/* <FaceDetect /> */}
      </div>
    );
  }
}
export default App;
In the code above, we mounted our components at lines 10 and 11, but if you notice FaceDetect is commented out because we are not working on it yet till our next section and to avoid error in the code we need to add a comment to it. We have also imported our components into our app.
To start working on our ImageSearchForm file, open the ImageSearchForm.js file and let us create our component below.
This example below is our ImageSearchForm component which will contain an input form and the button.
import React from "react";
import "./ImageSearchForm.css";

// imagesearch form component

const ImageSearchForm = () => {
  return (
    <div className="ma5 to">
      <div className="center">
        <div className="form center pa4 br3 shadow-5">
          <input className="f4 pa2 w-70 center" type="text" />
          <button className="w-30 grow f4 link ph3 pv2 dib white bg-blue">
            Detect
          </button>
        </div>
      </div>
    </div>
  );
};
export default ImageSearchForm;In the above line component, we have our input form to fetch the image from the web and a Detect button to perform face detection action. I’m using Tachyons CSS here that works like bootstrap; all you just have to call is className. You can find more details on their website.
To style our component, open the ImageSearchForm.css file. Now let’s style the components below:
.form {
  width: 700px;
  background: radial-gradient(
      circle,
      transparent 20%,
      slategray 20%,
      slategray 80%,
      transparent 80%,
      transparent
    ),
    radial-gradient(
        circle,
        transparent 20%,
        slategray 20%,
        slategray 80%,
        transparent 80%,
        transparent
      )
      50px 50px,
    linear-gradient(#a8b1bb 8px, transparent 8px) 0 -4px,
    linear-gradient(90deg, #a8b1bb 8px, transparent 8px) -4px 0;
  background-color: slategray;
  background-size: 100px 100px, 100px 100px, 50px 50px, 50px 50px;
}
The CSS style property is a CSS pattern for our form background just to give it a beautiful design. You can generate the CSS pattern of your choice here and use it to replace it with.
Open your terminal again to run your application.
/* To start development server again */
npm start
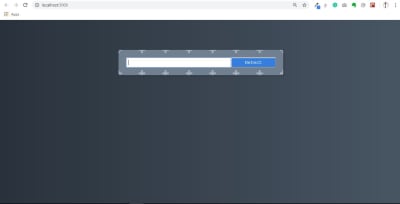
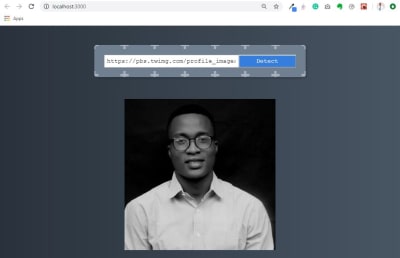
We have our ImageSearchForm component display in the image below.
Now we have our application running with our first components.
Image Recognition API
It’s time to create some functionalities where we enter an image URL, press Detect and an image appear with a face detection box if a face exists in the image. Before that let setup our Clarifai account to be able to integrate the API into our app.
How to Setup Clarifai Account
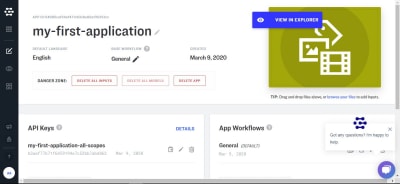
This API makes it possible to utilize its machine learning app or services. For this tutorial, we will be making use of the tier that’s available for free to developers with 5,000 operations per month. You can read more here and sign up, after sign in it will take you to your account dashboard click on my first application or create an application to get your API-key that we will be using in this app as we progress.
Note: You cannot use mine, you have to get yours.
This is how your dashboard above should look. Your API key there provides you with access to Clarifai services. The arrow below the image points to a copy icon to copy your API key.
If you go to Clarifai model you will see that they use machine learning to train what is called models, they train a computer by giving it many pictures, you can also create your own model and teach it with your own images and concepts. But here we would be making use of their Face Detection model.
The Face detection model has a predict API we can make a call to (read more in the documentation here).
So let’s install the clarifai package below.
Open your terminal and run this code:
/* Install the client from npm */
npm install clarifai
When you are done installing clarifai, we need to import the package into our app with the above installation we learned earlier.
However, we need to create functionality in our input search-box to detect what the user enters. We need a state value so that our app knows what the user entered, remembers it, and updates it anytime it gets changes.
You need to have your API key from Clarifai and must have also installed clarifai through npm.
The example below shows how we import clarifai into the app and also implement our API key.
Note that (as a user) you have to fetch any clear image URL from the web and paste it in the input field; that URL will the state value of imageUrl below.
import React, { Component } from "react";
// Import Clarifai into our App
import Clarifai from "clarifai";
import ImageSearchForm from "./components/ImageSearchForm/ImageSearchForm";
// Uncomment FaceDetect Component
import FaceDetect from "./components/FaceDetect/FaceDetect";
import "./App.css";

// You need to add your own API key here from Clarifai.
const app = new Clarifai.App({
  apiKey: "ADD YOUR API KEY HERE",
});

class App extends Component {
  // Create the State for input and the fectch image
  constructor() {
    super();
    this.state = {
      input: "",
      imageUrl: "",
    };
  }

// setState for our input with onInputChange function
  onInputChange = (event) => {
    this.setState({ input: event.target.value });
  };

// Perform a function when submitting with onSubmit
  onSubmit = () => {
        // set imageUrl state
    this.setState({ imageUrl: this.state.input });
    app.models.predict(Clarifai.FACE_DETECT_MODEL, this.state.input).then(
      function (response) {
        // response data fetch from FACE_DETECT_MODEL
        console.log(response);
        /* data needed from the response data from clarifai API,
           note we are just comparing the two for better understanding
           would to delete the above console*/
        console.log(
          response.outputs[0].data.regions[0].region_info.bounding_box
        );
      },
      function (err) {
        // there was an error
      }
    );
  };
  render() {
    return (
      <div className="App">
        // update your component with their state
        <ImageSearchForm
          onInputChange={this.onInputChange}
          onSubmit={this.onSubmit}
        />
        // uncomment your face detect app and update with imageUrl state
        <FaceDetect imageUrl={this.state.imageUrl} />
      </div>
    );
  }
}
export default App;
In the above code block, we imported clarifai so that we can have access to Clarifai services and also add our API key. We use state to manage the value of input and the imageUrl. We have an onSubmit function that gets called when the Detect button is clicked, and we set the state of imageUrl and also fetch image with Clarifai FACE DETECT MODEL which returns a response data or an error.
For now, we’re logging the data we get from the API to the console; we’ll use that in the future when determining the face detect model.
For now, there will be an error in your terminal because we need to update the ImageSearchForm and FaceDetect Components files.
Update the ImageSearchForm.js file with the code below:
import React from "react";
import "./ImageSearchForm.css";
// update the component with their parameter
const ImageSearchForm = ({ onInputChange, onSubmit }) => {
  return (
    <div className="ma5 mto">
      <div className="center">
        <div className="form center pa4 br3 shadow-5">
          <input
            className="f4 pa2 w-70 center"
            type="text"
            onChange={onInputChange}    // add an onChange to monitor input state
          />
          <button
            className="w-30 grow f4 link ph3 pv2 dib white bg-blue"
            onClick={onSubmit}  // add onClick function to perform task
          >
            Detect
          </button>
        </div>
      </div>
    </div>
  );
};
export default ImageSearchForm;
In the above code block, we passed onInputChange from props as a function to be called when an onChange event happens on the input field, we’re doing the same with onSubmit function we tie to the onClick event.
Now let us create our FaceDetect component that we uncommented in src/App.js above. Open FaceDetect.js file and input the code below:
In the example below, we created the FaceDetect component to pass the props imageUrl.
import React from "react";
// Pass imageUrl to FaceDetect component
const FaceDetect = ({ imageUrl }) => {
  return (
  # This div is the container that is holding our fetch image and the face detect box
    <div className="center ma">
      <div className="absolute mt2">
                        # we set our image SRC to the url of the fetch image
        <img alt="" src={imageUrl} width="500px" heigh="auto" />
      </div>
    </div>
  );
};
export default FaceDetect;
This component will display the image we have been able to determine as a result of the response we’ll get from the API. This is why we are passing the imageUrl down to the component as props, which we then set as the src of the img tag.
Now we both have our ImageSearchForm component and FaceDetect components are working. The Clarifai FACE_DETECT_MODEL has detected the position of the face in the image with their model and provided us with data but not a box that you can check in the console.
Now our FaceDetect component is working and Clarifai Model is working while fetching an image from the URL we input in the ImageSearchForm component. However, to see the data response Clarifai provided for us to annotate our result and the section of data we would be needing from the response if you remember we made two console.log in App.js file.
So let’s open the console to see the response like mine below:
The first console.log statement which you can see above is the response data from Clarifai FACE_DETECT_MODEL made available for us if successful, while the second console.log is the data we are making use of in order to detect the face using the data.region.region_info.bounding_box. At the second console.log, bounding_box data are:
bottom_row: 0.52811456
left_col: 0.29458505
right_col: 0.6106333
top_row: 0.10079138
This might look twisted to us but let me break it down briefly. At this point the Clarifai FACE_DETECT_MODEL has detected the position of face in the image with their model and provided us with a data but not a box, it ours to do a little bit of math and calculation to display the box or anything we want to do with the data in our application. So let me explain the data above,
bottom_row: 0.52811456 |
This indicates our face detection box start at 52% of the image height from the bottom. |
left_col: 0.29458505 |
This indicates our face detection box start at 29% of the image width from the left. |
right_col: 0.6106333 |
This indicates our face detection box start at 61% of the image width from the right. |
top_row: 0.10079138 |
This indicates our face detection box start at 10% of the image height from the top. |
If you take a look at our app inter-phase above, you will see that the model is accurate to detect the bounding_box from the face in the image. However, it left us to write a function to create the box including styling that will display a box from earlier information on what we are building based on their response data provided for us from the API. So let’s implement that in the next section.
Creating A Face Detection Box
This is the final section of our web app where we get our facial recognition to work fully by calculating the face location of any image fetch from the web with Clarifai FACE_DETECT_MODEL and then display a facial box. Let open our src/App.js file and include the code below:
In the example below, we created a calculateFaceLocation function with a little bit of math with the response data from Clarifai and then calculate the coordinate of the face to the image width and height so that we can give it a style to display a face box.
import React, { Component } from "react";
import Clarifai from "clarifai";
import ImageSearchForm from "./components/ImageSearchForm/ImageSearchForm";
import FaceDetect from "./components/FaceDetect/FaceDetect";
import "./App.css";

// You need to add your own API key here from Clarifai.
const app = new Clarifai.App({
  apiKey: "ADD YOUR API KEY HERE",
});

class App extends Component {
  constructor() {
    super();
    this.state = {
      input: "",
      imageUrl: "",
      box: {},  # a new object state that hold the bounding_box value
    };
  }

  // this function calculate the facedetect location in the image
  calculateFaceLocation = (data) => {
    const clarifaiFace =
      data.outputs[0].data.regions[0].region_info.bounding_box;
    const image = document.getElementById("inputimage");
    const width = Number(image.width);
    const height = Number(image.height);
    return {
      leftCol: clarifaiFace.left_col * width,
      topRow: clarifaiFace.top_row * height,
      rightCol: width - clarifaiFace.right_col * width,
      bottomRow: height - clarifaiFace.bottom_row * height,
    };
  };

  /* this function display the face-detect box base on the state values */
  displayFaceBox = (box) => {
    this.setState({ box: box });
  };

  onInputChange = (event) => {
    this.setState({ input: event.target.value });
  };

  onSubmit = () => {
    this.setState({ imageUrl: this.state.input });
    app.models
      .predict(Clarifai.FACE_DETECT_MODEL, this.state.input)
      .then((response) =>
        # calculateFaceLocation function pass to displaybox as is parameter
        this.displayFaceBox(this.calculateFaceLocation(response))
      )
      // if error exist console.log error
      .catch((err) => console.log(err));
  };

  render() {
    return (
      <div className="App">
        <ImageSearchForm
          onInputChange={this.onInputChange}
          onSubmit={this.onSubmit}
        />
        // box state pass to facedetect component
        <FaceDetect box={this.state.box} imageUrl={this.state.imageUrl} />
      </div>
    );
  }
}
export default App;
The first thing we did here was to create another state value called box which is an empty object that contains the response values that we received. The next thing we did was to create a function called calculateFaceLocation which will receive the response we get from the API when we call it in the onSubmit method. Inside the calculateFaceLocation method, we assign image to the element object we get from calling document.getElementById("inputimage") which we use to perform some calculation.
leftCol |
clarifaiFace.left_col is the % of the width multiply with the width of the image then we would get the actual width of the image and where the left_col should be. |
topRow |
clarifaiFace.top_row is the % of the height multiply with the height of the image then we would get the actual height of the image and where the top_row should be. |
rightCol |
This subtracts the width from (clarifaiFace.right_col width) to know where the right_Col should be. |
bottomRow |
This subtract the height from (clarifaiFace.right_col height) to know where the bottom_Row should be. |
In the displayFaceBox method, we update the state of box value to the data we get from calling calculateFaceLocation.
We need to update our FaceDetect component, to do that open FaceDetect.js file and add the following update to it.
import React from "react";
// add css to style the facebox
import "./FaceDetect.css";
// pass the box state to the component

const FaceDetect = ({ imageUrl, box }) => {
  return (
    <div className="center ma">
      <div className="absolute mt2">
            /* insert an id to be able to manipulate the image in the DOM */
        <img id="inputimage" alt="" src={imageUrl} width="500px" heigh="auto" />
       //this is the div displaying the faceDetect box base on the bounding box value
      <div
          className="bounding-box"
          // styling that makes the box visible base on the return value
          style={{
            top: box.topRow,
            right: box.rightCol,
            bottom: box.bottomRow,
            left: box.leftCol,
          }}
        ></div>
      </div>
    </div>
  );
};
export default FaceDetect;
In order to show the box around the face, we pass down box object from the parent component into the FaceDetect component which we can then use to style the img tag.
We imported a CSS we have not yet created, open FaceDetect.css and add the following style:
.bounding-box {
  position: absolute;
  box-shadow: 0 0 0 3px #fff inset;
  display: flex;
  flex-wrap: wrap;
  justify-content: center;
  cursor: pointer;
}
Note the style and our final output below, you could see we set our box-shadow color to be white and display flex.
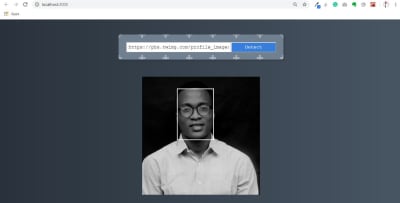
At this point, your final output should look like this below. In the output below, we now have our face detection working with a face box to display and a border style color of white.
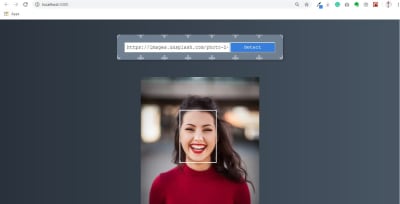
Let try another image below:
Conclusion
I hope you enjoyed working through this tutorial. We’ve learned how to build a face recognition app that can be integrated into our future project with more functionality, you also learn how to use an amazing machine learning API with react. You can always read more on Clarifai API from the references below. If you have any questions, you can leave them in the comments section and I’ll be happy to answer every single one and work you through any issues.
The supporting repo for this article is available on Github.
Resources And Further Reading
- React Doc
- Getting Started with Clarifai
- Clarifai Developer Documentation
- Clarifai Face Detection Model
(ks, ra, yk, il)
![Image-Link-Form[Console]](https://res.cloudinary.com/indysigner/image/fetch/f_auto,q_auto/w_400/https://cloud.netlifyusercontent.com/assets/344dbf88-fdf9-42bb-adb4-46f01eedd629/92d944e8-1867-4f0e-bdbf-d2c556c0f218/05-image-link-form-console-facial-recognition.JPG)
