Archive

Archive for the ‘’ Category

Live Streaming Platforms Comparison: Making The Right Choice

October 31st, 2023 No comments

Live streaming has become extremely popular and influential for brands, businesses, creators, and media outlets to engage audiences in real-time. But with many streaming platform options, it can take time to determine which one best suits your streaming needs. Comparing features and capabilities is vital to making the right choice. 

Here is an overview of critical platforms and factors to consider when selecting your live-stream solution.

Rumble Live Stream

Emerging platform Rumble Live Stream represents a new challenger in the crowded video streaming space, promising creators more independence and monetization leverage compared to mainstream giants like YouTube. The service enables influencers to broadcast real-time live content and engage audiences directly on Rumble. 

Interactive capabilities like live chat, screen sharing, tipping, and channel subscriptions aim to incentivize streamers. Rumble Live Stream promotes transparency and greater creator control over content and earnings. The platform hopes to draw a wide variety of streamers across political, gaming, entertainment and other verticals by positioning itself as a home for uncensored expression. 

While still dwarfed in size by the leading players, Rumble Live Stream offers creators another potential avenue to build their digital community and business through unfiltered live streaming and direct viewer engagement.

YouTube Live

With over 2 billion monthly users, YouTube is the world’s largest video platform. YouTube Live offers seamless integration for existing YouTube creators to go live and leverage their subscriber base. 

It has robust features like streaming up to 4K resolution, DVR to rewatch streams later, super chats for viewer payments, multi-camera switching capabilities, and integrates well with other YouTube tools. 

As an established platform, YouTube Live provides excellent viewer reach and discovery. Downsides can include moderation challenges within massive comment streams and less community building than other platforms.

Twitch

Image by myriammira on Freepik

Twitch specializes in gaming and esports streaming. It offers incredibly robust community tools for streamer/viewer interaction, including Stream labs integration, raids to redirect viewers to other channels, clipping highlights, and chatbots. 

Twitch is ideal for collaborative, engaging gaming broadcasts but supports different content verticals like music, sports, and creative arts. As an early live stream innovator, Twitch has an influential audience scale but less broad discovery versus YouTube. Subscriptions and channel points help monetize.

Facebook Live

With nearly 3 billion monthly Facebook users, Facebook Live offers unmatched access to gigantic built-in audiences ideal for brand reach. It allows multi-person streams and easy shareability across Facebook. 

Viewers can comment, react, and quickly find live streams. Facebook Live incentivizes viewer participation with comments prioritized in the feed. Downsides include fewer monetization options and community tools compared to other platforms. But for raw viewer numbers, it’s unmatched.

Instagram Live

Image by Freepik

For consumer brands and creators already active on Instagram, Instagram Live is a no-brainer add-on to drive real-time engagement. You can go live to your followers, interact via comments and Q&As, do dual streams with a guest, and post the replay as an IG Story. 

Seamless integration within Instagram makes it super convenient for mini broadcasts or supplemental content. Limitations include max 1-hour streams and smaller concurrent audience size versus standalone platforms.

LinkedIn Live

LinkedIn Live can be highly effective for B2B companies and thought leaders seeking to engage professional networks. LinkedIn’s focus on knowledge sharing and career building means informative broadcasts perform well. 

You can share live streams natively into your LinkedIn feed, Groups, and messaging. However, LinkedIn doesn’t allow multi-guest streaming and has fewer community and viewer interaction features than other platforms.

Vimeo Livestream

Vimeo Livestream shines for organizations and creators wanting a premium ad-free live streaming experience with high production value. It offers pristine HD quality streaming, customized branding, paywall and subscription options, marketing, and analytics tools, plus integration with Vimeo’s excellent VOD features. However, audience reach and discovery are smaller than mass market platforms. But for controlled high-quality broadcasts, Vimeo delivers.

Custom Multi-Stream Options

For advanced streaming events and productions, tools like Restream, StreamYard, and Switchboard enable broadcasting live video simultaneously to multiple platforms. This requires integrating APIs but allows access to wider audiences while controlling the experience across destinations. It does need more technical expertise to configure correctly.

Key Comparison Factors

When evaluating live streaming platforms, it’s crucial to consider your target audience, the streaming features available, how well the medium fits your content type, capabilities for building community, ease of use, video quality and reliability, options for monetization, and your overall goals. Be sure to review each platform’s specific terms of service since policies vary. Taking the time to dig into crucial comparison factors will help determine the best match:

Consider the built-in audience size and potential discovery the platform offers – can you tap into new viewers easily or only reach existing followers? Massive platforms like Facebook Live and YouTube Live provide access to billions of built-in users to aid discovery.

Conclusion 

Carefully weighing these key factors will guide your optimal platform choice aligned with your goals, audience, content focus, features needed, and resources. Pick one that fits your needs to maximize streaming success.

Featured image by Ismael Paramo on Unsplash

The post Live Streaming Platforms Comparison: Making The Right Choice appeared first on noupe.

Categories: Others Tags:

Tales Of November (2023 Wallpapers Edition)

October 31st, 2023 No comments

November tends to be rather gray in many parts of the world. So what better remedy could there be as some colorful inspiration? To bring some good vibes to your desktops and home screens, artists and designers from across the globe once again tickled their creative ideas and designed beautiful and inspiring wallpapers to welcome the new month.

The wallpapers in this collection all come in versions with and without a calendar for November 2023 and can be downloaded for free. And since so many unique designs have seen the light of day in the more than twelve years that we’ve been running this monthly wallpapers series, we also compiled a selection of November favorites from our archives at the end of the post. Maybe you’ll spot one of your almost-forgotten favorites in there, too? A big thank you to everyone who shared their designs with us this month — this post wouldn’t exist without you. Happy November!

  • You can click on every image to see a larger preview,
  • We respect and carefully consider the ideas and motivation behind each and every artist’s work. This is why we give all artists the full freedom to explore their creativity and express emotions and experience through their works. This is also why the themes of the wallpapers weren’t anyhow influenced by us but rather designed from scratch by the artists themselves.
  • Submit a wallpaper!
    Did you know that you could get featured in our next wallpapers post, too? We are always looking for creative talent.

Transition

“Inspired by the transition from autumn to winter.” — Designed by Tecxology from India.

Ghostly Gala

Designed by Bhabna Basak from India.

Journey Through November

“Step into the embrace of November’s beauty. On this National Hiking Day, let every trail lead you to a new discovery and every horizon remind you of nature’s wonders. Lace up, venture out, and celebrate the great outdoors.” — Designed by PopArt Studio from Serbia.

Bug

Designed by Ricardo Gimenes from Sweden.

Sunset Or Sunrise

“November is autumn in all its splendor. Earthy colors, falling leaves and afternoons in the warmth of the home. But it is also adventurous and exciting and why not, different. We sit in Bali contemplating Pura Ulun Danu Bratan. We don’t know if it’s sunset or dusk, but… does that really matter?” — Designed by Veronica Valenzuela Jimenez from Spain.

Harvesting A New Future

“Our team takes pride in aligning our volunteer initiatives with the 2030 Agenda for Sustainable Development’s ‘Zero Hunger’ goal. This goal reflects a global commitment to addressing food-related challenges comprehensively and sustainably, aiming to end hunger, ensure food security, improve nutrition, and promote sustainable agriculture. We encourage our team members to volunteer with non-profits they care about year-round. Explore local opportunities and use your skills to make a meaningful impact!” — Designed by Jenna Miller from Portland, OR.

Behavior Analysis

Designed by Ricardo Gimenes from Sweden.

Oldies But Goodies

Some things are just too good to be forgotten, so below you’ll find a selection of oldies but goodies from our wallpapers archives. Please note that these designs don’t come with a calendar.

Anbani

Anbani means alphabet in Georgian. The letters that grow on that tree are the Georgian alphabet. It’s very unique!” — Designed by Vlad Gerasimov from Georgia.

Cozy Autumn Cups And Cute Pumpkins

“Autumn coziness, which is created by fallen leaves, pumpkins, and cups of cocoa, inspired our designers for this wallpaper. — Designed by MasterBundles from Ukraine.

A Jelly November

“Been looking for a mysterious, gloomy, yet beautiful desktop wallpaper for this winter season? We’ve got you, as this month’s calendar marks Jellyfish Day. On November 3rd, we celebrate these unique, bewildering, and stunning marine animals. Besides adorning your screen, we’ve got you covered with some jellyfish fun facts: they aren’t really fish, they need very little oxygen, eat a broad diet, and shrink in size when food is scarce. Now that’s some tenacity to look up to.” — Designed by PopArt Studio from Serbia.

Colorful Autumn

“Autumn can be dreary, especially in November, when rain starts pouring every day. We wanted to summon better days, so that’s how this colourful November calendar was created. Open your umbrella and let’s roll!” — Designed by PopArt Studio from Serbia.

The Kind Soul

“Kindness drives humanity. Be kind. Be humble. Be humane. Be the best of yourself!” — Designed by Color Mean Creative Studio from Dubai.

Time To Give Thanks

Designed by Glynnis Owen from Australia.

Moonlight Bats

“I designed some Halloween characters and then this idea came to my mind — a bat family hanging around in the moonlight. A cute and scary mood is just perfect for autumn.” — Designed by Carmen Eisendle from Germany.

Outer Space

“We were inspired by the nature around us and the universe above us, so we created an out-of-this-world calendar. Now, let us all stop for a second and contemplate on preserving our forests, let us send birds of passage off to warmer places, and let us think to ourselves — if not on Earth, could we find a home somewhere else in outer space?” — Designed by PopArt Studio from Serbia.

Winter Is Here

Designed by Ricardo Gimenes from Sweden.

Go To Japan

“November is the perfect month to go to Japan. Autumn is beautiful with its brown colors. Let’s enjoy it!” — Designed by Veronica Valenzuela from Spain.

International Civil Aviation Day

“On December 7, we mark International Civil Aviation Day, celebrating those who prove day by day that the sky really is the limit. As the engine of global connectivity, civil aviation is now, more than ever, a symbol of social and economic progress and a vehicle of international understanding. This monthly calendar is our sign of gratitude to those who dedicate their lives to enabling everyone to reach their dreams.” — Designed by PopArt Studio from Serbia.

Tempestuous November

“By the end of autumn, ferocious Poseidon will part from tinted clouds and timid breeze. After this uneven clash, the sky once more becomes pellucid just in time for imminent luminous snow.” — Designed by Ana Masnikosa from Belgrade, Serbia.

Peanut Butter Jelly Time!

“November is the Peanut Butter Month so I decided to make a wallpaper around that. As everyone knows peanut butter goes really well with some jelly so I made two sandwiches, one with peanut butter and one with jelly. Together they make the best combination. I also think peanut butter tastes pretty good so that’s why I chose this for my wallpaper.” — Designed by Senne Mommens from Belgium.

On The Edge Of Forever

“November has always reminded me of the famous Guns N’ Roses song, so I’ve decided to look at its meaning from a different perspective. The story in my picture takes place somewhere in space, where a young guy beholds a majestic meteor shower and wonders about the mysteries of the universe.” — Designed by Aliona Voitenko from Ukraine.

Me And The Key Three

Designed by Bart Bonte from Belgium.

Mushroom Season

“It is autumn! It is raining and thus… it is mushroom season! It is the perfect moment to go to the forest and get the best mushrooms to do the best recipe.” — Designed by Verónica Valenzuela from Spain.

Welcome Home Dear Winter

“The smell of winter is lingering in the air. The time to be home! Winter reminds us of good food, of the warmth, the touch of a friendly hand, and a talk beside the fire. Keep calm and let us welcome winter.” — Designed by Acodez IT Solutions from India.

A Gentleman’s November

Designed by Cedric Bloem from Belgium.

Sailing Sunwards

“There’s some pretty rough weather coming up these weeks. Thinking about November makes me want to keep all the warm thoughts in mind. I’d like to wish everyone a cozy winter.” — Designed by Emily Trbl. Kunstreich from Germany.

Hold On

“We have to acknowledge that some things are inevitable, like winter. Let’s try to hold on until we can, and then embrace the beautiful season.” — Designed by Igor Izhik from Canada.

Hello World, Happy November

“I often read messages at Smashing Magazine from the people in the southern hemisphere ‘it’s spring, not autumn!’ so I wanted to design a wallpaper for the northern and the southern hemispheres. Here it is, northerners and southerns, hope you like it!” — Designed by Agnes Swart from the Netherlands.

Snoop Dog

Designed by Ricardo Gimenes from Sweden.

No Shave Movember

“The goal of Movember is to ‘change the face of men’s health.’” — Designed by Suman Sil from India.

Deer Fall, I Love You

Designed by Maria Porter from the United States.

Autumn Choir

Designed by Hatchers from Ukraine / China.

Late Autumn

“The late arrival of Autumn.” Designed by Maria Castello Solbes from Spain.

Categories: Others Tags:

Passkeys: A No-Frills Explainer On The Future Of Password-Less Authentication

October 30th, 2023 No comments

Passkeys are a new way of authenticating applications and websites. Instead of having to remember a password, a third-party service provider (e.g., Google or Apple) generates and stores a cryptographic key pair that is bound to a website domain. Since you have access to the service provider, you have access to the keys, which you can then use to log in.

This cryptographic key pair contains both private and public keys that are used for authenticating messages. These key pairs are often known as asymmetric or public key cryptography.

Public and private key pair? Asymmetric cryptography? Like most modern technology, passkeys are described by esoteric verbiage and acronyms that make them difficult to discuss. That’s the point of this article. I want to put the complex terms aside and help illustrate how passkeys work, explain what they are effective at, and demonstrate what it looks like to work with them.

How Passkeys Work

Passkeys are cryptographic keys that rely on generating signatures. A signature is proof that a message is authentic. How so? It happens first by hashing (a fancy term for “obscuring”) the message and then creating a signature from that hash with your private key. The private key in the cryptographic key pair allows the signature to be generated, and the public key, which is shared with others, allows the service to verify that the message did, in fact, come from you.

In short, passkeys consist of two keys: a public and private. One verifies a signature while the other verifies you, and the communication between them is what grants you access to an account.

Here’s a quick way of generating a signing and verification key pair to authenticate a message using the SubtleCrypto API. While this is only part of how passkeys work, it does illustrate how the concept works cryptographically underneath the specification.

const message = new TextEncoder().encode("My message");

const keypair = await crypto.subtle.generateKey(
  { name: "ECDSA", namedCurve: "P-256" },
  true,
  [ 'sign', 'verify' ]
);

const signature = await crypto.subtle.sign(
  { name: "ECDSA", hash: "SHA-256" },
  keypair.privateKey,
  message
);

// Normally, someone else would be doing the verification using your public key
// but it's a bit easier to see it yourself this way
console.log(
  "Did my private key sign this message?",
  await crypto.subtle.verify(
    { name: "ECDSA", hash: "SHA-256" },
    keypair.publicKey,
    signature,
    message
  )
);

Notice the three parts pulling all of this together:

  1. Message: A message is constructed.
  2. Key pair: The public and private keys are generated. One key is used for the signature, and the other is set to do the verification.
  3. Signature: A signature is signed by the private key, verifying the message’s authenticity.

From there, a third party would authenticate the private key with the public key, verifying the correct pair of keys or key pair. We’ll get into the weeds of how the keys are generated and used in just a bit, but for now, this is some context as we continue to understand why passkeys can potentially erase the need for passwords.

Why Passkeys Can Replace Passwords

Since the responsibility of storing passkeys is removed and transferred to a third-party service provider, you only have to control the “parent” account in order to authenticate and gain access. This is a lot like requiring single sign-on (SSO) for an account via Google, Facebook, or LinkedIn, but instead, we use an account that has control of the passkey stored for each individual website.

For example, I can use my Google account to store passkeys for somerandomwebsite.com. That allows me to prove a challenge by using that passkey’s private key and thus authenticate and log into somerandomwebsite.com.

For the non-tech savvy, this typically looks like a prompt that the user can click to log in. Since the credentials (i.e., username and password) are tied to the domain name (somerandomwebsite.com), and passkeys created for a domain name are only accessible to the user at login, the user can select which passkey they wish to use for access. This is usually only one login, but in some cases, you can create multiple logins for a single domain and then select which one you wish to use from there.

So, what’s the downside? Having to store additional cryptographic keys for each login and every site for which you have a passkey often requires more space than storing a password. However, I would argue that the security gains, the user experience from not having to remember a password, and the prevention of common phishing techniques more than offset the increased storage space.

How Passkeys Protect Us

Passkeys prevent a couple of security issues that are quite common, specifically leaked database credentials and phishing attacks.

Database Leaks

Have you ever shared a password with a friend or colleague by copying and pasting it for them in an email or text? That could lead to a security leak. So would a hack on a system that stores customer information, like passwords, which is then sold on dark marketplaces or made public. In many cases, it’s a weak set of credentials — like an email and password combination — that can be stolen with a fair amount of ease.

Passkeys technology circumvents this because passkeys only store a public key to an account, and as you may have guessed by the name, this key is expected to be made accessible to anyone who wants to use it. The public key is only used for verification purposes and, for the intended use case of passkeys, is effectively useless without the private key to go with it, as the two are generated as a pair. Therefore, those previous juicy database leaks are no longer useful, as they can no longer be used for cracking the password for your account. Cracking a similar private key would take millions of years at this point in time.

Phishing

Passwords rely on knowing what the password is for a given login: anyone with that same information has the same level of access to the same account as you do. There are sophisticated phishing sites that look like they’re by Microsoft or Google and will redirect you to the real provider after you attempt to log into their fake site. The damage is already done at that point; your credentials are captured, and hopefully, the same credentials weren’t being used on other sites, as now you’re compromised there as well.

A passkey, by contrast, is tied to a domain. You gain a new element of security: the fact that only you have the private key. Since the private key is not feasible to remember nor computationally easy to guess, we can guarantee that you are who you say we are (at least as long as your passkey provider is not compromised). So, that fake phishing site? It will not even show the passkey prompt because the domain is different, and thus completely mitigates phishing attempts.

There are, of course, theoretical attacks that can make passkeys vulnerable, like someone compromising your DNS server to send you to a domain that now points to their fake site. That said, you probably have deeper issues to concern yourself with if it gets to that point.

Implementing Passkeys

At a high level, a few items are needed to start using passkeys, at least for the common sign-up and log-in process. You’ll need a temporary cache of some sort, such as redis or memcache, for storing temporary challenges that users can authenticate against, as well as a more permanent data store for storing user accounts and their public key information, which can be used to authenticate the user over the course of their account lifetime. These aren’t hard requirements but rather what’s typical of what would be developed for this kind of authentication process.

To understand passkeys properly, though, we want to work through a couple of concepts. The first concept is what is actually taking place when we generate a passkey. How are passkeys generated, and what are the underlying cryptographic primitives that are being used? The second concept is how passkeys are used to verify information and why that information can be trusted.

Generating Passkeys

A passkey involves an authenticator to generate the key pair. The authenticator can either be hardware or software. For example, it can be a hardware security key, the operating system’s Trusted Platform Module (TPM), or some other application. In the cases of Android or iOS, we can use the device’s secure enclave.

To connect to an authenticator, we use what’s called the Client to Authenticator Protocol (CTAP). CTAP allows us to connect to hardware over different connections through the browser. For example, we can connect via CTAP using an NFC, Bluetooth, or a USB connection. This is useful in cases where we want to log in on one device while another device contains our passkeys, as is the case on some operating systems that do not support passkeys at the time of writing.

A passkey is built off another web API called WebAuthn. While the APIs are very similar, the WebAuthn API differs in that passkeys allow for cloud syncing of the cryptographic keys and do not require knowledge of whom the user is to log in, as that information is stored in a passkey with its Relying Party (RP) information. The two APIs otherwise share the same flows and cryptographic operations.

Storing Passkeys

Let’s look at an extremely high-level overview of how I’ve stored and kept track of passkeys in my demo repo. This is how the database is structured.

Basically, a users table has public_keys, which, in turn, contains information about the public key, as well as the public key itself.

From there, I’m caching certain information, including challenges to verify authenticity and data about the sessions in which the challenges take place.

Again, this is only a high-level look to give you a clearer idea of what information is stored and how it is stored.

Verifying Passkeys

There are several entities involved in passkey:

  1. The authenticator, which we previously mentioned, generates our key material.
  2. The client that triggers the passkey generation process via the navigator.credentials.create call.
  3. The Relying Party takes the resulting public key from that call and stores it to be used for subsequent verification.

In our case, you are the client and the Relying Party is the website server you are trying to sign up and log into. The authenticator can either be your mobile phone, a hardware key, or some other device capable of generating your cryptographic keys.

Passkeys are used in two phases: the attestation phase and the assertion phase. The attestation phase is likened to a registration that you perform when first signing up for a service. Instead of an email and password, we generate a passkey.
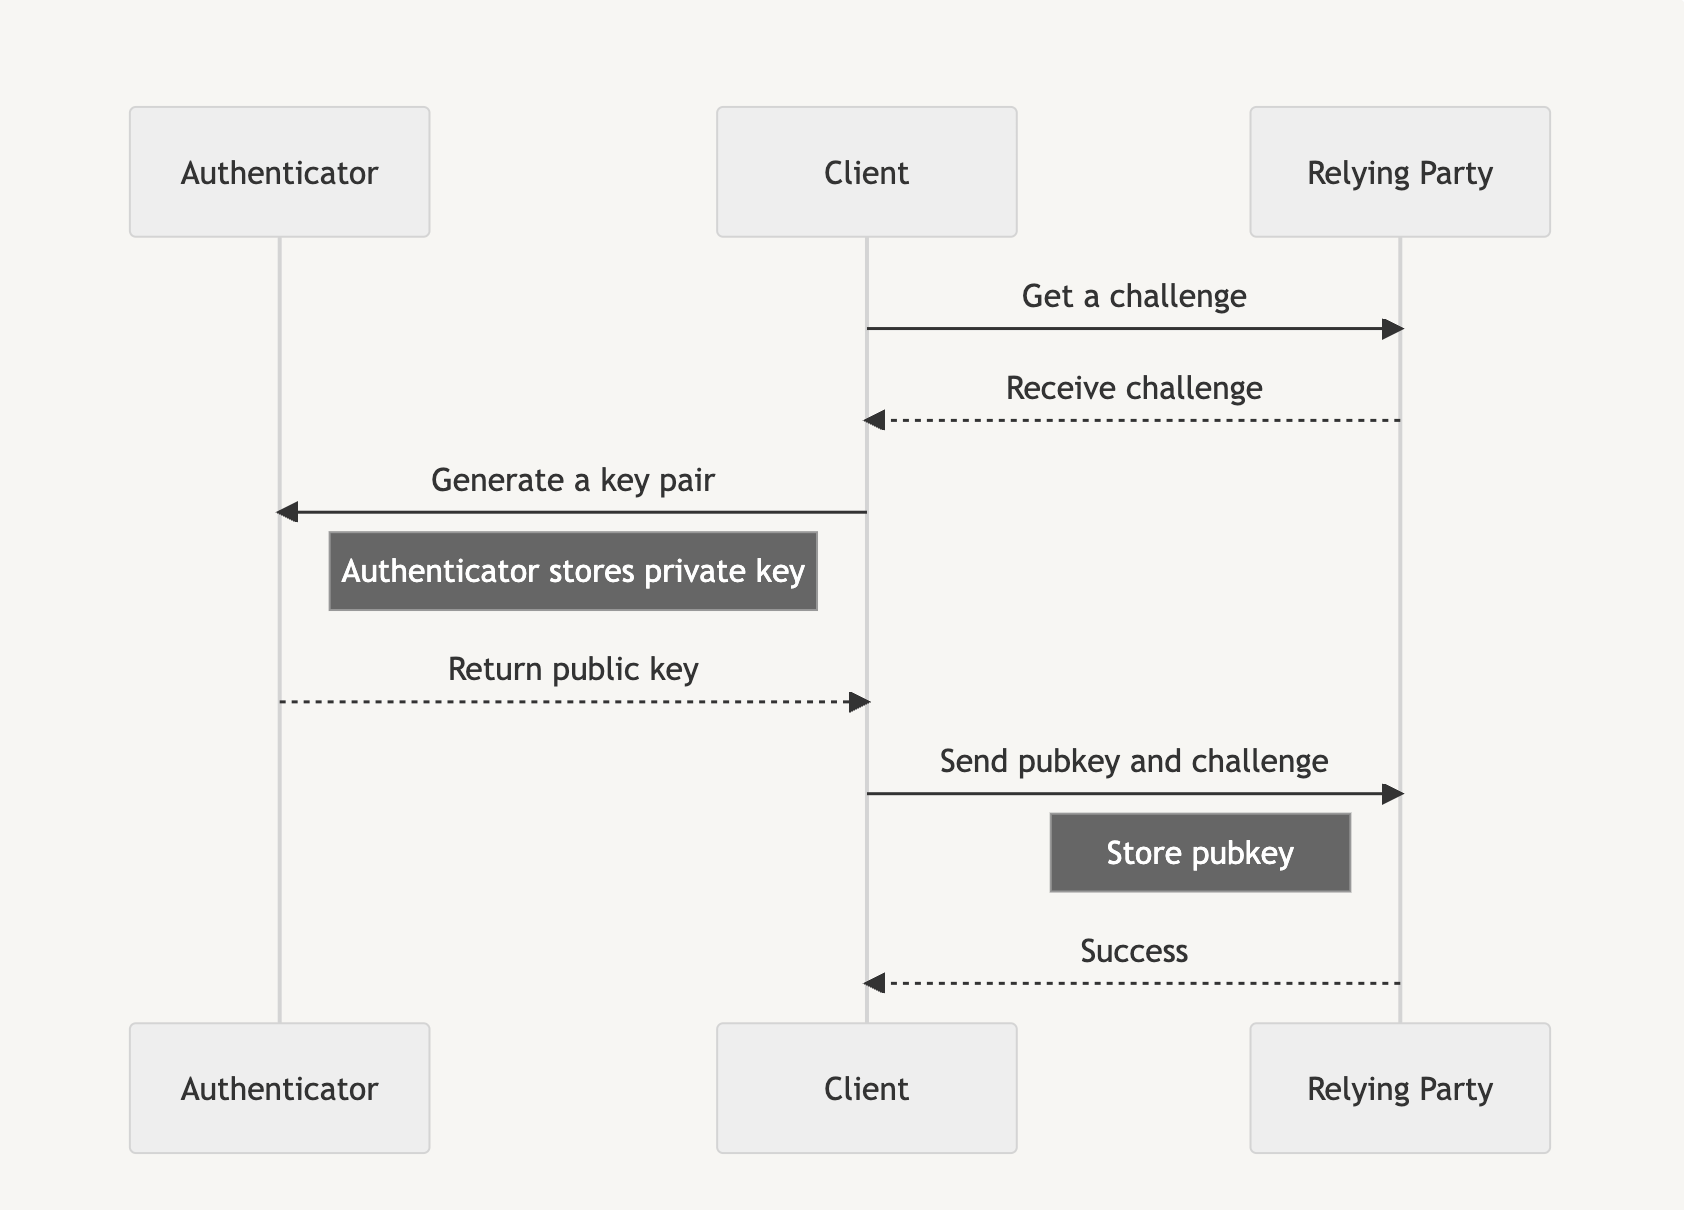
Assertion is similar to logging in to a service after we are registered, and instead of verifying with a username and password, we use the generated passkey to access the service.
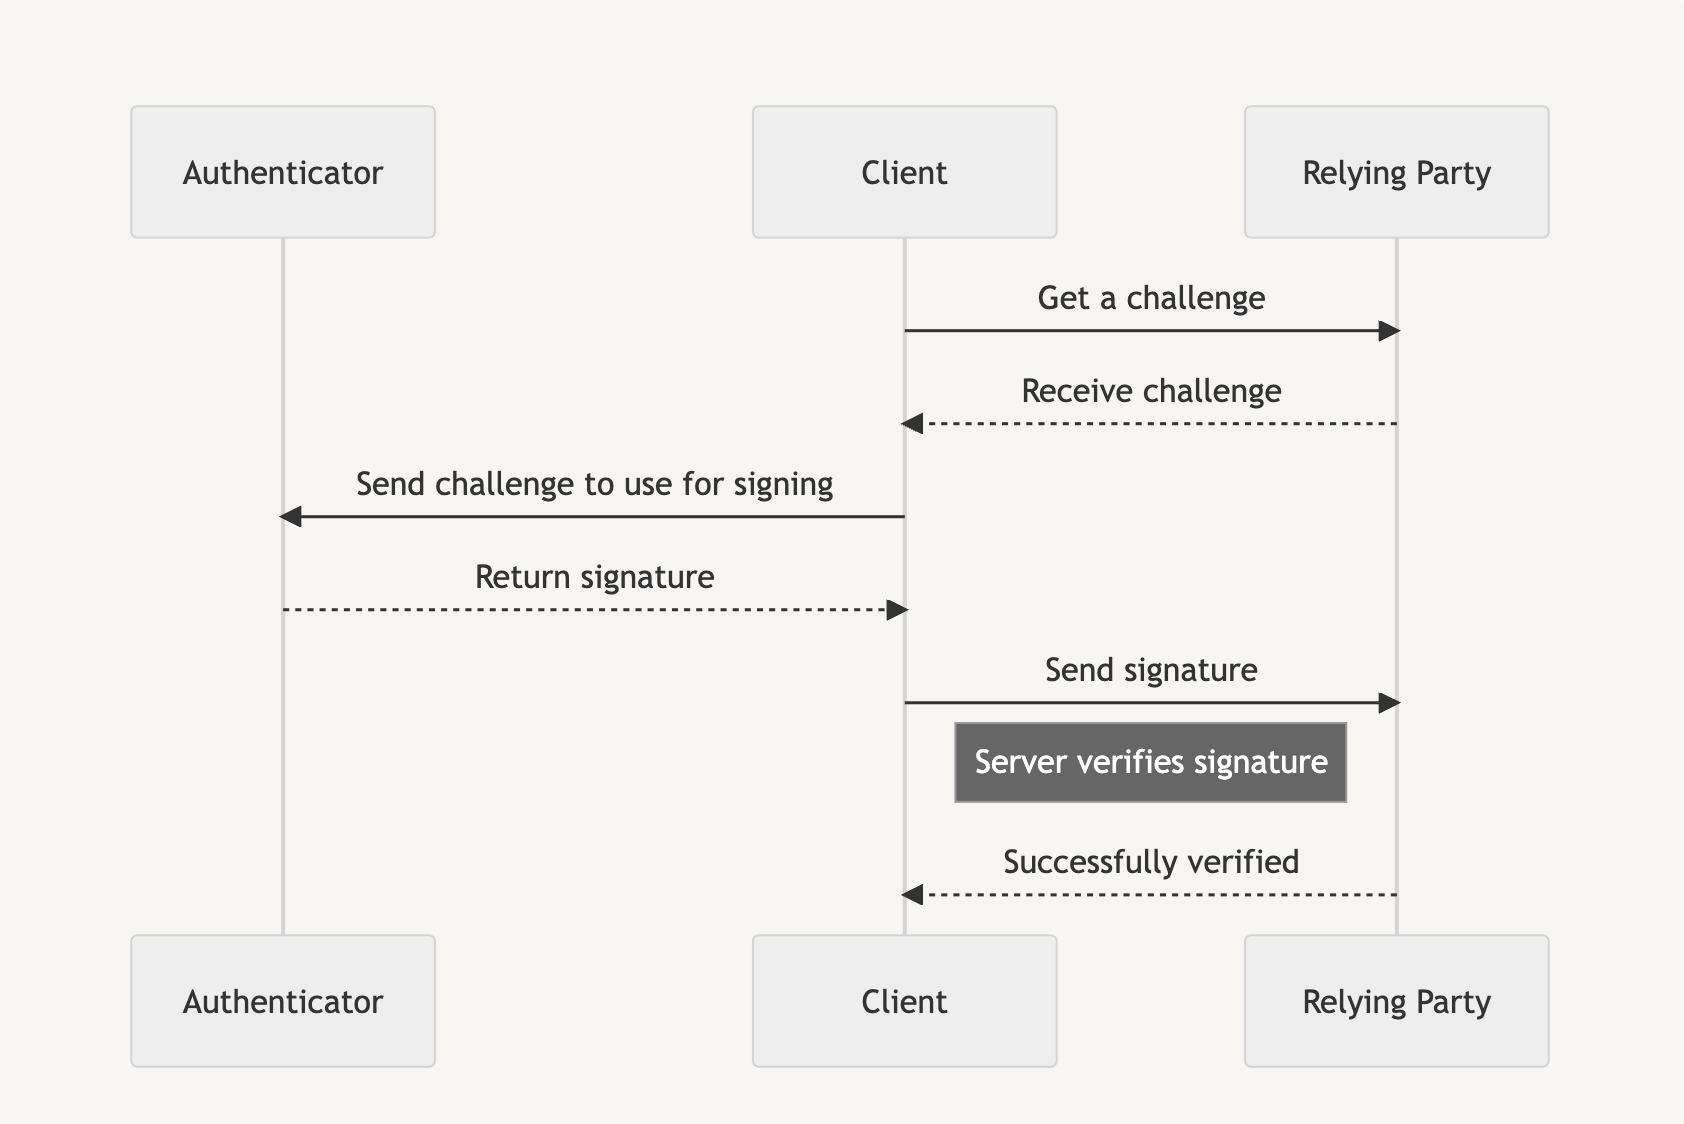
Each phase initially requires a random challenge generated by the Relying Party, which is then signed by the authenticator before the client sends the signature back to the Relying Party to prove account ownership.

Browser API Usage

We’ll be looking at how the browser constructs and supplies information for passkeys so that you can store and utilize it for your login process. First, we’ll start with the attestation phase and then the assertion phase.

Attest To It

The following shows how to create a new passkey using the navigator.credentials.create API. From it, we receive an AuthenticatorAttestationResponse, and we want to send portions of that response to the Relying Party for storage.

const { challenge } = await (await fetch("/attestation/generate")).json(); // Server call mock to get a random challenge

const options = {
 // Our challenge should be a base64-url encoded string
 challenge: new TextEncoder().encode(challenge),
 rp: {
  id: window.location.host,
  name: document.title,
 },
 user: {
  id: new TextEncoder().encode("my-user-id"),
  name: 'John',
  displayName: 'John Smith',
 },
 pubKeyCredParams: [ // See COSE algorithms for more: https://www.iana.org/assignments/cose/cose.xhtml#algorithms
  {
   type: 'public-key',
   alg: -7, // ES256
  },
  {
   type: 'public-key',
   alg: -256, // RS256
  },
  {
   type: 'public-key',
   alg: -37, // PS256
  },
 ],
 authenticatorSelection: {
  userVerification: 'preferred', // Do you want to use biometrics or a pin?
  residentKey: 'required', // Create a resident key e.g. passkey
 },
 attestation: 'indirect', // indirect, direct, or none
 timeout: 60_000,
};

// Create the credential through the Authenticator
const credential = await navigator.credentials.create({
 publicKey: options
});

// Our main attestation response. See: https://developer.mozilla.org/en-US/docs/Web/API/AuthenticatorAttestationResponse
const attestation = credential.response as AuthenticatorAttestationResponse;

// Now send this information off to the Relying Party
// An unencoded example payload with most of the useful information
const payload = {
 kid: credential.id,
 clientDataJSON: attestation.clientDataJSON,
 attestationObject: attestation.attestationObject,
 pubkey: attestation.getPublicKey(),
 coseAlg: attestation.getPublicKeyAlgorithm(),
};

The AuthenticatorAttestationResponse contains the clientDataJSON as well as the attestationObject. We also have a couple of useful methods that save us from trying to retrieve the public key from the attestationObject and retrieving the COSE algorithm of the public key: getPublicKey and getPublicKeyAlgorithm.

Let’s dig into these pieces a little further.

Parsing The Attestation clientDataJSON

The clientDataJSON object is composed of a few fields we need. We can convert it to a workable object by decoding it and then running it through JSON.parse.

type DecodedClientDataJSON = {
 challenge: string,
 origin: string,
 type: string
};

const decoded: DecodedClientDataJSON = JSON.parse(new TextDecoder().decode(attestation.clientDataJSON));
const {
 challenge,
 origin,
 type
} = decoded;

Now we have a few fields to check against: challenge, origin, type.

Our challenge is the Base64-url encoded string that was passed to the server. The origin is the host (e.g., https://my.passkeys.com) of the server we used to generate the passkey. Meanwhile, the type is webauthn.create. The server should verify that all the values are expected when parsing the clientDataJSON.

Decoding TheattestationObject

The attestationObject is a CBOR encoded object. We need to use a CBOR decoder to actually see what it contains. We can use a package like cbor-x for that.

import { decode } from 'cbor-x/decode';

enum DecodedAttestationObjectFormat {
  none = 'none',
  packed = 'packed',
}
type DecodedAttestationObjectAttStmt = {
  x5c?: Uint8Array[];
  sig?: Uint8Array;
};

type DecodedAttestationObject = {
  fmt: DecodedAttestationObjectFormat;
  authData: Uint8Array;
  attStmt: DecodedAttestationObjectAttStmt;
};

const decodedAttestationObject: DecodedAttestationObject = decode(
 new Uint8Array(attestation.attestationObject)
);

const {
 fmt,
 authData,
 attStmt,
} = decodedAttestationObject;
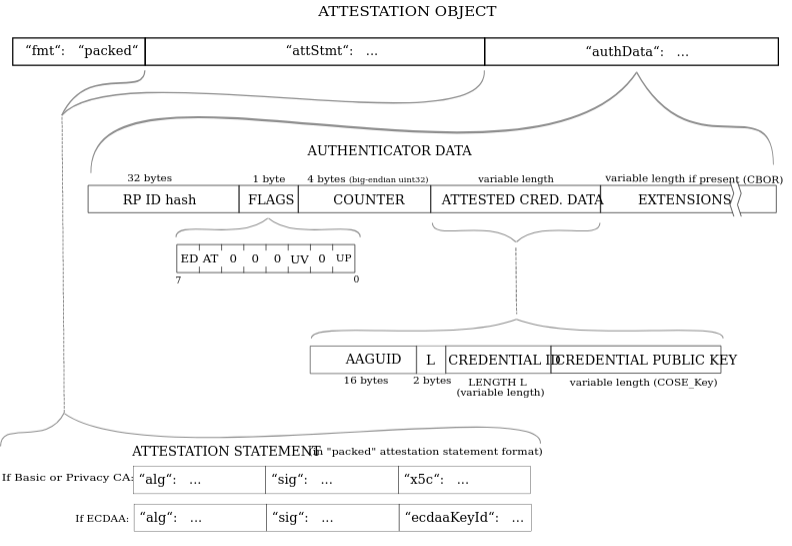
fmt will often be evaluated to "none" here for passkeys. Other types of fmt are generated through other types of authenticators.

Accessing authData

The authData is a buffer of values with the following structure:

Name Length (bytes) Description
rpIdHash 32 This is the SHA-256 hash of the origin, e.g., my.passkeys.com.
flags 1 Flags determine multiple pieces of information (specification).
signCount 4 This should always be 0000 for passkeys.
attestedCredentialData variable This will contain credential data if it’s available in a COSE key format.
extensions variable These are any optional extensions for authentication.

It is recommended to use the getPublicKey method here instead of manually retrieving the attestedCredentialData.

A Note About The attStmt Object

This is often an empty object for passkeys. However, in other cases of a packed format, which includes the sig, we will need to perform some authentication to verify the sig. This is out of the scope of this article, as it often requires a hardware key or some other type of device-based login.

Retrieving The Encoded Public Key

The getPublicKey method can retrieve the Subject Public Key Info (SPKI) encoded version of the public key, which is a different from the COSE key format (more on that next) within the attestedCredentialData that the decodedAttestationObject.attStmt has. The SPKI format has the benefit of being compatible with a Web Crypto importKey function to more easily verify assertion signatures in the next phase.

// Example of importing attestation public key directly into Web Crypto
const pubkey = await crypto.subtle.importKey(
  'spki',
  attestation.getPublicKey(),
  { name: "ECDSA", namedCurve: "P-256" },
  true,
  ['verify']
);

Generating Keys With COSE Algorithms

The algorithms that can be used to generate cryptographic material for a passkey are specified by their COSE Algorithm. For passkeys generated for the web, we want to be able to generate keys using the following algorithms, as they are supported natively in Web Crypto. Personally, I prefer ECDSA-based algorithms since the key sizes are quite a bit smaller than RSA keys.

The COSE algorithms are declared in the pubKeyCredParams array within the AuthenticatorAttestationResponse. We can retrieve the COSE algorithm from the attestationObject with the getPublicKeyAlgorithm method. For example, if getPublicKeyAlgorithm returned -7, we’d know that the key used the ES256 algorithm.

Name Value Description
ES512 -36 ECDSA w/ SHA-512
ES384 -35 ECDSA w/ SHA-384
ES256 -7 ECDSA w/ SHA-256
RS512 -259 RSASSA-PKCS1-v1_5 using SHA-512
RS384 -258 RSASSA-PKCS1-v1_5 using SHA-384
RS256 -257 RSASSA-PKCS1-v1_5 using SHA-256
PS512 -39 RSASSA-PSS w/ SHA-512
PS384 -38 RSASSA-PSS w/ SHA-384
PS256 -37 RSASSA-PSS w/ SHA-256

Responding To The Attestation Payload

I want to show you an example of a response we would send to the server for registration. In short, the safeByteEncode function is used to change the buffers into Base64-url encoded strings.

type AttestationCredentialPayload = {
  kid: string;
  clientDataJSON: string;
  attestationObject: string;
  pubkey: string;
  coseAlg: number;
};

const payload: AttestationCredentialPayload = {
  kid: credential.id,
  clientDataJSON: safeByteEncode(attestation.clientDataJSON),
  attestationObject: safeByteEncode(attestation.attestationObject),
  pubkey: safeByteEncode(attestation.getPublicKey() as ArrayBuffer),
  coseAlg: attestation.getPublicKeyAlgorithm(),
};

The credential id (kid) should always be captured to look up the user’s keys, as it will be the primary key in the public_keys table.

From there:

  1. The server would check the clientDataJSON to ensure the same challenge is used.
  2. The origin is checked, and the type is set to webauthn.create.
  3. We check the attestationObject to ensure it has an fmt of none, the rpIdHash of the authData, as well as any flags and the signCount.

Optionally, we could check to see if the attestationObject.attStmt has a sig and verify the public key against it, but that’s for other types of WebAuthn flows we won’t go into.

We should store the public key and the COSE algorithm in the database at the very least. It is also beneficial to store the attestationObject in case we require more information for verification. The signCount is always incremented on every login attempt if supporting other types of WebAuthn logins; otherwise, it should always be for 0000 for a passkey.

Asserting Yourself

Now we have to retrieve a stored passkey using the navigator.credentials.get API. From it, we receive the AuthenticatorAssertionResponse, which we want to send portions of to the Relying Party for verification.

const { challenge } = await (await fetch("/assertion/generate")).json(); // Server call mock to get a random challenge

const options = {
  challenge: new TextEncoder().encode(challenge),
  rpId: window.location.host,
  timeout: 60_000,
};

// Sign the challenge with our private key via the Authenticator
const credential = await navigator.credentials.get({
  publicKey: options,
  mediation: 'optional',
});

// Our main assertion response. See: <https://developer.mozilla.org/en-US/docs/Web/API/AuthenticatorAssertionResponse>
const assertion = credential.response as AuthenticatorAssertionResponse;

// Now send this information off to the Relying Party
// An example payload with most of the useful information
const payload = {
  kid: credential.id,
  clientDataJSON: safeByteEncode(assertion.clientDataJSON),
  authenticatorData: safeByteEncode(assertion.authenticatorData),
  signature: safeByteEncode(assertion.signature),
};

The AuthenticatorAssertionResponse again has the clientDataJSON, and now the authenticatorData. We also have the signature that needs to be verified with the stored public key we captured in the attestation phase.

Decoding The Assertion clientDataJSON

The assertion clientDataJSON is very similar to the attestation version. We again have the challenge, origin, and type. Everything is the same, except the type is now webauthn.get.

type DecodedClientDataJSON = {
  challenge: string,
  origin: string,
  type: string
};

const decoded: DecodedClientDataJSON = JSON.parse(new TextDecoder().decode(assertion.clientDataJSON));
const {
  challenge,
  origin,
  type
} = decoded;

Understanding The authenticatorData

The authenticatorData is similar to the previous attestationObject.authData, except we no longer have the public key included (e.g., the attestedCredentialData ), nor any extensions.

Name Length (bytes) Description
rpIdHash 32 This is a SHA-256 hash of the origin, e.g., my.passkeys.com.
flags 1 Flags that determine multiple pieces of information (specification).
signCount 4 This should always be 0000 for passkeys, just as it should be for authData.

Verifying The signature

The signature is what we need to verify that the user trying to log in has the private key. It is the result of the concatenation of the authenticatorData and clientDataHash (i.e., the SHA-256 version of clientDataJSON).

To verify with the public key, we need to also concatenate the authenticatorData and clientDataHash. If the verification returns true, we know that the user is who they say they are, and we can let them authenticate into the application.

Here’s an example of how this is calculated:

const clientDataHash = await crypto.subtle.digest(
  'SHA-256',
  assertion.clientDataJSON
);
// For concatBuffer see: <https://github.com/nealfennimore/passkeys/blob/main/src/utils.ts#L31>
const data = concatBuffer(
  assertion.authenticatorData,
  clientDataHash
);

// NOTE: the signature from the assertion is in ASN.1 DER encoding. To get it working with Web Crypto
//We need to transform it into r|s encoding, which is specific for ECDSA algorithms)
//
// For fromAsn1DERtoRSSignature see: <https://github.com/nealfennimore/passkeys/blob/main/src/crypto.ts#L60>'
const isVerified = await crypto.subtle.verify(
  { name: 'ECDSA', hash: 'SHA-256' },
  pubkey,
  fromAsn1DERtoRSSignature(signature, 256),
  data
);

Sending The Assertion Payload

Finally, we get to send a response to the server with the assertion for logging into the application.

type AssertionCredentialPayload = {
  kid: string;
  clientDataJSON: string;
  authenticatorData: string;
  signature: string;
};

const payload: AssertionCredentialPayload = {
  kid: credential.id,
  clientDataJSON: safeByteEncode(assertion.clientDataJSON),
  authenticatorData: safeByteEncode(assertion.authenticatorData),
  signature: safeByteEncode(assertion.signature),
};

To complete the assertion phase, we first look up the stored public key, kid.

Next, we verify the following:

  • clientDataJSON again to ensure the same challenge is used,
  • The origin is the same, and
  • That the type is webauthn.get.

The authenticatorData can be used to check the rpIdHash, flags, and the signCount one more time. Finally, we take the signature and ensure that the stored public key can be used to verify that the signature is valid.

At this point, if all went well, the server should have verified all the information and allowed you to access your account! Congrats — you logged in with passkeys!

No More Passwords?

Do passkeys mean the end of passwords? Probably not… at least for a while anyway. Passwords will live on. However, there’s hope that more and more of the industry will begin to use passkeys. You can already find it implemented in many of the applications you use every day.

Passkeys was not the only implementation to rely on cryptographic means of authentication. A notable example is SQRL (pronounced “squirrel”). The industry as a whole, however, has decided to move forth with passkeys.

Hopefully, this article demystified some of the internal workings of passkeys. The industry as a whole is going to be using passkeys more and more, so it’s important to at least get acclimated. With all the security gains that passkeys provide and the fact that it’s resistant to phishing attacks, we can at least be more at ease browsing the internet when using them.

Categories: Others Tags:

What I Wish I Knew About Working In Development Right Out Of School

October 27th, 2023 No comments

My journey in front-end web development started after university. I had no idea what I was going into, but it looked easy enough to get my feet wet at first glance. I dug around Google and read up on tons of blog posts and articles about a career in front-end. I did bootcamps and acquired a fancy laptop. I thought I was good to go and had all I needed.

Then reality started to kick in. It started when I realized how vast of a landscape Front-End Land is. There are countless frameworks, techniques, standards, workflows, and tools — enough to fill a virtual Amazon-sized warehouse. Where does someone so new to the industry even start? My previous research did nothing to prepare me for what I was walking into.

Fast-forward one year, and I feel like I’m beginning to find my footing. By no means do I consider myself a seasoned veteran at the moment, but I have enough road behind me to reflect back on what I’ve learned and what I wish I knew about the realities of working in front-end development when starting out. This article is about that.

The Web Is Big Enough For Specializations

At some point in my journey, I enrolled myself in a number of online courses and bootcamps to help me catch up on everything from data analytics to cybersecurity to software engineering at the same time. These were things I kept seeing pop up in articles. I was so confused; I believed all of these disciplines were interchangeable and part of the same skill set.

But that is just what they are: disciplines.

What I’ve come to realize is that being an “expert” in everything is a lost cause in the ever-growing World Wide Web.

Sure, it’s possible to be generally familiar with a wide spectrum of web-related skills, but it’s hard for me to see how to develop “deep” learning of everything. There will be weak spots in anyone’s skillset.

It would take a lifetime masterclass to get everything down-pat. Thank goodness there are ways to specialize in specific areas of the web, whether it is accessibility, performance, standards, typography, animations, interaction design, or many others that could fill the rest of this article. It’s OK to be one developer with a small cocktail of niche specialties. We need to depend on each other as much as any Node package in a project relies on a number of dependencies.

Burnout And Imposter Syndrome Are Real

My initial plan for starting my career was to master as many skills as possible and start making a living within six months. I figured if I could have a wide set of strong skills, then maybe I could lean on one of them to earn money and continue developing the rest of my skills on my way to becoming a full-stack developer.

I got it wrong. It turned out that I was chasing my tail in circles, trying to be everything to everyone. Just as I’d get an “a-ha!” moment learning one thing, I’d see some other new framework, CSS feature, performance strategy, design system, and so on in my X/Twitter feed that was calling my attention. I never really did get a feeling of accomplishment; it was more a fear of missing out and that I was an imposter disguised as a front-ender.

I continued burning the candle at both ends to absorb everything in my path, thinking I might reach some point at which I could call myself a full-stack developer and earn the right to slow down and coast with my vast array of skills. But I kept struggling to keep up and instead earned many sleepless nights cramming in as much information as I could.

Burnout is something I don’t wish on anyone. I was tired and mentally stressed. I could have done better. I engaged in every Twitter space or virtual event I could to learn a new trick and land a steady job. Imagine that, with my busy schedule, I still pause it to listen to hours of online events. I had an undying thirst for knowledge but needed to channel it in the right direction.

We Need Each Other

I had spent so much time and effort consuming information with the intensity of a firehose running at full blast that I completely overlooked what I now know is an essential asset in this industry: a network of colleagues.

I was on my own. Sure, I was sort of engaging with others by reading their tutorials, watching their video series, reading their social posts, and whatnot. But I didn’t really know anyone personally. I became familiar with all the big names you probably know as well, but it’s not like I worked or even interacted with anyone directly.

What I know now is that I needed personal advice every bit as much as more technical information. It often takes the help of someone else to learn how to ride a bike, so why wouldn’t it be the same for writing code?

Having a mentor or two would have helped me maintain balance throughout my technical bike ride, and now I wish I had sought someone out much earlier.

I should have asked for help when I needed it rather than stubbornly pushing forward on my own. I was feeding my burnout more than I was making positive progress.

Start With The Basics, Then Scale Up

My candid advice from my experience is to start learning front-end fundamentals. HTML and CSS are unlikely to go away. I mean, everything parses in HTML at the end of the day, right? And CSS is used on 97% of all websites.

The truth is that HTML and CSS are big buckets, even if they are usually discounted as “basic” or “easy” compared to traditional programming languages. Writing them well matters for everything. Sure, go ahead and jump straight to JavaScript, and it’s possible to cobble together a modern web app with an architecture of modular components. You’ll still need to know how your work renders and ensure it’s accessible, semantic, performant, cross-browser-supported, and responsive. You may pick those skills up along the way, but why not learn them up-front when they are essential to a good user experience?

So, before you click on yet another link extolling the virtues of another flavor of JavaScript framework, my advice is to start with the essentials:

  • What is a “semantic” HTML element?
  • What is the CSS Box Model, and why does it matter?
  • How does the CSS Cascade influence the way we write styles?
  • How does a screenreader announce elements on a page?
  • What is the difference between inline and block elements?
  • Why do we have logical properties in CSS when we already have physical ones?
  • What does it mean to create a stacking context or remove an element from the document flow?
  • How do certain elements look in one browser versus another?

The list could go on and on. I bet many of you know the answers. I wonder, though, how many you could explain effectively to someone beginning a front-end career. And, remember, things change. New standards are shipped, new tricks are discovered, and certain trends will fade as quickly as they came. While staying up-to-date with front-end development on a macro level is helpful, I’ve learned to integrate specific new technologies and strategies into my work only when I have a use case for them and concentrate more on my own learning journey — establish a solid foundation with the essentials, then progress to real-life projects.

Progress is a process. May as well start with evergreen information and add complexity to your knowledge when you need it instead of drinking from the firehose at all times.

There’s A Time And Place For Everything

I’ll share a personal story. I spent over a month enrolled in a course on React. I even had to apply for it first, so it was something I had to be accepted into — and I was! I was super excited.

I struggled in the class, of course. And, yes, I dropped out of the program after the first month.

I don’t believe struggling with the course or dropping out of it is any indication of my abilities. I believe it has a lot more to do with timing. The honest truth is that I thought learning React before the fundamentals of front-end development was the right thing to do. React seemed to be the number one thing that everyone was blogging about and what every employer was looking for in a new hire. The React course I was accepted into was my ticket to a successful and fulfilling career!

My motive was right, but I was not ready for it. I should have stuck with the basics and scaled up when I was good and ready to move forward. Instead of building up, I took a huge shortcut and wound up paying for it in the end, both in time and money.

That said, there’s probably no harm in dipping your toes in the water even as you learn the basics. There are plenty of events, hackathons, and coding challenges that offer safe places to connect and collaborate with others. Engaging in some of these activities early on may be a great learning opportunity to see how your knowledge supports or extends someone else’s skills. It can help you see where you fit in and what considerations go into real-life projects that require other people.

There was a time and place for me to learn React. The problem is I jumped the gun and channeled my learning energy in the wrong direction.

If I Had To Do It All Over Again…

This is the money question, right? Everyone wants to know exactly where to start, which classes to take, what articles to read, who to follow on socials, where to find jobs, and so on. The problem with highly specific advice like this is that it’s highly personalized as well. In other words, what has worked for me may not exactly be the right recipe for you.

It’s not the most satisfying answer, but the path you take really does depend on what you want to do and where you want to wind up. Aside from gaining a solid grasp on the basics, I wouldn’t say your next step is jumping into React when your passion is web typography. Both are skill sets that can be used together but are separate areas of concern that have different learning paths.

So, what would I do differently if I had the chance to do this all over again?

For starters, I wouldn’t skip over the fundamentals like I did. I would probably find opportunities to enhance my skills in those areas, like taking the FreeCodeCamp’s responsive web design course or practice recreating designs from the Figma community in CodePen to practice thinking strategically about structuring my code. Then, I might move on to the JavaScript Algorithms and Data Structures course to level up basic JavaScript skills.

The one thing I know I would do right away, though, is to find a mentor whom I can turn to when I start feeling as though I’m struggling and falling off track.

Or maybe I should have started by learning how to learn in the first place. Figuring out what kind of learner I am and familiarizing myself with learning strategies that help me manage my time and energy would have gone a long way.

Oh, The Places You’ll Go!

Front-end development is full of opinions. The best way to navigate this world is by mastering the basics. I shared my journey, mistakes, and ways of doing things differently if I were to start over. Rather than prescribing you a specific way of going about things or giving you an endless farm of links to all of the available front-end learning resources, I’ll share a few that I personally found helpful.

In the end, I’ve found that I care a lot about contributing to open-source projects, participating in hackathons, having a learning plan, and interacting with mentors who help me along the way, so those are the buckets I’m organizing things into.

Open Source Programs

Hackathons

Developer Roadmaps

Mentorship

Whatever your niche is, wherever your learning takes you, just make sure it’s yours. What works for one person may not be the right path for you, so spend time exploring the space and picking out what excites you most. The web is big, and there is a place for everyone to shine, especially you.

Categories: Others Tags:

How to Create Forms in WordPress 6.3 Using the Jotform Plugin

October 27th, 2023 No comments

WordPress and Jotform help simplify website form creation and management. This tutorial shows how to use the Jotform plugin to add Jotforms to WordPress.

Jotform, a popular online form builder, makes it easy to construct everything from contact forms to surveys and registrations. Jotform can improve user engagement, data collection, and user experience by integrating with WordPress.

Sign up for Jotform

You must first create a Jotform account in order to use Jotform on your WordPress website. In order to create your Jotform account, follow these steps:

  • Visit Jotform’s website.
  • Click on the “Sign Up” button located in the top right corner.
  • Fill out the registration form with your name, email address, and password.
  • After completing the registration, click “Create My Account.”

You may create and modify forms for your website using Jotform’s form-building platform, which you can use when you join up.

Install the Jotform Plugin on Your Site

Installing the Jotform Online Forms plugin is required in order to integrate Jotform with your WordPress website. This is how you do it:

  • Open your WordPress Dashboard.
  • Navigate to the “Plugins” section in the sidebar and click on “Add New.”
  • In the search field, type “Jotform Online Forms” and press Enter.
  • When the plugin appears in the search results, click the “Install Now” button.
  • After the installation is complete, click the “Activate” button to activate the Jotform plugin.

Now that the Jotform plugin is activated and installed, you may create and integrate forms on your WordPress website.

Create a New Form

You can begin developing forms now that Jotform is linked to your WordPress website. To build a new form using Jotform, take the following actions:

  • Using the login information you provided at registration, access your Jotform account.
  • Click the “Create Form” button in your Jotform dashboard, then choose “Use Template.”
  • You can look for a template that works well for your form. We’ll utilize a “Contact Us” template in this example.
  • To make sure the chosen template satisfies your needs, you can preview it.
  • Alternatively, you can begin with a blank template if you would rather start from scratch and design a form with unique fields and layout.

With Jotform’s intuitive drag-and-drop interface, you can quickly and simply adjust the fields and look of your form.

Embed the Form on a Page or Post

After creating your Jotform form, embed it in a WordPress page or post. Jotform forms are easy to add to WordPress pages and posts because of its block-based editor.

WordPress 6.3 uses blocks for content and images. Blocks organize text, graphics, and forms, making content arrangement more natural and versatile.

Method 1: Include via Classic Editor Block

  • Open the page or post where you want to include Jotform.
  • In the content editor, type /classic where you want to add the form.
  • Select the “Classic” block from the available blocks.
  • Within the Classic block, you’ll find the Jotform icon; click on it.
  • You’ll be prompted to log in to your Jotform account. After logging in, select the form you created earlier.
  • Save the Classic block, and then preview the page. Your form should now be displayed on the page.

Method 2: Include via Shortcode Block

WordPress shortcodes are unique blocks that let you add features from different plugins straight into your page. In this instance, your form will be shown using the Jotform shortcode.

  • On Jotform.com, open the form you want to embed.
  • Click on the “Publish” tab within the form builder.
  • Go back to your WordPress page or post.
  • Create a new Shortcode block by typing /shortcode in the content editor.
  • Insert the following code into the Shortcode block, replacing with the actual ID of your form:

[jotform id=”” title=”Simple Contact Us Form”]

The resulting block should look something like this:

You may quickly add Jotform forms to your WordPress content by utilizing the Shortcode block or the Classic Editor.

Choose a High-Quality WordPress Theme to Showcase Your Forms

Choosing a premium WordPress theme is essential to the usability of your website. How nicely your Jotform forms integrate with the rest of your website can be significantly influenced by the theme you choose. A well-thought-out theme can improve the user experience and give your forms a more polished appearance.

Consider features like style, responsiveness, customization options, and Jotform plugin compatibility when selecting a premium WordPress theme for your website.

On the website The Bootstrap Themes, you may browse a selection of premium themes. Make sure the theme you select complements the design and objectives of your website.

Conclusion

You now know how to use the Jotform plugin to easily incorporate Jotform forms into your WordPress website by following this step-by-step tutorial. This combo improves the functionality and user experience of your website by making it simple to create, modify, and integrate forms. You may effectively gather data, interact with your audience, and optimize several website processes by following these guidelines.

It’s important to select a WordPress theme of superior quality that goes well with your Jotform forms so that your website appears unified and expert. With these tools at your disposal, you may maximize the potent capabilities offered by Jotform and improve your WordPress website.  Begin constructing and integrating forms right now to improve the functionality of your website.

Featured image by Jotform on Unsplash

The post How to Create Forms in WordPress 6.3 Using the Jotform Plugin appeared first on noupe.

Categories: Others Tags:

From Image Adjustments to AI: Photoshop Through the Years

October 27th, 2023 No comments

Remember when Merriam-Webster added Photoshop to the dictionary back in 2008? Want to learn how AI is changing design forever? Join us as we delve into the history of Photoshop, from its early beginnings right through to the dawn of artificial intelligence.

Categories: Designing, Others Tags:

Reeling Them Back: Retargeting Ads That Convert on Facebook

October 26th, 2023 No comments

Ever wondered how some ads seem to follow you around online? That’s Facebook retargeting at work! It’s a smart way to grab the attention of people who’ve already checked out your products. In the world of digital marketing, where standing out is a challenge, retargeting is like giving potential customers a friendly nudge, reminding them about your awesome products or services. We’ll dive into the secrets of making retargeting ads work like a charm on Facebook. From eye-catching pictures to words that make you want to click, we’ll explore how to get people excited about your brand again. Let’s roll up our sleeves and make those ads pop!

The Power of Facebook Retargeting

Imagine a digital strategy that consistently drives higher conversion rates, leading potential customers back to your offerings. That’s the essence of Facebook retargeting – a method that personalizes the customer journey and yields remarkable outcomes.

The data speaks for itself. When comparing retargeting to prospecting, the difference in conversion rates (CRs) is stark. Retargeting campaigns shine with a median CR of 3.8%, effortlessly outshining prospecting’s 1.5%. These data underscore the prowess of retargeting.

Diving deeper, a more detailed analysis highlights an intriguing discrepancy in retargeting CRs between the United States and other parts of the world. This nuance emphasizes the adaptability and potential of retargeting on a global scale.

Segmenting Audience for Precision and Clarity

A really important aspect of effective Facebook retargeting lies in audience segmentation. By distinctly separating your prospecting and retargeting audience, you gain a clearer understanding of performance metrics and pave the way for more efficient cost management.

Here’s the rationale: Retargeting and prospecting serve different purposes and inherently target distinct audiences. Retargeting focuses on individuals who’ve already engaged with your brand, noting them along the path to conversion. On the other hand, prospecting aims to cast a wider audience, introducing your brand to potential customers who might not yet be familiar with it.

Retargeting vs. Prospecting metrics

Now let’s talk numbers. It’s a known fact that retargeting ads generally come with higher CPM (cost per mill) compared to prospecting ads. The reason behind this is the audience size. Retargeting audiences are naturally smaller since they comprise individuals who’ve interacted with your brand before. This smaller pool leads to a higher CPM for retargeting ads.

When you combine these two audiences in your metrics, you’re essentially mixing different dynamics. This can lead to skewed insights and an inaccurate representation of your campaign’s true performance. If retargeting and prospecting metrics are combined, the overall CPM may appear inflated due to the presence of higher-cost retargeting ads. This could potentially mark the cost-effectiveness of your prospecting efforts.

Creating Compelling Ad Components

When it comes to creating retargeting ads on Facebook, the art lies in combining compelling elements that engage, entice, and resonate with your audience. Let’s dive deeper into the core components that can turn a casual viewer into a converted customer.

  1. Captivating Visuals

The role of retargeting ads is to stop scrolling and make users pause for a second glance. This is where the power of eye-catching visuals comes into play. 

Consider visuals that are not just aesthetically pleasing but also encapsulate your brand’s essence. Whether it’s vibrant product images or lifestyle shots that evoke emotion, visuals should tell a story that resonates with your audience. To stand out, aim for high-quality images or videos that are well-lit, well-composed, and aligned with your brand’s visual identity.

  1. Irresistible CTAa (Call to Action)

An effective retargeting ad relies on a well-defined Call to Action (CTA) that guides customers toward the desired action. The CTA serves as a clear direction, steering customers through their journey. It’s essential that the CTA is succinct, compelling, and in harmony with the customer’s path.

Effective CTAs create a sense of urgency or offer tangible value. Consider “Limited Time Offer – Shop Now!” or “Unlock 20% Off – Get Yours Today!” Always keep the customer’s benefit in mind when creating your CTA – it’s the final nudge that propels them toward conversion.

  1. Highlighting Value Propositions

Your retargeting ad is a chance to showcase what makes your brand or product unique. Highlight key benefits and value propositions that set you apart from the competition. Whether it’s quality, affordability, or a specific feature, make it crystal clear why choosing your brand is the right decision.

For instance, “Experience Unmatched Sound Quality” or “Transform Your Cooking with Chef-Grade Knives” communicates the value your product offers in a succinct manner.

Leveraging Pricing Details for Effective Retargeting

When we talk about retargeting ads, how you show prices can be a strong tactic, But just like any strategy, there are things to think about. Let’s look at using pricing info in retargeting ads – the good things it does and the possible not-so-good things.

The Pros and Cons of Pricing Details

Including pricing details in your retargeting ads can be a double-edged sword. On one hand, it offers transparency, setting clear expectations for potential customers. Seeing the price upfront eliminates ambiguity and ensures that those who engage further are genuinely interested.

However, there’s a potential downside. Displaying pricing information could lead some users to make swift judgments based solely on cost. If your product or service is positioned as a premium offering with a higher price point, those who focus solely on price might miss out on the value and benefits your brand provides.

Strategic Application of Pricing Information

So, when should you deploy pricing details to attract potential customers? Here’s where understanding your audience’s journey comes into play. If your data reveals that users who engaged with your brand are particularly price-sensitive, mentioning a discount or showcasing a competitive price could be a smart move.

Our data points to an interesting trend – the absence of a discount in retargeting ads can sometimes yield negative consequences. Users who have interacted with your brand previously might be expecting a little extra incentive, and the absence of one could lead to disengagement.

Getting the Timing Right: Ad Frequency and Engagement

Timing is everything, especially in the world of retargeting ads. Let’s break down the concept of ad frequency and how it can affect how people engage with your ads.

Understanding Ad Frequency

Ad frequency is how often someone sees your retargeting ad. It’s like how many times you hear your favorite song on the radio – too much, and you might get tired of it. The same goes for ads. If someone keeps seeing your ad again and again, it can start feeling a bit overwhelming.

Striking the Right Balance

Finding the sweet spot for ad frequency is key. You want to remind people about your brand without becoming a digital pest. The goal is to avoid something called “ad fatigue,” where users get so used to your ad that they start ignoring it – not what we want.

So, how do you strike that balance? Well, it depends on your audience and your goals. Generally, showing your retargeting ad a few times over a specific period can work well. It’s like saying, “Hey, we’re still here,” without saying it too many times.

Remember, timing matters too. Showing your ad at the right moments can have a bigger impact. For instance, if someone abandons their cart, showing them a reminder shortly after can be more effective than waiting too long.

Retargeting ads: A/B Testing and Optimization

Now, let’s delve into a powerful method to make your retargeting ads even better – A/B testing. It’s like trying out different options to see which one works best. A/B testing lets you experiment with various parts of your ads to find out what makes people more interested.

A/B testing is like running experiments to improve your ads. Instead of guessing, you’re using real tests to see what gets better results. It’s similar to trying different ways of doing something to find the most effective one.

What You Can Test

Let’s break down what you can test. First, visuals – the images or videos in your ads. Change them to see which ones catch more attention. Next, CTAs – the buttons that tell people what to do. Try different words to see which ones make more people click.

Messaging is another part – the words you use in your ad. Test different messages to see what resonates better with your audience. Lastly, pricing – experiment with different prices or discounts to see what encourages more people to make a purchase.

How to Test

Testing is simple. Create two versions of your ad: one with the change you want to test (Version A) and one without the change (Version B). Then, show these versions to different people and see which one gets a better response.

A/B testing helps you find the best formula for your ads. By trying out different approaches, you’ll discover what works best for your audience

Summing up

Facebook retargeting is your way of reconnecting with potential customers who’ve already shown interest in your brand. By creating compelling ads with eye-catching visuals, clear calls to action, personalized messages, and emphasizing value, you engage your audience on their terms. Tracking performance and employing A/B testing further enhance your strategy. Remember, understanding your audience, monitoring performance, and continual improvement are key to effective retargeting. By combining these elements, you can confidently guide your retargeting efforts, leading to more conversions and stronger customer relationships.

Featured image by Greg Bulla on Unsplash

The post Reeling Them Back: Retargeting Ads That Convert on Facebook appeared first on noupe.

Categories: Others Tags:

Identity Verification Unveiled: 6 Must-Know Trends In 2023

October 25th, 2023 No comments

It is now more critical than ever to verify your identity at the same time as having access to your bank account, email account, or making a web purchase. In anticipation of 2023, the destiny of identification verification evolves, placing current new eras and techniques in the foreground.

The essay will describe six tendencies expected to alternate identification verification by 2023, and it will likely be surprisingly informative. First, with virtual living, there are conveniences such as biometric integration or identity fusion, finally acknowledging that artificial intelligence is significant.

These advancements will protect identity online as long as companies keep pace with them to ensure that people can always browse. Consequently, it will be possible for us to take a journey of exploration into the identification validation area that is expanding rapidly, changeable, and ever-changing.

1. Decentralized Identity and Self Sovereign Identity (SSI).

red padlock on black computer keyboard
Source

In 2023, self-sovereign identity or decentralized identification became famous. This enables people to have more opportunities for sharing and exploiting their data. What you need to know is as follows:

Blockchain as a Trust Anchor

Blockchain Technology and Decentralized Identifier – Providing Immutable Record System for Tracking and Verification of Identities. Identity verifications have become genuine and public due to the lack of a centralized government or an arbiter.

User-Centric Identity

By giving users control, SSI flips the script on conventional identity verification. With SSI, people may save and selectively share their identity data on their devices, lowering the risk of data breaches and identity theft. This pattern coincides with rising worries about data privacy and the need for more control over individual information.

2. Two-Factor Authentication

pink and silver padlock on black computer keyboard
Source

The ongoing war against identity theft requires instruments such as two-factor or multi-factor authentication. The customer should enter the code emailed or sent to their mobile phone. The verification method can easily be recognized by customers, and also understand how to use it. 

You can verify a customer’s email addresses and phone numbers in minutes with 2FA or MFA. That is a vital check when ensuring that your customers have inputted correct data.

When employing two-factor or multi-factor authentication, users are often required to provide a form of personal identification in addition to the standard username and password. The requirement for a token serves as a strong fraud deterrent. Thus, users should physically possess or memorize the token, such as a code they have received from the authentication service provider. 

3. Knowledge-Based Authentication

Using security questions, KBA confirms the user’s identity since it is built upon previous experience. These questions are often simple to answer for the respondent, yet they pose a problem to other people. However, KBA has some preventive procedures, including asking, “What was your favorite teacher?” and “What number of pets do you have?” for example. 

Some of them require answers in a specified duration. First and foremost, KBA is the most practical form of verification. However, social networking provides quick solutions for problems as a drawback. Other, more indirect methods may be used in social engineering.

4. AI and Machine Learning for Enhanced Verification

With AI/ML for identity verification, the process has become better targeted and efficient. How these technologies are influencing the environment is as follows:

Enhanced Document Verification

The document-checking tools driven by AI can detect at once if the given document, like a passport, license, or utility bill, is not fake. Using these instruments reduces the danger of unlawfulness inherent in false documents.

Advanced Fraud Detection

Systems of artificial intelligence-driven fraud detection continually learn about new fraud patterns. Anomalies are uncovered, reported, and stopped in real time as they occur.

Improved User Experience

The user experience is also being streamlined using AI and ML. They can determine a user’s legitimacy based on their actions and historical data, eliminating the need for onerous verification procedures.

5. Database Methods

Database ID approaches use data from various sources to verify a person’s identity card. Database approaches are frequently used to assess a user’s level of risk because they significantly minimize the need for manual assessments. 

6. Regulatory Compliance and KYC (Know Your Customer) Evolution

a person holding a phone
Source

Regulatory compliance is still driving identity verification trends. To keep up with technological improvements, KYC standards are changing:

Digital Identity Ecosystems

Developing Digital Identity Ecosystems. The ecosystem of identity comprises networks built to guarantee privacy, safety, and continuity in proving one’s online identity. These include biometrics, digital ID cards, electronic identity proofing, and blockchain-based solutions.

Global Regulatory Harmonization

As cross-border transactions intensify, the need for KYC standards’ global harmonization increases. Organizations, therefore, are adopting standardized procedures as a means to conform to more than one jurisdiction.

Bottomline 

As society changes its digital landscape with each year coming closer to 2023, identity verification remains one of the most essential elements for preserving online security and good quality user experience. The critical dimensions influencing the identity verification environment are biometric authentication, decentralized identity, innovations in AI And ML, regulatory conformity, zero-trust security models, and multi-factor authentication.

To this end, businesses and people would also have to constantly monitor all these technological innovations so that their interactions would be smooth when using the internet and keep them safe. Such enhancements will offer us a safer and more trustworthy digital environment, benefiting us all.

Featured image by Towfiqu barbhuiya on Unsplash

The post Identity Verification Unveiled: 6 Must-Know Trends In 2023 appeared first on noupe.

Categories: Others Tags:

Best AI Tools That Help You in Making Your Content More Unique

October 25th, 2023 No comments

In times like these, standing out from the crowd and grabbing your audience’s attention through unique content is essential. 

Fortunately, the introduction of Artificial Intelligence (AI) has completely transformed the content creation field.

This article explores five AI tools that have revolutionized the way content is created to be unique. These tools empower writers, marketers, businessmen, and students to add their own personal touch and genuine feel to their work. The tools listed include an online notepad tool, content creation tools, and SEO helpers.

From AI-powered content generation to using advanced paraphrasing techniques to make your content unique, AI tools provide many possibilities for those who want their content to be impressive.

So, start reading the article to explore the world of AI-driven creativity. 

Scalenut.com

Scalenut is your one-stop solution for all your content needs, from generating ideas to optimizing for SEO.

You can use Scalenut to create high-quality content for various formats, from blog posts and articles to social media posts and product descriptions. 

Using it for content creation can save you time and effort. You can focus on other business areas while your content is being created.

By creating detailed content briefs, Scalenut will help you create well-structured and informative content. It will also suggest ways to improve your content’s structure and the readability of your writing.

Using Scalenut to generate detailed content briefs, you can get feedback on how your writing is coming out, as well as suggestions on improving the grammar, style, and clarity of your writing.

So, it is a great tool for crafting supreme content. Whether you are a small startup or a large enterprise, Scalenut caters to businesses of all sizes. 

Rephraser.co

Rephraser.co is an absolute game-changer for content writers. This AI rephrasing tool has the incredible ability to generate a different version of your content, all while preserving the original meaning. 

This means you can effortlessly create different versions of your articles or blog posts for various platforms or audiences.

But that’s not all. This rephraser online tool also plays a crucial role in helping you avoid plagiarism and make your content unique.

It uses its state-of-the-art algorithms to use different words and sentences to make sure that your content is not a copycat of any existing content.

While ensuring your text is unique, rephraser.co tries to keep the key concepts and ideas inside your content so your message remains consistent and cohesive.

Additionally, this rephrasing tool makes your text easier to read, whether you are writing for a wide audience or for someone who does not speak English fluently. 

To meet your diverse needs, it provides six distinct rephrasing modes. These modes, namely Creative, Anti-Plagiarism, Fluency, Academic, Blog, and Formal, offer you the flexibility to choose the most suitable approach. 

By utilizing any of these modes, you can rephrase text to make it both plagiarism-free and captivating. 

Most importantly, creates content resembling human writing without requiring manual composition. With this remarkable tool at your disposal, you can effortlessly produce authentic, original content free from any traces of plagiarism. 

Hemingway Editor

The Hemingway Editor is a useful AI tool for enhancing the uniqueness, readability, and accessibility of your content. It effectively highlights adverbs, passive voice, and complex sentences, allowing you to identify and remove these elements for a more concise and readable writing style.

By eliminating adverbs and passive voice with the help of the Hemingway Editor, your writing becomes more engaging and distinctive. 

Moreover, the tool assists in identifying and replacing complex words and phrases with simpler alternatives, enhancing accessibility and uniqueness.

It also analyzes the readability of your content and provides a score, helping you identify and address any areas where your writing may be difficult to comprehend.

The Hemingway Editor’s readability score is valuable for pinpointing areas in your content that may require improvement. 

Therefore, it is an invaluable resource for anyone seeking to enhance the uniqueness, readability, and accessibility of their content. 

Grammarly

Are you tired of submitting content that is riddled with grammar, spelling, and punctuation errors? 

Do you want to make your writing more engaging and professional? Look no further than Grammarly!

Grammarly is a powerful AI tool that can help you identify and correct errors in your writing. Not only that, but it can also suggest improvements to your writing style, making it more concise and effective. 

With Grammarly, you can ensure that your content is original and unique, avoiding any accusations of plagiarism.

It is easy to use, making it accessible to anyone who wants to improve their writing. 

Grammarly provides synonyms and alternative words to enhance the language choices in your content, making it more distinctive and captivating.

The tool suggests adjustments to match the tone and style of your content with your target audience, enabling you to personalize your writing with a distinct and individual voice.

By promoting clear and concise writing, the tool assists in effectively conveying ideas, setting your content apart for its straightforwardness.

Yoast SEO

Last but not least, Yoast SEO is a WordPress plugin that can greatly enhance your content’s search engine optimization (SEO) and make it unique.

One of the key benefits of Yoast SEO is its ability to assist you in creating compelling title tags and meta descriptions for your pages and posts. 

These title tags catch the eye in search results, while meta descriptions provide a concise summary below them. 

Yoast SEO ensures that your title tags and meta descriptions are the appropriate length and contain the most relevant keywords.

In addition, Yoast SEO aids you in effectively incorporating keywords into your content. It offers suggestions for relevant keywords and phrases to include in your title tags, meta descriptions, and content. 

By doing so, it helps you avoid the detrimental practice of keyword stuffing, which can negatively impact your website’s search result rankings.

It assists you in structuring your content in a search engine-friendly manner.

Up to You

Now, you have a better idea of how to use the above-mentioned tools to craft unique content. We hope you find this article quite informative. 

We hope that this article has provided you with valuable insights. 

So why delay any further? 

Incorporate these AI tools into your arsenal and produce exceptional content that captivates your intended audience.

The post Best AI Tools That Help You in Making Your Content More Unique appeared first on noupe.

Categories: Others Tags:

The Fight For The Main Thread

October 24th, 2023 No comments

This article is a sponsored by SpeedCurve

Performance work is one of those things, as they say, that ought to happen in development. You know, have a plan for it and write code that’s mindful about adding extra weight to the page.

But not everything about performance happens directly at the code level, right? I’d say many — if not most — sites and apps rely on some number of third-party scripts where we might not have any influence over the code. Analytics is a good example. Writing a hand-spun analytics tracking dashboard isn’t what my clients really want to pay me for, so I’ll drop in the ol’ Google Analytics script and maybe never think of it again.

That’s one example and a common one at that. But what’s also common is managing multiple third-party scripts on a single page. One of my clients is big into user tracking, so in addition to a script for analytics, they’re also running third-party scripts for heatmaps, cart abandonments, and personalized recommendations — typical e-commerce stuff. All of that is dumped on any given page in one fell swoop courtesy of Google Tag Manager (GTM), which allows us to deploy and run scripts without having to go through the pain of re-deploying the entire site.

As a result, adding and executing scripts is a fairly trivial task. It is so effortless, in fact, that even non-developers on the team have contributed their own fair share of scripts, many of which I have no clue what they do. The boss wants something, and it’s going to happen one way or another, and GTM facilitates that work without friction between teams.

All of this adds up to what I often hear described as a “fight for the main thread.” That’s when I started hearing more performance-related jargon, like web workers, Core Web Vitals, deferring scripts, and using pre-connect, among others. But what I’ve started learning is that these technical terms for performance make up an arsenal of tools to combat performance bottlenecks.

The real fight, it seems, is evaluating our needs as developers and stakeholders against a user’s needs, namely, the need for a fast and frictionless page load.

Fighting For The Main Thread

We’re talking about performance in the context of JavaScript, but there are lots of things that happen during a page load. The HTML is parsed. Same deal with CSS. Elements are rendered. JavaScript is loaded, and scripts are executed.

All of this happens on the main thread. I’ve heard the main thread described as a highway that gets cars from Point A to Point B; the more cars that are added to the road, the more crowded it gets and the more time it takes for cars to complete their trip. That’s accurate, I think, but we can take it a little further because this particular highway has just one lane, and it only goes in one direction. My mind thinks of San Francisco’s Lombard Street, a twisty one-way path of a tourist trap on a steep decline.

The main thread may not be that curvy, but you get the point: there’s only one way to go, and everything that enters it must go through it.

JavaScript operates in much the same way. It’s “single-threaded,” which is how we get the one-way street comparison. I like how Brian Barbour explains it:

“This means it has one call stack and one memory heap. As expected, it executes code in order and must finish executing a piece of code before moving on to the next. It’s synchronous, but at times that can be harmful. For example, if a function takes a while to execute or has to wait on something, it freezes everything up in the meantime.”

— Brian Barbour

So, there we have it: a fight for the main thread. Each resource on a page is a contender vying for a spot on the thread and wants to run first. If one contender takes its sweet time doing its job, then the contenders behind it in line just have to wait.

Monitoring The Main Thread

If you’re like me, I immediately reach for DevTools and open the Lighthouse tab when I need to look into a site’s performance. It covers a lot of ground, like reporting stats about a page’s load time that include Time to First Byte (TTFB), First Contentful Paint (FCP), Largest Contentful Paint (LCP), Cumulative Layout Shift (CLS), and so on.

I love this stuff! But I also am scared to death of it. I mean, this is stuff for back-end engineers, right? A measly front-end designer like me can be blissfully ignorant of all this mumbo-jumbo.

Meh, untrue. Like accessibility, performance is everyone’s job because everyone’s work contributes to it. Even the choice to use a particular CSS framework influences performance.

Total Blocking Time

One thing I know would be more helpful than a set of Core Web Vitals scores from Lighthouse is knowing the time it takes to go from the First Contentful Paint (FCP) to the Time to Interactive (TTI), a metric known as the Total Blocking Time (TBT). You can see that Lighthouse does indeed provide that metric. Let’s look at it for a site that’s much “heavier” than Smashing Magazine.

There we go. The problem with the Lighthouse report, though, is that I have no idea what is causing that TBT. We can get a better view if we run the same test in another service, like SpeedCurve, which digs deeper into the metric. We can expand the metric to glean insights into what exactly is causing traffic on the main thread.

That’s a nice big view and is a good illustration of TBT’s impact on page speed. The user is forced to wait a whopping 4.1 seconds between the time the first significant piece of content loads and the time the page becomes interactive. That’s a lifetime in web seconds, particularly considering that this test is based on a desktop experience on a high-speed connection.

One of my favorite charts in SpeedCurve is this one showing the distribution of Core Web Vitals metrics during render. You can see the delta between contentful paints and interaction!

Spotting Long Tasks

What I really want to see is JavaScript, which takes more than 50ms to run. These are called long tasks, and they contribute the most strain on the main thread. If I scroll down further into the report, all of the long tasks are highlighted in red.

Another way I can evaluate scripts is by opening up the Waterfall View. The default view is helpful to see where a particular event happens in the timeline.

But wait! This report can be expanded to see not only what is loaded at the various points in time but whether they are blocking the thread and by how much. Most important are the assets that come before the FCP.

First & Third Party Scripts

I can see right off the bat that Optimizely is serving a render-blocking script. SpeedCurve can go even deeper by distinguishing between first- and third-party scripts.

That way, I can see more detail about what’s happening on the Optimizely side of things.

Monitoring Blocking Scripts

With that in place, SpeedCurve actually lets me track all the resources from a specific third-party source in a custom graph that offers me many more data points to evaluate. For example, I can dive into scripts that come from Optimizely with a set of custom filters to compare them with overall requests and sizes.

This provides a nice way to compare the impact of different third-party scripts that represent blocking and long tasks, like how much time those long tasks represent.

Or perhaps which of these sources are actually render-blocking:

These are the kinds of tools that allow us to identify bottlenecks and make a case for optimizing them or removing them altogether. SpeedCurve allows me to monitor this over time, giving me better insight into the performance of those assets.

Monitoring Interaction to Next Paint

There’s going to be a new way to gain insights into main thread traffic when Interaction to Next Paint (INP) is released as a new core vital metric in March 2024. It replaces the First Input Delay (FID) metric.

What’s so important about that? Well, FID has been used to measure load responsiveness, which is a fancy way of saying it looks at how fast the browser loads the first user interaction on the page. And by interaction, we mean some action the user takes that triggers an event, such as a click, mousedown, keydown, or pointerdown event. FID looks at the time the user sparks an interaction and how long the browser processes — or responds to — that input.

FID might easily be overlooked when trying to diagnose long tasks on the main thread because it looks at the amount of time a user spends waiting after interacting with the page rather than the time it takes to render the page itself. It can’t be replicated with lab data because it’s based on a real user interaction. That said, FID is correlated to TBT in that the higher the FID, the higher the TBT, and vice versa. So, TBT is often the go-to metric for identifying long tasks because it can be measured with lab data as well as real-user monitoring (RUM).

But FID is wrought with limitations, the most significant perhaps being that it’s only a measure of the first interaction. That’s where INP comes into play. Instead of measuring the first interaction and only the first interaction, it measures all interactions on a page. Jeremy Wagner has a more articulate explanation:

“The goal of INP is to ensure the time from when a user initiates an interaction until the next frame is painted is as short as possible for all or most interactions the user makes.”
— Jeremy Wagner

Some interactions are naturally going to take longer to respond than others. So, we might think of FID as merely a first impression of responsiveness, whereas INP is a more complete picture. And like FID, the INP score is closely correlated with TBT but even more so, as Annie Sullivan reports:

Thankfully, performance tools are already beginning to bake INP into their reports. SpeedCurve is indeed one of them, and its report shows how its RUM capabilities can be used to illustrate the correlation between INP and long tasks on the main thread. This correlation chart illustrates how INP gets worse as the total long tasks’ time increases.

What’s cool about this report is that it is always collecting data, providing a way to monitor INP and its relationship to long tasks over time.

Not All Scripts Are Created Equal

There is such a thing as a “good” script. It’s not like I’m some anti-JavaScript bloke intent on getting scripts off the web. But what constitutes a “good” one is nuanced.

Who’s It Serving?

Some scripts benefit the organization, and others benefit the user (or both). The challenge is balancing business needs with user needs.

I think web fonts are a good example that serves both needs. A font is a branding consideration as well as a design asset that can enhance the legibility of a site’s content. Something like that might make loading a font script or file worth its cost to page performance. That’s a tough one. So, rather than fully eliminating a font, maybe it can be optimized instead, perhaps by self-hosting the files rather than connecting to a third-party domain or only loading a subset of characters.

Analytics is another difficult choice. I removed analytics from my personal site long ago because I rarely, if ever, looked at them. And even if I did, the stats were more of an ego booster than insightful details that helped me improve the user experience. It’s an easy decision for me, but not so easy for a site that lives and dies by reports that are used to identify and scope improvements.

If the script is really being used to benefit the user at the end of the day, then yeah, it’s worth keeping around.

When Is It Served?

A script may very well serve a valid purpose and benefit both the organization and the end user. But does it need to load first before anything else? That’s the sort of question to ask when a script might be useful, but can certainly jump out of line to let others run first.

I think of chat widgets for customer support. Yes, having a persistent and convenient way for customers to get in touch with support is going to be important, particularly for e-commerce and SaaS-based services. But does it need to be available immediately? Probably not. You’ll probably have a greater case for getting the site to a state that the user can interact with compared to getting a third-party widget up front and center. There’s little point in rendering the widget if the rest of the site is inaccessible anyway. It is better to get things moving first by prioritizing some scripts ahead of others.

Where Is It Served From?

Just because a script comes from a third party doesn’t mean it has to be hosted by a third party. The web fonts example from earlier applies. Can the font files be self-hosted instead rather than needing to establish another outside connection? It’s worth asking. There are self-hosted alternatives to Google Analytics, after all. And even GTM can be self-hosted! That’s why grouping first and third-party scripts in SpeedCurve’s reporting is so useful: spot what is being served and where it is coming from and identify possible opportunities.

What Is It Serving?

Loading one script can bring unexpected visitors along for the ride. I think the classic case is a third-party script that loads its own assets, like a stylesheet. Even if you think you’re only loading one stylesheet &mdahs; your own — it’s very possible that a script loads additional external stylesheets, all of which need to be downloaded and rendered.

Getting JavaScript Off The Main Thread

That’s the goal! We want fewer cars on the road to alleviate traffic on the main thread. There are a bunch of technical ways to go about it. I’m not here to write up a definitive guide of technical approaches for optimizing the main thread, but there is a wealth of material on the topic.

I’ll break down several different approaches and fill them in with resources that do a great job explaining them in full.

Use Web Workers

A web worker, at its most basic, allows us to establish separate threads that handle tasks off the main thread. Web workers run parallel to the main thread. There are limitations to them, of course, most notably not having direct access to the DOM and being unable to share variables with other threads. But using them can be an effective way to re-route traffic from the main thread to other streets, so to speak.

Split JavaScript Bundles Into Individual Pieces

The basic idea is to avoid bundling JavaScript as a monolithic concatenated file in favor of “code splitting” or splitting the bundle up into separate, smaller payloads to send only the code that’s needed. This reduces the amount of JavaScript that needs to be parsed, which improves traffic along the main thread.

Async or Defer Scripts

Both are ways to load JavaScript without blocking the DOM. But they are different! Adding the async attribute to a tag will load the script asynchronously, executing it as soon as it’s downloaded. That’s different from the defer attribute, which is also asynchronous but waits until the DOM is fully loaded before it executes.

Preconnect Network Connections

I guess I could have filed this with async and defer. That’s because preconnect is a value on the rel attribute that’s used on a tag. It gives the browser a hint that you plan to connect to another domain. It establishes the connection as soon as possible prior to actually downloading the resource. The connection is done in advance, allowing the full script to download later.

While it sounds excellent — and it is — pre-connecting comes with an unfortunate downside in that it exposes a user’s IP address to third-party resources used on the page, which is a breach of GDPR compliance. There was a little uproar over that when it was found out that using a Google Fonts script is prone to that as well.

Non-Technical Approaches

I often think of a Yiddish proverb I first saw in Malcolm Gladwell’s Outliers; however, many years ago it came out:

To a worm in horseradish, the whole world is horseradish.

It’s a more pleasing and articulate version of the saying that goes, “To a carpenter, every problem looks like a nail.” So, too, it is for developers working on performance. To us, every problem is code that needs a technical solution. But there are indeed ways to reduce the amount of work happening on the main thread without having to touch code directly.

We discussed earlier that performance is not only a developer’s job; it’s everyone’s responsibility. So, think of these as strategies that encourage a “culture” of good performance in an organization.

Nuke Scripts That Lack Purpose

As I said at the start of this article, there are some scripts on the projects I work on that I have no idea what they do. It’s not because I don’t care. It’s because GTM makes it ridiculously easy to inject scripts on a page, and more than one person can access it across multiple teams.

So, maybe compile a list of all the third-party and render-blocking scripts and figure out who owns them. Is it Dave in DevOps? Marcia in Marketing? Is it someone else entirely? You gotta make friends with them. That way, there can be an honest evaluation of which scripts are actually helping and are critical to balance.

Bend Google Tag Manager To Your Will

Or any tag manager, for that matter. Tag managers have a pretty bad reputation for adding bloat to a page. It’s true; they can definitely make the page size balloon as more and more scripts are injected.

But that reputation is not totally warranted because, like most tools, you have to use them responsibly. Sure, the beauty of something like GTM is how easy it makes adding scripts to a page. That’s the “Tag” in Google Tag Manager. But the real beauty is that convenience, plus the features it provides to manage the scripts. You know, the “Manage” in Google Tag Manager. It’s spelled out right on the tin!

Wrapping Up

Phew! Performance is not exactly a straightforward science. There are objective ways to measure performance, of course, but if I’ve learned anything about it, it’s that subjectivity is a big part of the process. Different scripts are of different sizes and consist of different resources serving different needs that have different priorities for different organizations and their users.

Having access to a free reporting tool like Lighthouse in DevTools is a great start for diagnosing performance issues by identifying bottlenecks on the main thread. Even better are paid tools like SpeedCurve to dig deeper into the data for more targeted insights and to produce visual reports to help make a case for performance improvements for your team and other stakeholders.

While I wish there were some sort of silver bullet to guarantee good performance, I’ll gladly take these and similar tools as a starting point. Most important, though, is having a performance game plan that is served by the tools. And Vitaly’s front-end performance checklist is an excellent place to start.

Categories: Others Tags: