7 Secrets of Designing an eCommerce Website

August 15th, 2023 No comments

Have you ever wondered why some ecommerce sites have you effortlessly gliding from page to page, product to cart, while others feel like trudging through digital quicksand? The answer lies in design.

Categories: Designing, Others Tags:

Modern Methods For Improving Drupal’s Largest Contentful Paint Core Web Vital

August 15th, 2023 No comments

Let’s start with a fairly common example of a hero component on the homepage of Drupal’s demo installation of the Umami theme.

The image in this hero component is loaded by CSS via the background-image property. In order for the browser to display the image, it has a fairly long chain of dependencies:

  1. Download the HTML.
  2. Download and parse the CSS.
  3. Reconcile the CSS ruleset with the DOM.
  4. Download the image.
  5. Display the image.

While browsers are generally pretty fast, these steps still take time to load, typically in seconds, and even longer on slower, high-latency network connections. And because this image is within the initial viewport, it’s very noticeable.

So noticeable, in fact, that Core Web Vitals has a metric all about it called Largest Contentful Paint (LCP). This metric measures the time it takes, in seconds, to render the largest image or text block that is visible on the initial load. We can test for LCP in a number of ways. The following screenshot is taken from a test I ran through WebPageTest, resulting in an LCP of 2.4 seconds.

The image file used for the hero component’s background is the ninth item in the report, taking 1,041 milliseconds to even begin the download.

In case you’re wondering, 2.4 seconds is not great. That’s practically an eternity when talking about page speed performance. And since the image file used for the background appears to be making up about 50% of that time, it’s a prime target for optimization.

Here’s how we are approaching it.

Step 1: Use An Tag Instead Of A Background Image

To avoid the five-step dependency chain I outlined above, we want to prevent loading the image with CSS. Instead, we’re going to load the image as a standard HTML tag in the markup.

This allows the browser’s preload scanner to detect and download the image early in the process — something it cannot parse from a CSS file. The preload scanner does pretty much what you think it does: it scans the HTML as it’s still being downloaded and starts to pull down additional assets that it thinks are important.

How do we use an HTML as a replacement for a CSS background-image? We’re unable to simply drop an image in the markup and use it as a true background, at least in the CSS sense. Instead, we have to establish a container element — let’s give it a class name of .hero — and position the image in a way that stacks on top of it, and subsequently, allow other elements such as the hero content to stack on top of it. This gives us the illusion of a background image.

This requires us to use absolute positioning in CSS. This takes the image out of the normal document flow, which is a fancy way of saying that the elements surrounding it act as if it’s not there. The image is there, of course, but its physical dimensions are ignored, allowing elements to flow right on top of it rather than around it.

.hero {
  position: relative; /* Anchor the image */
}

.hero img {
  position: absolute;
  inset: 0;
  width: 100%;
  height: 100%;
}

This works! The element now stacks on top of the .hero container. But now we have a couple of new issues that need to be addressed.

The first is that the image is squished and distorted. You might think this is a bug, but we’ve set the image to take up width: 100% and height: 100% of the .hero container, and it is merely adjusting its aspect ratio to the aspect ratio of the container, as it’s being told to do.

If we were still loading the image with the CSS background-image property, we could fix this by setting background-size: cover on the image. But we don’t get that luxury when working with HTML images.

Fortunately, the object-fit property can solve this for us. It works pretty similarly to the background-size property and actually takes the same cover keyword as a value. We set that on the image in CSS:

.hero {
  position: relative; /* Anchor the image */
}

.hero img {
  position: absolute;
  inset: 0;
  width: 100%;
  height: 100%;
  object-fit: cover; /* Prevents squishing */
}

This brings us to the second issue we introduced when we applied absolute positioning to the image. Remember the content with the cool pink button that sat on top of the background image in the first screenshot at the beginning of the article? The image is completely covering it. It’s there, just not seen beneath the absolutely-positioned image.

The “problem” is that we get a stacking context anytime we explicitly declare a non-static position on an element. The image is taken out of the normal flow but is still visible even as elements that follow it in the markup flow right through it. As such, the content elements flow under the image and are hidden from view. I say “problem” in quotes because, again, this is expected behavior that comes by explicitly declaring position: absolute in CSS.

The trick? We can give the .hero element’s content container its own stacking context. We won’t use absolute positioning, however, because we want it to remain in the normal document flow. Otherwise, it, too, would obscure its surrounding elements.

That’s where setting a relative position — position: relative — comes into play. Elements come with position: static by default. By when we declare position: relative, it produces a stacking context but also keeps the element within the normal flow.

.hero {
  position: relative; /* Anchor the image */
}

.hero img {
  position: absolute;
  inset: 0;
  width: 100%;
  height: 100%;
  object-fit: cover; /* Prevents squishing */
}

.hero__content {
  position: relative; /* Adds a stacking context */
}

Now the content sits properly on top of the image as though the image were a true background:

I’ll note that your mileage may vary depending on the order of elements inside the parent container. You may find yourself needing to set the element’s level in the stacking context using z-index.

Step 2: Use A Modern Image Format

The hero banner looks correct now, but we still have a bit of work to do. The current image is a highly-optimized JPG file, which isn’t horrible, but we can do better. The new-ish WebP image format is supported by all modern browsers and typically comes in at a very small file size. Let’s use that instead of a standard JPG.

After configuring Drupal to serve WebP image formats, we can see the new image size is reduced by 10% with no noticeable loss of quality!

Note: In many cases, the file size will be reduced substantially more than that (frequently more than 50%), but in our case, the source image was already fairly optimized.

Step 3: Use Responsive Images

We now have the image being downloaded immediately, and we’re also using the new WebP image format, which can save up to 50% on the file size. But we’re still not done, as the same image is being served for every screen size. If we serve smaller images to smaller screen sizes, the image will download even faster to those devices. To solve this, we’ll implement responsive images.

Responsive images have been supported in browsers for a long time. At its core, the markup contains paths to multiple images, and information on which screen sizes to serve each lets the browser know when to display. This enables the browser to automatically pull down the images that are sized appropriately for the screen size.

We set this up using the element, and it looks something like this:

<picture>
  <source srcset="/img-path_wide/veggie-pasta-bake-hero-umami.jpg.webp 1x" media="all and (min-width: 1400px)" type="image/webp" width="3000" height="1285">
  <source srcset="/img-path_large/veggie-pasta-bake-hero-umami.jpg.webp 1x" media="all and (min-width: 800px) and (max-width: 1400px)" type="image/webp" width="1440" height="617">
  <source srcset="/img-path_medium/veggie-pasta-bake-hero-umami.jpg.webp 1x" media="all and (min-width: 500px) and (max-width: 800px)" type="image/webp" width="1200" height="514">
  <source srcset="/img-path_tiny/veggie-pasta-bake-hero-umami.jpg.webp 1x" media="all" type="image/webp" width="500" height="214">
  <img src="/img-oath_medium/veggie-pasta-bake-hero-umami.jpg.webp" width="1200" height="514" alt="Mouth watering vegetarian pasta bake with rich tomato sauce and cheese toppings">
</picture>

Note: Drupal supports responsive images out of the box. If you’re CMS or framework does not, there are services such as Cloudinary that can handle this for you (for a fee, of course).

There’s Still More To Do

We made significant improvements and improved the LCP by 58%, from 2.4s to 1.4s!

But there’s still more to do. Yet another, newer image format called AVIF can help reduce our image file sizes by another 20–30%. Similarly, there’s the new fetchpriority HTML attribute for images.

It’s worth mentioning that the attribute is still considered “experimental” at the moment, and browser support isn’t currently all the way there as I’m writing this.

That said, we’re currently working on a setting in the Drupal admin UI that adds fetchpriority to images, and when that lands, we’ll use it to inform the browser of the relative priority of the image (which in this case would be equal to high).

Wrapping Up

In this article, we identified, measured, and fixed a very common performance issue, not only in Drupal but in everyday front-end work.

Similar to accessibility, I find the biggest obstacle to making web performance better is indifference.

Web developers should learn to use various testing tools such as Lighthouse and WebPageTest. We should learn common metrics, such as Time to First Byte, LCP, and other web vitals. And most of all, we need to care. There is a wealth of information on websites to help guide you along your learning path.

Additional Resources

Categories: Others Tags:

YouTube Debuts Samples – A New Music Discovery Tool

August 15th, 2023 No comments

What do you get when you cross TikTok’s swiping with Spotify’s Discover feature? Enter Samples – YouTube Music’s new one-tap tool for finding new sounds.

Categories: Designing, Others Tags:

Dear AI Lets Users Generate Intimate Letters in Seconds

August 14th, 2023 No comments

Dear AI is an artificial intelligence program that enables users to create thoughtful, handwritten letters for their loved ones. Is it a must-have timesaver or a worrying sign that we’ve delved too far into the doldrums of impersonal machine-generated content?

Categories: Designing, Others Tags:

20 Best New Websites, August 2023

August 14th, 2023 No comments

Welcome to our monthly round-up of what’s good on the web. This month we’re bringing you designs featuring inspiring uses of positive colors, large type, retro elements, illustrations, and so much more.

Categories: Designing, Others Tags:

Knip: An Automated Tool For Finding Unused Files, Exports, And Dependencies

August 14th, 2023 No comments

Let’s face it. Most of us favor creating new features and user interfaces over maintenance tasks such as code cleanup, project configuration, and dependency management.

Lots of the boring and repetitive things, like formatting and linting, are mostly solved problems with tools like Prettier, ESLint, and TypeScript.

Yet there’s another area that often doesn’t receive much attention: handling unused files, exports, and dependencies. This is especially true as projects grow over time, negatively impacting maintainability as well as our enthusiasm for it. These unused artifacts often go unnoticed because they’re typically hard to find.

Where do you start looking for unused things? I bet you’ve done a global search for a dependency to find out whether it’s still used. Did you know you can right-click a file and “Find File References” in VS Code? These are the things you shouldn’t have to do. They’re tedious tasks that can — and should — be automated.

There’s Got to Be a Better Way

When I was in an expanding codebase, the number of unused files and exports in it kept growing. Tracking them became more and more difficult, so I started looking for automated solutions to help.

I was happy I found some existing tools, such as ts-prune. After some initial runs, I
discovered that our codebase required a lot of configuration and still produced many false positives. I researched how other codebases try to stay tidy and realized there’s a huge opportunity in this space.

Along the road, I also found depcheck, which deals with a lot of complexity and customizations in JavaScript projects. And then there’s unimported, which also does a notable job of finding dangling files and unused dependencies.

But none of these tools handled my project very well. The fact that I would have to use a combination of them wouldn’t be a showstopper, but I couldn’t get the configurations right for handling the project’s customizations without reporting too many false positives or ignoring too much of the project and leaving a large blind spot.

In the end, tools in this area are only used when they are fully automated and able to cover the whole project. It also didn’t help that none of the existing tools support monorepos, a structure for repositories that has recently gained widespread popularity. Last but not least, both ts-prune and depcheck are in maintenance mode, meaning they would likely never support monorepos.

Working Towards A Solution

I’m motivated to automate things and keep projects in solid shape.

Great developer experience (DX) keeps developers happy and productive.

So I started developing an internal tool for my project to see if I could do better. It started as an internal script that handled only the specifics of that particular repository, and throughout the journey, I kept realizing what a blessing and a curse this is. Automating boring stuff is a winning concept, but getting it right is such a difficult challenge — but one that I was willing to try.

Along the road, I also got more and more convinced that a single tool to find all categories of unused things was a good idea: each of them requires reading and parsing source files, and since this is a relatively expensive task, I think the efficient path is to track them in one go.

Introducing Knip

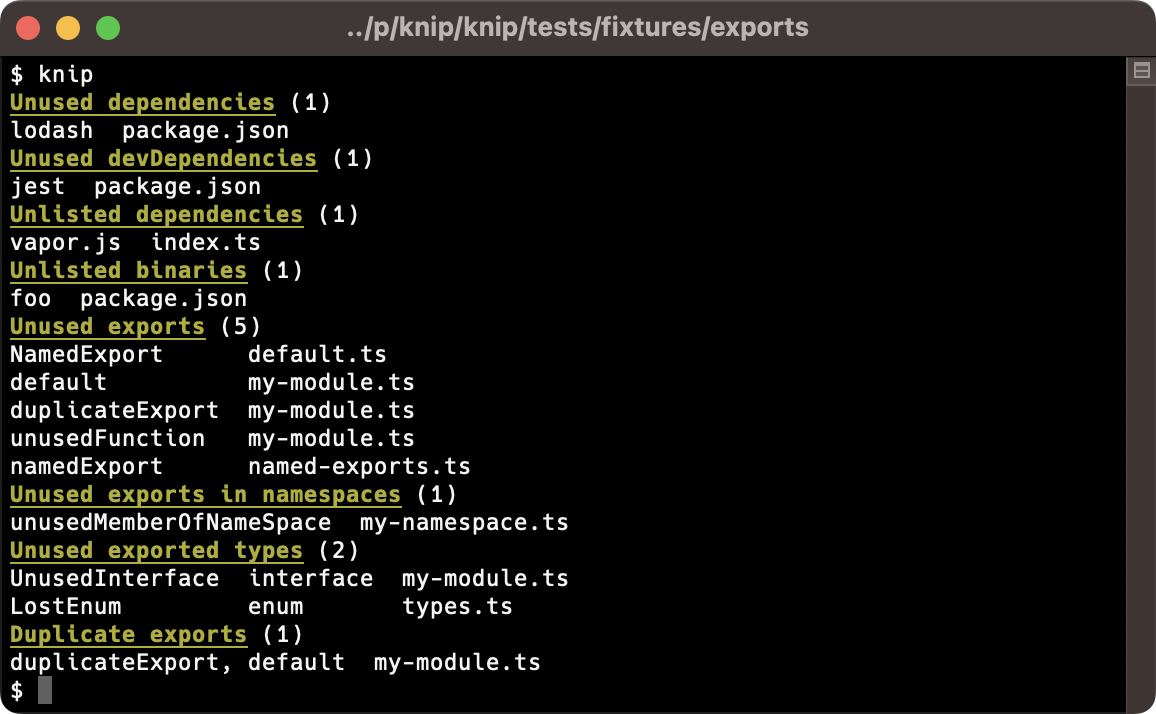
So, what is Knip? I think it’s best categorized as a project linter. It picks up where ESLint ends. Where ESLint handles individual files, Knip lints the repository as a whole. It connects all the dots — in terms of files, imports, exports, and dependencies — and reports what is unused.

Roughly speaking, there are two ways to look at Knip. In greenfield projects, it’s great to install Knip and let it grow with the project. Keep the repository tidy and run Knip manually or in an automated continuous integration (CI) environment.

Another way to look at Knip is in larger projects. Knip is a great companion for housekeeping as far as identifying unused files, exports, and dependencies. There may be false positives initially, but it’s much easier to skip them compared to finding needles in a haystack on your own.

Additionally, during or after large refactoring efforts, Knip can be a great assistant for cleaning things up. It’s only human to miss or forget things that are no longer used, even more so when the things are not close to the refactoring work.

Knip works with traditional JavaScript and modern TypeScript, has built-in support for monorepos, works with any package manager, and has many features, small and large, that help you maintain your projects.

How Knip Works

Knip starts with one or more entry files and calculates the dependency tree, helping it know all the files that are used while marking the remaining files as unused.

Meanwhile, Knip keeps track of imported external dependencies and compares them against the dependencies in package.json to report both unused dependencies and dependencies that are used but not listed. It also keeps track of internal imports and exports to report unused exports.

Let me give you a better look under the hood.

Production Mode

In its default mode, Knip analyzes the whole project, including both production and non-production files, such as tests, configurations, Storybook stories, devDependencies, and so on.

But this mode might miss opportunities for trimming. For instance, files or exports imported only by tests are normally not reported as unused. However, when the export is not used anywhere else, you can delete both the export and its tests!

This is why Knip has a production mode. This mode is more strict than the default mode, where Knip will use only production code as entry files and only consider dependencies (excluding devDependencies).

Scripts

Many projects use command line tools that come with dependencies. For instance, after installing ESLint, you can use eslint, and Angular makes ng available in "scripts" in package.json. Knip connects dependencies with binaries and tells you when they are unused or missing.

But there’s more. CI environments, like Azure and GitHub Actions, are configured with YAML files that may also use the same command line tools.

And finally, custom scripts may use command line tools by spawning child processes, either using native Node.js APIs or with libraries like zx or execa.

Knip has a growing number of such detections to keep your projects neat and tidy, refactor after refactor. Yet what is so interesting about those scripts? They may be complicated to parse, making it difficult to extract their dependencies. Let’s look at an example:

node -r @scope/package/register --experimental-loader ts-node/esm/transpile-only ./dir

Here, we can find @scope/package and ts-node and dir/index.ts are dependencies of this script. Honestly, this is just the tip of the iceberg. I promise a few regular expressions won’t be enough!

Now, if this script is updated or removed, Knip will tell you if any dependency or file is no longer used. On the other hand, Knip will also tell you if a dependency is used but not listed explicitly in package.json. (You shouldn’t be relying on transitive dependencies anyway, right?)

Plugins

There’s an abundance of tooling available in the JavaScript ecosystem. And each tool has its configurations. Some allow YAML or JSON, and some allow (or require) you to write configurations in JavaScript or even TypeScript.

Since there’s no generic way to handle the myriad of variations, Knip supports plugins. Knip has plugins for tools that may reference dependencies that should be listed in package.json.

What matters to plugins is how dependencies are referenced. They might be imported in JavaScript like any other source file, and Knip can also parse them as such. Yet, they’re often referenced as strings, much the same as what ESLint does with the extends and plugins options. Dependencies can be specified in implicit ways, such as prettier, which means the eslint-config-prettier dependency. Storybook has the builder: "webpack5" configuration that requires the @storybook/builder-webpack5 and @storybook/manager-webpack5 dependencies.

Compilers

Knip parses all sorts of JavaScript and TypeScript files, including ES modules and CommonJS modules.

But some frameworks work with non-standard files, such as Vue, Svelte, MDX, and Astro. Knip allows you to configure compilers to include these types of files so they can also be included in the analysis.

Performance

Until version 2, Knip used ts-morph to calculate the dependency graph (and much more). This worked great initially because it abstracted away the TypeScript back end.

But to support monorepos and compilers while maintaining good performance, I realized I had to work with the TypeScript back end directly. This required a lot of effort, but it does provide a lot more flexibility, as well as opportunities for more optimizations. For example, Knip can traverse the abstract syntax tree (AST) of any file only once to find everything it needs.

Configuration Hints

When Knip reports a false positive, you can configure it to ignore that dependency. Then, when Knip no longer reports the false positive, it will report that the configuration can be updated, and you can remove the ignored items.

Reporters

Knip comes with a default reporter and has a few additional reporters. There’s a compact reporter, a JSON reporter, and one that uses the CODEOWNERS file to show the code owner(s) with each reported issue.

Knip also allows you to define a custom reporter. Knip will call your function with the results of the analysis. You can then do anything with it, like writing the results to a file or sending it to a service to track progress over time.

What’s Next For Knip?

Naturally, I’m not done working on Knip. These are a few of the things I have in mind.

More Plugins = Less Configuration

My hope with Knip is that as more and more people start to use Knip, they will report false positives: something is reported as unused but is in use.

A false positive usually has one of the following three causes:

  • A framework or tool is used that Knip does not yet have a plugin for,
  • The configuration might need improvement; for instance, add an entry file that Knip didn’t know about or ignore something with a hard-to-find reference, or
  • Knip has a bug.

As Knip becomes better with bug fixes and plugins, more projects benefit because they need less configuration. Maintenance will become more enjoyable and easier for everyone!

When you are using Knip and enjoying it, don’t let false positives scare you away, but report them instead. Please provide a reproducible test case, and I’m sure we can work it out. Additionally, I’ve written a complete guide detailing how to write a new plugin for Knip.

Auto-Fix

Much like ESLint, Knip will have a --fix option to automatically fix all sorts of issues. The idea is that this can automatically take care of things such as:

  • Remove the export keyword for unused exports,
  • Uninstall unused dependencies and install unlisted dependencies, and
  • Delete unused files.

Given enough interest from the community, I’m excited to start building this feature!

Integrations

Integrations such as a VS Code plugin or a GitHub Action sound like cool opportunities. I’m happy to collaborate and see where we can take it.

Demo Knip

I think the best way to understand Knip is to get your hands on it. So, I’ve created a CodeSandbox template that you can fork and spin up Knip in a new terminal with npm run knip.

Conclusion

Knip aims to help you maintain your JavaScript or TypeScript repositories, and I’m very happy lots of projects are already cut by Knip daily.

There is lots of room for improvement, bugs to fix, documentation to improve, and plugins to add! Your ideas and contributions are absolutely welcome — and encouraged — over at github.com/webpro/knip.

Categories: Others Tags:

Microsoft Unveils New Default Office Theme

August 12th, 2023 No comments

Microsoft is in the process of beta-testing a new default theme for Office. The tech giant intends to release the change to the public in September 2023.

Categories: Designing, Others Tags:

iOS 17’s New Call Screen Leaves the World Confused

August 11th, 2023 No comments

Apple’s iOS17 offers a host of exciting new features, but users can’t get over the new look call screen. Are we just adverse to change, or do we have good reason to be horrified?

Categories: Designing, Others Tags:

How To Design a Killer Logo for Free

August 11th, 2023 No comments

The recent Twitter rebranding debacle has provided a reminder of just how important a good logo is to any company or organization. A good logo is a valuable asset — it creates brand recognition and establishes trust — while a poor logo can do real damage to a brand. So, what are the ways to get a logo that will prove to be a help and not a hindrance?

Categories: Designing, Others Tags:

Bricolage Grotesque Launches to the Public

August 10th, 2023 No comments

Bricolage Grotesque, a free, open-source typeface, was unveiled to the public recently. The font offers the perfect blend of quirkiness, creativity and uniformity.

Categories: Designing, Others Tags: