Archive

Archive for August, 2020

The Most Appreciated Web Solutions of 2020

August 21st, 2020 No comments

In this article you will find the most appreciated web solutions of 2020.

To create this list we took into account the following considerations: The popularity of the product or the service; How many users it has; How many times it was downloaded or installed; The level of efficiency; What you get for your money.

You’ll find WordPress themes and plugins, an affordable logo design contest, logo creators, website builders, web development services, and even more. Let’s get started…

1. WooCommerce Support

WooCommerce is the most popular e-commerce plugin for WordPress, being used by all kind of merchants, both small and large companies.

WPcustomify is 100% focused on WooCommerce, having huge experience. They will help you with everything you need:

  • WooCommerce Plugin Integration
  • Configuration Support
  • Support Services

Get in touch with them and let the experts manage all the issues and errors of your WooCommerce. Make the best out of your store, and help it get more traffic and convert better, by using the experience of WPcustomify.

2. actiTIME

Design and development projects require a high degree of precision and organization. To meet desired goals on time and budget, teams should adhere to initial estimates and deadlines impeccably. Besides, to be efficient and productive, they need to manage tasks and monitor progress in a systematic way.

actiTIME can assist developers and their managers in attaining these objectives effortlessly. As a high-quality and user-friendly timesheet app, it allows users to keep a detailed record of hours spent on multiple tasks and, in this way, collect data for consequent client billing and invoicing, as well as performance and productivity analysis.

However, actiTIME is more than just another time tracker – it includes powerful project management functionality that can help you:

  • Manage project scope by adding new tasks and creating a detailed work breakdown;
  • Allocate tasks to different team members;
  • Set up estimates, deadlines and budgets;
  • Review current work progress and modify task statuses on the Kanban board or in a simple list format;
  • Receive notifications whenever the risk of cost and time overrun arises.

actiTIME’s flexibility makes it an excellent choice for both individuals and teams of any size. The tool can be configured to meet varying management needs and integrated with many other useful apps through Zapier or API. In addition, you can always use the actiTIME timer through the Chrome extension in Jira, Github and GitLab, which will allow you to track hours without any distractions from the primary work process. Sign up for a free actiTIME trial and bring your productivity to the next level.

3. Total

Total is one of the most complete WordPress theme that you can buy in 2020, being filled with 80+ builder modules, 40+ premade demos that you can install with 1-click, and over 500+ styling options.

This theme has over 43k happy users and it is used by some of the best websites in the world.

This theme is developed and maintained by WordPress experts that have been a part of the WP community for over 10 years.

4. Webdesign Toolbox

Webdesign Toolbox will become a web design tools encyclopedia, currently featuring 965 resources in 78 different categories. Everybody was waiting for such a place and now it is live and heavily updated each month.

I just found out about this place and I can say that it is super. Having all the tools and services in a single place, very well categorized is super helpful. Now you don’t have to lose time on search engines and on ads (who pays more will get in front), you have everything at your disposal, in front of you.

Using Webdesign Toolbox is super simple to find the right web tools and services, just browse the website.

5. TestingBot

Trusted by some of the most innovative companies in the world (Microsoft, Disney, FOX, Grammarly, and many others), and with over 8 year’s experience in this market, TestingBot is a super solution that you can use for automated and manual testing.

It supports cross browser testing, live testing, real device testing, and tons of other things.

Start a free trial and see TestingBot in action.

6. Codester

Codester is a huge marketplace where designers and developers will find tens of thousands of premium PHP scripts, websites templates, apps, plugins, and much more.

Always check the flash sale section where hugely discounted items are being sold.

7. Taskade

Taskade is a super technologically advanced remote workspace (works from anywhere where there’s an internet connection) that you and your team can use for chatting, organizing, and getting things done.

You can build a workspace from scratch using the included editor, use a ready-made templates, or edit the one you want.

This collaboration platform is free to use for 10 projects.

8. Bonsai Invoice Templates

Bonsai is a the best suite of software for freelancers, being the top choice of tens of thousands of freelancers from all over the world.

They help you with everything you need, and they even provide invoice templates for freelance professionals – designer, developer, writer, marketer, contractor, consultant, photographer, etc.

9. Mobirise

Mobirise is the most powerful offline website builder in 2020, being loaded with 3500+ awesome website templates, with sliders, galleries, forms, popups, icons, and even more.

Use it to create a unique website, no coding or design skills needed.

10. Goodie

Goodie was created by a team of experts that have super experience in the web development world.

This service is used mostly by web designers that need a reliable web development partner, and by customers that need to amplify their online presence.

11. MailMunch

MailMunch helps you create eye-catching forms and landing pages in seconds – no coding or design skills required!

It is quick to set up, easy to learn, and packs a punch with built-in email marketing features and integrations with any email marketing service of your choice.

Boost conversions by up to 400% with this complete lead generation software.

12. Email Template Builder

You want to let your website visitors create awesome emails and pages directly on your website? With Unlayer it is possible and it is super simple to implement this feature on your website.

This plug and play email editor and page builder can be embedded it in 5 minutes on your website.

13. Rank Math SEO

Every WordPress website needs a powerful SEO plugin to take care of it. There is a huge difference between these plugins, some being extremely efficient.

One such efficient SEO plugin is Rank Math. This free WordPress plugin will make your website rank higher and get more traffic from your existing content.

Get it now, after a basic configuration the plugin runs autonomously.

14. Schema Pro

Schema markups will make your website rank higher and get more traffic. To quickly add them, use Schema Pro. You press 1 button, and you select all the pages on which you want the schema markups to be added. It is so simple.

15. Landingi

Landingi is a brilliant landing page builder that will help you create awesome designs with no experience, no coding skills and no design ideas.

Create a landing page that converts and which is engaging, with Landingi is a simple task for everybody.

16. CollectiveRay

CollectiveRay is specialized in providing super in-depth tutorials and articles for WordPress, hosting, themes, tools, and all kind of platforms.

You should always browse it whenever you are looking for detailed and accurate information about all kinds of stuff.

17. ContentSnare

ContentSnare is the smart way to collect content. Why is that? Because it is an automated service that will help you quickly gather content from your customers and partners, without losing time on this aspect of your business.

Configure it in a few minutes and right after ContentSnare will be on autopilot, collecting materials in your place.

18. XStore – The King-Size WooCommerce Theme

XSTORE is the most complete WooCommerce theme that you can get in 2020. It has included over 90 shop designs, and it also includes several plugins that are worth $407.

Get it now and build a high converting store.

19. FixRunner

FixRunner is your personal WordPress support team that will take care of your website 24/7.

They offer several services:

  • One-time fix – As the name says, they will fix a problem that you encounter on your WordPress website.
  • Several packages for WordPress support and maintenance
  • Speed optimization service
  • Custom development
  • Malware removal
  • Site upgrade
  • White label for agencies

Let the experts help you with everything you need so your WordPress website can get the best conversion rates.

20. Heroic Table of Contents Plugin

Heroic Table of Contents is the easiest way to add a table of contents to your WordPress website.

Are you using tables of contents? Everybody loves them, in articles and on websites.

Get your website to the next level with Heroic Table Of Contents, it’s free.

21. WrapPixel

WrapPixel is a popular name in the React templates world. They offer high-quality themes that look awesome and which are lightning fast.

Browse WrapPixel and pick what you need for your projects.

22. Pixpa

Pixpa is a professional website builder that people use to create all-in-one websites: a store, a blog, and a client gallery.

The editor is filled with tons of designs and elements, and it is super simple to use.

23. Astra

Astra is the fastest growing theme of all time, having almost 1 million users.

Why does everybody love Astra? Because it has pixel-perfect included designs, it is fast, SEO optimized, it is simple to use and configure, and it is optimized for conversions.

24. uKit

Meet a very affordable and convenient website builder uKit. It allows you to quickly kickstart your online presence. Prices start from 2.5 USD/month, you get a stable hosting, unlimited storage space, and a free technical domain. Lots of colorful up-to-date templates, responsive technical support, and the ability to connect your external domain. You can try it for free on a 14-day trial – no credit card required.

25. Fotor Online Photo Editor

Fotor is an online photo editor that is used by tens of thousands of web designers, online entrepreneurs, marketers, and people that have an online presence. Creating graphics and pictures that are engaging and converting is simple with Fotor, no need to have any design skills.

The interface will guide you every moment.

You can use Fotor also as a background remover.

26. stepFORM

stepFORM is a first-class freemium service for building forms, quizzes, and various online surveys. The whole process becomes seamless and takes a few minutes because due to the visual intuitive interface no programming skills are needed. With stepFORM, you can add a calc to your website, enable online payments, manage your orders with built-in CRM, and more. Try it out today! Free!

27. Opinion Stage Facebook Quiz

OpinionStage is a brilliant quiz maker that you can use with zero experience and zero design skills to create high-engaging quizzes.

Use the included editor and the beautiful elements to start designing your own content.

28. SuperbWebsiteBuilders.com

SuperbWebsiteBuilders.com focuses on reviewing and comparing website builders that refer to various business niches and make it possible to cover a broad spectrum of web design tasks. This information will be of great help to users looking for a professional web building platform to adhere to their needs. The resource also contains ratings and examples of websites created with popular website builders.

29. pCloudy

pCloudy is the right service to use for mobile app testing from anywhere and anytime. It has over 100k happy users and it is used by top companies like Philips, Honeywell and Jio.

Start a free trial to see pCloudy in action.

30. Bonsai Contract Templates

Bonsai is offering contract templates that will help you save time and look like a huge corporation.

You will find tons of templates to choose from, you will have the possibility to e-sign the contracts, and use automated reminders. It is super simple to use Bonsai for generating the right contracts for your projects.

31. uSocial

uSocial is an elegant, lightweight social media icon design tool. Don’t waste time on manual assembling of icons or ordering them from freelancers – now you can design them yourself with uSocial. Make them float, follow the user as they scroll, or simply make them bigger and/or styled in the theme of your website.

32. Controlio

Controlio will help you monitor your employees’ PC activity from anywhere, being the first choice of both small companies and enterprises.

Improve your company security and productivity by using this technologically-advanced software.

Start a free 14-day trial to see Controlio in action.

33. Wix2WP.Pro

Wix2WP.Pro is the all-in-one website migration platform that makes it possible to successfully transfer Wix-powered websites to WordPress. The service is a perfect solution for newbies as well as for web design pros, who lack time to handle the migration process independently. They employ qualified pros, who are ready to tackle all the special nuances of the website transfer procedure with precise attention to details.

34. WhatFontIs

WhatFontIs is the best font finder that you can use in 2020 to identify fonts for free, from any picture and from any website (or email).

This is the only software that has a huge database (over 620k indexed fonts) and which can identify both free and paid fonts, including Google Fonts.

Identify fonts like pros with WhatFontIs.

35. FoxMetrics

FoxMetrics is a super smart cloud-based web analytics platform that empowers businesses to collect, enrich, transform, and explore their mobile, web, and offline customer journey data.

It is much better than everything else.

36. Creative Tim

Creative Tim creates some of the best React, Vuejs, Angular themes, UI Kits, and elements.

They offer both free and paid stuff, take a look on what they offer. Once you use a Creative Tim product, you never go elsewhere.

37. SiteBuilders.PRO

When it comes to moving your website from one website builder or CMS to another, hiring the best SiteBuilders.Pro specialists will surely be an advantage. The platform has rich experience in transferring websites between popular web design systems. What they offer is text and graphic content transfer, web store data import, manual design replication along with SEO, web design and copywriting services.

38. uCalc

uCalc is a real catch for those who don’t want to splash out on a developer or web designer to build a calculator or form for their website. The service provides you a library of attractive thematic templates and basic elements that you can add, delete, modify, and duplicate. Plus, you can connect the form/calculator with CRM systems. Try it out for yourself!

39. UPQODE

UPQODE is an eCommerce development agency based in the US. The company offers cost-effective services for all types of businesses. They use Shopify, WordPress and Woocommerce platforms to design user-friendly websites.

In addition to this, the agency offers digital marketing services. These include Google Ads setup, social media advertising, conversion optimization, online store optimization and eCommerce SEO solutions.

UPQODE comprises a team of experts who offer support services for eCommerce platforms with complex functionalities.

40. IP Geolocation API

Abstract is an online tool that will help you get the location of any IP with a word-class API serving city, region, country and lat/long data.

There are over 10,000 developers using Abstrat’s APIs because:

  • It is easy to implement and maintain
  • It has speed and it can scale
  • This tool has reliable uptime and great support

41. Moderated group chat for live Q&A and Web Events

RumbleTalk will help you add a moderated chat on your website for free, in no time. The platform is filled with tons of features that you will love.

42. WordPressToWix.PRO

WordPressToWix.PRO focuses on ensuring easy, convenient and fast website transfer from WordPress to Wix. The platform also offers quality project promotion and preservation of search engine positions upon the completion of the task. The team of proficient web designers will gladly assist you with all the steps of the procedure, ensuring a top notch result.

43. uCoz

Get your online presence started with uCoz – a time-tested website builder that already powers millions of websites worldwide. It gives you the complete control over the code, and yet simplicity of the visual editor and a solid pre-built base. It offers you full creative freedom. Create the website of your dreams now, and for free with uCoz!

44. HTMLtoWordPress.PRO

When it comes to reliable, safe and professional HTML to WordPress website migration, it makes sense to contact HTMLtoWordPress.PRO experts. This is a team of professionals, who possess niche-specific knowledge and can boast years of expertise. This guarantees a safe and quick result that matches up to client requirements.

45. Blabber

Downloading the Blabber WordPress theme, you get an all-inclusive pack of tools and designs apt for the launch of a blog, online magazine, newspaper, or any other content-rich online resource. This is an ever-growing WordPress theme. It features a collection of 20+ homepage demos, which a new design added to the collection every week. The theme is fully based on the Elementor page builder and features full compatibility with a variety of WordPress plugins. It’s easy to set up the Blabber theme even if you are not a design or coding expert. The theme offers a rich selection of ready-to-go page sand layout styles, which you may adjust according to your specific demands.

46. FC United

If you are looking for a ready-made WordPress theme that can become a rock-solid foundation for your sports-related website, then FC United will handle this job perfectly well. The theme is ready to be used for the launch of football and soccer clubs, as well as basketball and NFL web projects. The multi-functional layout of the theme includes all tools and features that you may need for the launch of a professional sports website. This includes match reports, league tables, team and player profiles with stats, outstanding galleries and shortcodes, and more. Whenever it’s needed, the theme can be enhanced with the eCommerce features owing to its full compatibility with WooCommerce.

47. Craftis

If you are looking forward to launching handcraft services and goods websites, then Craftis WordPress theme will perfectly suit for this purpose. This is a multi-functional ready-made design featuring a collection of 10+ homepage demos under the hood. The theme is compatible with the Elementor page builder, which lets you apply all the necessary changes to the pre-built page in the intuitive visual mode. The theme also features a selection of ready-made pages that are suited for many different purposes. Using the Craftis theme, you may start selling online without any difficulties. The theme is also compatible with the Elegro Crypto Payment plugin that is perfectly suited for the launch of web stores.

Conclusion

There are lots of super-efficient and easy to use tools in this article. Make a schedule starting with today and start testing them.

Many times, simple solutions like this ai logo maker can make wonders for your website. Take your time to see these solutions in action.

[– This is a sponsored post on behalf of Mekanism –]

Source

Categories: Designing, Others Tags:

How To Help Your Clients Get More Backlinks Through Design

August 21st, 2020 No comments
Forbes article - ‘Why People Uninstall Apps' - long walls of text and distracting ads

How To Help Your Clients Get More Backlinks Through Design

How To Help Your Clients Get More Backlinks Through Design

Suzanne Scacca

2020-08-21T10:30:00+00:00
2020-08-27T08:20:13+00:00

There are certain truths when it comes to what helps a website rank in search. Google wants to see:

  • Mobile-first design
  • Fast page speeds
  • Top-notch security
  • User-friendly navigation
  • Trustworthiness and expertise

… among other things. It also wants to see high-authority websites link back to your website.

And if your clients aren’t obsessed with getting backlinks right now, just wait and see. They’re highly coveted and some businesses will go to great lengths to get them.

Obviously, the quality of the content has to be there if it’s going to be share-worthy. However, the way a page looks can also make or break whether someone decides to share a link to it.

You might not think this is something you can help with as a web designer, but you definitely can. And this post will provide you with a number of tips on how to contribute to this great quest for backlinks.

How To Design Sites That High-Authority Sources Want To Link To

The quality of a backlinked page can reflect on the quality and reputation of the linking website, so authoritative sites have to be incredibly choosy about who they give backlinks to.

The content needs to be reputable and valuable. That’s non-negotiable. But the design has to be top-of-the-line, too.

Let’s take a look at some ways in which you can help your clients’ websites be seen as trustworthy sources worth linking to.

Tip #1: Visualize Data Whenever Possible

In my line of work, one of the most common reasons I link to other websites is to cite data that they discovered or own. I do this to strengthen my points as well as to lend credibility to the arguments I’m making.

That said, there usually isn’t just one organization doing research on the topics I’m interested in, which means I need to figure out which site is worth linking to. And that often comes down to how well they’ve visually depicted the data.

To be clear, I’m not just referring to statistical data. This also pertains to things like breakdowns of processes. Like if I’m researching how various companies handle a given task and a website has a great visual depiction of their workflow, I may be more inclined to link to that page since it’s more valuable.

Let me show you an example.

Let’s say I’m writing an article about why people uninstall mobile apps. I don’t just want to cite a random list of what I think are the reasons for something like this. I know that the evidence exists, so I go searching for sources that can back me up.

In my research on the subject, I find two credible sources that present similar sets of findings. This article appeared on Forbes:

Forbes article - ‘Why People Uninstall Apps' - long walls of text and distracting ads

A Forbes article explains ‘Why People Uninstall Apps’. (Source: Forbes) (Large preview)

And this blog post and infographic was published by CleverTap:

CleverTap article and infographic - data presented visually and breaks down top reasons people uninstall apps

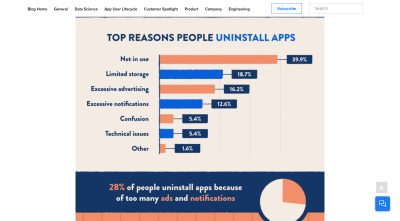
A CleverTap article and infographic explain ‘Why Users Uninstall App’. (Hint: It’s because 28% feel spammed.) (Source: CleverTap) (Large preview)

Let’s say that the two surveys both have a large pool of respondents and the research was done recently. In that case, I’d turn my attention to the way in which the findings are presented.

There are a number of reasons why I’d choose CleverTap over Forbes any day.

For one, CleverTap translated its findings into a user-friendly format. We’ve known for years that infographics get more engagement and shares than plain text content. Sharing and linking are two different kinds of engagement, but we usually do them for the same reason:

We trust the source or find some value in the content and want others to discover it as well.

So, because CleverTap presented this beautiful breakdown of its findings, it’s enabled me to more quickly and effectively identify the facts I’m looking for, more so than the run-on paragraphs on the Forbes site. With Forbes’ presentation of the data, I’d basically have to copy-and-paste the content into my own document and do some formatting of my own to try and figure out what’s going on.


No one should have to work for their data, just like no one should have to work to get through a website.

So, that’s reason number one. CleverTap shows extra care and consideration for the data that’s being presented as well as an understanding of the audience who needs to read it.

Reason number two is that Forbes’s page is littered with ads. When one disappears, another two appear in its place. It’s distracting and I don’t believe in sending people to a website that so blatantly prioritizes its profits over its content. Again, linked-to websites can have an impact on the linking website’s reputation, so this is something to consider when you design your own.

The last reason I’d link to CleverTap’s page over Forbes’ is because visually designed data saves me the trouble of having to create graphics on my own. It’s not like I can’t cite the data as is, but why should I? I know that it’s easier for my readers to find key data points and understand them when I call them out visually.

Plus, I’m already giving the linked website credit for their work, so I am more than happy to provide a companion branded image. It lends even more credibility to my source.

Tip #2: Make Lengthy Pages Easier To Scan

I have clients who constantly come to me and say, “I need you to write a 2,000-word article so I can rank #1 on Google.”

This is one of those SEO myths that’s part fact and part fiction. Here’s why:

Google’s John Mueller is often asked on Twitter to confirm various assumptions we have about SEO (since Google itself is so tight-lipped about it). And that’s when we get useful gems like this:

John Mueller (@JohnMu) responds to a question on Twitter about how word count correlates with page rank

John Mueller (@JohnMu) responds to a question on Twitter about how word count correlates with page rank. (Source: John Mueller on Twitter) (Large preview)

That’s what I tell my clients, but without the snark obviously. It’s not about hitting a target number of words that will magically make a web page rank. All you need to do is match the search intent and then unpack the topic as fully as needed.

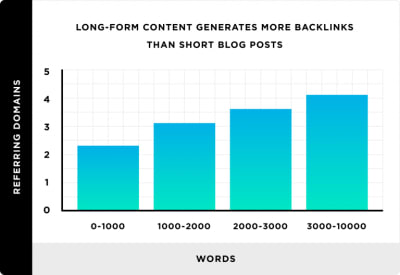
That said, there is data from Backlinko that confirms that longer pages do rank higher in search…

Backlinko data: long-form content generates more backlinks than short blog posts

Backlinko shows the correlation between number of words on a web page and how many backlinks it gets. (Source: Backlinko) (Large preview)

But it’s not the sheer volume of words that lends to a lengthy web page’s rank. It’s because longer content tends to be more authoritative which makes it more link-worthy.

Interesting, right?

So, knowing this, you should do everything in your power to make a lengthy piece of content (any linkable page, really — including informational pages and the home page) super easy to scan, read and link to. Because even the most engaged reader is apt to miss important details or give up part of the way through if you don’t design the page the right way.

For the purposes of this example, I’m going to show you two examples of long blog posts that are top-ranked for “how to price a saas product”.

ProfitWell handles it well enough and has 93 external followed links to show for it, according to MozBar. These are backlinks that pass SEO value onto Google, which is how a website ranks higher thanks to its backlink profile.

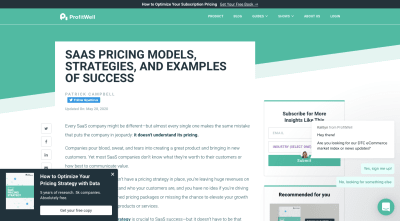
All I probably need to do is show you what the above-the-fold looks like to demonstrate why this article hasn’t been linked to nearly as much as one of its competitors. Here it is:

A ProfitWell article about pricing SaaS products

ProfitWell unpacks ‘SaaS pricing models, strategies and examples of success’. (Source: ProfitWell) (Large preview)

In terms of overall design, ProfitWell has a great website. It’s even done a fantastic job laying out the post so it’s easy to scan through and read.

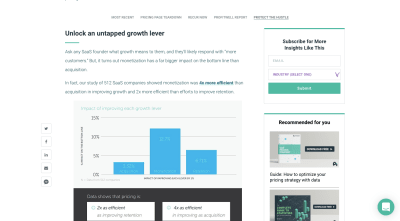
ProfitWell blog post design and layout - header tags, bolding, hyperlinks, graphics and more

The ProfitWell blog post is designed to make reading and scanning easy. (Source: ProfitWell) (Large preview)

In just this screenshot alone you can see how effectively the designer has worked their magic on the page, including text enhancements like:

  • Header tags,
  • Bolded and highlighted hyperlinks,
  • Data visualizations,
  • Short sentence and paragraph structures,
  • Bulleted and numbered lists.

However, it has a number of things working against it, which is what I believe has cost it backlinks.

One is the overwhelming amount of distractions: the cumbersome sidebar, the sticky social share bar, the chat widget that needs to be dismissed and a lead gen pop-up that adheres to the bottom-left corner at times. Secondly, this is a long article. If people want to read it in full — especially on mobile — it’s going to take a lot of scrolling to get all the way through it.

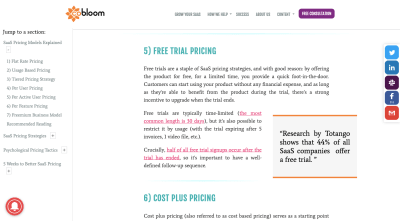
Now let me show you how Cobloom‘s page design is likely why it has 159 external followed links.

A Cobloom article on how to price SaaS products

Cobloom’s ‘ultimate guide to SaaS pricing models, strategies & psychological hacks’. (Source: Cobloom) (Large preview)

This looks fantastic, right? There are three sticky elements always present:

  • The sticky table of contents on the left,
  • The chat widget which is part of the ToC bar,
  • The social share widget.

But the sticky parts of the page never compromise the content:

Cobloom blog post design: sticky table of contents, sticky social share icons, sticky chat widget and well-designed content

Cobloom’s blog post design and sticky elements make it easy for readers to digest the content. (Source: Cobloom) (Large preview)

In fact, the table of contents on the left makes the page easier to read (among other design choices that have been made). Readers can click on the section that they’re interested in without having to bother with scrolling down the page.

The only thing I’d say this page falls short on is the mobile experience. The table of contents isn’t present and the page feels a little wobbly, as if the horizontal dimensions weren’t properly sized. So, in terms of this being a link-worthy page on mobile, I’d say it’s not when compared to ProfitWell’s super mobile-friendly post.

But that’s a good lesson for you to take away from this. Use your sticky elements on mobile wisely. Rather than disrupt a post with a chat widget or a lead gen promotional bar, place the table of contents beneath it and let it serve as a secondary “navigation” for lengthier pages.

Tip #3: “Design” Each Page’s Metadata

As a writer, I spend a lot of time looking for the right links to place within my content. Which means a good chunk of my day is spent on Google, social media and Feedly trying to hunt down the perfect sources.

Can you guess how I narrow down my options to ensure that I always share or link to the best content for my website visitors or social connections? I use the page’s metadata to help me decide.

I’m not the only one who cares about the external “image” of a web page either. There’s plenty of research that points to attractive social media content getting more shares than those that aren’t.

So, in addition to designing pages to look more trustworthy and user-friendly, I’d suggest designing your metadata to make it look more carefully groomed. If you’ve taken the time to create a buttoned-up micro-image of the page, people looking for sources for their authoritative websites are more likely to give yours a closer look.

As such, there are a couple things I’d recommend you do to increase the likelihood that this happens:

The first thing is to ensure that the page’s metadata appears complete in search.

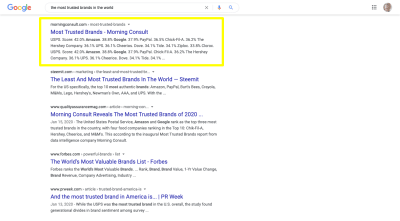
For instance, here’s what comes up when I search Google for “the most trusted brands in the world”:

Google search for ‘the most trusted brands in the world' with a highlight around a page on the Morning Consult website

A Google search for ‘the most trusted brands in the world’. (Source: Google) (Large preview)

For the most part, the meta titles are all fine as you can see them in full or, at the very least, get the gist of what the page is about and how it answers the search’s intent.

The descriptions aren’t that great, though, as some are nonsensical and some are incomplete. Both qualities demonstrate that the people behind the site didn’t care enough to write a helpful description for it. Authoritative figures are going to care about stuff like this.

One reason why is because it makes it harder for them to figure out which sites to look deeper into. It’s a pain having to review every top-ranking page because no details are provided to help weed out the so-so from the great. Also, if metadata isn’t filled in, the page might not look all that great when shared on social media, again requiring the sharer to do more work and clean it up.

Let me show you an example:

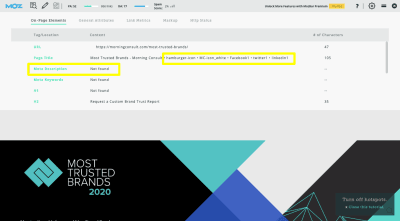
This is what MozBar reports to me from the Morning Consult page that ranks #2 for this search query:

MozBar analysis of on-page elements and metadata for Morning Consult page

MozBar reveals how the metadata was prepared for this page on the Morning Consult website. (Source: Morning Consult) (Large preview)

The page title includes a bunch of icons that thankfully don’t appear in search results. The meta description, however, doesn’t exist. This is why when Google tried to retrieve a description about the page, it created this mess from the report’s findings:

“USPS. Score: 42.0% Amazon. 38.8% Google. 37.9% PayPal. 36.5% Chick-Fil-A. 36.2% The Hershey Company. 36.1% UPS. 36.1% Cheerios. Dove. 34.1% Tide. 34.1% Ziploc. 33.8% Clorox. USPS. Score: 42.0% Amazon. 38.8% Google. 37.9% PayPal. Chick-Fil-A. 36.2% The Hershey Company. 36.1% UPS. 36.1% Cheerios. Dove. 34.1% Tide. 34.1% …”

That might be enough to keep someone from clicking into the site, believing that if the metadata is this messy, the page is too.

As for the shareability piece, the lack of metadata causes issues, too. Here’s what this page looks like on Facebook, LinkedIn and Twitter (in that order):

Three views of the Morning Consult report when shared on Facebook (top-left), LinkedIn (top-right) and Twitter (bottom-left)

Three views of the Morning Consult report when shared on Facebook (top-left), LinkedIn (top-right) and Twitter (bottom-left). (Source: Morning Consult) (Large preview)

Two of the shares pull in the brand logo and tagline, but not the featured image of the page. Two of the shares show no description at all while the other shows a snippet of the first sentence on the page.

Again, this lack of attention to detail ends up creating more work for the sharer, which might be reason enough for them not to share it. Or not to share anything from that website again.

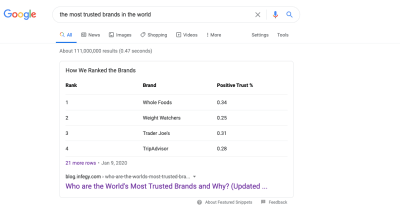
One last thing you can do to make your pages look more link-worthy in search is to use schema markup. The #1 page (from Infegy) for “the most trusted brands in the world” did a good job of this (in addition to writing their metadata). The results look great:

A Google featured snippet result for the query ‘the most trusted brands in the world' - from Infegy and displays chart with the top ranks and positive trust %

A Google featured snippet result for the query ‘the most trusted brands in the world’. (Source: Google) (Large preview)

If I needed this data for an article I was writing today, I’d probably end up focusing most of my efforts on this piece since it’s clear that the page and its metadata were so carefully built by its creators.

To recap: There are three things you should pay attention to when setting up link-worthy pages of your site for search:

  • Include complete SEO metadata.
  • Attach a featured image to the page that’s relevant and descriptive.
  • Use schema markup whenever possible.

Wrapping Up

You might not be too concerned with backlinks, but the owners of your websites certainly are or will be once they catch wind of the power they wield in Google. While a lot of the linkability of a page does depend on the quality of the content, certain design choices you make can affect it as well. So, add these strategies to your SEO-friendly design processes and help your clients claim those highly coveted top-ranking spots.

(ra, yk, il)

Categories: Others Tags:

Optimize Images with a GitHub Action

August 20th, 2020 No comments

I was playing with GitHub Actions the other day. Such a nice tool! Short story: you can have it run code for you, like run your build processes, tests, and deployments. But it’s just configuration files that can run whatever you need. There is a whole marketplace of Actions wanting to do work for you.

What I wanted to do was run code to do image optimization. That way I never have to think about it. Any image in the repo has been optimized.

There is an action for this already, Calibre’s image-actions, which we’ll leverage here. You’ll also need to ensure Actions is enabled for the repo. I know in my main organization we only flip on Actions on a per-repo basis, which is one of the options.

Then you make a file at ./github/workflows/optimize-images.yml. That’s where you can configure this action. All your actions can have separate files, if you want them to. I made this a separate file because (1) it only works with “pushes to pull requests,” so if you have other actions that run on different triggers, they won’t mix nicely, and (2) That’s what is in their docs and looks like the suggested usage.

name: Optimize images
on: pull_request
jobs:
  build:
    name: calibreapp/image-actions
    runs-on: ubuntu-latest
    steps:
      - name: Checkout Repo
        uses: actions/checkout@master

      - name: Compress Images
        uses: calibreapp/image-actions@master
        with:
          githubToken: ${{ secrets.GITHUB_TOKEN }}

Now if you make a pull request, you’ll see it run:

That successful run then leaves a comment on the pull request saying what it was able to optimize:

It will literally re-commit those files back to the pull request as well, so if you’re going to stay on the pull request and keep working, you’ll need to push again before you can push to get the optimized images.

I can look at that automatic commit and see the difference:

The commit preview in Git Tower.

How I can merge the PR knowing all is well:

Pretty cool. Is optimizing your images locally particularly hard? No. Is never having to think about it again better? Yeah. You’re taking on a smidge of technical debt here, but reducing it elsewhere, which is a very fair trade, at least in my book.


The post Optimize Images with a GitHub Action appeared first on CSS-Tricks.

You can support CSS-Tricks by being an MVP Supporter.

Categories: Designing, Others Tags:

To grid or not to grid

August 20th, 2020 No comments

Sarah Higley does accessibility work and finds that “tables and grids are over-represented in accessibility bugs.”

The drum has been banged a million times: don’t use a

for layout. But what goes around comes around. What’s the the #1 item in a list of “some of the ways tables and grids can go wrong”?

Using a grid when a table is needed, or vice versa

The day has come. CSS grid has dug its way into usage so deeply that developers are using it by default instead of using a classic

. And we don’t even have flying cars yet!

Sarah shows clear examples of both techniques and how the same information can be presented in different ways both visually and semantically. For example, a list of upcoming concerts can be displayed as a

, and that might be fine if you can imagine the purpose of the table being used for sorting or comparing, but it can also be presented as a grid, which has other advantages, like headers that are easier to skim.

Direct Link to ArticlePermalink


The post To grid or not to grid appeared first on CSS-Tricks.

You can support CSS-Tricks by being an MVP Supporter.

Categories: Designing, Others Tags:

A Community-Driven Site with Eleventy: Building the Site

August 20th, 2020 No comments
Screenshot of the site, showing a Meow vs. Bow Wow heading above a Weekly Battle subheading, followed by a photo of a tabby cat named Fluffy and one of a happy dog named Lexi.

In the last article, we learned what goes into planning for a community-driven site. We saw just how many considerations are needed to start accepting user submissions, using what I learned from my experience building Style Stage as an example.

Now that we’ve covered planning, let’s get to some code! Together, we’re going to develop an Eleventy setup that you can use as a starting point for your own community (or personal) site.

Article Series:

  1. Preparing for Contributions
  2. Building the Site (You are here!)

This article will cover:

  • How to initialize Eleventy and create useful develop and build scripts
  • Recommended setup customizations
  • How to define custom data and combine multiple data sources
  • Creating layouts with Nunjucks and Eleventy layout chaining
  • Deploying to Netlify

The vision

Let’s assume we want to let folks submit their dogs and cats and pit them against one another in cuteness contests.

Live demo

We’re not going to get into user voting in this article. That would be so cool (and totally possible with serverless functions) but our focus is on the pet submissions themselves. In other words, users can submit profile details for their cats and dogs. We’ll use those submissions to create a weekly battle that puts a random cat up against a random dog on the home page to duke it out over which is the most purrrfect (or woof-tastic, if you prefer).

Let’s spin up Eleventy

We’ll start by initializing a new project by running npm init on any directory you’d like, then installing Eleventy into it with:

npm install @11ty/eleventy

While it’s totally optional, I like to open up the package-json file that’s added to the directory and replace the scripts section with this:

"scripts": {
  "develop": "eleventy --serve",
  "build": "eleventy"
},

This allows us to start developing Eleventy in a development environment (npm run develop) that includes Browsersync hot-reloading for local development. It also adds a command that compiles and builds our work (npm run build) for deployment on a production server.

If you’re thinking, “npm what?” what we’re doing is calling on Node (which is something Eleventy requires). The commands noted here are intended to be run in your preferred terminal, which may be an additional program or built-in to your code editor, like it is in VS Code.

We’ll need one more npm package, fast-glob, that will come in handy a little later for combining data. We may as well install it now:

npm install --save-dev fast-glob.

Let’s configure our directory

Eleventy allows customizing the input directory (where we work) and output directory (where our built work goes) to provide a little extra organization.

To configure this, we’ll create the eleventy.js file at the root of the project directory. Then we’ll tell Eleventy where we want our input and output directories to go. In this case, we’re going to use a src directory for the input and a public directory for the output.

module.exports = function (eleventyConfig) {
  return 
    dir: {
      input: "src",
      output: "public"
    },
  };
};

Next, we’ll create a directory called pets where we’ll store the pets data we get from user submissions. We can even break that directory down a little further to reduce merge conflicts and clearly distinguish cat data from dog data with cat and dog subdirectories:

pets/
  cats/
  dogs/

What’s the data going to look like? Users will send in a JSON file that follows this schema, where each property is a data point about the pet:

{
  "name": "",
  "petColor": "",
  "favoriteFood": "",
  "favoriteToy": "",
  "photoURL": "",
  "ownerName": "",
  "ownerTwitter": ""
}

To make the submission process crystal clear for users, we can create a CONTRIBUTING.md file at the root of the project and write out the guidelines for submissions. GitHub takes the content in this file and uses displays it in the repo. This way, we can provide guidance on this schema such as a note that favoriteFood, favoriteToy, and ownerTwitte are optional fields.

A README.md file would be just as fine if you’d prefer to go that route. It’s just nice that there’s a standard file that’s meant specifically for contributions.

Notice photoURL is one of those properties. We could’ve made this a file but, for the sake of security and hosting costs, we’re going to ask for a URL instead. You may decide that you are willing to take on actual files, and that’s totally cool.

Let’s work with data

Next, we need to create a combined array of data out of the individual cat files and dog files. This will allow us to loop over them to create site pages and pick random cat and dog submissions for the weekly battles.

Eleventy allows node module.exports within the _data directory. That means we can create a function that finds all cat files and another that finds all dog files and then creates arrays out of each set. It’s like taking each cat file and merging them together to create one data set in a single JavaScript file, then doing the same with dogs.

The filename used in _data becomes the variable that holds that dataset, so we’ll add files for cats and dogs in there:

_data/
  cats.js
  dogs.js

The functions in each file will be nearly identical — we’re merely swapping instances of “cat” for “dog” between the two. Here’s the function for cats:

const fastglob = require("fast-glob");
const fs = require("fs");


module.exports = async () => {
  // Create a "glob" of all cat json files
  const catFiles = await fastglob("./src/pets/cats/*.json", {
    caseSensitiveMatch: false,
  });


  // Loop through those files and add their content to our `cats` Set
  let cats = new Set();
  for (let cat of catFiles) {
    const catData = JSON.parse(fs.readFileSync(cat));
    cats.add(catData);
  }


  // Return the cats Set of objects within an array
  return [...cats];
};

Does this look scary? Never fear! I do not routinely write node either, and it’s not a required step for less complex Eleventy sites. If we had instead chosen to have contributors add to an ever growing single JSON file with _data, then this combination step wouldn’t be necessary in the first place. Again, the main reason for this step is to reduce merge conflicts by allowing for individual contributor files. It’s also the reason we added fast-glob to the mix.

Let’s output the data

This is a good time to start plugging data into the templates for our UI. In fact, go ahead and drop a few JSON files into the pets/cats and pets/dogs directories that include data for the properties so we have something to work with right out of the gate and test things.

We can go ahead and add our first Eleventy page by adding a index.njk file in the src directory. This will become the home page, and is a Nunjucks template file format.

Nunjucks is one option of many for creating templates with Eleventy. See the docs for a full list of templating options.

Let’s start by looping over our data and outputting an unordered list both for cats and dogs:

<ul>
  <!-- Loop through cat data -->
  {% for cat in cats %}
  <li>
    <a href="/cats/{{ cat.name | slug }}/">{{ cat.name }}</a>
  </li>
  {% endfor %}
</ul>


<ul>
  <!-- Loop through dog data -->
  {% for dog in dogs %}
  <li>
    <a href="/dogs/{{ dog.name | slug }}/">{{ dog.name }}</a>
  </li>
  {% endfor %}
</ul>

As a reminder, the reference to cats and dogs matches the filename in _data. Within the loop we can access the JSON keys using dot notation, as seen for cat.name, which is output as a Nunjucks template variable using double curly braces (e.g. {{ cat.name }}).

Let’s create pet profile pages

Besides lists of cats and dogs on the home page (index.njk), we also want to create individual profile pages for each pet. The loop indicated a hint at the structure we’ll use for those, which will be [pet type]/[name-slug].

The recommended way to create pages from data is via the Eleventy concept of pagination which allows chunking out data.

We’re going to create the files responsible for the pagination at the root of the src directory, but you could nest them in a custom directory, as long as it lives within src and can still be discovered by Eleventy.

src/
  cats.njk
  dogs.njk

Then we’ll add our pagination information as front matter, shown for cats:

---
pagination:
  data: cats
  alias: cat
  size: 1
permalink: "/cats/{{ cat.name | slug }}/"
---

The data value is the filename from _data. The alias value is optional, but is used to reference one item from the paginated array. size: 1 indicates that we’re creating one page per item of data.

Finally, in order to successfully create the page output, we need to also indicate the desired permalink structure. That’s where the alias value above comes into play, which accesses the name key from the dataset. Then we are using a built-in filter called slug that transforms a string value into a URL-friendly string (lowercasing and converting spaces to dashes, etc).

Let’s review what we have so far

Now is the time to fire up Eleventy with npm run develop. That will start the local server and show you a URL in the terminal you can use to view the project. It will show build errors in the terminal if there are any.

As long as all was successful, Eleventy will create a public directory, which should contain:

public/
  cats/
    cat1-name/index.html
    cat2-name/index.html
  dogs/
    dog1-name/index.html
    dog2-name/index.html
  index.html

And in the browser, the index page should display one linked list of cat names and another one of linked dog names.

Let’s add data to pet profile pages

Each of the generated pages for cats and dogs is currently blank. We have data we can use to fill them in, so let’s put it to work.

Eleventy expects an _includes directory that contains layout files (“templates”) or template partials that are included in layouts.

We’ll create two layouts:

src/
  _includes/
    base.njk
    pets.njk

The contents of base.njk will be an HTML boilerplate. The element in it will include a special template tag, {{ content | safe }}, where content passed into the template will render, with safe meaning it can render any HTML that is passed in versus encoding it.

Then, we can assign the homepage, index.md, to use the base.njk layout by adding the following as front matter. This should be the first thing in index.md, including the dashes:

---
layout: base.njk
---

If you check the compiled HTML in the public directory, you’ll see the output of the cat and dog loops we created are now within the of the base.njk layout.

Next, we’ll add the same front matter to pets.njk to define that it will also use the base.njk layout to leverage the Eleventy concept of layout chaining. This way, the content we place in pets.njk will be wrapped by the HTML boilerplate in base.njk so we don’t have to write out that HTML each and every time.

In order to use the single pets.njk template to render both cat and dog profile data, we’ll use one of the newest Eleventy features called computed data. This will allow us to assign values from the cats and dogs data to the same template variables, as opposed to using if statements or two separate templates (one for cats and one for dogs). The benefit is, once again, to avoid redundancy.

Here’s the update needed in cats.njk, with the same update needed in dogs.njk (substituting cat with dog):

eleventyComputed:
  title: "{{ cat.name }}"
  petColor: "{{ cat.petColor }}"
  favoriteFood: "{{ cat.favoriteFood }}"
  favoriteToy: "{{ cat.favoriteToy }}"
  photoURL: "{{ cat.photoURL }}"
  ownerName: "{{ cat.ownerName }}"
  ownerTwitter: "{{ cat.ownerTwitter }}"

Notice that eleventyComputed defines this front matter array key and then uses the alias for accessing values in the cats dataset. Now, for example, we can just use {{ title }} to access a cat’s name and a dog’s name since the template variable is now the same.

We can start by dropping the following code into pets.njk to successfully load cat or dog profile data, depending on the page being viewed:

<img src="{{ photoURL }}" />
<ul>
  <li><strong>Name</strong>: {{ title }}</li>
  <li><strong>Color</strong>: {{ petColor }}</li>
  <li><strong>Favorite Food</strong>: {{ favoriteFood if favoriteFood else 'N/A' }}</li>
  <li><strong>Favorite Toy</strong>: {{ favoriteToy if favoriteToy else 'N/A' }}</li>
{% if ownerTwitter %}
  <li><strong>Owner</strong>: <a href="{{ ownerTwitter }}">{{ ownerName }}</a></li>
{% else %}
  <li><strong>Owner</strong>: {{ ownerName }}</li>
{% endif %}
</ul>

The last thing we need to tie this all together is to add layout: pets.njk to the front matter in both cats.njk and dogs.njk.

With Eleventy running, you can now visit an individual pet page and see their profile:

Screenshot of a cat profile page that starts with the cat's name for the heading, followed by the cat's photo, and a list of the cat's details.
Fancy Feast for a fancy cat. ?

We’re not going into styling in this article, but you can head over to the sample project repo to see how CSS is included.

Let’s deploy this to production!

The site is now in a functional state and can be deployed to a hosting environment!

As recommended earlier, Netlify is an ideal choice, particularly for a community-driven site, since it can trigger a deployment each time a submission is merged and provide a preview of the submission before sending it for review.

If you choose Netlify, you will want to push your site to a GitHub repo which you can select during the process of adding a site to your Netlify account. We’ll tell Netlify to serve from the public directory and run npm run build when new changes are merged into the main branch.

The sample site includes a netlify.toml file which has the build details and is automatically detected by Netlify in the repo, removing the need to define the details in the new site flow.

Once the initial site is added, visit Settings ? Build ? Deploy in Netlify. Under Deploy contexts, select “Edit” and update the selection for “Deploy Previews” to “Any pull request against your production branch / branch deploy branches.” Now, for any pull request, a preview URL will be generated with the link being made available directly in the pull request review screen.

Let’s start accepting submissions!

Before we pass Go and collect $100, it’s a good idea to revisit the first post and make sure we’re prepared to start taking user submissions. For example, we ought to add community health files to the project if they haven’t already been added. Perhaps the most important thing is to make sure a branch protection rule is in place for the main branch. This means that your approval is required prior to a pull request being merged.

Contributors will need to have a GitHub account. While this may seem like a barrier, it removes some of the anonymity. Depending on the sensitivity of the content, or the target audience, this can actually help vet (get it?) contributors.

Here’s the submission process:

  1. Fork the website repository.
  2. Clone the fork to a local machine or use the GitHub web interface for the remaining steps.
  3. Create a unique .json file within src/pets/cats or src/pets/dogs that contains required data.
  4. Commit the changes if they’re made on a clone, or save the file if it was edited in the web interface.
  5. Open a pull request back to the main repository.
  6. (Optional) Review the Netlify deploy preview to verify information appears as expected.
  7. Merge the changes.
  8. Netlify deploys the new pet to the live site.

A FAQ section is a great place to inform contributors how to create pull request. You can check out an example on Style Stage.

Let’s wrap this up…

What we have is fully functional site that accepts user contributions as submissions to the project repo. It even auto-deploys those contributions for us when they’re merged!

There are many more things we can do with a community-driven site built with Eleventy. For example:

  • Markdown files can be used for the content of an email newsletter sent with Buttondown. Eleventy allows mixing Markdown with Nunjucks or Liquid. So, for example, you can add a Nunjucks for loop to output the latest five pets as links that output in Markdown syntax and get picked up by Buttondown.
  • Auto-generated social media preview images can be made for social network link previews.
  • A commenting system can be added to the mix.
  • Netlify CMS Open Authoring can be used to let folks make submissions with an interface. Check out Chris’ great rundown of how it works.

My Meow vs. BowWow example is available for you to fork on GitHub. You can also view the live preview and, yes, you really can submit your pet to this silly site. ?

Best of luck creating a healthy and thriving community!

Article Series:

  1. Preparing for Contributions
  2. Building the Site (You are here!)

The post A Community-Driven Site with Eleventy: Building the Site appeared first on CSS-Tricks.

You can support CSS-Tricks by being an MVP Supporter.

Categories: Designing, Others Tags:

Never Build a CSV Importer Again

August 20th, 2020 No comments

(This is a sponsored post.)

CSV import as a process is broken. Messy customer data, edge cases, encoding formats, error messages, non-technical users: importing data into applications is a huge pain! Ingesting data has been long neglected as a software product experience, leading to customer frustration and wasted engineering cycles rebuilding what those users already expect to have. It’s a major distraction for product teams focused on building core differentiating features.

We’re going to look at the problems with turning messy spreadsheets into structured product data, how it’s typically addressed, and how Flatfile Portal solves the technical and user experience challenges inherent in CSV import.

If you’re a software developer and have built a CSV parser before, you know how frustrating it is to dedicate valuable engineering sprints to just one component of the customer onboarding. Building an entire CSV importer means addressing user experience and technical edge cases that result from involving humans in a highly technical ETL process. Trying to bake in more advanced functionality such as data normalization, column-matching, or even refining the interface itself results in developers building an entirely new product before the first one is even finished!

Investing engineering sprints to maintain an outdated data importer, or worse, building a CSV importer from scratch is now a pain of the past. Today, we’d like to show Flatfile Portal, which allows developer and product teams the ability to revamp their entire data import flows not in weeks or months, but in minutes. Did we mention you’d save thousands of dollars in development costs?

Common Problems with CSV Import Experiences

Importing CSV data is often one of the first interactions users have with a software application, especially “empty box” products. Unfortunately, there are too many ways that this data import experience can cause customer frustration, or worse, churn.

For users, an inefficient importer experience will cause them to question the value of the product itself.

“If the app can’t import my data easily now, what’s going to happen once my data is finally uploaded?”

Your customers shouldn’t have to battle with these kinds of CSV import errors (Source: Flatfile)Digsy.ai shared their experience with handling data imports for their real-estate CRM product prior to integrating Flatfile Portal. Not only was the team strained on resources from building and maintaining a proprietary data importer, but Digsy’s engineers also spent ten or more hours per new user cleaning up and formatting incoming customer data. Occasionally, these users would churn, rendering all that work fruitless.

Thankfully, there’s an out-the-box CSV importer that can do all this on its own, and with just a few lines of code.

Introducing: The elegant import button for web apps

We call it Flatfile Portal, and it was born out of frustration from continuously re-building CSV importers, parsers, and uploaders. Flatfile provides data normalization, CSV auto-column matching, and a modernized UI component with a few lines of JavaScript. Customers implement Flatfile in as little as a day: a massive improvement over 3-4 engineering sprints with continuous maintenance tacked on.

An animation of an import completed with Flatfile Portal. (Source: Flatfile)

Let’s look at issues associated with traditional CSV import experiences and how Flatfile Portal addresses them.

Issue 1: Unclear Guidance

Users tend to struggle with CSV imports, and usually have questions before the CSV is even uploaded. Here are questions users may ask during an import:

  • Can I upload XLS, XLSX, or XML files?
  • What is UTF-8 encoding?
  • What if my file is 9.7 MB?
  • Is it a problem if my file has special characters in column headers?
  • What happens if my spreadsheet columns don’t match the required fields?
  • How do I fix my data? Do I need to save a duplicate CSV and upload that file instead?

Unless your users spend a lot of time exporting and importing spreadsheets, they’re not going to think about these situations until the moment they import their data.

It shouldn’t be up to your users to read through intimidating data import documentation or watch a 15-minute tutorial on how to import spreadsheets into your product. Surprisingly, developers aren’t spared either! Although engineers understand the complexities of importing spreadsheets into an advanced system (like Microsoft Azure), there is still an exhaustive amount of content they need to ingest before their first import even happens.

A highly technical product like Microsoft Azure attempts to reasonably present developers with extensive documentation for importing user data. (Source: Microsoft Azure)Your product experience should make it simple to import CSV data without requiring users to become data scientists. The same goes for the technical understanding required to build a CSV importer to begin with, a goal we’ve dedicated reaching with Flatfile Portal.

Here’s an example of a simplified CSV import solution for a CRM from Portal, created in less than an hour complete with complex data validation.

A demo of how Flatfile Portal helps software engineers quickly build a data importer with a few lines of JavaScript. (Source: Flatfile)Portal is standardized, responsive and customizable to specific branding needs. With Flatfile, users will instantly know to:

  • Import their data using a CSV or XLS.
  • Match their spreadsheet columns in the next step, (if Portal’s 95% fuzzy-matching doesn’t catch it during an import.)
  • Click “Continue” to begin their data upload.

There’s no need to overwhelm the user with warnings about file encoding, incorrect date formats, or what fields are required. Portal solely focuses on importing CSV data from the user and making it a delightful experience during this first data onboarding touchpoint. Mapping columns and validating data will be completed at a later stage once the importer has matched the spreadsheet header columns using human-in-the-loop machine learning.

Portal’s JS configuration allows data models to be replicated in minutes instead of weeks. The label matches a CSVs column name, and the key is how you’d like the imported data to be saved in the JSON output. Portal also provides powerful validation options to work with any data model requirement and supports regex, data normalization, and server callbacks for those unique validation use-cases.

Once the data model has been built into the JavaScript config, all that needs to be done is to trigger the importer from within your product, typically by way of a button through a JavaScript call. If your application can execute JavaScript, you can integrate a truly modernized CSV importer, in minutes, and at a fraction of the cost.

With Flatfile Portal, you and your users won’t have to worry about things like file sizes or encoding formats causing problems during import. Portal helps you manage imported data via the browser or through a server-side process, enabling you to split and upload large CSV and Excel files without dropping imported data.

A Flatfile demo that shows how you can reliably split and import data from multiple customer files. (Source: Flatfile)Flatfile allows users to import CSV data from multiple files intuitively, without dropping data or doing manual splitting. In this demo, users are allowed to import spreadsheets containing three different sets of data. Not only will this help make their files more manageable, but it’ll make it much easier for your product team to ingest and organize customer data on your backend into a consistent structure.

Customers shouldn’t have to think here. CSV importers should be designed — error messages and all — to make data onboarding a quick and painless experience for users.

Issue 2: Inefficient CSV Column-Mapping

The next source of frustration often appears when poor column-matching functionality is in place.

As an example, let’s say that a Mailchimp user wants to import as many contact details into the email marketing software as they can. After all, it might be useful to have their business title or phone number on hand for future list segmentation.

However, initializing the import results in some data being skipped or dropped entirely:

This is how Mailchimp’s CSV field-mapping system displays unmapped data. (Source: Mailchimp)The app doesn’t recognize three of the four spreadsheet columns in our file. In order to keep the unmatched column data, the user has to go through each field and manually assign a matching label that Mailchimp accepts.

This is the case with many products that ingest user data, especially CRMs. Not all data will be used during an import, however, the decision to allow custom field submissions, in this case, should be left to the user; rather than removing their data prematurely.

We know what you’re thinking: “Why not just provide a pre-built spreadsheet template?” However, this is hardly a solution to the problem and will only create more work and frustration for your users. Especially those that bring in thousands of rows of data, or have 40 column headers (yes, we’ve seen it!)

The problem here lies within the customer data onboarding experience. Optimizing CSV import features within a product has been a difficult and expensive project to take on for product and engineering teams. That’s where Flatfile’s machine-learning, auto column-matching solution comes in handy.

Portal automatically learns which incoming fields are matched to which columns from each of your users. This results in a ‘human in the loop’ machine-learning experience that is truly unique to your product’s data model. Portal will automatically match imported CSV columns to your data model based on user inputs and consistently learns over time.

The importer also caches column assignments regardless of session, so a user that uploads ten CSV files in a day will get most if not all of their columns matched automatically.

ClickUp, powered by Flatfile Portal, has leveraged human-in-the-loop for its productivity web app.

The main data import modal for users that want to import tasks and projects into ClickUp. (Source: ClickUp, powered by Flatfile Portal)Portal is designed to help users of all technical expertise. Instructions are clearly provided as to what the user can upload, and the fields required. In addition, Portal’s manual data entry feature allows users to preview what sort of data can be imported into productivity software. This helps users preserve as much data as possible, rather than realize too late that the data importer didn’t recognize their columns and dropped the data out without any notice.

Configuration flags extend Portal’s functionality even further. For example, the allowCustom flag specifies whether you’d like users to add custom columns during the matching step. Using ClickUp as an example, one could add a column for “Billable”? As a boolean field to track whether a task is billable. Allowing users to place columns on the fly results in a shift of control not seen with legacy CSV importers – shaped by a product’s unique data model requirements.

Portal’s column matching step:

From Slite.com

Portal asks users to identify column names for accurate mapping. (Source: ClickUp)This step asks users to indicate where their column names live. This way, the importer can more effectively match them with its own or add labels if they’re missing. Some CSV data may only contain values rather than column headers.

Next, users get a chance to confirm or reject Portal’s column matching suggestions:

From Slite.com
From Slite.com

Portal uses a machine-learning column-matching system to automatically map users’ imported data. (Source: ClickUp)

On the left, users will find the columns and values they’ve imported. The white tab to the right provides them with automated column matching within ClickUp’s data model. So, “Task” will become “Task name”, “Assignee” will become “Task assignee(s)”, “Status” remains as is and so on.

If one of the labels in the CSV doesn’t have any match at all, the importer calls attention to it like this:

Flatfile Portal calls attention to labels or CSV values that don’t have an exact match in a product. (Source: ClickUp)

In this example, the Priority response of “High” was detected. But “Medium” was not. However, there’s no need for the user to guess what the correct replacement should be. The importer provides relevant options like “Urgent”, “Normal” and “Low” to replace it with. No need to re-import their CSV, or change the cell value prior to importing the data.

Once all spreadsheet mappings have been resolved, the user can easily “Confirm Mapping” or discard the column altogether if it’s proven unnecessary.

From Slite.com
From Slite.com

Users get a chance to confirm CSV labels and clean up their spreadsheet results before importing their data. (Source: ClickUp)Finally, users get a chance to review any errors detected with their data:

From Slite.com

Validation errors detected in ClickUp’s data import appear in red. (Source: ClickUp)In this ClickUp example, “Task Name” is triggered with the “isRequired: true” flag which requires users to submit data for that particular column. Whenever any validation fails in Portal, you have full control over how error messages are displayed to the user – all inline within the importer.

The “Only show rows with problems” toggle in the left-hand corner makes error rows easy to spot and address quickly.

This keeps users from having to:

  • Review the original CSV file and fix errors before re-importing again.
  • Import the data and do the cleanup afterward in the app.

How do you set up this system of column-mapping and error detection? Portal does most of the work for engineers.

From Slite.com

There’s no need to build a custom data importer with Flatfile Portal. (Source: Flatfile)Portal is configured via a JavaScript code snippet. Any labels, keys, or validation rules specified in this code will be reflected on the customer-facing importer. This allows for complex validation on things like phone numbers or normalizing multiple date formats:

This Portal demo provides the pre-written JavaScript code on the left and a sample of the importer output on the right.Flatfile Portal is truly a turn-key CSV importer built for SaaS applications. The critical part to integrating Portal is configuring the JS snippet to your product’s required data model. In other words, tell Portal what data needs to upload from users, what is the correct value, and whether you’d like them to add their own custom data.

Here’s a JS snippet you might use to customize Portal for a basic contact list:

An example from Flatfile on how to configure the JavaScript with your own keys and labels for a basic contact list import. (Source: Flatfile)You can then use validators to set strict rules for what can appear in the corresponding fields:

To recap:

It’s not easy building a CSV importer in-house. Integrating Flatfile Portal allows you to focus on building differentiating core features unique to your product’s experience, knowing that the CSV import component is taken care of, and optimized.

Build a robust data importer with Flatfile Portal

One of the reasons we build SaaS products is so customers can effectively manage their businesses without the costly overhead of outsourcing to a third party, or the costly practice of trying to build everything themselves.

Importing data doesn’t need to be the reason for customer frustration or churn during customer data onboarding. It’s easy to see how users can be frustrated with the inconveniences of common CSV import errors. Take advantage of a tool like Flatfile Portal whose sole product focus is designing faster and more seamless customer data onboarding experiences for your customers, partners, and vendors.

Direct Link to ArticlePermalink


The post Never Build a CSV Importer Again appeared first on CSS-Tricks.

You can support CSS-Tricks by being an MVP Supporter.

Categories: Designing, Others Tags:

Video Marketing: The Ultimate Guide

August 20th, 2020 No comments

Content-based marketing has become the gold standard for boosting brand awareness, reaching customers, driving web traffic, and increasing the bottom line. But there’s one area of content marketing that’s still in its infancy: video marketing.

Interest in video content marketing has grown as people’s preferences shift toward this dynamic medium. Businesses have naturally responded by allocating a greater portion of their marketing budgets to exploring and taking advantage of video, using it across social media, in ads, and on company websites.

video content marketing

In this guide, we walk through a number of video content marketing concepts, including defining the term and sharing benefits you can expect from video marketing. You’ll also learn about the types of videos you can produce, and even steps you can take to create a video marketing strategy of your own.

Chapter synopsis

  • Chapter 1: Introduction.
  • Chapter 2: What is video marketing? We start by covering the basics of video marketing, including its importance and how it’s being used in practice. We also provide some useful tips on creating videos that just might help you go viral.
  • Chapter 3: Benefits of video marketing. What good things can you expect from starting video marketing in your business? Results vary, but many companies that go down this road experience greater brand awareness and several other advantages.
  • Chapter 4: Types of videos. Videos are dynamic media, offering you a lot of creative flexibility, which is why there are several different types of video you can produce. In this chapter, we cover six of the most common ones businesses use today.
  • Chapter 5: How to create a video marketing strategy. Put what you’ve learned in the previous chapters to work with expert guidance on creating a video marketing strategy of your own. You’ll walk away with concrete steps that can help your business stand out from the crowd.

Remember to bookmark this guide for later reference. You never know when you may need to brush up on a few tips or try new types of videos you haven’t yet explored.

What is video marketing?

“They say a picture is worth a thousand words. But video allows you to say a lot more,” says Randall Harp, creator in chief at Chapel Hill Media. This idea captures the sentiment behind video marketing. To be more concrete about it, video marketing is a modern content marketing tactic businesses use to generate interest in their products and services.

Video marketing lets you communicate a lot more information to prospects and customers in less time than written content, and it helps audiences connect with your brand in a more engaging way. Below we answer a few questions to help solidify the concept of video marketing.

video marketing

3 FAQs about video marketing

Why video marketing?

Harp calls out two key reasons why video marketing has become such a popular tactic for marketers:

  • Culture shift. People tend to be visual, so it’s not surprising more people are choosing to watch instead of read since video is more commonplace today. Studies show that people receive and remember information better when it’s visual. “Plus, we live in a fast-paced culture where we’re very conscious of time, and reading takes more of it. That’s why video is such a great way to reach people rather than expecting them to sit and consume pages of text,” he explains.
  • Technology. The ability to produce and consume video has become much easier thanks to easier-to-use creator tools, smartphones, and social media. “While high-quality, well-scripted videos are easier to make, not every video has to be a Hollywood production. You can use your smartphone to record, then quickly and easily upload it to any social platform,” he says.

How is video marketing being used?

While consumers tend to create videos for nonmonetary reasons, Harp notes that companies, of course, use video marketing to benefit their business. Specifically, they use it to

  • Sell products. Many businesses use popular social platforms like Instagram, which focuses on visuals, to showcase their products. These social posts can then help drive people to a brick-and-mortar store or send them directly to an online shopping site.
  • Increase brand awareness. Businesses can also use videos to promote their brand or corporate identity, though Harp says this is typically reserved for larger companies with equally large budgets — for example, Coca-Cola and Apple.
  • Share information. Today’s digital landscape has spawned a knowledge culture that’s willing to pay for information. People such as Instagram influencers and business coaches often capitalize on this by engaging with viewers through videos and live streaming to create a following of people who may eventually convert to customers — purchasing courses, diet and exercise plans, sales training, and so on.
  • Promote company culture. From a different perspective, businesses also use video marketing to attract new talent. By giving prospective employees a look behind the scenes, businesses can open the door to their company culture and spur a desire to work there.

Tips for getting started with video marketing

If you’re just beginning your video marketing journey, Harp has several video marketing tips you can use to start off right:

  1. Each video should have a clear purpose

  2. To maintain clarity, always ask these three questions before making a video:

  • Who is your target audience? Pinpoint your audience for each particular video. Be as specific as possible. For example, if you’re selling a diet plan, are you speaking to people with a particular health concern — losing weight, building muscles, developing six-pack abs, etc.? Knowing your audience makes it easier to both speak to them and measure the effectiveness of your video.
  • What do you want them to feel? Stats are nice, but people likely won’t remember them. They will, however, remember how your video made them feel. Maybe you want them to feel hopeful, peaceful, energized, etc. This will spur them to the next part.
  • What do you want them to do? Give them something to do, a next step. Make it as easy as possible. For example, have them call a number or visit a website — be sure to provide a URL to a page that talks specifically about what you covered in the video to maximize effectiveness. Get them in the pipeline and start them on the journey of becoming a customer.
  • Understand the importance of quality

  • “Many people don’t know this, but audio quality is actually more important than video quality,” Harp advises. People will endure bad visual quality over bad audio quality. If they can’t hear what’s being said, they lose patience quickly. But if a video has good audio and not-so-great visuals, people tend to be more willing to stay in hopes that the video will improve.

  • Be consistent

  • Make sure the videos you’re producing are consistent compared to one another and with your overall brand. For example, try to use the same intro for each video — the sound and style of graphics should be the same.

    “This lends itself to the know, like, and trust factors of sales,” Harp says. “For example, consider how GEICO and Progressive insurance have used the same spokespersons for their companies for years. They often even use the same colors, sounds, props, wardrobe, and set for their videos.”

    Now that you understand video marketing as a concept, let’s get into the benefits you can expect to receive from it.

    Video marketing benefits, ROI, and social media

    For years marketers have been shouting, “Content is king!”

    Why?

    Because content has helped many companies bring in more business. And given the rise in video consumption in recent years — 55 percent of people view online videos every day — video might be the front-runner for favorite type of content.

    There are plenty more stats where that came from, but in this chapter we’re looking at the reason those stats exist. So if you’re still on the fence about video marketing, the points below will ensure you’re aware of its upsides.

    Video marketing benefits, ROI, and social media

    The importance of video marketing

    “Video marketing gives you the opportunity to provide valuable information to businesses you want to work with,” says Ken Kerry, executive creative director at Script to Screen. This information may be answers to specific questions your target audience has, advice about unique challenges they’re facing, or even clarifications regarding myths that could be holding potential customers back from making decisions.

    Kerry’s own video content marketing serves as a first impression of Script to Screen for a company that might be considering their services. His strategy is to provide content that not only shows his company’s capabilities (such as with an awareness video), but his team’s ability to address challenges or needs similar to the prospect’s (such as with a case study video).

    “Our belief is that, by presenting our expertise with tangible business results first, we create the ability and the permission to explore how we can best serve new clients,” Kerry says.

    Benefits of video marketing

    Aaron Nix, assistant professor of art, video producer, and filmmaker, has helped conceptualize and create many videos. He calls out several key benefits of video marketing:

    • Improved engagement. Video gives you the ability to engage your target audience using more than just words. Higher engagement translates to more people watching more of your video, extending their interaction with your brand. “With video, your audience is more involved. Instead of just reading or quickly scrolling past an image, you capture their attention and engage their senses for an extended period of time,” he explains.
    • Increased brand awareness. “People are always looking to engage with other people’s stories and events. It’s a part of our social culture now,” he says. Since video is easily accessible in our media-saturated culture — live events, streaming, social media, etc. — people expect video and are drawn to it. While they may scroll past an image, video makes them pause. Using video gives you the opportunity to share your brand with more people, instead of being ignored.
    • More compelling storytelling. “The more senses you can engage, the more interesting you can make the story,” Nix explains. Video is much more dynamic than text or still images, which means you can communicate complex subject matter in a simpler way and convey important aspects like tone. People connect with stories, so creating a compelling one can help endear people to your brand.
    • Greater trust. “People are time-sensitive, so asking them to take even 30 seconds out of their day can be a big ask,” he says. If you’re able to give them something they like and engage with — whether it’s emotional, comedic, or something else — that builds trust with your brand.

    Social media and video marketing

    The average person spends 144 minutes per day on social media — nearly two and a half hours — and that number is trending upward every year. Is it any wonder that many experts recommend including social media as part of your video marketing efforts?

    “People’s eyes are constantly on their feeds, but there’s a massive amount of noise people have to wade through every day,” Nix explains. In addition, the digital intelligence of the average user has increased as people become more social media savvy. They expect more from video, so getting your target audience’s attention requires a well-produced, extremely relevant social media video they can connect with.

    Achieving ROI with video marketing

    Video ROI comes in many forms — it really depends on the type of business you operate. Nix shares a few example goals:

    • Recruiting people. Whether you’re looking to attract students, athletes, or employees, awareness is a big part of this goal, and it doesn’t always have clearly trackable metrics. Useful proxies are social media metrics, such as a growing following. You can also use more direct means like sharing a video on social that links to a landing page and tracking performance. “Notably, video engagement is typically higher than any other post type on our social media pages,” says Nix of the college where he works.
    • Generating donations. Donations are a significant boon to nonprofits and colleges. A video/landing page combo comes in handy here, too, as you can share videos that speak to the causes donors care about. Nix says his college may share a video aimed at former students to elicit their support. “We typically have a specific campaign, such as for the annual day of giving, where we track performance for a specific class year to see how many responded versus donated.”

    Now you know how you can benefit from video marketing. Next, we walk through the main types of marketing videos you can make.

    Types of videos

    We’ve discussed a lot of concepts about video marketing, but now we move into the really interesting part — namely, the main types of videos you can create. Each has unique attributes you should be aware of to maximize their effectiveness.

    6 video content types

    1. Educational

    2. Educational videos provide your audience — typically people who are already your customers — with information about your products, such as technical details or how best to use them in different situations. These types of videos are often used by software-as-a-service (SaaS) companies to instruct users how to navigate through the product to accomplish a specific goal.

      education video marketing

      Lance Cummins, president of Anyvoo, explains that such tutorial videos are most effective when they

    • Sound conversational. People are fine being led, but they don’t necessarily want to be instructed. Tutorials should make users feel like someone is helping them accomplish something, not like they’re learning a lesson. “A conversational tone aids in making the experience real and genuine,” Cummins explains.
    • Employ screen sharing. When you can hold a product in your hand, it’s a lot easier to reference specific parts of it in, say, an instructional manual. However, SaaS products tend to have lots of screens that look nearly identical to the average user, so it’s important that users be able to follow along — screen by screen — with a guide. Cummins points out that the mouse should be visible and screens should load in real time, as opposed to cutting these transitions. “You want the user to have a real experience — like they hopped on a screen share with someone from your company who’s walking them through the task.”
  • Announcement

  • When your business has big news to share — for example, an upcoming merger or acquisition — this calls for an announcement video. However, Cummins cautions against focusing on your business as part of the presentation. “I’m a big proponent of framing any announcement to focus on the person hearing the message — your prospects, customers, and so on.”

    When writing the script for your announcement, Cummins suggests that you ask yourself

    • What is this news going to do for my audience?
    • Why will they care?
    • How does this help them?

    “If you can’t answer these questions, then you should rethink doing the video in the first place,” Cummins says.

  • Product launch

  • Product launch videos can be considered a type of announcement video since they announce when you’ve created or redesigned a new product, whether it’s tangible, such as a new car model, or intangible, like software. Whatever the case, your goal is to generate interest in your product. “You do this by helping your audience picture themselves using or experiencing what you’ve created,” Cummins says.

    He recommends producing a series of product launch videos, rather than just one. Multiple videos help people see a product from different perspectives, as well as consistently expose them to your product.

    “Avoid just listing out features you think they’ll like, for example, the fact that a new line of glasses is made from Titanium. Instead, focus on evoking emotions from your audience — for example, they may want to feel smart. Make a clear connection between those emotions and your product,” says Cummins.

  • Company culture

  • Company culture videos are typically used to provide an inside look at your business — how the business works, what employees think about working there, etc. These videos can also be used to engage current employees at workplace events. “If you’re showcasing your company culture at an annual get-together, by all means brag on yourself and share inside jokes.”

    In contrast, Cummins notes you should take a different approach if your company culture video is meant to help recruit new employees: “As with announcement videos, your culture video should focus on how your company culture would benefit a newcomer in the organization. And be sure that, when people speak, they are conversational. You don’t want anyone to sound like they’re reading from a teleprompter — it comes off as stiff.”

  • Q&A

  • Q&A videos give you the opportunity to address questions from users or prospects. For example, you may get a lot of questions from customers on ways your product can be used. You can quickly collect and keep track of these customer questions with JotForm, an easy-to-use form builder.

    Cummins recommends setting up Q&A videos interview style, with one person asking questions and the other one answering. To make the video more dynamic, you can place text on either side of the scene.

    “This will help emphasize the question being asked,” Cummins says. “It will also help viewers who are watching the video for a specific question to easily find what they’re looking for.”

  • Case study

  • Case study videos enable you to showcase how your organization has helped past clients overcome a particular challenge. For example, this case study video walks through how one JotForm client uses the platform to make her workflow easier — from collecting client consent forms to collecting client payments.

    “With case study videos, you definitely want the client to be a part of it,” Cummins advises, though that may mean you give up some degree of control. Still, the value in having a client speak to your organization’s capabilities will go a long way.

    In addition, case study videos can be a boon to video email marketing. If you use email as a marketing tactic — cold outreach, automations, etc. — incorporating a case study video can help elicit a reply.

    With the different types of videos covered, we’ll discuss creating a video marketing strategy.

    How to create a video marketing strategy

    Developing a video marketing strategy isn’t too different from developing other marketing strategies, but the underlying medium naturally creates some distinctions — after all, video requires more time and money to produce than text or images. We discuss these distinctions below, along with steps you can take to develop a video marketing strategy of your own.

    steps you can take to develop a video marketing strategy

    5 steps to creating a video marketing strategy

    1. Define your business objective

    2. “When you first start thinking about video, stop thinking about video. Instead, think about what you’re doing as a business,” says Robert Weiss, president of MultiVision Digital. Are you launching a new product? Are you moving into a new line of business? Your video goals should support these initiatives.

      For example, you wouldn’t want to focus on corporate overview or culture videos if you’re announcing a new product — your spend should go to product launch videos. “Video works best when it’s integrated into a thoughtful plan. And that plan can certainly evolve over time as your objectives change,” notes Weiss.

    3. Understand your target audience

    4. As with any marketing-focused effort, knowing who you’re speaking to is critical. You’ve no doubt already defined your target audience, but ensure you have an in-depth understanding of who they are and what they want.

      According to Weiss, knowing your audience inside and out is important for your production efforts and the costs associated with them. “It’s about added efficiency,” he says. “You can output multiple videos that speak to different audience segments while using the same basic video components. Just make a few changes and you have a whole new video — without scheduling a whole new shoot.”

      For example, consider an insurance company that wants to produce videos featuring experts talking about insurance. The information will be largely the same, but different customers look for specific insurance products or coverage.

      “The company can share the same insurance knowledge, but change up the talking points and visuals to focus on aspects that newlyweds or retirees care about most,” Weiss explains.

    5. Identify distribution channels

    6. The where of your video marketing strategy is another important component. You have to decide how best to reach your target audience with your videos. “The exact mix of distribution will differ depending on your business and the types of videos you make,” explains Weiss.

      Here are a few channels you may decide to use:

    • Streaming platforms (Netflix, Hulu, etc.)
    • Social media (Facebook, Instagram, YouTube, etc.)
    • Google Ads networks
    • Your website
  • Develop a video production budget

  • “I recommend starting small. You can test a monthly budget of around $1,000 until you’re satisfied with the results,” says Morten Storgaard, creator of PassiveIncomeGeek. Then build up from there. A good video marketing budget is one that gives a promising return. As you add more to your budget and keep testing, you can further refine the idea of good and acceptable ROI.

    As far as what you’ll need to consider, Weiss calls out a few key elements:

    • Time and talent to write the script
    • Cameras and other equipment
    • Production and editing time
    • Motion graphics and color correction
    • Labor and experience of the crew
  • Create your videos

  • Video branding is essential to establishing yourself with your audience. Make sure to include elements like your logo, slogan, and brand colors within the first five to 10 seconds of each video, especially if the video is an ad.

    Remember that users can typically skip video ads after a few seconds, or scroll past them on social. “Unlike traditional video ads for TV and streaming platforms, you can’t afford to tell the story first and then expect the viewer to watch to the end to find out who you are,” Storgaard explains.

    Also consider video SEO optimization to ensure your content is ranked and seen. Weiss says one video likely won’t cut it — you’ll need several, just like with blog posts in traditional content marketing. And speaking of content marketing, Weiss notes that adopting a video-first strategy can help achieve greater video optimization: “This strategy is about creating content for video, then turning that content into supporting blog posts, social media images, emails, and so on.”

    Creating your own video marketing strategy may seem like a big challenge, but the above guidance should give you a great foundation to start.

    Meet your video marketing guides

    Aaron Nix

    Aaron Nix currently serves as an assistant professor of art and video producer at Concordia University, Nebraska in Seward, where he leads courses in film production, film criticism, digital media, and photography. Through his freelance work, Nix has written and directed award-winning films and produced successful ad campaigns for clients nationwide.

    Ken Kerry

    Ken Kerry is the executive creative director at Script to Screen. Ken cofounded the company in 1986, along with his wife, Barbara. Together, they built Script to Screen into one of the nation’s leading direct response television companies, producing more than 600 infomercials and DRTV spots, generating more than $6 billion in sales for clients and winning numerous awards for excellence.

    Lance Cummins

    Lance Cummins is the president of Anyvoo, a scrappy maker-startup that helps remote workers revolutionize the way remote work is seen by handcrafting simple, professional video call backdrops. He’s also the president of Nectafy, a growth content agency that helps clients attract new business.

    Morten Storgaard

    Morten Storgaard is an online marketing veteran and creator of PassiveIncomeGeek. He has a background in e-commerce and has worked with large and small brands to establish awareness and drive sales online.

    Randall Harp

    Randall Harp is the creator in chief at Chapel Hill Media. He has a diverse background in fine arts, film scoring, and software development for a variety of industries. With his experience, Harp creatively tells the stories of businesses through video — driving the production of strategic video assets, including scripts, storyboards, voice-overs, music, and motion graphics.

    Robert Weiss

    Robert Weiss is the president of MultiVision Digital, a video content marketing company. He got started in video production and marketing nearly a decade ago and has produced over 800 videos addressing a wide array of business objectives.

    Categories: Others Tags:

    Body Art of the Centuries: Greatest Examples of Traditional Tattoos

    August 20th, 2020 No comments

    Getting inked has become a lot more popular recently, but tattoos are not something recent. In fact, tattoos are deeply embedded in human history and play an important role in many cultures and traditions.

    The oldest evidence that tattooing existed comes from the Upper Paleolithic period in Europe, where there are tools that signal people got inked 40,000 years ago. The earliest solid proof is found on Otzi the Iceman, who lived somewhere between 3300-3100 BC.

    So, in this article, we wanted to go over some of the traditional tattoo styles that still endure to this day. We’ve searched far and wide to find the best examples of each. It’s important to remember that, when people refer to traditional tattoos, they are usually talking about traditional American tattoos, but we thought that it wouldn’t do justice to other traditional tattoo styles.

    So in this article, we’ll be going over Japanese tattoos, Nordic tattoos, Polynesian tattoos, and traditional American tattoos. So, without too much delay, let’s get right into it.

    American Traditional Tattoos

    While we’re not a huge fan of traditional American tattoos, their popularity cannot be denied. Traditional American tattoos are defined by their symbolism and bright colors. They are usually rather small tattoos but there are larger versions or combinations of various different designs.

    Traditional American tattoo dagger design
    Source: Pinterest
    traditional american tattoo bird and heart
    Source: Pinterest
    traditional american tattoo ship tattoo
    Source: Myke Chambers
    traditional american tattoo butterfly tattoo
    Source: Pinterest
    traditional american tattoo rose and clock tattoo
    Source: Pinterest
    traditional american tattoo snake woman tattoo
    Source: Pinterest
    traditional american tattoo lighthouse and ship tattoo
    Source: Pinterest
    traditional american tattoo gas lamp tattoo
    Source: Pinterest
    traditional american tattoo anchor tattoo
    Source: Pinterest
    traditional american tattoo rose tattoo
    Source: Pinterest
    traditional american tattoo scorpion tattoo
    Source: Pinterest
    traditional american tattoo lighthouse tattoo
    Source: Pinterest
    traditional american tattoo hamsa tattoo
    Source: Pinterest
    traditional american tattoo heart tattoo
    Source: Pinterest
    traditional american tattoo crab tattoo
    Source: Pinterest
    traditional american tattoo chameleon tattoo
    Source: Pinterest
    traditional american tattoo gypsy woman tattoo
    Source: Pinterest
    traditional american tattoo jellyfish tattoo
    Source: Pinterest
    traditional american tattoo sailor tattoo
    Source: Pinterest
    traditional american tattoo watch tattoo
    Source: Pinterest

    Traditional Japanese Tattoos

    Did you know that tattooing is illegal in Japan? Inking has been outlawed for the last 200 years but still, people carry the vibrant and iconic Japanese style tattoos all over their bodies proudly. Tattooing in Japan has been carried mostly by underground artists, or a rare few who had a medical license to do so. Traditional Japanese tattoos include cultural symbols, a vibrant color palette, and are usually large tattoos that can cover an entire limb or even the whole body. Most iconic designs usually include the Koi fish, dragons, tigers, oni (Japanese devils), and Lotus themed designs.

    traditional japanese tattoo frog tattoo
    Source: Pinterest
    traditional japanese tattoo crab tattoo
    Source: Pinterest
    traditional japanese tattoo leg tattoos
    Source: Pinterest
    traditional japanese tattoo water lily tattoo
    Source: Pinterest
    traditional japanese tattoo dragon tattoos
    Source: Pinterest
    traditional japanese tattoo koi fish tattoo
    Source: Pinterest
    traditional japanese tattoo tiger tattoo
    Source: Pinterest
    traditional japanese tattoo koi fish arm tattoo
    Source: Pinterest
    traditional japanese tattoo sakura tattoo
    Source: Pinterest
    traditional japanese tattoo coiling dragon tattoo
    Source: Pinterest
    traditional japanese tattoo koi fish arm tattoo
    Source: Pinterest
    traditional japanese tattoo tiger back tattoo
    Source: Pinterest
    traditional japanese tattoo snake tattoo
    Source: Pinterest
    traditional japanese tattoo dragon arm tattoo
    Source: Pinterest
    traditional japanese tattoo nure-onna tattoo
    Source: Pinterest
    traditional japanese tattoo koi fish back tattoo
    Source: Pinterest
    traditional japanese tattoo golden koi fish tattoo
    Source: Pinterest
    traditional japanese tattoo detailed dragon tattoo
    Source: Pinterest
    traditional japanese tattoo eagle tattoo
    Source: Pinterest
    traditional japanese tattoo full body woman tattoo
    Source: Pinterest
    traditional japanese tattoo full body man tattoo
    Source: Pinterest

    Traditional Polynesian Tattoos

    Polynesia refers to the islands and tribes that are a part of Oceania. The Polynesian triangle is the home of many island tribes such as the Samoans, Hawaiians, the Maori, Tahitians, Cook Islanders, Marquesans, and Tongans. While there are slight cultural variations between tribes such as some variances in languages, inking remains a central and irreplaceable aspect of all Polynesian cultures. In fact, it was so important that tribe members who shied away from getting inked were shunned from the community and people who had incomplete tattoos would carry them as a reminder of their weakness for the rest of their lives. Traditional Polynesian tattoos are a bit different than the rest of the tattoo traditions on this article and don’t fall under tribal tattoos as their symbolism comes from patterns and the body parts they are inked on. A tattoo that is on the chest or arm means something entirely different than a tattoo on the lower body even if the designs might seem similar.

    traditional polynesian tattoo maori warrior tattoo
    Source: Pinterest
     traditional polynesian tattoo full back tattoo
    Source: Pinterest
    traditional polynesian tattoo owl and wave arm tattoo
    Source: Dennis Mata’afa
    traditional polynesian tattoo tiki mask pectoral tattoo
    Source: Pinterest
    traditional polynesian tattoo shark teeth pectoral tattoo
    Source: Pinterest
    traditional polynesian tattoo hawaiian tiki totem tattoo
    Source: Pinterest
    traditional polynesian tattoo full sleeve tattoo
    Source: Dennis Mata’afa
    traditional polynesian tattoo upper arm tattoo
    Source: Pinterest
    traditional polynesian tattoo tiki totem tattoo
    Source: Rob Deut
    traditional polynesian tattoo colored maori shoulder tattoo
    Source: Shane Gallagher Coley
    traditional polynesian tattoo calve tattoo
    Source: Pinterest
    traditional polynesian tattoo maori calve tattoo
    Source: Pinterest
    traditional polynesian tattoo full body tribal tattoo
    Source: Pinterest
    traditional polynesian tattoo hawaaiian lower leg tattoo
    Source: Pinterest
    traditional polynesian tattoo elbow tattoo
    Source: Pinterest
    traditional polynesian tattoo lower arm tattoo
    Source: Pinterest
    traditional polynesian tattoo modern lower arm tattoo
    Source: Pinterest

    Nordic Tattoos

    While there are conflicting historical reports on wether Vikings were inked or not, Nordic styled tattoos are great both because of the patterns used and the symbolism behind them. The intricate nordic themed patterns woven together with mythological signs make up for great tattoos that both are good looking and hold meanings behind them.

    nordic tattoos eagle shoulder tattoo
    Source: Pinterest
    nordic tattoos viking axe tattoo
    Source: Pinterest
    full sleeve nordic tattoo
    Source: Pinterest
    full pectoral nordic tattoo
    Source: Pinterest
    nordic full sleeve viking tattoo
    Source: BaVi
    nordic compass and viking tattoo
    Source: BaVi
    nordic tattoo viking compass tattoo
    Source: Pinterest
    nordic tattoo dragon tattoo
    Source: Pinterest
    nordic tattoo jormungandr tattoo
    Source: Pinterest
    nordic tattoo wolf shoulder tattoo
    Source: Pinterest
    nordic tattoo mjolnir tattoo
    Source: Pinterest

    All in all, we love tattoos, tattoos are cool. Carrying a great artists’ art on your body is a great honor. While tattoos are getting increasingly popular in the last few decades, they have their roots in the history of our kind and that makes them even cooler! If you think we did any injustice to any tattoo style or if you believe another type of traditional tattoo styles should be featured in this article, leave us a comment. If you know any great tattoos that would fit this article or if you have one yourself, reach out! We’ll love to feature them in our article.

    Categories: Others Tags:

    Let’s Make Generative Art We Can Export to SVG and PNG

    August 19th, 2020 No comments

    Let’s say you’re a designer. Cool. You’ve been hired to do some design work for a conference. All kinds of stuff. Website. Printed schedules. Big posters for the rooms. Preroll slides. You name it.

    So you come up with an aesthetic for it all — a design vibe that ties it all together and makes it feel cohesive. Yet each usage will be unique and different. Cool, let’s go from there.

    You’re mucking around in your design software, and the aesthetic you come up with is these overlapping rectangles in a randomized pattern with a particular limited color palette that you think can work for all the materials.

    Hey, sure. That’s a fun background pattern. You can lay white boxes on top of it to set type or whatever, this is just the general background aesthetic that you can use broadly.

    But it’s not very random while it’s in design software, is it? I suppose you could figure out how to script the software. But we’re web people so let’s get webby with it. Let’s lean on JavaScript and SVG to start.

    We could define our color palette programmatically like:

    const colorPalette = ["#9B2E69", "#D93750", "#E2724F", "#F3DC7B", "#4E9397"];

    Then write a function that just makes a bunch of random rectangles based on a minimum and maximum value you give it:

    const rand = (max) => {
      return Math.floor(Math.random() * max);
    };
    
    const makeRects = (maxX, maxY) => {
      let rects = "";
      for (let i = 0; i < 100; i++) {
        rects += `
          <rect
            x="${rand(maxX + 50) - 50}"
            y="${rand(maxY + 50) - 50}"
            width="${rand(200) + 20}"
            height="${rand(200) + 20}"
            opacity="0.8${rand(10)}"
            fill="${colorPalette[rand(5)]}"
          />
        `;
      }
      return rects;
    };

    You could call that function and slap all those rectangles in an and get some nice generative artwork.

    Now your work is easy! To make new ones, you run the code over and over and the you get nice SVG to use for whatever you need.

    Let’s say your client is asking you for some of this artwork to use as backgrounds on other things they are working on too. They need a background with different dimensions! At a different aspect ratio! They need it right now!

    The fact that we’re doing this in the browser is awfully helpful here. The browser window can be resized easily. Wow, I know. So let’s size the parent SVG to the entire viewport. This is the SVG that calls that function to make all the random rectangles here:

    const makeSVG = () => {
      const w = document.body.offsetWidth;
      const h = document.body.offsetHeight;
      const svg = `<svg width="${w}" height="${h}">
        ${makeRects(w, h)}
      </svg>`;
      return svg;
    };

    So, if we’re doing this in the browser, we’ll get a wide and squat SVG result if the browser is super wide and squat:

    But how do we get that out of the browser and into an actual SVG file? Well, there are probably native platform ways to do it, but I just Google’d my way out of it and found a snippet of code that did the trick. I take the SVG as a string, chuck it in a data URL as the href on a link, and fake-click that link. I do that on the click of a button.

    function download(filename, text) {
      var pom = document.createElement("a");
      pom.setAttribute(
        "href",
        "data:text/plain;charset=utf-8," + encodeURIComponent(text)
      );
      pom.setAttribute("download", filename);
    
      if (document.createEvent) {
        var event = document.createEvent("MouseEvents");
        event.initEvent("click", true, true);
        pom.dispatchEvent(event);
      } else {
        pom.click();
      }
    }
    
    const downloadSvgButton = document.querySelector("#download-svg-button");
    downloadSvgButton.addEventListener("click", () => {
      download("art.svg", window.globalSVGStore);
    });

    But I need is as a PNG!

    …cries your client. Fair enough. Not everyone has software that can view and deal with SVG. You could just take a screenshot of the page. And, honestly, that might be a good way to go. I have a high pixel density display and those screenshots turn out great.

    But now that we’ve built a downloader machine for the SVG, we might as well make it work for PNG too. This time my Googling led to FileSaver.js. If I have a , I can toBlob that thing and save it to a file. And I can turn my into a via canvg.

    So, when we call our function to make the SVG, we’ll just paint it to a canvas, which will automatically be the same size as the SVG, which we’ve sized to cover the viewport.

    const setup = () => {
      const v = canvg.Canvg.fromString(ctx, makeSVG());
      v.start();
    };

    We can call that setup function whenever, so might as well make a button for it, too, and call it when the browser window resizes. Here it is in action:

    And here’s the final thing:

    CodePen Embed Fallback

    It could be a lot smarter. It could decide how many rectangles to draw based on the viewport volume, for example. I just think it’s very neat to essentially build an art-generating machine for making design assets, particularly to solve real-world client problems.

    This idea was totally taken from a peek I had at a tool some actual designers built like this. Theirs was way cooler and had even more options, and I know who they built it for was very happy with it because that’s who showed it to me. I reached out to that designer but they were too busy to take on a writing gig like this.


    The post Let’s Make Generative Art We Can Export to SVG and PNG appeared first on CSS-Tricks.

    You can support CSS-Tricks by being an MVP Supporter.

    Categories: Designing, Others Tags:

    Chapter 3: The Website

    August 19th, 2020 No comments
    An IBM mainframe console from the 70's

    Previously in web history…

    Berners-Lee, motivated by his own curiosity, creates the World Wide Web at CERN. He releases its technologies to the public domain, which enables the development of several new browsers for every operating system. Mosaic proves to the most popular, and its introduction of color images directly inline in content changes fundamentally the way people think about the web.

    The very first website was about the web. That kind of thing is not all that unusual. The first email sent to another person was about email As technology progresses, we may have lost a bit of theatrics. The first telegraph, for instance, read “WHAT HATH GOD WROUGHT.” However, in most cases, telecommunication firsts follow this meta template.

    Anyway, the first website was instructive for a reason. If you were a brand new web user, it is the first thing you would see. If that page didn’t manage to convince you the web was worth sinking a bit of time into, then that was the end of the story. You’d go and check out Gopher instead. So, as a starting point for new web users, the first website was critical.

    The URL was info.cern.ch. Its existence on the CERN server should be of no surprise. The first website was created by the web’s inventor, Tim Berners-Lee, while he was still working there.

    It was a simple page. A list of headers and links — to download web browser code, find out more info about the web, and get all of the technical details — was divided only by short descriptions o f each section. One link brought you to a list of websites. Berners-Lee collected a list of links that were sent to him, or plucked them from mailing lists whenever he found them. Every time he found a link he added it to the CERN website, loosely organized by category. It was a short list. In July of 1993, there were still only about 130 websites in the world.

    (A few years back, some enterprising folks took it upon themselves to re-create the first website at CERN. So you can go and browse it now, just as it was then.)

    As far as websites go, it was noting spectacular. The language was plain enough, though a bit technical. The instructions were clear, as long as you had some background in programming or computers. The web before the web was difficult to explain. The primary goal of the website was to prompt a bit of exploration from those who visited it. By that measure, it was successful.

    But Berners-Lee never meant for the CERN website to be the most important page on the web. It was just there to serve as an example for others to recreate in their own image.

    Tim Berners-Lee also created the first browser. It gave users the ability to both read — and crucially to publish — websites. In his conception, each consumer of the web would have their own personal homepage. The homepage could be anything. For most people, he thought, it would likely be a private place to store personal bookmarks or jot down notes. Others might chose to publish their site for the public, using it as an opportunity to introduce themselves, or explore some passion (similar to what services like Geocities would offer later). Berners-Lee imagined that when you opened your browser, any browser, your own homepage would be the first thing that you saw.

    By the time other browsers hit the market, the publishing capabilities faded away. People were left to simply surf, and not to author, the web. For the earliest of web users, the CERN website remained a popular destination. With usage still growing, it was the best place to find a concise list of websites. But if the web was going to succeed — truly succeed — it was going to have to be more than links. The web was going to need to find its utility.

    Fortunately Berners-Lee had created the URL. Anyone could create a website. Heck, he’d even post a link to it.


    “Louise saw the web as a godsend,” Berners-Lee wrote in his personal retelling of the web’s history. The Louise in question is Louise Addis, librarian at SLAC for over 40 years before she retired in the mid-90s. Along with Paul Kunz, Tony Johnson, and several others, she helped create the first web server in the United States and one of the most influential websites of the early web. She would later put it a bit differently. “The Web was a revolution!” That may be true, but it wouldn’t have been a revolution if not for what she helped create.

    As we found in the first chapter, Berners-Lee’s curiosity led him on a path to set information free. Louise Addis was also curious. Her curiosity led her to try to connect people to that information. She studied International Relations at Stanford University only to bounce around at a few jobs and land herself back at her alma mater working for a secret research lab known simply as Project M in 1960. Though she had no experience in the field, she worked there as a librarian, eventually moving up to head librarian. After a couple of years, the lab would go public and become formally known as the Stanford Linear Accelerator Center, or SLAC.

    SLAC’s primary mission was to advance the research of American scientists in the wake of World War II. It houses a two-mile long linear accelerator, the longest in the world. SLAC recruits scientists across a broad set of fields, but its primary focus is particle physics. It has produced a number of Nobel prizes and has shared groundbreaking new discoveries across the world.

    Research is at the center of the work done at SLAC. While she was there, Addis was relentless in her quest to connect her peers with research. When she learned that there wasn’t a good system for keeping track of the multitude of authors attributed to particle physics papers (some had over 1,000 authors on a single paper), she picked up a bit of programming with no formal training. “If I needed to know something, I asked someone to show me how to do a particular task. Then I went back to the Library and tried it on my own.”

    A couple of years after she discovered the web, Addis would start the first unofficial tech support group for web newcomers known as the WWW Wizards. The Wizards worked — mostly in their spare time — to help new web users come online. They were a profoundly important resource for the early web. Addis continually made it her mission to help people find the information they needed.

    She used her ad-hoc programming experience in the late 1960’s to create the SPIRES-HEP database, a digital library with hundreds of thousands of bibliographic records for particle physics papers. It is still in use today, though it’s newest iteration is called INSPIRE-HEP. The SPIRES-HEP database was a foundational resource. If you were a particle physics researcher anywhere in the world, you would be accessing it frequently. It ran on an IBM mainframe that looked like this:

    The mainframe used a very specific programming language also developed by IBM, which has since gone into disuse. Locked inside was a very well organized bibliography of research papers. Accessing it was another thing entirely. There were a few ways to do that.

    The first required a bit of programming knowledge. If you were savvy enough, you could log directly into the SPIRES-HEP database remotely and, using the database-specific SPIRES query language, pull the records you needed directly from the mainframe. This was the quickest option, but required the most technical know-how and a healthy dose of tenacity. Let’s consider this method the high bar.

    The middle bar was an interface built by SLAC researcher Paul Kunz that let you email the server to pull out the records you needed. You still needed to know the SPIRES query language, but it solved the remote access part of the equation.

    The low bar was to email or message a librarian at SLAC so they could pull the record for you and send it back. The easiest bar to clear, this was the method that most people used. Which meant that the most widely accessed particle physics database in the world was beset by a bottleneck of librarians at SLAC who needed to ferry bibliographic records back and forth from researchers.

    The SPIRES-HEP database was invaluable, but widespread access remained its largest obstacle.


    For a second time in the web’s history, the NeXT computer played an important role in its fate. For a computer that was short-lived, and largely unheard of, it is a key piece of the web’s history.

    Like Tim Berners-Lee, SLAC physicist Paul Kunz, creator of the SPIRES-HEP instant messaging and email service, used a NeXT computer. When Berners-Lee called him into his office on one of his visits, Berners-Lee invited him into his office. The only reason Kunz agreed to go was to see how somebody else was using a NeXT computer. While he was there, Berners-Lee showed Kunz the web. And then Kunz went back to SLAC and showed the web to Addis.

    Kunz and Addis were both enthusiastic purveyors of research at SLAC. They each played their part in advancing information discovery. When Kunz told Addis about the web, they both had the same idea about what to do with it. SLAC was going to need a website. Kunz built a web server at Stanford — the first in the United States. Addis, meanwhile, wrangled a few colleagues to help her build the SLAC website. The site launched on December 12, 1991, a year after Berners-Lee first published his own website at CERN.

    Most of the programmers and researchers that began tinkering on the web in the early days were drawn by a nerdy fascination. They liked to play around with browsers, mess around with some code. The website was, in some cases, the mere after-effect of a technological experiment. That wasn’t the case for Addis. The draw of the web wasn’t its technology. It was what it enabled her to do.

    The SLAC website started out with two links. The first one let you search through a list of phone numbers at SLAC. That link wasn’t all that interesting. (But it was a nice nod to the web’s origin. The most practical early use of the web was as an Internet-enabled phonebook at CERN.) The second link was far more interesting. It was labeled “HEP.” Clicking on it brought you to a simple page with a single text field. Type a query into that field, click Enter and you got live results of records directly from the SPIRES-HEP database. And that was the SLAC website. Its primary purpose was to act as an interface in front of the SPIRES-HEP database and pull down queried results.

    When Berners-Lee demoed the SLAC website a couple of months later at a conference, it was met with wild applause, practically a standing ovation.

    The importance was obviously not lost on that audience. No longer would researchers be forced to wrestle with complicated programming languages, or emails to SLAC librarians. The SLAC website took the low bar of access for the SPIRES-HEP database and dropped it all the way to the floor. It made searching the database easy (and within a couple of years, it would even add links to downloadable PDFs).

    The SLAC website, nothing more than a searchable bibliography, was the beginning of something on the web. Physicists began using it, and it rebounded from one research lab to the next. The web’s first micro-explosion happened the day Berners-Lee demoed the site. It began reverberating around the physics community, and then outside of it.

    SLAC was the website that showed what the would could do. GNN was going to be the first that made the web look good doing it.


    Global Network Navigator was going to be exciting. A bold experiment on and with the web. The web was a wall of research notes and scientific diagrams; plain black text on stark white backgrounds as far as the eye could see. GNN would change that. It would be fun. Lively. Interactive.

    That was the pitch made to designer Jennifer Robbins by O’Reilly co-founder Dale Dougherty in 1993. Robbins’ mind immediately jumped to the possibilities of this incredible, new, digital medium.

    She met with another O’Reilly employee, Rob Raisch. A couple of years after that pitch, Raisch would propose one of the first examples of a stylesheet. At the time, he was just the person at the company who happened to know the most about the web, which had only recently cracked a hundred total sites. When Robbins walked into his office, the first thing he said to her was: “You know, you probably can’t do what you want.” He had a point. The language of the web was limiting. But the GNN team was going to find a way around that.

    GNN was the brainchild of Dale Dougherty. By the early 90s, Dougherty had become a minor celebrity for experiments just like this one. From the early days of O’Reilly media, the book publisher he co-founded, he was always cooking up some project or another.

    Wherever technology is going, Dougherty has a knack for being there first. At one conference early on in O’Reilly’s history, he sold self-printed copies of a Unix manual for $5 apiece just before Unix exploded on the scene. After spending decades in book publishing, he’s recently turned his attention to the maker culture. He has been called a godfather of the Maker movement.

    That was no less true for the web. He became one of the web’s earliest adopters and its most prolific early champion. He brought together Tim Beners-Lee and the developers of NCSA Mosaic, including Marc Andreessen, for the first time in a meeting in Cambridge. That meeting would eventually lead to the creation of the W3C. He’d be responsible for early experiments with web advertising, basically on the first day advertising was allowed. He would later coin the term Web 2.0, in the wake of transformation after the dot-com boom. Dougherty loved the web.

    But staring at the web for the first time in the early 90s, he didn’t exactly know what to do with it. His first thought was to put a book on the web. After all, O’Reilly had a gigantic back catalog, and the web was mostly text. But Dougherty knew that the web’s greatest asset was the hyperlink. He needed a book that could act as a springboard to bring people to different parts of the web. He found it in the newly-published bestseller by author Ed Krol, The Whole Internet User’s Guide and Catalog. The book was a guided tour through the technologies of the Internet. It had a paragraph on the web. Not exactly a lot, but enough for Dougherty to make the connection.

    Dougherty had recruited Pei-Yuan Wei, creator of the popular ViolaWWW browser to make an earlier version of an interactive Internet guide. But he pulled a together a production team — led by managing editor Gina Blaber — of writers, designers, programmers, and sales staff. They launched GNN, the web’s first true commercial website, in early 1993.

    GNN was created before any other commercial websites, before blogs, and online magazines. Digital publishing was something new altogether. As a result, GNN didn’t quite know what it wanted to be. It operated somewhere between a portal and a magazine. Navigating the site was an exercise in tumbling down one rabbit hole after another.

    In one section, the site included the Whole Internet Catalog repurposed and ported to the web. Contained within were pages upon pages of best-of lists; collections of popular websites sorted into categories like finance, literature and cooking.

    Another section, labeled GNN Magazine, jumped to a different group of sortable webpages known as metacenters. These were, in the website’s own description, “special-interest magazines that gather together the best Internet resources on topics such as travel, music, education, and computers. Each metacenter contains articles, columns, reference guides, and discussion groups.” Though conceptually similar to modern day media portals, the nickname “metacenter” never truly caught on. The site’s content and design was produced and maintained by the GNN staff. Not to be outdone by their print predecessors, GNN magazine contained interviews, features, biographies, and explainers. One hyperlink after another.

    Over time, GNN would expand to affiliated publications. When the Mosaic team got too busy working on the web’s most popular browser, they handed off their browser homepage to the GNN team. The page was called What’s New, and it featured the most interesting links around the web for the day. The GNN seized the opportunity to expand their platform even further.

    Explaining what GNN was to someone who had never heard of the web, let alone a website, was an onerous task. Blaber explained GNN as giving “users a way to navigate through the information highway by providing insightful editorial content, easy point-and-click commands, and direct electronic links to information resources.” That’s a meaningful description of the site. It was a way into the web, one that wasn’t as fractured or unorganized as jumping in blind. It was also, however, the kind of thing you needed to see to understand.

    And it was something to see. Years before stylesheets and armed with nothing but a handful of HTML tags, the GNN team set about creating the most ambitious project with the web medium yet. Browsers had only just begun allowing inline graphics, and GNN took full advantage. The homepage in particular featured big colorful graphics, including the hot air balloon that would endure for years as the GNN logo. They laid out their pages meticulously — most pages had a unique design. They used images as headers to break up the page. Most pages featured large graphics, and colored text and backgrounds. Wherever the envelope was, they’d push it a little further.

    The result: a brand new kind of interactive experience. The web was a sea of plain websites with no design mostly coming from research institutions and colleges. Before Mosaic, bold graphics and colors weren’t even possible. And even after Mosaic’s release, the web was mostly filled with dense websites of scrolling text with nothing more than scientific diagrams to break it up, or sparse websites with a link, an email and a phone number. Most sites had nothing in the way of hierarchy or interactivity. Content was difficult to follow unless it was exactly what you were looking for. There was a ton of information on the web, but no one had thought to organize it to any meaningful degree. Imagine seeing all of that, day after day, and then one day you click a link and come to this:

    Screenshot of what GNN looked like when it launched in 1993, with its famous hot air balloon logo

    It looks dated now, but a splash page with bold colors and big graphics, organized into sections and layered with interesting content… that was something to see.

    The GNN team was creating the rules of web design, a field that had yet to be invented. In the first few years of the web, there were some experiments. The Vatican had scanned a number of materials from its archives and put them on a website. The Exploratorium took that one step further, creating the first online museum, with downloadable sounds and pictures. But they were still very much constrained by the simplicity of the web experience. Click this link, download this file, and that was it. GNN began to take things further. Dale Dougherty recalls that their goal was to “shift from the Internet as command line retrieval to the internet as this more digital interface… like a book.” A perfectly reasonable goal for a book publisher but a tall order for the web.

    To accomplish their goal, GNN’s staff used the rules of graphic design as a roadmap (as philosopher Marshall McLuhan once said, “the content of any medium is always another medium”). But the team was also writing a brand new rulebook, on the fly, as they went. There were open questions about how to handle web graphics, new patterns for designing user interfaces, and best practices for writing HTML. Once the team closed one loop, they moved on to the next one. It was as if they writing the manual for flying a rocketship — while strapped to the wings and hurtling towards space.

    As browsers got better, GNN evolved to take advantage of the latest design possibilities. They began to use image maps to make more complex navigation. They added font tags and frames. GNN was also the first site on the web with a sponsored link, and even that was careful and considered. Before the popup would plague our browsing experience, GNN created simple, unobtrusive, informational adverts inserted in between their other listings.

    GNN provided a template for the commercial web. As soon as they launched, dozens of copycats quickly followed. Many adopted a similar style and tone. Within a few years, web portals and online magazines would become so common they were considered trite and uninteresting. But very few sites that followed it had the lasting impact GNN did on a new generation of digital designers.


    Ranjit Bhatnagar has an offbeat sort of humor. He’s a philosopher and a musician. He’s smart. He’s a fan of the weird and the banal. He’s anti-consumerist, or at the very least, opposed to consumerist culture. I won’t go as far as to say he’s pedantic, but he certainly revels in the most minute of details. He enjoys lively debates and engaged discourse. He’s fascinated by dreams, and once had a dream where he was flying through the air with his mother taking in the sights.

    I’ve never met Bhatnagar. I know all of this because I read it on his website. Anyone can. And his website started with lunch.

    Bhatnagar’s website was called Ranjit’s HTTP Playground. Playground describes it rather well; hyperlinks are scattered across the homepage like so many children’s toys. One link takes you to a half-finished web experiment. Another takes you to a list of his favorite bookmarks arranged by category. Yet another might contain a rant about the web, or a long-winded tribute to Kinder eggs. If you’re in the mood for a debate you can post your own thoughts to a page devoted to the single question: Are nuts wood? There’s still no consensus on that one.

    Browsing Ranjit’s HTTP Playgroundis like peeling back the layers of Bhatnagar’s brain. He added new entries to his site pretty regularly, never more than a sentence or two, arranged in a series of dated bullet points. Pages were laid out on garish backgrounds, scalding bright green on jet black, or surrounded by a dizzying dance of animated GIFs. Each page was littered with links to more pages, seemingly at random. Every time you think you’ve reached the end of a thread, there’s another link to click. And every once in a while, you’ll find yourself back on the homepage wondering how you got there and how much time had passed in the meantime. This was the magic of the early web.

    Bhatnagar first published his website in late 1993, just a few months after the GNN website went up. The very first thing Bhatnagar posted to his website was what he ordered for lunch every day. It was arranged in reverse chronological order, his most recent lunch order right at the top.

    SLAC captured the utility of the web. GNN realized its popular appeal. Bhatnagar, and others like him, made the web personal.

    Claudio Pinhanez began adding daily entries to the MIT Media Lab website in 1994. He posted movie and book reviews, personal musings, and shared his favorite links. He followed the same format as Bhatnagar’s Lunch Server. Entries were arranged on the page in reverse chronological order. Each entry was short and to the point — no longer than a sentence or two. This movie was good. This meal was bad. Isn’t it interesting that… and so on.

    In early 1995, Carolyn Burke began posting daily entries to her website in one of the earliest examples of an online diary. Each one was a small slice from her life. The posts were longer than the short-burst of Pinhanez and Bhatnagar. Burke took her time with narrative anecdotes and meandering asides. She was loquacious and insightful. Her writing was conversational, and she promised readers that she would be honest. “I notice now that I have held back in being frank. My academic analysis skills come out, and I write with them things that I’ve known for a long time,” she wrote in an entry from the first few months, “But this is therapy for me… honesty and freedom therapy. Wow, that’s a loaded word. freedom.

    Perhaps no site was more honest, or more free as Burke puts it, than Links from the Underground. Its creator, Swarthmore undergraduate Justin Hall, had transformed inviting others into his life into an art form. What began as a simple link dump quickly transformed into a network of short stories and poems, diary entries, and personal details from his own life. The layout of the site matched that of Bhatnagar, scattered and unorganized. But his tone was closer to Burke’s, long and deeply, deeply personal. Just about every day, Hall would post to his website. It was his daily inner monologue made public.

    Sometimes, he would cross a line. If you were a friend of Justin’s, he might share a secret that you told him in confidence, or disparage you on a fully public post. But he also shared the most intimate details from his own life, from dorm room drama to his greatest fears and inadequacies. He told stories from his troubled past, and publicly tried to come to terms with an alcoholic father. His good humor was often tinged with tragedy. He was clearly working through something emotional and personally profound, and he was using the web to do it out in the open.

    But for Hall, this was all in the service of something far greater than himself. Describing the web to newcomers in a documentary about his experience on the web, Hall’s primary message was about its ability to create — not to tear down — connections.

    What’s so great about the web is I was able to go out there and talk about what I care about, what I feel strongly about and people responded to it. Because every high school’s got a poet, whether it’s a rich high school or a poor high school, you know, they got somebody that’s in to writing, that’s in to getting people to tell their stories. You give them access to this technology and all of a sudden they’re telling stories to people in Israel, to people in Japan, to people in their own town that they never would have been able to talk to. And that’s, you know, that’s a revolution.

    There’s that word again. Revolution. Though coming at the web from very different places, Addis and Hall agreed on at least one thing. I would venture to guess that they agreed on a whole lot more.

    Justin Hall became a presence on the web not soon forgotten by those that came across him. He’s had two documentaries made about him (one of which he made himself). He’s appeared on talk shows. He’s toured the country. He’s had very public mental breakdowns. But he believed deeply that the web meant nothing at all unless it was a place for people to share their own stories.

    When Tim Berners-Lee first imagined the web, he believed that everybody would have their own homepage. He designed his first browser with authoring capabilities for just that reason. That dream never came true. But Hall and Burke and Bhatnagar channeled a similar idea when they decided to make the web personal. They created their own homepages, even if it meant having to spend a few hours, or a few weeks, learning HTML.

    Within a couple of years, the web filled up with these homepages. There were some notable breakthrough websites, like when David Farley began posting daily webcomics to Doctor Fun or VJ Adam Curry co-opted the MTV website to post his own personal brand of music entertainment. There were extreme examples. In 1996, Jennifer Ringley stuck a webcam in her room and beamed images every few seconds, so anyone could watch her entire life in real time. She called it Jennicam, a name that would ultimately lead to the moniker cam girl. Ringley appeared on talk shows and became an overnight sensation for her strange website that let others peer directly into her world.

    But mostly, homepages acted as a creative outlet — short biographies, photo albums of families and pets, short stories, status updates. There were a lot of diaries. People posted their art, their “hot takes” and their deepest secrets and greatest passions. There were fan pages dedicated to discontinued television shows and boy bands. A dizzying array of style and personality with no purpose other than to simply exist.

    Then came the links. At the bottom of a homepage: a list of links to other homepages. Scattered in diary posts, links to other websites. In one entry, Hall might post a link to Bhatnagar’s site, musing about the influence it had on his own website. Bhatnagar’s own site had his own chaotic list of his favorites. Eventually, so did Burke’s. Half the fun of a homepage was obsessing over which others to share.

    As the web turned on a moment of connection, the process of discovery became its greatest asset. The fantastic intrigue of clicking on a link and being transported into the world and mind of another person was — in the end — the defining feature of the web. There would be plenty of opportunities to use the web to find something you want or need. The lesson of the homepage is that what people really wanted to find was each other. The web does that better than any technology that has come before it.


    At the end of 1993, there were just over 600 websites. One year later, at the end of 1994, there were over 10,000. They no longer fit on a single page on the CERN website maintained by the web’s creator.

    The personal website would become the cornerstone of the web. The web would be filled with more applications, like SLAC. And more businesses, like GNN. But it would mostly be filled with people. When the web’s next wave came crashing down, it would become truly social.


    The post Chapter 3: The Website appeared first on CSS-Tricks.

    You can support CSS-Tricks by being an MVP Supporter.

    Categories: Designing, Others Tags: