Welcome to our roundup of the best new fonts we’ve found on the web in the previous four weeks. In this month’s edition there’s plenty of hand-lettering charm, and some excellent historical revivals. Enjoy!
A well-designed contact page is an essential part for any business website. It serves as a gateway for potential customers to reach out and connect.
One crucial element of a contact page is the phone number display.
A clear and easily accessible phone number can significantly impact user experience and conversion rates.
Now, suppose you’re scrolling through a website, and you’re ready to take the next step. You want to talk to someone, right? But if that phone number is hidden behind a maze of text or tiny buttons, you’re gonna bounce.
So, let’s discuss the best practices for displaying phone numbers on your WordPress site. We’re talking about making it easy for people to pick up the phone and connect with you.
Key Takeaways
Intuitive Design: Keep it clean, minimal, and easy on the eyes. People appreciate simplicity and efficiency.
Multi-Channel Accessibility: Offer a variety of contact options, including phone, email, and social media links, to cater to different preferences.
Clear Expectations: Define the purpose of the contact page and what visitors can expect in terms of response times. A clear call-to-action can encourage engagement.
Mobile-First Approach: Optimize your contact page for mobile devices, as people spend a significant amount of time on their smartphones.
Personality and Engagement(Optional): Add a touch of personality and humor to your contact page to make it more memorable and engaging.
Personal Connection
I recently tried to find phone number to contact a company online and was met with a frustratingly complex contact form. It demanded unnecessary information and made the simple act of reaching out feel like a chore. As a result, I gave up. A simple, user-friendly contact form can make a huge difference.
Key Elements of an Effective Contact Page
Your contact page isn’t just a way to your business; it’s a demo of your customer service. More than simply providing contact information, it’s an opportunity to create a welcoming and efficient experience.
With that in mind, let’s explore the essential elements that can make your contact page stand out.
The layout of your contact page should be straightforward. Cluttered designs can confuse people and may even discourage them from reaching out.
Here’s how to ensure a clear layout:
Use Ample White Space: Use ample white space to give elements room to breathe and prevent the page from feeling overwhelming.
Structured Sections: Clearly defined sections for various types of inquiries (e.g., customer support, sales, feedback) can make navigation easier.
A great example is Podia’s contact page. They introduce their support team right at the top, creating a friendly and approachable atmosphere. This not only shows their brand personality but also makes it easy for visitors to find the help they need.
Easy Navigation
A well-designed contact page should make it easy for visitors to find the information they need.
Place contact options prominently above the fold, such as buttons for live chat, email, or phone.
Include a link to your contact page in the main navigation bar for easy access from any page.
JetBlue is an excellent example of a contact page done right, with a clean layout, categorized options, and clear instructions for getting help.
A clear and compelling call-to-action (CTA) is essential for encouraging visitors to contact you.
Make your CTA stand out with contrasting colors or larger font sizes.
Offer a variety of CTAs to cater to different preferences, such as “Call Now,” “Chat with Us,” or “Send Us a Message.”
T-Mobile does a great job of using clear CTAs to guide visitors to the right resources. A well-designed contact page not only provides a functional tool but also helps build trust and foster a positive connection with your brand.
Best Practices for Displaying Phone Numbers
When displaying phone numbers on your website, try these best practices to improve user experience and accessibility:
1. Clear and Consistent Formatting:
Use a consistent format: Choose a format that is commonly used in your target region (e.g., (123) 456-7890, 123-456-7890).
Include area code: Even if it’s a local number, including the area code can help prevent misunderstandings.
Use hyphens or spaces: These can improve readability and reduce errors.
2. Prominent Placement:
Place phone numbers prominently: Make sure they are easy to find on the page. Consider placing them in the header, footer, or a dedicated contact section.
Use relevant icons: Consider using phone icons or other visual cues to indicate that a phone number is available.
Use a contrasting color: Make the phone number stand out from the rest of the text.
Optimize for mobile: Ensure that phone numbers are easy to read and tap on smaller screens.
Avoid excessive clicking: Make sure users can reach the phone number without having to navigate through multiple pages.
4. Accessibility Considerations:
Link phone numbers: Make phone numbers clickable to allow users to open their phone’s dialer app with a single click.
Provide a copyable format: Allow users to copy and paste the phone number for easy use in other applications.
Consider accessibility features: Ensure that phone numbers are easily readable by screen readers and other assistive technologies.
5. Multiple Contact Options:
Offer multiple contact methods: In addition to a phone number, consider providing other options like email, a contact form, or live chat.
Using Plugins to Enhance Phone Number Display
Now that you’re familiar with the best practices for displaying phone numbers on your website, let’s talk about some fantastic WordPress plugins that can help you elevate your contact information to the next level. These tools not only make phone numbers more accessible but also improve the overall user experience when reaching out to your business.
Recommended WordPress Plugins:
1. Jotform WordPress Forms:
Why it’s great: A great free way to create feedback forms and collect data from your customers.
How it helps: Create payment forms or surveys to engage with your users.
2. Elementor:
Why it’s great: A powerful page builder.
How it helps: Create custom phone number displays using its drag-and-drop interface. You can style the numbers, add icons, and integrate them with your website’s design.
3. WP Telephone Number:
Why it’s great: A dedicated plugin for displaying phone numbers.
How it helps: Offers various display options, including clickable links, pop-up modals, and integration with Google Maps.
4. JetElements:
Why it’s great: An addon for Elementor.
How it helps: Provides additional phone number widgets and customization options, such as different formats and styles.
These plugins can help you present your phone numbers in a clear, attractive, and user-friendly way, making it easier for visitors to contact your business.
Conclusion
Let’s be real, your contact page is like your business’s front desk.
If it’s a total flop, people are gonna bounce away. But if it’s eye-catching, they’ll be hitting that contact button. So, give your contact page a glow up. ?
We’re a generation that’s all about convenience. We want things fast, easy, and aesthetically pleasing. A contact page that’s a total eye-sore or hard to navigate is a major turn-off.
But a page that’s simple, modern, and user-friendly? That’s what we’re talking about! So, what are you waiting for? Go forth and design your contact page. Trust me, your audience will appreciate it.
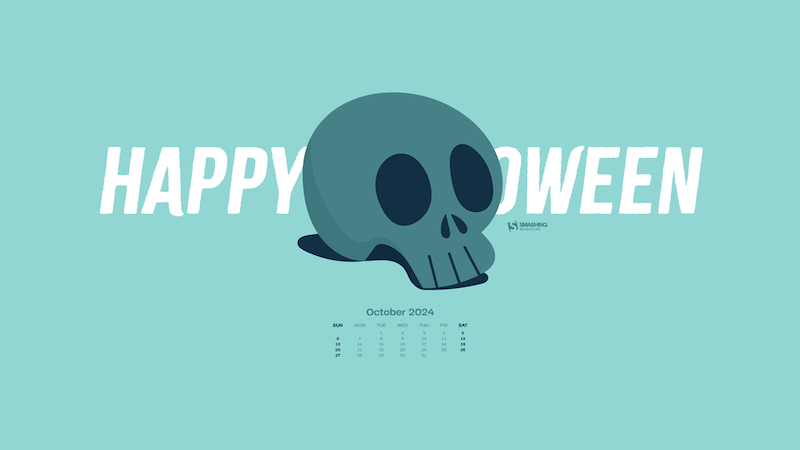
The leaves are shining in the most beautiful colors and pumpkins are taking over the front porches. It’s time to welcome the spookiest of all months: October! To get your desktop ready for fall and the upcoming Halloween season, artists and designers from across the globe once again got their ideas flowing and designed inspiring wallpapers for you to indulge in.
The wallpapers in this post come in versions with and without a calendar for October 2024 and can be downloaded for free. And since so many beautiful and unique designs evolve around our little wallpapers challenge every month (we’ve been running it for more than 13 years already, can you believe it?!), we also added some timeless October treasures from our wallpapers archives to the collection. Maybe you’ll spot one of your almost-forgotten favorites in here, too?
A huge thank you to everyone who shared their wallpapers with us this month — this post wouldn’t exist without you. Happy October!
You can click on every image to see a larger preview,
We respect and carefully consider the ideas and motivation behind each and every artist’s work. This is why we give all artists the full freedom to explore their creativity and express emotions and experience through their works. This is also why the themes of the wallpapers weren’t anyhow influenced by us but rather designed from scratch by the artists themselves.
Submit a wallpaper! Did you know that you could get featured in our next wallpapers post, too? We are always looking for creative talent.
“Let’s celebrate reptiles and raise awareness of their vital role in ecosystems. Many species face threats, so let’s learn, appreciate, and protect these incredible creatures and their habitats!” — Designed by PopArt Studio from Serbia.
“‘Make today a good day’ is a simple yet powerful reminder to take control of the present moment. It emphasizes that our attitude and actions shape our experience, encouraging positivity and purpose. Each day brings new opportunities, and by choosing to make it good, we invite growth, joy, and fulfilment into our lives.” — Designed by Hitesh Puri from Delhi, India.
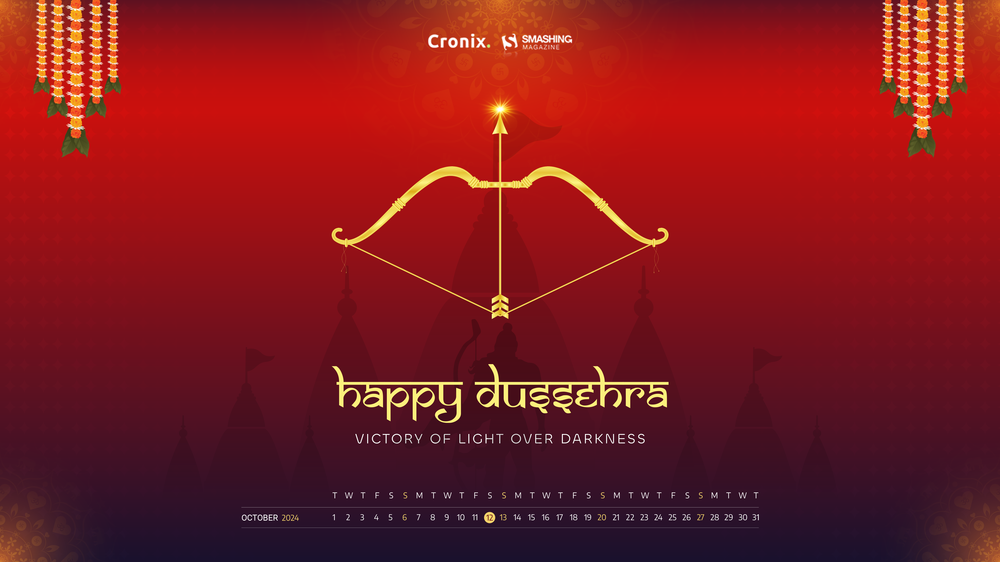
“I was inspired by Dussehra’s rich symbolism and cultural significance while creating this design. The festival celebrates the triumph of good over evil. The bow and arrow become the central focus, while the bold red background, golden accents, and the temple’s silhouette add a sense of grandeur and spirituality.” — Designed by Cronix from the United States.
“The transition to autumn brings forth a rich visual tapestry of warm colors and falling leaves, making it a natural choice for a wallpaper theme.” — Designed by Farhan Srambiyan from India.
“Join us in commemorating National Fossil Day, a day dedicated to honoring the wonders of Earth’s prehistoric past. On this special day, we invite you to step back in time and explore the remarkable world of fossils. These ancient remnants of life on our planet offer a glimpse into the evolution of life, from the tiniest microorganisms to the towering giants that once roamed the Earth.” — Designed by PopArt Studio from Serbia.
“October is a significant month for me because it is when my favorite type of bird travels south. For that reason I have chosen to write about the swallow. When I was young, I had a bird’s nest not so far from my room window. I watched the birds almost every day; because those swallows always left their nests in October. As a child, I dreamt that they all flew together to a nicer place, where they were not so cold.” — Designed by Eline Claeys from Belgium.
“Did you know that squirrels don’t just eat nuts? They really like to eat fruit, too. Since apples are the seasonal fruit of October, I decided to combine both things into a beautiful image.” — Designed by Erin Troch from Belgium.
“The term ‘Hanlu’ literally translates as ‘Cold Dew.’ The cold dew brings brisk mornings and evenings. Eventually the briskness will turn cold, as winter is coming soon. And chrysanthemum is the iconic flower of Cold Dew.” — Designed by Hong, ZI-Qing from Taiwan.
“At the end of the kolodar, as everything begins to ripen, the village sets out to harvesting. Together with the farmers goes Makosh, the Goddess of fields and crops, ensuring a prosperous harvest. What she gave her life and health all year round is now mature and rich, thus, as a sign of gratitude, the girls bring her bread and wine. The beautiful game of the goddess makes the hard harvest easier, while the song of the farmer permeates the field.” — Designed by PopArt Studio from Serbia.
“To me, October is all about cozy evenings with hot chocolate, freshly baked cookies, and a game night with friends or family.” — Designed by Lieselot Geirnaert from Belgium.
“October makes the leaves fall to cover the land with lovely auburn colors and brings out all types of weird with them.” — Designed by Mi Ni Studio from Serbia.
“October is the month when the weather in Poland starts to get colder, and it gets very rainy, too. You can’t always spend your free time outside, so it’s the perfect opportunity to get some hot coffee and work on your next cool web project!” — Designed by Robert Brodziak from Poland.
“To me, October is a transitional month. We gradually slide from summer to autumn. That’s why I chose to use a lot of gradients. I also wanted to work with simple shapes, because I think of October as the ‘back to nature/back to basics month’.” — Designed by Jelle Denturck from Belgium.
“We are about to experience the magical imagery of nature, with all the yellows, ochers, oranges, and reds coming our way this fall. With all the subtle sunrises and the burning sunsets before us, we feel so joyful that we are going to shout it out to the world from the top of the mountains.” — Designed by PopArt Studio from Serbia.
“When I was little, my parents always took me and my sister for a walk at the beach in Nieuwpoort. We didn’t really do those beach walks in the summer but always when the sky started to turn gray and the days became colder. My sister and I always took out our warmest scarfs and played in the sand while my parents walked behind us. I really loved those Saturday or Sunday mornings where we were all together. I think October (when it’s not raining) is the perfect month to go to the beach for ‘uitwaaien’ (to blow out), to walk in the wind and take a break and clear your head, relieve the stress or forget one’s problems.” — Designed by Gwen Bogaert from Belgium.
“Finished September, with October comes the month of routines. This year we share it with turtles that explore space.” — Designed by Veronica Valenzuela from Spain.
“The story is a mash-up of retro science fiction and zombie infection. What would happen if a Mars rover came into contact with an unknown Martian material and got infected with a virus? What if it reversed its intended purpose of research and exploration? Instead choosing a life of chaos and evil. What if they all ran rogue on Mars? Would humans ever dare to voyage to the red planet?” Designed by Frank Candamil from the United States.
“We were inspired by the breathtaking beauty of autumn, with its colorful foliage and the symbolic pumpkin, which epitomizes the season. Incorporating typography allows us to blend aesthetics and functionality, making the calendar not only visually appealing but also useful.” — Designed by WPclerks from India.
“October is the month when fall truly begins, and many people feel tired and depressed in this season. The jumping fox wants you to be happy! Also, foxes always have reminded me of fall because of their beautiful fur colors.” — Designed by Elena Sanchez from Spain.
Welcome to our roundup of the best new fonts we’ve found on the web in the previous four weeks. In this month’s edition there’s plenty of hand-lettering charm, and some excellent historical revivals. Enjoy!
Kornel
Kornel is a serif type family designed for long texts, featuring classic proportions and sharp details that work well on the web. Inspired by Renaissance typography, its simplified forms deliver a contemporary twist. There are seven weights and accompanying italics.
Tre
Tré is a unique typeface born from the logotype for Tré Seals, the founder of Vocal type. The forms are drawn from the scars left by Tré’s brain surgery. The self-titled font is a bold, confident, high-contrast stencil font with sharp angular strokes — exactly like surgical cuts.
Cin Cin
Cin Cin is a charming hand-lettered font. It includes a very well balanced upper and lowercase, giving it the flexibility to be used as more than display type. It’s perfect for books, greeting cards, posters, and even logos. It injects fun and energy into any project it’s used for.
Caslonian
Caslonian is an English-inspired typeface originally designed by ZeCraft for Estée Lauder. It draws on exaggerated contrasts and proportions from historical Caslon specimens, offering a contemporary take on the style. Caslonian is a tribute to expressive headline faces, blending past and modern design influences.
Scotus Sans
Scotus Sans is a low-contrast sans-serif family inspired by the successful 15th-century Scotus Roman type. It offers excellent readability across web and print. It combines simplicity with tradition, ranging from thin to black weights, with a unique matching italic.
Gamuth Sans
Gamuth is a versatile typeface family with serif and sans-serif variations designed for both web and print. Inspired by Dutch Baroque faces, it features narrow proportions, generous x-heights, and crisp detailing. Gamuth Sans excels in UI applications, offering clarity, flexible content hierarchy, and consistent metrics for seamless formatting.
De Gyubee
De Gyubee is an elegant, modern serif typeface with a luxurious, minimalist style. Ideal for websites, logos, branding, and wedding stationery, it features capital letters along with unique, classy alternatives. Its clean design suits a wide range of creative projects.
Lineal
Lineal is a free font family initiated by Frank Adebiaye and inspired by Gérard Manset’s song “2870.” Originally designed in 2010, it resembles a modular Futura without optical corrections. Since 2019, the character set, weights, and language support has been expanded.
Zeist
Zeist is a geometric sans serif typeface by Luzi Types, blending early 20th-century modernism with customizable features. Inspired by Futura, Neuzeit Grotesk, and Avenir, it offers clean lines, consistent shapes, and dynamic axes for terminals, x-height, weight, and italics, making it highly versatile for designers.
French Aperitif
French Aperitif is a hand-drawn font family featuring six unique fonts and fun alternate letters. Perfect for modern posters, wedding stationery, and content creation, it adds a creative, personal touch to designs. This quirky, one-of-a-kind font is 100% hand-drawn, making it truly special.
Brillante
Brillante is a modern serif font inspired by vintage Italian Art Nouveau shop signs. It features thin horizontal serifs, vertical letters, and a modern x-height. With numerous ligatures, contextual alternates, and stylistic sets, it’s ideal for headings, posters, logotypes, and labels.
Rudnik
Rudnik is a script font family with regular and italic styles, inspired by vintage calligraphy and modern monoline fonts. Its even spacing creates rhythmical, balanced words with distinctive letters. Featuring ligatures and swashes, Rudnik suits posters, packaging, menus, and elegant designs.
Forzata
Forzata began as a caps-only font, inspired by a hand-painted “no parking” sign in Florence. It evolved into a unique typeface with straight lines, round counters, and a lowercase set without ascenders or descenders, blending industrial engraving with a handmade, vernacular style.
Ringle
Ringle is a retro serif typeface with a modern twist, featuring sharp italics and strong contrast. With 18 weights, it’s ideal for luxury branding projects. Highly versatile and readable, Ringle suits nostalgic designs like bold magazine images, wedding invitations, posters, logos, and more.
Amolla Raspers
Amolla Raspers is a bubble-style handwritten font, ideal for various projects including logos, branding, packaging, mugs, quotes, posters, t-shirts, book covers, invitations, and greeting cards. It adds a playful, handwritten touch to designs, making it perfect for creative and special events.
The creator of CSS has said he originally envisaged CSS as the main web technology to control behavior on web pages, with scripting as a fallback when things weren’t possible declaratively in CSS. The rationale for a CSS-first approach was that “scripting is programming and programming is hard.” Since introducing the :hover pseudo-class, CSS has been standardizing patterns developers create in JavaScript and “harvesting” them into CSS standards. When you think about it like that, it’s almost as if JavaScript is the hack and CSS is the official way.
We can, therefore, feel less dirty implementing script-like behavior with CSS, and we shouldn’t be surprised that something like the new scroll-timeline feature has appeared with pretty good browser support. Too many developers implemented clever parallax scrolling websites, which has summoned the CSS feature genie we cannot put back in its bottle. If you don’t want janky main-thread animations for your next parallax-scrolling website, you must now come to the dark side of hacking CSS. Just kidding, there is also a new JavaScript API for scroll-linked animations if imperative programming better fits your use case.
Migrating a JavaScript sample to CSS
It was satisfyingly simple to fork Chris Coyier’s pre-scroll-timeline example of a scroll-linked animation by replacing the CSS Chris was using to control the animations with just one line of CSS and completely deleting the JavaScript!
Using the scroll() function without parameters sets up an “anonymous scroll progress timeline” meaning the browser will base the animation on the nearest ancestor that can scroll vertically if our writing mode is English. Unfortunately, it seems we can only choose to animate based on scrolling along the x or y-axis of a particular element but not both, which would be useful. Being a function, we can pass parameters to scroll(), which provides more control over how we want scrolling to run our animation.
Experimenting with multiple dimensions
Even better is the scroll-scope property. Applying that to a container element means we can animate properties on any chosen ancestor element based on any scrollable element that has the same assigned scope. That got me thinking… Since CSS Houdini lets us register animation-friendly, inheritable properties in CSS, we can combine animations on the same element based on multiple scrollable areas on the page. That opens the door for interesting instructional design possibilities such as my experiment below.
CodePen Embed Fallback
Scrolling the horizontal narrative on the light green card rotates the 3D NES console horizontally and scrolling the vertical narrative on the dark green card rotates the NES console vertically. In my previous article, I noted that my past CSS hacks have always boiled down to hiding and showing finite possibilities using CSS. What interests me about this scroll-based experiment is the combinatorial explosion of combined vertical and horizontal rotations. Animation timelines provide an interactivity in pure CSS that hasn’t been possible in the past.
The implementation details are less important than the timeline-scope usage and the custom properties. We register two custom angle properties:
Then, we “borrow” the NES 3D model from the samples in Julian Garner’s amazing CSS 3D modeling app. We update the .scene class for the 3D to base the rotation on our new variables like this:
Next, we give the element a timeline-scope with two custom-named scopes.
body {
  timeline-scope: --myScroller,--myScroller2;
}
I haven’t seen anything officially documented about passing in multiple scopes, but it does work in Google Chrome and Edge. If it’s not a formally supported feature, I hope it will become part of the standard because it is ridiculously handy.
Next, we define the named timelines for the two scrollable cards and the axes we want to trigger our animations.
Since the 3D model inherits the x and y angles from the document body, scrolling the cards now rotates the model in combinations of vertical and horizontal angle changes.
User-controlled animations beyond scrollbars
When you think about it, this behavior isn’t just useful for scroll-driven animations. In the above experiment, we are using the scrollable areas more like sliders that control the properties of our 3D model. After getting it working, I went for a walk and was daydreaming about how cool it would be if actual range inputs could control animation timelines. Then I found out they can! At least in Chrome. Pure CSS CMS anyone?
While we’re commandeering 3D models from Julian Garner, let’s see if we can use range inputs to control his X-wing model.
CodePen Embed Fallback
It’s mind-boggling that we can achieve this with just CSS, and we could do it with an arbitrary number of properties. It doesn’t go far enough for me. I would love to see other input controls that can manipulate animation timelines. Imagine text fields progressing animations as you fill them out, or buttons able to play or reverse animations. The latter can be somewhat achieved by combining the :active pseudo-class with the animation-play-state property. But in my experience when you try to use that to animate multiple custom properties, the browser can get confused. By contrast, animation timelines have been implemented with this use case in mind and therefore work smoothly and exactly as I expected.
I’m not the only one who has noticed the potential for hacking this emergent CSS feature. Someone has already implemented this clever Doom clone by combining scroll-timeline with checkbox hacks. The problem I have is it still doesn’t go far enough. We have enough in Chrome to implement avatar builders using scrollbars and range inputs as game controls. I am excited to experiment with unpredictable, sophisticated experiences that are unprecedented in the era before the scroll-timeline feature. After all, if you had to explain the definition of a video game to an alien, wouldn’t you say it is just a hyper-interactive animation?
Miriam Suzanne’s in the middle of a redesign of her personal website. It began in August 2022. She’s made an entire series out of the work that’s worth your time, but I wanted to call out the fifth and latest installment because she presents a problem that I think we can all relate to:
But the walls got in my way. Instead of minimal renovation, I got just far enough to live with it and then started a brand new Eleventy repo.
The plan was to prototype […] and bring back well-formed solutions. To echo Dave Rupert, prototyping is useful. It’s easier to play with new ideas when you’re not carrying a decade of content and old code along with you.
But prototyping evolved into what I would call tinkering (complimentary). Maybe I mean procrastinating (also complimentary), but it’s a wandering process that also helps me better understand what I want from a website. I might not make visible progress over two years, but I start to form a point of view […]. Keeping things easy is always where things get complicated. And it brings me back to where my redesign started – a desire to clarify the information architecture. Not only for visitors, but for myself.
Don’t even tell me you’ve never been there! Jim Neilsen blogged along similar lines. You get a stroke of inspiration that’s the kernel of some idea that motivates you to start, you know, working on it. There’s no real plan, perhaps. The idea and inspiration are more than enough to get you going… that is until you hit a snag. And what I appreciate about Miriam’s post is that she’s calling out content as the snag. Well, not so much a snag as a return to the founding principle for the redesign: a refined content architecture.
Sometimes I do events where I speak, or teach a workshop, or perform. Events happen at a time and place.
Sometimes I create artifacts like a book or an album, a website, or specification. Artifacts often have a home URL. They might have a launch date, but they are not date-specific.
Some of my projects are other channels with their own feeds, their own events and artifacts.
Those channels are often maintained by an organization that I work with long-term. A band, a web agency, a performance company, etc.
These boundaries aren’t always clean. A post that remains relevant could be considered an artifact. Events can generate artifacts, and vice versa. An entire organization might exist to curate a single channel.
So, Miriam’s done poking at visual prototypes and ready to pour the filling into the pie crust. I relate with this having recently futzed with the content architecure of this site. I find it tough to start with a solidified design before I know what content is going into it. But I also find it tough to work with no shape at all. In my case, CSS-Tricks has a well-established design that’s evolved, mostly outside of me. I love the design but it’s an inherited one and I’m integrating content around it. Design is the constraint. If I had the luxury of stripping the building to the studs, I might take a different approach because then I could “paint” around it. Content would be the constraint.
It’s yet another version of the Chicken-Egg dilemma. I still think of the (capital-W) Web as a content medium at least in a UA style sense in that it’s the default. It’s more than that, of course. I’m a content designer at heart (and trade) but I’m hesitant to cry “content is king” which reminded me of something I wrote for an end-of-year series we did here answering the question: What is one thing people can do to make their website better? My answer: Read your website.
We start to see the power of content when we open up our understanding of what it is, what it does, and where it’s used. That might make content one of the most extensible problem-solving tools in your metaphorical shed—it makes sites more accessible, extracts Google-juicing superpowers, converts sales, and creates pathways for users to accomplish what they need to do.
And as far as prioritizing content or design, or…?
The two work hand-in-hand. I’d even go so far as to say that a lot of design is about enhancing what is communicated on a page. There is no upstaging one or the other. Think of content and design as supporting one another, where the sum of both creates a compelling call-to-action, long-form post, hero banner, and so on. We often think of patterns in a design system as a collection of components that are stitched together to create something new. Pairing content and design works much the same way.
I’d forgotten those words, so I appreciate Miriam giving me a reason to revisit them. We all need to be recalibrated every so often — swap out air filters, top off the fluids, and rotate the ol’ tires. And an old dog like me needs it a little more often. I spent a few more minutes in that end-of-year series and found a few other choice quotes about the content-design continuum that may serve as inspiration for you, me, or maybe even Miriam as she continues the process of aggragating her distributed self.
This sounds serious, but don’t worry — the site’s purpose is key. If you’re building a personal portfolio, go wild! However, if someone’s trying to file a tax return, whimsical loading animations aren’t likely to be well-received. On the other hand, an animated progress bar could be a nice touch while providing visual feedback on the user’s action.
Remember, the web is an interactive platform — take advantage of that, where appropriate (less is more, accessibility is integral, and you need to know your audience). Whether that’s scrollytelling, captioned video, and heck, maybe for your audience, now’s the time to start looking into AR/VR! Who knows. Sometimes you just need to try stuff out and see what sticks. Just be careful. Experimentation is great, but we need to make sure we’re bringing everyone along for the ride.
Your personal site is a statement of who you are and what you want to do. If you showcase your favorite type of work, you’ll get more requests for similar projects or jobs — feeding back into a virtuous cycle of doing more of what you love.
But the prime reason to have a personal website is in the name: it is your personalhome on the web. Since its early days, the web has been about sharing information and freedom of expression. Personal websites still deliver on that promise. Nowhere else do you have that much freedom to create and share your work and to tell your personal story. It is your chance to show what you stand for, to be different, and to be specific. Your site lets you be uniquely you and it can be whatever you imagine it to be.
So if you have a personal site, make sure to put in the work and attention to make it truly yours. Make it personal. Fine-tune the typography, add a theme switcher, or incorporate other quirky little details that add personality. As Sarah Drasner writes, you can feel it if a site is done with care and excitement. Those are the sites that are a joy to visit and will be remembered.
Studies report that 98% of all website traffic comes from anonymous visitors. Sure, you can use tools like cookies, but their usefulness is limited and on borrowed time.
Thanks to remote work and smart devices, identifying who is visiting your company website is only becoming more confusing. The same user visits your site from different devices, locations, and web browsers.
Every anonymous visitor represents a lost opportunity. Read this article to learn how to track and identify anonymous website visitors.
Who Are Anonymous Website Visitors?
Anonymous website visitors are the unidentified users of your site. They arrive from various marketing channels, including organic search and social media campaigns. Visitors then exit your site without providing any identifying information.
Typically, all website visitors are anonymous, except those who log into or sign up for a user account. In most cases, these will be the only unique visitors that you can easily track. However, there are other ways to track unique visitors, such as browser cookies and tracking pixels.
Why Are Anonymous Visitors Significant?
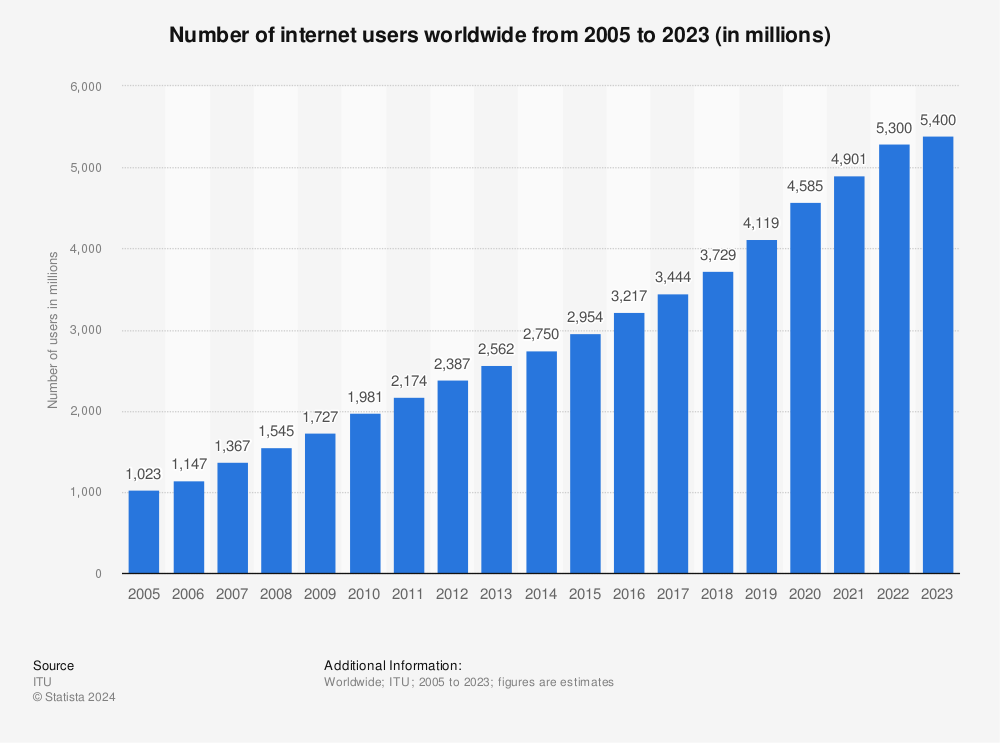
Internet users are on the rise, having reached 5.4 billion users in 2023. Every anonymous visitor is a lost opportunity. Hundreds or thousands of anonymous visitors interact with your website daily.
Image sourced from statista.com
Can you afford to miss out on hundreds or thousands of potential customers? Even at conversion rates of 1-3%, that still represents significant revenue.
What Are the Benefits of Tracking Anonymous Visitors?
Website visitor identification is rewarding for those who put in the time and effort. We list some of its benefits below.
Better Audience Segmentation
Odds are that nearly all of your current website traffic is anonymous. Tracking anonymous user data helps paint a more vivid picture of your audience. The more information you collect, the better you can segment marketing.
Identify High-Value Prospects
Some users visit your home page, scroll down, and exit your site. Others may add a product to their shopping cart and abandon the purchase at the last second. Prospects who are ready to buy are more valuable than those who are only browsing.
You can send high-value prospects straight to the bottom of the funnel. For example, you can reach out with closing offers and marketing content that addresses the most common objections.
Personalize the User Experience
Customers don’t just want personalized experiences, they expect them. A McKinsey report found that 76% of consumers get frustrated when they don’t find personalization. Two-thirds of respondents want relevant product recommendations and tailored messaging.
Image sourced from mckinsey.com
Create Relevant Content
Identifying who visits your website lets you focus on your marketing strategy. For instance, let’s say you discover much more healthcare than financial organizations are visiting your website. You then feature more case studies and white papers that cater to a healthcare audience.
What Are Challenges to Website User Tracking?
Tracking anonymous users has its benefits. However, there are plenty of obstacles you must overcome to implement anonymous visitor tracking
Inaccurate or Low-Quality Data
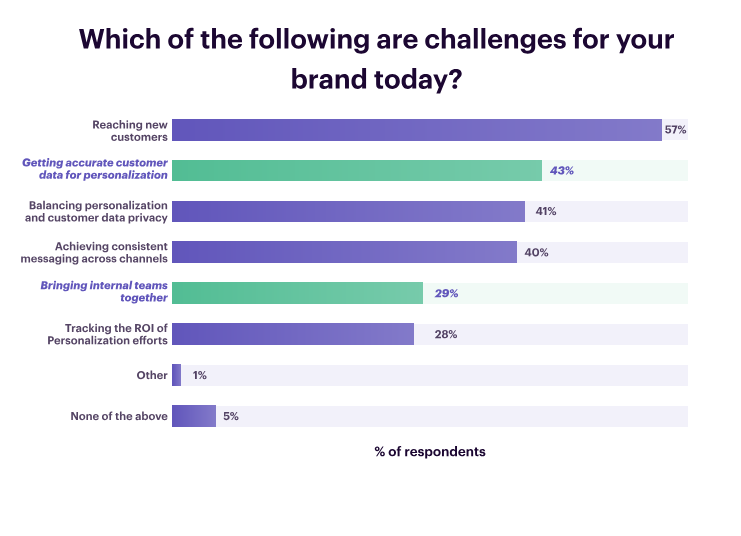
A study from Segment found that 43% of businesses found getting accurate, real-time customer data to be the biggest challenge to personalization. Not all data is created equal.
Tracking cookies may not be able to store data long enough for slower sales cycles.
Image sourced from gopages.segment.com
Third-party enrichment data may not be up to date. With some services for B2B, you may get the company name but not any other information such as contact emails for decision-makers at the company.
You want the most accurate data for tailored experiences with higher conversion rates.
Selecting the Right Tools and Techniques
There isn’t one way to monitor and identify anonymous users. You have a range of methods and solutions to choose from when deciding how best to track website visitors. Swimming in a sea of options leads you to drown from information overload and indecision.
Start by creating a plan and defining the objectives of your website visitor tracking strategy. Then, research and prioritize what capabilities and user information are vital for your business.
Data Protection and Privacy
When tracking user data, you must stay compliant with legal requirements. Laws such as the California Consumer Privacy Act (CCPA) stipulate how data can be collected, stored, and used.
Under regulations like the EU’s Global Data Protection Regulation (GDPR), you need user consent to use basic tracking tools like browser cookies.
How to Identify Anonymous Website Visitors?
Alright, so now you’re convinced that tracking unique visitors is worth the payoff. How do you identify anonymous users?
Customer Accounts and Form Fills
We’ll start with the obvious, customer account creation. Use landing pages and banners to entice users to sign up. Make sure you sell the benefits, such as a one-time discount code or customer loyalty program.
You can track website activity as long as visitors are logged into their accounts. Use that information to personalize their experience. Integrate with your CRM or website personalization platforms to curate the user experience.
You can even cut right to the chase and ask anonymous users questions with website form builders such as Jotform. Offer value to users with promo codes, whitepapers, or ebooks in exchange for filling out a form.
Use CTA buttons, sidebars, and popup ads to engage visitors with forms. Form fills streamline the process of identifying visitors and give your team some data about who they are or what company they represent.
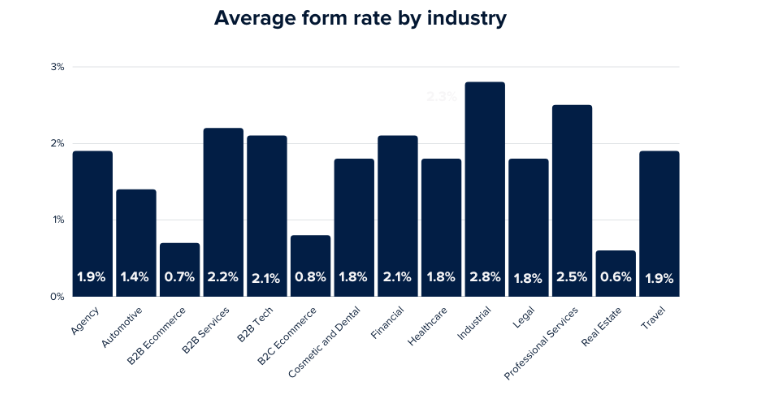
Image sourced from ruleranalytics.com
Unfortunately, the average form fill rate across all industries is only 1.7% (meaning you’d miss out on more than 98% of anonymous website visitors). Online form conversion rates vary from 0.6% to 2.8% across 14 industries.
Cookies
Tracking cookies is a proven method for user tracking. Visitors arrive at your site, and their browser downloads a simple file. Your web servers recognize the cookie file and use it to identify and monitor the visitor each time they come to your site.
There are two main types of cookies:
Session cookies: they track a single session and remember anonymous visitors when they return.
Persistent cookies: these stay in the browser cache and remember preferences and user behavior.
Cookies add a layer of personalization and prevent and enable you to identify return visitors. However, cookies are vulnerable to cyberattacks, leaking user information. Also, many regulations require user consent to download and install browser cookies.
There is also the issue of cookie deprecation. Many platforms such as Google Chrome are phasing out third-party cookies soon.
Tracking Pixel
Tracking pixels is an alternative to the browser cookie. The most well-known is the Facebook Pixel. How it works is that the pixel contains a small code. You can place this pixel on your website, ads, and emails. They are commonly used in B2B display advertising software for marketing attribution.
The tracking pixel identifies information and tracks user behavior such as page views and clicks. It’s a simple but effective way to monitor users and speed up your pipeline velocity.
For example, a user clicks on a demo but leaves the landing page. Your sales team is notified of this prospect’s interest. They can now either reach out to the potential customer or tailor a demo CTA specifically for the user when they return.
IP Address
Every device connected to the internet has a unique IP address. So why not use this information to catalog and identify every unique visitor?
An IP address alone will not tell you much about the person or company visiting your website. Tracking tools can identify other user characteristics, such as geographical location.
Some IP lookup solutions cater to B2B, cross-referencing data against an IP address database. They tell you what company is visiting your site. You can then look them up to learn more about their needs and challenges.
Browser Fingerprinting
Browser fingerprinting provides a cookieless method to identify and track anonymous users. A fingerprinting tool gathers information and signals from a website visitor. Browser fingerprinting pieces unique information together to identify anonymous website visitors.
User data collected may include:
Operating system
Browser type and version
Screen resolution and aspect ratio
User-agent string
Timezone
Installed plugins
CPU
GPU
IP address and network type
Since digital fingerprinting doesn’t require cookies, it doesn’t necessarily need user consent. However, for ethical reasons, it’s best to let every website user know what data is being recorded and how it’s used.
Third-party enrichment
Third-party enrichment tools further identify anonymous users and provide more detailed information. Some services append tracking solutions like cookies and IP trackers by recording user behavioral and technical data. These services can be integrated with other marketing and website tools.
Others come as visitor identification platforms that gather unique visitor information and cross-reference connected databases.
Third-party enrichment is especially useful in B2B. Besides identifying the company, you also get relevant information such as budget, market position, infrastructure, and what individuals to contact. Third-party enrichment solutions empower your team to tailor marketing campaigns and better nurture interested buyers.
Website Analytics Tools
You’re probably already using website analytics tools to monitor website performance. Services such as Google Analytics use tracking pixels to record user behavior. You can monitor traffic sources and metrics such as dwell time, bounce rate, and conversions.
Tools like Hotjar let you record user actions during a session and create activity heat maps.
On their own, website analytics can provide data such as location or operation systems.
However, you can integrate data to enrich website visitor identification tools.
Identify Anonymous Website Users and Grow Your Business
Anonymous web browsers aren’t going anywhere. More users work remotely and from multiple devices, making traditional tracking methods less fruitful.
It takes more than having faith for your website visitors to convert to user accounts. The vast majority of anonymous visitors won’t create an account or fill out forms before exiting your ecommerce store.
Start identifying anonymous visitors today. You’ll learn more about your prospects and be able to give them the content and experiences they desire.
In today’s fast-paced healthcare environment, technology has played a critical role in transforming how patients interact with healthcare providers. One of the most groundbreaking advancements has been the rise of wearable devices. These tools have revolutionized the way patients monitor their health in real-time, offering a wealth of benefits for individuals and healthcare systems alike. With the ability to track vital signs, activity levels, and other important health metrics, wearable devices are empowering patients to take a more proactive approach to their own healthcare management.
While the benefits of wearable devices span across multiple medical fields, their integration with Ambulatory EMR systems, Oncology EHR platforms, and their role in reputation management for doctors are particularly noteworthy. This article will explore how wearable technology is shaping patient care, enhancing doctor-patient relationships, and boosting healthcare outcomes.
The Rise of Wearable Technology in Healthcare
Wearable devices, such as smartwatches, fitness trackers, and biosensors, have become integral to how individuals monitor their health. These devices collect real-time data on heart rate, physical activity, sleep patterns, and even blood oxygen levels, making them a valuable tool for both patients and doctors.
The health data collected by these devices are typically synced with smartphone apps or healthcare systems, allowing patients to have immediate access to their health information. This kind of accessibility has proven especially useful for patients with chronic conditions, as it helps them track their health on a daily basis. Whether it’s managing diabetes, monitoring blood pressure, or keeping tabs on physical activity, wearable devices enable patients to stay informed and engaged with their health.
Moreover, the integration of wearables with Ambulatory EMR systems means that doctors have easier access to a patient’s continuous health data. This seamless flow of information provides healthcare providers with the tools they need to make more informed, data-driven decisions. For patients undergoing treatment for serious conditions, such as cancer, the ability to share real-time health metrics with their oncologists using Oncology EHR systems ensures that treatments can be fine-tuned and personalized, improving overall patient outcomes.
Wearable Devices and Chronic Disease Management
One of the most significant advantages of wearable technology lies in its potential for chronic disease management. Patients with heart disease, diabetes, or hypertension can benefit tremendously from continuous health monitoring. For instance, individuals suffering from heart disease can use wearables that monitor their heart rate and detect irregularities, allowing them to seek medical assistance before a problem escalates. Diabetic patients, on the other hand, can rely on glucose-monitoring wearables that track their blood sugar levels in real time, eliminating the need for frequent finger pricks.
By integrating the data from wearable devices into Ambulatory EMR systems, healthcare providers are better equipped to monitor patients remotely, reducing the need for frequent office visits. This continuous stream of real-time data allows doctors to catch early warning signs of a potential issue and intervene promptly. For patients, it offers peace of mind, knowing that their health is being monitored even when they aren’t physically present in the clinic.
The ability to share this data with healthcare providers, especially when connected to Oncology EHR systems, is critical for patients undergoing cancer treatment. For example, cancer patients undergoing chemotherapy can experience a range of side effects, such as fatigue, irregular heartbeats, and sleep disturbances. Wearable devices can capture these metrics in real-time and provide oncologists with a clearer picture of how patients are responding to treatment. This helps doctors make adjustments to the treatment plan as necessary and ensures that patients are receiving the most effective care possible.
Integration with Ambulatory EMR and Oncology EHR Systems
The integration of wearable devices with Ambulatory EHR and Oncology EHR systems marks a significant step forward in modern healthcare. Electronic Medical Record (EMR) systems, specifically designed for ambulatory care, help doctors manage patient records, prescribe medication, and track treatment plans. When combined with the continuous data provided by wearable devices, Ambulatory EMR systems can offer a more comprehensive view of a patient’s health over time.
For example, a patient with hypertension might wear a device that tracks their blood pressure continuously throughout the day. This data is then synced with their Ambulatory EMR, allowing their physician to analyze the trends and adjust treatment as needed. This creates a more dynamic, real-time approach to managing chronic conditions, as opposed to relying solely on in-office blood pressure readings.
Similarly, Oncology EHR systems are designed to help oncologists manage the complex nature of cancer treatment. By integrating data from wearables, oncologists can better understand how their patients are responding to treatments, monitor vital signs, and track activity levels—all of which are critical in managing a disease as multifaceted as cancer. Wearable devices, in combination with Oncology EHR platforms, allow for more personalized and precise treatment plans, increasing the likelihood of successful outcomes.
Enhancing Patient Engagement and Compliance
One of the most profound impacts of wearable devices is their ability to increase patient engagement and compliance with treatment plans. By providing individuals with real-time feedback on their health metrics, wearables encourage patients to take ownership of their health and make positive lifestyle changes. Patients who actively engage with their health data are more likely to adhere to prescribed treatments, medications, and lifestyle modifications.
For instance, a patient recovering from heart surgery might use a wearable device to track their daily step count, heart rate, and sleep patterns. Seeing this data can serve as a motivational tool, encouraging them to walk more, rest adequately, and keep an eye on their heart health. By syncing this data with Ambulatory EMR systems, physicians can monitor the patient’s recovery remotely and provide tailored advice based on the metrics collected.
Wearable devices also offer reminders for patients to take their medication or perform certain activities, helping to improve overall compliance. This is particularly useful for patients managing multiple conditions or those on complex medication regimens. The ability to share this data with healthcare providers ensures that doctors have a clearer understanding of the patient’s adherence to treatment plans.
Impact on Reputation Management for Doctors
As wearable devices continue to reshape patient care, they are also playing a role in reputation management for doctors. In the digital age, reputation is more important than ever, and the ability to provide personalized, high-quality care can significantly impact how a healthcare provider is perceived by their patients.
Patients who feel empowered and informed by the use of wearable technology are more likely to have positive experiences with their healthcare providers. They appreciate the fact that their doctors can monitor their health in real-time and make adjustments to their treatment plans without requiring an in-office visit. This level of personalized care not only improves patient outcomes but also leads to higher patient satisfaction, which can directly influence a doctor’s reputation.
In the age of online reviews and social media, patients who have positive experiences with wearable technology are likely to share their experiences, contributing to better reputation management for doctors. On the flip side, healthcare providers who are slow to adopt these technologies may face criticism for not staying up-to-date with modern healthcare trends, potentially impacting their reputation.
By incorporating wearables into their practice and using data from Ambulatory EMR and Oncology EHR systems to enhance patient care, healthcare providers can build a reputation for being innovative, responsive, and patient-centric. This, in turn, can attract more patients and strengthen the doctor-patient relationship.
Future Prospects: AI and Wearable Devices
As wearable devices continue to evolve, the integration of artificial intelligence (AI) presents exciting new possibilities for healthcare. AI-powered wearable devices can not only track health metrics but also analyze data and provide predictive insights. For example, AI algorithms can analyze heart rate data over time and alert users to potential irregularities before they become serious issues. In the context of Oncology EHR systems, AI can help oncologists predict patient outcomes and suggest adjustments to treatment plans based on real-time data.
The combination of wearable technology and AI also paves the way for more effective remote patient monitoring. With AI-driven analysis, wearable devices can detect trends and anomalies in health data that might otherwise go unnoticed. This can lead to earlier interventions and better long-term health outcomes, especially for patients managing chronic conditions.
Conclusion
Wearable devices have undoubtedly changed the landscape of healthcare, offering real-time health monitoring that empowers patients and enhances the quality of care provided by healthcare professionals. Through seamless integration with Ambulatory EMR and Oncology EHR systems, wearables allow for a more comprehensive approach to patient management. This technology not only improves patient outcomes but also plays a vital role in reputation management for doctors, as patients increasingly value personalized, responsive care.
Websites open a world of opportunities for information and services in today’s digital world. However, for users with dyslexia—a learning difference that affects reading and understanding of text—web navigation is quite different. Dyslexia users are almost 10-20% of the population, so millions of users are likely to struggle when accessing content that others might breeze through.
In this article we will outline some concrete and actionable steps to create websites accessible for dyslexic users, improving your site’s overall accessibility. Doest matter whether you’re a web developer, designer, or business owner, these practices can benefit all, ensuring the website is usable to everyone, regardless of their reading abilities.
So, what is Dyslexia?
Before getting into the details, it is important to understand what exactly dyslexia. Dyslexia is a neurological problem that primarily affects reading, spelling, and writing. People with dyslexia may experience:
Difficulty in word identification or recognizing the words.
Difficulty distinguishing between letters or words that look very similar.
Difficulty in reading fluently because dense material can be overwhelming.
By keeping these challenges in mind when designing, you can reduce cognitive loads and help dyslexic users navigate your website more easily.
Achieving Website Accessibility with Assistive Technology
Creating a dyslexia-friendly website is a step forward toward making the web experience more inclusive for your users. But if not so, assistive tools can make this process easier for non-accessible websites. You can use an All in One Accessibility tool to simplify accessibility for users with dyslexia and other disabilities. This user-friendly widget is easy to install and allows visitors to customize their experience, adjusting things like fonts and contrast, so they can navigate the website more easily. By integrating tools like these, you can break down barriers and make your site truly accessible.
Here are the steps to Design a website to make it easier for Dyslexia users:
1. Use easy to read Fonts
Font size is one of the most important factors when designing a website that is friendly to people with dyslexia. Some fonts are easier to read for dyslexic users because they reduce confusion between letters. Consider these recommendations:
Sans-serif fonts: Fonts like Arial, Verdana, and Helvetica are preferred because they lack decorative strokes, making them cleaner and easier to read.
Avoid decorative fonts: Cursive or intricate fonts increase cognitive load.
Dyslexia-friendly fonts: Fonts like Open Dyslexic help dyslexic readers by showing weight differentiation between letters.
Also, ensure text is well spaced and not too condensed, as tight spacing can make it harder for dyslexic users to read.
2. Use Clear Text Formatting
Even with a readable font, text needs to be well formatted. Clear, uncluttered text is helpful for users with dyslexia. Remember:
Line Spacing: Use ample line spacing (1.5x or 2x) so lines of text don’t merge together.
Short paragraphs: Breaking up information into smaller paragraphs prevents large blocks of intimidating text.
Avoid justification: Left-align your text and don’t fully justify it—it introduces uneven spaces between words, which can cause visual distortion.
Bold for emphasis: Bold text is more legible for dyslexic users than italicized or underlined text—both latter text treatments create a shape that’s harder to recognize.
Clear formatting benefits all users but is crucial for those with dyslexia.
3. Use Color and Contrast Strategically
Color can be a help or a hindrance for dyslexic users. Good contrast between text and background is key to readability:
High contrast: Ensure good contrast between text and background, like dark text on a light background (or opposite).
Avoid bright, neon colors: These cause visual discomfort and strain. Stick to muted tones.
No busy backgrounds: Avoid patterned backgrounds behind text, which can distract and hinder reading.
Provide a dyslexia-friendly mode that lets users adjust contrast and color to their preference, such as light-yellow backgrounds, which reduce glare.
4. Use simple and Concise language
Be Clear and Straightforward Complex, jargon-laden language can overwhelm dyslexic users. Simplifying content makes it more accessible:
Use Simple sentences: Break down ideas into easily digestible chunks.
Avoid jargon: Stick to plain language, and if necessary, provide definitions.
Use bullet points: Make key points stand out with bullet points or numbered lists and use them to head sections.
Make these changes and more for the dyslexic user, but everyone else will find these practices useful too.
5. Offer Alternative Content Formats
Not everyone processes information best through text. Offering alternative formats ensures dyslexic users can engage with your content:
Text-to-speech: Allow users to listen to content, especially helpful for long-form articles, blogs, or guides.
Captioned videos: Always include captions in video content to make it accessible to everyone.
Offering various formats helps all types of learners engage with your website.
6. Enhance Website Navigation
There are a few rules that should be followed: Keeping this in mind, dyslexic users need a clear and easy navigation system. Multilayered menus and numerous links will only confuse them:
Descriptive labels: Use descriptive text for links and buttons. For example, “Contact Us” rather than “Click Here.”
Logical organization: Material arranged logically into groupings, with clear headings and subheadings apparent to the reader.
Consistent navigation: Keep consistent navigation on your website so that users will not be confused by their movements.
This helps reduce cognitive effort, benefiting both dyslexic and non-dyslexic users.
7. Let Users Customize Their Experience
There are no one-size-fits-all solutions in web design, and certainly not for users with a specific need like dyslexia. Customization options will enable users to tailor the site according to their preferences:
Resizable text: Allow users to increase or decrease the size of text.
Dyslexia-friendly mode: Similar to high-contrast modes for low-vision users, offer a dyslexia-friendly mode with adjustable fonts, colors, and spacing.
Reader mode: Assist in distraction-free reading, avoiding ads and pop-ups.
Allowing users control over their web experience is key to inclusive design.
8. Test with Dyslexic Users
Best practices are great to follow, but the only way to ensure that your site is dyslexia-friendly is by testing it on people with dyslexia. Coupling platforms with special services for accessibility testing can realize real feedback from users in such a way as to make sure any design decision made counts and has the proper impact.
Conclusion: Web accessibility as a universal design feature
In essence, to make a website dyslexia-friendly means making the digital environment not only accessible through added functions but also inclusive and friendly to all users. Following these principles of dyslexia-friendly design, you can enhance the experience for a very large portion of your audience and improve the usability, engagement, and reach of your site.
Inclusivity is a journey. Always be open to feedback, stay abreast of best practices, and relentlessly enhance your website for all kinds of user needs. Accessible websites are better websites for everybody.
In today’s fast-paced digital world, businesses are continually seeking ways to enhance their communication capabilities and streamline operations. Cloud telephony, also known as cloud calling, has emerged as a transformative solution, offering a range of benefits over traditional telephone systems. But what exactly is cloud telephony, and how does it work? In this blog, we’ll delve into the essentials of cloud telephony, explore its key features, understand its functionality, and uncover the benefits it brings to modern communication.
What is Cloud Telephony/Cloud Calling?
Cloud telephony, also known as cloud calling, has made a revolution in business communication. Instead of using traditional lines, it utilizes the Internet to make calls, thus giving it more flexibility and efficiency. Such capabilities are what defines Unified Communication as a Service (UCaaS).
UCaaS is a platform that’s based on the cloud and integrates all communications tools including chat, video conferencing and telephony. This helps in making work processes more efficient by putting all the tools in one place; thus improving productivity. It eliminates the need for switching between apps for team members to work together easily.
Businesses are turning to cloud-based solutions like UCaaS in order to save on costs and increase productivity. Cloud calling raises connectivity and cuts down on expenses, making it suitable for any organization. This article therefore looks at how cloud calling operates as well as its effects on modern communication.
Key Features of Cloud Telephony
Voice over Internet Protocol (VoIP): VoIP technology is at the core of cloud telephony. By using VoIP, voice communication can be sent through the internet instead of through conventional phone lines. Consequently, it leads to calls with high quality and less dependency on physical telephone structure.
Call Recording:Cloud telephony system has the capability of recording calls. This enables companies to keep track of all conversations that happen on the phone for purposes such as quality assurance, training or even compliance with regulations. These recordings can be accessed later in order to analyze the interaction that took place and also to enhance customer service.
Interactive Voice Response (IVR): Automated telephony systems known as IVR systems interact with callers using pre-recorded voice prompts. This aids in routing calls to the relevant department or individual based on the caller’s replies, thereby simplifying the process and minimizing waiting time.
Call Analytics: One of the advanced features that are often found in cloud telephony platforms is call analytics. There are many useful insights which this analytical tool gives about call patterns, call length, and communication efficiency. Employees’ evaluations, customer behavior understanding, and data-based decision making by businesses can always be carried out with these analytics.
Scalability: Scalability is one of the key characteristics of cloud telephony that distinguish it from other forms of telephone communication. Businesses are able to easily change their communication resources so as to meet different needs. Whether you want to add new lines or scale up during high demand periods, there is no problem with using cloud telephony systems because they can adapt to your changing requirements effortlessly.
Cost-Effectiveness: Conventional telephone systems usually need a great deal of initial capital outlay for equipment plus continuous upkeep expenses that come along with their operation. However, cloud telephony does away with these costs through a subscription model that encompasses improvements as well as management, resulting to lower charges in totality.
Mobility: Using cloud telephony, the employees can talk or receive calls from anywhere they feel like so long as there is an internet connection available. This kind of mobility is very much needed in remote work settings and firms that have many locations because it guarantees that contact is steady and reachable.
Integration Capabilities: In most cases, cloud telephony platforms integrate seamlessly with other business tools, like Customer Relationship Management (CRM) systems, email platforms, and productivity software. This enables the process to become more efficient and operational workflow.
How Does Cloud Telephony/Cloud Calling Work?
Understanding how cloud telephony works involves breaking down its core components and processes:
Internet Connectivity: The center of cloud telephony is the connection to the internet. VoIP technology transmits voice data over the internet. Consequently, high-quality voice calls can be made that do not depend on standard telephone lines.
Cloud Servers: Cloud-based phone systems use a network of servers that are under the control of cloud service providers. These servers do the processing and transmission of voice information, making sure that calls are put through and handled effectively.
User Interface: Cloud telephony systems of the businesses are accessed using a web-based interface or an application. As a result, users can use this interface to control settings, look up call history and take advantage of other advanced tools like call analytics and reporting.
Data Encryption: Privacy and security are some of the major objectives that cloud telephony systems aim to accomplish by employing encryption protocols on voice data in transmission. Each information is secured from falling into wrong hands and this guarantees adherence to the set laws on data protection.
Integration with PSTN: Though internet is used by cloud telephony, it connects with traditional phone lines through PSTN for easier communication. Thus companies can contact and take calls from everyone irrespective of their communication method.
Benefits of Cloud Telephony
There are many benefits by implementing cloud telephony to your business, and some of them are explained below:
Enhanced Flexibility: Cloud telephony enables businesses to change their communication demands instantly, offering them unmatchable flexibility. For instance, it is good in scaling itself up to cater for new places as well as accommodating employees who work from home, thus able to meet the unceasingly transforming demands of various businesses.
Improved Customer Service: Cloud telephony possesses advanced features such as IVR systems and call recording that improve customer service. Customer satisfaction is improved by ensuring that calls are directed to the right department or representative, thereby reducing waiting times.
Increased Productivity: Workers can remain engaged and active even when they work from home due to the integration of other business tools and mobility offered by cloud telephony. It results in quick replies and better contact methods.
Cost Savings: The cloud telephony is based on a subscription pricing model that avoids huge capital outlays and regular servicing expenses of traditional telephone systems. These cost savings can be channeled to meet other business requirements.
Scalability: With cloud telephony, companies have the ability to adjust their communication resource levels based on changes in the demand patterns. Such flexibility guarantees that companies will not require major infrastructural adjustments to cater for expansion needs.
Data Insights: Several cloud telephony systems reveal call trends, staff productivity and consumer dealing analysis through analytics and reporting features which give remarkable insights. That way, they help companies make informed choices and refine their communication plans.
Conclusion
Presently, cloud-based telephone system is transforming the businesses perception towards communication by providing an adjustable solution, cheap and loaded with feature as compared to conventional telephone systems.
The innovative functions of this type of phone service enable companies to improve their customer care, boost productivity and attain better efficiency.
In the contemporary world where technology advancement is quite rampant, it emerges that cloud telephony is one of the critical platforms for communication enabling businesses to remain in touch and thrive in today’s competitive landscape.
One of the major advantages of using cloud telephony for business growth and communication infrastructure is to accommodate the needs of digital age. However, small start-ups or large organizations can develop new opportunities for growth and keep their communication structures competent for current-day demands with cloud telephony.